Crochet daisy: diagram and description for beginners with photos. Crochet daisy patterns. Crochet patterns: diagrams and description Beautiful crocheted daisies with diagrams
You will need “Iris” threads in white, yellow and green colors, a hook No. 0.7, green wire, a base for a brooch, and a needle with a wide eye.
For the petals, cast on a chain of 13 ch. Starting from the 3rd loop from the hook, knit 1 dc, 1 dc, 7 dc, 1 dc, 1 sc (photo 1). Turn the knitting and tie the petal around the perimeter with connecting posts (photo 2). Knit 2-3 stitches into the end loop so as not to tighten the fabric. The first petal is ready. Without breaking the thread, knit a chain of 13 ch for the 2nd petal (photo 3). Do it exactly like the first one. Knit 15 petals in total. The result is a bunch of 15 elements, in which each petal partially overlaps the previous one (photo 5). Work 1 ch for lifting. Tie the bases of the petals with a stb in such a way that each stitch fastens the left half of one petal to the right half of the previous one (photo 6, 7, 8). In total you will get 15 sc, according to the number of petals. Having finished tying, close the part with the petals into a ring and continue knitting sc, evenly decreasing until the hole in the center is completely closed (photo 9). In the first row, repeat five times: 1 sc - 1 decrease. There are 5 decreases in the second row. Just in case, let me remind you how to make decreases: insert the hook under both half-loops of the column of the previous row, pull out the thread, do not knit, insert the hook under both half-loops of the next column, pull out the thread, knit all three loops on the hook. The side on which the ends of the threads are located is the wrong side.

The yellow center (photo 10) is knitted in a spiral using single crochets with even increases: 6-12-18-24. The hook is inserted under both half loops. To increase from the loop of the previous row, knit two sc. First row: 6 sc in a slip stitch (amigurumi stitch). Second row: 6 increases. Third row: increase - 1 sc (repeat 6 times). Fourth row: 2 sc - increase (repeat 6 times). When cutting the thread, you need to leave an end of sufficient length to sew the center to the petals (photo 11). To make the middle convex, you can fill it with filler (photo 12). Bring the thread to the wrong side, tie all ends with a knot and trim.

For the sheet, cast on 22 ch. Starting from the 3rd loop from the hook, knit 2 dc, 3 dc, 10 dc, 3 dc, 2 dc (photo 13). Unfold the knitting, attach a green wire about 25 cm long to the edge of the part. Tie the part along the perimeter along with the wire as follows:
2 dc, 1 dc, 1 dc, ch 2, 1 sp in the base of the last stitch;
1 dc, 1 dc, 1 dc, 1 dc2n, 3 ch, 1 sp in the base of the last stitch;
1 dc, 1 dc, 1 dc, 1 dc2, 1 dc3, ch 4, sp at the base of the last stitch;
1 dc, 1 dc, 1 dc, 1 dc2n, 3 ch, sp at the base of the last stitch;
3 sc, from the end of the sheet knit 2-3 sc, 3 sc;
1 dc, 4 ch, 1 dc3n in the base of the chain of ch, 1 dc2n, 1 dc, 1 dc, 1 dc;
1 dc, 3 ch, 1 dc2n in the base of the chain of ch, 1 dc, 1 dc, 1 dc;
1 dc, 2 ch, 1 dc in the base of the chain of ch, 1 dc, 2 dc.
Using the same principle, knit 2 more sheets of a smaller size (make the initial chain shorter, the “teeth” lower and in smaller quantities).

The bud is knitted similarly to a flower, but its petals are shorter (instead of 13 ch for the initial row, you can dial 10), thinner (instead of dc and dc, knit a sc) and there are fewer of them (13 will be enough). Yellow center: 6-12-18. Green cup: 6-12-18-24. Sew the center to the petals. Using a piece of wire about 25 cm, sew through the petal circle from the inside out, hooking several threads (photo 19). Bend the wire in the middle, bringing the ends together. Place a cup on the stem and sew it to the petals (photo 21). Attach a green thread to the base of the cup and tie the wire stem rather tightly with a stb to the desired length (photo 23). During the tying process, attach a small leaf to the stem (photo 24).

Knit the cup: 6-12-18-24-30-36 (photo 25). Before the last - sixth - row, attach a stem, knit 2-3 sc, attach a leaf, knit 2-3 sc, attach the last sheet, knit the row to the end. Tie the ends of the threads on the wrong side with a knot and trim. Twist the wire ends together and lay them in a ring (photo 29). Sew the cup to the petals. Sew on the base for the brooch. Ready)
I really liked the process of knitting such flowers))) Firstly, in my opinion, they look wonderful. Secondly, you don’t need to water and they won’t wither :) So, I decided to continue the theme of crocheted flowers... The next flower on the blog will be a crocheted daisy...
Moreover, I will put more emphasis on assembling the daisy... Since now there are enough knitting patterns for this flower on the Internet... and you can easily find a daisy pattern that suits you... The patterns presented in the article are very conditional))) I knitted based on them, but without adhering )))
Crochet chamomile - job description
So, we will need:
1. Remains of white, yellow and green yarn
2. The wire is thin and thicker
4. needle + thread + a little filler
5. a drop of glue (PVA)
Step one - knit the flower details:
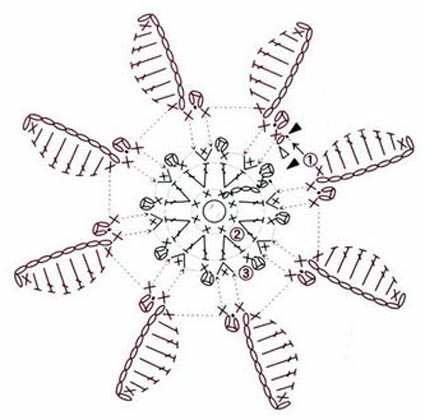
We knit the white flower itself according to the chosen pattern...
Crochet daisy pattern
We knit the yellow center of the flower, here you can do without any patterns, just knit a small circle according to the rule of the circle and one row without increases, for example:
1 row - in the sliding ring 6 RLS (6)
2nd row - double, i.e. 2 sc in each loop (12)
3rd row - 2 sc in every 2nd loop, i.e. repeat*1СБН, 2СБН*(18)
4th row - no increases
The green circle is knitted similarly, but without the 4th row  Knitting a leaf for a chamomile
Again, we take any simple leaf pattern we like... Here I chose a small leaf, because... I’m studying))) and I need, I just need, for everything to work out)))
Crochet leaf pattern

We collect air loops according to the diagram for the middle of the leaf and wrap the working thread with a piece of wire, which will subsequently serve not only as a frame for the leaf, but also as a fastening to the flower stem, make a VP for lifting and then knit the leaf according to the diagram, as if tying the wire all over the length of the original chain (the wire remains inside the posts).
Let's look at the photo)))  we tied the wire, and then according to the pattern we finish knitting the leaf
Step two - crochet daisy - assembling the flower:
We look at the picture and do the same))) Take a thick wire and twist the end into a small circle, then first string the chamomile itself onto it, and then a green circle, which we immediately sew to the chamomile with a simple needle and thread, and cover the wire on top with yellow the detail is also sewn to the flower. Both the yellow and green parts can be lightly stuffed with padding polyester, or you don’t have to bother)))  Next, we attach the leaf to the stem simply by wrapping it with wire)))
All we have to do is wrap the stem with green threads... to do this, we make a knot at the base of the flower (at the top) and systematically wrap the entire surface of the stem with thread, and also wrap the knot that you made and secure with a drop of glue, you will get a peduncle))) well, naturally, in At the bottom of the stem the thread should also be secured with a drop of glue...
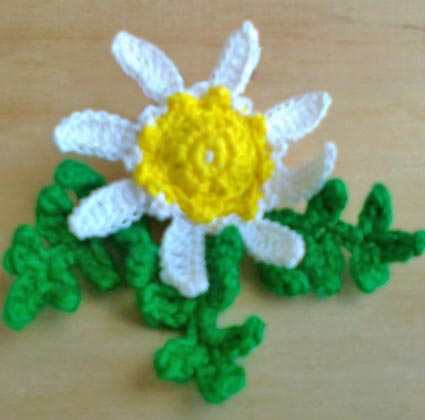
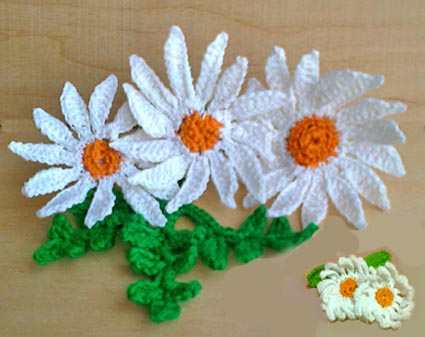
And here is the result - a crocheted daisy, and not just a daisy, but a flower on a stem, as it should be :)  By knitting and making several of these flowers we will get a wonderful bouquet of crocheted daisies
Happy knitting and creativity!)))
Crochet chamomile: descriptionYou will need “Iris” threads in white, yellow and green colors, a hook No. 0.7, green wire, a base for a brooch, and a needle with a wide eye.

For the petals, cast on a chain of 13 ch. Starting from the 3rd loop from the hook, knit 1 dc, 1 dc, 7 dc, 1 dc, 1 sc (photo 1). Turn the knitting and tie the petal around the perimeter with connecting posts (photo 2). Knit 2-3 stitches into the end loop so as not to tighten the fabric. The first petal is ready. Without breaking the thread, knit a chain of 13 ch for the 2nd petal (photo 3). Do it exactly like the first one. Knit 15 petals in total. The result is a bunch of 15 elements, in which each petal partially overlaps the previous one (photo 5). Work 1 ch for lifting. Tie the bases of the petals with a stb in such a way that each stitch fastens the left half of one petal to the right half of the previous one (photo 6, 7, 8). In total you will get 15 sc, according to the number of petals. Having finished tying, close the part with the petals into a ring and continue knitting sc, evenly decreasing until the hole in the center is completely closed (photo 9). In the first row, repeat five times: 1 sc - 1 decrease. There are 5 decreases in the second row. Just in case, let me remind you how to make decreases: insert the hook under both half-loops of the column of the previous row, pull out the thread, do not knit, insert the hook under both half-loops of the next column, pull out the thread, knit all three loops on the hook. The side on which the ends of the threads are located is the wrong side.

The yellow center (photo 10) is knitted in a spiral using single crochets with even increases: 6-12-18-24. The hook is inserted under both half loops. To increase from the loop of the previous row, knit two sc. First row: 6 sc in a slip stitch (amigurumi stitch). Second row: 6 increases. Third row: increase - 1 sc (repeat 6 times). Fourth row: 2 sc - increase (repeat 6 times). When cutting the thread, you need to leave an end of sufficient length to sew the center to the petals (photo 11). To make the middle convex, you can fill it with filler (photo 12). Bring the thread to the wrong side, tie all ends with a knot and trim.

For the sheet, cast on 22 ch. Starting from the 3rd loop from the hook, knit 2 dc, 3 dc, 10 dc, 3 dc, 2 dc (photo 13). Unfold the knitting, attach a green wire about 25 cm long to the edge of the part. Tie the part along the perimeter along with the wire as follows:
2 dc, 1 dc, 1 dc, ch 2, 1 sp in the base of the last stitch;
1 dc, 1 dc, 1 dc, 1 dc2n, 3 ch, 1 sp in the base of the last stitch;
1 dc, 1 dc, 1 dc, 1 dc2, 1 dc3, ch 4, sp at the base of the last stitch;
1 dc, 1 dc, 1 dc, 1 dc2n, 3 ch, sp at the base of the last stitch;
3 sc, from the end of the sheet knit 2-3 sc, 3 sc;
1 dc, 4 ch, 1 dc3n in the base of the chain of ch, 1 dc2n, 1 dc, 1 dc, 1 dc;
1 dc, 3 ch, 1 dc2n in the base of the chain of ch, 1 dc, 1 dc, 1 dc;
1 dc, 2 ch, 1 dc in the base of the chain of ch, 1 dc, 2 dc.
Using the same principle, knit 2 more sheets of a smaller size (make the initial chain shorter, the “teeth” lower and in smaller quantities).

The bud is knitted similarly to a flower, but its petals are shorter (instead of 13 ch for the initial row, you can dial 10), thinner (instead of dc and dc, knit a sc) and there are fewer of them (13 will be enough). Yellow center: 6-12-18. Green cup: 6-12-18-24. Sew the center to the petals. Using a piece of wire about 25 cm, sew through the petal circle from the inside out, hooking several threads (photo 19). Bend the wire in the middle, bringing the ends together. Place a cup on the stem and sew it to the petals (photo 21). Attach a green thread to the base of the cup and tie the wire stem rather tightly with a stb to the desired length (photo 23). During the tying process, attach a small leaf to the stem (photo 24).

Knit the cup: 6-12-18-24-30-36 (photo 25). Before the last - sixth - row, attach a stem, knit 2-3 sc, attach a leaf, knit 2-3 sc, attach the last sheet, knit the row to the end. Tie the ends of the threads on the wrong side with a knot and trim. Twist the wire ends together and lay them in a ring (photo 29). Sew the cup to the petals. Sew on the base for the brooch. Ready)
Crochet daisies
It's fun to crochet daisies.
They will never wither and will remind you of spring when fresh flowers bloom.
Crochet four types of daisies, or at least one of them.
Crochet daisies, a story about knitting
I offer several varieties of daisies from the following gallery to choose from.
If interested, read the story about daisies or immediately start describing knitting.
About daisies
An old story tells how the daisy acquired its charming appearance. It was Rose, the queen of flowers, having a birthday. Guests from the flora category gathered, decorated with bright petals.
One little daisy was embarrassed by her modest appearance and was very happy, whispering her congratulations to the luxurious Rose.
But the wind carried the chamomile's words to the queen, who assured her that there was no reason to be ashamed: the chamomile's dress was spotless white, and her heart was golden.
From these words, the chamomile became embarrassed and the tips of its petals turned slightly pink. An amazing daisy flower - its petals close at night and open during the day.
This is where the name of the flower comes from, “day’s eye”. Daisies symbolize devoted love, purity and are a symbol of innocence.
In the old days, girls decorated their hair with daisies. To this day, people use daisies to tell fortunes to express their love in a special way.
“loves, doesn’t love...” is a well-known fortune-telling involving tearing off petals from the center of a flower.
For knitting you need several types of yarn, as indicated in the materials. But you can always pick up the necessary threads from your yarn reserves.
Knitting materials:
- yarn YarnArt ETAMIN – 100% acrylic, 30 g/180 m;
- YarnArt Begonia yarn – 100% cotton, 50 g/169 m;
- yarn Alina –70% viscose, 30% silk, 50 g/115 m;
- Alize miss yarn – 100% mercerized cotton, 50 g/280 m;
- yarn KARTOPU conca – 100% Acrylic, 100 g/300 m;
- tapestry needle;
- green wire for peduncles;
- padding polyester filler for the cup.

Cups for flowers
When changing the thread from yellow to white, the remaining ends should be hidden for.
For each chamomile, knit a cup with green threads according to the details with photographs.
There is no need to knit the leaves in the last row of the cup; Knit the first two rows according to the description of the middle for each chamomile.
You can knit a chamomile according to the pattern or according to the knitting description.
Chamomile first
For knitting, use white Alina yarn for the petals and yellow YarnArt ETAMIN for the center.
Tie 4 chs with yellow threads and enclose in a ring.
Description of knitting the first chamomile
1st row: ch, 8 sc in the ring, sp-1.
Row 2: ch 3, 2 dc in each loop of the previous row, sp-3.
Row 3: ch+sc, picot, (2 sc! sc, sc! sc, picot) * 7, 2 sc! sc, sp-1.
Change the thread to white, which is attached to the first loop after the picot of the previous row and begin knitting the petals according to the description or using the diagram.
4th row: (hdc + picot! sc, (hdc, ch 9, hdc in second loop from hook, sc, 4 dc, sc, hdc) above the chain) * between yellow picots prev. row, sp-1. [Q]

The petals of the chamomile are crocheted with white yarn “Alina”, and the center is crocheted with orange yarn Alize miss.

Knit daisies according to the pattern or description.
Description of knitting the petals of the second chamomile
Knit the middle of the garden chamomile according to the description of 1-2 rows of the middle of “Scented Chamomile”.
Then attach a white thread to knit the petals.
3rd row: (5 ch, ss2n, 5 ch, hdc) * to the end of the circular row in each loop, sp-1. [16 petals]
Let's call the 5 ch of the previous row "arch5".
4th row: (4 sc under arch5, 4 ch, ss2n,4 ch, 4 sc under arch5) * above each petal, sp-1. [Q]
Pharmaceutical chamomile

Crocheted daisy with thick yarn
This flower is an absolute copy of the garden chamomile, but the knitting threads are chosen more closely.
Very small changes, but the result, as you can see, is completely different.
meadow daisy
The chamomile is knitted according to the description of the previous one, “Pharmaceutical Chamomile”, rows 1 to 3 from KARTOPU conca threads and therefore it looks more solid.
Among the daisies there is a small one, for which there is also a knitting description.
Flowers with petals of different lengths are knitted from Alina yarn, and the middle is made from Alize miss yarn.
Description of knitting a large chamomile
Knit the middle of the chamomile with orange thread.
1st row: knit “” from 7 sc, sp-1.
2nd row: increase * 7, sp-1.
Knit chamomile petals with white thread into each loop of the circular row. The length of the petal depends on the number of air loops in the chain.
The petals alternate in such groups - 11 ch and two times 10 ch. Attach a white thread to any loop of the second row.
When knitting, hide the tip of the cut thread.
3rd row: sc, knit a chain of 10 (11) ch;
petal of 10 ch - sc in the second loop from the hook, 6 dc, sc, sc in the first sc of the row.
petal of 11 ch - as in the description above, but instead of 6 dc, knit 7 dc. Alternating petals, continue knitting to the end of the circular row. [Q]
little daisy
It differs from the large daisy in the “magic ring” of 6 sc.
In the second row after increasing 12 sc.
Petals of 10 ch (see above) and 9 ch.
Petal of 9 ch - sc in the second loop from the hook, 5 dc, sc, sc in the first sc of the row.
Let's designate the petals:
- from 11 ch – 11;
- from 10 ch - 10;
- from 9 ch - 9.
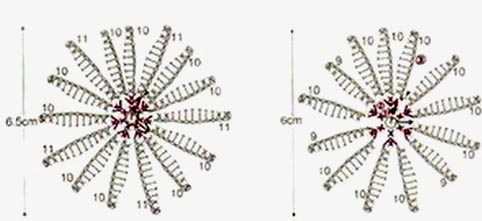
Knit petals according to the pattern:
9, 10 * 5 times, 9, 10, 9, 10 * 3 times.
In the photo of daisies in the right corner you can see two curly daisies, connected according to the same description.
The difference is that the unstarched petals curl inside the flower.
Loop names
Daisies are crocheted, like other similar ones. When starting to knit, carefully consider the information about the abbreviated names of the stitches so that the result is not disappointing.
List of abbreviations
| Abbreviated names of loops | Names of loops |
|---|---|
| slp, next p, next a loop | next loop |
| decrease | pull the working thread through the first loop, then through the second and knit them together |
| decreaseSS | knit two unfinished double crochets together by pulling the working yarn through 3 loops on the hook. |
| decreasePSSN | through two hdcs not knitted to the end (5 loops on the hook), pull the working thread |
| VP | air loop |
| sc | single crochet |
| dc | double crochet |
| ss2n | double crochet stitch |
| ss3n | double crochet stitch |
| psbn | half crochet |
| pssn | half double crochet |
| increase | 2 sc in one loop |
| increaseSS | 2 dc in one loop |
| increasePSSN | 2 hdc in one loop |
| sp-N | connecting loop, pull the thread through the Nth loop of the beginning of the row and the last knitting loop |
| connection loop | connecting loop; pull the working yarn through the first loop of the row and the loop on the hook |
| prop.N | skip N stitches |
| (ch + sc) | the plus sign indicates that both loops are knitted into one loop |
| arch | chain of several chs in a knitting pattern |
| ! | (exclamation mark) - to the left of the sign is what we are knitting, and to the right - where we are knitting in the previous one. a number of |
| * | repeat the specified number of times |
| twist or turn | turn knitting |
| previous row | previous row |
| ( ),() or (()) | brackets enclose a group of loops that are performed a specified number of times |
| number of loops in knitted row | |
| [X] | Fasten the thread, but do not cut it. Leave the tip 15-20 cm. |
| [Q] | Fasten the thread, hide the end of the thread inside the part and cut it. |
| "around" | the word “around” means that the indicated stitch must be knitted into each stitch of the circular row |
| "everywhere" | the word “everywhere” means that in each loop of a circular or flat row, knit the indicated stitch |
| RN | working thread |


