Felt angel: New Year's crafts for the Christmas tree. Do-it-yourself felt angel on the Christmas tree: a master class with patterns
For everyone on YouTube, you can also watch a video version of this MK. Don't forget to subscribe to the channel so you don't miss anything new from our creative team!
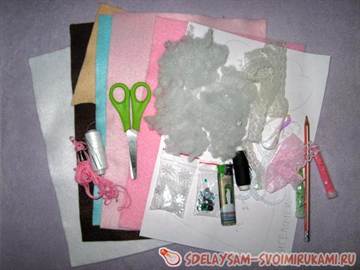
For work you will need:

- felt of medium hardness (white, warm beige, yellow);
- sharp needle;
- sharp scissors;
- beads for eyes;
- synthetic winterizer for stuffing;
- toothpick (it is convenient to stuff small parts with it);
- threads to match felt and beads;
- a bell or other symbol of Christmas or New Year;
- pastel, toned cheeks;
- hair ornaments (I have two).
How to make an angel out of felt:
- Print out the pattern on A4 paper. The angel turns out to be 14-15 cm. If you want less, paste the image into a Word file and reduce it to the desired size.

- We cut out the details as is, without seam allowances. Several necessary allowances are already taken into account right in the pattern. The preferred color of the parts and their quantity are also indicated. Do not forget to pin the elements of the pattern with pins to the felt so that the elements do not move when cutting.

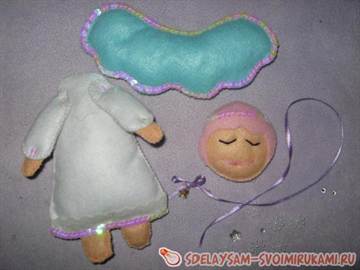
- We sew legs, handles, sleeves on two long sides. In the middle of the legs we put a double line. We apply hair to the elements of the head and find a place for the ears. We sew the head with sewing stitches, not forgetting to sew in the ears and leave a hole for stuffing in the upper part of the head. We stuff the legs, arms and head. It is convenient to stuff small parts with synthetic winterizer using a toothpick with a broken tip.

- Sew bead eyes to the face of an angel. Don't forget to attach your hair to find the best place to sew on. We tighten the thread harder so that pits appear under the eyes.

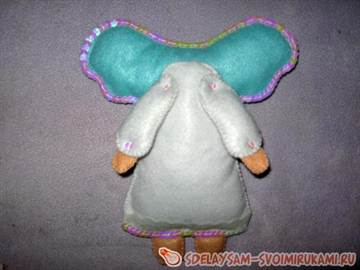
- We put our hands in the sleeves and pick them up with a white thread from the inside so that the handles do not fall out. We sew the dress, sewing the arms and legs. Do not forget to leave a place for stuffing - we do not stuff it very tightly, otherwise the dress will be deformed. Sew up the hole.

- We sew the head of the angel to the body with hidden stitches.

- Sew the wings on the back with a back seam.

- We sew two parts of the hairstyle along the upper border with an overcast seam. We put on a headdress. We continue to sew the lower part of the hairstyle at the back. Separate the ponytails with a double line.

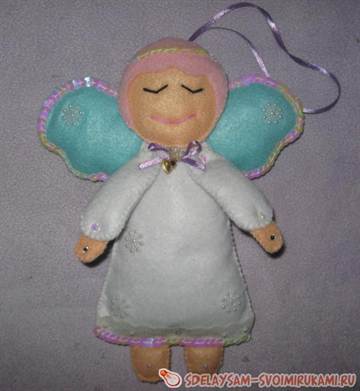
- Decorate ponytails. We draw cheeks. I didn't have pastels handy. I took the usual blush, put them on the gum of a simple pencil and tightly applied the angel to her cheeks.
- Now we sew the handles together and put something New Year's in them, for example, a bell.
Have fun preparing for the holidays!

Felt angel
Shared the master class
Kononenko Anastasia
It is pleasant to make some crafts from this soft and pleasant to the touch material, and if they still bring benefit or joy, then this is doubly pleasant work.
Due to the colorfulness of the felt sheets, you can come up with a completely different product. For example, you can make incredibly cute felt angels for a Christmas tree.
Necessary materials:
- felt: pink 2 shades, white, beige, light brown or yellow
- floss
- beads
- ribbon

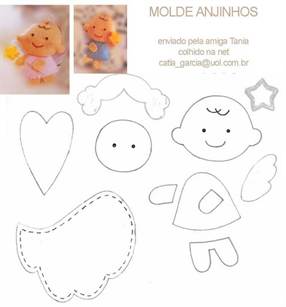
You can make a pattern of an angel from felt for a Christmas tree yourself. As you can see from the picture, the details are not complicated, but you can use other options for angels. After all, they are made on the same principle.
New Year's angels from felt. patterns


Do-it-yourself New Year's angel made of felt
Cut out pattern pieces from felt. For the body, we need to make two identical parts.
Using a buttonhole, sew a pocket to one part of the New Year's felt angel's body.

On the round part, which will be the face, you need to embroider eyes and mouth, sew on a hairstyle.

We sew the face to the part of the body, on which there is already a pocket. Make a string of beads from white beads and sew on top of the hairstyle. This will be the halo of our New Year's felt angel.

All details are carefully pinned with a pin to sew evenly.

On the back of the same part of the body, place the wings and carefully bast them so that no stitches are visible on the front.
Sew a loop of satin ribbon on top.
Now you can connect the two parts of the torso of our cute felt angel for the Christmas tree.
Even children can invent and sew a New Year's angel out of felt with their own hands. They should enjoy this activity. For inspiration, you can look at other options for New Year's felt angels, or consider the idea of \u200b\u200bhow to make an owl from felt for a Christmas tree.
What could be better than a declaration of love than a confession with the help of a cute soft toy. And if this is a hand-made craft, then the price of your feelings, in the eyes of a loved one, will increase many times over. How to melt someone else's heart? Try to make your own felt angel. The toy is cute and very easy to make. Having made one and presented it to your loved one, you will want to have the same one. So you will have to sew a second one. And if your loved one already knows about your feelings, then don't forget to give him a cupid for Valentine's Day.
Create a cute felt angel in a step-by-step master class
We will need:
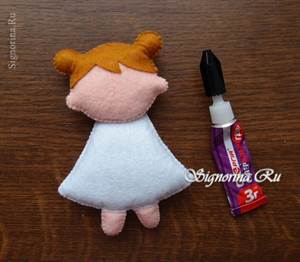
- Felt in different colors. You can choose the colors yourself, or you can use the hint in the photo. Skin color for the head, arms and legs. Red hair. Red for the heart. And white for the wings and dress.
- Superglue for gluing parts together.
- Dry pastel.
- Black acrylic paint.
- Red ribbon for bows, one centimeter wide.
- There are also two strazika or beads.
- Threads according to the color of the entire felt.
- Filler (synthetic winterizer or holofiber).
- Scissors.
- Needles.
Here is a detailed master class for making a cute soft toy. First of all, let's take care of the pattern. If you have difficulties with drawing, then you can use one trick. Copy the pattern from our website and paste it into a simple WORD document. In Word, we stretch the drawing to the size we need. Then you just need to attach a paper sheet to the monitor and circle the contours. That's all! Cut out the templates and go.
We will need one piece of wings and hair. And for the arms, legs, head, dress and heart, you need to cut out two parts each. They are all bilateral and will be stitched together.

First you need to sew the arms and legs. You need to pick up the threads to match the felt. In our case, you can take flesh or pale pink. It is necessary to sew using a buttonhole seam, with small stitches. We leave one side not sewn up and stuff, for volume, with synthetic winterizer or holofiber. The legs need to be sewn up immediately. Let's not touch the handles yet.
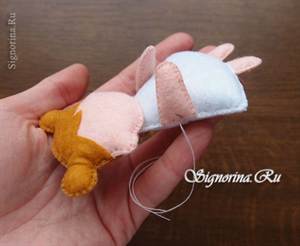
Starting from the top edge, sew the dress. We use white thread for this. At the bottom of the dress we insert the legs between the two patterns. These places can be sewn with regular stitches. Through the hole in the head area, you need to fill the body with synthetic winterizer or holofiber. The stuffing can be pushed through with scissors. At the end of the stuffing, we sew the upper part of the body and cut off the thread.

The hair of our doll is sewn together with the head. To do this, all the details of the head and hair, smoothly fit together. For convenience, you can fasten them with pins or make small stitches in several places. To prevent the pink felt from peeking out between the seams in the hairstyle, the details of the hair should be two millimeters larger than the details of the head. We sew with a thread to match the hairstyle, capturing all four details at once. We start from the ear, and reaching the other, fasten and then break the thread. Already with a pink thread we sew the lower part of the head. Don't forget to leave a hole for stuffing. You need to stuff, first of all, ears and buns for bows, and then the whole head. Sew up the hole and cut off the thread.
Now we need superglue. Lubricate the bottom of the head and the neck area on the dress. We connect the parts and glue them together. Waiting for it to be secure.

We take red threads and sew a heart. Do not forget to fill it with padding polyester or holofiber.
We continue to work with glue. Now you need to glue the heart to the hands. Lubricate the inner parts of the tips of the hands and fasten them with a heart.
Glued wings on the back will cover the ugly connection of the head with the body.

We need acrylic paint to draw eyes. This is best done with the head of a pin. But if you decide to use beads for the eyes, then do not forget to sew them on in advance, before sewing the head, so that all the knots remain on the inside of it.
We apply a scarlet blush on the cheeks. We do this with a soft brush, after grinding the dry pastel.
We need to make two bows. We take the ribbon prepared in advance and cut it to the desired size and burn the tips on the fire. We fold it so that the ends overlap each other by three millimeters. Sew and tie in the middle to make a bow. We also do the second one. You can decorate with beads or rhinestones. We glue the bows to the base of the buns.

Our felt angel is ready. If you decide to give it to yourself, then glue a magnet on the back or sew a rope to the head. Then you can attach the craft to the refrigerator or hang it on the Christmas tree. Cupid, made by hand, will bring you joy for a very long time.
Step-by-step training videos on the topic of the article
An angel made of felt is a very cute and delicate product that will appeal not only to children, but also to adults. Such an angel can decorate a Christmas tree, radiate warmth and please the eye. But this is not the only use of the angel, it can also be given as a valentine for Valentine's Day. This master class will help everyone who wants to learn how to make original and beautiful little things with their own hands.
Craft with a scarlet heart
For a beautiful angel you will need the following materials:
- felt fabric (white, red, flesh and light brown);
- Super glue;
- black paint (acrylic);
- dry pastel;
- red ribbon 1-1.2 cm wide;
- 2 rhinestones;
- threads to match each color of felt;
- sintepon.

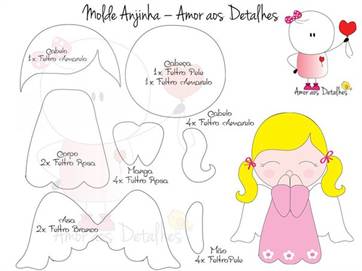
The pattern for working on the product looks like this:

It must be printed or, if there is no printer, transferred from the monitor to paper. To do this, attach a sheet of paper to the monitor screen and trace all the contours with a pencil or pen.
Then, to make one toy, you need to cut out two parts of the arms, legs, head, heart and dress. Wings and hairs - one copy each.

Next, start sewing the arms and legs of the doll. To do this, take the threads in a pale pink tone and sew the details with a buttonhole stitch with small stitches. Stuff them with padding polyester for volume. Sew up the legs immediately with regular stitches, and leave the handles unsewn for now.

Sew a dress with white threads, starting from the top edge. At the bottom, insert the legs between the two parts of the dress and sew these places with the usual running stitches. Fill the body with padding polyester through the hole in the neck area. Push the stuffing through with a sushi stick or the tip of scissors. Sew up the top of the calf and break the thread.

Sew the head together with the hair: attach these two parts to each other and walk with small stitches. The hairstyle should look a couple of millimeters larger than the head. Start sewing from the ear, piercing four parts at once with a needle, then go to the next ear, close and break the thread. Change it to pink and continue to sew the entire lower part of the head. Push the filler first into the buns and ears, and then the whole head. Sew everything to the end and cut the thread.


Attach handles to the side seams of the dress and sew them with a buttonhole seam. Sew up all the holes through which the parts were stuffed.

Sew a heart with a red thread, like an angel, fill it with padding polyester.


Lubricate the tips of the handles with glue inside and glue a heart to them.

Large wings should cover the back of the angel, glue them with super glue too.

Draw small eyes with black acrylic paint. You can also use beads as eyes.

You can grind dry pastels and apply on the face in the form of a blush.

Now make two primitive bows from a 1 cm wide ribbon. Cut off two pieces 4-5 cm long, burn the edges. Fold the ribbon so that its ends overlap each other by 3-4 millimeters, stitch the middle and pull it off to make a bow.
For decoration in the center, you can glue a rhinestone and sew on a bead. It would be nice to attach the bows to the hair with glue.

Angel is ready!
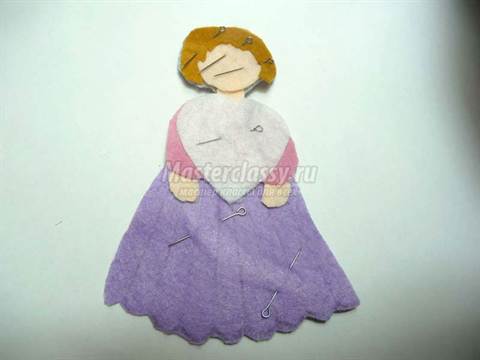
pink angel

Such a beautiful angel can be given to a little girl on her birthday or hung on a Christmas tree on Christmas Eve.
Necessary materials:
- felt (in white, pale pink, pink, beige and brown);
- white round beads;
- narrow pink ribbon.

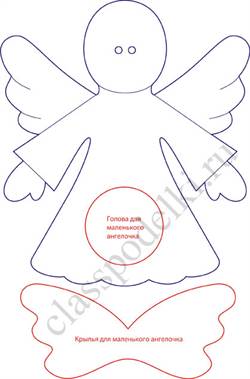
Prepare an angel pattern and cut out all the details from felt. For the body, it will be necessary to cut two identical parts.

Sew a pocket to the dress with a buttonhole stitch.

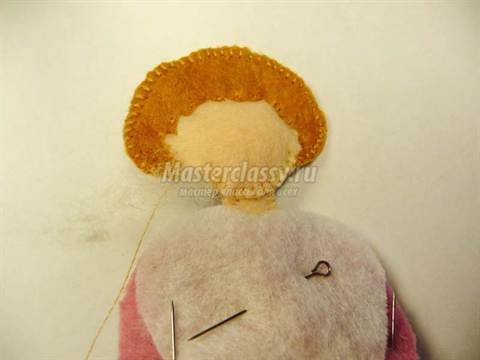
Embroider the face and sew on the hairs with the same stitch.

Put the head on the main part, fix with a pin and sew with a buttonhole stitch. Also quietly sew a halo.

Arrange the remaining parts in place, add a bow and a loop for hanging. Ready!
Video on the topic of the article
Wonderful rosy-cheeked sturdy angels can be a wonderful decoration for a child's room. If you know how to sew at least a little, you can create a wonderful craft - an angel made of felt. To create a cute doll and an unusual appliqué for a child's room is all within your power.
The benefits of working with felt
High environmental friendliness, plasticity and the absence of "shedding" of the edge of the felt, made from the finest down of goats and rabbits, allows you to use this material for children's creativity. Preschool children can create wonderful and bright applications from multi-colored woolen sheets.
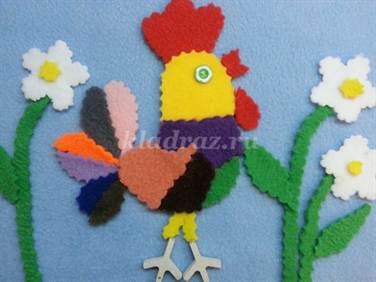
Their manufacture is not difficult, and the pleasure and benefits of classes are guaranteed. When working with small details, cutting them out with scissors, gluing, the child's speech center is stimulated. This happens due to its proximity to the center responsible for fine motor skills of the hands and fingers. Let the kid choose the colors of the crafts on his own, and he will develop his creative talent. Connecting the details into a whole picture will contribute to the development of logic, because it's like putting together a puzzle, only from fabric.
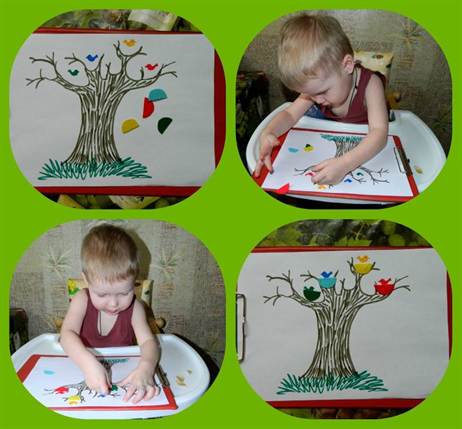
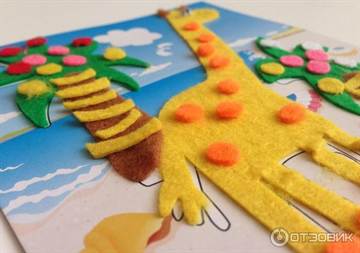
Application for kids
There are many different patterns for sewing felt toys. Figures can be flat and voluminous.
Use the pattern to create the details of the appliqué, there is no need to sew them together. You can glue the felt with PVA glue.
To complete the application with a child, you will need:
- Figurine template;
- A sheet of colored cardboard for the background;
- Glue and scissors;
- Sheets of thin felt of various colors;
- Decorative elements - sequins, beads, braid, ribbons.
First, choose the right picture. You can draw it yourself and make a template, or use one of the patterns below.

Circle the prepared template on sheets of felt and cut out the details. It remains only to entrust the kid with their assembly under your guidance. Invite your child to decorate their own angel. Place the finished picture in a frame, let the baby admire the fruits of his painstaking work.
For older kids
When a child already knows how to wield a needle, he can be offered to create with his own hands a simple felt angel, for example, this one.

To make it you will need:
- Felt of various colors;
- Sample;
- Sewing accessories;
- Scissors;
- Filler;
- Decorative elements - snowflakes, ribbons, lace, beads, rhinestones.
Transfer the pattern to cardboard and cut out the details.


Make a cut in accordance with the selected shades of felt, try on.


Sew the body, arms and legs and fill them with stuffing. Make neat and even stitches with a seam “over the edge”, you do not need to turn the parts inside out.

Sew the legs to the hem of the angel dress.

Sew the details of the wings, fill with stuffing.


Sew and stuff the rest of the details too.

Decorate the hem of the dress and the contour of the wings with sequined ribbon, lace.

Sew sleeves and handles to the dress, providing them with sequin fasteners.
Decorate the head with a ribbon and decorate the face by embroidering it with floss threads.

Use instant or hot glue to attach the head to the body. Complete the decoration with an angel, sew on a hanging ribbon.
You can combine toys into garlands or make a mobile out of them.

Gift for Valentine's Day
Do you want to please your soulmate with an unusual gift? Use bright and colorful felt! We offer you a master class on creating a very cute angel with a heart. It will be relevant for any holiday, whether it's your wedding anniversary, first date, or just celebrating Christmas or Valentine's Day.
To make an angel you will need:
- Felt (red, white, flesh and brown);
- Second glue;
- Acrylic paints;
- Dry pastel pink;
- Sewing accessories;
- Filler;
- Satin ribbon, adhesive rhinestones.
Use the following pattern to work.

Attach the cardboard part template to the felt and cut out the necessary parts.

Sew the arms and legs. Legs can be closed immediately.

When sewing the dress, insert the legs into place and sew them with running stitches.

All four parts of the head are sewn together immediately.
Note! When cutting, carefully make sure that the details of the hairstyle are slightly larger than the head.

Secure the head with instant glue.
Sew handles to the sides of the dress.
Sew a heart and place it in the angel's arms with glue.

The wings are also attached with glue.

Draw angel eyes and blush.

Sew ribbon bows, decorate them with glue rhinestones and glue them to the hair.

Angel is ready!

Preparing for the main holiday
When rare snowflakes begin to slip outside the window, you involuntarily think that the main holiday of the year is just around the corner. New Year's felt angels will help to decorate the house. You can study the process of their "birth" step by step in this master class.
You will need:
- Felt;
- Sewing accessories;
- A little filler;
- Scissors;
- Decorative elements.
You can use any sketch to work on the New Year figurine. Draw an angel, cut it out of thick felt, cut and sew the details, bring beauty to your angel. The principle of operation does not differ from the above. You can follow the stages of creating a New Year's toy in the photo.