Nail extension: gel, acrylic, on forms and tips. Independent nail extension on tips
Unfortunately, not all women have endowed nature with strong and durable nails. This issue is easily solved, one has only to visit a beauty salon and use the nail extension service. This process can also be done by hand. We will consider two types of gel extensions: on tips and forms. We will also briefly talk about the types of extensions in the French style with visual photos. And, if you have no desire to visit the salons, then our article will tell you about gel nail extension step by step.
What to choose: forms or tips?
Nail extension can be carried out using forms or tips. When there is a nail base on the finger, tips must be used. In order not to make a mistake in the right choice, you need to take into account the width of the nail surface, what kind of bend you want to get at the end of the work and do not forget about the height of the nail hole. When we talk about using gel extension molds, we mean recreating from scratch the length, shape that you or your client prefers, not forgetting to take into account the structure of the nails and the size of the fingertips. When the type of work that suits your client has been chosen, you need to know that there are five types of nail structure:
- slightly convex;
- snub;
- flat;
- cat's nail;
- wavy.
The most common are cat's nail and snub-nosed nail growth.
"Cat's Nail"
Cat nail extension should not be carried out on tips, since with the growth of the nail, its free edge will bend down. This will create a space between the tip and your nail, making it possible for dust and water to get in. In this case, you need to use the form for nail extension.

"Snub" nails
If you work with snub-nosed nails and decide to build on the forms, do not be surprised that in the future the nails will lose their correct structure. And in this case it is better to use tips.
The final result of gel extension also depends on the chosen type, one of which is used most often is a three-phase gel extension:
- Base gel
- Construction gel
- Finishing - gel polish

Nail extension at home
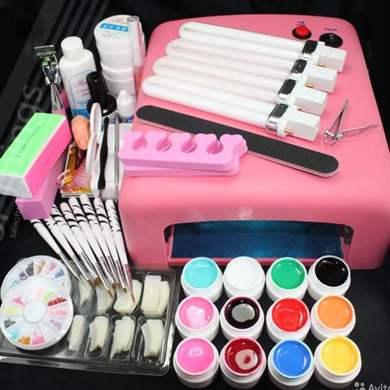
In order for your work at home to be harmonious and complete, you need to stock up on these tools, they can be purchased at ruNail:
- UV lamp;
- antiseptic;
- modeling agent - adhesive;
- the basis;
- degreaser - dehydrator;
- tips;
- forms;
- sculptor;
- clinser;
- flat brush;
- file 220/280 grit;
- file 240 grit;
- finishing gel;
- glue for tips;
- lint-free wipes;
- orange sticks;
- dust brush
- cuticle oil.
Step by step instructions for beginners
Gel nail extension on tips:
- We prepare the nail surface with an orange stick: peel off the cuticle, create the desired shape for the freed edge, and polish the nail area with a rectangular file 220/280 grit, it prepares the nails for polishing, smoothes and eliminates scratches.
- Apply a degreaser
- Apply a thin layer of glue for tips on the freed edge of the nail and the contact points of the tips. It is necessary to attach the tips to the nail at an angle of 45 degrees, and let it go so that the line of the foot of the tip and the edge of the nail are aligned.
- Further, without disconnecting, gently lower the tips on the nail and spread the glue in the same amount over the entire area with smearing movements.
- Again we put the tips at an angle of 45 degrees, bring them to the stop line and after the heard crackle, gently lower the tips onto the nail. It is necessary to hold for about 10 seconds.
- We shape the tips at the request of the client, taking into account the structure of the nail.
- We get rid of dust particles and degrease.
- We cover with a modeling agent on the area of the nail.
- With a slightly damp brush, apply the base gel along the entire length of the future nail and put your finger under the lamp for 1 minute.
- Using a flat brush, apply the sculptor, taking into account the structure of the nail. Leave under the lamp for three minutes.
- Remove the sticky layer with a lint-free cloth.
- With the help of a buff, we pale the area of \u200b\u200bthe nail.
- Degrease and cover with a finishing gel. Again, put your fingers under the lamp for three minutes.


Below we offer you video tutorials on building:
How to build gel nails on forms
- We treat our hands with an antiseptic.
- We clean the surface of the nail with a 220 grit file.
- Cover with degreaser.
- Next, cover with a base and put your hands under the lamp for two minutes.
- We clean the top layer.
- Fixing the form.
- Using a brush, apply the gel, while turning your finger down with your nail so that the gel is evenly distributed.
- Again, put your hands under the lamp for three minutes.
- Cover with gel again, form an “S” bend.
- After the lamp, clean the sticky layer.
- Getting rid of the form.
- Level the surface with a buff.
- We clean the dust with a brush and cover with a finishing gel.
- Again, put your hands in the lamp to dry for two minutes. Degrease the surface of the nails and cover the oil on the cuticles.
Below we propose to consider a step-by-step extension in photos and videos:


Ageless jacket
Under each type of jacket, you can see the finished work in pictures, as well as a video on design.

Coming out in the 70s? the first tips made a splash in the nail industry. Today, nail extension on tips is very popular, although it is inferior in some aspects to a similar procedure using forms. We will tell you how to choose this material for creating artificial nails and give lessons on how to build nails with tips.
How to choose tips for building
The work of any novice nail-master begins with the choice of material. It is believed that nail extension on tips is easier, and therefore many experienced craftsmen recommend that beginners start with this technology. Before you buy nail tips, pay attention to the following criteria that they must meet:
- In order for the result of your work to look as natural and not rough as possible, the substrates should be thin.
- Quality material should be soft, but should not break. You can check the elasticity of the material like this: squeeze the tips with your fingers, if white stripes appear on it, then it is of poor quality. Such material will be fragile and heavy to wear. Today on sale you can find substrates made of ABS plastic, nylon and polyflex. The former are impact-resistant and meet all the requirements for tips. The second ones are also no less durable, but their gluing will take longer, and polyflex has a high adhesion to the gel.
- It is also important how safe the material from which the substrates are made is. You are unlikely to find out this, and therefore just choose manufacturers who have proven themselves well with experienced craftsmen. Such manufacturers can be found in different price categories.
- The substrates should follow the shape of the nails, do not forget about this when choosing a material, since women's nails have different shapes.
- Do not forget about the design, as the substrates are not all the same in appearance - they are transparent, with a white tip or colored. Transparent ones are universal, if you have not decided on a specific design, it is better to choose them. For a French manicure, you can immediately purchase tips with a white tip.
- You can also find small substrates for sale, they are intended for design, if you are just starting to comprehend this skill, you will not need them yet.

For beginners, more experienced craftsmen recommend choosing universal transparent or natural substrates with a recess in the stress zone made of ABS material. The most popular companies among nail masters are Irisk (the price of a set of 400 pieces is about 500 rubles) and RuNail (the cost of a set of 500 pieces is about 300 rubles).
Nail extension lessons on tips
Before mastering the step-by-step nail extension on tips, it should be noted that it can be carried out both with acrylic and gel. There is also , this technology is something between and substrate.

Extension materials
In addition to substrates, you will need:
- Glue. It comes in liquid or gel form. The first one is cheaper and sets instantly. The second is found in more expensive manufacturers, it will take about a minute to harden it. Its advantage is that it perfectly fills all the cavities between the substrate and the nail, and therefore it is recommended to use it with an uneven surface of natural nails. The cost of liquid glue is about 50 rubles, and glue-gel is about 150 rubles.
- Tip cutter. Tool for cutting tips, outwardly resembling wire cutters. Its estimated cost is about 150 rubles.
- Brushes for acrylic and gel.
- Brush for shaking off dust after sawdust.
- Primer: acidic for working with acrylic and ethereal for gel extensions. The price is about 250 rubles.
- Gel or acrylic, depending on your preference.
- Ultraviolet lamp.
- Sticky remover. Cost from 80 rubles, can be replaced with nail polish remover.
- Files of different abrasiveness.

In addition, you will need an antiseptic to clean your tools and hands, as well as small things like orange sticks and cuticle oil.
Features of working with tips
Before telling about nail extension on tips for beginners, it is necessary to note a couple of subtleties of working with a substrate:
- All substrates have three parts: a free edge, a contact zone and a “stop” line located between them.
- In the set, usually all the substrates are numbered from 1 to 10 - these are their sizes. Number 1 is the widest, number 10 is the narrowest. The number is usually indicated on the tip, which is cut off during length correction. If necessary, the number can be erased with nail polish remover.
- Before gluing tips, natural nails need to be trimmed “under zero”.
- The substrate should be applied to the nail no more than 2/3 of the part. Width and length are adjusted with a tip cutter and file.
- Before work, select a substrate for each nail and lay them out in front of you.
Regardless of whether you will build up with gel on tips or acrylic, the preliminary preparation of nails and cuticles will be the same, it is also important to treat the client’s hands and yours with an antiseptic.

The stage of gluing and processing tips is also carried out in the same way:
- After selecting the desired size, apply glue to the contact area, then attach the substrate to the nail from its edge to the middle and press for 15 seconds.
- When the substrates are securely fixed on the nails, you can give them the desired length and shape of the free edge with a file and a tips cutter.
- With a file, you need to process the entire surface of the tips in order to ensure their subsequent coupling with the selected material.
Gel nail extension on tips
Subsequent tips are carried out according to the following scheme:
- Shake off the dust after sawdust with a brush and wipe the nail with a degreaser.
- Apply the essential primer to the natural nail. It is not necessary to apply a primer to the substrate.
- Holding your finger at an angle of 45 degrees, apply the gel with a brush, retreating half a millimeter from the cuticle. The gel on tips tends to spread quickly, with a brush “drag” it to the desired area of the nail: start from the free edge, moving to the side ridges and at the end to the area near the cuticle.
- Turn your finger upside down. The gel will begin to run off and a convex but even surface will form. Touch up the gel with a brush in the right places.
- Place your hand under the lamp for 3 minutes.
- We wipe the sticky layer with a special tool or a liquid that removes varnish.
- After that, take a file and adjust the length and shape of the free edge.
- File the lateral zones of the nail and the joint of the gel with a natural plate with a nail file.
- Remove the dust formed after sawdust with a brush.
- Apply a thin layer of finish gel and dry it under the lamp for 2 minutes.

After that, you can wash your hands and lubricate the cuticles with oil. Nail extension with gel on tips can be considered complete!
Nail extension with acrylic on tips
Before you start on the tips, prepare your liquid and acrylic powder by placing the open jars in front of you. It will also be useful to wear a respiratory mask for yourself and the client, since acrylic has a pungent odor.

After that, after gluing the tips and sawing off their free edge, repeat the following steps in stages:
- Apply an acidic primer to the natural nail, avoiding contact with the skin.
- Wait about 3 minutes for the primer to dry.
- Dip the brush in the liquid, let the excess flow back into the jar.
- Dip the brush into the powder, it will form a small acrylic ball on the tip.
- The ball is placed on the nail and a layer is formed with smoothing movements.
- Usually, 3 such balls are enough to model a nail, but their number depends on the length of the result.
- Having formed a plate, dip the brush into liquid and walk over the entire surface again, making patting movements. Acrylic dries quickly and does not require a UV lamp.
- After the material has completely dried, you can start working with a nail file: pay special attention to the side rollers and the junction of acrylic and natural nails.
- Brush off the dust from the nails with a brush, go through the polishing file again to give the plates a perfect smoothness.
- Nail extension with acrylic on tips is completed by applying oil to the cuticle.
As you can see, nail extension with tips at home is not such a complicated procedure, but in order to master it perfectly, you will have to practice more than once before you get the perfect result.
Video: How to properly glue tips
Have you decided to do nail extension and thought about the choice of technology? Nail extension on tips (gel and acrylic) is an easy way to become the owner of beautiful nails.
Studio ‘VictoryNails’ – nail extension on tips in Moscow
In recent years, it has begun to replace the usual manicure. Firstly, modern girls do not always have the opportunity to regularly practice their nails, file them, wait for hours until the varnish dries, and then get upset that the beauty induced with such difficulty turns out to be short-lived. Secondly, building up opens up a huge scope for creativity, because on artificial nails you can not only perform, but also create a whole work of art from flowers, rhinestones or even feathers. Thirdly, extended nails are more durable in everyday life.
All these undoubted advantages have been appreciated by thousands of girls who regularly do nail extensions on tips: gel and acrylic. If they decided on the first procedure thanks to their girlfriends, then they already did the next ones with the firm conviction that this type of extension is easy, convenient, safe and gives an excellent result that lasts for a long time. for nail extensions may vary depending on the complexity of the work, the quality of the material and the complexity of the design, but in any case, the final result will be simply stunning.
What are tips: history of occurrence, types, features

Tips, which are used as the basis for creating an artificial nail, are a plastic template that repeats the shape of a nail, which is attached to a natural plate with glue. Translated from English, tip is the tip, i.e. templates designed to imitate the free edge of the nail. The first tips appeared in 1970 and were hard plastic plates, excessively thick and uncomfortable to wear. In addition, they were made by hand, which made the process of building nails an unaffordable luxury. Modern ones allow you to make tips not only thin and flexible, but also durable and easy to wear. If earlier plastic templates were beaten the same size, and the craftsmen had to file them down for hours to fit the desired size, now tips are available in such a variety of shapes and sizes that the build-up time has been significantly reduced.
T ips used for nail extension differ according to the following criteria:
- in form;
- by color;
- on the contact zone;
- by appointment.
Form. Tips can have a classic shape with a slight bend, reminiscent of a natural nail. The classic is the most requested form, as it is almost impossible to determine that an extension has been done. Tips are also tapered, straight and curved. Templates are produced quite long, but the extra tip is cut off during the build-up process.
Color. Plastic templates are produced in four types: transparent, colored, repeating the color of natural nails and tips with a ready-made design. For classic extensions, involving the application of varnish or the creation of a French design, natural or transparent templates are used.
Contact zone- this is the place by which the tips are attached to the natural nail. It varies in size and depth. Focusing on the shape of the client's nails, the master can choose tips with a deep or shallow contact area, small or large. If colored tips are used or with a design, then there is no contact zone at all, and these templates are called non-contact tips.
N appointment. A variety of shapes, sizes, colors and other characteristics allows you to choose tips for different types of extensions, as well as easily choose a base that perfectly matches the natural plate.
Nail extension on tips: technology (instruction)

- The master files the surface of natural nails with a low-abrasive file, removes the cuticle, and cleans the nails from dust and grease. It is important that the surface of the nail is completely dry.
- Then a template is selected that matches the size of the nail plate. For each nail, the selection is repeated.
- A special glue is applied to the contact area, then the tips are pressed tightly against the nail plate for 20 seconds. The glue that has come out is carefully removed. When gluing the tips, it is necessary to ensure that there are no air bubbles between the template and the nail plate, otherwise the extended nails will not last long.
- The excess length is shortened with special tongs - a cutter or a tip cutter. It is recommended to leave the tip a little longer, since in the process of creating the desired shape, the tips will be additionally turned.
- The thickness of the tips is removed with a highly abrasive file, and the desired shape is given to it.
- The border between the natural plate and the tips is carefully but carefully polished, achieving an imperceptible transition.
- The further procedure depends on what material will be used, since there are two methods of extension: extension of nails with gel tips; acrylic nail extension.
- After the material hardens, the surface of the extended nail is polished, nourishing oil is rubbed into the cuticle.
- The final procedure involves the creation of a beautiful visual effect, for example, nail extension with French tips, modeling, artistic design, an aquarium, etc.
Correction of extended nails
As the nail plate grows, the difference between it and artificial nails becomes noticeable. Ideally, a correction should be done after two weeks, but if this is not possible, then a maximum of four. The master removes the top layer of the material with an abrasive file, removes the exfoliated material, applies gel or acrylic on the overgrown border, and then polishes the nail plate, achieving a smooth surface.
Pros and cons of nail extension on tips
pros
- The speed of the procedure;
- Tips are produced with a ready-made design;
- Extended nails are incredibly durable;
- Stronger adhesion with gel or acrylic;
- There are no restrictions on the shape and length of artificial nails;
- Individual selection of the shape and size of the template;
- Even the most imperfect nail shape can be corrected.
Such a way of caring for a manicure, like nail extension, has become a common procedure for a long time. Every girl at least once made herself beautiful And, of course, everyone is familiar with how the process of nail extension goes. Extension on tips is a simple method that will help you get your nails in a beautiful shape and the desired length. Knowing how to build nails with tips at home, you can easily try to do it in practice. The result will please every woman.
What are tips
Tips are special forms that are shaped like a nail plate. They are made from plastic. Tips are attached to the nail with a special glue, like false nails. In order not to notice the difference between artificial and real nails, the border between them is polished. After that, the desired shape is given to the nail plate and the nail is built up on the tips with the help of a gel. Of course, they know how to properly build up nails on tips. But in fact, there is nothing complicated in this, and each person can independently master this technique. The extension procedure takes on average no more than 3 hours.
In order to create a beautiful and tips should be as similar as possible in shape and bend to a real nail. If you can’t find the perfect shape, then you should choose a larger tip. The desired result can be obtained by cutting.
For those who are starting to get acquainted with the technology of how to build nails on tips, you need to know that they have their differences. Tips differ from each other in the following ways:
- Form.
- Color.
- Appointment.
- contact zone.

Tips shapes
Today there are several varieties of tips forms. This:
- Direct.
- Classic.
- Curved.
- Skinny.
Tips of all these forms are made in different lengths. But the most popular are the longest forms, since you can give the nail any desired length. Also, most often, manicure masters use the classic form of tips. It has a smooth curve and most accurately imitates a real nail plate. Classic tips are also called comfortable or standard.
When creating a manicure in the American style, preference is given to curved tips, they will more accurately convey the effect of curved nails.

Tip color differences
Before building nails on tips, you need to decide how the final manicure will look like in order to choose the right color for the material. Tips can be:
- Transparent.
- Natural color.
- Colored.
- French tips.
- With design.
Nail tips with a design are a ready-made manicure solution right away. Such materials do not need filing, have a ready-made pattern and are intended for coating only with a transparent color.
If the plans include varnishing, then clear or natural color tips are best.
French tips are naturally designed to create a classic French manicure. Such tips are often non-contact and thin.
On colored tips, you can draw a variety of patterns and elements, but the main color of the nail will no longer be so easy to change.

Appointment of tips
Another criterion for distinguishing tips from one another is the appointment. They are:
- Universal.
- With a strong bend.
- Extremely strong bend.
Tips should have a bend that is as close as possible to natural, so that the shape of the extended nail is perfect and does not look messy.
contact zones
The contact zone is the line along which the tips are glued to the nail. Contact zones are:
- Little ones.
- Large.
- deep and vice versa.
- Contactless.
The choice of the shape of the contact zone depends on the characteristics of the nail plate individually. For example, if the nail bed is very short or the nail is strongly bent down, then you need to choose the minimum contact area. But this does not mean at all that in the arsenal of the master there should be all types of tips with all kinds of contact zones. Knowing how to build nails on tips, the master can take tips with any contact zone and cut out the necessary shape. This procedure is quite simple and does not take much time.
Tips that do not require filing, that is, with a design or jacket, are made contactless. Thus, it is more convenient to work with them and there is no threat that the design will be violated by sawing.
Why Choose Tips
The master independently chooses how to build up nails - on tips or forms, since there is no significant difference between them. It all depends on the condition and shape of the nail plate and, of course, on the level of professionalism of the master himself. Tips should be chosen if:
- the nail plate is too narrow;
- nails are very short;
- there is a bad habit of biting nails, in this case they are very damaged and extension is possible only with the help of tips;
- the natural shape of the nail is very different from the desired;
- the side walls of the nail are uncomfortable.

What is a gel
Gel is a very popular and common material for nail extension. It is odorless and does not cause allergic reactions. It consists mainly of resinous substances of coniferous trees and acid-free elements. The gel wins in competition with acrylic in that it allows the nail plate to "breathe", does not allow the accumulation of harmful substances in the body, and prevents the occurrence of fungal diseases. For quick and uniform hardening of the gel, the nail is placed for a short time in a special ultraviolet lamp.
Preparation for extension
Before you build nails with tips, they must be carefully prepared. For this you need:
- completely clean the surface of the nail;
- process cuticles;
- using a grinding file, completely erase the shiny layer of the nail;
- make the surface of the nail plate smooth and even;
- brush off the dust;
- degrease nails.

Gluing tips
A step-by-step instruction on how to build nails on tips is the following algorithm of actions:
- We take the necessary tips and turn it over with the inside, open the nail glue.
- Apply a layer of glue. You should pay attention to the fact that a line is drawn on the inside of the tips, up to which glue should be applied. Don't overdo it with the amount of glue.
- We remove the glue and gently hold the finger on which the tips will be glued.
- The plastic nail comes into contact with the nail plate at an angle of 70 degrees and slowly lowers onto it. In the process of lowering, air is simultaneously squeezed out from under the tips.
- Firmly press the tips and hold in this position for about one minute. It is not necessary to move it at this time, it is necessary to ensure that air does not get under the material.
- Slowly let go of the nail. The glued tips take up approximately half of the real nail.
- Glue the rest of the tips in the same way.
Building process
After waiting another 5 minutes after gluing, until the nails are completely dry, we proceed to the extension procedure.
- Before you build nails on tips with gel, you should choose the desired length and cut the nail. For tips, there are special ones that are called heliatina.
- The border between the real and artificial nail is carefully washed down.
- Carefully remove the remaining glue.
- We cut off the top layer of tips so that its surface becomes rough (the gel will stick better).
It should be noted that scissors are strictly contraindicated for tips. They should either be cut down or use a special tool called a nail cut. With it, the tips will be neatly trimmed and not damaged.
- We apply a layer of gel on the nail plate. The distance from the cuticle should be 1 mm.
- Nails covered with gel are placed under an ultraviolet lamp. We keep them there for exactly 3 minutes.
- Next, apply a layer and also let dry.
- We shape the nails with a nail file.
- At the end, cover the nails with a gel finish.

For the first time, the nail extension procedure appeared in the 60s of the last century and over the past years has taken a strong position and unprecedented popularity among other varieties of manicure. Today, nail extension takes relatively little time and is available to everyone. This is a very easy process - to build nails on tips. Following the instructions step by step, you can quickly get the hang of building tips and start learning and practicing more complex methods. And taking care of such nails is very simple. You should not forget about the cuticles and treat them with oil, as well as periodically cover them with colorless varnish to give freshness to the manicure.
shared
In the world of the growing beauty industry, there are new ways to create luxurious nails. Among girls and ladies, the demand for extensions on tips is growing; clients get long and strong nails at minimal cost. Tips are a godsend for owners of thin, brittle nails who do not want to grow back. The technology is simple, accessible even to those who did not have the relevant experience. Such building is done at home; the necessary materials are purchased at the nearest specialized store.
Building on tips is much easier than building on forms, so it is recommended for beginners to start with it. There are two ways to build on tips: using gel and using acrylic. Both techniques are in demand, have advantages and disadvantages. When building on a gel, you will need a manicure lamp: UV, LED or combined. The gel on the nail is adjusted with a brush before going to dry, and will not dry without a lamp. Accordingly, you can slowly engage in the shape of the nail. When building with acrylic, time is short, as it dries quickly. Therefore, there is no room for error. But a lamp is not needed for such a procedure - acrylic dries on its own. Building on tips in the salon costs an average of 1500 rubles. Private masters at home are cheaper - from 800 rubles. But the technology does not require special education, so the procedure is quite realistic to carry out at home.
How to prepare nails
Regardless of the chosen method of extension, the preparation of nails will be the same. Need to:
From the materials you will need:
Photo gallery: materials for preparing the nail before building
Tips choose high-quality and elastic. To check the tips, squeeze it around the edges with your fingers. A flexible tip will give in, but will return to its original shape if you let it go, and on a poor-quality one, a strip from the fold will appear or it will even break under pressure. Tips are selected according to the shape and size of the nail, so it is recommended to use a set of 50 or 100 pieces. The more different tips, the more accurately you will find the right ones. Materials are distinguished by color: they are transparent, under a jacket, colored and with a pattern. They buy thinking about the subsequent design, but it makes no sense to take tips with a pattern: firstly, a thick layer of gel will cover it, and secondly, the pattern will only be on the tips, but not on the natural part of the nail. It is better to use transparent or stylized French. A tip cutter is a device similar to wire cutters. They remove the extra length of artificial nails. Glue the tips as follows:
This prepares the nails for further extensions.
Gel extension on tips
There are single-phase, two-phase and three-phase gel extension systems. Each requires an appropriate amount of gels. For three-phase, three types of gel are used, for two-phase - two, for single-phase - one type of gel. However, it is more convenient to use one gel for all systems, but if you wish, you can resort to different types.
Types of gels
There are 4 main types of gels used in building:
A single-phase transparent gel in extensions is used more often than others, since it is convenient to use only one type of gel. When building with it, a sawdust of the nail to the desired shape and an additional design are required. Camouflage gel is suitable for building on a two-phase system; you must first apply a layer of transparent gel, and then one or two layers of camouflage. With this method, it is required to wash down the nail to the desired shape, but it is not necessary to add a design, since the camouflage gel always has a pinkish tint. Colored gel is used in the design of an extended nail, they create drawings, jackets or cover the entire nail. The stained glass gel also serves for design, is final and self-leveling and has a translucent texture, which allows you to make an unusual manicure.
Photo gallery: types of gels
Building process
To build nails with a gel, you will need:
Photo gallery: gel extension materials
 UV lamp for manicure
  LED lamp for manicure
  Cuticle oil
  Buff for polishing and gloss removal
  Primer for better adhesion
  Gel brushes
  Degreaser and adhesive remover
Having prepared everything you need, you can begin the building process:
This is how the gel builds up on tips. When applying the gel, pay attention to the stress zone of the nail - the place where the natural nail comes into contact with the tips. In this area, the gel layer should be the thickest, then it is difficult to break the nail. If desired, create a design using color and stained glass gels.
Video: gel extension on tips
Acrylic extensions on tips
To work with acrylic you will need materials:
Photo gallery: essential items for acrylic extensions
Liquid or monomer - a liquid that, when interacting with acrylic, allows you to create a substance for building a nail, and also helps acrylic dry quickly. The extension brush is oblong, its fibers should be stiff and not be knocked out by individual hairs.
Building on acrylic includes the following steps:
Thus, extensions are carried out on tips using acrylic. When spreading the acrylic bead, the brush is periodically wetted in the activator so that the acrylic does not harden in the middle of the process.
Video: acrylic extension on tips
Gel polish for extended nails
The extension makes the nails long and gives the desired shape. Of course, on strong and even nails, you will want to experiment with the design - a delicate jacket, a romantic gradient, luxurious rhinestones combined with drawings, a “marble” pattern or “broken glass”. Lots of options. But not in every case it is advisable to apply gel polish on extended nails. After creating artificial nails, the plate becomes quite thick, and the gel polish thickens the nail even more. As a result, it looks unnatural. In this situation, do this:
Otherwise, the design for extended nails is created using the same technology as for natural ones:
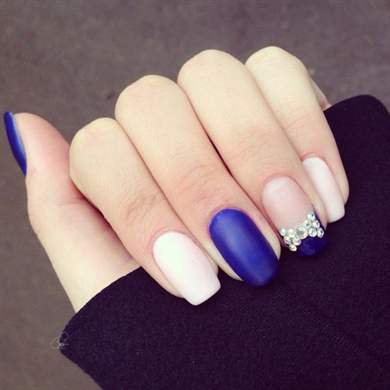
Design examples
Painting all nails in one tone has long gone out of fashion. Now the fair sex is striving for a unique design. Rhinestones, foil, drawings, stickers, three-dimensional patterns, rivets, sequins are used. Nails are painted in different colors, matte and glossy coatings are used, their combinations. In summer, fresh ideas with drawings of fruits, flowers, palm trees are popular. In winter, preference is given to iridescent decorations - rhinestones, sequins, silver stripes, foil and everything associated with snow and ice. Designs such as French, marble and matte are relevant at any time of the year.


