Making paper napkins for a wedding with your own hands. How beautiful to fold paper napkins on the festive table? in the shape of a heart
Wood burning in its modern form is a relatively young decorative art, but its roots lie in ancient times. In the distant past, the burning method was used mainly to decorate household utensils. Today, the art of burning has become more of a hobby. This craft is practiced not only by folk craftsmen, but also by children at labor lessons.
What tool is required for wood burning?
In order for the quality of the finished work to meet the highest standards, a wood burning machine is needed. Such a tool can be purchased ready-made or made independently. The domestic market is able to offer the consumer several options for burning devices. However, for all modifications, the presence of almost the same components is characteristic:
- metal screen;
- burning needle;
- needle holder;
- corps;
- power wire.
The wood burning tool is most often powered by a standard 220 V power supply through a transformer. Electric burning devices have an advantage, in which the standard wire is replaced by a cable with a large cross section ranging from 4 to 6 mm 2. Such a modification can significantly increase the incandescence of the burning needle.

A standard burner with nozzles contains straight needles, the shape of which is best changed independently to a curved one, bending at an angle of about 45 °. For ease of use, the plane of the burning needle should be processed with a small file. Thus, you can get the most convenient, versatile device with a needle that will allow you to burn both with a tip and with a plane.
The main types of devices for wood burning
The first category includes devices with hard nibs, the second - with wire needles. In this case, both types of devices occur through their operation from a standard power supply. In wire devices, there is a function to adjust the temperature of the glow of the working surface of the needle.

To understand which wood burning machine will be the most convenient and effective in a given situation, it is enough to familiarize yourself with the specifics of the design of individual options.
Hard feather appliances limit the choice to only a few available models, as their functionality remains extremely limited due to the constant glow temperature. Attention here should be focused on power, the indicators of which should be at least 20 watts, otherwise the wood burner will significantly slow down the work.
If we talk about burners with wire feathers, then their range is much wider compared to the previous category of devices. Therefore, leaning towards this option, it is better for an unprepared user to consult a specialist. If we talk about the most advanced, modern devices, then here we can single out a laser for wood burning.

Ultimately, having stopped your own choice on a particular model, you should make sure that there are a sufficient number of nozzles in the kit. This will greatly diversify the range of available works.
Advantages and disadvantages of burning devices with hard feathers
Returning to the question of choosing hard feather burners, it is worth considering their main advantages and obvious disadvantages. If we talk about the advantages, then such a wood burner boasts an affordable, affordable price, special ease of use, the highest strength and, accordingly, a long service life.
Among the shortcomings of such devices, it is worth highlighting:
- prolonged heating and cooling;
- strong heating and possible overheating of the handle;
- the lack of opportunities for the implementation of subtle, skillful artistic ideas;
- insufficient convenience of most handles;
- the presence of a high probability of burnout with prolonged use.
Features of burners with wire needles
Any professional burning device with wire needles has a much wider range of advantages compared to the previous category of devices. Such devices are used for the most delicate, artistic work. These devices have enough power to process the hardest wood species, and it takes no more than a few seconds to fully heat up the needle.
The main disadvantages of wire devices include the high cost, high cost of repairs, the difficulty of finding spare parts and components, especially if the burner is homemade and was purchased via the Internet. Moreover, wire needles often burn out, deform and become completely unusable. Therefore, they need to be replaced frequently.
What materials can be called optimal for burning?

At present, in order to engage in burning, it is not at all necessary to spend time searching for materials and sketches on your own. It is enough to purchase a ready-made wood burning kit. If it is necessary to realize the author's, unique idea, wooden blocks, boards, wood boards can be used as a basis.
Wood for work is better to choose well-dried, which will not warp and deform after completion of work. An important issue is the selection of a suitable texture, shade and luster of wood species. The best option for burning out can be small-vessel wood, which does not contain pronounced rings and knots.
If there are no suitable materials at hand or a burning device is used to teach a child, then for a start it is better to use a wood burning kit, which today can easily be ordered on the Internet.
Material preparation
The surface of the workpiece for burning must be leveled and, if possible, carefully sanded with sandpaper. At first, you should not resort to using too complex drawings. If the image does not match the size of the workpiece, it should be scaled down or enlarged.
In the absence of desire, you can not depict the drawing on the workpiece yourself. It is enough to use carbon paper, which will allow you to draw the main outlines of the drawing, which can later be traced with a pencil.
In order not to stain the material, it is better to choose old carbon paper. This is the only way to avoid damage to the wooden base, which was carefully polished and prepared for work.
wood burning technology
Currently, there are several common wood burning technologies. Silhouette, contour and artistic, or pictorial, burning are popular among craftsmen. The main differences in these technologies are primarily in the technique of execution and types of drawings.
contour burning
This technology is most often used by beginners, inexperienced craftsmen. The execution here can be compared to drawing a contour image on a sheet of paper. When performing contour work, the main thing is to keep the hand in the most free position with a well-fixed fulcrum.

All lines must be equal in depth and width. For work, it is better to use the most incandescent needle, reducing the voltage on the transformer to the limit. When making a contour drawing on a tree, you should not be too zealous, pressing the needle with force.
Silhouette burning
Carefully polished, bent needles are suitable for applying the silhouette burning technique, the working surface of which must completely touch the material. The needle should be directed along the wood fibers.
Beginning masters who use the silhouette burning technique are advised to use moderately heated needles. Only in this way can the smoothest possible surface texture be achieved at the end of the work.

Silhouette burning can process quite impressive areas of wood. In this case, the application of smooth strokes can form not only dark lines. Moving the hot needle at a fast pace makes it possible to obtain a wide variety of shades, from the deepest possible brown to a light beige pattern.
Artistic burning

The technology is based on a professional combination of both of the above techniques. It is better to make the first samples in artistic burning from images of geometric shapes of the simplest form. This approach will allow you to get acquainted with the features of the formation of the effect of the play of light and shadow on the surface of the wood.
Being engaged in artistic wood burning, you need to remember the need to guide clear contours of the depicted figures. At the same time, the main task of the technology of artistic burning is the transfer of volume in space.
I’ll tell you about my hobby, which is gradually turning into work) We are talking about wood burning, which is gradually rising into a new trend, but is still perceived by many as amateur crafts from Soviet childhood.
As I once wrote in my journal, many people associate woodburning with labor lessons, hooligan burning with a magnifying glass on benches or the creative output of dads of serious professions) However, today pyrography (literally - painting with fire) is getting more and more distribution, and if you ask a specific query in the search, you can see just masterpieces!

There are also a great many devices for burning out now, prices start at 500 rubles and reach ... In general, they reach well) They come with a constant temperature and adjustable, with and without interchangeable nozzles, domestic production and imported. For now, I'm still doing the same thing with which I started mastering this technique - a Chinese inexpensive device with interchangeable nozzles.

I have only five nozzles, and - which is sad - I can’t buy additional ones, there aren’t any, except to look for a used one.

And although from time to time I really want to change the device to the same one, but with 21 nozzles, in fact, I understand that this is greed, and in my work I mainly use one, well, sometimes two. What is really missing is a thin needle or blade.

I do all my work with a flat and at the same time sharp nozzle, such a "shovel". With it, you can both draw thin lines and paint over large surfaces.

There are as many options for drawing in this technique as with a simple pencil: you can draw with dots, strokes, you can limit yourself to a contour, you can completely shade and tonally highlight the volume, in general, whoever is much more)


With the help of a pyrograph, you can create various textures, again - the limitation is only the author's imagination.


With a burner of such a plan as mine, you can also make a fairly voluminous texture. When pressing with a hot tip on a tree, the upper layers of wood are pressed in and fixed in this position. Here, for example, the cat's fur is made exactly like this:

And, despite the fact that this is a rather labor-intensive way, from which fingers hurt, it can be very justified. Look - in different lighting, the cat's coat shimmers differently and looks voluminous:

A mixture of techniques can look very interesting, for example, wood burning and painting, or staining. You can make such funny ornaments or make an imitation of a wooden mosaic.

The technique, by the way, is not fast and requires perseverance and a certain amount of ability to concentrate. I also want to say that burnt wood, and especially plywood because of the glue content, does not always smell pleasant. And after a few hours of work, you may not want to return to it, so it’s better to work on large works in the fresh air)

And the rest is a very interesting technique, worthy of attention. I hope my story will be useful to someone or just inspire) Thank you for your attention!)
Everyone remembers one of the entertainments of childhood - wood burning pictures or portraits. And the smell of a burnt tree remained in my memory forever. Everything returns to normal. Today it's called pyrography, and it's back in vogue. Computers are computers, and many children want to express their individuality in a different way. Not just for kids, to say the least. Let's remember how this is done and what is needed for this. Below is all the information for beginners and more.
Everyone remembers one of the entertainments of childhood - wood burning
The burning apparatus (pyrograph) is the main equipment. Previously, it was a plastic box (usually yellow) with a small soldering iron inside, in which the tip looked like a paper clip in appearance and thickness. Today, when this art is returning, the burner is a more serious device. There are also devices of the old type, but, nevertheless, it is better to purchase a burner with hard feathers. It will last for a long time, because it is highly durable, and it has a lot of different attachments.
There are also cons:
- long heating - long cooling;
- sometimes - uncomfortable (heating) handles;
- the possibility of burnout, with long work.
Wire burners have more serious disadvantages:
- high cost;
- expensive repairs;
- frequent replacement of thin needles;
- difficulty in finding spare parts.
The choice of burner is a purely individual decision. But most choose the first option. You can recommend a Stayer pyrograph. Excellent burner suitable for all materials.
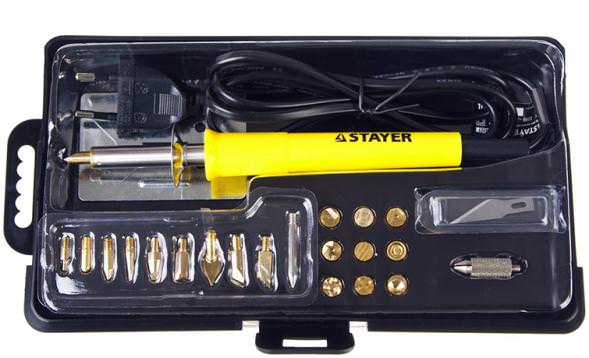
How to use the machine? This burning device is conveniently located in a plastic box, which is convenient for transportation. The kit includes a stand for a soldering iron (which is very important), a set of nozzles of 20 pieces (constantly necessary and curly ones). In general, a great gift for both a novice pyrographer and a professional one. Next, you need a wood burning kit. It will be cheaper and easier than doing an independent search for the necessary improvised means. There is enough material for the first time. The sets look like this:

There are several boards in a good set, some with ready-made sketches. Still need pictures that are not a problem to find. For starters, they are again in the burning kit.
Gallery: wood burning (crafts - 25 photos)


Burning lesson and technique - master class for beginners (video)
Preparation and burning wood with a soldering iron: beauty technology
Having prepared the necessary equipment, decide on the material. It is better to stay on soft woods.
Good fit:
- pine;
- Linden;
- birch;
- ash;
- maple.

Having prepared the necessary equipment, decide on the material
You need to let the device warm up on the stand. Then take a properly sanded material. Remember:
- It is necessary to grind along the fiber - so all the bumps and roughness will go away.
- After sanding, be sure to walk over the material with a damp cloth. Be sure to let the material dry.
- Next, you need to carefully draw a sketch on the surface of the prepared material with a pencil, with light strokes.
Having started work, forget about haste: no one sets the task of completing it on speed. This is not a fast process. Like any art, it requires thoroughness and gives great pleasure from the work done.
- Sketch, if you draw poorly yourself, apply to the surface with a carbon paper.
- It is necessary to apply the drawing on the prepared surface with a soldering iron with the same effort - so there will be no gaps on it.
- Do not overexpose the red-hot needle in one place - the tree will darken more strongly than in other places. This may ruin the final look.
- Hold the material with the fibers down - this will make it easier for the needle to go through it without encountering obstacles and resistance.
Always be careful and remember: you are working with a hot tool. Always keep it on a stand: it is better to blow on the water once again, but do not burn yourself.
How to burn on planks: the birth of the first masterpieces
As mentioned, this will require the following tool:
- sketch (it can be any one you like more);
- boards (pine, linden, birch, ash, maple);
- refractory stand for pyrograph (mandatory!);
- pyrograph.

Depending on the need and features of the pattern, change the nozzles that you always keep at hand
- Prepare a board. Clean it with fine sandpaper. Rub with a water-chalk solution. Allow the plank to dry (you can only burn it when the material is dry).
- Transfer the selected sketch to the board.
- Turn on the pyrograph. Wait until the pen glows and turns red.
- Then, with the same pressure, draw the pen along the outline and all the elements of the sketch so that a clear dark brown stripe appears (or black, if you want).
- The burning is completed when all parts of the sketch are drawn, and it turns into a full-fledged drawing.
Depending on the need and features of the pattern, change the nozzles that you always keep at hand. This technology for beginners allows you to quickly learn the art of pyrography.
Burning on plywood: the easiest way
The process of burning on plywood is not much different from pyrography on a thick board. It is easy to buy plywood sheets in any construction market. You can ask, and it will be cut into pieces of the desired size. Plywood weighs less and costs less than other materials. It contains no harmful resins. You need to choose plywood from birch, pine, beech, no more than 2 centimeters thick.
After choosing plywood, the process follows the already given scheme.
- The plywood needs to be cleaned. Wet with a solution of chalk and water. Let the plywood dry.
- During the drying time, you need to choose a sketch, pencil, carbon paper.
- Once the plywood is dry, start transferring the sketch onto the plywood.
- Turn on the pyrograph - it must be on a stand.
- After the pyrograph is hot, and the sketch is transferred to plywood, start work.

The process of burning on plywood is not much different from pyrography on a thick board.
By observing this simple technology yourself, you can burn out anything: from a simple inscription to a real picture. Doing this is easier than it looks.
What nozzles are better to buy
It is enough to purchase a set of nozzles to start. This is what a great set, tested empirically, looks like.
Our ancient ancestors were engaged in burning out, a nail heated on fire served as a tool for them. Despite such an ancient origin, pilography has not lost its relevance to this day.
If you asked yourself this question, then you are a creative person. People who practice this kind of art are called sawmills. Pylography is hot drawing. This activity is akin to meditation, requiring perseverance and concentration. Do-it-yourself burning out will bring a lot of pleasure and distract from household chores. Contemplating the finished work, you will experience pride in your work and the work done, which, in turn, will become a wonderful decoration for your home or a gift for your loved ones. Wood burning on wooden furniture looks great, it fits very harmoniously into any interior. Very useful wood burning for children. The development of fine motor skills of the fingers contributes to the mental development of the baby, and the perseverance and patience developed during work will help your child learn.
How to learn to burn wood?
To do this, you will need a sketch on paper or any other convenient material, burning boards, and a burning device. Any object can act as a sketch for you: a drawing, a photograph, a painting. Planks can be made of linden, birch, maple, oak, alder and even special cardboard. The burning device is a simple electrical appliance, consisting of: a voltage regulator, a plastic handle (most often, but it can also be made of other material), a pin or pen - this is a bent wire heated by an electric current. And, of course, one cannot do without inspiration, the desire to work and regular practice.
How to burn?
To do this, we prepare the board, clean it with a fine sandpaper, rub it with a solution of chalk and water, dry it and the board is ready for work. You can only burn on dry wood! We take the handle of the device in the right hand (if you are right-handed), like a pencil, we wait a little, as  only the pen has turned red, it's time to get to work. Be sure to have a fireproof stand at hand. The hot pin should not touch the table and other surfaces. Compliance with safety regulations is a prerequisite, especially if a child is working.
Helpful Hints
If you are planning a wedding celebration, you are well aware that the cost of it is likely to far exceed those planned: you will definitely need small details, which a great many are required for a wedding.
TAKE A FUN TEST:
If the budget is limited, and you dream of a wonderful, beautiful wedding with all the attributes, why not use some imagination, find time and make some original decorations with your own hands?
DIY wedding invitations
Starting to prepare for the wedding, you will certainly think about how beautifully warn your loved ones, friends and acquaintances about it. Wedding invitations can be ordered, but making them yourself is not so difficult. In addition, guests will certainly appreciate your work and, most likely, keep postcards in memory of your solemn event.

What you may need:
Sheets of white or colored paper and cardboard
Lace
Satin ribbons - wide and narrow
Curly and regular scissors
Text printer
Hole puncher
Lighter

Let's get to work:
1) First, consider what size will your invitations be, and type the appropriate prompt text. From one sheet of A4, as a standard, two invitations can be obtained, and from one sheet of cardboard - 1 envelope.
Colors can be taken in a variety of ways. Traditionally, white or delicate pastel colors are used, but if you want to make your invitation bright, colorful, you can take bright colors of cardboard and ribbons.
2) Print the text of the invitation on a piece of paper, and then cut it out using curly scissors.

3) Using a hole punch, make a hole at the top for attaching a bow.

4) Make an envelope out of thicker paper. To do this, according to the measured templates, cut out a similar figure from sheet A4, taking into account the fact that the side edges of one of the sides will be protrude a little and they should be bent. The envelope should be made depending on the size of the invitation itself, so that it can fit perfectly inside the envelope.

5) Use lace ribbons to decorate the blanks for the envelopes. To do this, use glue to fix the lace on the inside of future envelopes.

6) After that, fold the edges along the folds and glue them to the opposite side to make an envelope.

7) Make a hole in the upper part, insert the invitation into the envelope and secure it in it with a thin ribbon, threading it through the holes and tying it with a bow.

8) Make with wide and narrow satin ribbons large bow for the center of the envelope. To do this, bend two pieces of wide tape and secure the center with a thin tape. Do not forget finish the edges satin ribbons with a lighter.


9) Glue the resulting bows to the center of the postcard with glue. The work is ready.

Original wedding invitations
very nice invitation with an unusual heart in the middle easy to make using the following materials and tools:
Colored paper, preferably tissue paper, very thin - several colors of different shades of red
A blank for a postcard with inscriptions, inside you can write details of where the wedding will take place and so on.
Sheet of plain paper
Scissors

Fold each of the sheets with an accordion (5-6 folds) wide 2 centimeters. Then make cuts with scissors.

Glue the strips with cuts of different colors between each other, and then glue on the back heart cut out of plain paper.

Cut off the excess tissue paper along the outline of the heart. Then glue on the blank for the postcard two ribbons, cut out of paper, as shown in the photo. On these ribbons, you can write something like: "We invite you to the celebration" and date. After that, stick a multi-colored heart on top.

Decorating wedding cars with your own hands
Decorations for the wedding carriage- an important detail of wedding events, because the car should be as elegant as everyone else. Traditionally, cars are decorated flower bouquets, colorful ribbons and bows, toys.

The most popular detail for decorating wedding cars are long colorful ribbons. Including you can find special metal ribbons that sparkle in the sun.
It is not so difficult to fix the tapes on the car, you need to hook them on the ledges in the front and in the back, or, in order not to cover the windshield - front and side.

Here is another example of a simple car ribbon decoration:

With the help of the same adhesive tape and decorative New Year's rain or braid you can make whole drawings: waves, flowers, hearts. Here it is important to fasten the braid to the surface with adhesive tape in the right places, and it will beautifully fall down under its weight, giving the impression of an original pattern.

Flowers- the second most popular detail for decorating wedding cars. And it is not necessary to make large bouquets in front and behind, you can just fasten one flower over the entire area of \u200b\u200bthe car. This photo shows that the flowers are attached with a simple adhesive tape (both real and artificial flowers will do. From afar, adhesive tape will not be visible):

Bouquets of flowers, balls or the same folded ribbons will look good on the handles.

Can be original inside of the machine, for example, wrap colorful ribbons around the steering wheel or hang garlands on the windshield. Remember to keep these decorations did not interfere with good visibility for the driver.

Those who have artistic ability can paint the surface of the car with beautiful drawings using a special washable paint. Such a decoration, of course, is not for rainy weather, but it looks very impressive. If there are no artistic abilities, then ready-made stencils can be used, or stickers for cars which can then be easily removed.

Making wedding cars with your own hands (video):
Decoration of wedding glasses
Decorating wedding glasses for a celebration is not at all difficult. For this you will need:
Satin ribbon or braid
Lace, lace ribbons
beads
Small real or artificial flowers
Paint for painting glass
The easiest way to decorate glasses is use of satin ribbons. Usually wedding colors are white and soft pink, but you can use other colors if you wish:

To make this decoration, you need fold ribbons of three colors in a row, and then wrap them around a simple smooth glass, cutting off the edges in the right place and strengthening the decoration on the product with glue. To prevent the tapes from slipping, try to wrap them as tight as possible. Ahead, glue the prepared bow from one of the ribbons.

Another easy way to decorate a glass with ribbons is wrap the leg, and in the place where the leg is attached to the bowl - tie a bow. In this case, you can do without glue.

You can also use more thin satin ribbons, which in the form of patterns are glued directly to the glass. Ribbons can be chosen pure white or multi-colored. In this case, the cut ribbons were carefully glued to the glass in the form of three pyramidal patterns and decorated with beads. At the base of the bowl bows tied from a combination of thick and thin strips.

Advice: It is very important when working with satin ribbons to process their ends with the help of fire, otherwise they will crumble and lose their neat appearance.
DIY wedding glasses with lace
Another very simple way to decorate glasses is use of lace. Lace is an ideal finished material that already contains an intricate pattern and looks great on glass. Ideal for wedding glasses white wide lace.

To make lace richer, you can add beads, satin ribbons and other decorations. In this case, the glasses were decorated with rhinestones.

Advice: To better attach the beads to the uneven surface of the glass, it is better to use flat beads or rhinestones.
Painting wedding glasses
Those who are good with paint brushes can try paint glasses with your own hands. Here fantasy will work to the fullest: you can make beautiful curls, bitmaps, floral images, hearts, bows and so on. The pattern on the glass repeats the pattern of lace. It uses white and gold paint:

For such drawings, it is not necessary to have great artistic abilities, you can also use stencils:

Advice: For painting glasses, you can use glass paint, simple gouache or nail paint.
How to make a rose from ribbon
Wedding glasses are often decorated little roses made from the same narrow satin ribbons. You can buy ready-made roses at the jewelry supply store, but they are easy to make yourself. There are several ways to create a rose from ribbons, we offer you one of the simplest.

To make satin ribbon roses you will need: ribbon, scissors, thread and needle.
Let's get to work:
Take the edge of the tape in your left hand, and with your right hand, begin to fold the tape so that you get the middle of a rose. Then fix the result with a thread and a needle.

Continue to twist the tape not too tightly, remembering to periodically make stitches to secure.


At the end, do not wrap the tape too tight so that you get half-opened bud. Secure the base of the rose with thread. Cut off the excess with scissors.

Advice: In order to easily attach the rosette to the flat surface of the glass, make it as flat as possible.

By the way, a great idea to glue the glass real rose petals, however, such decoration is short-lived and will ideally look "fresh".

In addition to glasses, you can also beautifully decorate a bottle of champagne. You can read more about this.
Wedding hall decoration
Decorations for the wedding hall usually the concern is those who rent this hall, but sometimes it happens that decorations are a separate service. You can try to decorate the hall yourself to your taste. For this you may need balls, flowers, colorful ribbons, tablecloths, draperies.

Decoration of the wedding hall with flowers
Natural flowers always refresh and give the room an elegant and very festive look. The only thing, of course, is that they lose their appearance quite quickly without water, so attaching bouquets of fresh flowers to the walls is not the best idea.
It is possible to use only artificial flowers, which will cost you less and which can be used many times later. for sale ready made artificial flower garlands, and your task is just to hang them in the right places.

If you still choose fresh flowers, it is better to use them to decorate tables or put them somewhere indoors. large vase with water.

Since tables at weddings are usually bursting with dishes, and there is almost not enough space for decorations, you can choose tall narrow vases with flowers.

Decoration of the wedding hall with balloons
Balloons will cost you a little less than flowers, so you can leave the flowers only on the tables, and decorate the hall itself with balloons.
If you don’t know how to weave chic garlands from balls and make unique figures out of them, it doesn’t matter. You can simply combine several multi-colored balls and hang them.

Can be used balloons filled with helium. This gas is lighter than air, so the ball will constantly strive towards the ceiling. In order for it not to fly away, it is enough to attach it to chairs, tables or other interior details.
With such decorations, even a simple interior acquires its zest and get more comfortable.

Balloons filled with helium do not have to be tied to something, just tied to them serpentine and let it go up to the ceiling. Such decoration of the hall will look original if the ceilings in the room are not too high.

DIY balls of thread
If ordinary balloons seem too simple and battered to decorate a wedding hall, you might like balls of thread.
What you may need:
Thick threads for knitting
PVA glue (1.5 cups)
Starch (0.5 cup)
Water (0.25 cup)
Balloons
Oilcloth
Ball hanging bar or other device
Vegetable oil
1) First, inflate the balloons of the desired size and hang them by the threads, after lubricated with vegetable oil so that the threads do not stick to them later.

2) Mix glue, starch and water until smooth.

3) Dipping the rope in a mixture of glue and starch, wind it around the ball. Leave hanging on the bar for a day.

4) After the glue is completely dry, you need to pierce the ball and pull it out through the resulting holes. The rope will continue to hold its shape, and you will end up with a ball like this:

Decoration of the wedding hall with fabric
To make the holiday table look even more pompous and solemn, on the sides you can add decorations made of fabric. Usually these are light and airy materials - lace, mesh, tulle, tulle and others, which are fastened with waves, complemented by multi-colored floral decorations.

Think ahead, What colors will your room be?. Pay attention to the color of the walls, floor, ceiling. The most neutral color of jewelry is white, but you can combine a variety of colors with it. For example, the tablecloth itself can be white, and the fabric decorating the tables can be soft pink:

Look nice too large strips of delicate fabric hanging from the ceiling. To do this, you need to carefully study whether it is possible to attach the fabric to the ceiling. If not, then it is better to stop at decorating walls, tables and chairs.

A very original idea to add a bride and groom under the tablecloth and table cloth garlands-light bulbs. These ornaments are usually used as Christmas decorations, but will look incredibly beautiful at a celebratory banquet, making the bridal table stand out from everyone else.

Light bulbs will also look chic on the ceiling and walls.

For small cozy rooms, you can create a romantic atmosphere using subdued light and lots of candles. This is suitable for those who want to have a modest quiet wedding with pleasant calm music, without particularly wild fun and noisy entertainment.

Garland decoration
The easiest way to create homemade garlands - using thread and colored paper. You will also need a sewing machine for this. Such garlands look very stylish, especially in large quantities, despite the simplicity of their material and ease of manufacture.

Cut out circles of different sizes from colored paper.

Then, using a sewing machine, sew the circles of paper so that they connect in one long garland. In this case, a small distance can be left between the circles.

You can make whole compositions from these garlands and decorate the wedding hall with them.

DIY wedding table decorations
In order for guests to quickly and easily find places at the festive banquet, number tables and post a list of guests in front of the entrance to the hall who will sit at a certain table. On the tables, the places can be numbered or the following unusual cards with names can be attached to the glasses:


To do fluffy skirt for the table of the bride and groom you will need:
A large amount of transparent light fabric (tulle, mesh, tulle) or other fabric of your choice
The tape that will hold the tape, (slightly larger than the perimeter of the table).
pins
Scissors

Let's get to work:
Cut the fabric into strips wide 10 centimeters, and in length - in two heights of the legs of the table. Then start tying long strips onto the tape so that they are the same length. As a result, you will get a ribbon tied with strips of fabric, which will be a skirt.

Tie a ribbon skirt around the edges of the table and secure it to the tablecloth with pins.

Wedding decorations for the bride
A very simple, but insanely beautiful wedding decoration for the bride's hairstyle can be made from feathers.

What you may need:
White feathers (thin and large)
Sew a bead or button in the center from the front.

To make it convenient to attach this feather flower to your hair, add to it from the back side hairpin invisible.


