Origami fox step by step instructions. We fold the origami fox according to the schemes. Step by step photo lesson
Origami came to us from Japan. This is a way to beautifully fold paper to make different objects. Get your kids and friends involved in this fun activity. We offer you to learn how an origami fox is made.
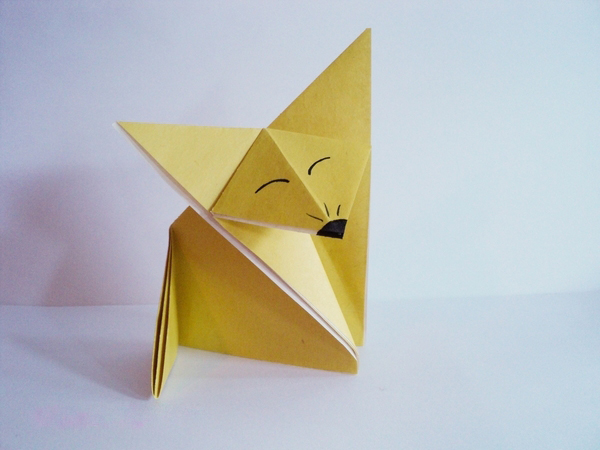
Scheme of assembly of the muzzle
Little kids will be very interested in learning how to make an origami fox. So that the lesson does not turn into flour, start with simple schemes.
Instructions on how to make a fox muzzle:
- Take a two-color square sheet of paper: on one side it should be white, on the other - orange. If not, join the two sheets together.
- Fold the paper diagonally with the white side inward (Illustration 1).
- Fold the top together (Figure 2).
- Bend both sides of the figure and turn it over (Illustrations 3 and 4).
- Draw the elements of the muzzle with a marker or pen.
The muzzle is ready!
Assembling the whole origami fox

To get such an origami fox, you need to use not a square sheet of paper, but an ordinary rectangular one.
The assembly diagram looks like this:
- Tuck the left corner of the sheet diagonally (Figure 1).
- Unfold the sheet and fold the right side (Figure 2).
- Fold the paper in half lengthwise (Figure 3).
- Fold the paper as shown in illustration 4.
- Make a fold in half on the bottom of the part (Figure 5).
- Wrap the top corner (Figure 6).
- Bend the bottom along the fold line (Figure 7).
- Turn the part over (Figure 8).
- Straighten the edges of the bottom part of the figure (Figure 9).
- Spread the top and “tail” in different directions (Figure 10).
- Make folds as in illustration 11.
- Gently straighten the figure along the formed fold lines (Figure 12).
The origami fox is ready! If desired, you can draw a muzzle with a marker or pen.
The second version of the origami chanterelle

If you take a square sheet, then you can get another one:
- Fold the sheet diagonally (Figure 1).
- Unfold it and fold it diagonally again, only in the other direction (Figure 2).
- Wrap the left and right sides of the resulting triangle (Figure 3).
- Fold the resulting figure in half (Figure 4).
- Wrap the right side of the upper triangle, as in picture 5.
- Straighten the figure along the fold lines and turn the part over (Figure 6).
- Bend the ponytail to the left and draw a muzzle (illustrations 7 and 8).
Origami paper fox is ready!
Collecting a fox on four legs
Master class on how to make an origami fox (assembly diagram attached):

- Take a square piece of paper and make fold lines on it, as shown in pictures 1, 2 and 3.
- Bend the bottom corner to the marked point (picture 4).
- Make folds as in pictures 5 and 6.
- Bend the figure in half (Figure 7).
- Unscrew the edges of the figure (picture 8).
- Fold the part again (Figure 9).
- Spread the sheet, but not completely (pictures 10-12).
- Fold the figure carefully along the marked fold lines (Figure 13).
- The top part must be bent (picture 14).
- Turn the figure over (picture 15).
- Make several fold lines, as in picture 16.
- Unscrew the marked parts (Figure 17).
- Turn the part over and fold it in half (picture 18).
- Make fold lines by bending the “wings” of the figure (Figure 19).
- Fold the part in such a way as shown in pictures 20, 21 and 22.
- Spread the figure a little so that it can be folded, as in pictures 23 and 24.
- Make a few folds on the left side of the part (picture 25).
- Straighten the left side of the figure (pictures 26 and 27).
- Scroll the part (picture 28).
- Now you have begun to emerge the figure of a fox.
- Divide the left side in half and bend it (Figure 29).
- Bend the right side to the left (picture 30).
- Align the right side to the points marked in the pictures 31 and 32.
- Make folds and tuck the inside of the future paw (picture 33).
- Tuck the right side along the folds and bend the lower corner of the “paw” (picture 34).
- Make the left part of the part, as shown in pictures 35, 36, 37 and 28. It should fold in such a way that a three-dimensional figure is obtained.
- Form the head of the fox (Figure 39).
- Give volume to the whole body (picture 40).
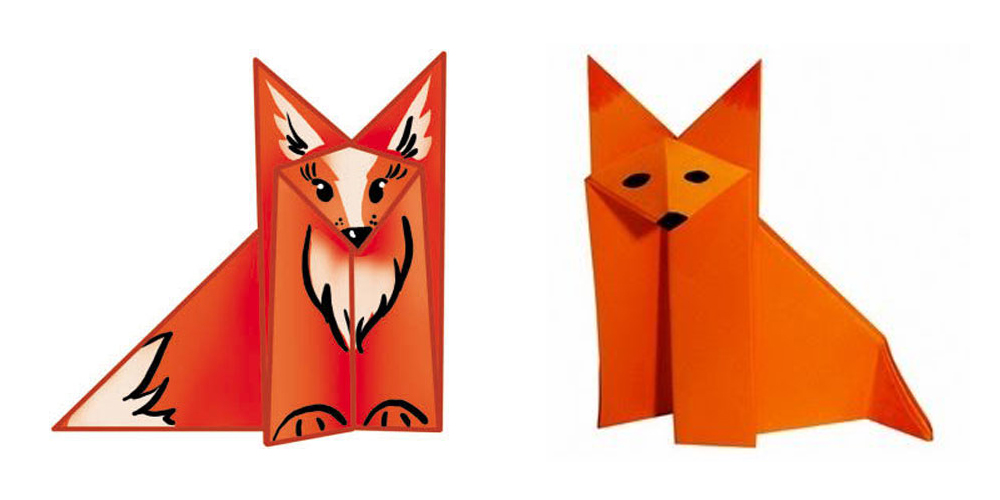
Origami fox is one of the most popular paper origami. If you do not know how to make an origami fox, then on this page you will find everything you need to assemble this simple paper figurine.
In the first photo you can see what you get if you follow the assembly diagram below. The second photo of the origami fox was taken by one of our site users. He got about the same fox as in the first photo. It is unclear why he used scissors. If you have photos of the origami you have collected, send them to the address This email address is being protected from spambots. You must have JavaScript enabled to view.

Assembly diagram
Below is an assembly diagram of an origami fox from the famous Japanese origami master Fumiaki Shingu. If you strictly follow the instructions, then the assembly of the origami fox will not take much time, and the result will be the same as in the picture. After doing what is described in the diagram several times, you will understand how to make an origami fox quickly and without peeping into the diagram.

Videos master class
Assembling an origami fox for beginners can seem like a daunting task. Therefore, we advise you to enter the query "origami fox video" on the largest video hosting site on the Internet, YouTube. There you will find many different videos about the origami fox, which clearly show the steps for assembling the fox. We hope that after watching the video of the assembly master class, you will have no more questions on how to make an origami fox.
This video tutorial will teach you how to assemble a simple origami fox:
If you want to build a more complex paper fox model, watch this video:
Symbolism
The fox in many cultures is a symbol of cunning, deceit and treachery. In Asia, the fox is considered a symbol of eroticism and feminine beauty. Some believe that the fox has a secret connection with the dark forces, and consider it a sharply negative symbol.
Isn't it time for us to add new inhabitants to the paper zoo? Today, the origami fox will replenish the collection of animal figurines. We will talk about 3 types of folding of a cunning forest beauty, the more interesting it will be to assemble a whole fox family, where each toy will be unique. Take an orange, preferably double-sided, colored sheet and a black marker to draw a cunning muzzle for a fox. More will not be required. Now watch carefully how to make a fox out of paper in no time.
Paper fox: option 1 - a simple toy
The first paper fox can be done even by kids. The following schemes will be more complicated, the more interesting it will be to tinker with them. We need a square piece of paper of a suitable color. You can make it from white office paper, and then color your animal or entrust this activity to children. Next, fold the paper in stages:

- Fold the square of the sheet diagonally, then fold it in half along one of the bends into an isosceles triangle;
- Bend the sharp corners of the resulting triangle to an obtuse corner. See fig. 1, step by step instructions in pictures will not allow you to make mistakes;
- Now fold the workpiece in half away from you. Having captured all 3 "walking" corners, bend them towards you, focusing on the vertical axis of the convolution;
- Then lay out the folded corners - the extreme ones will become ears, unfold the double central corner (from the inside) and squeeze it, forming a muzzle of a fox out of paper;
- Bend inward a tail of colored paper, due to which the fox will become stable. The origami fox is ready, it remains to draw her eyes and nose.
Here is what you should get:
Paper fox: option 2 - Japanese fox
Do you want to learn how to make an origami fox in the classic Japanese technique? Everything is incredibly simple: by analogy with the first simple version of the toy. Here you will also need a square of paper sheet. Scheme 2 converges with the first instruction in paragraphs 1-2, then this origami fox folds a little differently. Proceed step by step, first repeat steps 1 and 2 (the previous fox craft is simple from a square), and then:
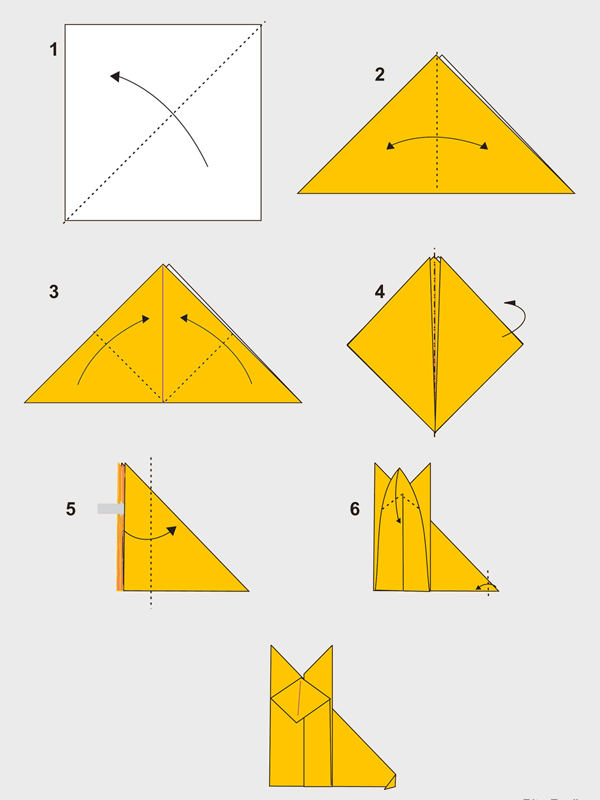
- Bend towards you not “walking” corners, but a strip of plane on this side (as shown in Fig. 2). So you set the supporting "legs" of a cunning animal;
- Next, expand the muzzle of the fox from the middle corner, straighten the ears and arbitrarily bend the tail so that the origami fox stands confidently, paint the fox out of paper.
We made it again! Hooray!
Paper fox: option 3 - voluminous complex toy
Ready to learn how to make a fox out of paper with your own hands, so that the beast looks like a real animal as much as possible? Then let's proceed to the analysis of the 3rd (most complex) scheme. She shows us how to make an origami fox with detailed anatomical study of body parts. The scheme is not easy, but you can be proud of yourself if you still manage to master the intricate folding technique. So:

- Fold a sheet of paper from a horizontal orientation so that its side edges converge in the center, then the origami paper blank must be sharpened from the bottom and top. To do this, bend inward all 4 corners of the convolution, then unfold them (you need outlines of the faces);
- Open the lower corner "pockets" from the inside (both) and squeeze along the plane. But the upper corners should not be opened, but tucked inward (both). Did you manage? We make a paper toy for children further;
- We bend the upper corners (future ears) towards ourselves, focusing on the palpable groove. The ears need to be folded towards you again, reducing the resulting regular triangle. The ears overlap one after the other (see Fig. 3);
- Bend the corners of the lower edge sticking up downwards, fold the bundle in half (basting the central axis) and return it to its previous position. Fold the structure along the axis with a step (accordion), as shown in Fig. 3. The bottom part now overlaps the top a little. We bend the corners of the step towards ourselves;
- Turns the bundle face down and bends the head of the future fox towards him - the upper corner of the blank. Next, make limbs-separators of the front paws from the hind legs towards you (see Fig. 3 carefully);
- Acting strictly according to the scheme, systematically form the details - paws, voluminous muzzle, tail. At first, the origami fox will seem angular, but then it will take on a spectacular final shape. You can watch the video if it is difficult to understand the scheme.
A voluminous fox is not made of cardboard - it is difficult to keep the shape of the workpiece. If you have mastered how to make a fox according to scheme 3, you can easily make origami animal figures of any complexity out of paper. For example, you are quite capable or amazing, which jumps or opens its mouth.
Didn’t understand how to make an origami fox, but still want to make a colored paper toy for your kid? Use a ready-made template (Fig. 4). There is no need to fool around with how to make a fox. It's simple: print the finished drawing, cut out the outline of the part and assemble the funny little fox for glue. It doesn't get easier.

The simplest origami models are animal faces. Even children 3-4 years old can do them. The basis for such crafts is the basic form of origami "triangle". Explaining to children how to make a triangle, you can do without complex geometric terms. We simply fold a “kerchief” (actually a triangle) from a “handkerchief” (square). The muzzles folded from paper very vaguely resemble those animals that we make. Therefore, it is necessary to additionally decorate them - draw eyes, nose, mouth, etc. with felt-tip pens. If you are working with older children, then you can not draw details, but make an application.
Having made such faces, you can put them in an origami tower, send them on a journey on a fun train, make finger puppets or arrange a table paper theater.
Origami animal faces: cat.

Let's bend our triangle in half, outlining the center line. Then we unfold it again.


Let's flip the figure. Bend back the triangle at the top of the muzzle.


It remains to draw the details.

Origami animal faces: dog.
Let's add the basic shape "triangle".

Bend and then unfold the triangle, marking the center line.

Focusing on the center line, at an arbitrary angle, bend down the sides of the triangle, as shown in the photo.

Bend back the triangles from the bottom and top of the muzzle.

It remains to draw eyes and a nose with a felt-tip pen.

Origami animal faces: fox and wolf.

At an arbitrary angle, bend the edges from the center of the triangle upwards, as shown in the photo.

Let's flip the figure. The muzzle of the fox is ready. It remains only to draw the details.


The muzzle of an origami wolf is done in the same way, but from gray paper.

Origami animal faces: mouse and bear.
Now let's make the faces more complicated. Children 3-4 years old are unlikely to cope with these muzzles. But for 5-6 years just right.
Let's add the basic shape "triangle".

Let's fold the triangle in half.

Let's expand the triangle. Bend the corner as shown in the figure from the center of the figure (we marked the center in the previous step)

Let's bend the corner in the opposite direction. This is a mouse ear.

We will do the same for the second ear.

Let's flip the figure. Bend the triangle at the top of the muzzle back, as shown in the figure.


Fold back the corners of the mouse ears to make them more rounded. You can use scissors for this and round the ears.

Let's draw a muzzle.

The bear is made in almost the same way as the mouse. But we make the bear’s ears smaller (we cut them with scissors) and bend the triangle from below, forming a heavy bear jaw.

Origami animal faces: hare and frog.
Let's create a basic triangle shape.

Bend the triangle in half and straighten, outlining the center.

Fold the base of the triangle up.

Bend the small triangle at the top of the figure down.

Bend the bottom edges of the figure up, combining them with the center line.

Let's flip the figure. The muzzle of a hare from origami is ready.

Color the muzzle with felt-tip pens.

The frog is made in the same way as the hare. But you need to cut and round off the “ears” with scissors so that we get eyes. And from the bottom of the muzzle, we bend the triangle back - the muzzle will become more round.

Target: Teach basic form "door", teach to fold a fox.
Tasks:
educational: contribute to the formation of ideas about the type of arts and crafts - origami(paper-plastic, continue to introduce students to the basic forms
Educational: we continue to develop children's creative abilities, imagination, thinking, develop fine motor skills of hands, interest in the subject, to origami.
nurturing: to nurture in children qualities such How: composure, diligence, attentiveness, sociability, activity. Ability to work in a team and accuracy.
Demo material: Illustrations depicting foxes, ready-made craft, ready-made basic form.
Handout:
Paper for origami, blanks for eyes and nose, scissors.
Repetition of safety precautions at work
Rules for working with scissors and knives:
1. Store scissors and knives in a designated place.
2. Place the scissors with closed sharp ends away from you.
3. Pass the scissors to each other with the rings forward, and the knives with the handle.
caregiver: Look guys, who is in the picture?
Children's answers.
Q. Of course it's a fox. Listen to what I'm going to tell you about foxes.
Coloring and dimensions foxes different in different areas; in total there are 40-50 subspecies, not taking into account smaller forms. In general, moving north foxes become larger and lighter, to the south - smaller and more dull-colored. In the northern regions and in the mountains, black-brown and other forms of color are also more common. foxes. Most common color foxes: bright red back, white belly, dark paws. Often foxes there are brown stripes on the ridge and shoulder blade, similar to a cross. General Distinctive traits: dark ears and white tail tip. Externally fox is a medium-sized animal with a graceful body on low, thin paws, with an elongated muzzle, sharp ears and a long fluffy tail.
B. Description, very similar to ours fox? What special traits do you remember foxes?
Children's answers.
V. Well done. Everyone remembered. Do you want us to make our own paper fox?
Children's answers.
Q. Then listen and look carefully.
First we need to stretch our fingers.
Finger gymnastics.
Walk
Let the fingers go for a walk
Hands clenched into fists, thumbs "run" on the table.
And the second to catch up.
Index fingers run across the table.
Third fingers running
Middle fingers.
And the fourth on foot.
Unnamed fingers.
Fifth finger jumped
Touch the table rhythmically with both little fingers.
And at the end of the road he fell.
Slam your fists on the table.
Q. Well, now we will begin to make a fox out of paper.
1. Fold the paper and cut out a square.
2. Now you need to fold the base shape - the door.
3. We take the opposite corners and fold our square in half.
4. We bend the end of the triangle to the middle of the opposite side.
5. We bend the left side tip up and the right one, we get ears.
Here we have a muzzle chanterelles.
And what is missing from our fox?
Children's answers.
V. Well done! Of course, the nose and eyes are missing. They need to be glued.
(the teacher shows the sequence of techniques for folding the figure, pays attention to the accuracy in working with paper. If necessary, provides individual assistance.)
But before that, I want to invite you to solve riddles.
The fluffy tail protects
And guards the animals:
They know the redhead in the forest -
very cunning (fox)
Forest red cheat -
Everyone knows her skill.
Be careful with her, don't yawn
And lock the chicken coop door!
(Fox)
This red-haired cheat
Chicken steals very cleverly.
Gray wolf sister
And her name is (fox) .
Summer, autumn, winter
He walks along the forest path.
The trace of the tail sweeps.
What is her name, who knows?
(Fox)
Guys, now glue the eyes, nose, and here is our the fox is ready.
Outcome: What did we do today? Which fox turned out to be the most accurate? What did you like? What other animals would you like to learn how to make?


