A simple handmade birthday card. Greeting card with your own hands. Happy birthday
Handmade gifts and postcards are much more expensive than standard purchased ones. And this is not surprising. After all, all hand made products are unique and created in a single copy. Moreover, a handmade greeting card with warm wishes will pleasantly surprise the birthday person and complement the birthday gift.
Many people think that it is impossible to create a beautiful postcard at home without expensive materials and tools, but this is far from the case. Knowing the basic principles of cardmaking and scrapbooking, you can make original birthday cards with your own hands from improvised materials that are in almost every home.
What do you need to create a happy birthday card?
- First of all, you need to prepare the basis of the postcard. It is best if it is cardboard or whatman paper. Base color - any, preferably plain.
- Scissors will need two types - one large to cut the base of the postcard, others - small manicure. The latter is convenient to cut out miniature applications or pictures.
- A ruler and a pencil are needed to correctly mark the length and width of the postcard on cardboard.
- Colored pens, especially helium ones with sparkles, can make beautiful inscriptions and drawings on postcards.
- The glue stick will help you make beautiful paper applications on postcards without smudges and stains. For fastening fabric, lace, felt, it is better to use PVA glue, and for more “serious” decorations, such as buttons, rhinestones, sequins, etc., using the Moment universal glue or a glue gun will help to avoid the troubles associated with falling off card details at the most inopportune moment.
- Anything can become a decoration for postcards: colored paper, felt, pictures from old magazines and newspapers, beads, rhinestones, sequins, beads, coffee, pasta, cereals, old twine, threads and much, much more. In general, anything that is in every home.
The process of making a simple happy birthday card
Making any postcard, even simple, even complex, begins with the preparation of the base. Postcards can be single and double, different formats, configurations and sizes.
The simplest postcard is, of course, a single one, when a square or rectangle of the desired size is cut with scissors. If you need a double postcard, the cardboard is folded in half, the desired size of the postcard is outlined and the part is cut out along the contours.
The base can be of any size. However, if you are going to send the postcard by mail, it is best to make it under the envelope.
Envelope sizes:

The same applies to the configuration of the postcard - it can also be varied: in the form of any shape - round, square, rectangular, oval with smooth or fancy-cut edges.
When the base is prepared, proceed to the preparation of decorations for the postcard. The simplest is, of course, the application, when the details are glued to the base. For example, such a postcard, on which a balloon is glued, is made very simply and quickly, the whole secret is in the selected materials:

You can even not use glue, but sew the necessary elements with a sewing machine:

For universal birthday cards that are suitable for any person, flowers are best suited. Details can be cut according to templates or come up with something of your own.


The edges of the card can be decorated with ribbons, lace, beads, etc. 
And the finishing touch - the inscription. You can sign with a colored pen, a felt-tip pen, or you can use beautiful inscriptions for postcards “Happy Birthday!” and “Congratulations!” Made in the scrapbooking technique, print on a printer:

Creative ideas: how to make original DIY Happy Birthday cards
- Use of various types of unusual bases. For example - watercolor paper for the background. Or drawing a pattern by stamping on tracing paper, and use bright decorative paper as a substrate for it.
- The color scheme, correctly selected, will make the simplest composition original. Three colors are enough - two contrasting and one neutral.
- The use of various options for folding postcards that violate symmetry.
- For inscriptions and signatures of postcards, use calligraphic outlines of letters and apply them with paint with silver or gilding.
- In the technique of scrapbooking. The base of the postcard is made of colored cardboard. Decorative elements and backgrounds for them are selected, matching in texture and color. Each background with decorative elements is glued in layers (using helium-based glue).
- In the technique of quilling. These are voluminous drawings from folded strips of double-sided colored paper. Figures are made (spirals, leaves, flower petals are folded) and glued to the base.
- Decoupage technique. Choose a napkin with the appropriate pattern, remove the top layer and carefully stick with PVA glue diluted with water on the base of the postcard, avoiding the appearance of wrinkled folds.
As you can see, it is not so difficult to quickly make a simple and creative postcard. If you spend a little more time on making, you can make more original postcards with your own hands.
Original handmade watercolor paper birthday card
It doesn't take long to make a birthday card using watercolor or ink on watercolor paper.

Materials:
- watercolor, ink, ink;
- watercolor paper;
- waterbrush;
- colored cardboard for the base;
- thematic sets of stamps for drawing.
Manufacturing
- If you make a square postcard, then the length of the cardboard should be twice the width. To fold the workpiece in half, you need to combine the upper left corner with the upper right. Do the same with the lower corners, then make an even kink in the middle and cover with a load for a few minutes.
- Watercolor paper should be in the shape of a square, the side of which is commensurate with the width of the cardboard base.
- A pattern is applied to the paper using stamps with the image of flowers. Stamping is done in a circle, with a change in angle. The image is obtained in the form of a wreath of flowers, leaves, directed both inside the circle and out. Then the drawing is painted with watercolor or ink using a waterbrush. On a separate sheet, it is recommended to practice choosing the color scheme for the wreath.
- When the drawing dries, it needs to be cut off (the sides of the square of the watercolor sheet should become slightly smaller than the sides of the base). Glue must be applied in dots in several places, or use double-sided tape. The picture is placed in the center. If desired, you can make ink the inscription "Happy Birthday!".
More difficult to manufacture, but very beautiful - the next craft.
Volumetric birthday card
An original version can be a voluminous postcard made by oneself on the principle of children's books. When the postcard is opened, three-dimensional compositions are formed with elements on different planes.
You will need:
- thick decorative paper;
- white cardboard;
- curly and ordinary scissors;
- PVA glue or pencil;
- colored paper;
- colored pens.
Manufacturing
- You need to take decorative paper of a rectangular shape, fold in half. This will be the cover for the future postcard.
- For the "stuffing" you should cut out the appropriate size cardboard, and also fold it in half.
- In the center, an outline drawing of the image is made (a stencil or patterns are used). It is enough to draw one large flower or, as an idea, use the following templates for voluminous postcards - from simple to complex:
- On a flower, you can make an application from bright colored paper or leave it white, and raise the details of the image with a colored pen.
- Curly scissors cut the cardboard along the edge.
- Glue cardboard with a flower on the cover and put it under the load.
- Write your congratulations and wishes near the flower.
- On the outside of the card, you can stick palettes, a ribbon, make the inscription "Happy Birthday!"
A beautiful handmade greeting card will delight loved ones for a long time.
In childhood, a birthday is a special holiday for any child. He is in the center of attention, receives gifts and congratulations. This makes the child feel their importance, individuality and love of loved ones, so the children are looking forward to their birthday and carefully prepare for it. With no less enthusiasm, they go on holidays to their friends and congratulate loved ones on their special day.
The birthday boy most of all likes to receive congratulations, and the child can do this with a postcard. Try to make it yourself. Such an activity for children is of particular importance: they put their skill and effort into crafts, learn patience and work with paper, cardboard, scissors, and glue. He develops not only fine motor skills, but also a sense of beauty.
Here are 10 postcard ideas that a child can make on their own or with a little help from an adult.
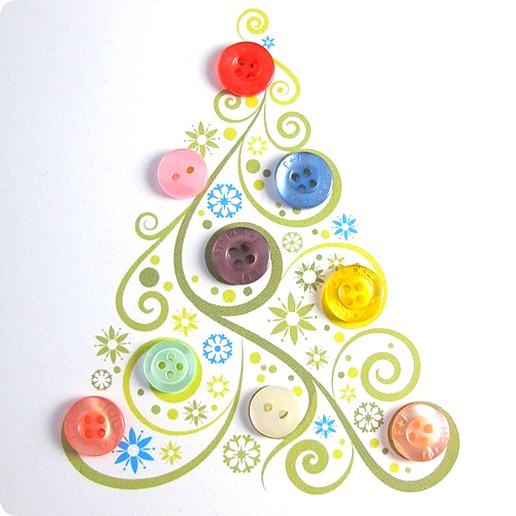
Postcard with buttons
Postcard with 3D application
Postcard with balloons
Volumetric flower for a postcard
Butterflies can be cut out of paper or use ready-made stickers
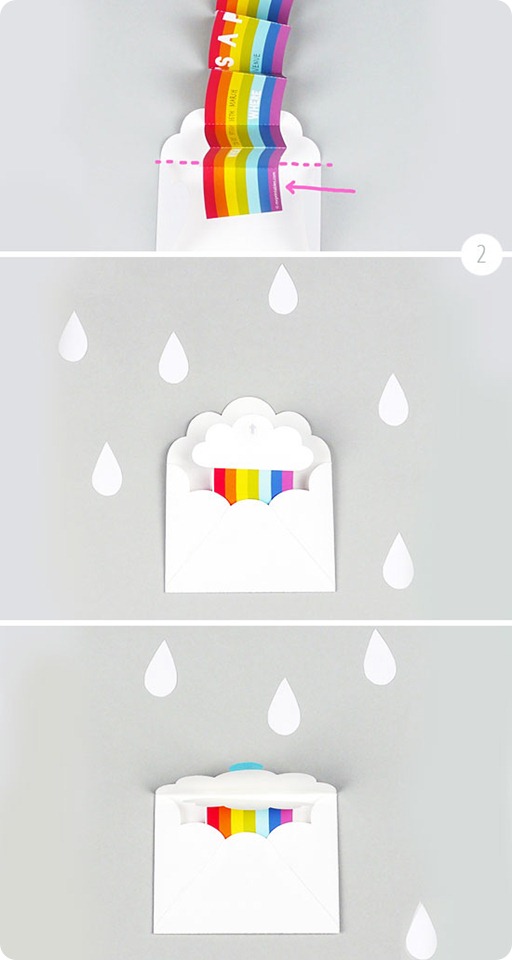
Envelope with confetti
Heart balloons
A teenager can make such a card, but kids can stick ready-made pompoms on paper
Bouquet of paper flowers
For this postcard, you first need to cut out flowers from colored paper, stick them on paper or cardboard and draw a stem.
A voluminous postcard, which is made by hand, will be an unexpected and very pleasant surprise for your loved one. There are a huge number of beautiful cards for any occasion, so you can simply find the right holiday gift.
This is an original postcard, despite the apparent intricacy.
It is wonderful for every person close to you. The occasion can be Women's Day, New Year's Day, and even Valentine's Day.
To make a postcard, you will need:
- cardboard or paper thick enough
- knife
- First of all, you need to make a printout of the postcard template located here. There are several copies there.
You can try to sketch a drawing with a heart on your own. To do this, you need a ruler and a simple pencil. - Take a knife and use it to make special cuts on the resulting template.
- Try to fold the card as carefully as possible so as not to wrinkle it. First of all, you need to make folds, in the picture they are drawn with a yellow pencil. Then, slowly, bend where you need a postcard.
The rest of the pieces will fold themselves. Iron each curve well on the card for a clear work of each individual element.
To make it convenient, you can attach the postcard to the table with tape. - Now it's time to decorate the postcard. Glue the edges with colored paper.
Almost everything is ready, you just need to add nice and good words.


Volumetric postcard Volcano of hearts
Such a postcard consists of several parts that need to be connected with glue.

To create a postcard, you will need:
- cardboard and colored paper
- scissors
- white glue.
- Download the template in the appropriate format.
Templates for a volumetric postcard, which is made by hand.
Knowing some rules, you can draw hearts yourself. You will find the rules below. - Take out a huge heart from the middle. It is located on the fold.
- When cutting out the hearts, try not to touch the places where they bend (see picture).
- On the hearts that are shown in this figure, you need to make cuts to connect them together.
So that the voluminous postcard can be closed as tightly as possible, you need to cut the paper at the middle fold to glue individual hearts to the base in the form of red cardboard. This cardboard is the background base of the postcard. - After you have glued the halves to the base, you need to fasten the hearts using the cuts previously made on them.
The size of the hearts should be the same on all sides.
The line in the diagram, which is drawn in blue, indicates the same distance that is from the central fold to the beginning of the incision, and the red lines indicate that there is exactly the same distance between the hearts, which are located closer to the middle part of the postcard.


Ideas to keep in mind


The approaching holiday is a great reason to think about how to make a greeting card with children. A postcard is one gift that children can make with their own hands. It is both creative and educational at the same time. We offer several simple video tutorials that will come in handy when making postcards with children with your own hands for any holiday.
ic.pics.livejournal.com
1. Postcard in the form of a bright outfit for your beloved mother, sister, grandmother
2. Unusual postcard in the form of a cup
3. Postcard in the form of a gift box
4. Postcard-lips
5. Basket with congratulations
6. Postcard in the form of an envelope
7. Postcard with origami elements
8. Card with a surprise of three-dimensional flowers
9. Postcard-eye
10. Postcard in the form of a voluminous cake
Making postcards with our own hands together with children, we teach children to show attention and care for loved ones, as well as train fine motor skills, develop an eye, skills in working in one technique or another, with various materials. It is doubly pleasant to receive a handmade card as a gift.
We hope our video examples will help you in creating your own original postcards. Take other people's finds into service and fantasize!
A greeting card is not just a sheet of paper folded in half! Don't be afraid to experiment! Surely you will get a real masterpiece! Manual creativity is valued because it keeps a piece of the master's soul. Let your cards bring warmth and love to those to whom you give them.
Dear readers! Tell us, have you ever received handmade postcards?
Original ideas are in the air. Catch and make paper art with your own hands that will delight your loved ones. The most important thing is that all your works will really appear in a single copy, which means that an exclusive hand-made postcard will be expensive not only in terms of high spiritual criteria, but also financially.

Scrapbooking
The most fashionable technique of working with paper today (scrapbooking) was invented and began its circulation around the world as one of the ways to design photo albums. But why not use it to create beautiful postcards.
It has already become common that demand, sticking out its tongue, is trying its best to keep up with the offer, and therefore the store has everything so that you and I can safely do our favorite hobby - making DIY birthday cards using the scrapbooking technique.

You will need:
- white paper for watercolor - A4 sheet;
- colored paper (lilac, purple);
- lace wide ribbon - 12 cm;
- beautiful ribbons or braid - 30 cm;
- three white artificial flowers that can be cut from hair ties;
- three small interesting buttons to match the paper;
- scissors, ruler;
- glue "Moment";
- a felt-tip pen or a purple gel pen.
How to make a scrapbooking card
- At the beginning of work, you can make paper blanks. Our greeting card "Happy Birthday!" when folded, it will have a size of 10x16 cm. Therefore, we fold a white sheet of paper measuring 20x16 cm in half. Then we cut out four blanks of colored paper with our own hands (two purple and two lilac), as shown in the photo.
- Carefully glue the lilac blanks onto the purple blanks so that equal fields of the same width remain on each side. Write the words of congratulations "Happy Birthday!" and circle the frame with a pen or felt-tip pen.
- Now you can stick all the rectangles on the workpiece, stepping back from the edge by 10-5 mm. Glue the lace and 12 cm of ribbon on it, tucking and securing the edges of the textile on the back of the scrapbooking card.
- Glue a colored postcard onto a piece of paper folded in half. Now you can make a bow out of the remaining tape, and glue it, voluminous flowers and beautiful buttons with Moment glue.
- The final touch in the design of a birthday card in the style of scrapbooking with your own hands will be drawing a picture. With a felt-tip pen or pen, draw a monogram and dots along the edge of the frame. Unfold the card and write congratulatory words.

Volumetric cards for mom on her birthday
They do not require any additional material investments, any schoolchild can do it with his own hands, at the same time, these beautiful simple voluminous works made of colored paper are very interesting and original.

You will need:
- colored paper;
- scissors, compasses;
- Double-sided tape;
- PVA glue;
- wooden stick;
- beads;
- beautiful ribbon.
The order of implementation of the idea
- Draw circles of different diameters on colored paper with a compass and cut them out. Directing the scissors from the edge to the center, make a spiral from each circle. If you use curly scissors, the edges of flowers in 3D can be made terry or carved.
- Twist each spiral with a wooden stick from the edge to the center, fixing the resulting flower with a drop of glue on the center of the spiral circle. Try not to make very dense buds so that the bouquet is lush.
- Fold the pretty cardboard rectangle for the base of your birthday gift in half and try it on for the first time.
- Cut out a flower pot from brown paper and stick double-sided tape to its wrong side.
- Glue green paper 1-2 cm smaller on the background of the card. Now you can make a composition of a pot and flowers for your birthday.
- Tie a bow and attach it to the pot. Glue the inscription "Happy Birthday!" and you can give a handmade card to your loved one.


Postcard folding bed "chicken"
- To implement this idea, you will need two sheets of cardboard or thick paper. Bend one sheet measuring 12x12 cm, retreating 3 cm from the edge.
- The second sheet of cardboard measuring 15x18 cm must be folded in half. This will be the base of the postcard. Therefore, you can decorate it by pasting it with beautiful paper on both sides.
- Cut 6 lines on the fold of the first workpiece. Step back from each edge by 3 cm. The side 4 lines should be 3 cm long and symmetrical to the fold. The middle strip is cut 1.5 cm high from the fold axis, 2.5 cm down. The width of the resulting strips should be 1 cm. Bend them in the opposite direction to get three steps of the same height, but of different lengths. They will serve as stands for paper figures.
- Cut out two brown eggs from colored paper, decorate them with appliqués and glue them to the outer steps.
- Draw a chick in egg pattern on paper. On it, you must first cut out a newborn chick with paws and a scallop from yellow paper, and then a shell from white paper. Glue them together, draw a beak, eyes and glue to the middle step. Drape the backdrop with pretty appliqué and chicken feathers.
Postcard in quilling technique
Elegant, voluminous decorations on a postcard do not look at all like paper ones, but are made very simply. You just need to cut narrow strips of colored paper and fold them into spirals in a certain way.

The quilling technique is well described in many sources. You can learn the simplest tricks quickly. For such a picture, you need to make 4 “closed spirals” of green paper, 4 “off-center spirals” of yellow and 8 pink, as well as 14 green leaves in the shape of an “eye”.
Start decorating with a large flower. Its center is also made from a strip of paper folded into a spiral, previously cut to the middle of the width into a fringe. Then glue the petals and leaves.

Attach the butterfly details in the upper left corner. Without gluing, lay out the details of the picture with a congratulation and a ladybug on a postcard, observing the proportions. It remains only to add "twigs" and fix the still life.
Gift Ideas
In order to make the voluminous postcard even more voluminous, you can make not a flat pot, but a bag with a bow. Fold an accordion fan out of pink paper or, as in the photo, a bag. Fix the edges of the fan on paper and glue the bottom of it with a corner. To prevent the fan from opening, limit its volume with a white ribbon with a bow.

To the inscription "Happy Birthday!" looked original on the postcard, it can be made with silicone. Next, you need to paint the background with a brush with dry paint, and then carefully remove the silicone film from the paper. There will be a white inscription on a colorful background.

There is no simpler and more original idea than an “endless” postcard. Write congratulatory texts, torn and connected in the process of folding, prepare applications, drawings. Decorate this postcard made by yourself according to the master class shown in the video.
Use natural material: leaves, dried flowers, flattened straws, ears of corn. This will enliven the gifts and give them natural living warmth.


