Lush flower from foamiran. Flowers from foamiran
1. USEFUL TIPS FOR BEGINNERS
If you want to make a truly valuable gift with your own hands , pay attention to such a versatile material for making elegant crafts as. This material is often used in the production of parts for children's educational games, dolls, rugs. But our craftswomen have long found use for this plastic suede - foam in their work, from which original handmade flowers. Peonies, roses , gladiolus, lilies, asters from foamiran literally come to life in the hands of craftswomen who have just created these decorative flowers with their own hands.
In previous materials, we have placed for you step-by-step master classes and video tutorials that simply and clearly outline the ways making homemade flowers (peonies, roses) from foamiran. In this article you will find tips, mk, video tutorials for beginners. If this is your first time getting acquainted with the properties of this amazing material, we advise you to start your creative journey by creating simple flower for decorating hairpins or elastic bands on hair.
3 helpful tips for beginners:
- which foam is better?
before you get to work and make your first flower yourself It is important to choose the right material. Foamiran is sold either in the form of sheets or in rolls and may have different names on the packaging - foam, fom, eva, plastic suede. But there is an option on the packaging of which foams is written - this is porous rubber for children's creativity and beautiful flower it is very difficult to make it.
There are Iranian and Chinese versions of foam. Experienced craftswomen use both options in their work with equal success. But we advise beginners to use Iranian foam in their work, from which it is easier to make petals of the desired shape.
- how to give the petal the desired shape?
This material is very flexible. It is enough to crush the foam with warm palms and you can fold, twist, bend it, changing its shape.
Many needlewomen use heat treatment with an iron when working with foamiran. You can heat the iron (at the minimum value) and stick blanks cut according to the template to the warm sole. After a few minutes, they will fall off, after which you can make any shape of the petal . If you do not like the shape, you can always change it by attaching the workpiece to the soleplate again and starting all over again.
- how to make a foamiran blank thinner?
To make our decorative flower elegant, with thin "airy" petals, it is advisable to use a thin sheet of foam in the work. But what if there is only thick material on a roll at hand? There is a way out!
First, we cut out the blank in the shape of a petal, and then we begin to diligently knead and rub it in the palms, releasing air from the bubbles of the material as much as possible. Then we apply the workpiece to the sole of the iron and, after heating, stretch it a little with our fingers.
2. HOW TO MAKE A FLOWER FROM FOAMIRAN
There are many ways to make plastic suede crafts.
Consider the classic stages of creating a flower from this material:
Cut off several strips 3 cm wide from a sheet (or roll) of foamiran. Cut into 3 by 3 cm squares. Cut out a flower petal from each square according to the template (from cardboard). The number of petals depends on the type and size of the flower. . To make the color of the petals look realistic, you need to slightly tint them around the edges and at the base with pastel crayons or paint.
Now we need to give the blanks a realistic shape of the petals. To do this, we crumple each in warm palms, stretch it out, form bulges with our fingers (you can use special bulbs for florists and a heated iron sole for this).
When all the petals are formed, we begin to collect them into a flower bud . A common option is to make a loop at the end of a thin wire, apply a little glue from a glue gun and wrap a petal around the loop. After that, glue each subsequent petal in a circle at the same level in height
Now let's make the sepals to make the flower look more realistic. On a green foma sheet, according to the template, draw the outlines of the sepal with a toothpick and cut it out. With nail scissors, we make small notches along the edges of the workpiece.
We make flower leaves. According to the template, we cut out blanks of leaves from a sheet of green foam. Now we will apply a drawing and relief on each leaf using molds (forms, relief blanks and special castings). It remains to give the leaves of the flower a natural look, changing their shape by heat treatment.
How to quickly make a simple foamiran flower for a rubber band in your hair:
For work, we will prepare the following tools and materials: green and purple foam sheets, iron, nail scissors, glue gun.
Stages of work
√ cut a rectangle 8 cm wide from a Foma sheet and fold it in half horizontally. Glue with glue gun
√
from the side of the fold, at regular intervals, we cut the workpiece with scissors. The workpiece will take the form of a comb. We fold it several times and fix the shape with a glue gun.
√
now we make flower leaves by drawing a contour according to the template on a green foamiran sheet. We apply streaks (you can use a toothpick) and sculpt to the sole of the iron. After heat treatment, give the leaves the desired shape.
√ it remains to glue a circle (base) of foam to the inside of the hair elastic and glue the bud and leaves to the base on the outside of the accessory.
3. MASTER CLASSES FOR BEGINNERS. HOW TO MAKE A FLOWER FROM FOAMIRAN IN DIFFERENT WAYS
Master class 1:
HOW TO MAKE A SIMPLE BUT VERY ELEGANT FOAM FLOWER. STEP-BY-STEP LESSON WITH PRACTICAL RECOMMENDATIONS - WE FORM PETALS AND FOLD THEM INTO A BUD, MAKE SELILS AND A CAPITAL.
Master class 2:
WE MAKE A VERY DELICATE AND ELEGANT FLOWER FROM FOAMIRAN FOR DECORATION OF POSTCARDS, GLASSES, DECORATIVE JEWELRY. MK WITH PHOTOS AND EXAMPLES OF MASTERS' WORKS.
Master class 3:
TWO LESSONS FOR BEGINNERS. HOW QUICKLY AND SIMPLY TO MAKE BEAUTIFUL FLOWERS FROM PLASTIC SUEDE IN THE FORM OF A LILY AND A ROSE.
Master class 4:
WE MAKE AN ELEGANT FLOWER FOR DECORATION OF WOMEN'S ACCESSORIES. WE GIVE THE REQUIRED SHAPE TO THE PETALS AND THE LEAF, AND THEN APPLY ON THE HAIR CLIP.
Master class 5:
HOW TO MAKE A PION FROM FOAM.
Artificial jewelry is widely used in the design of holidays, in interior decor and in the creation of women's jewelry. Foamiran flowers are especially popular, the manufacturing master class of which does not require special experience. Such flower decorations are very similar to natural ones, therefore they are very popular with needlewomen. Foamiran is called plastic rubber or suede, but let's see what this material really is.
What is foamiran and where to buy it
Foamiran is a new synthetic Iranian material, recently brought to Russia. Its name comes from the name of the issuing company "FoamIran". Foam is a popular material, because its rich color range allows you to create very realistic compositions and toys. The material easily takes any shape, and the volume of the workpiece is given by light heating with an iron. Foamiran is environmentally friendly, and you can buy it in needlework stores. At an affordable price, plastic suede is sold in online stores that deliver to any region of Russia.
How to make flowers from foamiran
Plastic suede is a malleable material, so even novice needlewomen can make flowers from foamiran using a master class as a step-by-step instruction. Any crafts will be distinguished by accuracy and realism. With the help of our master classes, you will learn how to make foamiran hairpins, stencils of flowers and leaves, patterns from which it will be easy to create works of art later. So, let's make different flowers from foamiran, and master classes with photos will help you.
Lily making master class
To make a flower, we need:
- leaf of green and white foamiran;
- stamens;
- acrylic paints;
- cardboard;
- felt-tip pen;
- thermal gun;
- wire;
- toothpick;
- iron;
- scissors.

Preparation method:
- Make a 6 cm cardboard blank of a lily petal, cut it out.
- Using this template, cut out 6 petals on white foam.
- Toned them on both sides with a pink-lilac color.
- To make the petals textured, heat them on the iron, drawing veins with a toothpick.
- Heat the edge of the petal too, giving it a waviness.
- With a brown felt-tip pen, make a few dots at the bottom of each petal, giving the flower a natural look.
- For the pistil and stamen, prepare a 0.3 mm wire, stamens and small diamond-shaped pieces of plastic suede, dyed black.
- Glue them to the wire.
- Before assembling the flower, cut out the leaves on the green foamiran (foam).
- Give the leaves texture by heating on the iron.
- Glue the first row of petals (3 pcs) around the glued stamens to the pistil.
- Glue the second row in a checkerboard pattern.
- Glue the leaves as you like at the bottom of the lily.
Do-it-yourself poppy
Bright flowers from foamiran are very beautiful, and a master class in creating a red poppy will help you make sure of this. Poppies have long won love and attention for themselves, thanks to their simplicity, beauty and brightness, and absolutely anyone can handle their production, even if they pick up plastic suede for the first time. For the manufacture we need:
- red and green foam;
- cardboard;
- bead 2 cm;
- black threads;
- toothpick;
- glue gun;
- scissors;
- wire 20 cm.

Preparation method:
- Draw a petal template on cardboard and cut it out.
- Cut out a 6 cm circle of green foam.
- Thread the wire into the bead, twist it, forming a leg.
- Heat the green circle and wrap the bead around it, connecting the edges on the wire.
- Fix the foam with black threads with an intersection point in the center.
- Using a toothpick, circle the cardboard templates on red foam, cut out with scissors.
- Fold the petals like an accordion, then twist them tightly with your fingers and straighten them - they will acquire a wavy texture.
- Glue the petals in two rows to the base of the balloon.
- Cut out two green leaves and score all around the edge, then twist and flatten for texture.
- On the back of the bud, glue the leaves by cutting the wire.
MK chamomile
The modest wild flower is recognized as a symbol of the family, which is why "chamomile" weddings with artificial daisies have become popular. We will tell you how to make these beautiful foamiran flowers on your own in a master class. To create a flower we need:
- white foamiran;
- cardboard;
- oil pastel;
- ruler;
- glue;
- pencil;
- protractor.

Preparation method:
- On the foam with a compass, apply the contours of circles (3 pcs) in 9 cm, cut out.
- Then cut a strip 2 cm wide and 27 cm long to create the center, paint it yellow.
- Fold the strip in half, glue along the edge, cut the fringe from the side of the fold.
- Twist the core with a spiral, smearing it with glue.
- Cut out a 9 cm cardboard circle, then use a protractor to draw cuts for the petals.
- Use the resulting pattern to cut out the white petals.
- Cut the petals, not reaching 2 mm to the core.
- Heat the tips of the petals with an iron, round off, like a real chamomile.
- Put the workpiece in the middle, glue it.
- Make 2 more rows of petals in the same way, fixing with glue.
Rose
You will need:
- 2 sheets of foam (green and pink);
- glue;
- foil;
- patterns.

Preparation method:
- Cut out two cardboard patterns of different sizes, but the same shape of a rose petal.
- Trace 5 large and 5 small petals with a toothpick on the foam, cut out.
- Place all the petals against the iron, and pull the edge to make them wavy.
- Roll up a ball of foil, wrap the first small petal around it into a cone, fix with glue.
- Make a bud from the rest of the small petals, and glue the large ones on top, making the edges wavy with an iron.
- Cut out 6 leaves from green foam, attach to the iron, then glue to the rose.
Ranunculus
You will need:
- a sheet of blue foam;
- toothpick;
- scissors;
- glue.

Preparation method:
- Make 18 pcs. petals of various shapes and one strip measuring 2x10 cm.
- Cut a small fringe on the edge of the strip with scissors.
- Glue the fringe to the toothpick to make a roll.
- On the overlapping roll, glue the larger petals first, and the smaller ones last.
- Make the gluing with white foam so that you can paint over it with a pale blue color.
hydrangea and sunflower
Hydrangea, made at home with the help of foamiran, looks amazing. Working on its creation is very similar to creating a sunflower, but the difference is only in the color of the foam. For hydrangea, pale blue material is taken, and for sunflower - white, which is then tinted in several shades of yellow. We will give one master class on making a sunflower, and make a hydrangea under the same conditions.
You will need:
- white sheet of foam;
- cardboard or thick paper;
- paints;
- floral green tape.

Preparation method:
- Draw rectangles on the cardboard in 4 different sizes, cut out the petals.
- To create a stem, wrap a long toothpick with tape.
- Circle the petals of each size 12 times on white foam with an awl, cut out.
- Paint over with yellow of a different shade (darker from the edge).
- Draw and cut out 4 leaves, paint over with green paint.
- Cut 1 meter strip, 2 cm wide.
- Paint it black, turning the edge into a fringe.
- Twist the black strip into a roll based on the stem, and glue the end - this is the middle of the sunflower.
- Heat the yellow petals with an iron and twist, and then paste over the black roll, first small, then large.
- Also form the leaves by attaching them to the underside of the bud.
Master class hairpins and headbands from foamiran


 Before studying the master class, you need to familiarize yourself with the material, its properties, and only after that create divinely beautiful flowers from Foamiran with your own hands. Owning this type of needlework, you can usefully pass the dull time by creating spectacular floral decor, funny toys or scrapbooking elements.
 This material is called differently: Plastic suede, Fom Eva, Revelure, Fom, Foamiran, Foam. It is a soft synthetic modern material used in scrapbooking. Its main feature is plasticity, which tends to be slightly stretched within 10%. It is enough to accept the material, with subsequent memorization of the form necessary for the master. He remarkably reacts even to the warmth of human hands, which makes working with him easy and pleasant.
In our time, the use of Foamiran turned out to be a real find. Fans of creativity note a large palette of colors, the possibility of additional coloring of the material in the required color, shade, which opens up, both for masters and beginners, almost limitless possibilities for imagination and creativity.
The color saturation of Foamiran is ideal for creating a variety of accessories. Nude and pastel colors are used in the process of making dolls or works in the style of " Shebbi».
Material Tools
 To work with this material, ordinary scissors are enough. However, you can additionally use special machines to create the necessary forms, curly composters, molds. You can change colors, give new shades with the help of pastels or acrylic paints.
To change the shape, it is not necessary to use heating devices such as an iron or curling iron, the warmth of the fingers is enough. Under the influence of heat, plastic suede perfectly bends, wrinkles, while remembering "new" forms with their subsequent preservation.
It must be remembered that excessive tension of Foamiran can lead to rupture of the workpiece.
A thousand words cannot replace even one photograph. Therefore, we propose to move from words to deeds and try to create a purple flower with your own hands. Our master class will help you with this. We will not start with the birth of a Peony, since it is difficult to perform, but a purple rose and a snowdrop are just within the power of everyone.
We invite you to get to know this type of creativity more closely by watching a video about what Foamiran is and how to work with it.
purple rose
 To perform a certain range of work, you will need the following tools and materials:
- Foamiran olive and purple flowers;
- scissors;
- glue gun;
- fastening for hairpins, brooches or other jewelry.
So, the master class for making our flower will consist of four stages:
- cutting out;
- gluing;
- bud fluffing;
- sepals and calyx.
Each step will be described in detail by us with the provision of relevant photos.
Step One "Cut"
 From a roll of purple foamiran, we cut out a long strip, the width of which should correspond to three centimeters. Then we cut it into separate shreds, preferably rectangular, from which flower petals will be cut.
When creating this composition, the shape of the petals can be arbitrary, but in our case it is oval with a small cut.
Now you need to twist the opposite edges of each cut petal with your fingers, and then slightly stretch the middle with your fingertips. Such petals will be required within 20 or 25 pieces.
Step two "gluing"
After giving each petal the necessary curved shape with wavy edges, you can begin to glue them together. For this purpose, we take a glue gun or glue of strong fixation. We apply it in a small amount to the “cut” part and gradually form a flower bud out of them. In its center, to facilitate the work, we place a ball rolled from foil. You can also use other convenient improvised material.
The petals are glued in a "chessboard" order next on top of the previous one, do not forget to press them tightly against each other. Using cold glue will significantly increase the process in time, and the use of a glue gun will speed up any part of the work.
Step Three "Blooming Bud"
 The gluing of the petals occurs approximately at the same level in relation to each other. This method provides an opportunity to end up with a beautiful flower with smooth edges with a blossoming bud.
Now our master class can go further and tell you exactly how to create an equally beautiful green part of the plant with your own hands.
Step four "Sepals and calyx"
From a flap of Foamiran, but already olive in color, we cut out several long strips with a length of 7 to 8 cm and a width of not more than 1 cm with scissors. After that, we cut each of them into two even parts almost to the very end. Use your fingers to twist the elements to the state  tight flagella, which, unwinding, will acquire the necessary “natural” shape for us.
While our flagella take on the required state, we cut out one, maybe two, circles from the same patch, the diameter of which does not exceed 3 cm. With their help, we will create a base for the flower. Subsequently, it is to these circles that the decorative mount for our creation will be glued.
Perhaps our master class seemed to you a little difficult or insufficient in explanation.
For a more detailed look at exactly how flowers of this kind are created from Foamiran with your own hands, use the corresponding video, from which you will learn a lot of useful information.
Everlasting Snowdrop
 Many of us enjoy the spring time by gathering snowdrops. This plant is listed in the Red Book, so these actions turn out to be a misdemeanor, which is punishable by a fine. Making this flower is much easier than Peony.
However, if such beautiful flowers cannot be collected in the forest because they are an endangered species, then let's create them artificially with our own hands from Foamiran. After passing the master class we offer, you can make a whole bunch of such flowers without breaking the law.
So, the manufacturing instructions say that in the process of creation we will need materials and tools such as:
- white foam;
- olive-colored plastic suede;
- toothpick;
- thermal gun;
- for the stem - wire;
- paints;
- green teip tape;
- scissors;
- iron or curling iron.
Last time, our master class was built on a phased disclosure of the process of creating a flower. In this case, we will do the same.
Create petals
 On a white flap of Foamiran, using a toothpick, draw the outlines of future petals: three inner (small) and three outer (larger). Now cut them out with scissors.
The inner part of the petals is tinted with green pastels. To do this, you need to draw hearts, and then paint over them all with chalk.
 Next, you need to heat up the iron. Depending on the number of modes for the most gentle. If there are only four, then give preference to the second. Attach your petal to the heated sole. It will stick well, but as it warms up, it will begin to lag behind a little. During this step, the edges of the petal may melt a little. But your iron does not threaten anything bad.
 After heating, it will acquire a convex shape and twist a little. Taking advantage of the moment when it is heated, give your fingers the desired shape even before the moment of cooling. Agility in this case will not hurt. After cooling, it will keep its shape perfectly. The same procedure should take place in relation to the large petals of the Snowdrop.
We create the middle
 A stamen is glued to the end of the thick wire, which can be purchased at the store.
All three small leaves are glued to the finished structure, so that they are on top of each other.
We collect a flower
 From above, on small petals we glue large petals at the same level with them. As a result, you will get a half-opened flower. To create a flower whose bud has opened, you need to bend the large petals back, and drop a small amount of hot glue on their base. After it dries, the petal will fix its position.
Stem and leaves
 We tear off the required length of the tape tape and cut it with scissors into two ribbons of the desired width. We wrap them around the bottom of the wire of the flower and create a smooth transition to the bud itself. The winding takes place in a spiral.
To create snowdrop leaves, you will need
olive foamiran prepared in advance  colors. The further master class will consist of cutting out one small and two large petals, the middle of each is tinted with green pastel.
Squeezing each leaf separately along the central vertical with your fingers, we give it the natural shape we need.
 In order for the flower to look as realistic as possible, we bend it, and glue the first leaf at the fold, as shown in the photo.
At the bottom of the stem, first glue one leaf, and then the second, as shown in the photo.
This is where our master class ends, with the help of which you created a spring flower with your own hands - a Snowdrop.

I recently made a wedding card and there were no mint-colored flowers in my arsenal.
But on the other hand, there was a suitable foamiran, so I decided to make it out of it and just hit the color perfectly.
In order to make such flowers we need:
Foamiran (any color) thickness 1.5 mm;
- stamens for flowers;
- iron;
- awl, ruler with circles;
- mousepad;
- a stick with an iron ball with a thick end;
(or whatever can be substituted)
- white acrylic paint and decor of your choice.
1. According to the template (I attached the template completely, maybe it will come in handy for someone, in the same template you will find the one that we need) The format of the template sheet is A-4, you can simply print, cut out the templates and use them on different materials - paper, felt, foamiran, etc.

2. We circle the flowers on the foamiran according to the pattern, I circled it with a regular knitting needle. (how many large, medium and small you need) Very comfortable and does not leave blots, like after pencils.
I took 3 large templates and 1 small one for a large flower, 3 small templates for a small flower. It turns out a large flower 3 cm, small 2 cm. Cut out. We put it on a hot iron and hold it with something so that the flower is convex. When it heats up and becomes convex, remove it and stretch it carefully so as not to tear the ends in different directions.

3. Then we fold and bring the tip of the flower to the iron again, heat it up and twist it and leave it to cool for 10 minutes.
Once the flowers have cooled down. gently straighten, assemble into each other, put on a rug from under the arm (or someone has another option) take a stick with a thick end, a blob with an iron ball (who has it), I took a brush with a thick end. And we push through the middle of the collected flower.


4. We prepare the stamens, take an awl, pierce the middle and insert the stamens.

5. Then we take the glue, I use the crystal moment to pour a little glue between the petals and fix it with my fingers, up to the stamens, and also form a flower. Since foamiran sticks together well, as you fix the bud, so it will remain.

Recently, do-it-yourself foamiran flowers have been very popular with needlewomen. The abbreviated name is fom, this delicate material came to us from Iran. In the talented hands of the craftswoman, any detail from foamiran turns into an elegant petal or leaf, the curves of which practically do not differ from the real ones. There are many ideas for inspiration: these are decorations in the form of flowers, fridge magnets, toys, you can also use it in scrapbooking or for decorating rooms. Today, the site's editorial experts will hold several master classes and share their secrets for making elegant flowers.
The ranunculus flower is often included in large compositions, there are a lot of its varieties, as well as manufacturing options. Let's start the learning process with the simplest flower shape. For work we need:
- marshmallow foamiran;
- foil and wire;
- glue gun.
The process of making a flower is performed as follows.
| Illustration | Action Description |
 | Give shape to foamiran and thin it. To do this, put it between layers of textured paper and iron it. |
 | Cut the fom into squares, mark the future petals and give a voluminous shape. |
 | Cut out all the petals along the contour. |
 | To create the middle, take a bead or foil, give it a round shape, then wrap it with a piece of foma and fasten it to the wire. |
 | Glue the finished stamens. |
 | Glue the smallest petals together one by one. |
 | Glue all other rows in ascending order. |
 | Cut the sepals from the green foamiran. |
 | At the end of all work, pull the floral sleeve onto the wire. |

Rose from foamiran - master class
On the Internet you can find many schemes for making roses with your own hands: this is an ordinary rose, small, interior, peony, multicolor, with a transition of shades, in the form of a bud and in a bouquet group.
Templates and patterns for foamiran roses
Before you make a rose from foamiran, you need to decide on the shape of the flower and choose the right scheme.
Schemes of interior roses:

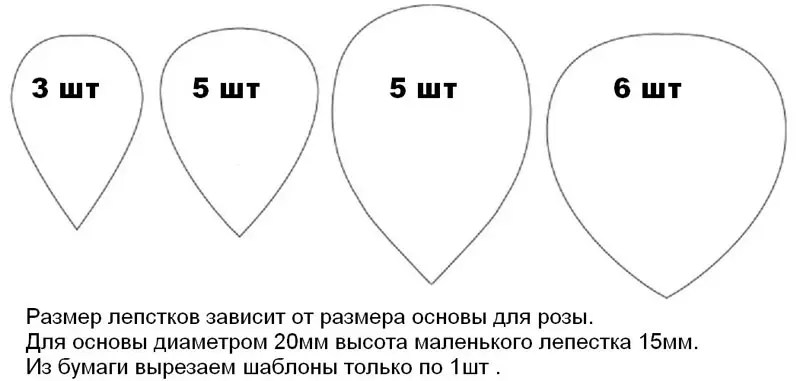
Schemes of small roses:


Large foamiran rose
To make a large foamiran rose with your own hands, you need to prepare:
- pink and green foamiran;
- glue gun.
The step-by-step process of making a flower is as follows.
- Transfer the diagram of a small rose onto cardboard, the diameter of the pattern should be 6, 7 and 9 cm. Cut out the petals.
- Heat the iron as for silk, attach each petal to the sole, then give them a slight bulge with your hands or on a blank.
- Fixing the petals starts from the smallest, then close the bud from the opposite side, then glue them on the right and left.
- Then you need to make a substrate in the form of a cinquefoil, paint it with bright green paint, make small cuts and fix it.

Small flowers roses from foamiran with their own hands
To make small roses from marshmallow foamiran, the following master class will help us. For blanks, you need to transfer the diagram to the cardboard, then cut out 2 pieces of petals of each size, 3 green leaves and 1 sepal. Iron all samples between napkins with a warm iron and give a wavy shape.
Small petals should be slightly pinched at the base. Then fold the workpiece into one leaf, slightly scrolling, stretch the edges. Glue 3 petals on the bud, the foil should be completely closed, and then fix the rest of the elements in sequence at the same distance. Finish with the sepals and leaves.

Lily from foamiran - master class
The process is carried out as follows:
- Paste the base of the bud with white foamiran, protonate it with pink pastel.
- Cut out leaves of different sizes at the rate of 2-3 pieces for each flower.
- Apply an imitation of veins on each leaf with an orange stick, stretch them along the length and glue them onto a thin wire.
- For 1 lily flower, you will need 3 small and 3 large elements. Pre-tinted at the base with a pale pink pastel and put specks with a toothpick.

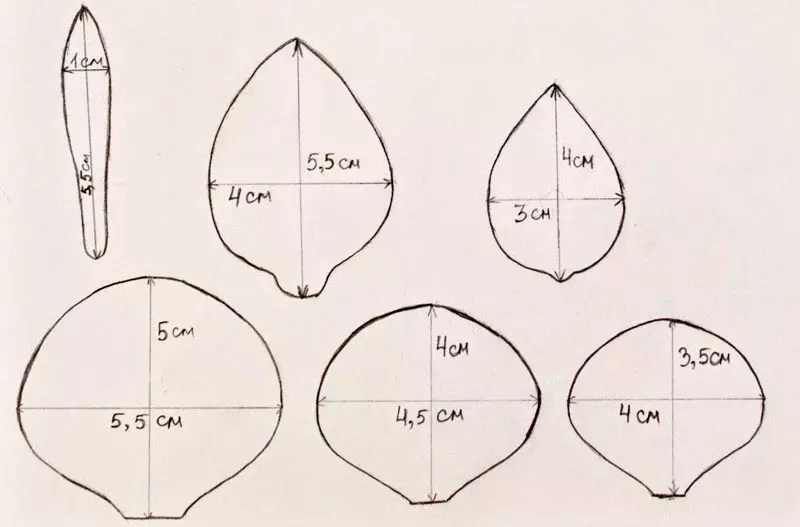
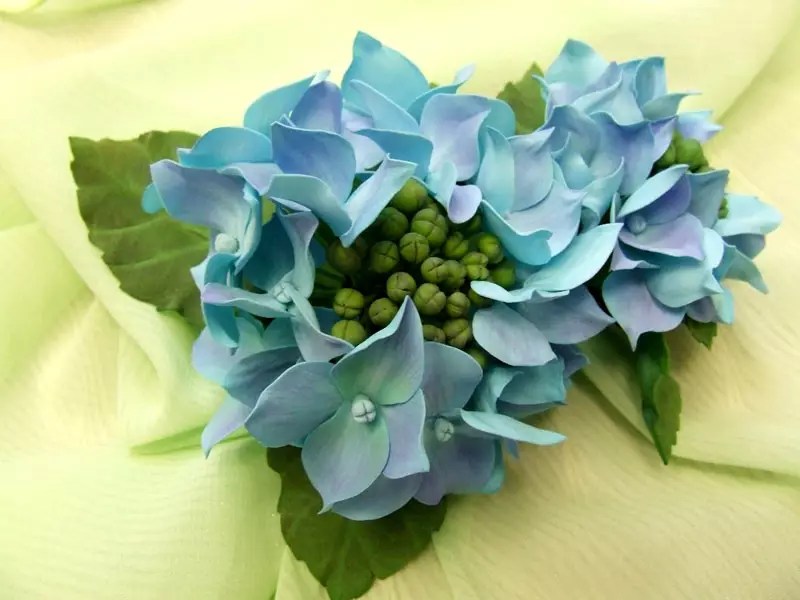
Hydrangea from foamiran - master class
To make hydrangeas, cut foamiran into strips 18 mm thick, then into rectangles 46 mm long. Next, bend the pieces in half and cut out the petals in the form of a drop, in the unfolded form, you should get the shape of a bow. Thus, prepare at least 35 blanks.
Warm up each petal on the sole of the iron, then tint from one edge with a purple pastel, and the middle with a blue tone. Everything is good to shade. Treat both sides of each element in the same way. Next, form flowers: on one flower, connect 4 stamens and secure with 2 petals. On one stalk there can be 3-4 flowers, and in hydrangea there are up to 35 inflorescences. They are assembled on a wire, which is decorated with a green ribbon.
Growth flowers from foamiran - master class
You can make large flowers from foamiran, they will become a real decoration of the interior, and the next master class will help us with this. You need to choose a pattern, circle the petals according to the template and cut them out. To shape, heat the blanks on the iron, then form bulges with your hands, and also slightly bend the edges. You can make smooth tint transitions with a pastel and draw veins with a toothpick.
You need to collect a flower on a cone-shaped middle of the foil, starting with the smallest ones. The more elements, the more magnificent and natural the finished product should turn out. Finish the composition with a green sepal.

Related article:
In the publication you will find master classes on making roses, tulips, lilies, bouquets with sweets, what materials and tools are needed, as well as recommendations from specialists.
How to make wild flowers from foamiran
Wild flowers are loved by many, they decorate compositions, they can be fixed on headbands or hairpins, and also used as room decor. For their manufacture, it is important to strictly adhere to the recommended schemes, then the appearance of the flower will be more natural.
How to make a chamomile flower - instructions for beginners
For the manufacture of field chamomile, you will need yellow and white foamiran. From the yellow we make the middle, for this you need to cut a strip of 1 × 15 cm, cut the fringe on the real side and fix everything on the wire. Cut a blank from a white foam according to the scheme, process it on an iron so that the edges rise a little. With a stick, draw two strips along the edges and fasten to the wire. Cut out a sepal from a green foma, after heating, give it a shape and glue it at the base. The wire is decorated with green ribbon, you can also fix the leaves.


Poppy flower from foamiran - a master class with a pattern
To make a poppy flower, we need:
- a bead with a diameter of 15 mm;
- wire;
- fom green and red;
- black threads;
- glue gun, scissors.
First of all, you should form a leg of wire. After that, wrap the bead with green material. Next, in the middle of the bead, you need to tie it in such a way that you get 8 segments. Then form stamens 2.5-3 cm long with threads, as shown in the diagram.
Cut out 5 poppy petals using a 60x50mm template. To give shape, it must be folded into an accordion and scrolled in different directions, slightly stretching the middle. The assembly begins with a uniform fixation of the stamens at the base of the bead, then 3 petals are glued, after which the volume is supplemented with two more. From a green foma, you need to cut out leaves about 80 mm long, fix them on the wire and decorate the leg with green tape.

How to make a peony flower from foamiran with the help of schemes and templates
To make a beautiful peony flower, you need a little more time, as the work is quite painstaking. In addition, for clarity, it is not bad to have a live sample in front of your eyes. Choose from the scheme 4-5 types of petals and cut out, the total number should be at least 40 pieces.
Form all the petals with an iron, then twist the leaf into an accordion and rub it in a spiral. The sides of some samples can be screwed back. Assembly begins immediately on the wire. The first row is made from elements of the same size; petals of a different design are taken to form each next row. The middle of the peony is filled with glue to give a bulge. At the final stage, the sepals are glued and the wire is decorated with ribbon and leaves.


Tulip flower from foamiran - step by step instructions
To make a foamiran tulip, we need:
- foamiran red and green;
- wire;
- foil;
- glue guns glue;
- pastel and acrylic paints;
- teip tape and sponge.
| Illustration | Action Description |
 | Cut out 6 petals. |
 | The base of the petals should be tinted with green pastel. |
 | By heating the petal, we give it a natural shape. |
 | Cut out the leaves according to the pattern. |
 | From the foil on the wire you need to form a bud. |
 | Decorate the wire with foma tape, then glue the teip tape. |
 | Shape the leaves. |
 | We fix the petals. |
 | At some distance from each other, you need to glue the leaves. |
This master class can be viewed on the video:
How to make an orchid flower from foamiran using patterns and patterns
To make an orchid you will need:
- foamiroan white or pink, dark for the middle and green for the leaves;
- bead, foil;
- dark pastels.
Print templates for flowers from foamiran, transfer them to the material and carefully cut them out. Toned the middle and bases of the petals with pastels and shaded. Lightly heat the blanks and give them a shape, slightly stretching along the length.
Attach the bead to the wire. Make a hole in the middle blank and string it on the wire, then attach double petals, then triple ones, securely fix the base with glue. You can make a whole scattering of flowers, in addition, to give naturalness, make aerial roots and place the entire structure in a flower pot, fixing it on foam plastic, photos in the interior will be a source of inspiration.


How to make small flowers from foamiran from the remnants of the material
After work, we have a lot of foamiran scraps left, it’s a pity to throw them away, you can make small flowers out of them. They will be a good addition to artificial compositions. For manufacturing, you need to cut out the petals, after that, slightly heating the edges on the sole of the iron, bend them, giving the shape of a cup. Then cut the wire and glue the tops of the cotton swabs to it. Put a petal circle on the wire, glue its base tightly and form a bud, if desired, it can be tinted with pastel. Next, make a flower from a stamen and two petal circles.

How to care for foamiran jewelry
A new hobby will completely fill the house, unusual objects can be used as decor, form flower arrangements or framed. But they also require careful care. In order for the products to last much longer, you need to follow a few simple rules:
- any dirt can be easily removed with a sponge, warm water and detergent;
- after washing, the product must be wiped dry and dried.
It is important! It is impossible to use abrasive powders, chlorine-containing compounds, acetone and solvents during cleaning, as objects will quickly lose their color and shape.

Conclusion
From foamiran today you can make both simple single flowers and whole compositions. After the first product, not a single needlewoman will refuse an exciting process. Despite the general schemes, in the hands of each master, all jewelry will look great, but with individual uniqueness. Which of the compositions attracted your attention, and what would you like to try to make with your own hands first of all? Share with us in the comments.


