Crochet Christmas tree diagram and description. Master class: souvenir knitted Christmas tree. Ways to decorate a cone-shaped Christmas tree: colored stripes
Little crochet Christmas tree
Materials and tools:
acrylic thread green and white
hook 1.75
pom-poms ready about 30 pieces
large bead on top
glue/hot glue gun
piece of cardboard
scissors, filler, weights

We start with green threads, we collect 200 VP. In the second loop from the hook, we begin to knit double crochets, 1 loop - 1 CCH. It turns out something like a ribbon about a centimeter wide, which will be the basis for spruce paws. And once again we knit it in the opposite direction in the following sequence:
In the 2nd loop - 5 CCH;
In the 3rd loop - 1 sc;
In the 4th loop - 5SSN;
In the 5th loop - 1SBN, etc. to the end of the chain, so wavy spruce paws grow on the base))

The second part of the Christmas tree is white, it turned out that the upper part of the Christmas tree is more “snowy” than the lower one, so I will describe how best to make the Christmas tree come out more even.

We make a chain of 200 VP, we knit it in the opposite direction with single crochets, we get a long narrow ribbon. We make 1 lifting VP and knit it again with such a sequence of loops:
1st loop - 1SBN,
2nd loop - 1 sc,
3rd loop - 1SBN,
4th loop - 1 sc,
5th loop - 3 CCH.
This sequence must be repeated 6 times, this will be the less lush top of the tree. If you knit 5 CCH each, the white will strongly crawl out from under the green.

It is better to knit the bottom of the Christmas tree when it is completely pasted on the cone, so for now it remains to tie the crown:
1st row: make an amigurumi ring, cast on 5 loops (5)
2nd row: 5 sc (5)
3rd row: 5 sc (5)
4th row: 5 sc (5)
5th row: increase in each loop (10)
6th row: (1 sc, 1p) * 5 times (15)
In the last row, we knit 5 dc in one loop, alternating such loops with sc. RLS in between can be any number you like. 
These are such long ribbons) If you are not yet very confident in knitting double crochets, then this is a great chance to practice) I have no problems with knitting these loops, but even then I watched everything - when will I knit already ?!))))
And now the "skeleton" of the Christmas tree:
We cut off a square of cardboard (I have about two-thirds of an A4 sheet), fold it into a cone and seal the seam. You can glue it with tape or glue. The cone turns out to be higher than the future Christmas tree, but it is better to cut it off at the last moment, otherwise it will be inconvenient to hold the workpiece in the process of gluing “branches” and “snow”.
First, we glue the top of the Christmas tree, then we begin to wind the green part, leaving a place for snow between the tiers. It would be more convenient to start from the bottom of the tree so that the upper tiers do not interfere, but I was afraid to miss the height.
When the greenery is attached, glue the snow in between the tiers, positioning it so that it peeks out slightly. Already in the process of gluing the snow, I thought that instead of knitting this white long thing, one could use white lace with an openwork edge, a centimeter and a half wide. But I had to postpone such an idea for later, because I definitely don’t have lace in my chest.

We knit the bottom of the Christmas tree:
The size is selected individually, depending on the diameter of the base of your Christmas tree.
1st row: make an amigurumi ring, cast on 6 loops (6)
2nd row: increase in each loop (12)
3rd row: (1 sc, 1p) * 6 times (18)
4th row: (2 sc, 1p) * 6 times (24)
5th row: (3 sc, 1p) * 6 times (30)
6th row: (4 sc, 1p) * 6 times (36)
7th row: (5 sc, 1p) * 6 times (42)
8th row: (6 sc, 1p) * 6 times (48)
We knit the last row in the same way as the last row of the crown, 5 CCH in one loop and small gaps from RLS.
I stuffed the Christmas tree with filler, and added 3 glass balls to the base as weighting agents for stability. Glue the bottom and the tree is ready.

left to decorate)
A bag of mini-pompoms, bought the day before in Needlework, came in handy for decorating the Christmas tree
White Christmas tree made of spirals

Knitting such a Christmas tree is very easy and fast.
This white beauty can decorate any interior in the New Year.
For knitting a Christmas tree for you required.
- yarn (50% wool, 50% acrylic) white leftovers;
- hook number 2;
- cardboard;
- glue.
How to knit a Christmas tree from spirals
From cardboard, cut out the base for the Christmas tree in the form of a cone.
From white yarn, knit spirals of the size you need according to the pattern and glue them to the base in tiers, starting from the bottom tier. 
Thus, you can tie a Christmas tree of any size.
The crown can be decorated with an asterisk, the Christmas tree itself with beads.
HOOKED CHRISTMAS PENDANTS
 Wonderful pendants will perfectly complement the festive composition in your home on New Year. Below, there crochet pattern for Christmas tree pendants, which you can use. You can make Christmas trees of different colors, you can even use rainbow yarn, and don't forget about accessories, ribbons, bows, beads and buttons. You can tie a lot of beautiful Christmas trees and give them to your loved ones.


Knitted Christmas trees from Annoo. Detailed master class
Cute knitted Christmas trees offered by craftswoman Annoo (annoocrochet.com) will be a wonderful gift for friends and family.
The Christmas tree is crocheted in a spiral. You can play with different threads, add a variety of decor. If you use fragrant herbs as a filler and add a few drops of essential oils of pine needles or citrus, the Christmas tree will turn into a sachet and will fill the surrounding space with New Year's aromas:


You will need
Yarn (green and brown were used for the master class); a suitable hook (for the master class, hook No. 2.5 was used); filler for soft toys; tapestry needle; colored beads with a wide hole.Step 1
Fold the thread ring, tie 6 single crochets into it (st. b / n).
Step 2
In every st. b / n tie 2 tbsp. b / n \u003d 12 tbsp. b/n.
Step 3
Knit in each loop of the previous row 1 tbsp. b / n, but knit only for the front wall of the loops! In a row of 12 st. b/n.
Step 4
Knit this row behind the back wall of the loops of the 2nd (not 3rd!) Row as follows: *st. b / n, 2 tbsp. b / n next. loop *, repeat from * to * to the end of the row = 18 tbsp. b/n.
Step 5
Knit in each loop of the previous row 1 tbsp. b / n \u003d 18 tbsp. b/n.
Step 6
Knit in each loop of the previous row 1 tbsp. b / n, but knit only for the front wall of the loops! In a row of 18 st. b/n.
Step 7
Row knit behind the back wall of the loops of the 5th (not 6th!) Row as follows: * 2 tbsp. b / n, 2 tbsp. b / n next. loop *, repeat from * to * to the end of the row = 24 tbsp. b/n.
Step 8
Knit in each loop of the previous row 1 tbsp. b / n \u003d 24 st. b/n.
Step 9
Knit in each loop of the previous row 1 tbsp. b / n, but knit only for the front wall of the loops! In a row of 24 st. b/n.
Step 10
Row knit behind the back wall of the loops of the 8th (not 9th!) Row as follows: * 3 tbsp. b / n, 2 tbsp. b / n next. loop *, repeat from * to * to the end of the row = 30 tbsp. b/n.
Step 11
Knit in each loop of the previous row 1 tbsp. b / n \u003d 30 st. b/n.
Step 12
Knit in each loop of the previous row 1 tbsp. b / n, but knit only for the front wall of the loops! In a row of 30 st. b/n.
Step 13
Row knit behind the back wall of the loops of the 11th (not 12th!) Row as follows: * 4 tbsp. b / n, 2 tbsp. b / n next. loop *, repeat from * to * to the end of the row = 36 tbsp. b/n.
Step 14
Knit in sequence. Each time, knitting a row with Art. b/n. behind the back wall, shift the double columns by one. Thus, knit to the 28th row, knitting it behind the back wall of the 26th row as follows: * 10 st. b / n, 2 tbsp. b / n next. loop *, repeat from * to * to the end of the row = 66 tbsp. b/n. Break the thread.
Step 15
Tie the bottom of the toy. To do this, make a thread loop with a brown thread and tie 6 tbsp. b/n. In the 2nd circle. R. in every st. b / n tie 2 tbsp. b / n \u003d 12 tbsp. b/n.
Step 16
Knit 3rd round. R. as follows: *2 tbsp. b / n in one loop of the previous row, then a single st. b / n *, repeat from * to * to the end of the row = 18 tbsp. b/n.
Step 17
4th circle. R.: * 2 tbsp. b / n in one loop of the previous row, then 2 single st. b / n *, repeat from * to * to the end of the row = 24 tbsp. b/n.
Step 18
5th round. R. : *2 tbsp. b / n in one loop of the previous row, then 3 single st. b / n *, repeat from * to * to the end of the row = 30 st. b/n.The size of the base can be made arbitrary: you can achieve the exact lower diameter of the main part with a base circle, you can make the base a little larger or a little smaller.

Step 19
Tie the leg of the tree. To do this, make a thread loop with a brown thread and tie 6 tbsp. b/n. Then knit the 2nd round. row, performing * single st. b / n, then 2 tbsp. b / n in one loop of the previous row * = 9 tbsp. b/n.
Step 20
Then perform an arbitrary number of circular rows, knitting according to Art. b / n in each loop of the previous row = in each row there will be 9 tbsp. b/n. Stop when the length of the leg seems sufficient. Break the thread and fasten off.
Step 21
Sew colored beads onto the main part of the Christmas tree using a tapestry needle. The location of the beads can be arbitrary.
Step 22
Sew the round base to the bottom of the toy, picking up the loops of each piece. When the base is more than half sewn on, fill the Christmas tree with filler.
You can adjust the volume of your toy by stuffing it more or less.

Having achieved the desired result, finish sewing the base.

Step 22
Stuff the leg of the tree and sew it in the center of the base.
Step 23
At the top of the Christmas tree, fasten the green thread with a connecting post and tie a chain of 20 ch. Fasten it to the loop of the base, break the thread and hide the tip.
To make a Christmas tree, we need: green yarn about 80 g (I have NAKO Bambino 50g / 130m, 25% wool, 75% acrylic); red yarn for a star; filler; hook number 3; large beads, glue.
Description of knitting Christmas tree:
With a green thread, we collect a chain of 70 air loops - v.p. (the number of loops must be a multiple of 7), we close in a ring.
1 row: Three ch. for lifting, double crochet (CCH) in each loop.

2 row: Three ch. to lift and begin to tie the CCH of the previous row, do 7 CCH, 1 ch, again 7 CCH, tying the next CCH of the previous row; a feather is obtained; then we skip 5 dc and tie the dc of the previous row - 7 dc, 1 ch, 7 dc, tying the dc of the previous row. So we continue to the end of the row, at the end of the row we make a connecting column in the ch. lifting chains; I got 10 feathers.


3-8 row: we knit similarly to 2-3 rows.
9 row: in this row we make decreases, but attention! Feathers should remain in a checkerboard pattern; in the interval where there are three feathers, I knitted CCH not in each loop, but through one, so twice. You should get 56 CCH.

10 row: we knit as the second row, the number of feathers is 8.
11.13, 15 rows: 56 CCH.
12,14,16 rows: 8 feathers.
17 row: we make decreases, do not forget about the order of the feathers. It turns out 42 CCH
18, 20, 22, 24 rows: 6 feathers.
19, 21, 23 rows: 42 dc.
25 row: we make decreases 28 CCH.
26, 28, 30, 32 rows: 4 feathers
27, 29, 31 rows: 42 dc.
33 row: we make decreases 27 CCH.
34, 36, 38, 40 rows: 3 feathers.
35, 37, 39, 41 rows: 27 CCH, we break the thread.

We decorate the Christmas tree. I glued beads to the top of each feather.

Making a star we take a red thread, we collect 5 ch, we connect it into a ring.
1 row: 10 sc knit in a ring;
2nd row: 15 sc
3rd row: 20 sc.
We knit two circles of the desired size, it all depends on the thickness of the yarn.
We divide the number of loops of the last row of the circle by five, and in these places we connect with two ch. both circles; there are five holes. Then we tie these holes, evenly decreasing to the top, so we knit 4 tops and fill them with filler.

We knit the fifth peak, gradually filling it. It turned out to be a massive star.

Sew a star to the top of the Christmas tree.
We fill the Christmas tree with synthetic winterizer, knit a circle equal to the circumference of the bottom of the Christmas tree and sew it on. Already in the process, I put a piece of cardboard so that the Christmas tree was stable.

The beautiful Christmas tree is ready to celebrate the new year. All with the upcoming!

The New Year holidays are rapidly approaching, and we are all thinking about how to decorate our home. In addition to the main "New Year's beauty", people often decorate the interior with small original Christmas trees. There are many ideas on how to DIY Christmas tree. A Christmas tree can be made of tinsel, cardboard, beads, knitted with your own hands and there are a lot of other techniques for its execution.
The photo master class will help you learn how easy and simple crochet the original Christmas tree with legs for New Year's decor of the apartment. Moreover, it is not at all necessary to have extensive knitting experience, elementary knowledge is enough.
To tie crochet herringbone You will need:
- yarn "Grass" of green color,
- white and red yarn
- hook,
- scissors,
- a piece of foam
- some wire with a diameter of 3 mm,
- a sheet of cardboard A4,
- 6 barbecue skewers
- scotch,
- stationery knife,
- hot glue gun,
- decor: ready-made or homemade eyes and nose.
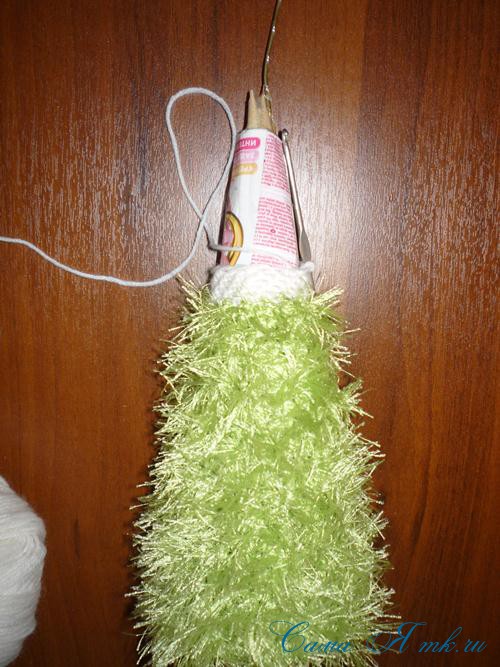
We make a cone from a sheet of cardboard. If you do not have a whole sheet of A4 format, like mine, then you can glue it with tape. The connection point is also more convenient to fix with tape.

From a piece of foam, you need to cut a small cone that would fit snugly in our large base cone.
You can use a ready-made foam cone instead of a cardboard base.


We connect 3 skewers together with hot glue. I shortened the skewers by about 5 cm.
We fix them in a cone.


Let's make a hat with a curved crown near the Christmas tree, for this, we additionally attach a wire to the center with hot glue.

I tentatively, for myself, divided the Christmas tree into 4 parts.
We will knit a Christmas tree from the bottom up.


First you need to dial a chain of air loops (Fig. 1), its length depends on the diameter of the cone. I did not close the chain in the ring, it was more convenient for me.
We begin to knit with single crochets (Fig. 2), so the knitting turns out to be denser and fluffier. You can also knit with a double crochet, it all depends on your desire.
Periodically applied to the cone, gradually reducing the number of loops.
You can stick to some kind of system, I personally reduced the loops by eye. The most important thing is that it happens evenly.

Having connected, approximately, 2/4 of the entire Christmas tree, I fixed the knitting a little with hot glue on the cone and connected the side edges by crocheting.


I left the last part on the cap, knitted several rows of white yarn, then red, to the end of the cone.

We fasten the loop so that it does not bloom.


We cut out the boots from the foam plastic with a clerical knife and tie them with yarn. We collect approximately 4-5 air loops and tie them “in a circle”, so we knit the oval sole of the boot and go up, reducing the loops if necessary.
I hope that needlewomen and knitting craftswomen will not scold me much, but in crocheting I have remained only at the initial level. 🙂
Therefore, I tied it purely intuitively, according to a foam blank.


It remains to put the Christmas tree in boots. Do not place them evenly, spread them a little, then your Christmas tree will be more stable.
I forgot to say that the legs, for greater decorativeness, can be wrapped with yarn. In my case, this was not necessary, since they are almost invisible.
Glue the eyes, nose and mouth with hot glue.

Like this tree with legs turned out!


Such cheerful Christmas tree can be placed on your New Year's table. In addition, it is completely safe, so it can be placed in the children's room. And when the holiday is over, such a Christmas tree will need very little space in a box on the mezzanine. And she will delight you again next year. This little one handmade Christmas souvenir, can also be a wonderful New Year's gift, which will undoubtedly bring joy to your family and friends.
I was glad to help!
Small crochet herringbone- A great handmade gift for your loved ones. It's nice that several of these Christmas trees can be made at once, which means that all friends and acquaintances can be gifted for the New Year. This project is quite easy to complete, and its author, the craftswoman Annoo, provided detailed instructions and even developed a master class for beginners, knitters with some experience can cope with and from the picture.
We at "Handicraft Runet" decided that such a cheerful Christmas tree is a great project to make it all together in a friendly company. We will not rush, every day a small stage of work awaits us. Our collaborative starts on Monday, November 21st and will last for a week. We invite everyone!
So, let's see what materials we need?
The remains of any yarn, preferably not very thick, in two colors. In one color, we knit the main part of the conical Christmas tree. You can choose any color, who said that the Christmas tree toy must be green? We need the second color for the bottom of the Christmas tree and the trunk. The yarn of dark shades, for example, brown, is best suited;
Beads or small beads with which we will decorate our Christmas tree;
Christmas tree filler;
Hook, the size of which is suitable for the thickness of the yarn;
Textile needle for sewing on beads.
And now let's see how to tie a Christmas tree. First, let's take a look at Annoo's blog page, where she posted a job description and crochet Christmas tree master class. English is not a hindrance to us, we will knit a Christmas tree together and consistently analyze and translate all the necessary information.
First, it is important for us to analyze the course of work itself. We start by knitting the main part of the Christmas tree in the shape of a cone. It is knitted from the top in a spiral with single crochets, alternating rows behind the front and behind the wall, so that a voluminous effect is obtained. You may need markers to help you keep track of your rows. Increases are not performed in every row in order to achieve a conical shape of the toy. Then we immediately embroider the main part of the Christmas tree with beads or beads.
Now it's the turn to tie the "bottom" of the Christmas tree and the trunk. To do this, you need to complete two details. The first part is round, we knit it from dark-colored yarn, while remembering about. The trunk is knitted with single crochets for two walls in a circle.
All three parts are ready, we just have to assemble the Christmas tree and sew a loop to it, if necessary.
Our beauty is ready!
Bonus from Annoo: crochet Christmas tree video tutorial. If something is not clear to you in its description and master class, you can always check the video:
We knit together a crochet Christmas tree toy
Attention! You can join a collaborator in our VKontakte group "New Year 2017: handmade marathon": https://vk.com/darievna2017 on topic "We knit together a Christmas tree toy according to the description from Annoo": https://vk.com/topic-132566450_34311029.
Stage 1. We knit the main part - the body of the Christmas tree

Description of work.
Attention: this piece is knitted in a spiral.
Row 1:
Row 2:
Row 3: 1 sc in each sc of the previous row FOR THE FRONT wall of the column. Check photo in Annoo master class, it's right after the line that starts with "Round 3: In Front Loop only".
Row 4: behind the BACK wall of the columns of the 2nd row (attention! not the third row, which would be simpler than simple, but the second row, otherwise the desired volumetric effect will not work) we knit single crochets in the following sequence: 1 RLS in RLS of the 2nd row, then 2 sc in the next sc of the 2nd row, alternating to the end of the row (= 18 sc). In case of difficulties, do not forget to consult the Annoo master class.
Row 5: 1 sc in each sc of the previous row (= 18 sc).
Row 6: 1 sc in each sc of the previous row FOR THE FRONT wall of the column (= 18 sc).
Row 7: for the BACK wall of the columns of the 5th row, we knit single crochets in the following sequence: (1 RLS, 1 more RLS, then 2 RLS in the next RLS of the 5th row), alternate to the end of the row (= 24 RLS).
Row 8: 1 sc in each sc of the previous row (= 24 sc).
Row 9: 1 sc in each sc of the previous row FOR THE FRONT wall of the column (= 24 sc).
Row 10: for the BACK wall of the columns of the 8th row we knit single crochets in the following sequence: (1 RLS, 1 RLS, 1 more RLS, then 2 RLS in the next RLS of the 8th row), alternate to the end of the row (= 30 RLS).
Row 11: 1 sc in each sc of the previous row (= 30 sc).
Row 12: 1 sc in each sc of the previous row FOR THE FRONT wall of the column (= 30 sc).
Row 13: for the BACK wall of the columns of the 11th row we knit single crochets in the following sequence: (4 sc in a row in each column of the 11th row for the back loop, then 2 sc in the next, fifth sc of the 11th row), alternate to the end of the row ( = 36 sc).
Row 14: 1 sc in each sc of the previous row (= 36 sc).
Row 15: 1 sc in each sc of the previous row FOR THE FRONT wall of the column (= 36 sc).
Row 16: for the BACK wall of the columns of the 14th row we knit single crochets in the following sequence: (5 sc in a row in each column of the 14th row for the back loop, then 2 sc in the next, sixth sc of the 14th row), alternate to the end of the row ( = 42 sc).
Row 17: 1 sc in each sc of the previous row (= 42 sc).
Row 18: 1 sc in each sc of the previous row FOR THE FRONT wall of the column (= 42 sc).
Row 19: for the BACK wall of the columns of the 17th row we knit single crochets in the following sequence: (6 sc in a row in each column of the 17th row for the back loop, then 2 sc in the next, seventh sc of the 17th row), alternate to the end of the row ( = 48 sc).
Row 20: 1 sc in each sc of the previous row (= 48 sc).
Row 21: 1 sc in each sc of the previous row FOR THE FRONT wall of the column (= 48 sc).
Row 22: For the BACK wall of the columns of the 20th row, we knit single crochets in the following sequence: (7 RLS in a row in each column of the 20th row for the back loop, then 2 RLS in the next, eighth RLS of the 20th row), alternate to the end of the row ( = 54 sc).
Row 23: 1 sc in each sc of the previous row (= 54 sc).
Row 24: 1 sc in each sc of the previous row FOR THE FRONT wall of the column (= 54 sc).
Row 25: for the BACK wall of the columns of the 23rd row we knit single crochets in the following sequence: (8 sc in a row in each column of the 23rd row for the back loop, then 2 sc in the next, ninth sc of the 23rd row), alternate to the end of the row ( = 60 sc).
Row 26: 1 sc in each sc of the previous row (= 60 sc).
Row 27: 1 sc in each sc of the previous row FOR THE FRONT wall of the column (= 60 sc).
Row 28: for the BACK wall of the columns of the 26th row, we knit single crochets in the following sequence: (9 sc in a row in each column of the 26th row for the back loop, then 2 sc in the next, tenth sc of the 26th row), alternate to the end of the row ( = 66 sc).
The main conical part of the Christmas tree is ready.
A small comment after the completion of the first part of the Christmas tree:
If you follow the description exactly, you will get a fairly regular cone at the body of the Christmas tree. If you want your Christmas tree to be a little elongated, as in the photo from Annoo, then the rows with increases (which are behind the back wall) need to be diluted with rows without increases (similarly, knitting columns behind the back wall). In addition, pay attention to the fact that there are more rows in the author's Christmas trees in the photo than in the description. The description of Annoo shows and tells the very principle of knitting well. You can play around with the size and shape of the tree however you like.
Stage 2. We knit the bottom of the Christmas tree
Attention: this piece is knitted in a spiral. If you have difficulty knitting this part, we recommend that you follow the link above to the Annoo blog and see photos of the bottom knitting master class.
Row 1:, then an air loop and 6 single crochet (RLS).
Row 2: we knit 2 single crochet (SC) in each column of the previous row (= 12 sc).
Row 3: 2sc in sc of the previous row, 1 sc in the next sc of the previous row, alternating to the end of the row (= 18 sc).
Row 4: sequentially in each sc of the previous row: 2 sc in one column, 1 sc, 1 sc, repeat the sequence to the end of the row (= 24 sc).
Row 5: sequentially in each sc of the previous row: 2 sc in one column, 1 sc, 1 sc, 1 sc, repeat the sequence to the end of the row (= 30 sc).
We continue to knit the bottom rows further, making increases according to the same system as in the previous rows, until we reach the desired diameter of the bottom (each row increases by 6 loops). You can make the bottom narrower than the main conical part of the Christmas tree, or you can precisely fit the diameter of the Christmas tree body, the decision is yours.
Look at the page of our collaborator in our Vkontakte group and see


