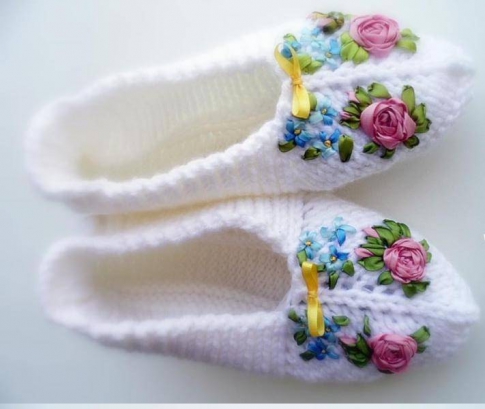
Knitting slippers on knitting needles. Knitted house slippers on two knitting needles with description and video tutorial
Agree, slippers are one of the most cozy and comfortable inventions of mankind! It’s especially nice if you made soft and warm indoor shoes with your own hands. For example, knitting slippers will take you no more than a couple of hours and will help you relax after a hard day at work.
Knitting slippers for beginners
It’s not at all necessary to look for complex patterns on the Internet to make slippers for the first time! To some extent, knitting slippers similar to knitting socks - here again you will need the size of the foot and its length in centimeters, in some cases the circumference of the ankle.
If you haven’t even learned how to knit hosiery yet, don’t worry! In Japan, there is such a variety of slippers that even someone who is just learning how to knit basic types of loops can make!
- Choose an arbitrary type of loop that is convenient for you to work with, and use it to knit a T-shaped workpiece. The product should have the following parameters: the length of the lower rectangle to the junction with the upper one should be equal to the size of your foot, and its width should be equal to the width of the foot in the most voluminous place. The upper, horizontal rectangle should have the same width, but its length should be added as follows: the length of the foot multiplied by two, plus the width.
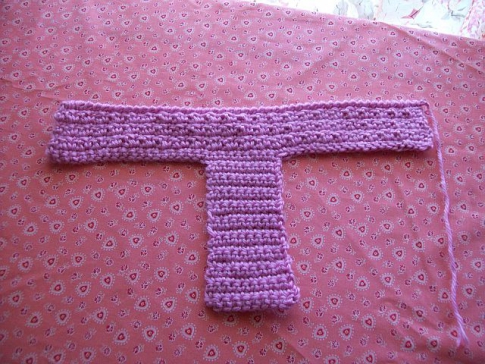
- Fold one side of the top rectangle towards the bottom so that their long and short sides touch each other.

- Similarly, connect the second side of the long rectangle to the base.
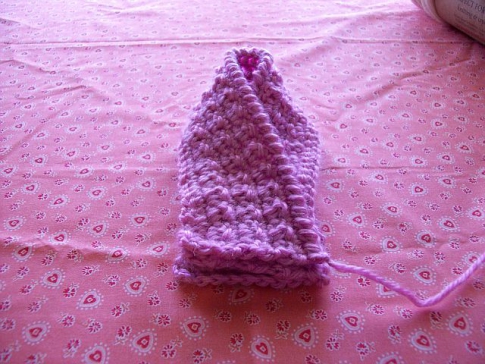
- Use a basting stitch to connect the pieces to each other in the position in which you left them. Sew along the edge using a sewing machine or using a regular needle and thread and turn inside out.
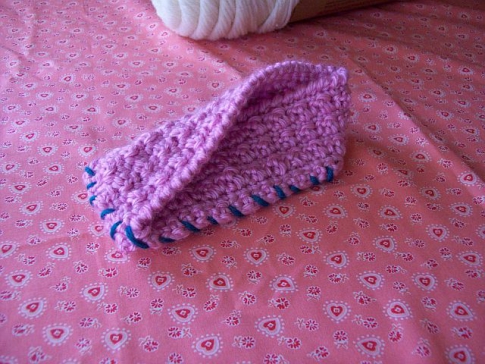
- You can skip the previous step if you know how to knit a connecting seam. Then you just need to fasten the parts this way.

Slippers were nicknamed Japanese not only because they were invented and worn with pleasure in the Land of the Rising Sun - they are a little reminiscent of the top of a wrapped kimono.
The products look cutest on the miniature feet of children up to five years old, but you can easily use this knitting of slippers for any foot size, insulating the whole family in one fell swoop!
To decorate slippers, you can use several different types of knitting - for example, knit the middle rows in a horizontal rectangle with a pigtail. This way you can create an interesting design for the side part of the work.
Step-by-step patterns for knitting slippers
If you liked the previous version of working on house shoes, this master class will definitely not leave you indifferent! The principle of operation is similar - you will need to knit a solid fabric of a certain shape, and then simply sew its individual parts together, forming slippers.
The beauty is that the shoe blank has a very interesting initial shape, when folded you will get an original warm product exactly for your foot.
This master class shows how to knit slippers on two knitting needles for size thirty-seven - if your leg is smaller or larger than this number, calculate the amount of yarn and elements in the rows that suits you.
- Knit the fabric in the same shape and size as shown in the image. Take the following figures as the basis for the calculations: knitting in the lesson was done with regular yarn 250 m/100 g, consisting of wool and acrylic in a one-to-one ratio. A distance of seven and a half centimeters equals approximately seventeen loops.
- Using the symbols of the diagram, fold the required sides of the workpiece with each other - the dotted lines indicate the place of the fold, the arrows indicate the sides that need to be connected.
- Perform connecting knitting in a “crawfish step” - a line with strokes indicates the places that need to be sewn together.
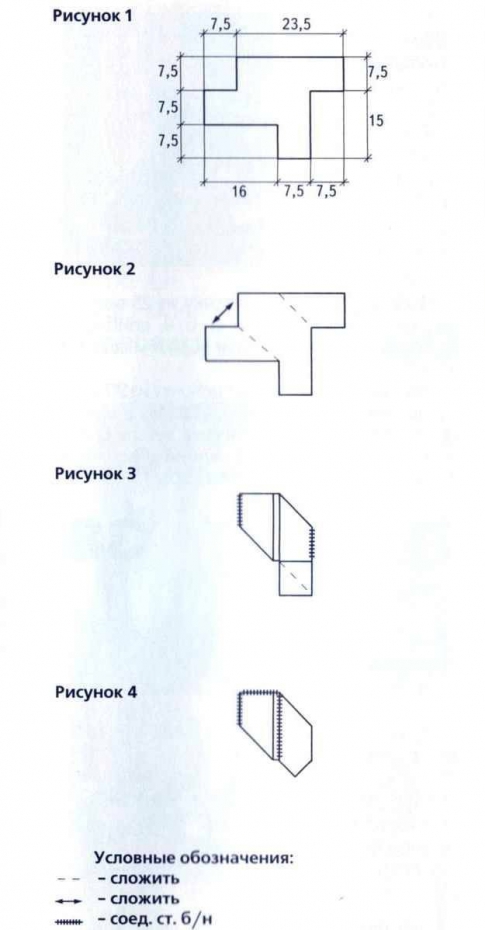
To decorate the products, the connecting seam can be made in a yarn color contrasting with the body of the slippers. Thanks to the simplicity of execution knitting slippers You can practice this way with small children - they will love watching how the intricate figure gradually turns into a cute pair of house shoes that they will definitely want to wear.
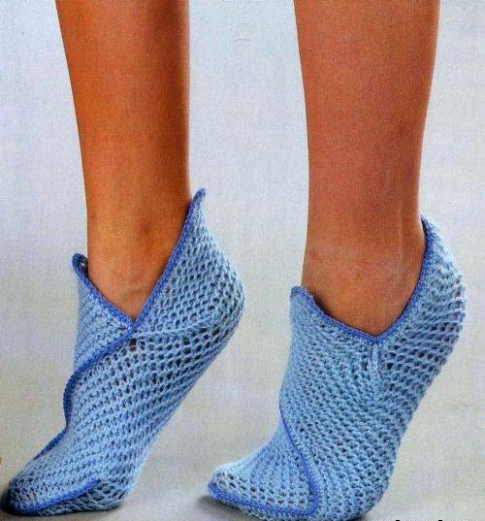
How to knit footprints with knitting needles?
Slippers are interesting products that can be considered something between slippers and socks. The fact is that slippers most often have hard soles, and footprints are more like tight low ankle socks with an open top.
Many people prefer the footprints of standard house shoes due to their softness and warmth. Knitting slippers can be done in just a couple of hours, and in one evening you can prepare a pleasant surprise for yourself or a nice gift for your loved ones. The products from the lesson are suitable for those with feet sizes 37-39.

- Cast on forty-one stitches on the needles.
- You need to start knitting like this: make twenty knit stitches, mark the middle one with yarn overs on both sides, finish the remaining twenty loops with knit stitch.
- Remember that all odd rows must be knitted purlwise.
- The third row should be done like this: knit twenty, yo, knit one, yo, knit one, yo, knit one, yo, knit twenty. That is, you need to add a loop.
- In all the following purl rows, the yarn overs must be knitted at the back walls before and after with twenty knit stitches to obtain an openwork pattern with slits.
- In the fifth row, knit twenty, secure with a yarn over, knit two, yarn over, knit one, yarn over. Knit two, yarn over, knit twenty. In subsequent rows, you will need to add one more loop in this way, forming three knit loops instead of two in the seventh row, and four in the ninth.
The more additions you make, the longer the toe will be. After knitting it, you need to move on to creating the soles of the slippers.
- Work six rows in garter stitch without adding elements.
- Knit only the middle nine to ten stitches, gradually decreasing them until you only have nine to ten stitches left on your knitting needles.
- Pick up the loops from the sides of the slippers. Start knitting, removing stitches again until you have about a dozen left.
- When you've completed the side stitches and you have about ten stitches left, simply cast them off.
Your tracks are ready! Depending on what color of yarn you chose, the product can be left in this form. If desired, decorate the front or sides of the slippers with ribbon embroidery, cross stitch or beads.
A simple video tutorial will help you thoroughly understand what knitting slippers is and how to do it.
Beautiful and cute house slippers will decorate any home. Meanwhile, you can make such a beauty yourself. All you need to create your own little masterpiece is thread and a hook (or knitting needles). In addition, a person must know the rules of crochet for beginners. To do it yourself, use very dense threads.
Some stores even have an indication on the skeins that they are used for knitting slippers. For a novice needlewoman who is puzzled by the question of how, it is best to get comfortable with a specific example.
Beautiful and interesting slippers will fit perfectly on your feet and please the eye. However, initially the leg is measured in height and width, and a pattern is made based on the measurements. To understand how to calculate a pattern and make it, pay attention to the photo below.
Slipper pattern
Let’s say a person makes slippers as a gift, and he cannot try on the recipient’s feet, then a sign will help.
 size table
Crocheting slippers yourself is easy; even inexperienced craftswomen can usually do it. When all the necessary preparations are made and selected, we begin to make the slipper.
- First we do the heel. We cast on loops in the quantity required.
- We look at the patterns to clarify their number and density.
- After this we crochet single crochets.
- Add one stitch on each side until you complete the heel.
- Next, we will make the fabric to the middle of the foot and again add one loop from the beginning, and then at the end of the row.
- We knit our fabric to the end of the little finger.
- After we do this, we decrease on both sides evenly by about 3 or four loops.
Now we will step by step create the upper part of the slippers.
- We make it from the bottom up, making decreases.
- We cast on as many loops as necessary.
- We knit single crochets, and in the middle we decrease every 3 rows.
- We continue our knitting until we reach the height we need.
- All that remains is to assemble the product. We connect the sole and the upper part.
- And along the edges we knit connecting posts.
- When we have made the slippers, we knit a second one.
- If this is your first time crocheting slippers with your own hands, you can first use one color. But then you can make multi-colored ones - from two or 3 tones.
- At the end of knitting, we decorate our slippers with pom-poms or.
These are the cute slippers you should get:

Slipper squares are used as part of the motif. You can make other things with the same squares - for example, a scarf, and more. Now let's move on to the example for slippers.
 DIY square slippers
Don't forget about the pattern for the slippers - you definitely need to make it. Then we knit motifs, while choosing simple patterns for knitting slippers for beginners, or you can use the one presented below.

Knitting pattern for slippers
This knitting square is called a grandmother's square. To create it, create a chain of 4 loops and make a circle. The beginning of the row consists of three lifting loops, and at the end there is always a connecting post. Further, at the beginning it is knitted less than in the next arc.
Perhaps you don’t quite understand how to crochet slippers with squares like these. Knitters with extensive experience advise trying to make 1 square for a sample. Then it will be easier for you to navigate.
- The first row consists of 11 double crochets, which are tied into a ring.
- In the second row, two double crochets are knitted into each previous column. These two columns are connected to the following air loops (one piece).
- The third row is done this way. In the previous row there were air loops. From these, 3 double crochets are made, which are connected to the next three double crochets with air loops - once 3 pieces, and 2 times one at a time.
- We make the 4th row. Our instructions will help you. We knit 3 chain crochets from the third row like this: two double crochets, then 1 chain crochet, then one double crochet, again one chain crochet, and finish with two double crochets. These arcs are connected by 1 air loop. An arc was made from one air loop. We knit three columns from it and connect them to the next ones with 1 air loop.
- The fifth row will be our last. In an arc consisting of two air loops, you need to knit 3 double crochets, connect 1 time with 3 air loops. The second time we connect one air loop with the column that comes next. In an arc consisting of one air loop, we knit 3 double crochets. We connect with the next 1 air loops.
This pattern for crocheting slippers for beginners helps to create a plain square or multi-colored ones. Combine slippers as follows: using connecting posts. Combine 4 squares to create one large square, which I unfold into a diamond shape. Another similar one is applied to the edge of the lower corner, sewn together, and the heel is sewn to the sole.
Then the side triangle and heels are divided into three parts. We sew all adjacent parts together. When our slippers are ready, we tie them on top with half-columns in the amount of 1 row.
To sew such slippers without a single seam, we first knit the sole according to the pattern, which can be seen below. And our master class and sewing will come to your aid.

Seamless slippers
We cast on 23 air loops, in each row there are 3 air loops at the beginning. They are needed to raise the row, so they are left.
Knitting pattern without seam slippers for beginners:

Knitting pattern for seamless slippers
- 1 row. We knit two double crochets, then one double crochet. Having reached the end of the chain, we knit 4 columns into the last loop. We knit a circle on the other side of the chain - 1 half-dc in each loop, then you need to knit three double crochets into the very first loop.
- 2nd row. 3 lifting loop - to create 3 double crochets. Then in a circle we knit 15 double crochets in each loop, another 20 half double crochets, then 14 double crochets, and two double crochets between the loops.
Now we need to fabricate up. We pull out 3 air loops from the heel half column. We break the thread. We knit the first row with double crochets in the amount of 56 pieces. The second row is like this: first there are three double crochets and two columns made from one loop, 5 columns and 2 more also from one loop. Next 12 columns.
We skip one loop, make a rapport: two double crochets from 2 knitted together, two loops together with a double crochet, knit two loops together, from them we make a double crochet. Then we make 2 loops together with one column and two more columns, make a report, and knit 10 double crochets.
The third column consists of 26 double crochets, with two double crochets, then one double crochet. repeat 5 times and end with 10 double crochets.
The fourth row is almost like 3, only there are 25 columns. Similarly, 2 columns from one loop and two double crochets. Continue 6 times, then make 8 double crochets.
And finally, the fifth row, consisting of columns with a crochet, which is used to tie the slippers.
We hope you understand how to crochet slippers without a seam with your own hands. To decorate the edge of the sole, we use a step step, and then we create a second slipper. Our beautiful beginner slippers can be further decorated with embroidery or beads.
There are a lot of different models that you can make yourself using a hook and thread: flip-flops, shoes, sneakers, in the form of some toys. To make such a pleasant surprise yourself, you just need patience, imagination and a little free time. You can also additionally watch video instructions for children's slippers and products with soles:
On two knitting needles, their types, knitting methods, manufacturing features, we will reveal the secrets of knitting slippers from experienced craftswomen.
What are slippers?
Classic slippers look like short socks; only the feet, heels and toes are covered. This type of indoor footwear is very popular, but despite this, slippers that are suitable in size, appearance, and color are difficult to find in the store. But if you have basic knitting skills, it won’t be difficult to make your own slippers with 2 knitting needles. The description is not difficult to understand.
Bound ones will be your best friend on cold winter evenings. They will warm your cold feet. Footprints made from thin, lightweight thread will allow your feet to “breathe” in the summer. Some women accept them not only as indoor shoes, but also as a beach option. Knit yourself slippers on 2 knitting needles. Even a beginner can handle the description of knitting summer slippers.

Features of knitting slippers
An excellent way to recycle the remains of different threads would be on 2 knitting needles. To make soft and cozy prints, you don’t need a lot of experience as a knitter.

There is a general scheme for the procedure for knitting slippers on knitting needles:
- using wool yarn, cast on 43-47 stitches on knitting needles, knit four stripes with granny stitches - this is the edge of the product;
- divide the loops on the knitting needles equally, highlight the middle loop;
- knit the main part of the slipper, yarn over in front of the selected loop, knit it, yarn over again. When making slippers on 2 knitting needles in this way, it is not necessary to consult the description; you need to knit rows and periodically try them on on your feet.
- After completing the main part, start knitting the sole.

Secrets from the masters
The fabric of the product can be knitted from individual motifs, but for beginners in needlework it is better to get their hands on it by making one-piece knitted slippers-footprints on 2 knitting needles. It is better to familiarize yourself with the description of the stages of work in advance.
- You can decorate the tracks with decorative elements - flowers, rhinestones, ties, bows.
- To become fashionable, you need to lengthen the slippers with an openwork top.
- Experienced needlewomen recommend decorating the slippers with a knitted ribbon, which is made after knitting the sides, wraps around the ankle and is secured at the instep.
Slippers-sneakers with 2 knitting needles with description
It is quite difficult to knit them on two knitting needles, so let’s consider the manufacturing process on five.
- 150 g of thread.
- Stocking needles No. 3.
- Stocking needles No. 3.5.

The process of knitting sneakers
To make cuffs, cast on 56 stitches on a pair of needles number 3, dividing them into 4 needles (14 pieces each).
Tie ten ring rows with an elastic band 1 * 1.
There should be a strip of 4 stitches on the back half of the cuff and a strip of 2 stitches on the front of the cuff.
For the next 12 ring rows, continue knitting the front as before, and behind make 2 vertical stripes from purl stitches.
Heel execution.
Make one circular row, then change the threads from the first knitting needle to the fourth, then use only them. Turn the product over, in each row transfer the starting thread to another needle without knitting, perform 28 rows with granny loops, making vertical columns through the heel.
Heel turn.
- transition thread, 9 knit stitches on the left, decrease the loop to the left, turn the product over;
- transition thread, 9 knit stitches on the left, knit 2 purl threads at the same time, turn the work over;
- transition thread, 9 knit stitches on the left, decrease to the left, unfold the product;
Continue knitting in this way until there are 12 stitches left in the work. Then make a circular row on these loops.
Using an empty knitting needle, cast on 15 stitches on the heel side and knit them.
Divide 12 heel stitches into two equal parts, distribute them on 4 and 1 knitting needles.
Knit with knit stitches on needles 1 and 4, and on needles 2 and 3 with an elastic band 1 * 1.
Decreases to form the toe are made at the end of 1 knitting needle and at the beginning of 4, in each row, until there are 14 loops left on each knitting needle.
Knitting a toe.
Decrease every other round until there are 8 stitches left on each needle. Then decrease the loops in each circular row. When there are 2 loops on the knitting needles, cut the thread and tighten.

Making straps for laces
Make strips in the upper half of the sock. To do this, pick up every second loop along the edge of the beginning of the elastic from the cuff to the toe.
Knit 4 rows with knit stitches.
Make a row for the holes: knit 2 knit stitches at the same time, yarn over, 2 knit stitches.
Additionally knit one purl row. Fasten the loops.
Making the soles of sneakers
- Throw 7 loop-shaped threads onto 3.5 knitting needles.
- 8 facial.
- Transition thread, 2 knit stitches, make 1 yarn over, 2 knit loops, make 1 yarn over, 3 knit stitches. At the end of the row there will be 10 stitches in the product.
- Grandma's loop.
- Grandma's loop.
- Transition loop, knit 2, make 1 yarn over, knit 4 loops, make 1 yarn over, 3 knit stitches. At the end of the row there will be 12 stitches on the needles.
- From 6 to 18 rows knit with facial loops.
- Transition thread, 3 knit loops, make 1 yarn over, 4 knit loops, make 1 yarn over, 4 knit loops. At the end of the row there will be 14 stitches on the knitting needles.
- From 20 to 33 rows knit with facial loops.
- Transition loop, 3 knit stitches, make 1 yarn over, 6 knit stitches, make 1 yarn over, 4 knit stitches. Upon completion of the row, the product will have 16 loops.
- Rows 35 to 48 are knitted with knit stitches.
- 1 transition thread, 3 knit stitches, make 1 yarn over, knit 8. loops, make 1 yarn over, 4 knit stitches. At the end of the row there will be 18 stitches in the work.
- From 50 to 60 rub. knit with stockinette stitch.
- 1 transition loop, 3 knit stitches, make 1 yarn over, 10 knit loops, 1 yarn over, 4 knit stitches. When the row ends there will be 20 stitches in the work.
- From 62 to 84 rows knit with facial loops.
- Transition loop, knit 2 loops at a time, 14 knit loops, knit 2 knit loops at a time, 1 knit loop. At the end of the row there will be 18 stitches on the needles.
- Grandma's loops.
- Grandma's loops.
- Transition thread, knit 2 loops at a time, knit 12 loops, knit 2 loops at a time, knit 1. At the end of the row, there will be 16 stitches left on the needles.
- Grandma's loops.
- Grandmother's knitting.
- Transition thread, knit 2 loops at the same time, 10 knit stitches, knit 2 loops at the same time, 1 knit thread. At the end of the row, there will be 14 stitches left in the product.
- Grandma's loops.
- Grandma's loops.
- Transition thread, knit 2 loops at a time, 8 knit stitches, knit 2 loops at a time, 1 knit thread. At the end of the row, there will be 12 stitches left in the work.
- Face loops.
- Face loops.
- Transition thread, knit 2 loops at a time, 6 knit stitches, knit 2 loops at the same time, 1 knit loop. When the row ends, there will be 10 stitches on the needles.
- Face loops.
- Close the working threads of the product.
Sew the parts, secure the threads. Sneakers-slippers are ready.
"Lazy" slippers on 2 knitting needles with description
The main advantage of “lazy” slippers is that they are made in pairs at once. You will need two balls of thread and knitting needles. Very easy to make with 2 knitting needles. Let's look at the description.

Throw on 27 loops from the first ball and 27 loops from the second.
K8, p1, k9, p1, k8.
Do the same with the second set of loops.
Face loops.
Up to 23 is the same as row 2.
Shaping socks.
1 knit stitch, 1 purl stitch - repeat 13 times.
Up to the 12th row, knit as the 4th row.
In rows 12 and 13, 27 loops are reduced to 8 in two stages: every 2 loops are knitted together. After completing the 12th row, 14 loops will remain, after completing the 13th row, 8 loops will remain.
Now you need to assemble the slippers. Pull yarn through the last 8 stitches and pull tight. Sew the edges of the product. Lastly, sew the seam that will bring the heel together.
So the slippers on 2 knitting needles are ready. You probably didn’t have any difficulties with the description. To completely match your product with the original, you will need to gain a little patience and experience. Mastery comes with practice. A very exciting activity is knitting slippers on 2 knitting needles. With the passage of time you will not have any problems with the description.
Knitted slippers retain heat well and will be an excellent addition to your home clothes during the cold season. You can easily make them yourself. This work will not take much of your time and effort. Such simple slippers can be worn on your loved ones for any holiday, for example, for the New Year. Seeing the smile on their faces will make you want to give such gifts again and again.
In this article you will be presented with slippers knitted yourself on two knitting needles, and we will analyze them with diagrams and descriptions. This technique is not difficult to master, so you just need a little patience and perseverance.
Knitting slippers on two knitting needles for beginners with patterns and descriptions
Let's look at this technique with an example. Any girl or woman wouldn’t mind trying on these cute slippers.
We will knit on two needles No. 4, starting from the sole.
The diagram is presented for a foot size of 23 cm along the length of the insole.
Knitting density: 20 loops per 20 rows.
We start with the sole. We cast on 26 loops.
1st row: knit all the loops, adding one loop at the beginning and at the end. There are 28 loops in total.
2nd row: knit with facial loops.
Rows 3-16: repeat rows 1 and 2 (42 stitches).
Row 17: knit with knit stitches, adding 2 knit stitches at the beginning and at the end. There are 40 loops in total.
Row 18: knit with knit stitches.
Rows 19-32: repeat rows 17 – 18 (26 loops). 
Let's move on to the top.
Row 33: cast on 8 stitches (for the heel) and knit (34 stitches).
Row 34: knit with knit stitches, add one loop at the end. There are 35 loops in total.
Row 35: knit with knit stitches.
Rows 36-48: repeat rows 34-35 (42 stitches).
Row 49: close with 24 stitches, end the row with knit stitches (18 stitches).
Row 50: knit with knit stitches.
Row 51: knit with purl stitches.
Rows 52-56: repeat rows 50-51 (18 stitches).
Row 57: cast on 24 stitches and knit. There are 42 loops in total.
Row 58: knit with knit stitches, at the end we knit 2 loops together. There are 41 loops in total.
Row 59: knit with knit stitches.
Rows 60-73: repeat rows 58-59 (34 stitches).
After this, close all the loops, leaving a long thread.
 That's all, all that remains is to sew and your slippers will be ready. Decorate them to your taste, for example, with crocheted flowers.
We present to your attention another diagram that describes in detail how to knit slippers on two knitting needles:
The second version of an interesting DIY product
A very simple pattern for knitting such cute tracks:

It is best to use a medium thick wool buckle.
We cast on 30 loops.
Rows 1-6: knit with knit stitches.
Rows 7-22: knit stitch (we knit odd rows with knit stitches, even rows with purl stitches).
Rows 23-41: knit the heel. Knit 19 stitches, knit 20 and 21 together, turn the work over. We knit 9 purl stitches, and purl 10 and 11 together, turn them over again, knit 9 knit stitches, 10 and 11 knit stitches together. We continue this way, alternating rows 24 and 25, until there are 10 loops left on the knitting needle.
Row 42: cast on 10 loops from the braids on the side of the heel, turn the work.
Row 43: knit 10 stitches, then cast on 10 more stitches from the other side of the heel. Total 30.
Rows 44-74: knit in stockinette stitch.
Row 75: we begin controls (knit 7, knit 3 together, knit 10, knit 3 together, knit 7).
Row 76: knit with purl stitches.
Row 77: knit 6, knit 3 together, knit 8, knit 3 together, knit 6.
Row 78: purl stitches.
Row 79: knit 5, knit 3 together, knit 6, knit 3 together, knit 5.
Row 80: purl stitches.
81 rows: knit 4, knit 3 together, knit 4, knit 3 together, knit 4.
Row 82: purl loops.
Row 83: knit 3, knit 3 together, knit 2 together, knit 3 together, knit 3.
Row 84: purl 9 and knit the 10th from a braid (in total we cast on 18 loops from braids on each side).
Row 85: knit 4, knit 3 together, knit 3 and 4th from the braid.
Row 86: knit similarly to row 84.
Row 87: similar to row 85.
Repeat rows 84 and 85 until all the braid loops are closed. Cast off the remaining 9 loops.
Video on the topic of the article for beginners
For a visual representation of the knitting process, it is best to watch a video. You can knit right away together with the master.
Slippers
Slippers with 2 spokes
The simplest traces
Footprints on 2 knitting needles
Two-color footprints
At home, a person wants to feel comfortable and cozy. Particular importance is attached to slippers. They create that very homely environment. Knitting slippers is an easy way to create your favorite handmade item, which will allow you to feel the unique comfort of your home. Knit slippers for yourself, men's, children's, by following our detailed step-by-step instructions and following all the recommendations provided.
We prepare materials and tools
To knit slippers you will need knitting needles. Their thickness depends on the type of knitting chosen. For lace slippers, thick knitting needles are suitable, but dense and durable heels need to be knitted on thin knitting needles.
We carefully select the yarn. It should be durable, not wear out, not fade and be pleasant to the touch. To knit children's slippers, you need to pay attention to the slipperiness of the finished product. Threads with the addition of synthetics are suitable. Clean wool will be prickly and slippery. The knitting needles can be on a fishing line or straight. The article will also discuss how to knit slippers on five knitting needles.
You will also need a measuring tape, a hook, and a gypsy needle. For the insole - thick fabric, or better yet - felt or leather.
Determining the size of the product
The choice of children's or adult size depends on how the slippers are knitted. Footprints are measured exactly the same as socks. In this case, you can use the standard pattern for determining loops for knitting socks.
In other cases, when thick soles are used or slippers are knitted using a different method, the size is determined depending on the size of the shoe. You can measure your ankle circumference and instep height. Add these two numbers and divide by two. The number of loops is calculated depending on the knitting density, which is determined from the sample.
Knitting slippers using knitting needles: step-by-step master class with photos
The easiest way to knit indoor slippers is on the base. The best option for the base would be a felt insole. You can trace the foot on paper and cut out two soles using the resulting pattern. Please note that they must be symmetrical. We put the finished insoles aside and begin knitting slippers using knitting needles, following a simple step-by-step pattern:
- To create slippers for foot size 36, cast on 42 stitches on two knitting needles. We knit 1.5-2 centimeters in garter or stockinette stitch.
- We divide the loops into 4 parts: we leave the outer quarters on the knitting needle, and continue knitting the middle, that is, 20 loops.
- We continue knitting only in the middle. You can change the thread or choose a pattern. We knit until the length of the product reaches the end of the little finger.
- If you used a different thread, break the end. We continue knitting with the same thread we started. Cast on 25 stitches along the resulting rectangle.
- We form the toe. We knit unfinished rows until four loops remain. We continue knitting, picking up loops along the edge on the second side of the rectangle.
- We knit 6-8 rows with the selected stitch to create the height of the future product.
- You can do this. But, before closing the loops, try the workpiece on your foot to see if the knitted fabric covers your foot. If not, knit a few more rows.
Having closed all the loops, you can start assembling the slippers. To do this, using a gypsy needle and thick thread, we sew the knitted fabric to the insole. At the same time, sew up the seam on the heel. So, using the correct knitting technology, you will knit comfortable and warm slippers in a short period of time.

Footprint slippers with embroidery
There is another way to create slippers. In this case, a seamless sock knitting technique is used, but without elastic. To do this, follow the description:

- It is necessary to cast on the required number of loops for quick knitting of slippers (depending on the calculation according to the table).
- We knit 2-3 rows in satin stitch and start. We put two knitting needles aside and continue working on the other two. We knit the height of the heel.
- We begin to knit two loops together on each side to create a heel wedge.
- Once all the side loops are closed, make a set of edge loops and continue knitting in the round.
- To form the desired size, we make removals in even rows on the 1st and 3rd knitting needles.
- We tie it to the required length - the product should cover the little finger or reach the bone of the thumb.
- Cast off 2 stitches in even rows on the 1st and 3rd needles until the number of stitches is halved. We continue to decrease in both even and odd rows. We tighten the remaining four loops with thread.
- The finished slippers are decorated. You can use floss or multi-colored yarn. It is easier to do this using a gypsy needle. The choice of pattern depends on your desire.
Advice: do not place the embroidery so that the threads are in the area of contact of the trace with the floor, that is, on the sole or side parts.
This technique will be especially familiar to those who have already knitted socks. But even for beginner knitters, creating tracks will not be difficult. If you have any questions about this technique, you can find answers to them in the video tutorial we offer.
Children's slippers or a flight of fancy
Knitting children's slippers is a separate topic that requires not only developed imagination, but also great skill. You can knit the footprints and simply decorate them with embroidery, patterns and appliqués. If the skill allows, then the mother will have a great idea - to knit slippers for the baby in the form of animal faces or any other shape. A baby can even sleep in slippers made of fine openwork knitting.

When choosing a model, consider your child's tastes. For a boy, an unusual and beautiful knit in the shape of a tank slipper.

A cool idea for baby shoes for a girl in the form of animals - a hedgehog, a dog or tiger paws. If a girl goes to dances, then knitting Czech shoes will be an excellent and stylish solution. So that your child has an unusual pair of shoes for school, take the trouble to weave ballet flats for him. The technique for making such shoes is more difficult, but after several training sessions you will be able to knit such a product. A great New Year's gift idea for a child is hand-knitted slippers in the shape of a Christmas tree.

But still, the most exciting activity for you will be knitting slippers for babies. These are unique models that seem complex only at first glance. To create them, you can use the master class described above, which will help you a lot.

Decorate your slippers with whatever you like. The simplest method is thread embroidery, described above. Models with appliqué look great. You can make a voluminous applique and create interesting faces or flowers.
Skilled craftswomen decorate slippers knitted with lace patterns, rhinestones, beads and stones. They can be located along the edge of the product or on its upper part. Thanks to these methods, you can make elegant slippers, even with a minimum of skill.
Slippers knitted using a complex pattern look especially attractive. No less interesting are the multi-colored models.

Advice from professionals
- When knitting slippers, use dense threads that cannot be separated into individual fibers.
- In the area of the toe and heel of the footprint, you can strengthen the wedges by adding a second synthetic thread.
- Don't leave the tracks free. Being short in length, they will fall off your feet. To prevent this, you need to knit a couple of rows with a thick elastic band and only then continue knitting according to the pattern.
- For embroidery, use threads that do not fade. Take the time to wash a piece of thread in advance and rub it on a white cloth. If there are no traces left, feel free to use embroidery threads. The same applies to applications. The fabric should not fade, otherwise your slippers will not be so attractive after washing.
- The most practical are slippers with soles. For winter evenings, you can knit footprints or slippers using the sock technique, and reinforce the finished product with an insole sewn on top of the knitted fabric. These slippers will last you a long time. They are especially suitable for men and children. In the latter case, try to use a non-slip cloth. The ideal option would be leather or rubber soles.
If the step-by-step master class is too complicated for you, we suggest you try to learn how to knit slippers by following the instructions in the video tutorial. You can watch the video to the end, stop it at any convenient place, and watch it again and again if necessary. We are sure that thanks to the video you will be able to learn a new hobby, and also create any kind of house slippers not only for yourself, but also for all your loved ones.


