Do-it-yourself sketches of postcards for the new year. Do-it-yourself New Year's cards from paper and cardboard (templates for children inside). Original postcard "snowflakes in a frame"
A children's New Year's card is a pleasant, cute, memorable gift for each of the relatives (grandparents, aunts, etc.). Don't waste time. Create holiday souvenirs with your kids. Any creative process that a baby is engaged in in a kindergarten or at home brings positive results in development. A self-made gift gives the baby self-confidence and pride in the work done.
Card Ideas for Kids
Children's New Year's can be made in the form of objects of different shapes. The options are:
- Traditional geometric (square, rectangle, circle).
- Christmas tree or triangle stylized as it.
- Christmas tree decoration.
- Snowman.
- Father Frost.
- Snowflake.
These are the most commonly used types. All complex objects, of course, are simplified.
Techniques
Do-it-yourself children's New Year's card can be made using different techniques. The most popular and interesting are:
- Application from paper, cardboard, fabric and other materials.
- Quilling.
- Origami.
When creating their congratulatory souvenirs, some copy the template they like, and many like to create their own exclusive options based on what they see.
Craft "New Year's card in kindergarten"
Corrugated paper is very interesting and easy to process. It is sold in a wide range. There is even a metallic one with decorative effects. Use it to make a New Year's card. The central element will be a tree.

The execution sequence is as follows:
- Take a sheet of thick paper or cardboard (white, colored, one-sided or two-sided). Fold the blank in half so that the decorative side is the front for the postcard.
- Draw a Christmas tree on the cover in the form of a triangle or simply mark the boundaries of the future object.
- Cut green crepe paper into rectangles. For one postcard, you can take 2-3 parts. Of these, the tiers of the Christmas tree will be performed. The height of the workpiece should correspond to the tier, and the length should be longer, since the rectangle will fold like an accordion.
- Fold each rectangle, making neat equal or different folds in width. Corrugated paper allows you to form the volume of the element, slightly arching the material.
- Glue the blanks to predetermined places. You can apply glue only to the top of the elements so that the tiers of the Christmas tree look more voluminous.
So, you have learned how to make a children's Christmas card with a Christmas tree. If time permits, you can invite the guys to decorate the resulting Christmas trees.

You can do it like this:
- Kids can glue the finished circles on the base.
- It will not be difficult for older children to cut out decor from colored paper on their own.
- As an option, offer to twist
- The big guys will be able to glue beads, stars and other small elements.
New Year's cards in kindergarten (senior group)
The craft will be made in the form of a paper Christmas tree, folded from a colored sheet and decorated with small details. You will need the following to complete:
- Green colored paper (preferably two-sided).
- Christmas tree stencil.
- Pencil.
- Scissors.
- Colored decorations.
- Glue.

The work will go like this:
- Take a sheet of paper and place a stencil on it.
- Trace around with a pencil.
- Cut out the piece with scissors.
- If the paper or cardboard was prepared one-sided, place the Christmas tree in front of you so that the green part becomes the front for the postcard, and the white part is inside.
- Draw guides along the ruler for future fold lines.
- If the cardboard is thick, it is better to first draw along these lines with the edge of the back of the pencil, the corner of the ruler or the pointed tip of the scissors. This will help to neatly and evenly complete the fold line.
- Bend the workpiece along the prepared lines.
- Start decorating the surface of the Christmas tree. For convenience, lay out the template again on a plane. At the same time, the fold lines will be clearly visible, the child will no longer stick decorations on them.
- Decor can be offered to cut out of colored paper yourself, if you have the appropriate tools. For this, scissors with curly edges and curly hole punchers in the form of snowflakes are perfect. The main thing is to use thin paper so that the child does not have to put in a lot of effort to get decorations. Be sure to explain where the sheet is inserted. Even a 2-year-old kid will be happy to stamp stars and snowflakes.
- If you do not have curly hole punchers, use the usual one. You will get colored circles, from which it is easy to collect beads or stick them like Christmas balls on your Christmas tree postcard.
- When the decor is ready, start gluing. If circles, stars and snowflakes are not made of self-adhesive paper, apply PVA glue to the base and attach decorative details.
When the glue dries, the card will be ready.
We take the child at home
A children's New Year's card made with their parents will, of course, be different from what a child can do in kindergarten. It offers options with which the baby will be able to cope completely independently, with minimal help from the educator, to do some actions according to the instructions.

At home, you can make more elaborate Happy New Year cards as you work with the kids. Under the individual control of an adult and a younger child, they will be able to use small details in their work (beads, beads, sequins) to decorate the product.
If mothers themselves are engaged in needlework, then they not only know the methods and technologies of work, but also have a lot of remnants of beautiful ornamental materials (decorative paper, cardboard, fabric, satin ribbons, etc.).
In a word, the homemade "Happy New Year" will be more interesting, educational and educational than a similar activity in the garden. Here you can devote more time and attention to your baby.
Origami Christmas tree (very easy way)
When working with this method, the child will very quickly get a beautiful New Year's card. The master class will teach you how to do the job step by step.

Prepare the following:
- Cardboard or decorative paper for the base.
- Green thick paper for the Christmas tree.
- Glue.
- Decor.
Make a postcard like this:
- Cut out the base blank in the form of a square or rectangle.
- Fold the piece if needed.
- Take a rectangle of green paper for the Christmas tree. Make an accordion out of it. To make it even, you can first draw the fold lines.
- Glue the resulting part on one side so that the shape resembles a triangle (fan).
- Glue the Christmas tree fan to the base of the card.
- Decorate the Christmas tree and the surface of the postcard with prepared decorations using the appliqué technique.
Postcard with a three-dimensional Christmas tree inside
In this way, a folding New Year's card is made. The master class from the previous section taught how to make a Christmas tree in the form of an accordion element. Here, it will be used as the initial part.

Work like this:
- Take a rectangular base sheet and fold it in half.
- From green paper, prepare several rectangles according to the number of tiers of the Christmas tree. Size should be from largest to smallest.
- Fold each blank in the form of an accordion in the same way as in the previous method.
- On the basis, mark up where the tiers will be glued.
- Glue the accordion blanks between the sides of the base.
- Decorate the surface of the card inside and out in any way and material, for example, glue small circles made from white paper with a hole punch in the form of falling snow. This option will look spectacular on a dark blue background.
Thus, when you open a souvenir made by this method, it will turn into a voluminous decorative Christmas tree.
snowman card
Very often it is required to make New Year's cards for a kindergarten for a craft contest or to decorate a group. Such a souvenir is made at home under the guidance of parents or the child independently. A beautiful postcard is easy to make in the form of a snowman or using it as the main element of the application.

To work, you will need the following:
- White paper.
- Compasses or stencils (circles).
- Scissors.
- Glue.
- Base (preferably colored, for example, blue or light blue).
- Paints and brushes, felt-tip pens or other materials).
- Decorations for the background and snowman (snowflakes, stars, artificial snow).
How to make a snowman card
Work like this:
- Fold the base sheet in half.
- On white paper, draw circles or invite your child to make them on their own using stencils of a suitable size.
- Cut out the blanks.
- Glue the resulting parts on the front side of the postcard from the largest to the bottom at the bottom.
- Cut out colored paper or glue ready-made plastic eyes.
- Draw or applique a carrot nose and a hat (bucket).
- Glue on a lace, satin ribbon, or crochet scarf.
- Decorate the bottom of the card with artificial snow, cotton wool or balls of
- The background can be decorated with snowflakes cut out of white paper or made using a figured hole punch.
The souvenir is ready.
As you can see, a children's New Year's card is made in different ways. For work in kindergarten, simpler options are suitable using ready-made templates and application elements. At home, parents can do part of the work together with the child, so the result of family creativity will turn out to be more spectacular, elegant and professional.
On the eve of the New Year, we are increasingly thinking about gifts that we can make for our relatives and loved ones with our own hands. Now just those times when manual work is a luxury. This is individuality. It's not like others. This is an opportunity for self-expression in creativity. Handmade gifts are valued more than those bought in a store. It is a pity that there are fewer and fewer golden pens in the world, and not everyone can and wants to create a miracle with their own hands. If you want and can, we will be happy to show you a master class of a very beautiful card with a Christmas tree, which can be a great New Year's gift from you to someone.
For making a postcard, any paper from the scrub set or colored paper or even plain white paper for printing and cardboard will work. Still need scissors and glue. Using white paper as an example, we will show how easy and simple it is to make a beautiful postcard with a Christmas tree.

We cut out 5 squares of different sizes from paper: 12x12 10x10 8x8 6x6 4x4cm. Fold each one in half. We bend the upper corners to the middle. You will get 5 three-dimensional triangles.

We fold a sheet of cardboard in half - this is the basis of the postcard. We glue the triangles from top to bottom on top of each other, starting with the smallest one. Glue a star to the top of the Christmas tree.


Improvise and your handmade postcard will become one and only!

Ideas for postcards with a three-dimensional Christmas tree

The simplest - we make 4 slots of different lengths, bend and voila - the Christmas tree is ready!
If we complicate the drawing a little, the Christmas tree will also turn out to be lacy.

Or we will make it from rectangles folded like an accordion.

The more branches we make, the taller and fluffier the Christmas tree!

Such a simple and beautiful postcard can be made from a triangle of green colored paper and a few buttons.

Hello dear readers of my blog! So that today the New Year's mood reigned in your house, we will make New Year's greetings ourselves. And how to make a New Year's card with our own hands, we will now figure it out. Handmade postcards are of particular value to the recipient.
Stylish DIY New Year cards
Do-it-yourself postcards can be made by adults for adults
And here is a video that shows how to make a beautiful cardboard with a napkin and a pretty envelope
How to make a Christmas tree out of paper - take note
The main thing on New Year's greetings is a fluffy Christmas tree. When creating postcards for 2017, I suggest moving from a simple option to a complex one.
Making a simple craft:
- Take paper with different colors on both sides,
- Fold in half
- Cut out a semicircle
- We make a fan out of paper,
- Glue on colored cardboard
- We decorate the top with a bead.
Or here is such a variant of a voluminous Christmas tree made of paper
Corrugated paper
Let's try to make voluminous postcards.
 For manufacturing you will need:
- A dense colored sheet of A4 format or cardboard;
- Green corrugated paper;
- Scissors, pencil, glue or double-sided tape;
- For decoration (rhinestones, sequins, beads).
Step 1. Take the cardboard, bend it in half. Inside, write warm words of congratulations in advance. On the outside, draw the outline of the Christmas tree with thin lines.
Step 2 Cut the bottom strip from the corrugation, 1.5 centimeters high. Then cut them into different heights and lengths to match the silhouette of the Christmas tree.
Step 3. Glue the strips into place, starting from the bottom, slightly gathering them.
Step 4 Decorate the beauty with whatever you find. Make a garland out of beads, and lights out of rhinestones. Do this craft with your children, it will bring them great joy!
Button Beauty
Original crafts can be made from multi-colored buttons. Look how many options!
It is better to cook such simple congratulations with children, small buttons develop fine motor skills well, which means memory, creative thinking of children.

original version
Forest guest in scrapbooking style. What is scrapbooking? This is a type of needlework for creating postcards, photo albums, photo frames and other products, which are then decorated with various decorations. The craze began in England in the late 16th century.
For making postcards for 2017 you need to take paper for scrapbooking:
- Cut it into small rectangles of various widths.
- Using a pencil, roll them into a cylinder, smearing with glue inside.
- After winding the tubes, glue them to each other.
- Then assemble the structure in the form of a Christmas tree.
- Fold the cardboard in half, write your wishes inside. And glue the dried Christmas tree from the tubes on the outside of the craft.
- Then decorate it with beads, rhinestones, tinsel.
Especially valuable will be children's products, as a gift to your loved ones.

Where is Santa Claus?
Postcards to Santa Claus should be created together with the children, because they will write their wishes to him.
Try to cut out glasses, a beard, a mustache, then glue them onto colored cardboard. Only half an hour and cheerful Santa Claus flies with New Year's greetings!

Idea for children's crafts. Even a child can make such Santa Claus.
- We take burgundy cardboard
- Fold in half, cut corners
- From the corrugated sheet, which is put into boxes of chocolates, we cut out the edge of the cap
- Glue a cotton pad on the side
- We glue the tinted sheet where the eyebrows and eyes will be located
- From the album sheet we cut out mustaches, eyebrows
- We cut out a beard from a semicircle, making cuts in the form of a fringe
- Cut out the mouth and nose from red paper.
- We glue the eyes (sold specifically for crafts) or cut them out ourselves from blue paper.
- Cut out the Christmas tree, glue it inside the card.
And here is another example of a postcard with Santa Claus made from ice cream sticks.
How to make a postcard with a dog so that his ears rise
And here is another example of a funny homemade greeting card for the Year of the Dog. A moving and LIVE postcard with a DOG for the New Year 2018 made of paper! A postcard is made of colored cardboard, and if you pull the tongue, the dog's ears rise and its eyes open. I think you will like this card and give it to your loved ones this year!
Here is such an interesting postcard with a puppy. Pull the tongue - the puppy will raise his ears from his eyes and say hello.
For manufacturing, we will need: colored sheets of paper, glue, ruler, scissors, knife.

- We take white paper. Fold in half (size about 14 x 22 cm). This is the postcard itself. Now let's start decorating it.
- You will need a postcard template. You can download it Here. It needs to be printed.
- Cut out ears and tongue. We glue as in the photo.
- Glue a yellow semicircle to the blue substrate. We insert the glued tongue and ears into the cut.
- Glue the cut out yellow part to the blue one. There is a fold at the top.
- Cut out eyes from black and white paper and glue them on.
- On the reverse side, glue the body of the postcard.
- We write congratulations inside.
Balls - an indispensable attribute of the New Year
In the Year of the Rooster, the balloons on the cards should be as colorful as the plumage of the owner of the year.
1. Cut sheets of a glossy magazine into thin strips, stick on a sheet, cut out circles of different sizes, decorate a congratulation.
2. Christmas balls from buttons.


Instead of buttons, you can take multi-colored rhinestones.
Crafts with the palm of your hand
Your children will love to come up with such fantasy cards, because getting their hands dirty with paint is their favorite pastime! And then, add the missing details, and you get a cute Santa Claus or Snowman.


What is New Year without a snowman?
The scrapbooking master offers such an option for congratulations.
- From thick white paper, you need to cut 3 circles of different sizes.
- They need to be slightly shaded along the edges so that they do not merge. You can shade with gray shadows.
- Then, from colored sheets, you need to cut out pens, a scarf, a nose, eyes and buttons.
- It remains to glue all the parts of the Snowman on the basis of congratulations.
Crafts from improvised materials
Another idea for New Year's greetings. A very cute card will turn out, decorated with appliqué, framed with grains of rice. In the Year of the Rooster, this is especially true:
- Glue a sheet of blue color onto thick cardboard
- Glue the Christmas tree cut out according to the template
- Glue rice grains along the contour
- Glue rice snowflakes in the corners. Original, beautiful, simple!


Another snowman idea
This postcard can be made from buttons and felt. You just need to cut out the clouds, the snowdrift, then glue them on the base, then cut out the details that are shown in the photo.

Do-it-yourself magical 4D New Year card
Dear friends! There is no limit to human imagination, as you could see for yourself! Get your kids involved and start making beautiful, unique crafts!
No matter how good a gift is, it is considered incomplete without a postcard. The range of greeting cards today is very large. However, if you want a unique unique postcard, then it is better to make it yourself with your own hands. This is exactly what we will do now: consider the ideas of greeting cards for the New Year with our own hands.
You will need: A4 thick colored cardboard, scissors, corrugated paper, PVA glue or double-sided tape, a simple pencil, decoration elements (sequins, beads, ribbons ...).
Master Class

New Year card in scrapbooking style
scrapbooking- this is a whole art that teaches how to create and decorate photo albums with your own hands (in our case, a postcard). Scrapbooking has a whole story of how a notebook turned into an album. At the end of the 17th century, notebooks appeared with additional blank pages. Their owners pasted images, creating entire collections. This is how scrapbooking began.
You will need: thick colored A4 cardboard, PVA glue or double-sided tape, scissors, scrap paper, pencil, decoration elements (sequins, beads, rain, buttons, sequins ...).
Master Class
- Make 12 scrap paper rectangles. The size of each rectangle should be different, starting with the smallest and ending with the largest. (Width from 1 to 12 cm, length 5 cm for all rectangles).
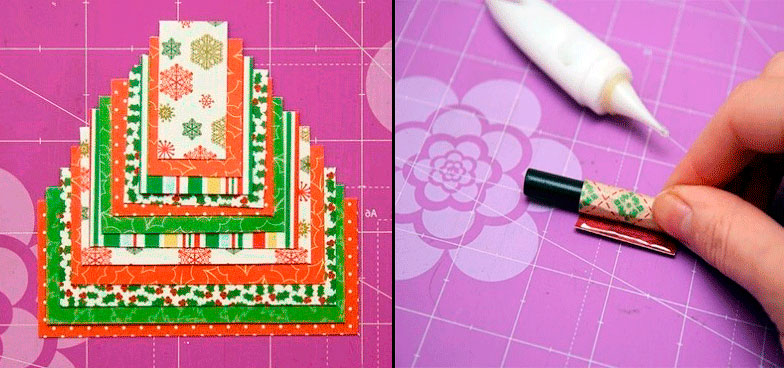
- Roll each rectangle into a cylinder in the width direction, using a simple pencil to secure each cylinder with glue.
- Glue all the tubes together, starting with the largest and ending with the smallest, creating a Christmas tree shape.

- Let the Christmas tree dry well, then glue it on the right half of the card.

- Decorate the postcard to your taste with sequins, sequins, buttons, rhinestones ...
You will need: A4 color cardboard, wrapping paper or candy wrapper, thin black marker, scissors, PVA glue or hot melt adhesive, stapler, decoration elements (sequins, beads, rain, buttons, sequins, bows ...).
Master Class

New Year's card in the style of minimalism
Minimalism(from Latin - the smallest) - this is a style that is distinguished by simplicity and brevity of composition.
You will need: A4 color cardboard, a shaped hole punch or a stationery knife, thread, needle, sequins, a simple pencil, a ruler and scissors.
Master Class
- Make the base of the card by folding a sheet of cardboard in half.
- On the right half of the card, sketch out the Christmas tree and star tops. Use a ruler and pencil.
- Cut through the star with a shaped hole punch or a clerical knife.
- Make holes in the shape of a Christmas tree with a needle - a triangle.
- Take a thread with a needle and make stitches. String sequins after each stitch.
- Carefully fasten the thread from the back.
New Year card in origami style
Origami- This is a type of arts and crafts, literally translated from Japanese as "folded paper" into various figures.
You will need: multi-colored A4 cardboard, PVA glue, scrapbooking paper or thick paper, decoration elements (sequins, beads, rain, buttons, sequins, bows ...).
Master Class
- Make the base of the card by folding a sheet of cardboard in half.
- Take 3 squares of thick paper with sides of 20 cm.
- Fold the square diagonally, unfold and again fold diagonally across. (Conditionally marking 4 triangles).

- Fill 2 opposite triangles inward.
- Press the resulting triangle to the surface and conditionally mark the center.
- Bend the bottom corner parallel to the middle. Repeat this procedure with the second corner. The module is ready!

- Make 2 more of these modules, you can have different colors.
- Assemble the Christmas tree in this way: glue the origami module on the right side of the postcard, form the Christmas tree from top to bottom, put the next module into the previous one.

- Decorate the Christmas tree to your taste with sequins, sequins, buttons, rhinestones ...
You will need: A4 color cardboard, scissors, a simple pencil, ribbons, PVA glue, decoration elements (sequins, beads, rain, buttons, sequins, bows ...).
Master Class
- Make the base of the card by folding a sheet of cardboard in half.
- Glue the tree trunk to the right side of the card in the center. The barrel should be made of brown ribbon in the shape of a trapezoid length.
- Cut 6 strips of ribbons 2 cm wide, 2, 4,6,8,10,12 cm long.
- Trim the corners of the ribbons on both sides.
- Glue the tapes from the bottom up, in the shape of a triangle.
- Decorate the Christmas tree to your taste with sequins, sequins, buttons, rhinestones, an asterisk, bows ...
You will need: A4 color cardboard, scissors, a double-sided round napkin, a ruler, a simple pencil, double-sided tape, decoration elements (sequins, beads, an asterisk, rain, buttons, sequins, bows ...).
Master Class

You will need: A4 color cardboard, A4 color paper, scissors, a ruler, a simple pencil, a stationery knife, flat paper decorations (snowflakes, stars ...), decoration elements (sequins, beads, an asterisk, rain, buttons, sequins, bows ...).
Master Class
You will need: colored cardboard and A4 paper, scissors, stationery knife, compasses, thick thread.
Master Class

The tradition of giving cards on the occasion of significant events and holidays dates back more than two centuries. Despite the fact that modern information technologies have entered our lives: mobile communications and the Internet, we are still happy to receive a colorful New Year's card as a gift from a loved one with our own hands.
However, modern postcards look very different than those that we received twenty years ago. We no longer want to congratulate each other with faceless products of the printing industry, which stamped them in unlimited editions.
Boring standard cardboard boxes were replaced by postcards, skillfully made on their own, in which the person who made them put a piece of soul, warmth and care. One of our favorite holidays has always been the New Year: it is with it that we connect our dreams and hopes for a better future, we exchange gifts with people close to us.
A handmade card can be a nice addition to a gift. It is not difficult to make it at all, since the materials for its manufacture (colored paper, cardboard, satin ribbons, bright shreds, beads, sequins, braid) can be found in every home. The task will become even easier if you purchase a special scrapbooking kit in the store (this is the name of the art of making postcards).
In addition to materials, we may need a figured hole punch, openwork scissors or zigzag scissors, a set of decorative stamps.
An original postcard for a man can be a pocket, which contains a New Year's greeting. In recent years, a fashionable trend has emerged to necessarily link the congratulatory text with the patron saint of the coming year - one of the twelve animals of the Chinese horoscope.
Having found a suitable poem on the Internet, we add from ourselves everything that we want to wish to a person dear to us and print the text on a home printer. Of course, for this we need a sheet of thick cardboard, the edges of which can be tinted with acrylic paints and decorated with an ornament using suitable stamps.
403 Forbidden
403 Forbidden
nginxHow to make a postcard-pocket?

For this we need:
- A sheet of thick gift paper with a "male" pattern.
- Small details (you can use some knightly paraphernalia taken from a children's game).
- Several fibers of sisal.
- Small snowflakes.
- Cloves (spice, a few things).
- String of artificial pearls.
- Artificial berries and imitation of a spruce branch.
- Silver ribbon bow.
- Silver braid.
- From gift paper we model and glue the original pocket envelope.
- We carefully glue the edges of the pocket with a narrow silver braid.
- In the lower left corner of the pocket we create a beautiful composition of sisal fibers, beads, berries, snowflakes and spruce branches. It is advisable to place fragrant carnations among artificial needles: they will imitate spruce cones, while flavoring the postcard.
- In the foreground of the composition we fix small details (imitation of weapons, a shield or a fragment of knightly armor).
- At the top of the sheet of congratulations, we fix a small but spectacular bow made of silver braid, decorated with a snowflake and a bunch of artificial berries.
- We put a beautifully designed congratulation in the finished pocket.
403 Forbidden
nginx A holiday postcard for the New Year, made by hand and intended as a gift for a woman, can be a three-dimensional imitation of a cozy winter window. Below you can find out how to make it.
We will need:
- A sheet of dark blue cardboard.
- Striped gift paper.
- Trimmings of guipure, tulle or lace.
- Silver braid.
- Tape narrow lace.
- A picture depicting a beautiful winter landscape.
- Scraps of ceiling tiles or thick felt.
Execution sequence:
- We bend a sheet of blue cardboard in half.
- We paste over the inside of the card with coated white paper with beautifully designed corners and a pre-printed congratulation.
- We decorate the front side with striped gift paper: it will imitate wallpaper on the wall surrounding the window.
- We paste a beautiful winter landscape (it will be visible from the window).
- We make an imitation of a window frame from strips of ceiling tiles or thick felt and glue it over the winter landscape.
- We make a lambrequin from a piece of ribbon lace and fix it on the top of the frame.
- We make curtains from scraps of tulle or guipure, glue them on the sides of the window, intercept with a narrow braid and tie it with a bow.
- Under the window we place a strip with a beautifully executed congratulatory inscription. It can be printed on a printer or cut out of an old postcard with curly scissors.
403 Forbidden
nginx Even the simplest postcard with an application made by a child's hands will be a very expensive gift for his mother.
Give your baby a piece of cardboard folded in half and a leaf of a fern (or any dried plant whose leaves are shaped like a Christmas tree).
- We stick a leaf on the front side of the postcard: this will be the basis of the Christmas tree.
- We decorate the Christmas tree with ready-made sparkles or circles of confetti, which the child can independently make from colored foil or the pages of a glossy magazine.
- Taking a thin brush and white gouache, you can depict snowflakes swirling around the Christmas tree.
- We make an imitation of snowdrifts from pieces of cotton wool and stick them under the Christmas tree.
- A congratulatory inscription (if the child can already write) can be made by hand.
- The same applies to the text of the congratulations: made with touching children's scribbles, it will warm any mother to the core.
A very small child can please his mother with a postcard decorated with purchased stickers. These stickers are sold in sets and come in the form of stars and various geometric shapes. Offer them to the baby and help him make a simple application in the form of a Christmas tree.
403 Forbidden
403 Forbidden
nginx A card with a Christmas tree made by the hands of a child will be no less dear to his dad. It will look quite original with a Christmas tree made of paper tubes. What will be required for this?
- Colored thick cardboard.
- Scrap paper.
- PVA glue.
- Beads, sequins, beads.
Execution sequence:
- Fold the cardboard in half.
- We mark the future postcard, determine the size of the Christmas tree.
- We cut the scrap paper into rectangles, roll up and glue the tubes out of them. The length of the tubes should be different, corresponding to our preliminary markings.
- Having made a sufficient number of tubes, we begin to stick the Christmas tree on cardboard. We put the longest blanks down. With each new tier, their length should decrease. We glue the tubes together.
- We decorate the finished Christmas tree with ready-made sequins, beads and beads.
- Together with the child, we write congratulations to our beloved dad.
403 Forbidden
nginx A beautiful postcard made in an unusual technique will be a pleasant surprise for your beloved friend. On the front side, you can cut a round window and arrange it in the form of a beautiful Christmas tree decoration.
We will need:
- A sheet of thick cardboard.
- Gift paper.
- Large silver snowflake.
- A piece of brightly colored felt.
- Narrow silver ribbon.
- Round paper napkin with carved edges.
- Paper spruce branches.
Execution sequence:
- We make the base of the card: fold a sheet of cardboard in half. We cover the front side with beautiful gift paper.
- Using a compass or any rounded object, draw a circle for the future window. The diameter of our circle should correspond to the diameter of the snowflake we have (you can buy it in the department that sells Christmas tree decorations).
- We close the window with a piece of silver metallized cardboard.
- We make out the edge of the cut window using a paper napkin with lace edges (we cut out the middle of the napkin along the same diameter).
- We make the volumetric edging of the window from thick felt: having made the necessary markings, we cut out the ring and stick it over the paper lace, like a frame.
- The edges of the felt frame can be decorated with silver glitter gel.
- Place a snowflake in the center of the window and glue it to the silver cardboard.
- In the upper part of the resulting Christmas tree ball, we glue an imitation of a metal mount, made all of the same silver cardboard.
- On both sides of the "mount" we strengthen paper spruce branches (ready-made or cut out on our own).
- We decorate the center of the “fastening” with a bow made of a silver ribbon.
- Paste the finished card from the inside with beautiful paper and write the warmest wishes on it.
403 Forbidden
nginx You can please a friend with a cheerful card with a picture of a smiling snowman.
Necessary materials:
- Thick green cardboard.
- A picture of a cheerful snowman.
- Double sided sticky tape.
- Simple double sided tape.
- Ready volume stickers.
- Halves of mother-of-pearl beads.
- A piece of ribbed ribbon.
- Stamp.
- Glue "Titan".
Stages of work:
- We fold the card, mark it out and cut out the window on its front side.
- In accordance with the size of the window, we select a suitable picture and cut it out, making an additional allowance of 0.5 cm on each side (it is necessary to attach the picture to the volumetric adhesive tape). All markings are done with a simple pencil. Having cut out the picture, we erase the auxiliary lines.
- We attach small squares of double-sided tape along the edges of the front side of the picture and glue the image of a snowman to the back of the future postcard. This should give the impression that the snowman is looking out the window.
- At the bottom of the postcard we attach a piece of rep tape (using double-sided tape).
- We hide the edges of the tape under the voluminous snowmen-stickers.
- After applying a few drops of glue, we attach sequins in the form of snowflakes to the ribbon.
- With the same sequins we make out the upper corner of the postcard.
- We decorate the upper right corner of the window with a bright fabric bow.
- In the left corner we place and glue the halves of mother-of-pearl beads.
- We will make an insert for the inside from scrap paper, cutting out a square of the desired size and processing its edges with a border hole punch.
- Glue the liner on a double-sided ordinary tape.
- Using an acrylic stamp, we will print a congratulatory inscription.
403 Forbidden
nginx A New Year's card with an applique made of buttons will be a pleasant surprise for your beloved grandmother. Bright, unusual and very easy to manufacture, it will become the center of admiring attention at the time of the solemn presentation of gifts.
Necessary materials:
- Thick white cardboard.
- A large number of large and small buttons of different colors.
- Beads, beads, sequins.
- Felt scraps.
- Balls of multi-colored wool yarn.
- Glue "Titan" (for ceiling tiles).
- Having bent the cardboard in half, we prepare the basis for the postcard.
- Using a simple pencil, we make a light sketch of the Christmas tree.
- We lay out the image of the Christmas tree from the buttons, densely filling the drawn outline with them. We glue the buttons, alternating them in color and size, leaving no gaps or gaps.
- We decorate the Christmas tree with small beads and sequins.
- At the crown, we strengthen the star cut out of bright felt.
- From pieces of felt we cut out a large number of squares and rectangles that will imitate a mountain of gifts at the base of the Christmas tree. We tie each “gift” with an elegant bow made of woolen yarn (some threads can be passed through a small button before tying a bow).
- Beautifully group the "gifts" under the Christmas tree and glue them.
- We write a touching congratulation inside the postcard.
 Another option for a gift for a grandmother can be a postcard made of threads. Taking a fluffy green yarn, lay out the silhouette of a Christmas tree with a thread and stick it on thick cardboard with a figured border. Glue three large buttons in the center. The original postcard is ready!
403 Forbidden
403 Forbidden
nginx Dear grandfather, you can make a postcard that is somewhat reminiscent of a traditional one, but only of the old times and with an indispensable modern “zest”.
What will we need?
- A piece of dark cardboard.
- A picture of Santa Claus (cut out of a magazine or old postcard).
- A few strips of scrap paper or pages from a glossy magazine.
- Golden braid.
- Decorative bell.
- Artificial twigs and berries.
Sequencing:
- In the center of the cardboard folded in half, we paste a picture with the image of Santa Claus. You can pre-attach a narrow rectangle of plain colored paper to it, placing it closer to the top corner of the postcard.
- We attach several tubes of glossy paper with letters tied with bows of golden braid to the bottom edge of the picture: this is an imitation of congratulatory scrolls. They can be additionally decorated with paper spruce branches.
- We decorate the side of the picture (just above the “scrolls”) with a three-dimensional image of a gift tied with a golden thread with a tiny bell.
- You can additionally decorate it by cutting a pair of snowflakes from an openwork paper napkin.
- We make a congratulatory inscription by hand, using a gel with sparkles (or cut it out from an old postcard).
403 Forbidden
nginx A mother-needlewoman can please her beloved daughter with a postcard depicting the beautiful Snow Maiden.
Necessary materials:
- A sheet of thick cardboard.
- Cardboard with silver letters.
- Picture with the image of the Snow Maiden.
- Glitter gel.
- Wool yarn.
- Finished silver snowflakes.
- Satin braid, floral mesh strip, beads, sequins.
Execution sequence:
- Fold the cardboard in half. Using a sewing machine, we attach a leaf of beautiful thick cardboard with silver letters to the front side. Thanks to this application, the postcard will be both stronger and more solid.
- Using a simple pencil, we mark up a round window (the edges of the circle can be made curly). Cut out the window with a utility knife.
- In order for the postcard to acquire an original look, you can highlight the window with a beautiful frame. To make it, we take a beautiful cardboard and make a free-form edging. Glue it with titanium glue.
- The outer and inner edges of the frame are circled with a gel with silver sequins.
- Let's decorate the frame from one edge with snowflakes, an elegant bow made of braid, woolen yarn and a floristic mesh.
- We paste over the inside with light paper and write a New Year's greeting.
403 Forbidden
nginx For your beloved son, you can make a postcard using the now popular quilling technique. Skillfully made mittens will clearly demonstrate how great a mother's desire to please her child is.
Necessary materials:
- Blue cardboard.
- Narrow strips of red and white paper.
- Beads and sequins.
- Satin ribbon.
- A congratulatory inscription printed on a color printer and cut out with curly scissors.
Execution sequence:
- We make the base of the postcard from blue cardboard.
- We cut out images of a pair of warm mittens from thick white cardboard and tightly fill them with red paper ribbons twisted into spirals. We make the edge of the mittens from white stripes, and decorate their middle with sequins.
- We place the finished mittens in the very center of the front side, connecting them with a satin ribbon and tying it with a bow.
- We decorate the upper corners with elegant white flowers imitating frosty patterns. Glue glitter in the center of the flowers.
- In the lower corners we make “frosty” curls, decorated with transparent beads.
- We attach a congratulatory inscription under the mittens.
403 Forbidden
nginx A three-dimensional postcard for the New Year of the Goat (sheep) is a great reason to please your beloved girl by giving her a card-amulet depicting a cute sheep - the patron saint of the coming year. To make it will take no more than half an hour and a modest set of materials. So, we need:
- A sheet of white and thick textured paper.
- A piece of black half-cardboard.
- Ready-made eyes for toys.
- Scissors: simple and curly.
 Manufacturing sequence:
- We fold white textured paper in half and draw a circle on it with a compass or any other round object.
- Cut out the circle with curly scissors, leaving a small piece of the fold intact so that the card can open.
- From scraps of white paper we make an oval hat and a small round ponytail.
- On a sheet of black semi-cardboard, we outline a muzzle, a pair of ears and four legs. Cut out all the details with ordinary scissors.
- Before assembling the postcard, we lay out all the details, achieving the greatest expressiveness of the image. Our postcard will stand, so you need to arrange the legs so that they match.
- Carefully glue all the details, promptly removing excess glue with a soft cloth.
- Our card-amulet is ready. You just need to write the warmest words inside and give it to your beloved girl along with a New Year's gift.
403 Forbidden
nginx Even a small child can make a postcard for a brother. Of course, if an adult family member will help in the work. Let's find out how to make it in a fashionable technique called cardmaking.


Our postcard will be a bright picture with a frame made of cardboard base. For its implementation we need:
- A sheet of very thick cardboard (21/15 cm in size).
- Set of colored velvet paper.
- Double sided sticky tape.
- Star sequins.
- Metal chain (22-25 cm long).
- Several acrylic or metal pendants and rings for attaching them.
- Sintepon or cotton wool.
- Glue "Titan" or glue stick. In extreme cases, ordinary stationery glue is also suitable.
- Regular scissors and zigzag scissors.
- Special press luversator and three eyelets.
Execution steps:
- Cut out a 18/11 cm rectangle from blue velvet paper with zigzag scissors and glue it to a sheet of white cardboard: this is the background of our postcard.
- With the same scissors, we cut out a triangular (with sides 6/9/9 cm) Christmas tree from green velvet paper. Decorate with star sequins.
- We attach strips of voluminous adhesive tape to the back of the Christmas tree and place it on the postcard.
- We make two New Year's boots for gifts from red velvet paper and fix them with the same adhesive tape.
- In the same way, cut and paste the house.
- In three places we make holes with a press-luversator. Using detachable rings, we attach a chain to the postcard and decorate it with funny pendants.
- To simulate a snowball, we use cotton balls, attaching them to the roof of the house, boots and at the base of the Christmas tree.
403 Forbidden
nginx A very tender and original postcard made of beads can please your beloved sister. It will take no more than a quarter of an hour to make it, but the result will be a very nice addition to the gift.
Required materials:
- Thick blue cardboard.
- Three pieces of New Year's paper with a pattern of similar colors.
- Mother-of-pearl white beads of different diameters (preferably three sizes).
- Flat double sided tape.
- Narrow nylon ribbon.
- Hot glue.
Work sequence:
- We fold a square-shaped card from cardboard.
- We decorate the front side with squares and rectangles of New Year's paper, arbitrarily placing them on cardboard and gluing them with double-sided tape. The most important thing is that the composition is original and harmonious.
- With a simple pencil, we make a light sketch of the silhouette of the Christmas tree and start gluing the beads of the bottom row using hot glue. In the process of gluing, we alternate the beads in size, trying to place the smallest of them in the upper tiers of the Christmas tree.
- Having pasted the Christmas tree, at the bottom of the card we make an elegant bow from a translucent nylon ribbon. To do this, with a sharp clerical knife, we make a small incision on the fold, thread a ribbon into it and tie a bow.
- We guarantee that any girl will be delighted with such a postcard. Multiply her joy by finding suitable good poems on the Internet. Sign it by hand or print the text of the congratulations on the printer. 3 votes, average: 5,00 out of 5)


