Isothread for beginners: simple instructions and tips. Magic isothread (many diagrams, templates) Isothread: materials and tools for work
Isothread for beginners schemes with numbers flowers step by stepIsothread for beginners schemes with numbers flowers step by step
allows you to create true masterpieces. It is so easy to master that even every novice needlewoman will soon be able to become proficient in embroidering beautiful postcards, still lifes, ornaments and even portraits. In order to bring this moment closer, you need to learn how to create beautiful flowers using this technique. 


Necessary equipment
To work with the isothread technique, you will need to prepare the following “ingredients”:
Basic Rules
The pattern with numbers you choose will help you make beautiful flowers, as well as tips for beginners that our master class offers. If you already know how an angle and a circle are worked out, then you will have to act as follows:

Enhancing the effect Once you start working with the isothread technique, you will soon see that it, like no other, is perfect for creating truly luxurious products. If you initially have complex patterns in your hands, then to enhance the decorative effects, act as it tells you. Otherwise, our master class for beginners will help you.
You have to do the following manipulations:

Schemes always indicate each of the stages with Roman numerals.
Petal elaboration 
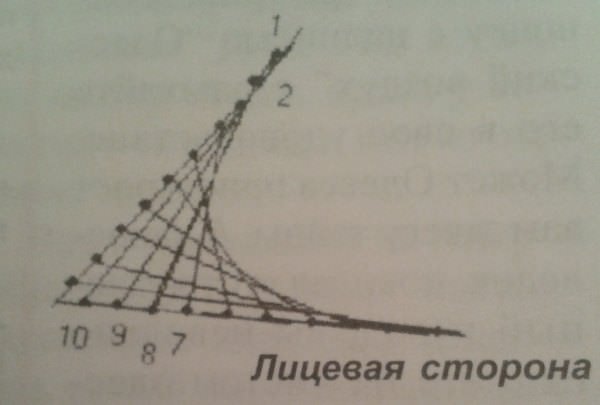
A flower petal embroidered using the isothread technique should be worked out like incomplete stitching of an oval. You should adhere to the following recommendations:
- work should begin from the sharp end of the embroidered element;
- work should end there;
- choose the distance between 2 points equal to the line that touches the bottom of the embroidered element.
We embroider flowers for the holiday
How about embroidering delicate chamomile, forget-me-not and cornflowers using the iso-thread technique? Choose the schemes that suit you and act boldly!
Chamomile 
To make a chamomile flower using the isothread technique, you will need to perform the following manipulations:
- embroider several petals;
- in the middle of each of the resulting flowers, sew a beautiful bead;
- work out the buds (the diagrams will tell you exactly how to do this);
- work the leaves and stems in the same way.


Forget-me-not You can get a beautiful and delicate forget-me-not that will decorate your interior by following these steps:
- embroider flowers;
- carefully work through the leaves (as indicated in the diagrams);
- draw stems in steps of one to three.


cornflower 
Would you like to have a flower in your home - a symbol of purity, tenderness and holiness? Then, without further delay, start embroidering the cornflower. This wildflower will fit perfectly into the interior or will be an excellent gift for a loved one. And you will need to do the following:
- work out the core of the flower (steps one to ten);
- carefully sew a bead along the contour;
- depict the petals of a plant;
- work through the leaves (steps one to eight);
- embroider the stems (steps one to three);
- finalize the remaining elements.
The work is ready! 

To ensure your work is perfect, try to follow the tips below:
Finally
The finished picture with flowers can be pasted onto a cardboard sheet. If you wish, you can make a frame, and then give it as a gift or hang it on the wall.
Schemes with flowers


Comments
Related posts:
 Isothread for beginners diagrams with butterfly numbers (pictures)
Magic isothread Ivanovskaya T.V.
Owl
You will need
Thick green cardboard, light brown, dark brown, yellow, green threads, needle, scissors.
Progress
1. Use a needle to make working holes for the sketch of the drawing on the cardboard. They must be applied to the reverse side in a mirror image in accordance with the picture.
2. You should start working with the owl's head. Using light brown threads, embroider the upper part of the head based on the basic “corner” element, starting from the upper left corner. Then fill the right side of the head in the same way.
3. Complete the eyes in two stages. Using dark brown thread, embroider the pupils based on the basic “circle” element. Embroider the beak with simple stitches using yellow thread in the form of a fan.
4. Sew the owl’s wings with dark brown threads using simple cross stitches, 2 for each wing.
5. Use light brown thread to sew the belly of the bird using simple fan stitches.
6. Embroider the owl’s feet with dark brown thread using simple stitches.
7. Sew the branch using simple stitches using dark brown threads. Embroider the leaves with green thread according to the pattern (Fig. 69).
From the book Felt Toys and Accessories author Ivanovskaya T.V.Owl You will need Decorative felt in two primary colors, small pieces of felt in two other colors, thick paper or cardboard, padding polyester, small black buttons or beads, sewing threads of different colors, pencil, tailor's measuring tape, pins with rings, chalk,
From the book Feng Shui in handmade jewelry authorPillow "Owl" You will need a piece of plain felt measuring approximately 60? 60 cm, remains of red, orange, yellow, green, blue, grey, white and black felt, thick paper or cardboard, threads to match the color of the fabrics, padding polyester or other filler, pencil,
From the book The Big Book of Applications from Natural Materials author Dubrovskaya Natalia VadimovnaWarmer for a cup "Owl" You will need a piece of thick plain felt of the main color, the remains of plain felt of color B, patterned, white, black felt, thick paper or cardboard, threads to match the color of the fabrics, pencil, tailor's chalk, centimeter, cup, compass, ruler,
From the author's bookOwl Owl protects against stupid thoughts and irrational financial investments. An owl sits on the Money Tree, which represents your business or family budget. The tree grows and develops. Its fruits are coins. The tree needs protection. Such a protector is
From the author's bookSmart Owl A smart owl sits high on a tree. Her beautiful, fluffy feathers shimmer in the moonlight. Our owl is fabulous, and, of course, her feathers are unusual. Each feather is an elm seed. And the wings are scales from pine cones. Materials needed: White sheet of paper
From the author's bookOwl Owl protects against stupid thoughts and unreasonable spending. She sits on a money tree, which represents the family budget. The tree grows and develops. Its fruits are coins. The tree needs protection. The wise owl is such a protector. Necessary
Every mother knows perfectly well that the full development of her baby is a priority. You can train fine motor skills, perseverance, develop imagination and accuracy with the help of applied arts. Embroidery on cardboard, thread weaving - all this has a common name - isothread. You will find her diagrams with numbers for children in today's article.
Learning the basics of string graphics
There are so many things that needlewomen come up with, trying to surprise with their skills and originality. So, recently, isothread has become very popular. Pictures with patterns can be found without much effort on the global network, but before you start creating a masterpiece, you need to master the technique of embroidery on paper.
Isothread is an ancient art form that was forgotten over time, but today craftswomen are happy to revive traditions. Embroidery with threads on paper allows you to create real masterpieces - three-dimensional paintings.
Mothers who care about the development of their children try to teach their children thread weaving at the age of 5-6 years. This practice allows you to develop fine motor skills, and not only that. The baby will learn to fantasize, become neat, diligent, and will be able to show his talent.
You have already received a general idea of the isothread technique. Before we look at diagrams for beginners and pictures with numbers step by step, let's study the main aspects of modeling crafts in this style:
- The basis of the embroidery is thick cardboard or other paper of appropriate thickness. Some needlewomen use planks.
- You can choose any threads, the main thing is that they are strong and elastic.
- For children, you need to select soft, bendable needles so that the baby does not get hurt while working.
- As you know, threads tend to fray. To avoid this, just rub the thread with wax.
- To make the picture uniform and openwork, you need to make a minimum distance between the points.
- The child can number the puncture sites. It’s easy to do this yourself. It is important to know the rules for applying numbering.
- Almost any masterpiece created in the isothread style is based on three main pillars - filling corners of various types, arcs and circles.
- The drawing must be transferred using carbon paper to the wrong side of the base. First make punctures in accordance with the numbering.
- If you use a base that is too thick, the punctures are made with a large needle, the tip of which must be heated over a fire.
- We fix the threads on the wrong side with office glue.
- For isothreads you can use small carnations. But this method of embroidery is best practiced at an older age, since the baby may get hurt.
Learning the isothread technique with your baby
As already mentioned, embroidery on paper is based on several methods. Before you start creating full-fledged paintings, hone your skills on individual simple elements.
The following methods of string graphics are mainly used in practice:
- contour;

- solid;

- volume;

- combined.

You need to start with small paintings and only after your child has completely mastered the technique of embroidering corners, circles and arcs. If your baby can't count, it doesn't matter. Help him with your tips. Just indicate where you want the thread to go.
To captivate the baby with such an activity, you need to choose interesting pictures, for example, let a boy embroider a boat, and a girl - a butterfly or a flower. Also use different colored threads. The play of colors will not only attract the child, but will also allow him to fully express his imagination and creative thinking.
We create a masterpiece in isothread style
If you have already learned the basic methods of embroidery in the isothread style, then you will need patterns for beginners. You can make pictures with numbers step by step for children yourself or use ready-made templates. Try embroidering a snowman with your child.

You can also embroider an original cockerel. To do this, you just need to learn how to trim the outline and fill the circles with threads.

If you are new to this business, try to make a beautiful, but at the same time very simple picture. Let's together embroider colorful balloons floating in the sky.
Necessary materials:
- thick sheet of paper;
- multi-colored pencils;
- threads;
- needles;
- copy paper;
- scissors;
- glue.
Step-by-step description of the creative process:

This technique of decorative and applied art, such as working with isothread, has two easy-to-perform techniques: mastering embroidery using geometric shapes - a circle and an angle. Thanks to your wide imagination and uncontrollable imagination, you can create masterpieces worthy of an exhibition hall from two figures. Paintings created using the isothread technique are an unusual gift for a loved one, an excellent addition to the interior style and just a good mood on a dull day.
Paintings created using the isothread technique are an unusual gift for a loved one
In practice, there are two types of schemes.
For a circle
- On a sheet of thick cardboard, select a starting point - the center of the circle. Use a compass to draw a circle. To determine the equal distance between future holes, we use a protractor. We make an equal number of holes on the circle according to the markings.
- Conventionally, we number clockwise with numbers from 1 to 16 without missing holes. Following the instructions, pass the thread in the following sequence: from purl 1 to 3, return purl to 2, from 2 to 4, back to 3, from 3 to 5, and so on until the end of the circle. The pattern is good for embroidering the outline of figured images. To create an arc, use a semicircle as the base.
- The following pattern is made with long stitches, convenient for making ovals in the design. From designation 1 we count seven punctures, along the front side we make a stitch in the eighth. From the purl we go to the seventh and the front one we go back before the designation 1. The movement of the thread is counterclockwise. The ornament is ideal for embroidering a New Year's snowman, decorative elements in images of animals, butterfly wings and bows.
- Now we make the same pattern with long stitches with a distance of five punctures. The center circle will be slightly larger, which makes it possible to make the internal ornament with stitches “alternately” or diagonally.

For corner
- Draw a corner of any shape on thick cardboard from the inside out. On both sides of the figure, mark the same number of points at equal distances. Puncture the markings with a pin, 5 punctures on each side.
- We number the points on one side from top to bottom from 1 to 5, on the other from bottom to top from 6 to 10, respectively.
- Filling out the diagram. From point 1, stretch the thread to 6, along the purl to 7, from there the front thread to 2. Then down 3 and along the outer 8. Complete the pattern by fastening the end of the thread with a sketch to the purl 10.
Gallery: isothread (25 photos)


How to embroider a circle with isothread: master class
Making a circle with isothread requires concentration and consistency of actions.
Necessary:
- A sheet of thick cardboard;
- Iris threads, floss;
- Compass, needle, awl;
- Scissors, glue, protractor.
How to do:
- Turn the cardboard wrong side over and draw a circle in the center with a compass. Using a protractor, accurately distribute the points around the circumference with a pencil, using a degree ruler as a basis. For example, every 10 degrees we put a designation.
- Carefully pierce the markings with an awl. To avoid damaging the work surface, place a cloth or wooden board under the cardboard. To make the holes smaller, you can use a needle.
- Now mentally imagine a watch dial. Where the number 12 should be, put the number 1 above the puncture, then clockwise we number all the holes with numbers.
- Start the work with designation 1. From the wrong side of the paper, through the number 1, we stretch a needle and thread to 5 on the front side. Then to 6 from the wrong side to 2. Observing the numerical order, from the wrong side you get a seam around the circumference, from the front side - a circular pattern like a polyhedral star.
- You cannot tie knots; when pulled together, the thread deforms and spoils the image of the painting. Secure the ends of the thread with glue.
There are options for other circle patterns:
- A stitch equal to the diameter: Measure the center inside the figure and put a dot. Pierce a hole from the inside with an awl. Then, from purl 1 through knit to the central point, stretch the thread, return to purl 2, from it along the front to the central one and again return below to 3.
- Equal length stitches: Mentally divide the circle into the dial. Where the number 12 should be, we retreat along the wrong side to 11, from it the front thread up to 5, along the wrong side from 5 to 4, from 4 right up to 10.
It is very important not to go astray with the sequence of symbols; before making a seam, think about the location of further numbers.
Isothread embroidery on nails for preschoolers step by step: how to do it
Such crafts look impressive, creating visual volume by raising the thread above the surface of the base.
You will need:
- Small carnations with caps;
- Floss threads;
- Wooden board or plywood sheet;
- Drawing template, hammer.
Such crafts look impressive, creating visual volume by raising the thread above the surface of the base.
How to do:
- Having chosen a drawing for your future masterpiece (print out new diagrams), secure it with a strip of tape on the work surface.
- To maintain the exact distance between nails, use a pencil to mark the base. Drive nails at the points of the contour boundaries. Remove the drawing.
- Form a loop at the end of the thread, place it over the nail of the first corner, and twist it around the fastener. Then stretch it diagonally to the opposite stud. The isothread technique on nails allows you to form a pattern both in a certain sequence of thread application, and in a chaotic manner.
- Work in a clockwise direction without disturbing the order of the threads.
At the end of the execution, secure the end of the thread with glue.
Isothread: star for children
You will need:
- A sheet of thick paper;
- Iris threads or floss;
- Pencil, ruler;
- Needle, awl.
What to do:
- Draw a symmetrical star on the wrong side of the sheet. Let's take the top ray of the star as the initial basis of the drawing. Let us conventionally denote the apex point of the ray by the letter A. From the designation downwards along the sides of the angle, count an even number of points. For example, five on each side, for a total of ten. Let's denote them by numbers from left to right.
- Make holes with an awl where the points are marked. The result is a drawing diagram.
- From the inside of the 9th point, stretch the thread to the top of A. Then from A return to 2nd and down to the 7th point. Accordingly, from 7 to 5 we move along the wrong side, along the front side from 5 to 4. From 4 to 6 down the wrong side. From 6 to 3 on the front, from 3 to 1 on the back and to 8. From 8 to 10 and to top A. Using this scheme, make all the rays of the star step by step.
- After finishing the embroidery of the corners, you can come up with an original image in the middle of the star. For example, here we use the embroidery technique of equal length stitches.
Just keep in mind the obligatory nuance - to prevent mixing of graphic styles of the drawing, it would be more advisable to make some deviation from the pierced holes of the original image.
How to make a snowflake using isothread
The snowflake pattern will be very easy for inquisitive and restless needlewomen.
The thread graphic of the image is a circle or square, covered with thread from the middle to the edges. Here the size of the seam can be varied, for example, make one larger, that is, outside the figure, the next seam is smaller, respectively, not reaching the edges of the image.
When starting to work on a snowflake, your child will need adult help. Draw a square on a piece of paper with a central point O inside. From it we measure segments of equal distance to the edge of the figure and beyond, alternating one at a time. In the marked places we put designations from 1 to 10. From 1 we pull the thread to O, then from O to 2, from 2 to 3 and back to the central point. If you follow the sequence of the pattern, you get a small snowflake in the picture. After finishing the drawing, use an eraser to erase the square shape with light movements.
The snowflake pattern will be very easy for inquisitive and restless needlewomen
The second version of snowflake embroidery involves covering the contours of the design with a stitch “every other” (1-3,2-4). Inside the contours, you can decorate the image with beads or sequins, weaving them into the stitches.
The idea of making a snowflake using the principle of corner embroidery is more complex. You will need:
- Cardboard or velvet paper;
- Scheme of an octagonal snowflake (from the Internet);
- Colored threads of wool, acrylic, iris;
- Pin, needle, tape, paper clips.
How to do:
- Attach the drawing diagram to the cardboard with paper clips, and use a pin to pierce holes along the image.
- Conventionally, we number the angle of the snowflake, number one is the end of the segment from the beginning of the angle, then down to the beginning of the angle. The other side of the number from bottom to top, for convenience, we denote from 9 to 1.
- We make the first seam from the wrong side 1, securing the tail with tape. From 1 we go down with a thread to 9, return to 8 on the same side and to 2 on the next side of the corner. Fill the corner sequentially, without disturbing the order of the threads.
- Follow this principle to complete the remaining corners of the snowflake.
Monkey isothread
To make an image of a monkey you need:
- Threads for embroidery or floss, iris in appropriate shades;
- Colored cardboard (lawn green), a sheet of thick paper;
- Needle, scissors, glue, pencil, pin.
How to do:
- For the picture you need to take a drawing of a monkey. You can copy it using a carbon copy from a coloring book or find it on the Internet.
- To make the drawing have a reverse side, copy the monkey’s figure through the glass. Transfer the inverted image through carbon paper to the back of the background cardboard.
- Pierce the contours of the figure with a pin.
- Embroider the tummy, inner parts of the paws, ears with yellow thread like a circle. We sew the contours of the pattern with brown threads using an alternate stitch. The peculiarity of this stitch is that the distance between its beginning and end is one puncture. That is, if we conditionally divide the punctures by numbering, we get a stitch length of 2 -4, skip 3, skip 5-7, skip 6. In the second circle we grab the missed holes, skipping 2, 4, 5, 7 respectively.
- We embroider the nose and eyes with black thread.
You can add decorative elements to the picture, for example, embroider a ball next to the monkey with beads or make eyes in the form of black buttons.
Isothread: heart embroidery technique (video)
The unique technique of embroidery on a hard surface allows you not only to develop creatively, but also to dream to your heart's content. There are different patterns, the most popular and easy ones are a heart, a flower, a ship, a rose and other various patterns for the New Year. The initial patterns of thread graphics are clear, and the desire to create and surprise will help you prepare an original and colorful handmade gift for a loved one. And the paintings, stylized for the interior, will complement the comfort of home with notes of extraordinary painting.
The circle is one of the main elements of isothread and a large number of puncture points need to be marked on it. How to do it? This is what today's post is about.
To divide a circle into any quantity equal parts, you can use the coefficients (see table 1.). Knowing what number n the circle should be divided by, find the coefficient k. By multiplying the coefficient k by the diameter D of this circle, the length of the chord is obtained, which is plotted with a compass on a given circle n times.
n k n k 30.86603200,1564340,70711210,1490450,58779220,1423160,5230,1361770,43388240,1305380,38268250,1253390,34202260,12054100.30 902270,11609110,28173280,11196120,25782290,10812130,23932300,10453140,22252310,10117150, 20791320,09802160,19509330,09506170,18375340,09227180,17365350,08964190,16459360,08716If a larger quantity is required, the coefficient can be calculated independently. To do this, divide 360 by the required number of parts and take the sine of this number. We divide the result by two - this is our coefficient...
Today in the post I am posting several pictures of ships and patterns for them for embroidery with isofilament (pictures are clickable).
Initially, the second sailboat was made on studs. And since the nails have a certain thickness, it turns out that two threads come off each one. Plus, layering one sail on top of the second. As a result, a certain split image effect appears in the eyes. If you embroider a ship on cardboard, I think it will look more attractive.
The second and third boats are somewhat easier to embroider than the first. Each of the sails has a central point (on the underside of the sail) from which rays extend to points around the perimeter of the sail.
Joke:
- Do you have any threads?
- Eat.
- And the harsh ones?
- Yes, it’s just a nightmare! I'm afraid to approach!
This is my first debut Master Class. I hope not the last. We will embroider a peacock. Product diagram.When marking puncture sites, pay special attention to ensure that there are them in closed contours even number.The basis of the picture is dense cardboard(I took brown with a density of 300 g/m2, you can try it on black, then the colors will look even brighter), it’s better painted on both sides(for Kiev residents - I bought it from the stationery department at the Central Department Store on Khreshchatyk). Threads- floss (any manufacturer, I had DMC), in one thread, i.e. We unwind the bundles into individual fibers. Embroidery consists of three layers thread At first Using the laying method, we embroider the first layer of feathers on the peacock’s head, the wing (light blue thread color), as well as the dark blue circles of the tail. The first layer of the body is embroidered in chords with variable pitches, trying to ensure that the threads run tangent to the contour of the wing. Then we embroider branches (snake stitch, mustard-colored threads), leaves (first dark green, then the rest...


