How to make crafts from vegetables and fruits. Simple children's crafts of animals from fruits - a mouse from a pear. Autumn crafts from watermelon
Quick article navigation
Are you preparing for a traditional autumn exhibition in a kindergarten or school? Or maybe you just want to have fun and usefully take your baby on a rainy day? In this material, we have collected 80 photo ideas of cute and interesting crafts from vegetables and fruits for the little ones and older children.
- To connect the parts, use toothpicks, wooden skewers and pins.
- In the absence of special tools for carving (artistic cutting by fruit), to cut out small details, it is worth choosing a knife with the narrowest blade (for example, a penknife is suitable). Small holes in the peel are most accurately obtained with a drill or screwdriver.
- To prevent the fruits from darkening, a solution of vinegar, lemon juice or gelatin diluted in water should be sprayed onto the sections. If you want to carve details from carrots, soak them for a couple of hours in salt water, then they will become more plastic and stronger.
- If you make crafts using the carving technique (artistic cutting of fruits) or simply use cut fruits / vegetables, then you should start making crafts no earlier than a day before the start of the exhibition. If you want to make a craft in advance or extend its life as long as possible, use only whole, dense and slightly unripe fruits.
- Crafts from vegetables and fruits (with the exception of watery vegetables / fruits) can be stored for several days in cold water. Watery fruits will keep their beautiful appearance longer if they are periodically sprayed with water.
For decorating crafts, it is good to use plasticine, paper, marker, gouache, acrylic paints and all kinds of improvised materials.
- Kids up to 7 years old can and like to make simple figures of animals, funny little men and cartoon characters.

It is more interesting and useful for older children to make crafts that are more detailed and subordinate to any plot or idea. For example, a pirate should drive a ship made of zucchini, Cinderella should ride in a pumpkin carriage.
- Do you want to make a spectacular building that will delight the child and his friends? Make a craft of a large size, for example, based on a pumpkin, watermelon, tall zucchini or melon.
- Here is a list of traditional themes and ideas for children's fruit and vegetable crafts:
- Towers, houses and castles;
- Animals and insects;
- Characters of fairy tales and cartoons from the Firebird to Shrek;
- Still lifes of flowers, plants, mushrooms in baskets and vases;
- Funny little people (for example, it can be a composition on the theme “My Family” or “Me and my friends”, etc.).

- Types of transport (airplanes, ships, etc.);

- Unstable crafts are best mounted on a stand, such as cardboard, foam, or a shoe box lid.

Autumn vegetable crafts for the exhibition
- In addition to voluminous figures, you can try to make a mosaic of fruit and vegetable slices on a dish (then you don’t need to glue the craft) or on a framed board (then it’s better to use fruits / vegetables with dry pulp and attach them to pins or glue).


Vegetable Craft Ideas
From zucchini and eggplant
Zucchini is good for its variety of sizes, strong skin that holds its shape perfectly, and pulp that does not change color over time, unlike potatoes. Therefore, they are great for carving and making parts of various shapes, such as round wheels.
Zucchini makes excellent boats, ships and planes.


Thanks to the dark color of eggplants and their elongated shape, they make beautiful penguins, whales and ... zebras.


from a pumpkin
Pumpkins are simply made for children's creativity, because they are so bright, round, can be very large or miniature, their peel is easy to carve and remove the pulp.
A classic pumpkin craft story that every girl will love is Cinderella's carriage.


Also, pumpkins make good houses and towers.


Using several pumpkins of different sizes, you can make a big bear.

Want to make a fun pumpkin craft quick and easy? Just attach or cut eyes over the tail of the fruit, make a mouth, then put a hat or other accessories on the pumpkin. You will get something like this funny head.

from cucumbers
From cucumbers, you can make frogs or a princess frog and, of course, Gena the crocodile.


In combination with cucumber carrots, caterpillars, centipedes, snakes and mini-mobiles work well.


Cucumbers will also help out if the craft needs legs.

From potatoes
To make potatoes easier to cut and more plastic, it is advisable to keep them warm or at room temperature for 3-5 days. After cutting the potatoes, soak them in ice water for 20-30 minutes to remove the starch so that the cuts do not darken. In general, any figures can be created from potatoes.


In a pair of cucumber crocodile Gene, you can make potato Cheburashka.


from cauliflower
Cauliflower florets are ideal for making sheep and poodles.

from carrots
Carrots are bright and beautiful, but when cutting out details, they can break. To prevent this from happening and the fruits are easily cut, carrots should be used wilted or artificially wilted (keep the fruits in a warm place for a couple of days, and then restore by soaking in ice water).
The orange color makes carrots the best material for making giraffes, foxes and other "red" animals.


Here are a couple more cute carrot craft ideas for a kindergarten display.


And finally, we offer you to watch a video tutorial on how to make a craft from vegetables in the form of a hare with your own hands.
fruit craft ideas
From watermelon and melon
Melons and watermelons are the most suitable fruits for carving and making all kinds of crafts due to their shape, dense rind and color.
Many animals can be carved from watermelon rind, especially green turtles, frogs, dinosaurs, and the tabby Cheshire cat.


Baskets with beautiful handles and without them are easily made from half a watermelon. Inside the basket you can put fresh flowers, a bouquet of autumn leaves, flowers carved from fruits and vegetables.


Here are some more cool watermelon and melon craft ideas.


from apples
As we have already mentioned, in order for the slices of apples not to darken, they must be left in a solution of citric acid for 15-20 minutes and sprayed with it periodically.

Fruit craft for kindergarten


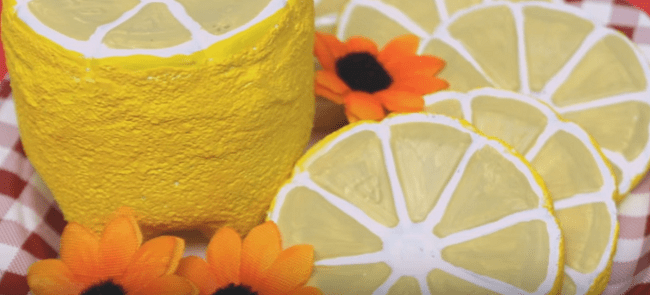
You can also cut small parts of various shapes from the peel of citrus fruits with scissors or metal baking tins.


From slices and slices of orange, tangerine, lemon and other citrus fruits, you can "write" pretty pictures and pictures.


From grapes
Grapes are well suited for making mini crafts, such as little men or caterpillars.


Grape canapes can be used as legs and arms, as a mane, hair or hedgehog needles as in the photo below.

Also, grapes are suitable for creating a dark or green background, as in this photo example.

from a banana
To make banana crafts, choose firm and slightly unripe fruits, and so that their peel does not turn black, do not put the fruit in the refrigerator, but store it at room temperature.
By the way, figures of dachshunds and dolphins are best obtained from bananas.


banana dolphins

And here is an excellent master class on how to make a craft from an orange in the form of a bear with your own hands.
Carving
This option is more suitable for adults and schoolchildren, i.e. for those who can handle a sharp knife well. Squash fruits seem to be ideal for carving, because these vegetables are quite elastic and soft, it is quite easy to cut them. Well, the patterns are unusually attractive due to the contrast between the light flesh of the zucchini and their dark green skin. Of course, to become a real master, you will have to spend a lot of effort and time, but if the next fruit was spoiled due to your slightly unsuccessful actions, then you can always cook and please the whole family with a delicious dish, besides quite simple to prepare.

As for the options for crafts, there are countless of them - these are various vases, and figurines, and a tea set, and even a pair of stylish shoes. We suggest you make small openwork candlesticks. Cut off the bottom of the fruit for stability, determine exactly what height the future candlestick will have, select the core with seeds with a spoon and cut out beautiful patterns on the walls. Well, now you just have to put a round pill-candle inside and light the wick. By the same principle, you can make lanterns that can create a romantic atmosphere in the house.

You can also use beautiful carved vegetable products to decorate the festive table. To do this, purchase vegetable cutters at the hardware store, which will allow you to cut strips of different thicknesses. Ready-made zucchini strips can be folded into a variety of colors, tinting them with food coloring - this way you get roses, peonies, daffodils.
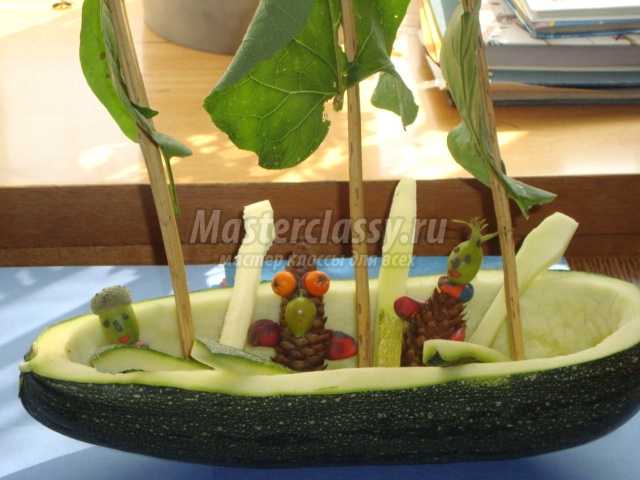
Ship
To make such a beautiful “needlework”, you should take a large squash fruit (do not peel it, as you usually do when cooking) and cut it so that the cut part is a third, and the remaining, respectively, two thirds.
To work, take a large part and leave a deck raised by about a third from one tip, make a recess in the remaining part - select the pulp with a spoon or cut it out with a knife.

Peel and cut the carrots into layers, use them to make an anchor and a pair of flags. Chop another carrot, also peeled, in circles, they will then be useful for making portholes and a steering wheel.
From the remaining third of the vegetable, or rather, using its skin, make a couple of stairs, their length should be equal to the deck height. Make a steering wheel - stick a few broken toothpicks into a large carrot circle. Use the same toothpicks to fix the portholes on the boats, and to fix the anchor. If you want to further decorate your boat, then you can stick broken matches with sulfur heads along the upper side.
Cut a few large whole cabbage leaves to size - secure these sails using long bamboo skewers. Decorate with carrot flags on top of the mast. If you do not have cabbage leaves, then you should not be upset, because ordinary colored paper is also suitable for sails. Make a through hole on the bow of the boat and place a whole thin peeled carrot there. What a wonderful thing you have done!
Do-it-yourself zucchini craft - photo:
Crafts from zucchini for kindergarten
If in the near future there will be an exhibition in honor of the autumn holiday in the kindergarten, then by all means do crafts from zucchini for the holiday. Such cute "homemade" will undoubtedly appeal to teachers, children, and parents.
Take an oblong zucchini with a thickening at the end and make a hole in a narrow place, remove the pulp from the hole.
Cut the zucchini about a third lengthwise to simulate a torn shoe sole. Amuse both cut parts, in this case the “open mouth” will turn out to be more expressive. Cut a few paired holes for the laces on top of the peel, insert plastic strips inside (a plastic bottle is suitable for cutting them out), paint them with white nail polish. On the sides, apply a pattern imitating the usual pattern on sneakers with a knife, tie ordinary white laces or a connected chain of air loops to the plastic strip. Stick a few matches into the "mouth" of the shoe, which will play the role of shoe studs. Here is ready funny crafts from zucchini for children kindergarten.
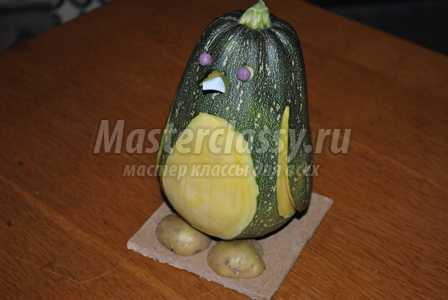
Take a small fruit with a soft skin. Cut out an oval tummy in the center. Cut the wings on the side, cut them a little from the bottom so that they protrude slightly. Cut holes for the eyes and fasten the plasticine button eyes with the help of matches.
For the beak, a triangular slot should be made, the beak part itself should be cut out of a plastic bottle, painted with white nail polish, and then inserted into the squash pulp.
Cut a small oval-shaped potato in half lengthwise, use the potato halves as penguin legs. Here is another one ready and in just a couple of tens of minutes.
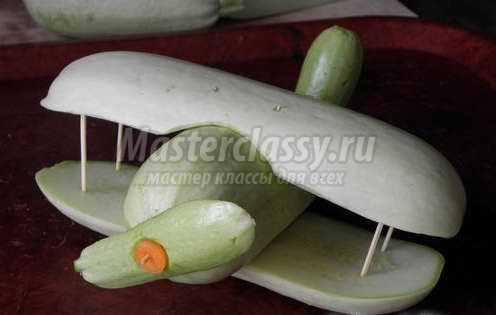
The fuselage of the aircraft will be made from a medium-sized zucchini - from above, make a slightly in-depth environment for the wings. Make an oval cut at an angle near the stem.
Cut the longest fruit into 3 parts along, you will not need the middle, but in the upper and lower parts you will need to make oval recesses, the fuselage will lie in them.
Cut the smallest zucchini into halves lengthwise, one of the halves will go to make the tail of the aircraft, and the other for the propeller. Cut the second half of it once along, then make a hole in the center of the outer roundish part and put a small carrot circle there.
The next stage is the assembly of the aircraft. Secure the tail with a pair of toothpicks. Fasten the upper wing with the fuselage with three toothpicks. Stick a pair of sharp sticks into each wing from the edge. Attach the bottom wing by inserting two toothpicks at an angle. Well, now attach the screw with half a stick.
Take a rounded vegetable, cut off the skin in front, without affecting the pulp - this will be the windshield of the cab. Cut the sides of the skin in the same way to make side viewing windows. On the windshield with matches, fix a couple of carrot circles - a kind of eye.
Use small potatoes for the chassis, make a spinner from the cut off top of a small pumpkin, cut as needed.
Crafts from zucchini - photo:

Crafts from zucchini for the autumn holiday
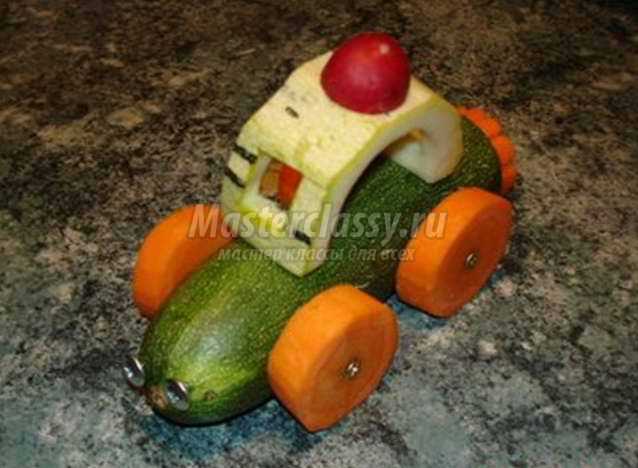
In the fertile autumn, many vegetables and fruits ripen, which is why kindergartens and schools hold themed holidays dedicated to harvesting. Craft autumn from zucchini will have to "go to court" at any exhibition of handmade products.Tractor
This technique is indispensable during harvesting, which is why it is symbolic that this craft is made from zucchini. For work, you will need to take two fruits, and one of them will not need to be cut. Cut the second one into two parts, and the one near the former flower should be smaller in size. This will be the cabin of the vehicle. Trim the core a little so that the cabin slightly wraps around the second zucchini. Be sure to cut the back and seat in the cab. The second half of this vegetable is cut in such a way that it turns out 2 circles of large and medium size, one small for the steering wheel.
Lay the untouched fruit horizontally and fix the cabin on it, fix it with a toothpick stick at the back. Attach the stick at an angle - this will allow your "machinery" to be more durable. With another, attach the cabin obliquely across the floor so that you can then fix the steering wheel on it. Attach large and medium wheels to the base - do not stick the toothpicks to fix them all the way, otherwise the wheels may fly off. Make a pipe from a miniature zucchini by cutting off the excess. Cut these surpluses into two headlights and also attach to the tractor.
By the same principle, you can make other transport crafts - cars, steam locomotives, etc.
Craft from zucchini autumn do it yourself
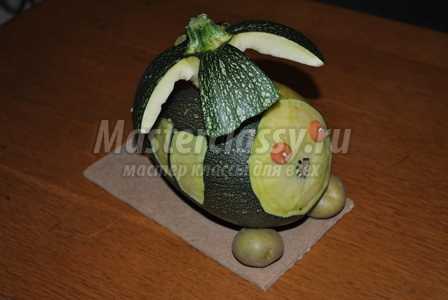
The natural cylindrical shape of such vegetables allows you to make a wide variety of animals together with the children - crocodiles, bears, hippos, dolphins, whales. The basis for the crocodile will be a long green zucchini, but the short and wide fruits are perfect for making funny pigs.
Bunny
Take a couple of spherical zucchini, different in size - this will be the head and body of the animal. Paws can be made from oblong zucchini, or other vegetables can be used. Kids will surely like this vegetable mix, because they are crazy about variety. A cherry tomato will serve as a nose for a bunny, circles of radishes and black olives will serve as eyes. Ears can also be squash or eggplant.
Rat
The basis for a cute rodent will be an oblong zucchini, a slightly smaller carrot will be used to make a nose. Carrot circles will serve as ears, small carrots for paws, and pumpkin seeds for eyes. That's all you need for the rat.
As you can see, there are a lot of options for making crafts from this vegetable. In addition, do not forget about the advantages of such a natural material - it is quite inexpensive in season, in addition, it does not darken on the cut, as potatoes do. That's why you can use both whole fruits and cut pieces for work. The pulp of zucchini is not hard, pliable, but at the same time quite dense. This makes the vegetable ideal for creativity. So, quickly choose the best master class for yourself, sit down with your child and start tinkering.
The first educational instances that parents and children go through are children's early development schools, circles, courses. Teachers of these institutions are often asked to work with kids at home, and in order to be able to check this, vegetable crafts for kindergarten are brought to the exhibition. Such competitions allow each child to gain new ideas, knowledge and develop logical thinking. And to make it easier for parents to complete an interesting craft, we offer step-by-step master classes of the best vegetable options.
Step-by-step lessons on making children's crafts from vegetables for the kindergarten
Crafts from vegetables for kindergarten can be very different and unimaginable. The more unpredictable the accessory, the more attention will be paid to it, thereby increasing the child's self-esteem and creating a positive attitude towards him. In order for homework in the form of vegetable crafts for kindergarten to be done perfectly, we recommend that you view the best options for master classes.
Ship from a zucchini
- We prepare a zucchini, 30-40 cm long and 7-10 cm in diameter. It must be washed under water, dried with towels.
- We put the zucchini on the most stable side so that its back end (with the spine) is slightly raised. If the vegetable does not want to become the way you want, then it is easy to cut it a little at the bottom to make the bottom even. With this treatment, the boat will not fall and lean to the sides.
- We cut out the upper part of the zucchini so that the edges of the vegetable remain intact by 5-7 cm. In this way, we form the bow and the back of the ship closed.
- If, after cutting out the upper part, it turned out to reach the seeds and entrails, then they need to be pulled out and the zucchini completely cleaned of seeds. After this procedure, it is better to dry the vegetable with paper towels.
- Using a knife from one side and the other in the center of the zucchini, we cut out small square windows (3 each), with a width of each side 1-2 cm. So we will have a hole so that we can insert the “oars of the ship”.
- Near such windows, a vegetable anchor is cut with a knife or a ready-made accessory is attached (made of cardboard, carrots, zucchini skins, etc.)
- At the beginning, at the end of the ship, we insert wooden skewers, 10-15 cm long. Instead of them, it is allowed to take green branches of a shrub or a vine.
- In the center of the vegetable ship, we insert similar skewers exactly vertically, this will be the basis for the sails.
- We prepare sails from cardboard or thick colored paper. They can be of different sizes or the same, large or small, rectangular or square - all this at the request of the child.
- We string the sails on skewers, slightly bending the cardboard. In this way, “inflated” sails of a vegetable ship are obtained.
- Through the extreme skewers and the central, highest, we pull the thread, which will imitate the ropes.
- We insert small wooden toothpicks or sticks into the cut-out windows, this will be the basis of the oars of the vegetable ship.
- Using plasticine, we sculpt the edges of the oars and attach them to the sticks that are already ready.
- It is allowed to decorate a ship from a zucchini with any little men, animals, cartoon characters.
eggplant penguin

- To make such a vegetable craft for kindergarten very beautiful, you need to prepare several medium-sized eggplants and bright purple, black coloring.
- We take a knife with a small tip (possibly a clerical one), we begin work.
- The green eggplant caps do not need to be removed, they will be penguin caps. But on the other hand, the spine should be cut evenly so that the animals are stable.
- With a knife, cut out 2 eyes from a vegetable, at a level of 1.5-2 cm from the top hat. A little lower we make a round hole for the nose.
- We take a small carrot, cut off 2 cm from its lower end and insert such a spout into the resulting hole for the nose.
- On the "belly" of vegetable penguins, we outline an oval with a knife and inside we clean the eggplant to green pulp. From the skins that remain, we cut out several circles with a diameter of 1 cm and use a toothpick to pin them in the center of the “belly”. In this way, we got unusual buttons on the stomach of animals.
- Gently with a knife from the left and right sides of the eggplant we make a small incision in the skin, turn it 2-3 cm up. In this way, penguin wings will turn out.
- It is allowed to decorate the original vegetable crafts with greenery, autumn leaves, artificial snow or stones.
Funny faces or pumpkin men

- We take several small pumpkins, wash them, dry them.
- Using a can of paint, cover each pumpkin with bright orange or yellow paint. We are waiting for the vegetable to dry.
- Using a black or dark brown felt-tip pen, a thin marker or a bold pencil, draw the contours of the eyes, nose, mouth (if you want to create an unusual craft, you can finish drawing teeth, mustaches, glasses, moles, nostrils).
- We paint the eyes, nose, mouth with the desired colors (blue, white, red shades of felt-tip pens).
- Similarly, on the vegetable, draw the edges of the hair or hat, paint in the appropriate color.
- We put pumpkins-men on a tray, decorate them with leaves, belts, earrings, beads, other accessories and present them!
Original cauliflower lamb

- We prepare small pieces of white cauliflower, long carnation flowers, hard black olives with a stone, a knife, toothpicks.
- We pierce each clove with a wooden skewer and insert it into the cabbage. We carry out similar actions with 3 other spices. In this way, we get legs, the wool of a vegetable sheep.
- As a head, we take one black olive, pin it with a toothpick to the cauliflower.
- On the sides with a knife, we cut small parts of the olive to make ears.
- We do the same with the eyes. In order to make them look more organic, it is allowed to use grains of round rice, buckwheat or white berries. The eyes are glued artificial from old small toys.
- It is advisable to put the resulting vegetable sheep on green grass, moss, or create a special composition for them.
Cartoon characters Smeshariki from potatoes and onions

- Cooking an onion of bright orange color, medium size. My potatoes are the same size, color doesn't matter. Additionally, among the vegetables, it is possible to take beets, lemon, tomato, small squash.
- In order for the vegetable figures to be stable, one edge of the bottom should be cut off a little with a knife.
- We knead multi-colored plasticine in our hands, make eyes, nose, mouth for each Smeshariki.
- To make the vegetable craft spectacular, the body parts of the heroes should be done in the color that is used in the torso (onion with orange, beets with purple, lemon with yellow, etc.)
- Place the resulting vegetable Smeshariki on a beautiful pallet, after laying out the base with grass or autumn leaves. Such a simple craft will be even more original if it is supplemented with small multi-colored mushrooms, berries and fruits.
How to make crocodile Gena from cucumber and Cheburashka from potatoes

- For such a vegetable craft, you need to take several large potatoes, cucumbers, colored paper.
- We cut off a ring from the potato, 2 cm wide, put it across the remaining piece, pin it with toothpicks. In this way, we got a torso, a head.
- We cut off 2 circles of potatoes, 1 cm wide for the ears and pin them similarly to the head on toothpicks or wooden skewers.
- We cut off several small pieces for the legs and arms from the potatoes and attach them in the same way.
- With the help of colored paper and scissors, we cut out the eyes, nose, mouth, buttons for the body for the Cheburashka. Glue them with glue to the dried potatoes.
- Cut the cucumber into 2 pieces in proportions of 60%, 40%. The larger piece will serve as the body, and the smaller one needs to be cut from the whole edge and insert a small piece of toothpick. In this way, an open mouth was obtained, we attach it to the body with a skewer.
- We cut off small pieces for the legs and arms from another cucumber and attach them in the same way.
- From colored paper we cut out the eyes, nose and glue it to the finished cucumber crocodile Gene.
- We decorate the vegetable composition of Cheburashka and Gena the crocodile with leaves, vegetables, fruits, and other gifts of nature.
A simple craft for children a flower made of carrots using the technique of kirving

- We prepare several large carrots, wash them under running water. It is desirable that such a vegetable be a little sluggish, for this it is recommended to leave it warm for 2-3 days.
- We clean the carrots with a knife along the entire length, make vertical triangular cuts.
- Cut the carrot into thin circles. In this way, figured petals of the future vegetable flower are obtained.
- We prick circles of carrots on a skewer, bending them up. It is worth lowering the largest petals down, and the small ones will be located at the top.
- The leaves of such a vegetable rose from carrots are allowed to be made using onions, dill, parsley or other herbs.
Funny hare from white cabbage for the autumn holiday in the garden

- We prepare a small cabbage, separate the topmost sheets from it - 2 pcs.
- We clean the carrots, cut it into 2 parts, make vegetable legs from each half.
- We fasten the cabbage to the carrots, thereby obtaining the basis of the hare on the legs.
- We attach the 2 remaining leaves of cabbage with toothpicks to the top, making ears.
- Eyes, nose of a vegetable hare are performed with the help of black olives.
- The mouth is allowed to be made using red bell pepper.
Very beautiful autumn composition in a basket of vegetables and fruits

- Such a fantasy vegetable craft should be framed in a beautiful basket of vines, zucchini or pumpkins.
- It is necessary to put bright tomatoes, peppers, cauliflower, corn, squash, zucchini, carrots, small watermelons in it.
- It is desirable to supplement the vegetable composition with lettuce, dill, yellow, white daisies, field plants, cones.
- A basket of vegetables decorated with ears of wheat, oats or barley will be especially original.
Find out what you can do with your own hands.
Video tutorials: what can be done from vegetables on the theme of autumn
Crafts from vegetables for kindergarten can be made from both natural materials and artificial ones. Decorations of products with the help of applications, toys, various bouquets, animals look very unusual. To make such needlework enjoyable for all participants, it is recommended that you watch video recommendations and lessons on the correct implementation of some points before starting work. We offer to consider the best videos that demonstrate the possible flight of children's imagination and methods for its implementation using vegetables (carrots, cabbage, zucchini).
Pumpkin lantern at the exhibition gifts of autumn in the garden
Master class on making a giraffe from carrots
Do-it-yourself duck from potatoes and carrots
Frog from apple, grapes and cucumber
Photo ideas for autumn crafts from vegetables and fruits in kindergarten
Among the most popular children's vegetable crafts, it is worth highlighting animals (hedgehogs, bunnies, squirrels, bears), cartoon characters and cars. If you plan to create accessories for Halloween, then for this you definitely need to take a pumpkin, zucchini or watermelon and make unusual shapes out of them. The easiest way to do an excellent job is to analyze the finished vegetable crafts in the photographs and the methods for making them. We suggest considering the best options:
Everything is just the most interesting! How to make eclairs, lemons from bottles, sew vegetables and berries, make them from papier-mâché.
Food is a pleasant topic for many. Products run out pretty quickly, and already from delicious cakes, fruits, only memories remain. But you can make it so that they will always be in front of your eyes, and even decorate the interior. Don't believe? Then find out how to achieve it.
How to make eclairs from plastic bottles?
Look how delicious the cakes look. But do not forget to warn home and visiting guests that these eclairs cannot be eaten, they can only be admired.

To make such a sweet that will always be in the house, take:
- 3 plastic bottles of 0.5 l;
- foil;
- salt;
- PVA glue;
- acrylic paints;
- scotch;
- thin white foam;
- Styrofoam;
- white fom;
- glue gun;
- brushes.

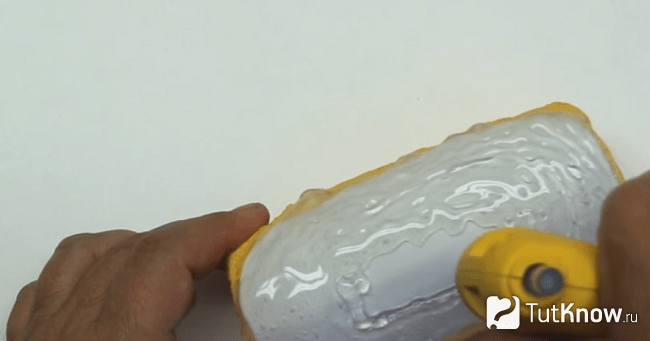
Expand the foil, put this blank on it, and next to it is another, but a whole bottle without a cap. Wrap them in foil, put them in the oven for two minutes. Homemade eclair also needs to be baked, but these blanks are placed in a hot place to make them more pliable. When you take them out of the oven, press down on the foil to make the bottles oval.

Cut the whole container in half, you only need a part of it, which is with a bottom. She will play the role of half a cake. A blank of two bottles at the junction must be glued with adhesive tape.
Pour PVA glue into a convenient container. Sprinkle salt on the board. Lubricate the plastic bottle blank with glue with a brush, then roll it over salt, which will adhere well to this base.
Set these future eclairs aside to dry. After that, you need to brush off excess salt with your hands or a brush. Cut out a small cone shape from the styrofoam. Lubricating it with silicone from a glue gun, glue a sheet of thin white foam rubber here. You will need to wrap the foam blank a couple of times.
At the same time, the foam rubber strip will imitate the dough, and the foam plastic will be the inner white cream.
Now shove this blank with the cone-shaped part inside into the bottle. This part should fit firmly and well into it. Lay the bottle on the board on its side, cut off the excess with a sharp knife to get a nice even cut.
Now with yellow acrylic paint cover the surface of the cakes. To highlight the dough of the eclair halves with this color, apply it with a thin brush along the contour of the cut, painting over the white foam rubber here.
From a white foamirant, cut a rectangular blank, round the edges. Its shape almost repeats the view of the cake from above.
Glue this part with a glue gun, cut off the excess.
Now generously pour silicone from the glue gun here. To do this, prepare the silicone rods in advance so that they do not run out in the midst of the process.
Wait for this glue to dry, after which it needs to be painted over with brown acrylic paint to make a delicious glaze. The photo clearly shows how to make such an eclair.
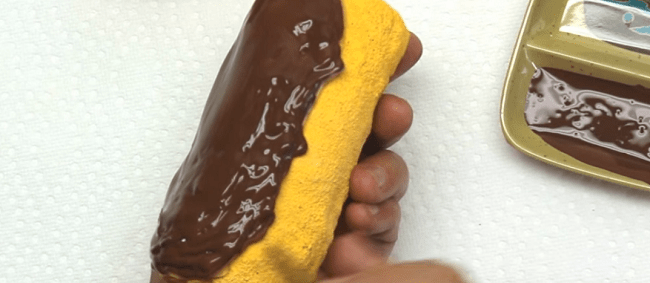
In the same way, make the icing for the second cake, after which you can put them on decorative dishes, but it’s better to put them not on the table, but behind the glass in the cabinet. After all, these cakes are so similar to real ones, they look very appetizing, you need to make sure that someone does not want to try them “by the tooth”.
If you need to bring crafts to a kindergarten competition, this will be an excellent way out. But also the teacher should not lose vigilance so that the children cannot take such an artificial sweetness.
The next craft also looks like a real one. Therefore, it is also necessary to warn everyone who will look at her that she is not edible.
How to make lemon at home?
For this craft, take:
- small bottles;
- sharp knife;
- PVA glue;
- salt;
- acrylic paints;
- scotch;
- thin brush.

From the bottom of the bottle, cut off a piece about 7 cm high, you can vary this value at your discretion to make a lemon of the desired size. From above, cut its strips, the distance between which is 1 cm, their length is the same.

As in the first case, such a fringe will help to better put the second part of the bottle on this one. But downloaded from the second bottle, you need to cut off the bottom, the height of which is quite small, about 1.2 cm.

Match these two blanks, seal the junction with tape. Lubricate the surface of one and the second bottle with glue, sprinkle with salt.
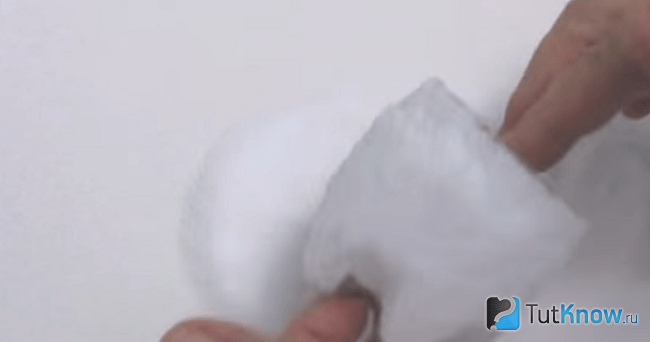
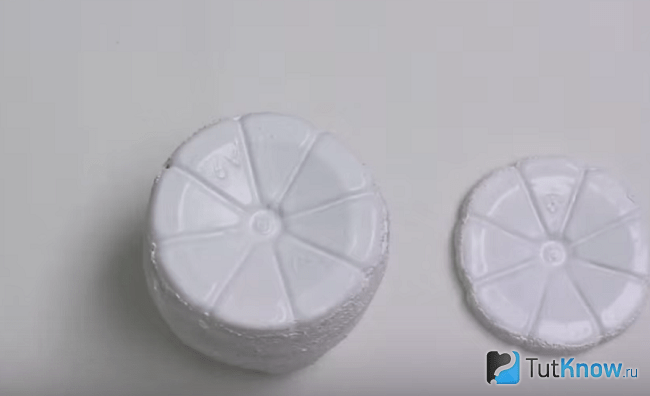
In this case, the bottom, which is inserted into this container, does not need to be lubricated. To make lemon wedges, cut the bottoms of plastic bottles so they are about 1cm or less high. With PVA glue, you need to lubricate only their sidewalls, also sprinkle them with salt. While the glue dries, you can go about your business.

Then you need to remove excess salt with your hands. If this is not done, then along with these grains the paint will fly around when you cover the surface of the fruit with it.
To make the color of the final work the most vivid, it is better to first cover the surface with white acrylic paint, when it dries, use the one you need.
This is how elegant blanks painted with white acrylic look.
Now the skin of lemons and its slices need to be painted with bright juicy yellow paint. To make the flesh have a realistic color, mix white, beige paint, add a little yellow. This composition should be applied with a thin brush on slices of lemons, but leave white streaks and light edging.
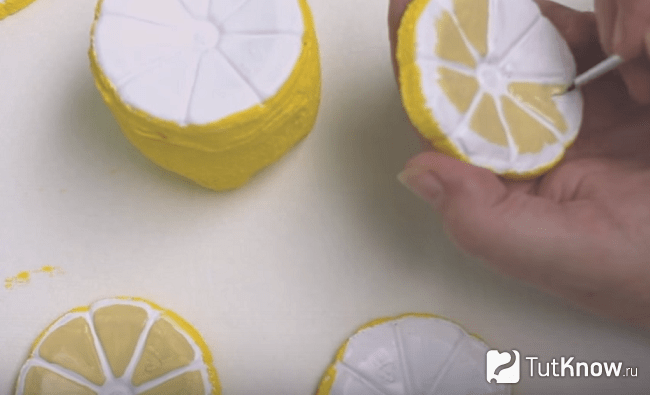
When the paint dries, lay the juicy lemon and its slices on a dish. Let everyone who sees such beauty praise your golden hands and be surprised that such a bright realistic lemon can be made from a plastic bottle.
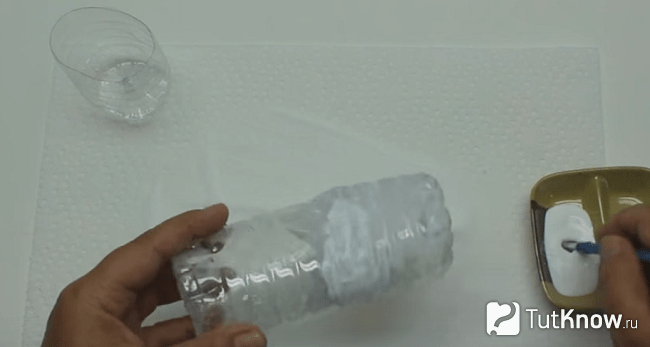
How to make a candle in the form of a watermelon with your own hands?
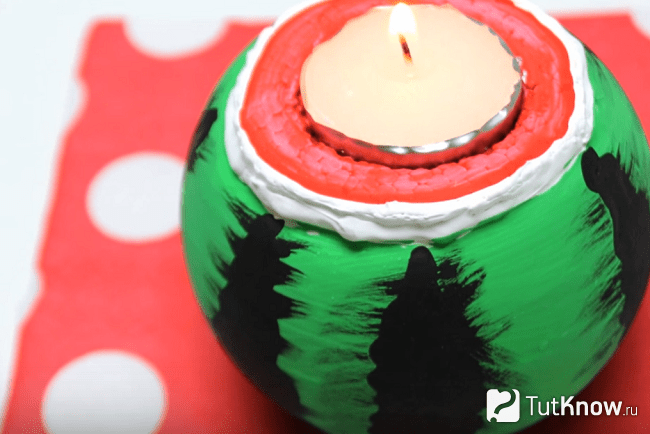
The main component will also be a plastic bottle, but small and round. Here is what you need to transform it:
- a piece of foam;
- sharp knife;
- small round candle;
- expanded clay;
- acrylic paints.

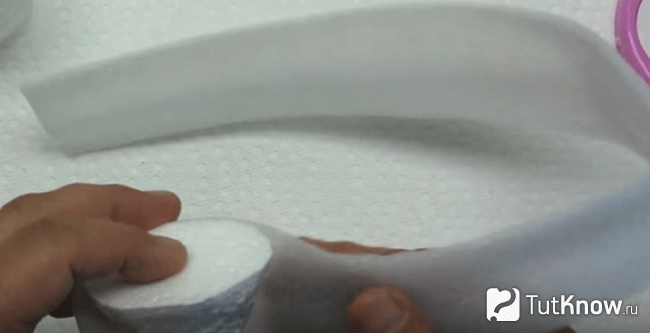
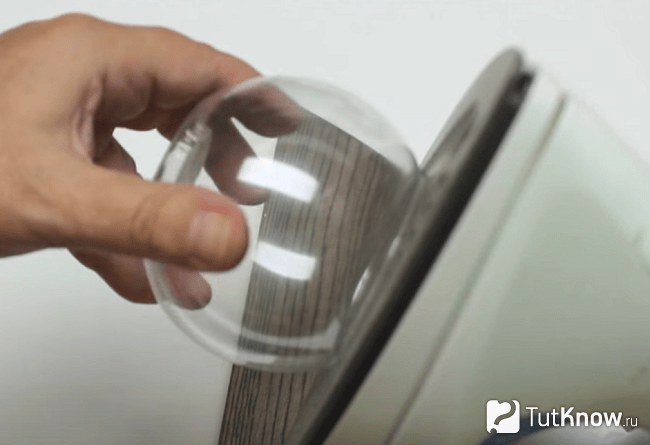
To round the edges of this container, to make them less sharp, attach this cut to a heated iron for a few seconds.
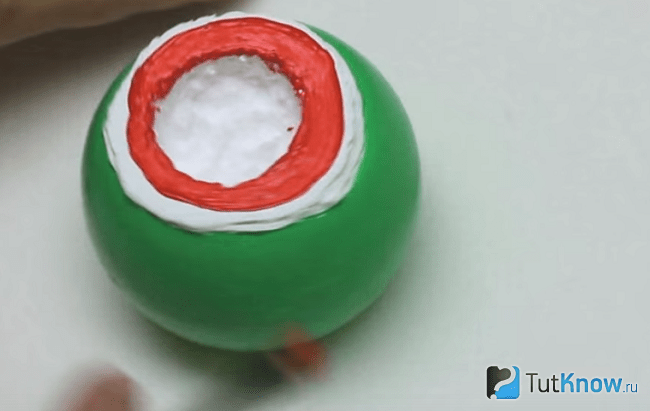
Put the foam in front of you. Turn the blank from the bottle over, place it with a cut on this material, draw a circle along these contours with a pencil. Cut it out, inside draw another circle, its diameter is equal to the diameter of the candle. Make this inner notch.

Pour expanded clay or other decorative stones into a plastic bottle, put a foam blank for a candle on top.

Outside, paint the blank from the plastic bottle, as well as from the foam, with white acrylic paint. On top of it, apply green, of course, when the previous layer is dry.

From above, cover the whiteness with red paint to make the pulp of the fruit.
Now, on top of the dried green paint, you need to draw black stripes of a watermelon, they may not necessarily be straight, make them openwork.
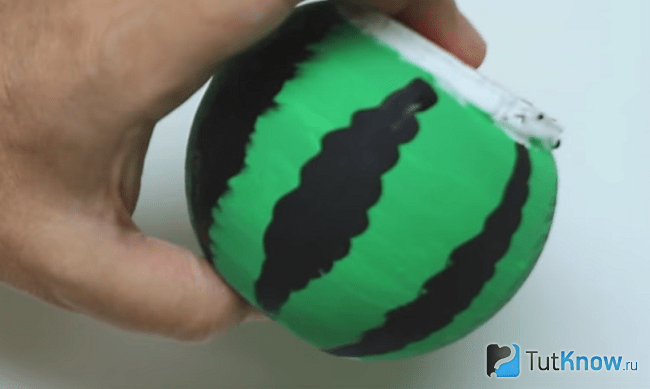
It remains to put a candle inside, light the wick and you can indulge in romantic dreams by the fire.
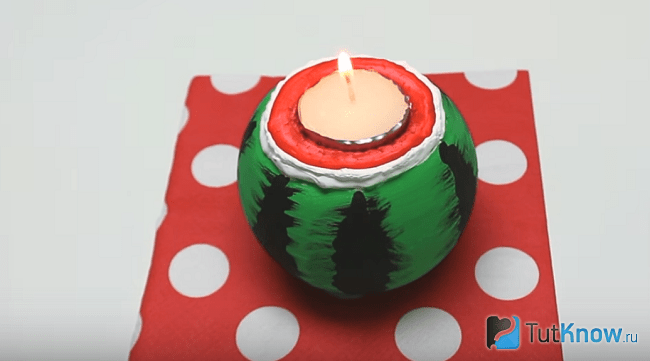
Here's how to make a candle at home out of almost nothing.
How to make vegetables and fruits: a master class
We will make them from papier-mâché. To do this, take:
- newspapers;
- paste or PVA glue;
- foil;
- scotch;
- colored paper or corrugated, or tissue paper.
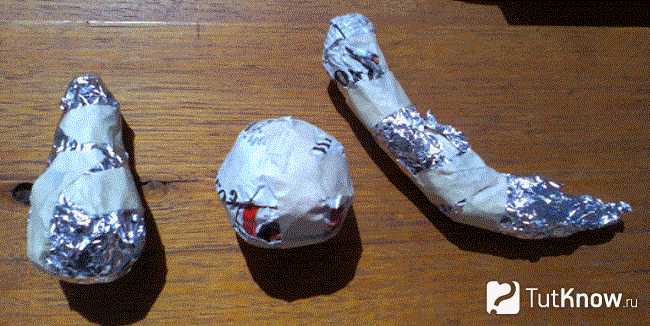
The next batch of newspaper sheets must also be kneaded well, then lowered into PVA or into glue prepared by oneself. To do this, you can mix flour or starch with water, put on fire, with frequent stirring, bring to a boil.
When such glue has cooled, you need to lower the newspapers into it, distribute them over the surface of the foil fruit. Lay the blanks on a tray, put them in a warm place, for example, under the battery, so that they dry completely. Only then proceed to the design.
To do this, you need to generously lubricate colored, corrugated or tissue paper with a paste or PVA, glue future fruits and vegetables with these blanks.
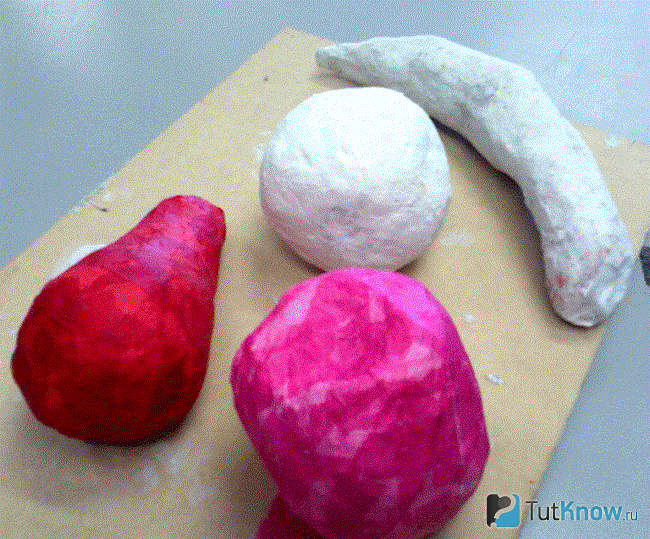
See what wonderful crafts you get. Put them in a bowl. Place on a table or nightstand to decorate.

There is another way that will tell you how to make fruits and vegetables with your own hands from papier-mâché.
- This will require real products. If you want to use them later for food, then take only a natural flour or starch paste for work.
- Pour it into a bowl, dip a paper napkin torn into pieces there, take out the mass with a spoon with holes, which is called a slotted spoon. Then the excess glue will drain.
- The paper composition must be applied to the selected object, for example, a banana, orange or apple. The layer must be sufficient. Then also put the crafts in a warm place.
- When they have reached the condition, having dried, then carefully cut the paper layer of each fruit in the middle to remove the two halves of the frozen papier-mâché mass. To give them integrity, connect again by gluing the cut.
- Further, such blanks are drawn up at your discretion. You can glue them with colored paper or cover them with paints.

If you want to make halves of an apple, then you do not need to glue its 2 paper parts, on the contrary, you need to fill them with a mass of newspaper or napkins mixed with glue. When the blanks are dry, prime them with putty. After drying this mass, it must be sanded, then covered with acrylic paints.
For this job you need:
- paper napkins;
- fruits and vegetables;
- paste;
- Bowl;
- sandpaper;
- acrylic paints;
- tassel.
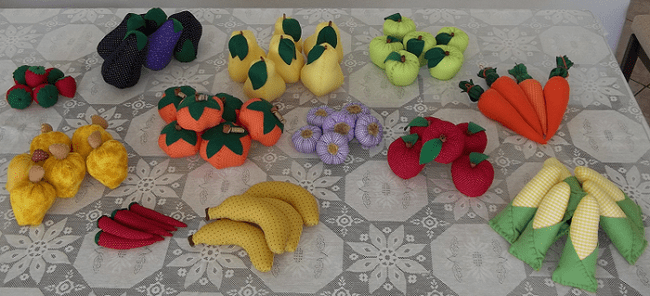
How to make artificial fruits and vegetables from fabric?
They can be voluminous and flat. Let's take a look at the first option. If you were asked to bring toy fruits and vegetables to kindergarten, then you can sew them from the remnants of the fabric.
Take:
- patches of fabric;
- synthetic winterizer;
- presented patterns;
- scissors;
- chalk or dry remnant.

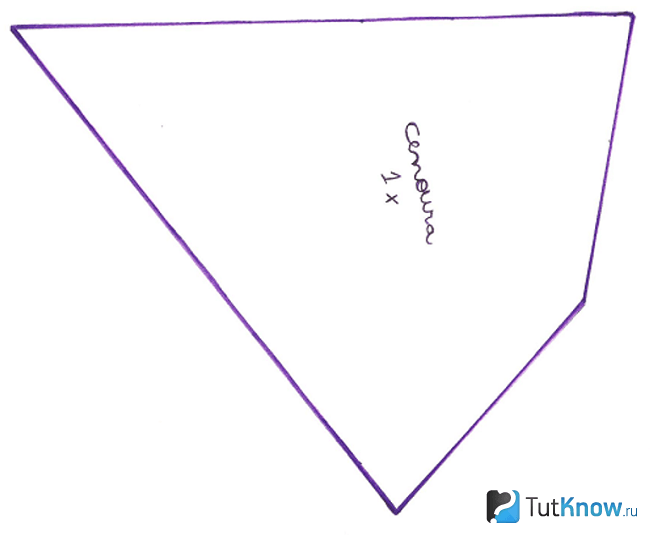
It consists of several slices, the following photo will tell you their pattern.
Based on this diagram, cut out 6 blanks, they need to be sewn into a single canvas. Sew the second side of the last piece and the first side of the first. Fill the resulting bag with padding polyester, sew it on top, tighten the thread. Sew this hole, glue or attach tow with a thread and a needle on top.
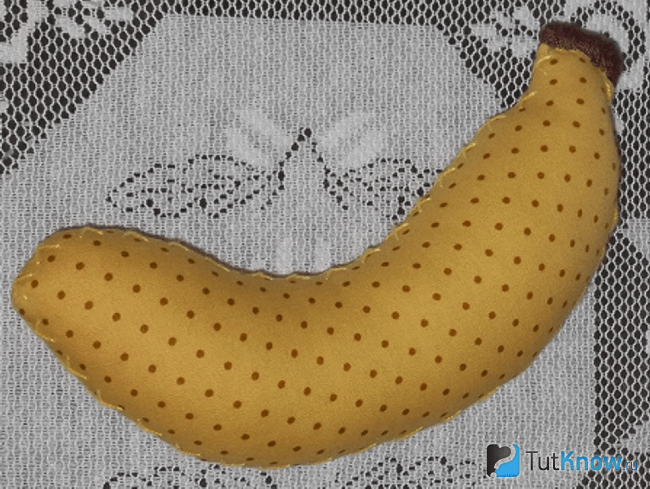
You can also sew a banana out of fabric.
For this you need to take:
- fabric of a suitable color;
- bulk filler;
- thread with a needle.
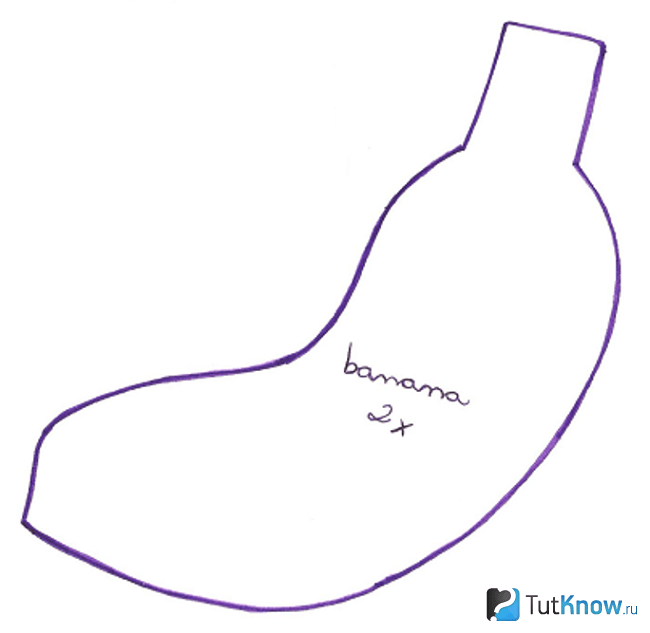
- Redraw the outlines of this fruit, attach this template to the yellow fabric, cut out two blanks.
- If you have a sewing machine and work skills, then sew both halves on it, leaving a small edge free on top.
- Through it, you will fill the banana with padding polyester. Cut a small rectangle out of brown fabric, fold it in half in the form of a ribbon, sew it here, at the same time closing this hole.
- If a sewing machine is not available, then you need to sweep both halves using a seam over the edge. Even without this tool at hand, you can still make a banana.

Looking at such bright-colored carrots, summer is immediately remembered and the mood rises. Find fabric in the right color. As you can see, you can use not only plain orange, but also small white polka dots.
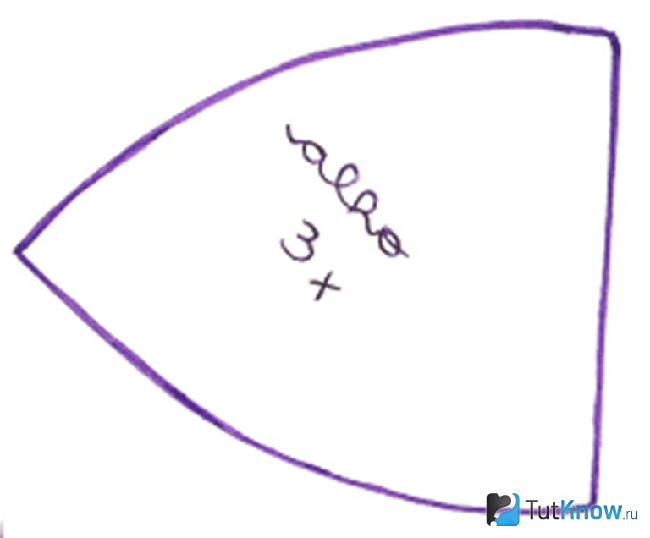
- Translate this template onto the canvas of your choice. Connect the sides of this figure to make a cone. They can also be swept away on a typewriter or by hand.
- Stuff this cone with padding polyester, sew greens on top. To make it, cut a circle from a dense fabric of this color. Cut with scissors its edges almost to the middle. Raise them up, sew this part to the carrot.
- In order for the greenery to acquire the shape we need, tie it with a thread.
A pattern will also help you make this vegetable.

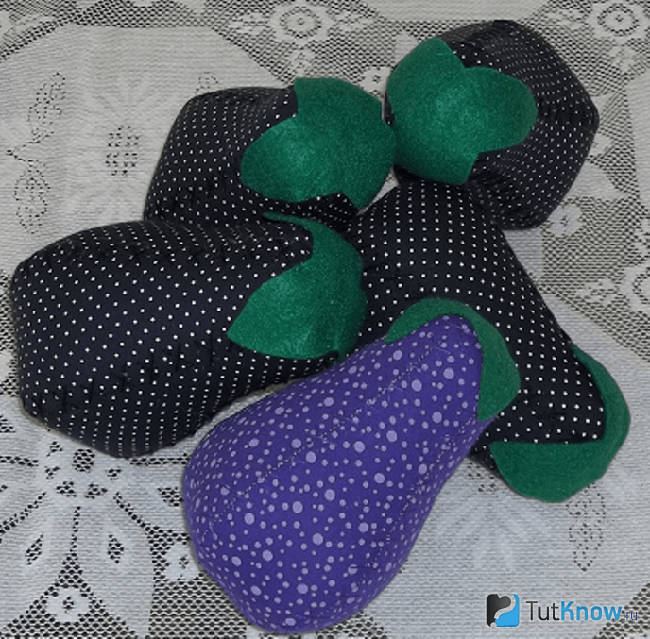
As you can see, the big part is the eggplant itself, you will need to cut 5 identical ones. A small petal-shaped form is the greens of a vegetable. Cut it out of fabric of this color. 5 identical wedges need to be sewn together to make a blank similar to a cone. Through the upper hole, you will fill it with padding polyester, sew greens here.
A pattern will also help you make a quince.

The main part of this fruit is a large blank, they will need 3 pieces that need to be swept away on the sides. You will make a quince tail from brown fabric by sewing 2 parts for this. Stuff the body of the fruit with synthetic winterizer, sew a tail on top, covering the junction of these two elements with it.
Here's how to make an apple out of fabric. To do this, cut out three identical parts, stitch them on the sides. Collect the resulting workpiece on top of the thread, tighten.
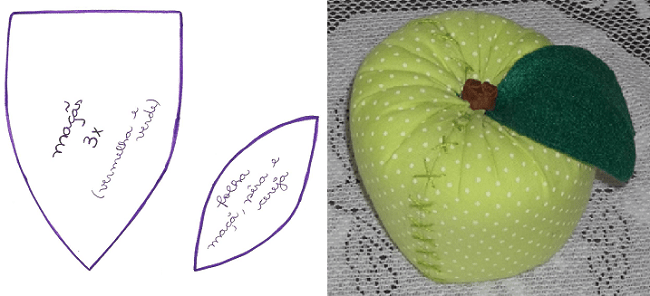
Cut a leaf from a green drape or felt, a fruit tail from a brown one, attach these details in place using a thread with a needle.
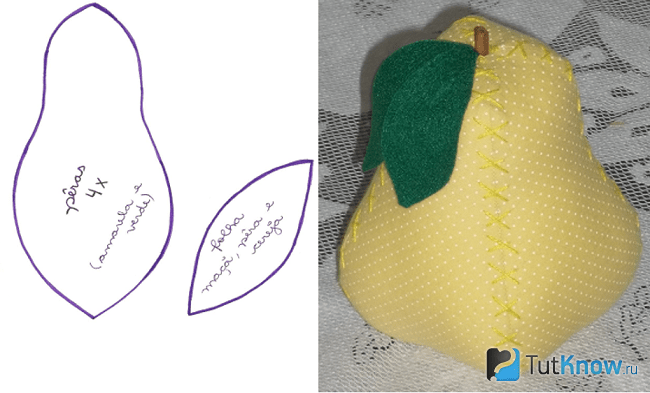
A pear consists of 4 blanks that need to be swept away. If you are doing this on your hands, use a cross stitch. To do this, first make parallel seams at an angle of 45 °, then with an inclination to the other side - seams perpendicular to them.
If you do not know how to make strawberries to add this berry to fruits and vegetables from fabric, then pay attention to the pattern.
Three parts of an almost triangular shape, sewn into a single canvas, will become a berry, if you then fill this semi-finished product with a padding polyester, gather it upstairs, sew the greens of the berry here.
- Grapes are created in a very interesting way. From fabric of a suitable color, cut out a triangle similar to the one you made for the carrot, but larger.
- Sew this blank on the side to make a wide cone. Stuff it with synthetic winterizer. Starting from the bottom, separate small pieces of fabric together with a padding polyester, tie them with a thread to make balls.
- Make such grapes all over the surface of the cone. Sew a green drape hat and ponytail on top.

In the finale, you can add spice if you make another vegetable. A pattern is also provided for it.

You can make hot peppers using a plain red cloth or with fasteners. Cut out two identical acute-angled parts, connect them on the sides with a seam. Fill with filler, close the place with a green cap of fabric.
Here's how to make your own vegetables using leftover fabrics, empty plastic bottles, old newspapers, or paper towels.
We hope that you will be interested to see the process of making vegetables in the presented story.
How to make a sweet, beloved by many - lollipops, is described in the second video. You will create them from plastic bottles using interesting needlework methods.
Too bad we didn't get it sooner. Beautiful crafts from vegetables and fruits
Oh, well, I didn’t come across this article in the fall, when Katyushka had to make crafts from vegetables at school! I've been digging on the internet, but haven't come across anything like it. Something came across either quite primitive or complex. But nothing, next autumn will come. In addition, in September it will be necessary to do two crafts already - Vera will also become a first grader)))
Crafts from vegetables and fruits with their own hands. See how to make children's crafts from vegetables and fruits for kindergarten and school with a photo. With the onset of autumn, harvesting begins in gardens and fields throughout our country. It is at this time of the year that fruits and vegetables look insanely beautiful: they are already ripe, strong and bright enough. Now they, in addition to stimulating appetite, also seem to push to create something new. It is not surprising, because from the collected fruits and, accordingly, vegetables, you can make very beautiful and interesting children's crafts from vegetables and fruits - natural material, while quite quickly and, by the way, quite simply. We will show you interesting beautiful crafts from vegetables and fruits handmade with photo instructions.
In this article, you will see a lot of unusual crafts from vegetables and fruits and useful tips will be given. They are unusual due to the fact that we are used to using vegetables and fruits for their intended purpose - to eat. In addition, crafts made from vegetables and fruits with their own hands are not stored for a long time and quickly deteriorate. To make such crafts, the use of a sharp knife is required, so the child should work only under the guidance of an adult assistant.
We want to note in advance that in most crafts it is required to fasten together some parts of the product carved from vegetables or fruits. It is best to use ordinary toothpicks for this. Well, in extreme cases, matches.
1. Beautiful children's crafts from apples with their own hands - little men.

Simple and beautiful do-it-yourself children's crafts from apples for kindergarten - little men. Nice photo example.
In order to cook such unpretentious guys, you will need the following components:
- 1. Big apples.
- 2. Some apple seeds.
- 3. Simple toothpicks.
- 4. Knife.
The process of making this children's apple craft:
You need to take two apples, one of which will be larger than the other, and put on top of each other. Accordingly, a small apple will be on a large one. Fasten them quite easily with an ordinary toothpick. These two apples will serve as the body of our future man.
After that, four pieces must be cut off from the apple. Two pieces will serve as legs and need to be fixed at the bottom of the body. And accordingly, the other two pieces will be the hands of a person and they need to be fixed on the sides.
You need to take a small apple and cut it into two equal parts. Each of the parts will serve as a little man's hat.
Pumpkin seeds will be needed in order to make the eyes and, accordingly, the nose of a person. The mouth can be cut with a knife right on the apple. However, there is another way: you can cut off a separate piece and fix it with the same toothpicks.
2. Crafts from vegetables and fruits - a giraffe from carrots or potatoes.

Beautiful children's crafts from vegetables - a giraffe from carrots or potatoes.
In order to make a giraffe from vegetables with your own hands, you will need two potatoes of different sizes. Accordingly, the one that will be larger will act as the body of a giraffe, and the one that will be smaller in size will act as the head. In order to make a neck, carrots are perfect, from which you will need to cut off the tip. The torso with the neck will need to be fastened with toothpicks. Of course, any giraffe has ears and they can be made using small leaves or even seeds. In order to make legs, you can take small twigs from any trees, and the tail itself can be made from grass, which you can also look for dried for beauty. The easiest way to make eyes for a giraffe is with grits. Most often, buckwheat is used. You can also make a giraffe from a carrot, such as shown in the photo above.
3. Simple children's crafts of animals from fruits - a mouse from a pear.
What to make such an unusual mouse? From very simple ingredients like the pear itself, a couple of pumpkin seeds, a small piece of wire that has a plug and, of course, with a knife.

Crafts of animals from fruits with their own hands - a mouse from a pear with a photo example.
The process of making fruit crafts with your own hands:
First of all, we will make the ears of the mouse: First, using a knife, you need to make cuts in the pear in those places where the ears themselves will be. After that, you should slightly bend your ears, which you will get back.
The next step: we make the eyes of a mouse from a pear. Let's take pumpkin seeds, which we wrote about earlier, and you need to draw black pupils on them with a felt-tip pen or a marker, respectively (whichever you prefer). After that, you need to make incisions where the eyes will end up and insert pumpkin seeds. There is nothing complicated about this fruit craft.
The last stage of this fruit crafts- mouse tail In order for the mouse to have a tail, you will need the wire that was mentioned at the very beginning. We stick it on the other side of the eyes with the plug outward.
4. How to make children's crafts from pears - funny little men.
If you suddenly feel sad in the fall, you can make such unpretentious little men. To prepare the second of them, you don’t even need any additional ingredients. It will be enough just to take a knife and cut out their eyes and a smile. If you want your little man to have legs and arms, then you can simply take ordinary toothpicks and insert them in place of the arms and legs, respectively.

Funny pear men. Here's how to make DIY fruit crafts.
To prepare the first little man, you may additionally need one more pear, lettuce and grapes and a banana. In order to make the eyes, you will need two circles, which we will cut off from a banana. On the circles themselves, we make pupils with a marker or a black felt-tip pen and, accordingly, attach them with toothpicks. The role of the nose of the little man's nose is performed by grapes, and the role of the hat is a circle cut from the second pear. A leaf of lettuce is just for beauty, and a smile can simply be cut out with a knife. By the way, if you want, you can also fix raspberries or blackberries with a toothpick at the tip of the pear.
5. Crafts from vegetables with your own hands - Larisa rat from radish.
An interesting enough rat will turn out for anyone who has a radish in the garden. You can’t distinguish it at all from the one that the well-known old woman Shapoklyak had. How to make yourself such a girlfriend? And it's very simple.

Beautiful crafts from vegetables - Larisa rat from radish. Photo example of the finished composition.
To make such a children's craft, you will need:
- - one large white radish
- - a few lettuce leaves or, if none, cabbage
- - one radish
- - some olives to be stuffed with paprika
- - kitchen knife
- - five toothpicks.
Process:
The first step is to properly wash and dry your large radish accordingly. After that, you need to remove all the leaves from it. You can leave only those that are in place of the tail of the future Lariska rat. You also need to remove all the roots, leaving them exclusively in place of the future antennae.
After that, the front part of the radish should be cut off, and at the end, with the help of one of the toothpicks, the very large radish should be fixed. Immediately it is worth sticking a couple more toothpicks so that they later act like hair on a rat's beard.
In order to make the ears, you will need to make two fairly large notches on the left and right, respectively. They will need to stick the same lettuce or cabbage leaves. There really is no difference. Maybe just the lettuce leaves are a little brighter.
At the very end, we will make eyes for the rat Lariska. We cut the olives into small circles and stick each one into the radish with a toothpick (as you can see, we would not have been able to do almost anything without toothpicks). But what is a rat without eyebrows? They can be made using the leftover piece of radish.
6. How to make a teapot and a cup from an apple and an orange.

A teapot and a cup made of apple and orange - a tea set and beautiful children's fruit crafts! Brief photo instruction.
With the help of apples and an orange, you can make a real tea pair or, if you want, a whole tea set. Here it will already be a matter of dexterity and accuracy, since the only tool that you will use is a knife. With it, it will be possible to make the base of the cups by removing the pulp from apples or, as in this example, use an orange for a cup.
Making such a penguin is quite simple and you only need an eggplant and, accordingly, a knife. In order to make the eyes of a penguin, it will be possible to take beads and pins, with which they can then simply be fixed.

Children's crafts from vegetables with their own hands for the garden and school - an eggplant penguin in several photos.
First, you just need to cut the eggplant into two even parts. Each of their parts will become a separate penguin. After that, you need to take the beads and fix them in place of the eyes. However, what is a penguin without wings? They can be easily made with a knife. It is enough just to cut them in shape with a knife.
You can also try to make a slightly different penguin, for which, in addition to eggplant, other vegetables will be required. You will need to take a couple more carrots and one pepper. The carrot will be used for the penguin's legs and nose, and the pepper for the wings. That's all, then we will consider children's DIY fruit crafts, but for now, about eggplants.
8. How to make duck from cabbage and eggplant?

How can you make duck from cabbage and eggplant quickly, beautifully and simply?
If you take a curved eggplant and one head of cabbage, which is called Beijing, then you can easily make a duck. There is already a beak and, accordingly, her chest will be made of green sweet pepper.

Children's beautiful crafts from vegetables and flowers with their own hands - a beautiful vase of flowers.
Also, with the help of eggplant, you can make a beautiful vase designed for flowers. Using a knife, you will need to remove all the eggplant pulp, and a beautiful pattern can be cut with a knife. By the way, the pattern can be absolutely anything and as varied as your imagination allows.
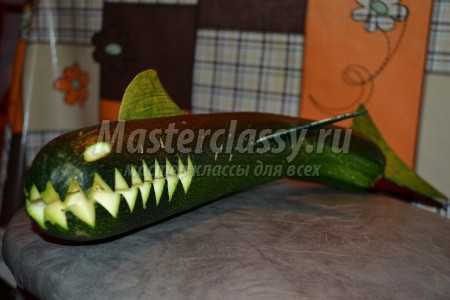
A shark can be made from a simple zucchini and sleight of hand.

Shark from zucchini - vegetable crafts for kindergarten and school with photo instructions.
It will be enough just to take a knife to cut out the fins and, accordingly, the tail. By the way, if you don’t have a zucchini, then a large cucumber can easily replace it.
Beautiful shoes can be made from all the same zucchini.

Zucchini shoes - vegetable crafts for children with a photo example of a composition.
This craft is most to the taste of girls. It is not surprising, because they are maddeningly similar to the beautiful shoes that Cinderella dropped at the ball. Of course, shoes can also be made from cucumbers, but here you have to look for the right cucumber, since it must be really large.
12. Crafts from zucchini - a piglet.
In order to make such an interesting piglet, you will need the zucchini itself, a small cucumber, and a couple of rowan berries.

The process of cooking crafts from vegetables
- 1. You need to clean the skin from the zucchini.
- 2. Cut the cucumber into slices and take five of them
- 3. One circle, cut into two equal parts, can be used as ears.
- 4. The other two mugs will serve as the nose of the pig
- 5. Rowan berries should be fixed in place of the eyes.
- All. Piglet is ready.
13. Cucumber train.

With the help of cucumbers, you can also make a train. For this you will need four cucumbers. Two of them will serve as wagons. One will need to be fixed on the car of the first for beauty. And the remaining two cucumbers need to be cut into circles. They will act as train wheels in this craft, which will need to be fastened with toothpicks and pieces of cheese.
14. Crafts racing cars from natural material - cucumbers.
With the help of all the same cucumbers, you can make cars for racing.

Cars - crafts made from natural material - cucumbers. In the photo, the children happily craft themselves.
Additionally, you will need radishes, carrots and the most ordinary toothpicks. The radish in this craft will act as a helmet for the racer, and the carrots, cut into circles, will replace the wheels of the car. To attach the wheels, you will need a toothpick that is already familiar to everyone, which will connect the wheels, both to each other and to the body of the racing car.
Without exception, all girls will like flowers that can be made for the holiday for mom with toothpicks and carrots.

With a knife, you need to cut out the desired shape of the flower and then string it on the toothpick itself. Carrots can also be safely replaced with corn. Then the core can be made brighter from beets or corn kernels. If you make about ten flowers, you will get a rather beautiful bouquet.
16. Cabbage and carrot ice cream for kindergarten and school.

Cabbage and carrot ice cream. Children's crafts from vegetables with their own hands with a beautiful photo example.
To prepare such a craft, you will need:
- 1. Cauliflower
- 2. Carrot
The amount of carrots and cauliflower depends entirely on how many servings of ice cream you want to make. Carrots will need to be washed and put in cups. She will perform the role of a waffle cup. On top in the form of ice cream, you will need to fix the cauliflower. Looks very appetizing and very similar to real ice cream.

Craft sheep, from natural material - cabbage. Give children joy and do crafts together!
You can also make a pretty cute sheep from cauliflower, for the preparation of which you will also need currants and, accordingly, ordinary matches or toothpicks, with which you will actually need to fix your eyes. The figure of the lamb and its legs will need to be cut out with a knife.
18. Man and vegetable cheburashka for kindergarten and school

Here's how to make crafts from human vegetables and cheburashka.
It is quite simple to make a hand-made craft of a person from vegetables with your own hands. For the body, a medium-sized carrot is perfect. Ideally, of course, it will be if during the harvest you can notice carrots that have a forked end. In this case, even the legs do not have to be additionally attached, since they will already be ready. For a human head, you can take a small potato or even an onion.
In order for a person to be like a real person, of course, he will need eyes. From it can be made either from black peas or from any grains at all. For the mouth, no additional vegetables are needed, since a smile can be cut out with a simple knife. It is only advisable for an adult to do this, since not all children will be able to cut it out neatly, and in the end I want to get the ideal figure, of course. What is a man without hair on his head? They can be made using threads that can be woven into absolutely any hairstyle, or even using straw or even grass. If you didn’t get a carrot with a forked end, then the legs can be made from carrots. Just in order to secure them, we will need toothpicks or matches, depending on your preference. For such a person, a child can come up with a name, and girls can even prepare clothes.
19. DIY fruit crafts - pear hedgehog.
Craft Ingredients:
- 1. Large pear
- 2. Almond spikes or the simplest toothpicks
- 3. Cherry in sugar
- 4. Some raisins.
How to make a beautiful hedgehog with a pear

Here's how to make DIY fruit crafts for the garden and for school - a pear hedgehog.
At your choice, the pear can be peeled or directly with the skin. However, you must understand that if you decide to leave the pear without the skin, you will need to sprinkle it with a little lemon juice, otherwise the “naked” pear will darken quite quickly.
After that, you need to stick almond spikes into the pear (if they are not there, then the most ordinary toothpicks). It is they who will serve as needles on the hedgehog's body.
Of course, the hedgehog will need to make both the eyes and the nose. For the nose, we just took a cherry in sugar, and the eyes can be made very simply by fixing a raisin in their place.

Simple and beautiful children's crafts from vegetables and fruits with their own hands, which you can then eat. :-)
In order to make a crocodile, it is best to take a sufficiently curved cucumber, which will act as a torso. On the cucumber you need to make small cuts. After that, another cucumber must be cut into two equal parts, one of which will act just like a head. In order for the crocodile to turn out with beautiful teeth that will be as similar as possible to real ones, you need to arrange it quite carefully, complete it by cutting them on both sides of the notch of the figure in the form of triangles. Crocodile legs are best made from the other half of the cucumber. They are also best attached with matches or toothpicks. For the eye, as well as for all other figures, you can use any berries that you like. You can even make pupils with peas or even a piece of carrot. Only at first it will be necessary to get rid of sulfur.
Banana fakes have also become very popular recently.

Beautiful children's DIY fruit crafts for the garden. A few photo examples, for a flight of fancy.
This banana craft is quite simple to make and even a small child can do it. For the body of the dog you will need a large banana. By the way, it’s better to take a couple of bananas for a fake, since at least one more will be needed to make a muzzle for a future dog. Using a knife, you can cut the dog's ears out of the banana peel, the main thing is to remove all the pulp first. The head with the body is simply fastened with simple matches, but the main thing: do not forget to attach eyes. For this, you can use, for example, raisins.
Beautiful children's crafts made from fruits and vegetables from natural materials, in fact, make it possible to cook a huge number of a wide variety of items and animals, and the main thing is your imagination. It is she who will allow you to decorate the dinner table with such beauty that you can then eat!


