How to make a red riding hood costume at home. New Year's costumes with their own hands. Little Red Riding Hood. How to make a DIY red riding hood costume
New Year is getting closer and closer, it's time to think about carnival clothes for your little princess. Perhaps you want to choose a Little Red Riding Hood costume?
How to make a New Year's Little Red Riding Hood costume with your own hands?
Carnival celebration with white flowers that look like snow, balloons, obligatory colorful ribbons and huge flakes of confetti. This description alone makes you touch the mystery of masquerade and unbridled children's fun, the smell of a Christmas tree. We just have to make a Little Red Riding Hood Christmas costume for this seething magic.
Pattern and fabric
A do-it-yourself Little Red Riding Hood costume for a girl of five to seven years old will bring incredible pleasure to your child, especially if she takes an active part in choosing patterns and fabrics.
First you need to choose:
- children's version of the pattern (let the girl herself show the picture that she likes);
- choice of fabric for the skirt and headdress;
- blouse selection.
A pattern for a skirt will suit almost any, but it is better that it be a skirt of the “sun” type. Girls love to spin, watching the flying hem. But you can pick up a pattern for a wedge skirt, a wide version fits perfectly into the image of a fairy-tale heroine. 
It is better to choose the same, bright, saturated shade for the fabric for the skirt and headdress. Bright red or crimson. Let the child show himself what color attracts his attention.
You can not sew a blouse, but pick it up. It will be much faster, even if you are a sewing pro, it will still take a long time. And you can pick up a white or cream blouse, with short sleeves, for example, flashlights.
What does carnival fairy clothes consist of?
Do-it-yourself Red Riding Hood costume is made for a very short time, the description of the work takes much more time. We list the main details of clothing.
- skirt;
- blouse;
- apron;
- corset;
- cap;
- basket.

Step-by-step instruction
New Year's costume "Little Red Riding Hood" is created in separate stages.
- According to the selected pattern, we sew a skirt.
- The upper part of the clothes will be complemented by an elegant blouse with sleeves "lanterns" or "wings". The blouse should match the bottom of the suit.
- The apron is another part. Make it simple. It is required to cut a semi-oval, Then you need to process the edges and sew on satin red ribbons. If you add lace or flounces here, the apron will become even more elegant.
- A corset or vest is also a necessary detail. Don't think too much about making it. A pattern of a wide belt is suitable, inside which you can put the same thick cardboard for rigidity. The corset should be made of black satin to contrast with the rest of the details. Ribbons are sewn on the edges. We cut them out of the same black satin. The vest is ready.
- The costume is unthinkable without a hat. First, we make the bottom of thick paper. The size of the bottom should match the size of your child's head. Fields can be wide, narrow, it all depends on your vision and desire. First, draw the details on paper, then cut them out of the fabric. On the inside, glue a gasket for density. All parts should be assembled and sewn with a fitting seam. After making sure that the cap fits well, you can sew it with a strong seam. Now you need to add a contrasting ribbon or frill.
- You can weave the basket yourself. Now you can find an incredible number of lessons on weaving from vines, straw or plain paper. Be sure to put pies in a wicker basket. You can bake them yourself. From above, all this must be covered with a festive napkin.

So we finished making the Little Red Riding Hood costume with our own hands.
 DIY winter crafts: scrapbooking snowflake, how to do it step by step


 How to beautifully decorate a shop window for the New Year with your own hands, photo
 DIY gift: knit socks on two knitting needles, photo
The Little Red Riding Hood costume is always a fashionable option for dressing up for carnival events and some holidays. Its advantage is not only that such an outfit does not lose its relevance. Another of its advantages is the ease of creating an image, because its details can be created independently and at home. Do not torture yourself with thoughts about how to sew a Little Red Riding Hood costume. It is enough just to remember what that character looked like and create simple do-it-yourself details that are included in her image.
Do-it-yourself Little Red Riding Hood costume for a girl
For the simplest version of such a children's carnival attire for a girl, you only need to sew a few details:
- apron;
- bonnet;
- skirt;
- corset.
For the blouse, you will need two large pieces of white satin fabric, from which two large pieces should be cut out to repeat the shape of the blouse and sewn, leaving holes in the neck, bottom and sleeves. You need to cut it so that the blouse is very loose and easy to dress.

Making an apron is very easy. From a white satin fabric, cut out a piece in the form of a semicircle. We sew its arc with white lace braid, and sew a belt of white satin fabric to the base. The approximate width of the belt is five centimeters.
To create a bonnet, you need to cut out a figure in the form of a rugby ball from red satin fabric, sheathe it with lace braid in a contrasting color, and sew satin ribbons to its two edges, which will be tied with a bow under the chin.

To make a skirt, two pieces of a medium-length skirt with a wide bottom should be cut out of a red fabric. We sew both parts, bend the upper edges, insert the elastic band, tightening it a little, and sew it so that the elastic band cannot fall out.


For the corset, you will need satin fabric. We cut it in the shape of a rectangle and make five holes on the edge of each side of it. Passing a black cord or a very thin ribbon through the holes crosswise.


Original children's outfit for girls
For girls who like to stand out, you can create a carnival look with unusual details.
Instead of a cap, you can sew a red beret from wedges by placing a perky pom-pom on top, or sheathe it with lace.
A red tutu skirt will look impressive, which is easy to create with your own hands from a fabric in the form of a mesh and an elastic band.

So that the corset does not cause inconvenience, it can be sewn on any white blouse from the wardrobe. To do this, you need to take three rectangles (one on the back and two on the front sides) and a cord that will connect the two parts in front.
You can also make a very simple apron with your own hands, which does not require needles and threads. It is enough just to cut out a part from a light satin that resembles a semicircle in shape so that two long thin strips extend from its base, which will play the role of ties.

Variant of the adult Little Red Riding Hood costume
To create such a carnival outfit with your own hands, you only need to sew a few details, the rest can be found in your own wardrobe or purchased.
You can find a red skirt and a white blouse on your own. It is desirable that the skirt is not straight.

Ahead of the New Year's carnival in the kindergarten or school. Where can I get a beautiful costume for a child? Especially if your girl at the New Year's party has the role of a red riding hood. Everything is quite simple! From improvised materials with your own hands, you can make a beautiful New Year's outfit. After all, for the image of a red riding hood, you do not need to make a lot of elements ...
New Year's Red Riding Hood Costume: Master Class
For work we will use:
- a piece of red fabric;
- lace;
- a piece of black fabric;
- white cord or braid;
- gum;
- thread and needle;
- scissors.
Our Red Riding Hood costume will consist of three parts: skirt, belt and cap.
Red riding hood skirt
To make a skirt, we take a piece of red fabric and fold it in half, forming two tiers. We retreat a few centimeters from the fold of the fabric (the width of the indent is equal to the width of the elastic band) and sew the skirt along the entire length.

We sew the edges of the skirt with lace.

Now we just have to insert the elastic and sew up the side seam. We take the elastic band wide enough - 2-2.5 cm, so that it does not bend and holds the skirt well.
Beanie
For sewing a hat, we will use the remains of our red fabric. It is very simple and will consist of only two elements. To facilitate the patterning process, you can take the hat that the child is currently wearing. And so, first we make the bottom of our cap. We get a kind of oval, cut off at the bottom. The upper part of the cap is a straight strip, equal in length to the rounded part of the bottom oval.

We sew the parts together and the hat is ready. So that when worn, the cap does not fly off the head, in front, on both sides we fix it with invisibility.

Belt
For the belt, we will need a piece of black fabric and a white cord. Cut off a rectangular strip slightly larger than the child's waist. We sew Velcro to the ends of the belt - now our belt will be easy to put on and take off. Using a white cord or braid, we make an imitation of lacing.


This is how you can make a beautiful New Year's Red Riding Hood costume quickly and at no special cost and please your little princess.

And this is what the red riding hood costume looks like on a child.

The Little Red Riding Hood costume is quite easy to sew. If there is left from the last New Year's party white elegant, not very long dress from the Snowflake costume, then it can be put into action.
You will need:
- red satin for skirt and hat,
- white satin for the apron,
- white lace
- elastic band or hidden zipper,
- sequins,
- adhesive interlining,
- a piece of dark dense fabric for a vest,
- 2 laces.
I do not indicate the footage of the fabric, because. it depends on the size of the child.
If you do not have a white dress, then you will have to sew more white blouse. The pattern can be taken in the magazine "Burda". She will need white satin with a width of 150 cm long - one blouse length + sleeve length. For example, such a blouse is suitable (this blouse is from another suit).

From red satin we sew a semi-sun skirt.

Since I took a white fluffy dress as a basis, I simply sewed a new red skirt, between the white skirt and the top. I ripped off the white skirt and sewed it back together with the red one. I didn't need a petticoat in this case.

If there is no ready-made dress, and the costume is made from scratch, then you can sew a belt larger in volume than the waist to the red skirt and thread an elastic band inside (a simpler option), or you can make the belt around the waist, glue it with non-woven fabric, then sew a secret into the side seam of the skirt lightning. Bottom at a distance of 5 centimeters from the edge can be embroidered sequins.
I attached sequins to sewing machine. I set the length of the tie equal to the distance from the edge of the sequins to the center of the sequins and only manage to put it under the foot. True, I had a typewriter twist by hand, but still faster than by hand.
petticoat can be sewn from tulle. Take a tulle three times wider than the hip circumference and collect it on a satin belt.
Rectangle 30x23 with two rounded corners. Sew any to the edge lace, laying it in small folds. The length of the lace should be about twice as long as the perimeter along which you sew it. Belt - it is better to cut the ties along the oblique. The apron itself should be slightly gathered along the belt.

After you have sewn on the lace, the apron must be stitched to the edge at a distance of 2 mm from the edge. So the lace will lie well and will not wrap.

The most important element is Little Red Riding Hood.

We cut according to the pattern from red satin. Rear end - single(det.1), but the one in the form of a rectangle (det.2) - double, glued interlining. We select the width so that it would be possible to do lapel, i.e. distance from crown to forehead «+» 4-5 cm.

Parts No. 2 are folded with the front sides inward, sewn on three sides (on the pattern along the black outline). We twist, iron and stitch at a distance of 5 mm. from the edge.
Sew to part No. 1 (on the pattern along the red outline). We process the edge with a zigzag.

The remaining raw lower edge of part No. 1 is smoothed up, tucked and adjusted.

Beanie doesn't hold up very well on the head of the child, so you need to sew strings or pin invisible to the hair. But the "ears" of the hat are very funny.

In principle, the costume is ready.

The Little Red Riding Hood costume looks more complete if sewn vest. I have pieces brown costume spandex, from which the vest turned out. You can cut out according to any suitable pattern taken from the magazine Mod.
For beauty, the vest was embroidered with sequins.


Instead of a clasp air loops and from black shoelace.


With another lace we make lacing in front.

On legs- white tights and dressy shoes. That's all. You can also add to the costume basket in hand, but such props on a children's matinee usually only get in the way.
For personal use only! Republishing in other editions forbidden.
One of these ideas was the creation of a copy of the cap of the heroine Yana Poplavskaya from the movie “About Little Red Riding Hood”, writes Dinara Shakirova (diushakirova), -

Materials:
- red felt 2 mm thick - 2 sheets 50 / 50 cm in size (the first is consumed almost completely, from the second I cut off two strips 1 cm wide - this is for ties, and if you use a satin ribbon as ties, then the second sheet of felt will not needed);
- threads in the color of felt;
- hand needle;
- manicure scissors with curved ends;
- tailor's scissors;
- tailor's pins;
- ball pen.
I developed hat pattern for an adult person (head circumference 56-58cm). If neededbaby hat size- then it is necessary to reduce the base of the pattern on all sides by 1 cm, then transfer the pattern using the elements of the pattern from the adult pattern (without reducing it).
Pattern for an adult:
The pattern consists of two parts: No. 1 is the upper part of the cap with openwork edges, No. 2 is the back of the cap.
Half details no. 1 is not included in the A4 format, so I give it in parts:


Detail No. 2 (it shows a 0.5 cm seam allowance with a highlighted contour):

Hat making process:
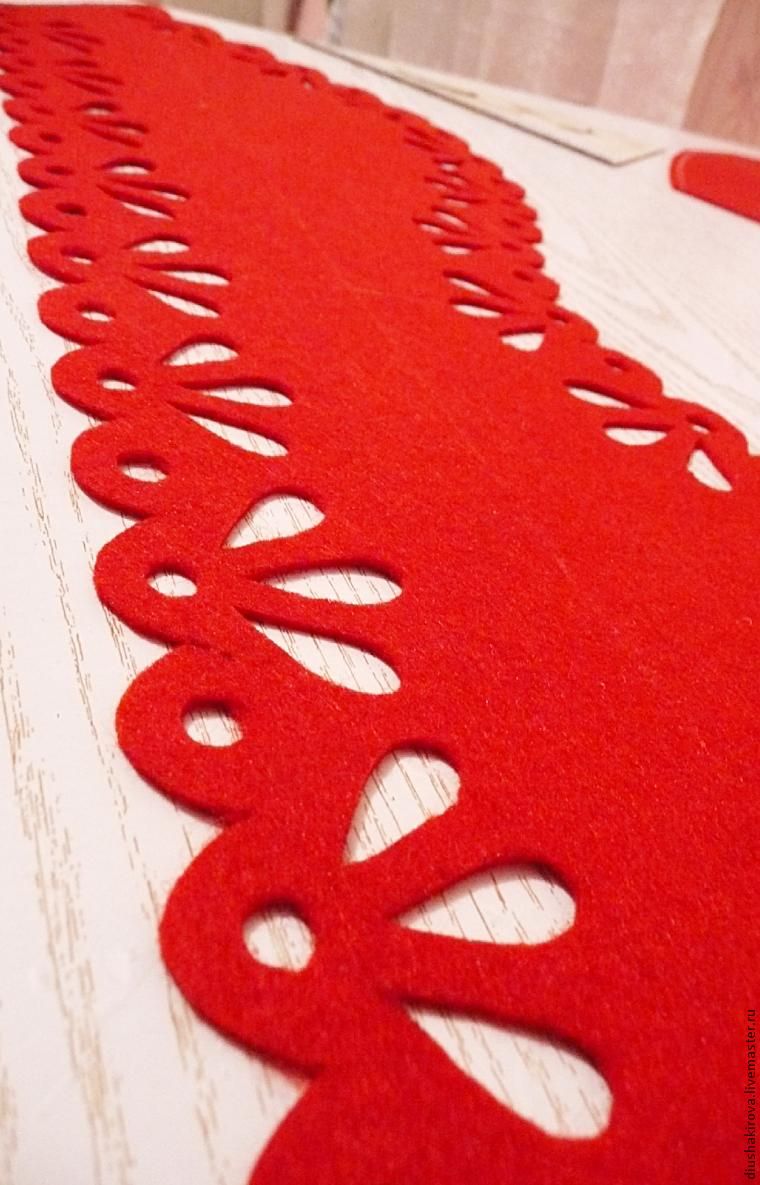
1. Cut out part number 1 from felt. On a sheet of felt 50 by 50 cm, it is located exactly diagonally:

From the leftovers, cut out Part No. 2.
2. Apply an openwork pattern to Part No. 1.
There are two ways here: cut out the pattern on a paper pattern and transfer it to felt even before cutting out the part (see point 1), cut the part immediately with an openwork edge, or cut the part along the general contour, and then, using the paper pattern as a stencil (I cut it out on it has only three repeating elements), moving it, apply a pattern along the edge. Who is more comfortable...
I applied the drawing with a ballpoint pen, and when cutting out the openwork, I cut off the ink contour. The pen leaves a clearly visible mark on the felt.

3. Cut out the openwork pattern on Part No. 1 using nail scissors.

This is what the finished Part #1 looks like:

4. Pin pieces No. 1 and No. 2, matching the middle marks.
As you remember, in detail No. 2, the seam allowance is 0.5 cm (point 1), and this allowance must be applied to the space between round holes and droplet holes in openwork:

Even with pins already beautiful

5. Carefully turn the hat inside out. Sew the pieces together by hand from the wrong side, while part No. 2 is pierced with a needle completely, and part No. 1 - half the thickness so that no stitches are visible on the front side.

Front side after connecting the parts:

Hat is sewn:

6. Left put on a ribbon. Since I made a copy of the hat from the movie, I kept the felt tie option. To do this, I cut two strips 1 cm wide from the second sheet of felt 50/50 cm and sewed them together. It turned out one tape 1 meter long.
Lace the ribbon through all holes at the junction of parts, starting from the middle at the crown - down to the edges:

When the ribbon came out of the last hole in the top edge of the cap,


