How to make a festive hat out of paper. How to make a witch's cap and hat out of paper. Creating measuring strips
We will send the material to you by e-mail
Not everyone was born great creators, and sometimes people are simply afraid to try their hand at handicrafts, and in vain. If you follow the advice and instructions from the editors of the site, it will not be at all difficult to make beautiful and elegant Christmas trees from paper and cardboard (voluminous) for the New Year!
Paper is always in demand, and especially on New Year’s Eve, because it is such a wonderful material for applied arts! If handled and stored with care, paper products can last for more than one holiday, and the modern material is bright and colorful, which allows for the full use of such decorative crafts in the interior.

We invite you to learn how paper Christmas trees are made and make the same beauty yourself.
Creating a three-dimensional Christmas tree
For those who don’t remember how to work with paper, we will remind you of a few simple rules:
- We do not allow any errors in paper sizes. If you need a square, it will be a figure with equal sides; if you need a rectangle, let it be a rectangle, even and beautiful;
- all fold lines are usually carefully smoothed with a fingernail - the accuracy of the folds allows you to assemble full-fledged high-quality products;
- the paper should not be of poor quality and tear at the slightest attempt to bend or cut it.


To assemble a voluminous fluffy Christmas tree you need scissors, colored paper and a little glue.
| Illustration | Description of action |
|---|---|
 | We use green paper. We turn the sheet into a square by bending one corner so that the edges coincide with each other. We cut off the remaining strip and remove it. |
 | We need fold lines, so we fold the sheet and iron the resulting folds, first along one diagonal of the square, then along the other. Then fold the paper in half. |
 | Unfold the product partially, leaving one corner folded. |
 | We bend the free corner to the folded part, as in the photo. |
 | Now the resulting trapezoid needs to be turned into a square by pulling it by the middle of the base and bending it to the right corner. |
 | It turns out to be such a figure in a spread. |
 | We bend each of the corners sequentially towards the center. Turn the product over and do the same on the other side. Let's unfold one corner and bend it inward. |
 | We do this with every corner. |
 | Cut off the bottom part of the resulting tie. |
 | It is necessary to make slits on the sides of the product. |
 | On each side of the tree we bend the top part from the cut to the base. |
 | Straightening the branches of this fluffy beauty! |
Funny spiky Christmas tree made of paper tubes
Everyone has heard about weaving from newspapers, but not everyone is ready to master it. But trying to make paper tubes and gluing them to the base of the Christmas tree is a simple and interesting activity.

Those who want to master weaving from newspaper tubes should be patient: first you need to prepare a considerable number of tubes. To do this, the newspaper is cut into strips 5 cm wide. Each strip is wound onto a thin knitting needle at an acute angle, gluing the free tip with a PVA tube at the end. Then they decide how they will paint the product: straight tubes or a finished craft. Coloring is done in any convenient way. Someone dips the workpieces in paint, stain, someone paints them with a brush on a grid. The finished Christmas tree can be painted with a spray bottle.


Video: beautiful wicker Christmas tree
Cute fluffy Christmas tree for opening cards
A child can make paper Christmas trees for the New Year under the guidance of an adult. For this craft you need colored paper, a card base, PVA glue, a simple pencil and scissors.


How to make a box Christmas tree from cardboard or thick paper: excellent packaging for a gift
Sometimes you wonder what to pack a New Year's souvenir or a delicious gift in. Handmade packaging will always touch the heart of the recipient, so let’s spend a little time in creative work.


Advice! It is better to decorate the box with beads, snowflakes, and sparkles.
Let's make a three-dimensional Christmas tree from paper and cardboard with our own hands and decorate the interior
There are many simple and chic ideas for using a DIY paper Christmas tree to decorate the New Year's room interior. A voluminous beauty, even if it was not brought from a store and did not grow in the forest, will wonderfully serve to lift the mood for the holiday.
Volumetric Christmas trees: conical base
First of all, let’s figure out how best to make a cone for a Christmas tree out of cardboard. A dense, durable cone is a guarantee that the product will last throughout the New Year holidays without deformation.

For the cone, cardboard, thick paper and leftover wallpaper are suitable.
How to beautifully decorate a cone base
It’s easy to turn a cardboard cone into a fairy-tale Christmas tree with the help of various decorations. The simplest solution available to everyone is braiding a cone with paper fringe. It is better to make fringe from corrugated paper. But if it is missing, then regular colored paper will do: cut strips of the required width, glue them into one long strip. If you carefully fold them several times without creasing the edges, you can immediately cut a beautiful fringe along the entire length.

Christmas trees made of cardboard from blades
Following the principle of creating a product from blades, it is not difficult to make a Christmas tree of any size. The essence of the work is to prepare two, three or four identical templates of the silhouette of a New Year's tree with slits at the top and bottom. No glue is needed for assembly, the craft will stand without any problems.


From two templates you get a four-blade Christmas tree.
Volumetric Christmas trees: carved art of vytynanka
Many people are familiar with the paper cutting technique called vytynanka. We suggest creating a Christmas tree of magical beauty using paper, a pencil (or a printed template), scissors and a cutter knife.
Christmas tree paper templates
It’s worth taking a look at the idea of a New Year’s tree using this wonderful technique:


Article
New Year is the most fun and children's holiday. Even adults are not afraid to look funny in red Santa hats and with a bunch of gifts. What can we say about the kids who, in this joyful chaos, are trying to take part in all the activities! The main attributes of the New Year are Santa Claus and a Christmas tree. Traditionally, a large Christmas tree is decorated with toys and tinsel, and round dances are performed around it. What if you make a non-traditional Christmas tree? A beautiful DIY paper Christmas tree will not claim a central place, but it can decorate a child’s room or become a souvenir gift. Believe me, such a Christmas tree will find its use. 
A Christmas tree is made from paper, cardboard, colored and corrugated paper, tinsel and any other available materials. It’s easy and fun to do: the kids take part in the work with great pleasure. Two-year-old children, for example, can roll plasticine balls, which later become a toy, or glue a small part to the place indicated by adults. And the memories of a joint craft will last for several days.
There are at least a dozen ways to make a paper Christmas tree with your own hands, but in any case you will need:
- Paper (colored, corrugated, thick - whatever)
- Pencil with ruler
- Glue and stapler
- Scissors
- Sometimes a compass
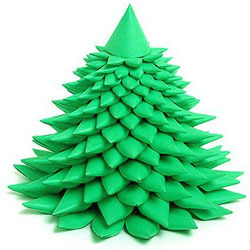
Model No. 1. Three-dimensional paper Christmas tree
First, the base of the tree is made - a cone. If the tree is planned to be large, the cone is made from whatman paper (it can be replaced with four A4 sheets glued together). Mark the center in the center of the wide side, draw lines from it to the two lower corners, cut it off (don’t forget to leave an allowance for gluing), cut off the semicircular base, glue it, check that it’s level. On this basis - a cone - you can make several different versions of Christmas trees. You can get a large paper tree if you make a large cone, and a small one - on a small cone. And the different methods of making needles will generally be misleading: it may seem that these are different Christmas trees.
 To make the blank cone look like a Christmas tree, we make needles from colored paper. Traditionally, the needles are green, but you can assume that there is snow or frost on the branches - the choice of color is yours. We outline the rectangles: for the lower needles, the width of the rectangle is 7 cm. We make a trapezoid from the rectangle: the upper side is cut off. The wide side is folded into a triangle and fastened with a stapler or glue, the top side is convenient to glue to the cone.
 Volumetric needles can be replaced with circles glued to the top. If you cut out circles of different shades of green, the tree will look more original.
The needles are glued in rows, starting from the bottom. To make the tree look beautiful, reduce the size of the needles every three rows. That is, we first draw rectangles 6.5 cm, then 6 cm and 5 cm. We decorate the top of the tree with a small cone, the bottom of which is cut off with triangles. If desired, the Christmas tree is decorated with sparkles. You can use ready-made glitter, or finely chop tinsel. Apply glue to the needles and sprinkle glitter on them.
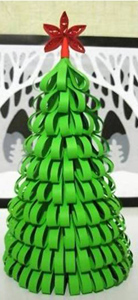
The second version of the Christmas tree-cone
We build a frame, cut thin short strips from colored paper, and wrap each strip around a pencil. The stripes take on a curled appearance. With a certain skill, you can twist strips of paper with scissors: carefully draw the blade of open scissors from one end of the strip to the other, while simultaneously pulling out the strip. Glue the twisted strips to the cone. You can decorate the Christmas tree with anything: sparkles, bows, balls, stars.
The third version of the Christmas tree-cone
 We glue drop needles onto the prepared frame. We make needles from strips of green (or any other) paper, glue their ends together - we get a drop. We glue larger drops at the bottom of the cone, and smaller ones at the top.
The fourth version of the cone tree
Wide strips of paper cut into fringes are glued to the base. Again, the stripes are wider at the bottom (accordingly, the needles are longer), at the top the stripes are narrower. The color of the needles can be any: green will make it natural, multi-colored - decorative. We cut the strips into small “needles”, not cutting to the end of about 1.5-2 cm. After the glue has dried, the needles can be bent upward - carefully draw the blade of the scissors from the base of the needles to the ends. Such a Christmas tree made of corrugated paper will look beautiful.
Model No. 2. Christmas tree made of paper and cardboard
You will need double-sided cardboard. Fold a sheet of cardboard in half and draw the outline of the Christmas tree. We draw exactly the same outline on another sheet. We cut out both contours, then make slits along the axis to the middle: on one Christmas tree at the top, on the other at the bottom. We insert the parts into each other. We decorate with tinsel, balls (glass or paper), sparkles - whatever you like. The photo shows slotted toys.
A similar Christmas tree can be made from colored paper. It will require 4 sheets. Fold each sheet in half and cut out a triangle. We glue the resulting parts together and cut them at an angle with a needle. You need to tighten them before the glue dries.
Model No. 3. Christmas tree made of colored paper
 For this model you will need thick paper. It’s easy to do: cut out a triangle, fold it like an accordion, make a through hole into which we insert a stick-rod. To make the Christmas tree stable, a stick can be inserted, for example, into an eraser. This Christmas tree can become a small souvenir or decorate your workplace. She will definitely create a New Year's mood.
Model No. 4. Christmas tree using papercraft technique
 The diagram clearly shows how such a Christmas tree is made from paper. You need to cut out several circles of different diameters (the bottom of the tree is from circles of larger diameter, the top is from circles of smaller diameter). Circles are drawn and cut, needles are folded. The finished tiers are strung on a rod. We decorate the Christmas tree with sparkles, beads, foil bows - the imagination is limitless.
Model No. 5. Folding Christmas tree

For such a Christmas tree, several circles of different diameters are cut out. The diameter and number of circles depends on the desired size of the Christmas tree. Fold each circle in half 4 times, unfold and straighten the circles. The trunk of the Christmas tree can be made from an old pencil, a cocktail straw, a wooden stick - all this is wrapped in colored paper, the tip is glued. We cut a small hole in the center of each circle (it should be smaller than the diameter of the trunk to hold it tighter). We string circles in tiers onto the trunk, starting from the bottom. A Christmas tree stand can be made from a wooden spool, cork, a plastic bottle cap, plasticine, or glued together from thick paper.
Model No. 6. Paper origami - Christmas tree
This popular technique can be used to make any figures, including Christmas trees. The video will demonstrate better than any words how a paper Christmas tree is made using the origami technique. We offer two options.
But the third option is more complicated.
Model No. 7. Christmas tree in a hurry.
For this Christmas tree you will need a color printer, paper, scissors with glue, hands and a few minutes of free time. We print a Christmas tree template from paper, cut it out, fold it, and glue it together.
The Christmas tree is one of the main attributes of the New Year. Nobody forgets about it: people buy live ones, and rush to decorate them with different outfits - toys and garlands.
Today's Christmas tree does not need to be cut out - it is made with your own hands from paper. The only important thing is to find beautiful cutting patterns that you like.
How to make a Christmas tree out of paper, which can be placed not only in the apartment, but also to decorate the desktop or make a nice gift for family or friends? Very simple.
For creativity you will need:
- thick paper, not cardboard
- stationery knife
- sewing machine
- openwork stencils
How to cut a Christmas tree out of paper and sew it
1. Choose a suitable pattern, that is, a stencil for the Christmas tree. Transfer it to paper or simply print it out. Fold the sheet in half lengthwise.

2. Cut out using a utility knife, first placing a sheet of thick cardboard under the template so as not to cut through the table. You will be able to cut out small parts better and more accurately with a stationery knife than with scissors. For the Christmas tree you will need 2 such blanks.

3. Now fold and sew them together using a machine exactly along the fold.
 This is what we got.
 4. Tie the ends of the threads into knots and then cut them off with scissors.
5. Now place the tree vertically and straighten it. The result is a stylish white New Year's beauty. You can lightly spray it with glitter spray and even hang small, light toys.
 A few more openwork stencil templates to choose from:


You can make many beautiful New Year trees from paper and cardboard.
The very first way to make a Christmas tree for the New Year holidays is to take green colored paper, maybe blue or light green, draw a circle on the paper, for this you can use any round object or compass.
Divide the circle into 12 equal parts, cut lightly, it is advisable that the cuts are not cut to the middle. We make cones from the corners and secure them with glue. In this way we make several tiers for the spruce; if the spruce is large, then there will be a lot of green leaves, about 20 - 30. If you need to make a small spruce, then it will be small.
The next step is to pierce all the leaves in the center of the leaf; for this you can use a needle or other sharp object; we seal the spruce with thread or thin wire. At the top of the spruce we will have a triangular cap made of green paper, which should be glued to the top of the New Year's beauty.
The next spruce will be made from green stripes. To do this, take green paper and cut strips out of it. The length of each strip will be different, since the spruce has different tiers. The strips should be 40, 30, 20 and 15 centimeters long. The next step is to carefully twist the strips; for this you can use a pencil or toothpick. We remove the rolls made from toothpicks so that the spruce is lush, you need to let it fluff up slightly.
The end of the strip, after they have fluffed up, must be secured with glue; we make the stripes look like small droplets, which we press lightly.
We string small rolls onto a toothpick, which need to be glued together with glue. The next step is to glue our droplets to the trunk of the future spruce.
We make the top from a roll, make it in the form of a drop and glue it to the top of the spruce.
You can glue beautiful toys made from colored paper onto the prepared Christmas tree.

A very beautiful spruce is made from colored cardboard.

To do this, you should take cardboard and draw a spruce on it. Cut out the Christmas tree along the drawn lines.

Bend the tree in the middle and make small cuts. We cut the first spruce from the top to the middle, the second from the bottom and to the middle. Then we carefully insert the cuts so that they coincide with the tree. Secure with tape.

In order to decorate the spruce, you can use a brush and paints, felt-tip pens or pencils, and various sparkles.

The next spruce is very simple to make. To do this, you should take a compass and draw circles of different sizes. The circles need to be folded in half, then folded again. This should happen about three times.
The resulting circles need to be straightened, and then a small hole should be cut. We cover the pencil with shiny paper, you need to spread it with glue, we string tiers of spruce, make the top out of foil or just glue a bead. That's it, the New Year's beauty is ready.
This is an article from the “Holiday Props” series
How to make a paper cap?
For some reason, the conical paper hat is called a “birthday hat” on the Internet. I remembered this decoration from the movie “Always Say Yes.” Well, these are the traditions - in order to show themselves and others that it’s time to feel fun, people can put on caps. In general, let’s figure out what the pattern should be.
I am planning a cap for a small mannequin head - Manyasha. I take a sheet of paper, roll it into a cone and trim off the uneven bottom edge. Hmmm, perhaps it turned out a little high and, therefore, unstable. Like in the story about Robin Hood:
Robin Hood began to dress.
First I put on my cap.
And that cap stood like a stake,
He held on somehow.
Okay, I'll lower the height. The pattern turned out like this:

Paper cap pattern
I cut it out, roll it up and try it on again, gradually pushing the cap deeper and deeper onto the mannequin’s head. A large margin is specially given for the seam, so the cap can be made narrow, like Tove-Jansson’s Tofsla and Fifsla, or it can be made wider and pulled directly over the ears to hold it tighter. When I like the look of the cap, I seal the side seam. But anyway, such a hat will not stay on your head just like that, you need an elastic band or ribbons - tie it under the chin.

Decorating with pictures and tinsel is up to your taste.
Now let's figure out how to make a witch's hat out of paper.
Looking at the resulting cap, I remembered that hats for witch costumes usually look somewhat similar. An imported Halloween witch, I mean. Our dear Baba Yaga, it seems, wore a headscarf. Although, who saw her? I don’t think there are any eyewitnesses who met European witches alive and examined their costumes either. But for some reason, witches are credited with a pointed hat with a brim. Well, gluing the brim to our cap is not difficult. But I want to clarify one point - a person’s head is not strictly spherical, and the contour of the edge of the cap, when I remove it from Manyasha, retains its acquired oval shape. So the fields must be planned based on the oval slot in the center. I won’t make it very wide - paper is not cardboard, and wide margins will simply sag under their own weight. So, I put the cap on a sheet of paper, trace the outline of the edge of the cap with a pencil, and draw the edges of the margins with some indentation.


Now I’m trying on a cap for these fields:

Fits well. Okay, let's glue it together. It must be said that this hat does not just stay on the head; it also needs to be secured with an elastic band or ties. Moreover, since the design still turns out to be bulky, you will have to fasten the ends of the elastic band or ribbons to the hat (somewhere in the area of the temples) very, very tightly. For example, use several strips of tape or apply strong glue.


