How to sew a bear with your own hands from fabric. How to sew a simple plush toy with your own hands. DIY soft toys for beginners
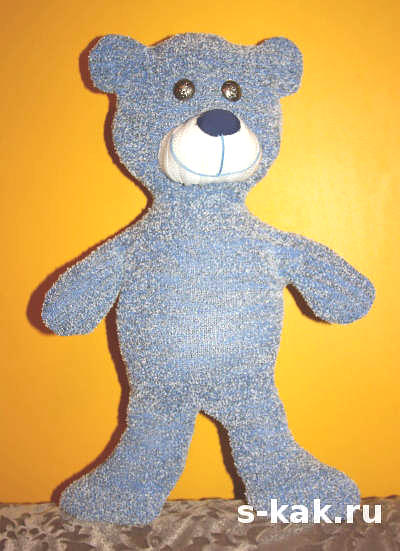
Children and adults love soft toys, especially those that are the result of their own creativity. The instruction "" will allow you to sew a Mishka for mom with her daughter, with her own hands. Unpretentious tricks and a simple pattern will help in the process of creation, and sewn bears will bring positive emotions and joy.
To sew a bear, you will need:
- creative mood
- pattern
- fabric (velor, faux fur, knitwear, velvet, plush, felt or an old sweater with elastane 🙂)
- thread, needle, scissors and pins
- filler (synthetic winterizer, foam rubber, holofiber, cotton wool for soft toys ...)
- frame wire (optional)
- buttons or beads for the eyes and nose.
How to sew a Bear
Step 1. We make a pattern on tracing paper, paper or cardboard. Pattern No. 1 is so simple that you can easily draw it yourself:
If you want to sew a bear from different materials or pieces of fabric do not correspond to the large size of the bear, you can use Bear pattern number 2 and sew each part of the body of the toy separately, then connect them:
Step 2 We translate the pattern onto a material folded 2 times (front sides inward): we chop off the fabric with pins, pin the pattern, circle and cut it out:

Step 3 We put the details of the bear with the right side inward and sew on a sewing machine or with a seam “over the edge”, retreating 5 mm from the edge and not forgetting to leave holes (for turning on the front side and filling), which are indicated on the patterns. Turn the toy right side out through the holes. If you use pattern No. 2, then we sew the details of the body parts of the bear, then we sew the paws and head to the body with a thick thread with an “over the edge” seam.
Step 4 Insert the wire frame. For any soft toy, it is necessary for greater stability, and also if you want to plant a bear or change the position of the paws. At the same time, it is completely optional, sometimes it is enough to fill it tightly with filler.
How to insert a wire frame
If you decide to insert the frame into a soft toy, use a wire with a diameter of 1.5 to 2 mm. Too thin wire can break, but there is a way out - twist 2 pieces of wire of the desired length together.
3 pieces of wire, through the punctures in the body or the holes left, alternately insert into the stitched shape of the toy, twisting and bending the ends with a loop so as not to pierce the fabric.
Insert the frame into the stitched bear shapes according to the following pattern:
Step 5 Now, through the holes left, you can fill the bear with filler, bypassing the ears and, conversely, adding more to the abdomen and paws. Do not spare the filler, a densely filled bear will turn out prettier and more magnificent, as it should be.
Step 6 We sew the holes with matching threads, with a seam “over the edge”:

Step 7 We decorate the bear's muzzle.
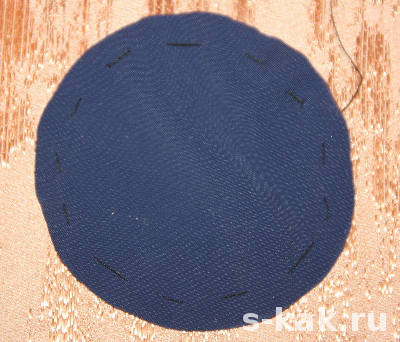
How to sew a muzzle of a bear
Eyes and spouts for soft toys can be buttons without holes or beads. You can also buy ready-made eyes in needlework stores, or cut them out of fabric or black shiny oilcloth and glue them with fabric glue. Spouts are often made of dark fabric:
- Cut out a circle with a diameter of 4-5 cm, depending on the size of the toy's head.
- Sew around with a basting stitch.
- Lightly pull the thread. Put a piece of cotton wool in the resulting bag.
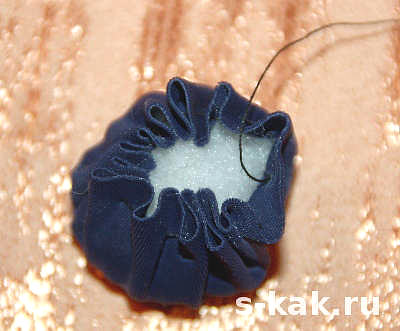
- Pull the thread to the end and you will get a ball nose.
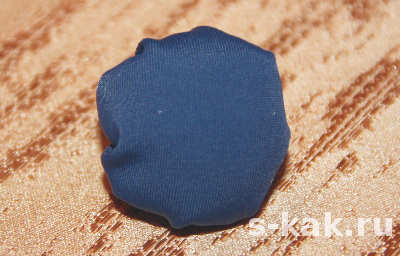
In this way, you can also sew eyes for a soft toy. We decided on the nose and eyes, we make a muzzle by analogy:
- We cut out a circle from the material with a diameter slightly smaller than the head, but larger than the spout.
- We collect on a thread in a circle and tighten. We put the filler, tighten to the end.
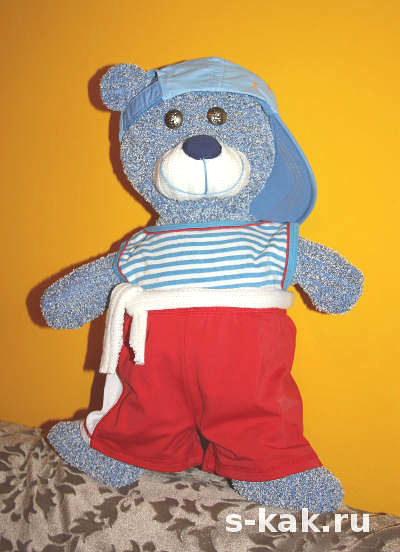
 bears can be sewn on the belly, and on the paws - fingers and heels. But we decided to dress Methodius so that he would not be shy:
Sewing a teddy bear is easy enough if you follow the instructions in this article! The first thing you need to do when you learn how to sew a teddy bear is to find a pattern that you like, as there are many options from beginner to advanced. Making a teddy bear bear is one of my favorite homemade crafts. These two approaches are easy for beginners and are created using very easy-to-handle patterns that can be made over and over again using different fabrics and materials, and without additional levels of complexity.
I mean, who says your pet teddy bear has to be brown and just fluffy to be cuddly? Why not make your own teddy bear with ultra-long purple hair, which would make a wonderful creative homemade gift. There's so much interesting stuff out there; it seems ashamed to only make "normal" teddy bears.
Features of sewing a bear with your own hands
These two bears were very funny and I would recommend going from scratch. But if you're looking to start something a little easier, or if you're looking for a nice craft gift, then a kit might be the best option.
How to sew a teddy bear with your own hands (1 option)

Even a pair of favorite pajamas that your child has just grown up can be cut and sewn into a cute bear. You can even find old battered stuffed toys that can be split up and reused to stuff your bear or create new bears.
The first version of the teddy bear pattern
A dressy mini teddy bear that looks great when made with bright patterns and colorful fabrics.
This toy is perfect for a child to ride; it's small enough to make a bit of extra fabric big enough to get creative.
What do you need to sew a bear
- Brown kraft paper (plain cardboard)
- Pins, embroidery thread or fabric pen
How to sew a teddy bear
Step 1


Draw this freehand Teddy Bear pattern and then cut it out. To make your teddy bear pattern, place the design on a piece of cardboard (an empty grain box works well for this), draw on it, and then cut it out. Place a cardboard toy template on the back of your material, make sure any design on the material will fit the bear exactly, then draw the template, turn it over and draw again.
Step 2


Cut out both pieces. Make your own teddy bear. Place both pieces on top of each other, on the other side. Sew together leaving a gap large enough to stuff the bear.
Step 3


To help stop any wrinkles when you turn the right side of the bear on the click around the curves of the bear.
Step 4


Turn the right side of the bear inside out. You may find it easier to use a wooden spoon handle to push your arms and legs out.
Step 5


Stuff the bear with polyfiber stuffing or soft toy stuffing of your own choice, then hem the gap.
Step 6


However, for the bear's eyes I used a couple of sewn-on buttons on press studs, however, if you don't find anything suitable, it's best to sew on the "eyes" with thread. You can plan the shape of the nose by sewing a triangle and then fill it in with vertical stitches. Using the (Y) shape for the nose will result in the lips nicely. Now decorate your bear with the ribbon; use a bow on the head for a girl or a bow around the neck for a boy.
Of course, you don't have to be a kid to have one of these cute shades; these funny little hairstyles can be a great gift when used as a pillow for mom or grandma!
How to sew a Teddy bear (Option 2)


This cute little teddy bear has a small tummy and arms and legs that are flexible enough to sit easily, but this little Ted is easy to make and can be created by hand or sewing machine.
I used long thick fur for the plush in the picture, the great thing about using long fur (other than wonderful of course) is that it doesn't show any flaws so the stitching doesn't have to be perfect which is good news because such thick fur can be hard work for a sewing machine, so I usually sew it by hand. When using any other fur or fabric, I would usually use a sewing machine.
Necessary materials:
- Sewing needle or machine
- Scissors
- Marker or chalk
- Buttons (buttons)
- Cardboard (large grain box is good for this)
- Fake Fur or Cotton Fabric Material (3/8 yards)
- 1 small plastic nose or embroidery thread
- Polyester fiber filling
- Mouth Floss Embroidery (Optional)
How to do it
Step 1


Print and cut out this teddy bear pattern. Place the template on cardboard and draw on it, then cut it out to make a template. Hamster teddy bear
Step 2


Place the fur back up and place templates on it to make sure you have the fur going from top to bottom. Draw the patterns with a marker or chalk, then flip the patterns over and draw them again.
Step 3


Cut out all four pieces (two backs and two fronts). This model was made to provide 1 cm seams. With the right sides together, fasten the 2 front pieces together. Sew the two front pieces; start at the top of the bears head and end at the beginning of the legs (see the pins in the picture). Repeat with the back sections, but leave a hole in the middle of the back as shown in the picture (see the middle pins in the picture).
Step 4


Pin the seams (this helps stop any wrinkles as you turn the right side of the bear)
Step 5


If you are using a plastic shank and eyes, insert them now
Step 6


Attach or pin the front and back (wrong side) and then connect all around.
Step 7


Turn the bear to the right side, you may find it easier to use the wooden spoon handle in your arms and legs to push them out.
Step 8
Align along the ear marks as shown. Stuff the head of the head with Fiberfill using enough stuffing to give the character a muzzle. Here again, a wooden spoon handle will come in handy.
Step 9


Tie the head area with strong thread by wrapping the thread around the bear's neck and tying it off, this will be vitally discreet later and can be covered with tape. Put on both arms and legs (use a wooden spoon if necessary), then draw along the marks as shown. Finally, strain the body cavity and close the hole in the back.
Step 10


If you didn't use the shaded ones, place on the buttons for the eyes. rip out any fur that gets caught in the seams
Step 11


If you have not used a plastic nose, you will need to plan the shape of the nose. You can easily create a natural looking nose by stitching a triangle over the muzzle and then filling it in with vertical stitches. you might find it easier to cut a triangle off a piece of black felt and then glue it onto the bear before stitching it, this will stop any fur sticking out your stitch and give the nose a neat finish. Using the (Y) shape for the nose makes it easy to lead to the lips.
Step 12


Finally, wrap your pet toy with some chic new ribbon.
making a cute little homemade teddy bear
It is impossible to remain indifferent at the sight of a charming soft toy, especially if it is sewn with your own hands. For a baby, it will become a wonderful friend whom you want to hug before going to bed, and for an adult, it will be just a wonderful individual gift.
Do not be upset if you do not have a sewing education, just one desire to create and the ability to use a needle and thread is enough. Plunge into childhood, making a soft toy, show creativity and get a lot of pleasure from the work done!
DIY simple soft toys for beginners
So, we have already decided that a toy created on our own is much more valuable than a purchased one. To easily make such a unique little thing, you only need:
- Familiarize yourself with a simple algorithm for its manufacture.
- Select the required materials.
- Correctly form and cut out the pattern of the future toy.
Internet expanses are overflowing with patterns of a wide variety of soft toys, but you can find them not only there. It will not be superfluous to look into handicraft shops , children's departments for creativity (here you can buy huge kits and manuals for making toys yourself), bookstores . If there are old and already worn out soft toys available, you can rip them apart and circle the details along the existing contour - this is a ready-made pattern.

Involve your child in the process of making toys, this is very important! Such leisure will introduce the baby to work and discipline, teach him to be careful in his actions. Working with different materials and small accessories contributes to the development of fine motor skills, attention and creativity.
But don't forget - safety first! Provide the child with blunt-ended scissors for work, do not let them sit at the sewing machine without adult supervision.
Fabrics that are used for sewing soft toys
- Knitwear , dignity - it stretches easily.
- Faux fur with pile of different lengths - suitable for creating pillows in the form of animals.
- Silk - a rather capricious material, but it is indispensable in tailoring and decorating dresses for dolls.
- Cotton - different variety of colors.
- Wool - dense, fleecy matter.
- Velvet and velor - the presence of a small pile allows you to sew soft toys - animals, imitating their fur.
- Felt - a huge number of crafts can be done by felting.
Soft toy manufacturing technology
- Gather materials and prepare them for work. The fabric must be washed, ironed, steamed wrinkled places.
- Uncover all the necessary details.
- Baste the fabric along the outline.
- Sew all parts of the parts according to the basting.
- Stuff the middle of the toy, use cotton wool, synthetic winterizer, foam rubber.
- Gather all the parts of the soft toy and sew them together.
- The final processes in the design of the general appearance of the toy.
It is best to use thick cardboard for making patterns. Such stencils are easier to trace on fabrics, they will last longer to create many more identical toys. Simply attach the template to the wrong side of the fabric, circle, pressing firmly to the fabric.
So you got acquainted with the basics of sewing soft toys with your own hands. To hone your skills, use these simple examples:
DIY patterns and patterns for soft toys
The patterns of these cute animals are quite simple and do not require additional explanations.
DIY soft toy: photo master class
Soft toy "mouse"
Let's try to sew a wonderful little soft toy. It is perfect for playing crumbs, up to a year old. The kid will already be able to grab such a bright and interesting model, and will gladly show interest in it. This will help him develop his tactile senses. Having mastered the basics of making such a light toy, it will be possible to start performing more difficult work.
- Use the suggested pattern, it is already ready in the right size.
- Stock up on bright shreds of fabric and contrasting threads, so the finished product will simply attract the eye.
- Be original - connect the parts not from the wrong side, but from the front side, using a buttonhole (overlock) seam. It is for this purpose that bright threads were chosen.
- Attach ears, nose and eyes to the body.
- Stuff the toy with stuffing and attach the tail.
- Sew together the details of the head and paws, loosely fill with foam rubber or padding polyester, cotton wool is also suitable if nothing else is at hand. In the same way, create a tail, only it does not need to be filled.
- Sew round patches to form a shell, leaving holes for stuffing and connecting the paws and head.
- Gather all the details together using a hidden seam. Sew on the tail last.
- Attach eyes to the toy, and a wonderful turtle pillow is ready. You can not only play with it, but also sleep.
A bouquet of soft toys: manufacturing technology with a photo
Such gifts appeared relatively recently, and are now at the peak of popularity. Such a bouquet will not wither like natural flowers, but will delight its owners for a long time to come. You can buy a bouquet of soft toys by spending a lot of money, or you can create it yourself, saving a lot of money.
Prepare for work:
- Small soft toys bears - 3 pcs.
- Corrugated paper, organza.
- Ribbons, sticks, mesh for bouquets, other decorations.
- Glue gun.
Master class on making a bouquet:
- First, prepare the base on which the bears will be attached, they will be located on sticks. Cut out two squares of organza for each stick, form a flower from the patches and attach with a hot gun to the stick in two layers.
- Do the same from a special mesh for bouquets and fasten over the organza. You should get peculiar flowers, as shown in the photo.
- The next step is to decorate the toys. Rid bears of labels, tags, and other factory identification marks. You can simply glue the bottom of the bears to the newly formed flowers on a stick, or you can sew them on discreetly. The second method will allow, if necessary, to “disassemble” the bouquet without damaging the toys. Now start collecting the whole bouquet. Tie all sticks with toys tightly with ribbon, you can still fasten them together with a few drops of glue.
- Take the remaining organza and wrap the bouquet with it, fix it in the place of attachment of the sticks themselves. With the help of the corrugation, form another case for the bouquet, you can hide all the working moments in it. Secure the entire product with a bow. Correct all irregularities with your hands, where necessary - form folds.
- This toy is easy to make the basis for it will be the usual sock. Don't use old, worn out socks: it's a myth that worn things make bright and colorful things. But, for sure, there is one attractive sock in the house that has lost its pair, so use it.
- Before starting work, decide which cat you would like to make - thin or thicker. Based on this, cut the sock in a certain place. If you want to get a well-fed toy, cut off the part of the sock that covers the foot, and move the upper part of the elastic to the side.
- Fill the toy with stuffing material, in this case - synthetic winterizer. The body should be larger than the head, so fill it tightly. After, bend the free hole inward and fasten it with needles. Sew up the cut and stretch the edges, forming the ears.
- Give the product the desired shape with your hands, make the ears sharper. Embroider the pet's face with a contrasting thread according to the previously drawn stencil. Use a back stitch.
- Decorate the cat with a bright accessory - a scarf, a bow, a tie, a butterfly.
Do-it-yourself soft toy rooster
Let's make a small soft toy - a felt pendant, you can decorate the Christmas tree with it, or you can just hang it in a conspicuous place, as a kind of amulet. Let's consider two options.
Cockerel in the shape of a heart.
- Cut out two pieces of felt for the heart, choose white, gray, black, or another muted color as the basis. Against its background, a multi-colored tail will stand out better.
- Take a closer look at the picture, all other parts of the cockerel's body are also cut out in the form of hearts.
- Attach the wing and eye to one part of the body, and then carefully sew to the other part of the body, placing the tail, comb and beak in their places. Fill a little toy with padding polyester and fasten the loop.
Snow cock.
- For this decoration, you will need fewer bright colors than for the previous toy, but the easier it is.
- From white felt, cut out a body in the form of a wide eight and wings, as in the figure.
- Embroider a joyful image on the face of the toy, use black threads, and also process the edges of the wings with them.
- Make a red comb and yellow legs with a beak.
- Sew all the details of the toy, fill it with padding polyester and make a loop.
DIY soft toy owl
You can create such a beauty owl yourself if you have scraps of fabrics of different colors on hand.
Step by step work

Every child has a favorite toy, most often these are cozy soft animals. Now it is very fashionable to make toys with your own hands, because, unlike factory-made products, the work of a needlewoman is invested in them. Such products are made with soul and love. Handmade toys can be ordered from the master or made at home on your own. This is easy to do, and mom can sew a toy for her baby herself.
For this you will need:
- 1. Cardboard or thick paper.
- 2. Pen or pencil.
- 3. Scissors.
- 4. Plush or plain fabric.
- 5. Felt.
- 6. Hot glue.
- 7. Needle and thread.
- 8. Sintepon.

From thick paper or ordinary cardboard, you need to prepare a pattern. To do this, by hand, you can draw the outline of the future toy and cut it out.

Attach the pattern to the fabric and outline the outline.


Facial features will be used as decoration. For the eyes, you need to cut out two large white circles from felt and two small black ones.


Glue the pupils with hot glue.


From the same felt, you can cut a triangle that will become a spout.

Sew on the eyes and nose on the front side of the toy in the appropriate place.

Under the spout, you can embroider a mouth with a regular black thread.

When all the decorative elements are sewn on, you need to sew the product along the drawn contour from the wrong side, leaving a small hole. Turn the toy right side out through this hole.

Now the product needs to be stuffed. As a filler, you can use a special synthetic winterizer for soft toys or ordinary cotton wool.

The filler must be carefully distributed inside the toy through the left hole and carefully sewn up.

The soft toy in the form of a cat is ready.
As the child grows up, you can create new products together with him. This is a wonderful educational activity that will bring results in the form of developing creative skills and a finished handmade toy. We wish you creative success!
A handmade soft toy can be a good gift for a child, as the baby's preferences can be taken into account in the manufacture. Making it yourself is not as difficult as it might seem. The main thing is to follow the step-by-step manufacturing instructions, the rules, and prepare the materials that will be needed for this.
To create a children's toy, you must use only safe materials. For children under 5 years old, it is better to choose whole natural fabrics, without lint or synthetics added. It is also recommended to do without accessories in the form of buttons, sequins and other things. If a toy is made for an older child, then the fantasy is limitless here, as is the choice of material.
Soft toy fabrics
Knitwear is ideal for sewing toys for the little ones. It is an elastic and practical material, from which it is very easy to make a toy, it is safe. It is easy to wash and does not lose its shape, does not require additional processing, and thanks to the variety of colors, the toy will turn out to be very effective.
Another fabric that is often used for tailoring is silk.. This is a capricious material, when working with it, patience and accuracy will be required. But products made of silk are very beautiful and durable. It is also used for decoration, but can also be used with a solid fabric. Requires gentle washing and gentle drying.
And the most popular material for sewing soft toys for the little ones is cotton fabric.
It is very diverse, inexpensive and is used everywhere. It is very easy to work with, it has increased durability and strength, besides it is safe, and stains and dirt are removed quickly.
For older children, you can use other fabrics, this is faux fur, wool, ideal for sewing bears, it will give the toy realism, and with careful handling it will last a long time. Other fabrics are also suitable, for example, velvet, velor, felt.
Other materials
To make a soft toy with your own hands, you will need not only fabrics, you need to have other materials, such as:
- Pattern and template, according to which the details of the toy will be created;
- Soft filler, you can use cotton wool, but it is recommended to take pieces of foam rubber, it will help to keep its shape longer;
- Threads and a needle, scissors;
- Thick paper;
- If decor is planned (when making toys for children over 5 years old), then buttons, sequins, ribbons can be used.
Important nuances
To sew a soft toy, you need to accurately make a fabric pattern using a template. This is an exact copy of the details of the future product, depicted on paper, which is then transferred to the material. Each toy has its own set of patterns, but you can draw it yourself. Then you should cut them out and fix them on the fabric with the help of tailor's needles.
Before making the toy, wet the selected fabric and dry it. This will help to check if it will shrink on the first wash and if the toy will lose its shape. If this happens, it is recommended to wash the material before sewing, dry it, and only then proceed to work.
Pattern toy Bear
Making a soft toy teddy bear is quite simple and easy on your own. For  it is enough to use any popular pattern.
A few tips on how to pick it up:
- All patterns can be divided into simple (with a minimum number of details) and complex (where additional design is required in the form of accessories and decor, these are dresses, ribbons, seam processing).
- Beginners should start with easier ones, these include: Barney bear (or a simple cloth bear), sock bear, Tilda-style bear.
- Other popular but complex sewing patterns are: Teddy bear, ballerina bear, polar bear, bear with babies.
Workshops on making soft toys
Fabric teddy bear
One of the simplest patterns is the Barney Bear, transferred directly to the fabric, without the use of templates. 
How to make a soft toy with your own hands without a template:
- Take a small piece of fabric and fold it in half exactly in the middle with the right side inward;
- Using a pencil, draw some rounded lines;
- You should start with the head - describe a small semicircle, then an ear, a rounded cheek, a slightly elongated paw, a slightly rounded belly and an elongated one leg;
- Cut strictly along the contour;
- Expand the material - the bear pattern without using a template is ready;
- Repeat all the manipulations exactly, so prepare its back;
- Sew together the two halves from the wrong side;
- Leave a small gap, unscrew the product and fill with filler.
There are other interesting patterns of a soft bear toy.
Felt bear
To make a felt toy you will need:

Performance:
- Select and transfer to tracing paper the template of the details of the felt bear, the scale must be respected and be 1:1. Also, everyone can show their imagination and draw parts of the bear's body on their own.
- After the drawing has been transferred to tracing paper, it is transferred to thick paper, observing the scale and every detail exactly. Thus, the template is ready.
- Then all the constituent parts are cut out of a dense sheet, and with the help of tailor's pins it is fixed on the fabric. Carefully outline with a simple pencil or chalk, remove the template and cut it out - the pattern is ready. Advice! perform all manipulations on the wrong side.
- Next, 2 identical parts are superimposed on one another and sewn together, leaving a small gap for the filler. They are turned inside out, the toy is evenly filled with foam rubber, cotton wool, padding polyester (optional) and sewn up to the end with neat stitches.
- After all parts of the bear's body are made, they are sewn together, and depending on the fantasy, eyes, nose, mouth are made.
One option for creating a face is to use buttons or sew on store-bought sequins. Many craftswomen embroider them from multi-colored Mouline threads using satin stitches. You can also cut out the nose, eyes and mouth from felt of a different color and sew them on with threads; for this, chain stitch is most often used.
The final touch in the manufacture of felt bears is the decoration of the product. You can sew on several multi-colored ribbons, bows, sequins and a very bright and beautiful toy is ready.
Teddy bear from a sock
Making a teddy bear out of a sock is very easy.
For this, you do not need a pattern, it is enough to have materials:

Work algorithm:
- turn the sock inside out, put the heel up;
- the head is the bow, draw them with a marker;
- cut along the contour and sew;
- leave a small hole, fill the product with filler;
- we form the nose of the sock into a ball;
- evenly distribute and sew to the end, tightening the edges with threads;
- a rounded head is obtained;
- then the heel and part of the toe to the elastic is the torso and paws;
- the heel is the future hind legs, it must be cut strictly in half and form two limbs, sewn together, stuffed with filler;
- the front legs are made of elastic, simply cut out, sewn together and sewn to the body.
- then the ears are created, they can be made from the rest of the sock or take a new one.
- They can be made from elastic - just draw two semicircles and cut out, stuffed with filler and simply sewn to the head.
- For decor, you can use ribbons, buttons, sparkles, thus creating eyes, mouth, nose.
- From another sock, you can make a color for a bear, for this you need to cut out small round fragments and sew on paws, muzzle and even stomach - thus, get an unusual color.
Bear pillow
To create such a bear, you will need cotton fabric, soft filler, a sewing machine, and scissors. To get a more realistic product, it is recommended to take weave in various colors. 
The first step is to create a pattern, it should be large enough, rounded. The head and ears are depicted, then they are cut out, the seam is sewn on the machine, the product is turned inside out and stuffed with soft filler, sewn up to the end. The material acts as a decor, it will be comfortable to sleep on it and so  Thus, the effect of the muzzle of a bear will be created.
Two round applications are cut out of a dark color - these are the eyes. They are sewn to the pillow with hidden seams or attached on a typewriter.
It is better to make the muzzle bright, it is any color to choose from, in the form of a large oval-shaped piece of fabric. A small round mouth is sewn to it.
For realism, you can sew on small front paws. They are made of the same fabric color as the pillow itself and are attached to its lower part, having previously been stuffed with filler.
Bear in Tilda style
This teddy bear is distinguished by its elongated body proportions and legs, and recently it has gained a lot of fans. To make a Tilda-style bear, you need to take a fabric made of bright sprint cotton, a pattern according to which a pattern, scissors, threads, a needle will be created, ribbons, bows often act as decor. 
Transfer the template to the double folded fabric, leaving a small seam allowance. Sew together and turn right side out, then sew with a blind seam.
The peculiarity of this soft toy is that the paws are attached to the body with buttons, this allows them to move, creating a different position of the bear's body. The ears are sewn to the head, and the nose, eyes and mouth are created from threads, without the use of any decor. Ribbons or bows are an obligatory decoration for a bear in the Tilda style; you can also make original embroidery by hand.
Teddy bear
Making a soft toy Teddy bear with your own hands is a difficult task, so you should carefully study the algorithm before starting work.
How and where to start:

Work algorithm:
- Transfer patterns of details to a pile fabric, they must be in a mirror image;
- Cut them out, leave punctures for the paws to create fasteners;
- The ears and paws are made from two different materials, the outer side is made of pile, the inner side is made of cotton;
- Sew them together;
- Turn out, and then fill with filler;
- The next step is fixing cases;
- They are inserted into the space left in advance, these are cardboard discs with a hole with a bolt to be mounted (the body of a bear cub);
- A nut is also sewn into the limb, and then stuffed with foam rubber;
- The mount is carefully sewn into the limbs and torso, making them invisible;
- Next, you should screw the limb to the body, such an attachment gives mobility to the soft toy;
- By analogy, do this manipulation on all paws;
- After the body of the teddy bear is ready, the eyes, mouth, nose should be embroidered with threads;
- Tie a bow or ribbon around the neck;
- Teddy bear is ready.
Bear-ballerina
To sew a bear - a ballerina, you need to take a dense material, best of all from a short pile. For heels, palms and the inside of the ears, you need to choose a soft fabric, for example, silk, cotton. 
Patterns need to be made according to patterns, there will be a lot of details here, because. legs, palms, knees and shoulders are movable, they are sewn separately. In order for the pile to lie in one direction, all fragments of the bear are made in a mirror image, and then sewn together. They are turned inside out, stuffed with foam rubber and sewn up with a hidden seam.
The ankles, legs, shoulders and palms of the toy are movable, this is done with the help of a button fastening. There are 2 design options, this is hidden (when the stitches and buttons are sewn into the details from the wrong side) and external (they are sewn on the front side and look pretty cute, only the color of the fabric and the color of the buttons should match).
The loop is made on the body, and the button is sewn on the legs. Further, the loop is made on the arm or leg, and the fastening is sewn on the palm or ankle. To decorate the face of a bear - ballerinas most often use beads or multi-colored sparkles. A ribbon is tied around the neck, the same is attached to one ear.
A mandatory accessory for this toy is a ball tutu, it is created by hand and transparent bright fabric, such as chiffon, veils, cambric.
The cut should be short, it should be baited on a thread evenly distributed to get beautiful volumetric waves. Pull off the skirt at the waist of the bear, sew it up with a hidden seam, you can also insert a narrow elastic band, this will make it possible to change clothes at the ballerina bear.
Polar bear
 In order to understand how to make a soft toy with your own hands, you will definitely need a bear pattern with the number of necessary details.
 This soft toy differs from all the previous ones not only in color, but also in the fact that the bear stands on four legs. Therefore, tailoring a polar bear is different from the rest. The fabric should be chosen dense with a long hard pile, the pattern should be made strictly according to the pattern, performing in a mirror image. Sew fragments together, fill with filler through a small hole.
In order for the toy to be stable, it is necessary to fill the paws very tightly.
In one version, the polar bear is performed in a stationary state, the limbs are sewn to the body, and in the other, a hidden button mount can be made.
Bear with babies
To make a soft toy of this type, there are many options for patterns, it can be a bear in a prone position, and around it are several of her cubs. And also sitting with the offspring on his knees, or even standing. The complexity of this composition lies in the fact that you have to work with small details. The fabric can be varied, ranging from faux fur or regular cotton.
For sewing the family, movable fasteners are not used; all limbs are sewn tightly to the body. To create muzzles, buttons are selected from the mother, for babies, most often the mouth, nose and eyes are made out with Mouline threads or glued with small sparkles.
What stitches to use when sewing a soft toy?
Threads for sewing toys must be strong and must match the product. An exception happens only when it makes a looped decorative seam, it is used as a finishing seam and not only sews parts together, but processes the edges of the fabric.
To create a soft toy with my own hands, I usually use the following types of seams:

How to connect the parts of a soft toy
If the parts of the toy are sewn together without fasteners, then a butt seam is usually used. To do this, you need to form each of them, then simply attach the workpiece to the junction and thread the needle and thread gently with small stitches on the front side to sew them together.
If there are movable fasteners, then sew them with a blind seam into the part and, before connecting them, also apply a blind seam.
What is better to make the eyes and nose of a bear
Most often, buttons are used or sequins are glued, but sometimes Mouline threads can be used to decorate the muzzle. To do this, you need to master the embroidery method. The most common of them is the smooth surface, the stitches are made even, tightly adjacent to each other. Cross stitching is also used, this is the easiest way. 
For some toys, the application method is used.
Here it is necessary to cut a small blank from a fabric of a different color and sew a pattern using a buttonhole seam.
How to fill a sewn toy
Foam rubber is most often used as a filler, this material is dense, it does not fall off and perfectly holds any shape. It's also easy to take out if the toy needs to be washed. You can take ordinary cotton wool, but it quickly goes astray, and the product may lose its original appearance.
A synthetic winterizer is also used - it is easy to purchase, and it is a pleasure to work with it. With it, the toy will keep its shape for a long time, it is easy to dry and does not go astray. An alternative option is holofiber - this material is durable and easy to use.
As a filler, natural fillers are used, this is wool. It is environmentally friendly, allows the product to keep its shape and even generates heat, with such a toy the child will be very pleased to sleep.
How to insert a wire frame
The wire frame is used in soft toys quite often, it allows you to keep the shape and gives it flexibility. To create it, you need some wire, for safety, its ends should be bent with round teeth. The wire should be copper or floral, along the entire length of the toy. 
Then, when the desired workpiece is made, it is lightly coated with glue and wrapped with the selected filler. This will prevent her from getting out during the operation of the toy. Further, the filler is evenly distributed around it and a frame is obtained, which is then placed in a fabric pattern. The fragment is merged.
Thus, the wire frame is inserted into both the torso and limbs or even the ears and tail of the toy.
How to decorate a soft toy
There is a huge selection of accessories for decorating toys. The most commonly used beads, buttons, sequins, ribbons and bows. They are sewn to the product with a hidden seam or special glue. You can also take small pieces of fabric, for example, velvet, cambric, silk, chiffon, they are superimposed and then sewn on with a buttonhole.
Sometimes original embroidery acts as a decoration, as this helps to make a soft toy unusual. This option is increasingly used when the product is created by hand.
Another option for creating a unique look can be specially tailored clothing, such as a dress, skirt or overalls. It is made from beautiful lightweight fabric.
Video: how to make a soft toy with your own hands. bear pattern
How to make a bear with your own hands, see the video clip:
We draw a pattern for a soft toy:


