Painting golden autumn from natural material. Landscape of autumn leaves. Master class with photo. Painting "Autumn" from the leaves
With my own hands. The technology is simple, and the result can be very effective. This decor is suitable just as decoration for the interior. Making is easy to turn into a joint creativity with children.
Panel made of natural material
It is very possible to create by gluing dried leaves and flowers, individual petals onto a base, for example, from cardboard. This technique has its own name - mistaken (or osibana). Quite often acts as a hobby for adults. Oshibana is an ancient Japanese art of laying out pictures from dried leaves and flowers.
For children's creativity, the option is also suitable. The child in the process of doing crafts and preparing the material will learn new information about the world around him, learn to compare colors and shapes. He will develop fine motor skills, perseverance. It is very good to combine leaves and flowers with twigs, seeds, grains. So you can get a relief surface and even three-dimensional details.
Do-it-yourself panel of autumn leaves
So, what is needed in order to build such beauty? A panel of autumn leaves (photo below) can only be made from flat elements, while using both the natural forms of objects and complex configurations of artificial origin created on a paper substrate.

You can choose from the following scenes:
- bouquets;
- landscapes;
- still lifes;
- portrait or complex thematic ideas.
In a word, this technique is very interesting, unusual. The result depends on your imagination, perseverance and the blanks that you have.
Materials and tools
To make a panel of autumn leaves with your own hands, you will need the following:
- base (cardboard, fiberboard, paper, for example, colored);
- dried leaves, flower petals;
- glue;
- brush for applying glue (optional);
- glass and frame for work decoration.
So, nothing special is required. The main thing is patience and the desire to do something special.

Leaf preparation technology
To make a beautiful panel from natural material, it is important to properly prepare the source materials. You will need:
- freshly picked leaves, flowers, petals;
- unnecessary thick books;
- cardboard;
- cotton wool;
- scissors;
- threads or large stationery gum (not erasers, but those used for banknotes);
- a flat free surface for several days (table, shelf).
Drying the material is not a quick process, but you definitely shouldn’t rush to get high-quality blanks for work.

The sequence of drying leaves is as follows:
- Spread the leaves evenly and carefully between the pages of an unnecessary book (the paper may get dirty). Do not lay out the leaves one by one, it is better to do this after a few pages (they will dry out faster and better, they will not stick together).
- Place the book under a press (box, crate, or several large books).
- Wait a few days.
- Check if the blanks are dry. If the quality suits you, take out the leaves and get to work. If the material is not dry, leave for a couple more days.
How to dry flowers
Flower petals or small (not thick) flowers are dried in the same way as leaves. So, you can prepare flowers of daffodils, phlox, bindweed, viola (pansies), bells. But asters, roses and other flowers, in which the base is dense, fleshy, it is better to dry like this:
- Prepare a sheet of cardboard or thick paper a little larger than the flower itself.
- Fold the blank in half like a postcard.
- Cut a hole of any shape in the center of each side (this is a kind of ventilation so that the flower does not rot).
- Unfold the cardboard and put a layer of cotton wool inside.
- Put a flower on the cotton.
- Add another layer of cotton on top.
- Close with cardboard (fold the sashes).
- Secure the "postcard" with rubber bands or tie with threads.
- It is advisable to put under pressure.
- Check the result after a few days. If the cotton wool is very damp and the flower is not dry, change the cotton wool and dry it.
As you can see, the technology for harvesting leaves and flowers is simple, but if you do not follow it, you will not get high-quality material. Incompletely dried leaves can be deformed, and the petals of the flowers will fall off.

Panel execution technology
To make a beautiful panel of leaves (photo above), you need to work like this:
- Take a cardboard base or colored paper if part of the background is left uncovered with dried material.
- To make objects of complex unnatural shape (vases, houses), cut out substrates (blank parts) from thin paper.
- Spread glue on one side of the backing paper and place dry leaves on top.
- Wait for the element to dry and trim along the edge contour. Throw away small leaf clippings, and use large ones for other details.
- When all the components are ready, apply glue to the base and glue the blanks. If necessary, first lay out a background of leaves or petals.
- After the painting has dried, arrange it in a frame under glass. So the panel will be better preserved.
Panels of dry leaves can be made in the form of a relief using twigs, spikelets, cones, grains and seeds. This option is perfect for children's creativity.
So, making a panel of autumn leaves with your own hands is easy. This creative activity can be a fun and rewarding way to spend time with your child. Prepare quality material and explain the technology. Even small children can make a simple composition of leaves and flowers.
Master class on needlework "Landscape of autumn leaves"
Annenkova Elena Nikolaevna, teacher of fine arts and technology, MBOU "Glebovskaya secondary school" of the Fatezhsky district of the Kursk region.Material Description: I offer you a master class on creating an autumn landscape using the floristry technique. This material is aimed at middle and senior students and will be useful to technology teachers, teachers of additional education, and all creatively oriented people.
Purpose: a gift with your own hands, a decorative interior decoration with an original product.
Target: creation of an autumn landscape from dried leaves.
Tasks:
1. to get acquainted with the basics of floristry technique,
2. develop imaginative thinking,
3. develop creative abilities, aesthetic taste, environmental awareness.
All art originates from natural sources. Leaves, flowers, twigs, herbs, spikelets make up a non-woven carpet, forming bizarre, intricate patterns. You can not only enjoy this beauty, but also continue it. natural material- pantry for the development of children's creativity. You just need to know how to manage the wealth from this pantry. A little imagination, perseverance, and wonderful pictures are obtained from the simplest materials. The main idea of such creativity is the realization by children that nature, even in the smallest particles, is a reflection of the whole vast world as a whole.
One of the directions in working with natural material is floristry. This word is translated as "flat ikebana".
Each blade of grass is uniquely individual, has its own, unique silhouette, pattern, evokes certain associations: cineraria leaves - with snow-covered trees, yarrow heads - with a flowering apple tree, lupine flowers - with flying birds ...
I'm trying to the souls of the timid
To convey to your pupils:
In the hands of the skilled, maybe even
Dry branch to bloom.
I teach as co-authors I take Nature,
After all, we all start from it.
Art that is in the service of the people,
She rocked in her arms.
To work in the technique of floristry, it is necessary to dry the leaves, flowers, inflorescences, herbs. To do this, use a stack of old newspapers. The material to be dried is laid out between layers of newspapers, put a stack under the press. In order for parts of the plants not to lose their color, it is necessary to shift them between layers of new newspapers after 3-4 days.
For landscape work we need:
- dried leaves of corn, birch, willow and other trees, twigs of wormwood, a large leaf of poplar, tree lichen;
- a sheet of matte cardboard of blue color (it does not adhere well to glossy material),
- sheet of tracing paper,
- scissors, PVA glue,
- a clean rag.

Let's take a sheet of blue cardboard, outline the horizon line.

Crumple the sheet of tracing paper and lightly smooth it.


We smear the future sky with glue, glue the crinkled tracing paper, forming small folds. We press the tracing paper well with a cloth. Trim off the excess around the edges. There were cirrus clouds.


We lay out dried corn leaves, imitating fields, half a poplar leaf is a hillock. Thus, we create a preliminary drawing with the help of leaves.

We start sticking leaves from the horizon line. First, a poplar leaf is a tubercle.
We smear the sheet with glue, placing an oilcloth, and press it well with a cloth to the background.
If necessary, you can put the work under the press (something heavy).


We glue the next sheet with glue, stick it in the same way. Glue a willow leaf next to it, creating a horizon pattern.


Gradually fill the entire bottom of the cardboard with corn leaves.


The next stage: we lay out birch leaves and other small leaves of a different shape, imitating trees; sprigs of wormwood, imitating grass on the field. We place smaller leaves closer to the horizon line, and larger ones below the previous leaves.

Glue the details of the composition one by one.


And sprigs of wormwood are well smeared with glue, glued on corn leaves.

The final stage: on the horizon line we paste a tree lichen that imitates a mass of trees in the distance.

It remains only to insert our landscape into a frame.
Do-it-yourself panel of cones and cereals
Master class on making panels "Autumn Fantasy"
Age: 12 years old
Head: Ivonina Irina Mikhailovna, teacher of labor education of the MBS (K) OU "Special (correctional) general education school No. 9 of the VIII type", Perm
The sultry summer passed imperceptibly, and September and October became full-fledged masters in forests, fields, on rivers and lakes. The gray sky is more and more often covered with clouds, and a fine annoying rain is falling. It is already very cold in the early morning, and in the afternoon the sun is still warm, reminding of summer. But, despite this, autumn pleases us with its colors. So we decided to make a panel from natural materials that we collected in the forest - to remember summer and meet autumn.
leaf fall
Forest, like a painted tower,
Purple, gold, crimson,
Cheerful, colorful wall
It stands over a bright meadow.
Birches with yellow carving
Shine in blue azure,
Like towers, Christmas trees darken,
And between the maples they turn blue
Here and there in the foliage through
Clearances in the sky, that windows.
The forest smells of oak and pine,
During the summer it dried up from the sun,
And Autumn is a quiet widow
He enters his motley tower ...
The execution of the panel will not take much time, and you will get enormous pleasure when doing the work. Such a panel will be a good gift for parents, friends, teachers. It can be an interior decoration and an original birthday present.
Materials and tools needed to do the job:
2-3 bumps
alder branches,
A little buckwheat.
Beads of various sizes.
A sheet of orange cardboard.
3 types of glue: PVA, glue stick, Moment glue.

Work order:
1. We translate and cut out the vase template from thick cardboard (if the cardboard is thin, then after drying it begins to bend in different directions). The shape of the vase can be the most diverse, at your discretion. We apply PVA glue with a thick layer on the base and sprinkle buckwheat on top, pressing lightly.

2. We disassemble the bumps into scales. I discovered a certain feature for myself - it is necessary to disassemble the cones when they are raw. It is easier, faster and the scales remain more intact.

3. We sort the scales by size and shape.

4. It is difficult to determine the exact location of the details on the panel, so it is better to stick the scales on a small cardboard base. You can spread the scales in one layer or make more voluminous in two rows. Each flower is obtained separately and when composing the work it is easier to determine the location of each detail.
We decorate the middle of the flower with beads of different sizes, but you can decorate the middle with black peppercorns or cloves. The choice is yours.

5. Parts should dry well.

6. We begin to collect our panels. At this stage, there are no clear recommendations. Everything is up to you. The final look of the work will depend on the size of the flowers collected from the scales of the cone, the shape and number of alder branches, the shape of your vase. Complete freedom of choice.

7. Pay attention!! Alder twigs are not flat, so glue them only at the points of contact with the base. The detail of the vase only in the lower part is in full contact with the base, and the upper part is on the fly.


8. Finished work is inserted into the frame

There was an autumn girl, teasing with an outfit,
Warming in velvet light.
And with that girl, meeting her gaze,
We suddenly forget about the summer ...Svetlana Efimova 2
D Good day my dear friends!
Today, I am sharing with you my new experience in needlework. It will be a picture of autumn leaves, I wanted to call it: a girl - autumn. Actually, I didn't plan to do this job. But, at work, an annual craft competition was held, from autumn materials. The leader asked me to make some crafts from natural materials. As a boss, would you refuse a request? Yes, and I wasn’t going to refuse this request to him, this is needlework! And I like needlework, well, I really like it. Here's what I ended up with.
Picture of autumn leaves: girl - autumn.
For work, I took:
- Fiberboard - 50 x 40 cm;
- Natural materials - ears of wheat, a bunch of autumn leaves, twigs, acorns, rowan berries, flowers, grass, millet;
- PVA glue;
- Acrylic matte varnish;
- Acrylic paints - gold, bronze and white;
- Watercolor paint - yellow.
As a basis for the picture, I took a piece of fiberboard, 40 x 50 cm in size. not smooth))) Right in the middle, there was a scratch, but it doesn’t matter, I will decorate it.

The frame of the picture, I decided to draw in the technique - terra. For this, I needed a mixture into which I would press ears of wheat and millet. Usually putty is taken for this, and I was sure that I had it. But everything was a break, I didn’t find it, it turned out to be over, but I didn’t want to go to the store ... But I had dry glue for tiles and I decided to experiment. Let the glue be the basis of the mixture. I needed to get a mass of medium density into which wheat and millet could be pressed. In this case, the mixture should eventually harden and firmly stick to the frame. And I did this, mixed: tile glue (6 parts) + flour (3 parts) + PVA glue. I actually used PVA instead of water. That is, as soon as the mass became the consistency I needed, I stopped adding it.

frame mix
First, I generously smeared the canvas with PVA glue, around the entire perimeter, in place of the future frame. After letting the PVA dry a little, I began to apply the experimental mass, with a layer of about 1 cm, beforehand.

Made the base for the frame
And immediately she began to press ears of wheat into this mass, and then plentifully, sprinkled with millet. Everything was pressed in, so that wheat and millet were pressed in, but at the same time they were clearly visible.

Pressed wheat and millet

Pressed wheat and millet
Then, she put the picture on its edge and shook off the excess millet.
Approximately, after 30 minutes, I mixed PVA glue and acrylic varnish, in equal proportions and with this composition, covered wheat and millet. When you apply this composition, it is white in color, but after drying it becomes transparent.


Covered with a composition of PVA glue and acrylic varnish
When the composition of glue with varnish dried, I painted the frame abundantly with gold paint. Painted with a wide brush. And after drying, I walked over the ears of wheat, with bronze paint.
Now, finally, the picture itself of autumn leaves. I want to say right away: I am not friends with drawing, and especially with drawing with paints! I painted as I thought.))) White acrylic paint, poured into a separate container and slightly diluted with water, so the paint is applied more evenly. Then, I painted over the surface of the fiberboard with paint (without affecting the frame). Thus, I prepared the canvas, lightly primed it. By the way, in the end, it looked like the picture was made on canvas. When the white paint dried, I began to apply the background of the painting. I made all the strokes smooth, semicircular or something (I don’t know what the artists call it). In the middle, closer to the top, again painted with white paint. Then I began to darken the background, bringing it closer to the edges. To do this, gradually began to add gold to a container with white acrylic paint. The farther to the edges, the more gold was added, making the tone darker.

Painted fiberboard, making the background
Looking at the result, I wanted to add a yellow tone. I didn’t have acrylic yellow paint, so I took watercolor paints. Mixing white and yellow watercolor paints, I walked right behind the edge of the white background. That's it, I put the picture aside until the paints completely dry.
For this work, I collected some different, autumn leaves, thin birch twigs, grass. Also, twigs with rowan berries, acorns, flowers from narwhal flower beds (fortunately, they were not fined))). But my husband found the highlight. Helping to collect acorns, I found a sleeping dragonfly (it's good that it was already not alive).
Leaves, and flower petals, I laid between the pages of books, so they lay with me for about two days. I had them at work, only slightly dried up.
But first, I drew a silhouette of a girl on paper (I found it on the Internet) and attached it to the picture to determine the size.

I drew a silhouette of a girl
Then she cut off the skirt and painted the girl with gold paint. It could have been acrylic, but I had spray gold paint))). From the waist, cut off a small pointed piece, these will be cilia.

Painted the “girl” with gold paint
Then, I glued the girl to the place, which I decided in advance. I didn’t take pictures of my further steps, because. I'll tell you in words.
She formed a wreath for the girl from grass, leaves and twigs with rowan berries. I glued everything on a mixture of PVA glue and acrylic varnish (in proportions 1/1). In the future, I used this composition. Let me explain why I used just such a composition. Before starting to make a picture, I rummaged through the Internet, in search of how to preserve the color of autumn leaves. And I found information that the color and elasticity of autumn leaves can be preserved, including with the help of this composition. Other options did not suit me (I will not write about them).
I continue. The skirt was made from leaves. Glued in rows, starting from the hem, rising higher.
The bodice of the dress was made from flower petals.
Since, initially, there was a scratch on the fiberboard, I glued a branch with leaves in its place. And she glued the dragonfly, spreading her wings. I really liked this dragonfly.

Made a girl, glued a dragonfly and a twig
On both sides of the girl, I glued twigs and leaves, trying to imitate trees. I started gluing from the top level, then, going down, I glued the following branches and leaves.
And in the lower left corner I glued panicles, small twigs of flowers and a few acorns.
And further! Examining the work, I found that on the frame, there are places that were not painted over. Therefore, once again, I went over the frame with gold paint.

Glued grass and acorns
Then, through all the leaves, twigs and flowers, I walked again, with a composition of glue and varnish.
That's all. My painting of autumn leaves is ready. Of course, this is most likely not a picture, but a panel ... But let it be a picture, I really want it)))

Friends, if my master class was useful to you, share it with your friends!
In order to create a cozy atmosphere in your home, every detail designed to decorate the interior must clearly fit into its overall style. To emphasize the dignity of the interior, highlighting the advantages and hiding the disadvantages, the decorative sound of various accessories will help. One of these creations of home art is handmade crafts made from natural materials. From our article you will learn how with the help of simple things that surround us, you can create exquisite jewelry and original decor items. The following workshops with photos and step-by-step instructions, as well as various ideas for home, summer cottage, school and kindergarten, will help you easily cope with this task.
Beautiful crafts: we do it quickly and easily (photo)
Kanzashi, topiary, decoupage, planters, origami - the world of handmade tirelessly excites the imagination of needlewomen.
A variety of crafts made of wood, glass, shells, cereals, coffee beans, pasta, paper, stones, pebbles and other natural materials will help create a unique cosiness and light romantic mood in any interior.
Advice! You can create a variety of stocks for making crafts from natural material from absolutely anything, just look around, you probably have a lot of things suitable for this at home.


Hazel and pine nuts, beans, buckwheat, peas, coriander, pepper - are excellent material for creativity

Advice! In order for handicraft creativity to give you exclusively positive emotions, and the process of preparing material turned into a real holiday, you can combine business with pleasure.
- Being at sea in the summer, stock up on beautiful shells and small pebbles. They make great wall decorations for the home.
- Walking through the autumn park, give your child the task of picking up acorns, chestnuts, colorful fallen leaves. Products from natural materials made by children's hands are endowed with special warmth and love.
- When caring for your own garden, do not be too lazy to sow the seeds of dried flowers. They are perfectly stored in the winter and will be an ideal tool for creative work.

Natural wood crafts
Tree- a beautiful and malleable material that has gained popularity among designers, architects and ordinary amateurs. Natural array is easy to combine with metal, glass, plastic and stone decor.
Wooden crafts will harmoniously fit into a cozy country-style room, set the tone for the brutal loft style, and advantageously change the classic, Scandinavian, minimalist decor.


We offer you to view a universal selection of interesting wood products that can transform the design of any interior, becoming its beautiful and bright accent:
Tree branches
- a refined natural material that allows you to create many original things for your home with your own hands: chandeliers, wall lamps, candlesticks, photo frames, hangers, headboards and much more.
- Painted dry branches with many branches will give a special charm to the living room, kitchen, bathroom.
- Tables, lamps, shelves, vases trimmed with a saw cut look nice.
- A romantic mood will be set by decorative panels in the form of a heart, a bird, a star.
- Gold, silver, white, black rods, placed in a transparent vase with stones, attract attention.


Wood saw cuts
Tree cuts help create larger crafts: vases, clocks, frames, stylized wreaths. Wooden tubs for flowers, shelves, hot coasters will harmoniously fit into the interior.
Having shown a little imagination, it will not be difficult for craftsmen to build an unusual countertop from these round ones, fixing the saw cuts of wood on a plywood sheet, filling the voids with shavings and opening them with varnish.


Bark of tree
Bark is a natural and affordable material. Modern craftsmen use birch bark to create unique paintings and appliqués. Mugs, baskets, tuesas and boxes made of birch bark will last for decades.
Crafts made from natural materials will help not only to reveal your creative potential, but also to translate your interior ideas into reality.


Decorative stone and pebbles
- Decorative rock- the unbridled power of the elements, which has a strong charge, which affects the overall design concept of personal plots, interior decoration.
Chests, caskets, vases filled with pebbles will dilute the routine atmosphere of city apartments and office space. Small stones will decorate walls, mirrors, door handles, stands for installations, as well as bottles. Look at the examples in the photo.

An interesting solution would be glass bottle candle holder filled with shells with colorful pebbles. No less beautiful will look beautiful stones stuck to the wall.
A decorative rug, pasted over with flat pebbles, planted on silicone or special glue, looks unusual and elegant. With it, your porch will look stylish and beautiful.
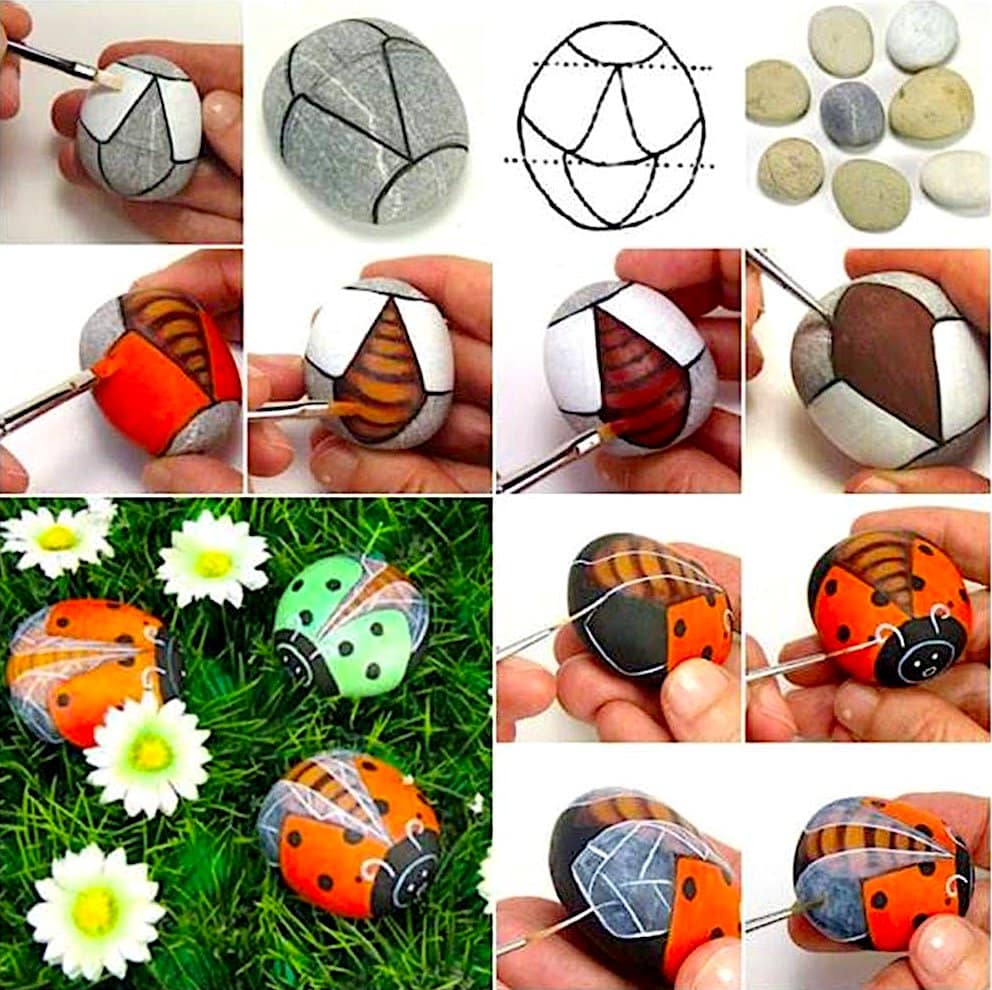
Even children can create original stone compositions. Just before that, you need to conduct a step-by-step master class for them.


Mosaic, painting, stone cutting- a great way to entertain children by creating magnets, flower arrangements, trees, cacti in decorated pots.
Advice! It is best to paint sea pebbles in one tone with the help of special cans, but you need to apply drawings and thin lines on them using brush liners.


- Decorative panels and figurines are made from multi-colored stones. Pebble cladding of walls, floors, fireplaces and window sills - the basis, kitchens, toilets.

Picture of stones - a unique piece of furniture

Summer crafts from fruits, leaves and flowers
The formation of a careful and caring attitude towards the environment is formed by classes with natural materials. An important stage of work is the collection, processing and preparation for the use of summer gifts.
You can make beautiful and original home accessories with children's hands from:
- leaves;
- poplar fluff;
- colors;
- seeds.
Dry grass, fruits, flowers, tree fruits and plant seeds make it possible to create complex volumetric applications for autumn and summer themes, unique and colorful compositions and other original art objects.


Advice! If wood (saw cuts, logs, bark, twigs) is used to create crafts from natural material, it should be thoroughly dried before starting work. Using damp wood will significantly shorten the life of homemade masterpieces.
Ideas for creating autumn crafts
Autumn is the best time to pick fruits, seeds, vegetables, as well as acorns, cones, and chestnuts. Fallen leaves, dry flowers, grass will serve to create unusual bouquets, wreaths, applications.


Natural compositions look good in ordinary vases, watermelon peel, coconut shell, pumpkin shell. An original master class can be held for children, teaching them how to create crafts from natural materials with their own hands.
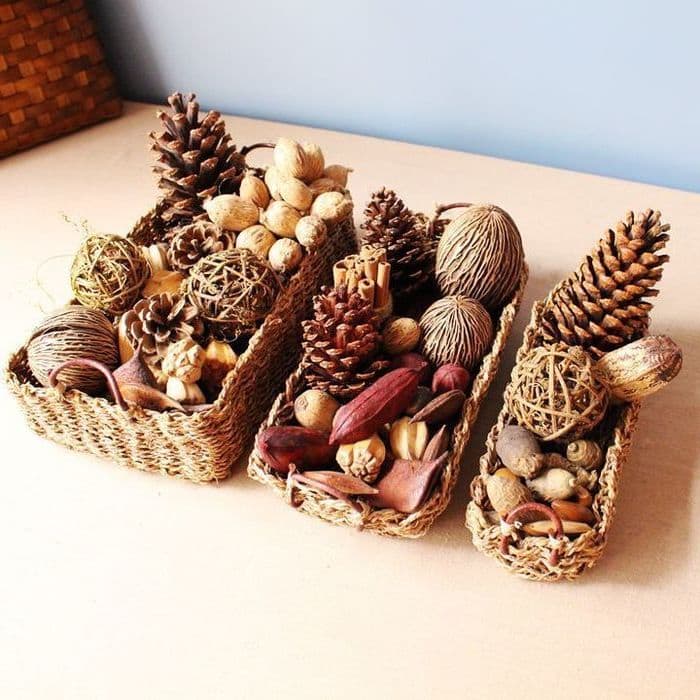
- The cones will make a cozy basket or wreath that can be hung on the front door.
- Zucchini decorated with berries and flowers will become the main character of the garden plot.
- A kaleidoscope of bright colors of pumpkins, potatoes, eggplant will decorate the yard landscape if you come up with a worthy use for them.


Advice! Looking for ideas for crafts for kindergarten, check out the wonderful houses made from bark and tree branches.


Crafts on the theme: "Sea and the underwater world"
Sea crafts give bright emotions and a rainbow mood even in cold winter. If you are lucky enough to collect a collection of shells during your vacation, hurry up to become the authors of voluminous applications, paintings, frames, a marine theater or an aquarium.
- Sea treasures are easily transformed into beads, pendants and pendants.
- Cold porcelain, salt dough will help to complement the composition with starfish, corals, colored stones.
- The ocean in a bottle is a whole underwater world that allows you to invent different stories and study marine life.
- On a cool day, warm memories of summer will also be given by boats made from improvised materials.

When making nautical-themed decor, do not limit yourself to anything - create, try, dare

In the manufacture of products on the theme of "sea" you can use absolutely any natural material

Feathers for needlework
- bird feathers- used by craftswomen to create soft pillows, warm feather beds, hat decorations, toys, unusual souvenirs.
They also decorate the interior, complementing the crafts with sequins, sparkles, small ribbon bows and other decor.


Despite the fact that the pen is a very capricious material, working with it is quite simple and easy.

Dream catcher - a magical talisman that attracts good luck


Important! Bird feathers can cause a severe allergic reaction in humans, so be careful using them as home decorations.
DIY crafts (step by step)
It is easy to create crafts from natural material with your own hands - the main thing is to get the necessary tools and material. The following step-by-step instructions for creating versatile home and garden decor will help you complete this simple task.
colorful panel
Panel - decorative, facades. Currently, three main genres are used for its manufacture: sculptural, mosaic and appliqué.
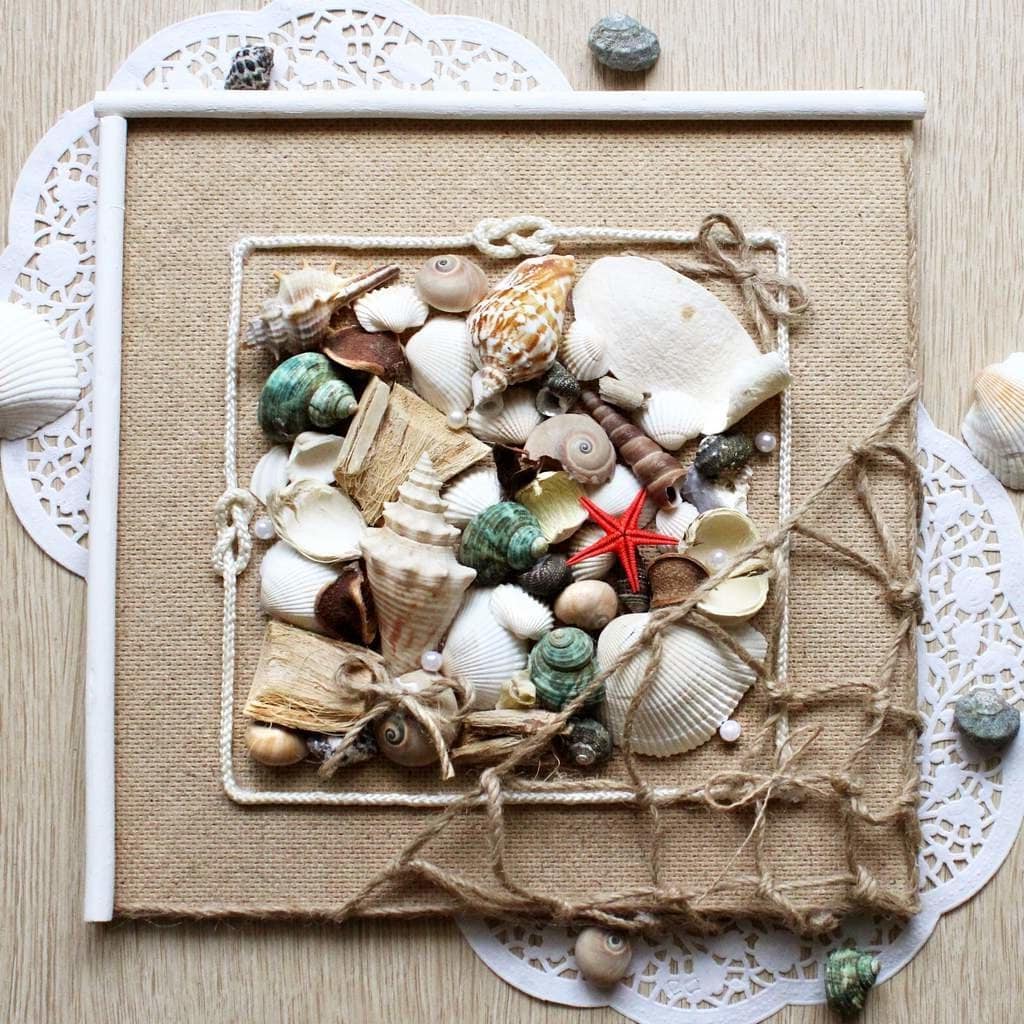
An interesting solution is an artistic panel made of natural materials: dry leaves, straw, nut shells, dried flowers. Its production takes place in 3 simple steps:
- First you need to make a base. It can be made from wooden boards knocked down into a shield or a piece of plywood.
- Next, the base must be covered with burlap material or a straw grate over it, on which the application will be applied. You can make an application from flat elements (leaves, grains, seeds), or get a relief surface by combining three-dimensional details. An unusual solution would be to weave dried citrus, moss and leaves into a straw net.
- The final stage is the creation of a rope or wire loop for attaching the panel to the wall. Rate the result in the photo!
Advice! If desired, a frame made of snags or vine branches can be added to the resulting composition. It will make your work more elegant


Egg shells for indoor plants
Creating small flowerpots from eggshells requires special care, since the shell itself is a rather fragile material and can be easily damaged by careless movement.
Procedure:
- Prick the top of a raw egg and pour the contents into a bowl.
- Finish the edges until a clean cut is obtained, or leave them chipped.
- Stabilize your vases with a stand or egg carton. Alternative options may be a plasticine flagellum that complements the bottom of the shell.
- The resulting container is ready for seedlings of wild flowers, greenery, moss, small succulents.
Interesting to know! An eggshell can also be used as an elegant candle holder, an Easter craft or a miniature flower bed.


To create your own mini-garden, you will need quite a bit of time, the main thing is to do everything carefully and follow the rules described above.


Saw candlesticks
Preparing an exclusive candlestick from a stump or saw cut wood will take a minimum of time and effort. Obtain the necessary material and tools to perform the following actions:
- Impregnate the wooden base with compounds that prevent the formation of rot and insect pests.
- Using a drill and a special nozzle, make a shallow hole in the center of the stump to install a standard candle. So that the edges do not pose a danger, process them with sandpaper.
- Decorate the product with burlap tied with a jute rope or a beautiful ribbon.
A wooden stand for 2-3 candles, made of simple driftwood, mounted on a wall, hangers or supports, will look unusual. Such an interesting hand-made product will be the best attribute for romantic evenings.


Kitchen clock
A clock for the kitchen from cutlery is made very quickly and simply. For this we need:
- clockwork with a beautiful dial;
- disposable plastic spoons and forks;
- glue gun.

Step by step master class
- First you need to disassemble the watch, separating the mechanism from the dial;
- Next, using a glue gun, we glue improvised arrows opposite each number so that the spoons and forks alternate and go one after the other. So the watch will look much prettier;
- It remains to let the glue dry, set the dial in place and insert the battery into the watch. Original and useful ready!

Summing up
Do-it-yourself decor for home, summer cottage, school, kindergarten is easy to do, especially if you use natural material for this, which is a pleasure to work with.


You just need to enlist the help of family and friends, connect your imagination, and boldly create! Try, experiment, look for your own!


