Kirigami openwork carving voluminous products country of masters. Mysterious kirigami - tips for beginners
Finished products in the kirigami technique amaze with their beauty and airiness, with many carved windows and patterns. An interesting kind of creativity, related to origami, can be mastered by everyone - it is enough to have scissors and a sheet of paper at hand.
Kirigami technique - the basics of creativity
What is kirigami? The intricate word comes from two Japanese meanings: "kiru" - "to cut", "kami" - "paper". Thanks to the sound, you can see that this technique is similar to origami. Indeed, kirigami masters also create paper products, but, unlike origami, they can use scissors, and in some cases, glue.
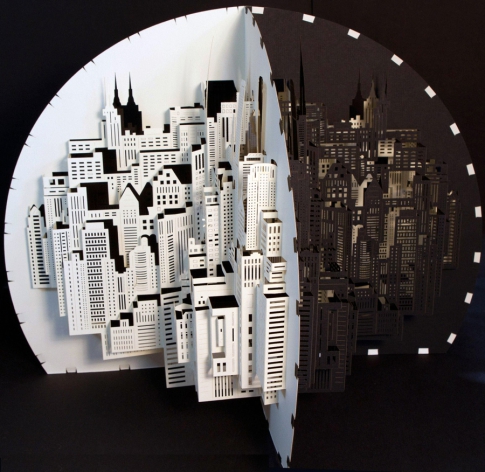
Exact date of appearance kirigami unknown - most likely, creativity appeared simultaneously with the art of origami several centuries ago. However, since the 80s of the twentieth century, this work has experienced a new wave of popularity - it was at this time that the Japanese architect Masahiro Chatani invents one of the subspecies, which is called paper architecture.
The principle is the same as when working with other types of kirigami - the professor tried to cut out from one sheet of paper a three-dimensional image of a building with as many small details as possible, which characterize famous architectural monuments. This principle helped to make his works recognizable - they all have an incredible resemblance to the original buildings.

Some attribute the kirigami technique to similarities with the art of pop-up - cutting out paper postcards, when opened, three-dimensional figures appear. It is important to understand the difference here: Japanese creativity is made from only one sheet of paper and preferably without glue.
Kirigami cutting - types of products
Over the many years of existence, kirigami has managed to acquire many features, each of which characterizes a separate type of this art. To understand their differences, check out the classification of possible paper products.
flat images
This variety consists in preparing a flat image with filigree patterns and fixing it on some bright background.

One example is the beautiful paper snowflakes that we decorate our windows with every winter.
Volumetric crafts
This includes postcards that can be opened 90 or 180 degrees and get a pop-up figure - a heart, letters, a gift.
The principle is simple: cut out the details of the image from one sheet of paper without separating them from the base, and bend them in the right places, forming three-dimensional pictures.
3D shapes
In this case, with the help of cuts, holes, flaps and folds, the master folds a full-fledged three-dimensional image - a figure that can be studied from all sides for a long time, considering the smallest details.

If you want to make something like this, use kirigami-cutting templates - without them, even professional paper craftsmen can not cope with this kind of Japanese creativity.
Kirigami patterns and patterns
Each work in the kirigami technique is performed according to a specific template, previously transferred to the working paper. And if professional craftsmen are able to develop drawing schemes themselves, based on the principles of adding figures, then it is better for beginners to use ready-made sketches.
Kirigami for beginners
If you are just starting to master the art kirigami, give preference to the creation of flat crafts. Don't worry, in terms of beauty they are in no way inferior to three-dimensional ones, and some even surpass them.
For example, you can practice cutting out snowflakes! First, use ready-made templates, and after about 5-10 products, try to develop your own original design.

In addition, you can try making a cute simple card with 3D stars inside.

The scheme of the picture corresponds to a standard size A4 postcard. Solid stripes indicate incision sites, dotted lines indicate fold lines back. And the dotted segments indicate that the picture needs to be bent forward.
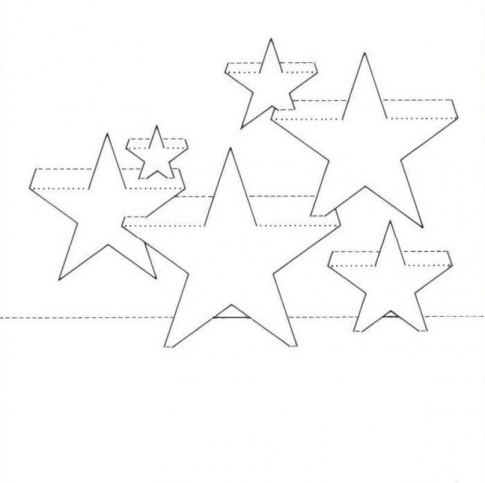
If you choose the right paper color, you can make a very beautiful image with an advantageous play of light and shadow on it.
Complex kirigami
Those who find the kirigami patterns in the previous paragraph too simple can try more complex paper craft options. For example, sheets folded in half with figures from many folded strips have recently become popular.
One of the simplest is the kirigami postcard scheme called “Wave and Sail”. When performing the same element, deployed in different directions, a beautiful imitation of the seascape is obtained.

- Print this template on half a standard sheet.

- Fold an A4 piece of paper in half widthwise and unfold, leaving a fold mark.
- Attach the template to the blank 2 times: the first time the way you printed it, and the second time turning it upside down.
- Cut into strips, guided by solid lines.
- The dotted designation indicates the folds back, and the dotted designation indicates the place where the craft needs to be bent forward.
Such crafts with many thin narrow details are difficult to cut with scissors, even nail scissors. Therefore, prepare a clerical knife in advance.
New Year's kirigami - master class
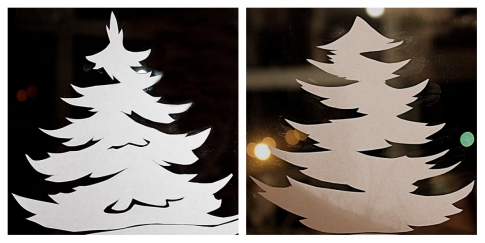
On the eve of the New Year, I want to plunge into a fairy tale a little and decorate the house with festive attributes. And white openwork kirigami patterns are perfect for decorating an apartment - they look so much like frosty patterns on glass!
For example, a desktop and shelves can be decorated with such homemade figurines of Christmas trees made of paper.

- On two A4 sheets, print the same schemes for the future product.
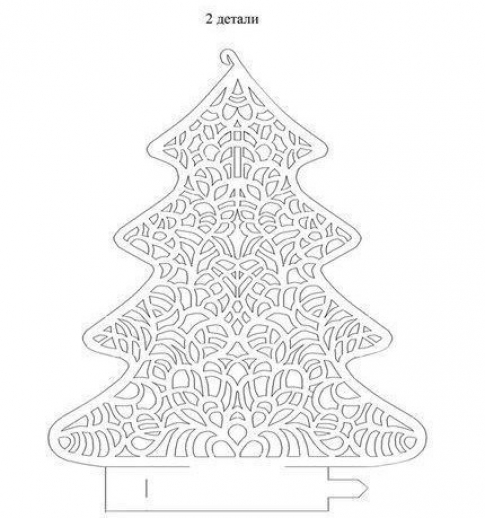
- First, cut through the small parts inside the blanks.

- After finishing work, cut out the details along the edge.

- At the bottom of the Christmas tree - stand - make a small slot in the place of the vertical line. Connect the workpieces with the help of valves from below, and with the help of hooks - from above.
Your Christmas tree is ready! It can also be used as a New Year's toy, and if you increase the size of the product - as a festive headdress.
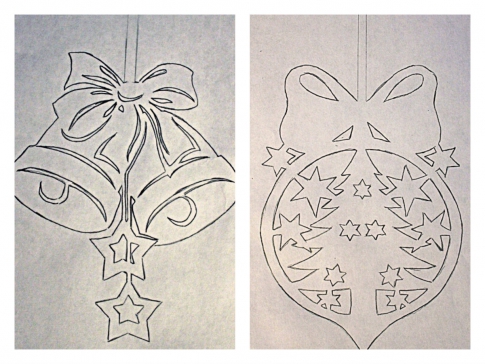
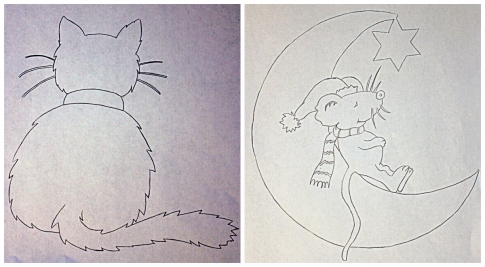
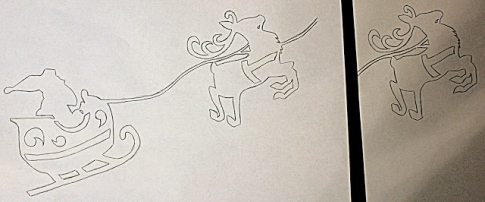
Don't forget about decorating windows for the New Year! Beautiful patterns on the windows will create a festive atmosphere in the house and cheer up those who see the composition from the street.
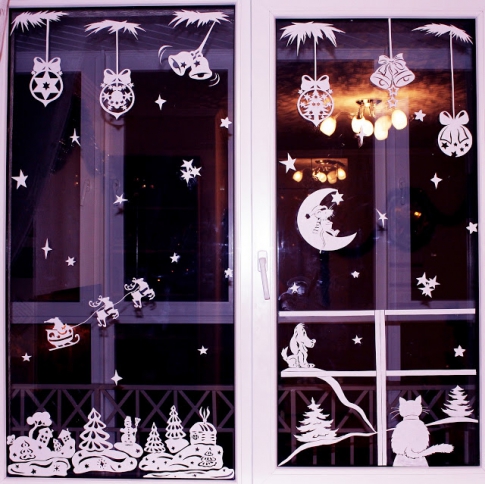
- Use the templates below to cut out beautiful Christmas decorations, animals and winter landscapes from paper.

- You can glue paper pictures with soapy water: moisten a paintbrush liberally, and rub it with a bar of soap to pick up some of the sticky top coat. Smear the paper and stick to the window in the right place.
- You can use tape as a fixing material, but after removing it, it will be more difficult to clean the window from the sticky layer.

- If you don't have a printer at home, you can redraw the templates by hand by placing a sheet of paper on a glowing computer screen, which will display the desired size.
Another example of a New Year's scheme kirigami for beginners, you can see in this video tutorial - try to make a beautiful Christmas decoration with it.
I met kirigami when I saw a beautiful pencil case made of paper. She was so good that I didn’t even believe that a repetition of this was possible. But the scheme was attached, and I decided to take a chance - after all, in case of failure, I did not lose anything - a sheet of paper and half an hour of time is something that can be sacrificed for the sake of the experiment.
The work took, of course, more than half an hour - stretching for one and a half, but the result is worth it. Despite the fact that I made a model from ordinary office paper with a density of 80 g / m2 (that is, the most standard paper for printers, etc.), it kept its shape quite well. True, I could not use it as a pencil holder, but for some time it stood and adorned my desktop. And then it was used for classes on the course of Lena Makarova. In general, only after this course I began to create with pleasure. Before that, I had never had such a need. But after him ... Only after him did beads, quilling, and much more enter my life - although at Lena's we only drew, sculpted, glued. Such a side effect 🙂 Although I also fell in love with drawing - only problems often arise over time. For all classes - for some reason, it is sorely lacking. You have to prioritize.
Digging through the archives, I found a photo of my pencil box (the very first work with paper). Showing:

Well, now the promised kirigami schemes:
Ferris wheel
scheme (click to enlarge)


butterfly scheme


Knight and beautiful lady

Kirigami is a Japanese word that consists of two words: "to iru" - cut + " kami"- paper. This is one of the paperwork techniques for creating three-dimensional images of objects, which consists in cutting and folding paper in a certain way to create a three-dimensional shape. Kirigami is similar to origami in that it is a form of paper art. The main difference between them is this: in origami you only fold the paper, while in kirigami you not only fold but also cut the paper.
One of the directions of kirigami is pop-up postcards, or folding postcards. When it is opened, the form folded between its pages straightens and becomes voluminous. Often this technique is used in children's books, where houses, castles, entire landscapes and characters of the book seem to appear out of nowhere as soon as you turn the page. Impressive effect!
To design kirigami, you need to understand the basic principles for creating such three-dimensional forms. We will talk about this in a separate article on this topic.
Kirigami is a hobby that does not require many expensive materials, but the effect that can be achieved with minimal materials - paper and a knife - is amazing. Below you will find a number of free templates and patterns for creating kirigami castles in the style of a pop-up card.
Kirigami postcards can be created on a single sheet of paper. But you can also use two sheets of contrasting colors: one for creating the kirigami project itself, and the second as the basis for the postcard, as in the picture below.

Also, the castle can be tinted with pencils or a pen.

Below are 11 kirigami castle designs that you can print out. Below we will discuss the principles of folding and cutting paper to create these castles.
Kirigami Castle No. 1.

Pattern of this castle:

Kirigami Castle No. 2.

Pattern of this castle:

Kirigami Castle No. 3.

Lock pattern:

Kirigami Castle No. 4.


Kirigami Castle No. 5.


Kirigami Castle No. 6.


Kirigami Castle No. 7.


Kirigami Castle No. 8.


Several kirigami castle templates without end result images:


How to create a kirigami postcard with locks?
It is better to use thicker paper for printing templates. Slots are easier to make by helping yourself with a ruler. The incisions can be made with a utility knife or scalpel. Use the stylus as an auxiliary tool to fold paper.
There are two types of kirigami schemes in our templates: multi-colored with lines of different colors and black and white. Let's start with the first type of schemes - multi-colored. In these diagrams, different line colors represent different types of paper folds and cuts, namely fold in, fold out, and the size line. Since the schemes belong to different authors, the colors responsible for different types of work with lines are different. But looking at ready-made projects with a lock next to the templates, it is easy to figure out what kind of line a certain color is responsible for. For example, in project #7, the red line is the inward fold line, the gray line is the cut line, and the blue line is the outward fold. In project No. 8, the red dotted line is the cut line, the pink dotted line is the inward fold, and the blue dotted line is the outward fold.
In the second type of schemes - black and white - the following lines and their designations are used:
- solid line - size line;
- dotted line - inward bend;
- dotted line - outward bend.
After printing the template with a lock, lay the sheet on a board or cardboard, and use a clerical knife to cut along the lines on the template that are intended for cutting. A more difficult stage is folds. First, gently fold the card along the center line without hitting the lock itself. Then, for each line in the lock pattern, fold inward or outward, depending on the type of line. In this case, place a finger or a stylus under the bent element for support.
3D PAPER CUT PICTURES BY ARTIST LISA RODDEN
The unusual art of the artist Lisa Rodden(Lisa Rodden) consists in the fact that she does not use pencils, brushes, or paints. She creates her three-dimensional paintings from paper using scissors. Ordinary sheets of white paper are transformed into images of animals or fantastic birds, as well as intricate geometric patterns. These paper cut pictures are eye-catching and captivating.
The secret of the artist is that she not only makes cuts with extraordinary precision, but also uses the play of light and shadow, as well as color contrasts with the background, in her three-dimensional images. Creating volumetric paintings from paper is a matter that only at first glance seems simple. It requires extraordinary perseverance and utmost accuracy, reaching the point of pedantry. Lisa Rodden possesses these qualities to the highest degree.
Lisa's talent has not gone unnoticed. The originality of the carved paintings, their laconicism, the minimalism of visual means made the artist's art very popular: her paintings are shown in salons, large companies order her original booklets and business cards.

Kirigami. Postcards for the New Year of the Dragon.
How to make a unique, voluminous Dragon card from colored paper for the holiday with your own hands.
Learning how to make voluminous postcards using the technique - kirigami. Spectacular, bright postcard - Year of the Dragon from colored paper.
Kirigami (jap. 切り紙?) is a type of origami that allows the use of scissors and paper cutting in the process of making a model. This is the main difference between kirigami and other paper folding techniques, which is emphasized in the name: 切る (kiru) - cut, 紙 (kami) - paper.
A handmade Dragon card can be decorated with beads, sequins, pieces of fabric and fur, multi-colored braid, decorative laces, beads and rhinestones, satin ribbons. In a word, everything that is at hand at home or in the nearest store. Scissors, bright colored paper, sometimes glue, threads and jewelry, that's all you need to create original, unique, author's postcards. Read full text...
Kirigami is the art of paper-cutting three-dimensional objects, which has some common principles with origami and zhenigami. Due to its characteristic features, kirigami is often used to create postcards. Postcards made in this way are distinguished by originality and elegance of forms. Making them is quite difficult, but to make this process easier for yourself, you can use ready-made kirigami templates.
Kirigami is the art of paper cutting.
Even children can use simple schemes in their work, the main thing is to make sure that they follow the safety precautions when working with a knife and scissors. One of the simple schemes for beginners is to make a birthday cake card.
For this you will need:
- stationery knife;
- double-sided cardboard - colors should be different on both sides;
- rubber mat;
- ruler.
Manufacturing technique:
- The finished template is redrawn with a pencil on the cardboard chosen for work.
- The workpiece is cut out of the sheet along the perimeter of the template.
- With the help of a knife, all solid lines are cut.
- All dotted lines are bent. Special attention should be paid to candles - they must be turned up.
- With this technique, a two-color cake is obtained.

You can decorate the completed postcard with various decorative elements. However, it is worth considering that they should not create a strong contrast, diverting attention from the main object of the postcard, made using the kirigami technique.
Gallery: kirigami (25 photos)


Do-it-yourself voluminous postcard kirigami (video)
How to make a postcard for the New Year using the kirigami technique: a master class
Kirigami is a technique that allows you to make a huge variety of postcards, including for the New Year. In order for them to be as expressive as possible, it is recommended to use high-quality paper with prints or interesting textures. Kirigami allows you to cut out both opening greeting cards and 3D.
Volumetric Christmas tree in the technique of kirigami
One of the New Year's images is a Christmas tree. Therefore, as a postcard for the New Year using the kirigami technique, you can make a voluminous magic tree.

It is made from the following materials:
- double-sided green cardboard sheet A4;
- food film;
- a silvery or greenish napkin with the image of some kind of background ornament, for example, polka dots.
Master Class:
- A cling film is applied to 1 of the sides of the green cardboard, and a napkin is placed on top of it (the top layer is with an image).
- Then the made pyramid is ironed with an iron until the napkin sticks to the main cardboard.
- The scheme is transferred to the cardboard.
- The template is cut around the perimeter with scissors.
- Then, with the help of a knife, all solid lines are cut, and the dotted lines are bent.
- The Christmas tree is placed vertically so that both its parts form a single whole.
- The cut half of the heart is bent to the side.
The originality of this postcard is due to its two-sided feature: the Christmas tree can be bent so that it is green or napkin-colored.
Kirigami Opening Christmas Tree Card
Using the kirigami technique, you can also make an opening card in the shape of a Christmas tree.
This requires the following materials:
- 1 sheet of A4 double-sided cardboard. The two sides must be different colors;
- stationery knife;
- decorative elements.
Cutting principle:
- First of all, a stencil for making a postcard is transferred to the cardboard.
- Then a general postcard shape is cut out of the sheet.
- Wavy lines are cut on the future postcard, located at the bottom of each tier of spruce, as well as the trunk. A piece of a Christmas tree is also cut out on a rectangular base.
- Then both the rectangular and semi-oval bases are bent in half along the marked lines.
- Next, the inclined lines of the spruce and the trunk are bent.
- The postcard is folded so that when it is opened, the fir tree becomes voluminous; for this, the central line of the fir tree bends forward.
- A piece of a Christmas tree on a rectangular base is bent to the side.

Such a card allows you to use a large number of decorations on its front part, since the main object is inside.
Pop up postcard: an easy template for cutting
Using the kirigami technique, or as it is also called - Pop up, you can cut out a spectacular, but very simple butterfly-shaped postcard.
This will require:
- sheet A4;
- scissors;
- stationery knife;
- a sheet of cardboard of your favorite color;
- pencil.
How to make a paper butterfly:
- First of all, on an A4 sheet, you need to print the finished template.
- All solid lines are cut with scissors so that the wings are almost completely free of paper, with the exception of their base.
- The ornament on the wings should be cut through with a clerical knife.
- Then the base is folded along all the dotted lines.
- A piece of cardboard is selected according to the size of the cut out base. It is worth considering that it should have an allowance of 0.5 centimeters on each side.
- A sheet of cardboard is folded in half, opened and a cut out base is glued into its center. The fold lines of both elements must match.
- After the glue dries, the wings are inserted into the slots so that a voluminous butterfly is obtained.
- The wings curl slightly in different directions so that the card becomes more elegant.

Such a cut out postcard can be presented as a postcard for any holiday thanks to the versatile image object.
Kirigami: architectural scheme
Kirigami are not only light postcards, but also complex ones that can only be made by masters of their craft. There are a lot of complex schemes, according to which you can cut out the image of a castle, a cathedral, bridges and other detailed elements. One of the simplest in kirigami is the architecture of the cathedral.. This template can be recommended for children who have already mastered the initial level of this technique.
How to cut an architectural structure out of paper:
- The first step is to transfer the template to a sheet of thick paper.
- You should start cutting SOBR from the dome: all vertical and semicircular lines are cut through. The horizontal lines are left for the fold.
- Further, according to a similar principle, side towers are cut through.
- At the bottom of the cathedral, you should carefully cut the vertical lines of the columns with a clerical knife. You should also carefully cut through the triangular gable.
- All rectangular, oval and round windows are cut through.
- After all the indicated lines are cut, you can proceed to the fold of the remaining ones.
- The result is a three-dimensional architectural structure.

You can add originality to such a postcard if you install a contrasting color LED deep into the structure. Using this technique, you can achieve interesting openwork shadows, as well as a feeling of highlighting the building.
Volumetric postcard kirigami (video)
Pop up, or kirigami, is a technique for the hardworking and diligent. It is worth considering that cutting out even the simplest postcard will require maximum concentration and accuracy, otherwise, uneven lines can completely spoil the overall impression of a hand-made craft. To avoid this, you can use the instructions and master classes presented above to make interesting and memorable postcards.
"! Today we will talk about a new technique for making paper crafts - kirigami. This type of paper art is related to origami (read). However, there is a difference between them, which is that kirigami cutting and gluing paper is used. This difference simplifies the work with paper and allows you to create real works of art that are distinguished by beauty and originality.
KIRIGAMI technique
For the manufacture of crafts in technology kirigami, diagrams and drawings are used, in which the symbols show which parts need to be cut (solid line) and bent (dotted line - bend inward to the center of the sheet, a line of dots - outward).
It is better to use thick paper (see) in kirigami (150-220 g / m2), it is easier to cut and it retains its shape well.
A clerical knife is used as a tool. It is desirable for him to have a good supply of replacement blades, since the quality of the cuts in the paper depends on the sharpness of the knife.
In addition to a clerical knife, you will need a stylus (instead of a stylus, a ballpoint pen that does not write is suitable). It is used to make bending easier.
And also we will need an even ruler. It is better to use a metal ruler, because. it will be used not only for drawing, but also for making cuts in paper with a clerical knife.
In the workplace, you will also need to use a lining so that the knife does not spoil the furniture. For this purpose, ideally, a special self-healing rug is used, but a piece of linoleum, a piece of plexiglass, or, at worst, a few old magazines may work.
Crafts KIRIGAMI
And now we propose to make some crafts in the style of Kirigami. To do this, you will need to print out the diagrams on the printer and, exactly in accordance with the drawings, make the necessary cuts and bends.
cubic pyramid

Diagram Cubic Pyramid


Castle scheme

Cathedral of Saint Marcus

Diagram of Saint Marcus Cathedral
And now we suggest watching a video about what kind of kirigami-style crafts you can do if you wish.


