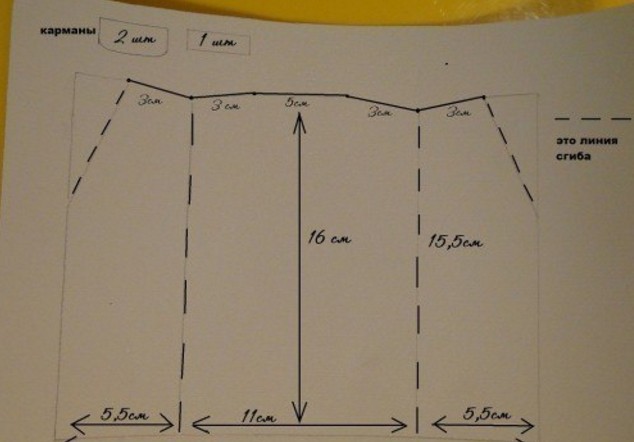
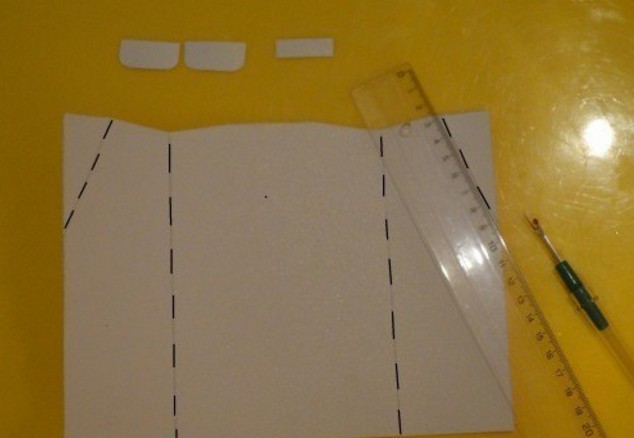
Beautiful homemade postcards for February 23. Preschool development of children with the help of unique materials. Ideas for inspiration
Helpful Hints
Handmade cards are always a pleasure to give and receive. By February 23, you can cook several different postcards and crafts made by hand. You can make them yourself or with children and give them to dad, grandfather, uncle, friend, colleague.
To date, the holiday of February 23 has ceased to simply be a holiday for military personnel. On Defender of the Fatherland Day congratulations to all the men you love.
To make a card or a gift, you need to prepare a few details, but first you need to think about the design, about what exactly you would like to do.
In this master class, you will learn how to make several types of cards and gifts with their own hands.
DIY crafts for February 23. Origami shirt

Video Lesson (below it is a diagram in pictures)
To make a paper shirt you will need rectangular sheet of paper any color.
You can also choose shirt size. When choosing a size, you need to take into account several details: the ratio of the length and width of the rectangle is 2:1; the sides of the shirt after it is assembled will be 2 times smaller than the sides of the rectangle.

* You can try to fold an origami shirt first, using a regular sheet. Thus, you will learn where and how you can avoid mistakes when making a direct gift.
1. First you need to fold the rectangle in half, but along and not across. Next, you need to unfold and bend the edges of the paper to the middle (see picture).


3. Prepare your sheet face down again. Once again, fold the corners to the fold lines you just made. This time you do not need to unbend these small corners.


4. Now fold the top of the sheet with the folded corners in the part of the paper where the edge of the sheet intersects with the fold lines of the corners.


5. The next thing to do is fold two ribs towards the middle of your paper shirt and make the sleeves (see picture) while holding the ribs with one finger.


6. You have made the sleeves and now it's time to move on to the collar. You may have already guessed that the collar needs to be started from the other end of the folded rectangle. To do this, fold the bottom edge of the sheet so that the collar is about 2 times shorter than the sleeve.

7. Turn over the folded sheet and make the corners of the collar.


8. Finally, fold the resulting sheet so as to align the edge with the sleeves and collar. Straighten the corners of the collar and use glue to secure them.

You have made the base of the shirt. Move on to decoration. Add buttons. You can also add a corner of a handkerchief, a bow tie or a tie.

How to make a paper tie for your shirt:

Using an origami shirt as a base, you can easily decorate your postcard. You can make a large shirt and use it separately as a gift.
You can also make several small shirts in different colors and attach them to one postcard.
On any holiday, the most important gift is a reminder that the man you love is important to you. For this, a handmade gift is what you need.
If you know how to knit, then here is one idea for you - a knitted butterfly.

DIY postcard frame for February 23
And if you are not inclined to knitting, then you can prepare such a colorful postcard frame that not only looks original, but is also very easy to make. In principle, anyone can make such a frame.

You will need:
Wooden photo frame 10x15
* It is better to choose white color. And if you have a dark-colored frame, you can repaint it in a light one, using white acrylic paint and a sponge.
Colour pencils
Glue hot gun
* It can be replaced with a transparent strong adhesive.
Colored paper (in the form of a square), for the manufacture of a boat or airplane.
1. Prepare a light frame, and pick up colored pencils of the right size.
*To paint the frame with white acrylic paint, dip a sponge into the paint and gently spread evenly over the frame. Then leave the frame to dry.
* Pencils need to be selected so that they look beautiful on the frame.
2. Glue the pencils to the frame using a hot glue gun.
3. Draw a postcard and make a boat that you need to glue on the postcard, and glue that in turn to the frame.
Cool congratulations on February 23
Men also like sweets, and therefore you can cook and decorate chocolates beautifully.

You will need:
wooden skewers
colored paper
Double sided tape
Multi-colored thick cotton threads
PVA glue
Two wrapped chocolates
Scissors
Side cutters for cutting skewers
1. To make a sail, you need to cut out an isosceles triangle from paper with sides equal to 10 cm and a base of 12 cm.
2. Fold the triangle in half and insert a piece of skewer into its fold. Make sure that the end of the skewer protrudes only 1 cm above the sail.
3. Now you need to glue the structure using PVA glue.
4. Stick double-sided tape along the entire length of the chocolate bar.
5. On the other side of the adhesive tape, remove the protective film and glue the mast with the sail as shown in the picture.
* The mast must be pressed between two chocolates.
* You can decorate the mast with colored paper flags!
Congratulations to the boys on February 23. Photo frame "Order"
With this gift, you can reward your hero for all his merits. Such an order, made by hand, is suitable not only for an adult man, but also for a little boy. And most importantly, he will be pleased.

You will need:
Cork stand for hot
Thin plexiglass
Satin ribbon (color blue, width 4cm)
Cardboard (heavy paper)
Metal ring (2pcs)
Acrylic paint (gold color)
colored paper
Eyelet 0.4 cm, 1 pc (you can do without it)
PVA glue
glue gun
Punch
1. Using PVA glue, prime the cork hotplate and paint over it using gold acrylic paint.
2. Cut out an eight-pointed star out of cardboard or heavy paper, large enough to fit the cork stand as shown in the picture.
3. The star now needs to be covered with two layers of acrylic paint.
4. Use the glue gun to connect the base and the star. In this case, the recess in the stand should be on the outside.


5. Prepare the plexiglass and cut out a circle from it, the diameter of which should be 0.1 cm larger than the diameter of the stand. Thus, you will ensure a good fixation of the plexiglass in the photo frame.
6. Using a universal punch, make a hole in one of the arms of the star.
7. Insert the eyelet, which also needs to be fixed, using the same punch, but with a special nozzle for installing eyelets. Insert a metal ring into the hole.
8. Prepare a satin ribbon, thread it through the ring and make a bow.
9. Now you need to glue the second metal ring on the back side. It will be needed for fasteners.


10. It's time to decorate the rays with triangular elements made from colored paper.
Do-it-yourself gift for February 23. Keychain - shoulder strap.
In this master class, you can learn how to make a military attribute with your own hands and give it to a man. Namely, you will learn how to make a felt keychain, with embroidery as a decoration.

You will need:
Burgundy felt (thickness 0.1cm)
Green felt (thickness 0.5cm)
Mouline threads (different colors)
Copy paper
Eyelets 0.4cm (quantity 2pcs)
Chain ring (as part of a keychain)
Universal Punch
1. Find a picture of a soldier. Use carbon paper to transfer the design to the felt.
2. Slowly pull the felt over the hoop. Use the "simple double-sided stitch" technique and try to embroider a picture on felt. Next, you need to remove the hoop and cut out the image, while leaving allowances of 1.5 cm.

3. Prepare a green felt and cut out 2 parts from it in the form of a small shoulder strap (both should be the same size). Now you need to make holes on both parts. To do this, you need to install the nozzle on the punch, and punch.
Use a special nozzle to fix the eyelets. You can also try to process this hole by hand - just wrap the edges with threads of a suitable tone.
4. With the help of a blind seam, tediously sew the felt with embroidery to one of the blanks made from green felt.

5. As for another workpiece, here you need to make a slot in the form of a window.
6. For now, fold all the pieces, and sew by hand using an over-stitch.

7. The top part needs to be decorated. To do this, sew it with red threads.
8. Insert a chain with a ring into the hole.

Postcard for February 23 in quilling technique

You will need:
Paper
simple pencil
Scissors
Quilling tool (can be replaced with a toothpick or awl)
Quilling paper
If you do not know about quilling, then watch two short video tutorials on quilling for beginners.
Quilling for beginners (video)
1. Fold a sheet of paper so that one half is longer than the other.
2. Using a simple pencil, mark the numbers 23 (see picture). You can simply draw the numbers and cut them out, or you can cut strips, from which you can then carefully fold the number 23.
Time flies not noticeably, it seems that it was just the New Year, Shrovetide and Valentine's Day, and it's time to congratulate our men on their truly masculine holiday, February 23rd.
And there is nothing more beautiful for every dad than a gift from a child, executed on his own. In our country, it is very common in schools to make various postcards at labor lessons. But sometimes you want something original and interesting performance.
We tried to find you the most interesting and unusual options for greeting cards. The main thing is to follow our instructions exactly and the result will please you.
Tricolor as a gift
Quite patriotic and simple in execution, your dad will definitely like it. 
Required tools:
- Multi-colored sheets of cardboard - 2 pcs.
- Multi-colored paper (blue, red, white) - 3 pcs.
- Sharp scissors -1 pc.
- Ruler — 1 pc.
- Stationery glue - 1 pc.
 You can start:
1. Cut a strip of at least forty millimeters wide from each sheet of multi-colored paper.  2. Bend the blanks and glue to each other. Then give them the shape of the flag of the Russian Federation.
  3. Draw and cut out a flag holder on black cardboard.
Tools :
- Colored paper - 4 different colors
- Glue - 1 pc.
- Scissors. - 1 PC.
Operating principle:
Cut out a rectangle 25 * 20 centimeters. Cut off a strip 5 centimeters long from the top, stepping back 5 centimeters from the top. And cut out a tie from black paper.
Glue these two blanks.
From green paper, cut out a rectangle 40 centimeters wide and 20 centimeters long. Glue shoulder straps and yellow paper buttons to it.
Connect all the details together.
Cap postcard
Such a postcard for a cap can be made by February 23.
In our country, both military service and the army itself are very popular. In the last decade, the state has been very encouraging of its military personnel, which gives them a reason to be proud of their work. Therefore, we offer to give your dad a postcard cap, which will always remind him of his military service. 
List of required tools:

Let's get started:
On colored cardboard we draw a cap. And we cut.  From multi-colored paper, cut out a visor, an asterisk, a rim, a cockade and petals in the style of quilling. We divide the lace into two parts, by cutting off 1/3, this will be one part.
  We collect the cap: We attach the rim to the workpiece, attach the visor, asterisk and cockade with decorations.
  That's all you can congratulate the defender of the motherland on his professional holiday.
Postcard - congratulations
Surely everyone wants to convey to their beloved dad an incredible amount of warm phrases, but in our rhythm of life, sometimes there is no time, sometimes it is not appropriate. Only on holidays do we allow ourselves to speak from the heart. Therefore, we bring to your attention a way to simultaneously say dozens of congratulations. And will be a joyful memory for many years. 
Required tools:
- Multi-colored squares - 16 cm.
- Scissors - 1 pc.
- Ruler — 1 pc.
- Pencil - 1 pc.
- Stationery glue - 1 pc.
- Helium pens — 1 pc.
You can start:
We bend one blank diagonally and along the floors on both sides.  On one of the resulting squares, step back from the fold 2 cm and draw a line, not reaching the edges of 1 cm. Then draw from the ends of the strip to the upper corners to make a trapezoid. Cut it out.
  Spread glue on the remaining piece and glue from below to the adjacent sheet.
  This is how it should be for you.
  We carry out exactly the same manipulations with the rest of the colored paper.
  Next, glue them one by one. Pressing them tightly together. Then we attach a card of a different color to the center of each base. And we write different words on it.
 We glue the date of the celebration on the front side. That's it.
DIY postcard with a ship
Sometimes it takes quite a bit of effort to make a pleasant surprise. And the pleasure received from the words of gratitude will more than overlap your efforts. 
Tools:
- Blue cardboard - 1 pc.
- Sheet of white paper - 2 pcs.
- Scissors - 1 pc.
- Glue - 1 pc.
Let's get started:
Fold a white leaf in half and on one side draw a sketch of the future ship on the waves, seagulls and clouds.  Cut along the contour of everything that you have drawn.
  Bend the two parts of the boat, as in the picture. Draw the windows of the holds on three floors. You can draw them square or round, or as in the picture, two options.
  Spread glue on the top of the workpiece and the sides.
  Gently but fairly firmly press the smeared parts onto the aquamarine cardboard.
  Around we glue additional details of the decor.
  Ready. Look how beautiful it turned out. Add a congratulation on the front and you can safely give it to the recipient.
Do-it-yourself gift for February 23 - tank
Required tools:
- Jars of Coca-Cola - 3 pcs.
- Candies m * ms - 2 pieces
- Two types of ritter sport chocolate - 1 pc.
- Candies Rondo — 1 pc.
- Candy tik tak - 1 pc.
- Any chewing gum - 1 pc.
- Military-colored fabric — 1 pc.
- Green strips of fabric - 1 pc.
- Scissors - 1 pc.
- Double sided tape — 1 pc.
Let's start making:
Using sticky tape, wrap the lemonade in military cloth. And fasten together with ribbons.  Alternately, using double-sided tape, we attach sweets to our base, checking each time for strength. Try to fasten them so that the adhesive tape is not visible.
  That's it, your gift is ready!
DIY postcard for February 23
In the modern world, development does not stand still, there are 3D movies, pens and printers that have already learned how to print human skin. Therefore, we can also make a 3D postcard with our own hands as a gift. She looks unusual and interesting. 
Required tools:
- Empty box from any chocolates - 1 pc.
- Picture or own drawing — 1 pc.
- Styrofoam - 1 pc.
- Scissors - 1 pc.
- Glue gun — 1 pc.
- Toothpicks - 3 pcs.
- Cutting board - 1 pc.
- Stationery knife - 1 pc.
- Colored plasticine - 1 pc.
You can start:
Take an empty candy box.  With the help of a ruler and a pencil, draw the outline of the future picture.
  Place a cutting board under the box and use a clerical knife to cut out the unwanted part.
  Choose a picture with a military theme or draw it yourself.
  From the foam, cut out the figures and cut them out.
  To mold a tank and an airplane from colored plasticine.
  Using a glue gun, attach the picture and figures to the box.
  3D postcard is ready, you can congratulate!
Postcard insert for February 23
It also looks very interesting postcard inserts, which consist of several prefabricated elements.
You can exactly repeat the postcard according to our example, and here you can also replace the elements with something else to your liking. 
Necessary materials :
- Several different colors of double-sided cardboard - 5 pcs.
- Ruler — 1 pc.
- Pencil - 1 pc.
- Glue stationery - 1 pc.
- Contour map — 1 pc.
- Silver braid - 20 centimeters - 1 pc..
Let's get started:
Fold one sheet of double-sided cardboard in half. For a stronger fold, you can press down with a ruler.  Stepping back from the top 4 centimeters draw a cut line.
Cut off the top. On the first sheet, draw a semicircle in order to cut off the corner. And cut out. 
 Take an old contour map and circle our front part on it. Cut out.
  Along the fold line at the very bottom we make an incision 0.5 centimeters. We bend the right side inward, and cut off the left side.
  Glue the bent strip and the sharp lower corner of the front part with glue and glue both sides. Reduce the contour map at the edges by one centimeter and glue it exactly to the base.
  Cut out a rectangle 4 * 6 centimeters black and stripes 1 * 6 centimeters orange, and glue together. Next, we glue this blank to the base. We fasten them, beautifully spreading them out on a postcard. Insert a ribbon under the star.
  Cut out a rectangle 3 * 5 centimeters red and 2.5 * 4.5 white. On white, write "February 23", preferably in red.
  Cut a yellow shoulder strap 3 * 10 centimeters, attach a red star to it, and make a hole on top. Tie it to the braid. Insert the shoulder strap into the pocket. Our postcard is ready!
Postcard for February 23 in the style of scrapbooking
Another interesting way to make a postcard as a gift for February 23 is scrapbooking. Very interesting and exciting, allows you to create simply unimaginable masterpieces with minimal tools. And variations of performances depend only on the imagination of the person creating it. So let's get started. To make this postcard, you will need art ink, which can be purchased at any art supply store.
Tools:
- Sheet of A4 paper - 1 pc.
- Scissors - 1 pc.
- Printing for ink - 1 pc.
- Ink - 6 pcs.
- Pencil - 1 pc.
Let's get started:
The basic rule in this technique is to always start with the lightest shade of ink.
We take light beige ink and tint the sheet with a special print with a pad. Movements are carried out in circular motions and whether as if drawing a sign of infinity.  The next ink color is brown, we also make the same movements with them, trying not to leave any white spots painted over on the sheet.
  We apply them to the base and tint especially carefully with each color separately. Here's what happens in the end.
  And now, working with such a base of military camouflage, you have the opportunity to create an unimaginable number of postcard options. For example, with the help of beads, threads and fabric, such beauty is obtained.
  And if you change the theme of the pictures depending on the type of troops, then we get such a postcard.
  Fantasize, try different options and you will definitely get something special and unique.
Good day everyone! February 14 is followed by another holiday, which is celebrated in our country annually on February 23. Last time we talked about what, and also did with the children
Today we continue and will, together with the children, congratulate our defenders and make interesting and original cards for them.
This type of work for schoolchildren or kindergarteners is the most common. Because it is not so difficult to make such a miracle, you just need to listen to the instructions of the teacher and everything will work out.
So, if you have not yet decided to do this and give it as a gift, then perhaps you will stop at this option.
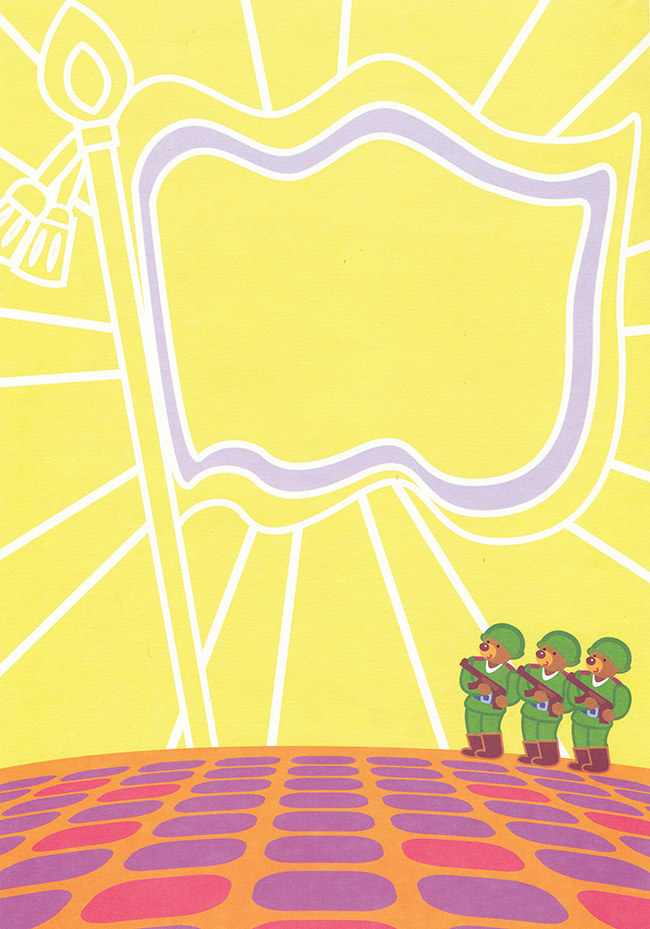
On this day, all mothers, daughters, grandmothers and indeed the entire female half of the population congratulates the male half on this celebration. It is so customary that the symbols of this holiday are state flags, military equipment and other vehicles, as well as stars on shoulder straps.
Therefore, all drawings or pictures are directly related to this. I propose to make the first option out of paper - this is a tie using the origami technique.

And I also really liked the idea with a dollar bill, or you can take our rubles and roll it up, like this, it looks pretty cool, and as they say, a small stash is at hand.

For the smallest craftsmen of the second junior group of the kindergarten, you can make work from plasticine.

Now we will make a postcard on which the car will be depicted. Such an adorable and fun creation you can make with older and preschool kids, or use in elementary grades.
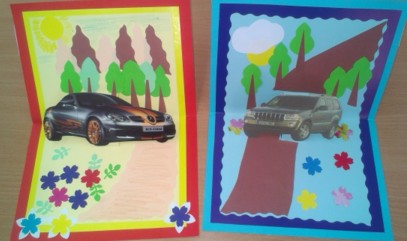
Stages of work:
1. Prepare everything you need for work, these are paper, glue, scissors and pictures with cars.

2. Cut out the necessary details to complete the plot.
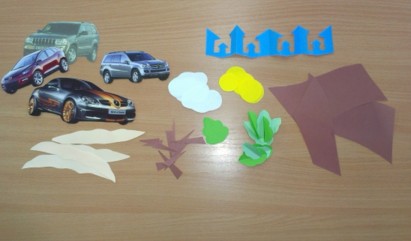
3. Then, to make the machine seem voluminous, make an incision, while folding a sheet of paper in half.

4. Here is such an interesting and cute story.

5. You can decorate the outside as you like, using various decorations and decors.

6. You can do it as an application, or simply draw with colored pencils or felt-tip pens.

Cool design in the technique of scrapbooking
I give you a few ideas that impressed me, you can take them as the basis of your work and create your own plot. See how bright you can make a star.
Miloi is very talentedly executed, even a flower is not at all superfluous here.

Wow, a message or a little surprise).

In general, it looks wonderful and not primitive.

So, do something for everyone!

And surprise, in general, act.

And I also offer you a step-by-step instruction that you can take for your creative work in the scrapbooking style, here:
Original ideas for greeting cards for schoolchildren on February 23 with templates
I want to make and decorate a postcard in a special way, I know that many are interested in options for bulk products, because they look great and amazing. Moreover, if there is a step-by-step instruction, then you and your children at school can do such a miracle.
Or you can create this creation at home, and then your son or daughter will give it to dad.
Stages of work:
1. First of all, you will need to find a double-sided cardboard, it is advisable to take blue or blue, this will be the background of the sea. Then fold the blue sheet in half and glue the base in the form of a boat to it.

2. Accordingly, in order to glue the base from the ship, you first need to make it, for this, find the image of the ship or ask me for a template, I will send it to you for free by mail. So print it on A4 sheet and cut out the desired image along the contours with a clerical knife.


4. Glue the white base gently to the blue base.

5. This is how it should work out for you.

6. Looks just fantastic beautiful and charming.

You can make a simple application from colored paper and from geometric shapes, for this, draw patterns, and glue the composition on them.


You can go another simple way, print this sample, and then color it or make an application.

I liked another type of postcard, I am happy to show it to you.
We will need:
- colored paper or cardboard
- scissors

Stages of work:
1. Draw the templates, as I showed you in this picture, it’s not difficult, even a beginner can do it. But what color to make for each workpiece, decide for yourself, this is a creative work that can be done in a labor lesson.

2. For the base, it is best to take colored cardboard or double-sided or plain. Fold the paper in half and cut out a circle on one side.

3. Now it remains to design the product. Find the right text or write your own by hand.

4. Glue the congratulations inside the card.


6. And the front side will look like this. It's like a ship is floating on the waves.

I also saw such a handsome boy yesterday, I suggest you build it too.
To create such a charm, cut the blanks with scissors.

Glue everything you have in mind on the background you want. The flag can be made from satin ribbons and a match, or use a cotton pad instead of a stick.

If you want a masterpiece in general, take a look here, a stylish and very cool idea for children of any age.

We make postcards with children in kindergarten from paper for dad and grandfather
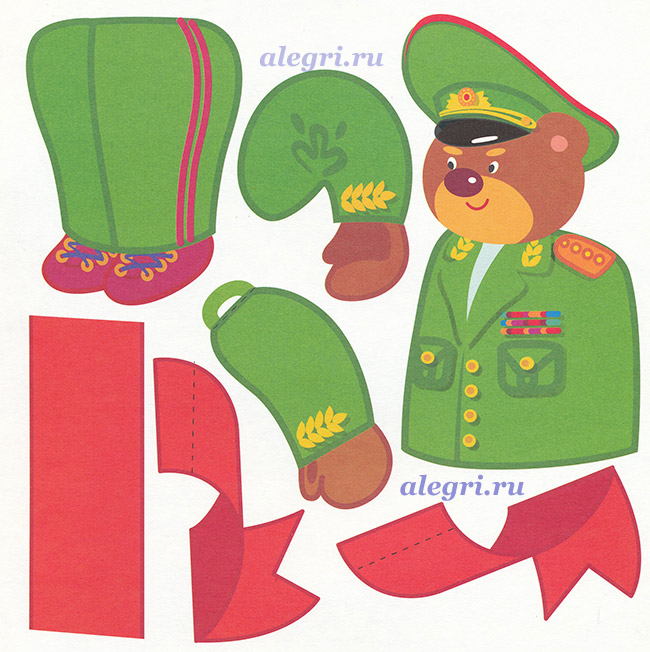
An excellent option would be a rather unpretentious postcard with the image of a bear cub in military uniform. You need to make such a background on a piece of paper using a printer.
Cut out the stencils according to the pattern.
Then glue them to the background.

And on the back, write or print a congratulation.

Well, I also found such a simple idea for very small young talents.
We will need:
- multi-colored cardboard with embossing
- colored paper
- scissors
- ruler
Stages of work:
1. Print the stars on an A4 sheet, or make stencils, and then draw them on colored paper and cut them out.

2. Fold the embossed cardstock in half. Cut out two strips of colored paper and glue them overlapping. Also decorate with a star.

3. Such a very beautiful and cute result, write wishes on the other side.
Unusual gift in the style of quilling Tank
It will be really cool if you make a postcard and, in addition to everything, present a small souvenir in the form of

Those who are familiar with this technique will easily create any plot).

And for those who are not familiar yet, I found a video for you from which you will learn how to do this:
You can deviate from the topic and make it out of numbers, but in the same style.

Master class on how to make a shirt with a jacket
The easiest option can be an origami souvenir, using colored double-sided paper or a white A4 sheet.

It turned out a small shirt with a tie.

In addition to everything, since this is a postcard, you will need to come up with a poem or congratulation and read it with expression.
Or you can go another way to make a blue or light blue sheet tie first, and decorate it with all sorts of stickers, sequins, rhinestones, etc.

And then glue it and you get the easiest gift option.

And if you want to do something more serious, then use this instruction.

It is necessary, as shown in the figure, to make a product layout.
Then use the ruler to collapse along these lines. Of course, draw the lines with a pencil, not a felt-tip pen, a felt-tip pen is shown here so that you can see it better.
This is how the jacket looks like.

It remains to make a collar, make it according to the scheme.

Then cut and roll.

Finish by gluing the right touches to complete it, this is a satin ribbon or paper tie and a poem.

You can also make a postcard with a little secret.

Defender of the Fatherland Day has long ceased to be associated in Russia only with those people who served in the army or linked their careers with the military forces and other law enforcement agencies. On this holiday, all representatives of the stronger sex are congratulated, from young to old: fathers, brothers, husbands, friends. And any of them will be pleased with such a sign of attention as a postcard for February 23, made by hand.
First of all, planes!
If your congratulatory craft will be intended for a person associated with aviation, then use drawings, applications in the form of airplanes, parachutes, clouds, etc. in your work.
- To make a voluminous postcard for February 23 with your own hands, take two sheets, one of which should be blue or blue (like the sky), and the other should be well combined with it, for example, yellow or orange. Glue the sheets together and fold the resulting blank in half so that the background for the sky is inside.
- Now take care of the cover: in the center you need to stick a paper rectangle of blue or blue color (the same as the inside). Place white paper applications along its edges: an airplane, clouds and birds. In each figure, before gluing, you can cut through some element (window, wing outline, etc.) to make the details look more interesting. Finish the cover with paper lettering, placing it in the center: “dad”, “brother”, etc.
- For the inside, cut out a plane from cardboard and paint it (or stick on colored film / paper). To make it appear larger, stick it to the opening half of the postcard using thick double-sided tape. Glue clouds around the plane.
- The last element left is the trail from the plane. Make it from a paper circle with wavy edges. Draw a spiral on it and cut it through. Glue the narrow part of the spiral below the tail of the aircraft, and the wide part with a wavy end on the opposite side.
Daytime “decorations” can be replaced with nighttime ones by making stars in a dark blue or black sky out of foil or metallized tape.

sea captain
A do-it-yourself postcard for February 23 from a son to dad should be not only beautiful, but also quite simple in execution. It is no secret that boys are less assiduous and accurate than girls. Therefore, invite your child to create a ship sailing on the waves as a gift to his father!

Leave the bottom tier for congratulations. Print out a wish like “Always a fair wind to you, dad!” and glue the strip with the text down the postcard.
If your ladder strives to part, then fasten the parts of the accordion together at the bottom with strips of cardboard of the desired length.

Tanks rumbled across the field...
You can try to make a postcard for February 23 with your own hands from your daughter using the quilling technique. Surely your girl will like some "openwork" crafts.
The base will be cardboard folded in half. Color can be absolutely anything, completely rely on your taste. Glue a white sheet of thick paper on top of the cover, the edges of which are preliminarily cut into shapes. If you have a special hole punch, this makes the task much easier. On the printer, print the phrase "Happy Defender of the Fatherland Day" or similar in small print and attach to the cover.
- To make a tank using the quilling technique, prepare special paper or cut colored strips 3 mm wide. You need to start making a tank from the caterpillar: twist two large (each of two glued strips) and two small (each of one strip) wheels. Place the large ones in the center, the small ones at the edges. Stick to each other and paper. Wrap the wheels with another strip - the caterpillar is ready.
- Twist the cabin from three strips, giving it an oval shape. Glue a flattened “tower” twisted from one strip on top.
- For the muzzle, use a toothpick: break off a small piece, wrap it with paper and glue it to the tank.
You can adjust the degree of paper curl at your discretion, thereby making the application larger or smaller in size.

To the beloved soldier
How to make a postcard for February 23 with your own hands to a young man? After all, it is one thing to give a homemade postcard to relatives, and quite another to a loved one. I want it to look like from a store and without a hint of needlework. Then you should try to cut your congratulations!

It remains to place the letters on the cover as you like, and stick them with foam tape.
You can endure crafts in this theme, or you can depict in each square an “attribute” of various Russian armed forces: an aircraft, a ship and a tank.

Handyman!
When creating a postcard for February 23 with your own hands for dad or someone else, it is not necessary to focus on the army component of the holiday. Since February 23 has almost become an unofficial men's day, it can be emphasized that you appreciate the skills and craftsmanship of your man (dad):
- Fold thick paper in half. Corners, from the side of the fold, mow with scissors. On the cover, above the center, cut out a rectangle with the same beveled corners at the top. The "box" for tools is almost ready.
- Attach two cardboard triangles to the bottom corners of the drawer. Glue three circles of a lighter shade on top, imitating nail heads. With a cardboard strip, “strengthen” the handle of the box.
- Now you need to complete the postcard box with tools: a hammer, a hacksaw, a screwdriver, a nail puller, and so on. Draw the “metal” parts on paper in silver or blue, and the pens in white. Glue the pieces together.
- Glue one end of the tools to the inside of the cover and the other end to the outside of the drawer handle. Below you can stick a sign with the name of the holiday or the name of the addressee.
Do not forget to write warm and sincere wishes for your man, father or brother, which will make yours a valuable and expensive gift!
What do-it-yourself postcards for February 23 to make for your beloved dad, grandfather, brother? How to congratulate a sailor, a pilot, or someone who wears a jacket and tie, but held only a virtual or toy weapon in his hands? We tell and show.
In Russia, International Women's Day is celebrated on a grand scale (though not at all as Clara Zetkin bequeathed), and its European counterpart, Mother's Day, has also taken root. For men, there is only one such holiday - Defenders of the Fatherland Day, and even to this day there are disputes: whether it is necessary to congratulate all men or only the military on it. We think - yes, it is necessary and tell you how to make postcards for February 23 with your own hands.
Today we will show you how to make origami cards for February 23, how to make a card in 5 minutes, how to cut out voluminous surprise cards with space invaders or cards with fighters and ships for Defenders Day (for those who are familiar with the basics of scrapbooking).
Po-oh-oh-driving-and-and-and!
In the style of "8 bit": do-it-yourself voluminous postcards for February 23
Let's start with the most common type of troops in the country: virtual, or computer. If your dad had the prefix "Sega" or "Dandy", he will definitely appreciate a pop-up postcard with a space invader or a scalp.

To make a postcard for February 23 in the “8 bit” style with your own hands, you will need 3 sheets of colored paper or cardboard, a ruler, a cutter or a scalpel, a piece of tape, glue and a printed template.

Fold 2 sheets in half and set one aside for now. Print out the postcard template, align the center line with the fold, and use a ruler to make cuts along the red lines. Then bend along the green lines. Glue the blank to the second sheet with a fold, and build an envelope from the third. The more intrigue - the more interesting the gift.

Done, you are amazing!
Parade of technology: do-it-yourself postcards for February 23
If you have time, patience and multi-colored paper, and your dad or grandfather is a real military man with real shoulder straps, make him a more complex surprise card for Defenders of the Fatherland Day. The materials are the same (only tape is not needed).
Starting day, you need to correctly bend the sheet for the future postcard on February 23 (see master class). The next step is gluing stripes: red, blue and green background for the surprise tab. Decorate the “face” of the card with a bronze-colored application-branch.
Next, you need to cut out a “pedestal” for the equipment, glue it to the fold of the postcard and fix the figures of tanks, aircraft, etc. on it. The do-it-yourself postcard is almost ready - it remains to cut and paste the numbers, stars and make “berries” to the branch from lumps of paper.

Postcards-origami for February 23 in the form of shirts
If your real dad is not related to the army and seems to have been born in a jacket and a white shirt, fold for him for February 23 origami postcard in the form of a shirt.
Making an origami card is very easy. Just keep in mind that in the process of work, the sheet will decrease many times, so it is better to take a sheet of paper large and thin enough. This card is essentially an envelope card, so you can put a note of congratulations or a small gift (like movie tickets) inside.
You can glue ties or bow ties, pockets, buttons to the finished one - in a word, make them even more like real ones.


Similar shirt cards can be made even easier. If you do not have a large sheet of paper, but have cardboard, it is better to focus on them.


And here the card-shirt is supplemented with a tunic. And for a sailor on February 23, you can make a postcard with a vest.


A Hawaiian postcard will suit dad with a good sense of humor.

And for a dandy dad and a favorite of women, you can make a stylish postcard with a pocket.

Do-it-yourself cards for February 23 for grandfather
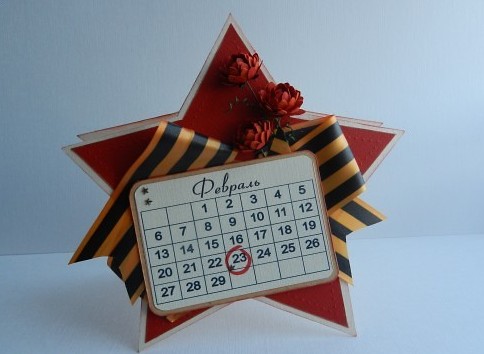
And this postcard with a three-dimensional star should really please the grandfathers. It is very concise and simple, and for it you only need a sheet of cardboard and paper in 2 colors. The template is attached - you need to print it.


Grandfather will definitely appreciate the lovingly hand-cut postcards for February 23 with fighters or sailboats.


Last minute postcards
Option number 1 - postcard with pasta. They need to be painted, glued, signed - and that's it, you're done.

Options No. 2 and 3 - a postcard for February 23 with a star (you will need mom's help to sew them on, but this is a matter of minutes) and a postcard consisting of a base and several strips of colored tape - very stylish.

Choose a postcard to your taste and please your defenders!


