Easy craft for Victory Day. Step by step process of making paper carnations. Monument with an eternal flame made of cardboard and paper "Monument with an eternal flame"
Paper crafts by May 9
With the approach of the great holiday of Victory Day in the Great Patriotic War, a number of preschool and school educational institutions, as well as many young mothers, for educational and educational purposes, begin to make themed children's crafts by May 9th.
Children's crafts by May 9 is not only a way to instill in the younger generation respect and love for veterans, patriotism and deep gratitude for the exploits of our grandfathers and great-grandfathers, who made it possible for each of us to live under a peaceful sky above our heads. But they are also amazing, touching little masterpieces of arts and crafts that can be a great gift for war veterans.
In this article, the Site news portal has prepared for you several simple master classes on making themed crafts by May 9 from paper, cardboard and other improvised materials.
So let's get creative...
DIY paper carnations
 The traditional flowers that are usually given to our dear veterans are, of course, bright red carnations. Try with your children to make paper bouquets of carnations that will delight veterans for more than one day or even a week, such flowers can stand for years.
 To make paper carnations, you will need two colors of corrugated paper (green and red), wire, glue and scissors.
 You can use green electrical tape to drape the carnation stem.
 If your child is still too young to make such flowers, then you can try to make a simpler paper bouquet.
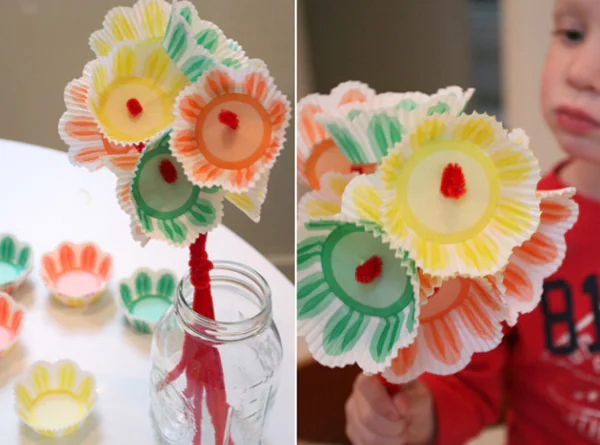
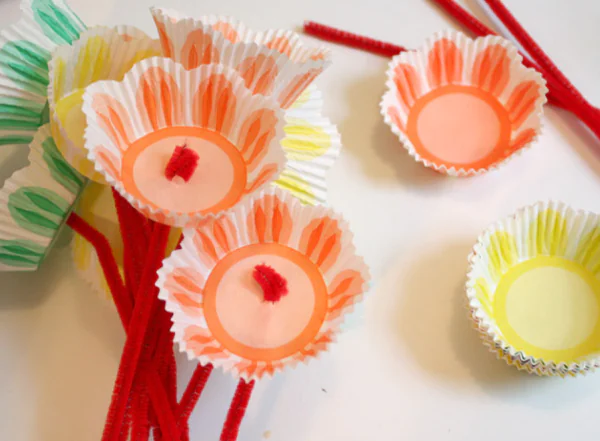
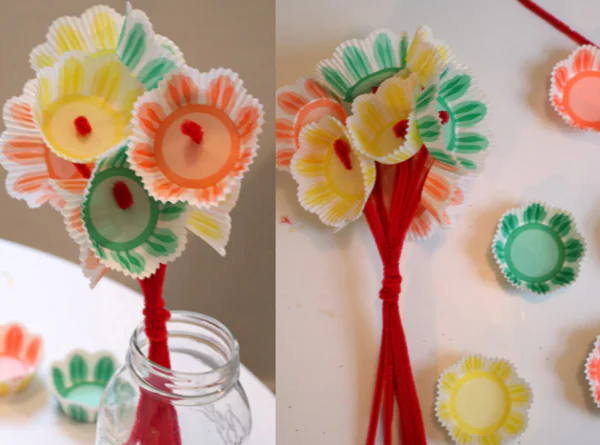
 To make it, you will need paper cupcake baskets, you can buy them in any supermarket and decorative wire.
 Make a small hole in the middle of the cupcake basket with a piece of paper through which you thread the decorative wire.
 Tie one knot inside the future flower, and the other outside.
Do-it-yourself eternal flame from paper
 Such a paper craft by May 9 can become the design of a concert hall, an exhibition or a school class for Victory Day.


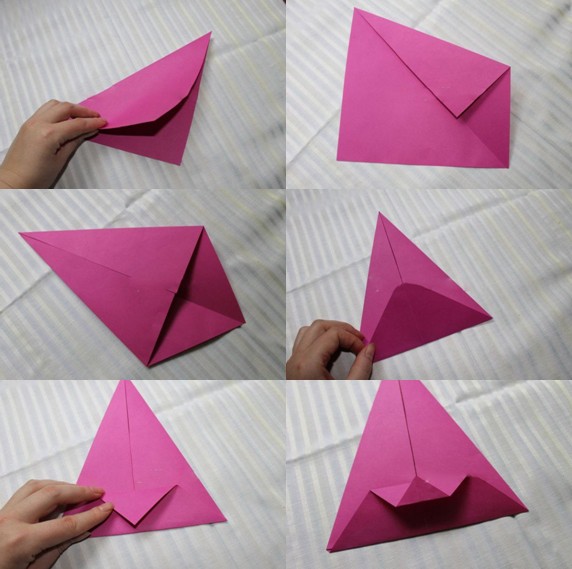
 From a thick sheet of colored paper (you can use colored cardboard), fold a three-dimensional star.

 Make a small hole in the center of the star and place a piece of red paper in it.
Do-it-yourself aircraft
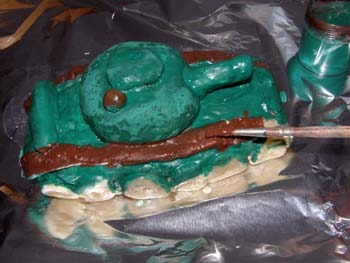
DIY paper tank
 To make a paper tank, you will need cardboard toilet paper rolls, any paper (you can use colored paper too), silver decorative paper (if not, you can make a foil tank caterpillar), and a straw for cocktails.


Do-it-yourself tank from washcloths for washing dishes
 This craft is sure to please young children, because it is easy to do, but it looks very colorful. To make a washcloth tank, you will need washcloths, glue, scissors, and a baby juice tube.


 Depending on which washcloths you choose as a material, in this color and size you will get tanks.
 Be sure to decorate the finished tank with a red star.
Vytynanka
 Another amazingly beautiful and interesting craft for May 9, Victory Day, can be considered paintings made using the extrusion technique.
 Choose any postcard or picture you like on the theme of the holiday, transfer it with tracing paper to a white sheet of paper and cut out some details with a sharp knife or nail scissors. Attach the finished white composition to a sheet of colored paper, then the drawing will be visible more clearly.
Do-it-yourself orders of military glory
 This craft is made in the applique technique. You can make a wide variety of medals, any shapes and colors.
Good afternoon, dear readers and guests of the blog! On the eve of a rather significant day that we celebrate in the month of May, I want to offer you a selection of ideas and master classes of crafts for Victory Day.
We all treat May 9 with pride and respect, go to the memorial and lay flowers at the monuments. But in schools and kindergartens, various exhibitions on this topic are arranged. Plus, there are events and, of course, competitions for the best work.
Therefore, I certainly wanted to help you with such a difficult upcoming work, and in order for you to complete it beautifully and quickly, I went through the Internet and collected a lot of magnificent and creative presentations, which I am happy to share with you.
We have already made various kinds of souvenirs, because there are a lot of holidays in the year. By the way, speaking of some ideas, you can take and coincide with this topic, I mean mine on the Day of Defenders of the Fatherland. And why not, because in it we made tanks, military equipment and the like, whoever has not seen, please come visit).
Very beautiful DIY crafts for May 9
I will start with perhaps the simplest, but at the same time popular and super beautiful option. Indeed, on this day, the red star and the St. George ribbon will definitely act as a symbol. I propose to make such a masterpiece out of paper.
Take a look at this layout and template. It is made of thick paper, or rather from A4 sheet, you can also take photo paper and then it will turn out even brighter and more saturated.

To build this, you need to print the blank that you see now on your screen. I have it in a large format, so if you need to write, I will send it to your email inbox.


The next option is plasticine fantasies.


You can add something else to the plasticine, for example, flowers, namely carnations, but how to make them and from what, look further.

Here is such a wonderful work with a bird and symbols.

And this is already more complicated, a whole composition, even if you can put it on an exhibition. Instead of plasticine, you can take a special dough for modeling.

Look, here are some more options made from salt dough.

Here are badges and medals.

This work deserves applause, made of dough in the form of a photo frame. Bravo to the author! It was taken from the Land of Masters.


You can make holiday surprises in the style of quilling, and origami can also be timed here.

Also, the method of trimming from ordinary napkins will go well here. See the torch, the fire of glory is made in this way.

I remind you that for this you need to cut a square and wind it on a rod or pencil, and then glue it.

Or this dove, well, it looks great, and most importantly, it’s elementary simple and accessible to anyone.

The main thing is a little patience and you will certainly succeed.

First draw a plot with a pencil, and then cut out the squares from a napkin, and glue all the details with a pencil and glue.

Star and flowers also look pretty together. And most importantly, the desired background is orange-black.

You can also post the date. And then continue the thought and do something unique and unrepeatable.

Of course, you can't do without fireworks. Tadam, it rumbles in the sky!

Ordinary discs are very popular among preschoolers and schoolchildren of elementary and senior grades. And what, after all, if you turn them over, it will be brilliant and original.

Place any symbols of the Victory Day on it, and then show everyone your work.

You can specify a date or how many years have passed since that day.

I also propose to dwell on such a funny product, namely a tank. Cut strips of cardboard corrugated paper, and then follow the step-by-step instructions.


You can even assemble matches from matches, imagine, but this video from the YouTube channel will help you with this.
It turned out pretty, but not enough to complete the star, right? Let's make it in the origami technique and it will act as a stand.


Excellent, how do you like such a charming idea? And then it will only get more interesting.
You can also make such military equipment from the dough, for this, make a steep dough from water (1 tbsp), vegetable oil (0.5 tsp), salt (1 tbsp), flour (1 tbsp).

Then start creating. It is best to do according to the picture or according to the finished toy tank.

Then paint in the desired color.

Craft in the form of the Eternal Flame with a template
The easiest thing that comes to mind is this application, schoolchildren and preschoolers always really like this idea. After all, they all love to work with paper and glue.

To get started, draw a fire, or use ready-made blanks, then a star and symbols, cut it out and glue it on a postcard.

I also liked this model, but based on this star pattern. Dotted lines are fold lines.

Transfer it to a sheet of cardboard, draw clear outlines on the back side.

Start folding along these lines.


It remains to add a missing note, a red fiery flame.

Here is a similar idea, I have a sample of a large star, write at the bottom of the article, I will send it.
By the way, you can make this craft from plasticine balls.

The main thing is to outline the contours for the child and tell him what is required of him. You can also paint the background with watercolors.

Well, make a small application, in general, come up with, for inspiration, take this idea.

Well, I could not pass by about this creative work.

We will need:
- candy cardboard box
- colored paper or colored cardboard (red, orange, grey, yellow)
- PVA glue or double sided tape
- hydrocyanic wire
- cupcake paper molds
- full body photograph of a soldier

Stages of work:
1. Cut out stars of different sizes from cardboard.


2. Tape the candy box in the desired color.

3. Saddle a crepe paper fire in different colors to make it look like it's on fire.

4. Now make triangles-stands from strips of cardboard and place soldiers on them.
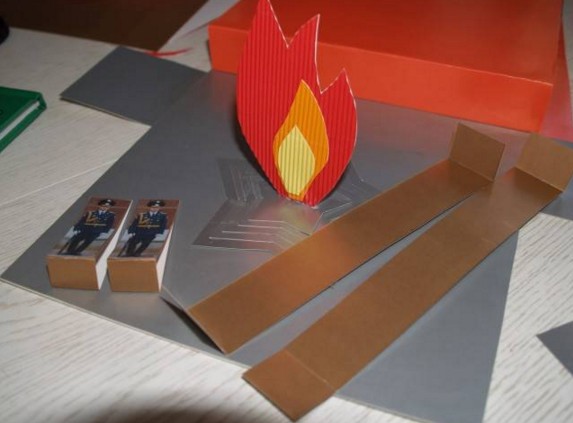
5. Plus such semicircular columns behind them.

6. Well, it remains to build flowers, you can make any, I have one for this case, because you can make roses and tulips. In this version, it is supposed to be made from cups and decorated with paints, and chenille wire will act as stems.

7. And this is the result, it turns out that everything is not so difficult.

Here is another model.

Postcard made of paper and cardboard for Victory Day for students in grades 1-4
Probably the most common, and even very charming miracle, is of course flowers. How many of them there are, it’s just not with honor, I already gave you the best practices, but I didn’t show the carnation how to do it. Therefore, I am correcting myself, because it is they who, for the most part, are given on postcards to veterans on this day.
Fold a sheet of paper in half, then again and again. A red paper napkin is best suited for this purpose. You should have 6 rectangles.
Works well with corrugated paper. After that, put all the rectangles in one pile and fold them with an accordion, and then tie them with wire, as shown in this picture.

Make the ends in the form of triangles and fluff the flower. But, that's not all, you can experiment and take, for example, white, and circle the ends with a felt-tip pen.

There are many options, and they are all similar to each other.

Now you can take and decorate holiday cards with them.
Let's do this again. Fold the sheet in half and on one side draw what you want to hit.


Roll them into balls.

But, that's not all, you also need long strips, roll them into flagella.

Now, with the help of glue, start decorating the product.

It'll turn out great, don't you think?

Looks pretty cool and very stylish. 
Here's another great piece of work.

Master classes of work for kindergarten (preschoolers)
For the little ones, I can suggest making flowers from ordinary cupcake tins. With this type of activity, they will cope with a bang.
We will need:
- cups
- chenille wire
- paints
- tassel

Stages of work:
1. Take multi-colored paper molds, if you have white ones, then paint them in any bright color with a brush, let dry.
Make a hole with a pen or an awl.

2. Insert the wire carefully and bend its end into the base.

3. Here is such an elegant bouquet came out.

Or a fun craft in the form of a salute, using the blowing method, put a drop of paint on the sheet, and then let your child blow into the tube.

Due to the air, splashes and splashes will be obtained in different directions.

You can draw a whole city in this way.

Or use bushings.

And the same molds only in a different role.

You can invite the kids to make an airplane out of ordinary plasticine.


Of course, they will need help, but they will clearly cope with this task.

It is possible to organize collective activities together with parents.

The main thing is to convey the symbolism of the upcoming holiday.

Even the postcards were made by pupils of senior, middle and preparatory groups.

Well, here is another masterpiece, very stylish and beautiful.

You can, if you want something more serious, create a machine from toilet paper rolls. Of course they will need to be painted in the desired color, black.

Then tie with masking tape.

And glue it with colored or wrapping paper.


Then it remains to complete the gun and the cabin.

We do crafts very quickly by May 9 for a school competition
The first thing that came to my mind was a stand newspaper. In my time they were very popular, we made them for every event, why not resume this tradition again.


You might find this video helpful.
I want to bring to your attention such small blanks in the form of coloring pages, take pencils and felt-tip pens and start conjuring over these posters, it will turn out just super and cool.


In general, if you want to somehow stand out from the whole crowd of your peers, then make a hanger from foamiran. Take a look at these flowers on ribbons.

I offer a small master class on this topic.
We will need:
- foamiran
- glue gun
- a pin or better a brooch with a pin
- St. George Ribbon
- wire

Stages of work:
1. Take the ribbon and cut it carefully with scissors, about 25 cm long. The edges can be singeed with a candle or a lighter so that they do not fringe.

2. The next step, glue the blank as shown.

3. Mark up the details on a plain sheet of paper. Since this is a carnation, then they will be as follows:

4. Make such blanks from foamiran. That is, it will be petals and leaves.


7. Glue in some places, use a gun.

8. Fix the finished flower on a ribbon.

9. Glue the brooch on the reverse side.

Also, such a craft using the quilling technique looks original and excellent. You will need to first put on triangular parts, and then insert into each other in a certain sequence.

I hope you are familiar with this technique, here is some hint for you.


You can create any form yourself.


These pictures are taken from the country of masters. What a hand, just a torch of victory.


Well, of course, decorate it to your taste with symbols, for example, write Patriotic War.

Here is another creative masterpiece in the trimming style.

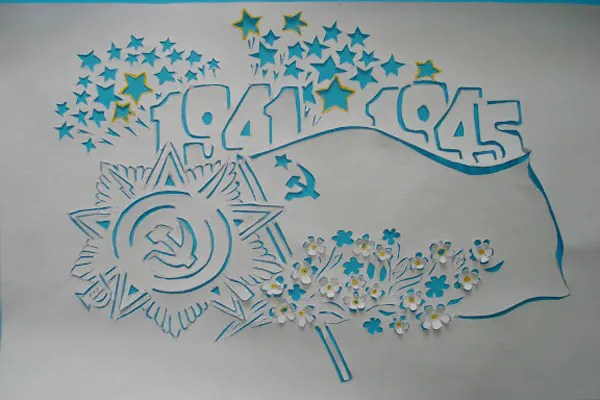
It is impossible to do without vytynanok on this day.

This pattern looks lovely and very cute.

Fantasize and you will definitely succeed.


Here are some samples for you.


Here, in general, the Memorial of Glory from birch trees turned out. The main thing is that he also timed the living branches.

You can paint pictures with stained glass paints.

Or decorate with threads.


And if you know how to embroider, then go ahead and complete such a product.

And finally, a super idea, this is beading.

Of course, if you do not understand this, then it will be difficult for you to disassemble this circuit. But, on the other hand, the result will be a very tender red rose. And the orange and black ribbon will go perfectly with this masterpiece.


Souvenirs and gifts for veterans on this day
For kindergarten children, I propose the simplest option, in my opinion, to make badges and orders.

You must first find and print the template.

Well, then for business, paint them as it should be.

First, paint the surface with white paint and let dry. Apply PVA glue to the purchased badge.


And stick them on the badge. Paint with acrylic paint.


Then continue to work and make a St. George ribbon.

On the other side, it looks like this.

You can also make such a holiday note out of paper in the form of a triangular letter.

Of course, all sorts of postcards with Victory!

For example, you can set it up like this.

Or put flowers on them.

Here's more work, take your pick.

Here is such a voluminous work that deserves attention, light fabric is used here.

This is what I will show in the next article in stages, so that it is easier to recreate. In the meantime, you can subscribe to my group in contact or add the site to your browser bookmarks.

Here's another super masterpiece.

Or take this one as a base.

Inside write wishes and congratulations, veterans will be very pleased to receive such a letter.

You can make and give a book, which is wrapped in a special way.

Scrapbooking style, as you may have noticed.

You can also bake the most delicious cake.

We make a St. George ribbon from satin ribbons with children
This year, as usual, we will decorate our clothes with St. George ribbons, which will symbolize and remind us of this important event in history (this is one of the main attributes of this celebration). If you look, these two colors represent the eternal flame of fire (orange) and smoke (black), which arose when the cities and towns of the Russian population of the country burned.
All of you have probably seen satin ribbon brooches at least once in your life, and now it has become fashionable to decorate them with kanzashi-style flowers.

Do you want to learn this skill? Then watch this instruction from left to right and repeat step by step, you will succeed, use a glue gun.


Choose any option and act.

All these masterpieces are fantastic and very attractive.
How cute and soft it all looks.

Here are some more ideas about it.


To whom these schemes seemed intricate, then for you I picked up a video with detailed instructions. Thanks to him, you will definitely learn this work of art.
Competitive works from the Country of Masters
Well, now, as promised, the works that I saw from this famous site. You can recreate such wonderful images from them.


paper dove of peace
Doves are another symbol. They can also be done with the help of improvised means that are in your apartment.

To make them look voluminous, make a lot of feathers, and then connect them with glue, or you can still use foam rubber.

Also take the threads and make the base out of them, this will be the body, and all other parts of the body from a different material, as in this photo.

Templates can be obtained on the Internet or requested from me.

See also on sticks you can arrange a composition.

I also liked this dove, it seems to be real.

In principle, it only needs to be printed on paper and cut out, and then bent along the fold lines.


And then enjoy the craft. Cool.
Or maybe you like this, the traditional version.

From plastic dishes, namely plates, look what happened.

Who would have thought, but this is also an imitation of real bird wings, if you have a cup with such ribbed rims.

And finally, does the bird in the style of vytynanok, or kirigami, really look superb?

How can you make a three-dimensional star?
In principle, in this article at the very beginning, we have already seen various kinds of stars. But, here I still want to offer one more video for viewing.
Plus, handmade items.


You can try first in the origami technique by bending.

Well, from this one you will be simply shocked, such a direct magic star will turn out.

Use cardboard, corrugated paper and glue to work. Do the preparatory work, cut out all the necessary details.

Glue all the parts together, and then decorate with imitated leaves.

Fold roses from corrugated paper, twist them in a spiral, then fasten.

Holiday cards for the Great Victory Day
I would like to slightly touch on this topic, although soon I will write a separate note on this subject. Now I propose to watch the video, and maybe you will make just such a charm for this Victory Day.
Even more ideas
Or take it and follow this pattern. It's bulky and not hard at all.
Or I offer a simple master class for viewing. Cut out a circle from corrugated paper and fold it like this.

Then cut the ends.

There should be at least 3-4 pieces of such blanks per flower. Lubricate the middle with glue.

And then put it on a postcard.

And add stems and leaves, as well as inscriptions and a ribbon.

If you do not like this option, then take this one or the next one.
They both look very good live.
That's all friends, this is the end of this post. I hope you liked these ideas and ideas and you will definitely take something to note. All bye and see you soon! Good luck and have a great sunny mood. Bye!
Sincerely, Ekaterina Mantsurova
In contact with
Victory Day is a great holiday for our country. Therefore, they always prepare for it in a special way in kindergartens and schools, including making crafts for May 9th. There can be quite a lot of options for making an interesting product.
The simplest will be a poster or postcard. But they can also be made original and interesting if you use some unusual decorative materials.
Yes, and the simplest paper sometimes takes an interesting shape, which can also be used to create crafts for Victory Day.
 Victory Day is a great holiday for our country
 Paper crafts for May 9
The simplest option is to makecrafts for May 9 in kindergartenaspaper postcard. It can be done in the form of an application, which is available for children of any age, including preschoolers. A tank, an asterisk or a dove of peace can be glued onto a blank from an album sheet. These are the most popular elements that decorate crafts for Victory Day.
 The easiest option for crafts for May 9 will be a postcard
 But even the easiest craft to do can sparkle with new colors and become more original if you take not only paper, but also sequins or other interesting elements for decoration. On a paper basis, you can lay out a thematic drawing even with the help of ordinary buttons.
Volumetric paper postcards are very interesting. Here you can use various techniques, for example, origami or quilling. In the first case, a child can make an airplane or boat craft, which must then be glued onto a paper base.
 DIY greeting card for May 9
 On a note! In the quilling technique, the child will work very interestingly.
Here the whole process is based on rolling circles, ovals and other shapes from thin strips of colored paper. Then they are glued to the base, after which a very interesting three-dimensional picture is obtained.
Using the quilling technique, you can make a postcard "May 9", "dove of peace", "tank" and many others. This material is considered very convenient and easy to use, so everyone will have the opportunity to create a masterpiece, which only fantasy tells.
 Holiday card can be decorated with flowers
 A holiday card for Victory Day can also be made with flowers. Cloves are often used here. Quilling strips will help in their manufacture. They make very beautiful and lush flowers that will be a great decoration for a postcard.
You can complement everything with a St. George ribbon, which you can draw using 2 colors: orange and black. It is very convenient to spread it out of neat quilling strips.
 Postcard for grandfather on Victory Day
 Not only postcards and posters can be made from paper. Do-it-yourself holiday crafts of a three-dimensional type, made by yourself, photos of which can be seen below, will also be a good gift.
There are a lot of different techniques, one of which is the use of modular triangles. Such work will be simpler than origami, but the result is no less spectacular.
Considering that products from modular triangles do not require much effort, even preschoolers can handle such crafts.
Important! The main thing here is to learn how to make the basis, and then everything depends only on the imagination of the performer.
To create one triangular module, you need a small rectangle. It must be folded in half lengthwise, and then across to indicate the middle. Further to the center, the edges are folded so that a triangle is obtained.
Its edges are bent towards the top, and then the protruding corners are bent to get an even triangular element. It folds in half at the fold.
 Star and St. George Ribbon for Victory Day
 You can also make a simple star from a paper strip. It will come in handy for designing a voluminous postcard for May 9th.
To work, you need a paper strip measuring 1x26 cm. As for how to make a star, first you need to take a strip and wrap one end so that you get a loop.
The pentagon turns out to be voluminous and not too similar to an asterisk. But, if you press on it, then the rays of the star will immediately become clearly visible.
It is not necessary to press the product strongly, it should turn out to be quite voluminous.
Such decorative elements are made very simply, but they perfectly decorate crafts for Victory Day.
 DIY paper flowers for Victory Day
 Crafts from beads
Such an option for making interesting products will be suitable for school-age children who already have enough perseverance. Beads can be used in several ways.
 St. George's ribbon made of beads made by hand
 The most popular type of creativity is beading. But to make beautiful work, you need skills.
If they are available, then the master can make a tank, an airplane from beads, weave a St. George ribbon or even a whole composition of several products. The second popular needlework technique is beadwork. This is also a difficult and painstaking work, but some children already cope with this task at a younger school age.
You can draw a scheme for embroidery on May 9 with your own hands. This will be a more original craft.
 If desired, you can replace the beads with sparkles or sequins
 For those who still do not know how to manage a thread and a needle, you can choose another option for working with beads. Here you need to use glue, on which small beads will be glued.
Even a small child from kindergarten will cope with work on such a picture. If desired, you can replace the beads with sparkles or sequins.
 St. George's ribbon with a bouquet of tulips with their own hands
 Pictures from threads on May 9
Isothread technique is gaining more and more popularity. On a solid basis, large and small stitches of multi-colored threads are obtained, which in total looks like an interesting and very unusual picture.
The base must be made of durable cardboard. It is necessary to mark the contours of the future picture on it. In the right places, you must immediately make punctures with a thick needle or awl.
 The base must be made of durable cardboard
 On a note! Most often, round and square elements are used for the isothread technique.
If there is no experience in this direction yet, it is worth first practicing to perform the basic drawings - a circle, a semicircle, a square and a triangle. Next, you can proceed to the design of the festive picture. Using the isothread technique, you can make a dove of peace, a tank, and even a Kremlin with a star or an Eternal Flame.
Recently, there have been more and more goods for creativity and needlework.
Among them there are also those that were previously used only by professionals, and are now available to any student. If there is a desire, each child can do glass painting. Stained glass requires special paint and some utensils.
 Original crafts for Victory Day in the form of a painted plate
 In such an interesting way, a child can create a very original craft for Victory Day in the form of a painted plate or glass. If there is no desire to use dishes, you can take glossy or plain paper. So it will turn out just a beautiful drawing with a small volume.
The topic must be chosen appropriately. It can be absolutely any image: a bouquet of carnations with a St. George ribbon, fireworks. Working with stained glass paints is no more difficult than with others, so if a child has good artistic abilities, he will be able to make a very interesting picture on May 9th.
Plasticine and salt dough
Speaking of children's crafts for any holiday, one should not forget about such an important material as plasticine. It is with him that children get acquainted from an early age, learn the basics of creativity. Plasticine is very easy to use, it takes any shape and develops a lot of useful skills in the baby.
 Plasticine is very easy to use
 Forcrafts on the theme of May 9 plasticine fits just fine, you can fashion a three-dimensional detail from it, which will become an independent product or part of the overall picture. By May 9, children can practice modeling plasticine planes, tanks, ships and carnations. You can fashion a dove of peace, carrying a twig and a St. George ribbon. The complexity of crafts depends solely on the experience of the master and his creative abilities.
But plasticine is far from the only material from which a child can mold a three-dimensional craft. Now you can find all sorts of options for clay for modeling and other similar compositions. For a small child, you can find a more suitable alternative.
 For crafts on the theme of May 9, plasticine fits just fine
 You can prepare salt dough for modeling in 5 minutes. In work, it will be no worse than plasticine, but it hardens stronger than any purchased clay. To make modeling material, you need to take a glass of flour, the same amount of fine salt and a little water. These components should form a dense mass of white.
 Submarine on May 9 from plasticine
 You can use salt dough in the same way as plasticine. But after the craft is molded, it should be placed in the oven and left for a couple of hours at a temperature of 50 degrees. This way the dough will harden faster. The finished craft needs to be painted, and if desired, varnished. The main advantage of salt dough crafts for May 9 is that such work is very cheap, work on them is simple and safe for the child, and the product itself can be stored for years.
Kazan technology on May 9
One of the main symbols of Victory Day is the St. George ribbon. In its normal version, it looks like a loop made of orange and black striped ribbon.
 One of the main symbols of Victory Day is the St. George Ribbon.
 But needlewomen never choose simple paths. Therefore, in recent times, the traditional symbol began to take on new forms. Despite the fact that there are opponents of the idea of \u200b\u200busing the Kazan technique for decorating the St. George ribbon, such options will be quite relevant as crafts for school or kindergarten.
In itself, this direction in needlework is based on beautifully folding ribbons. The result is voluminous flowers, leaves and other decorative elements. They can be used as hairpins, brooches.
For preschoolers, this option is not suitable, since the work is quite complicated and involves the use of scissors, needles and even fire to burn individual elements. But schoolchildren can try, under the supervision of adults, to make an interesting craft in the style of Kazan on May 9.
This section presents a lot of already implemented ideas and master classes for the Victory Day holiday. Crafts as a gift to veterans, as a rule, are associated with the symbols of the Victory and are imbued with a desire for peace.
Great Victory for Peace. crafts for children
Contained in sections:Includes sections:
Showing publications 1-10 of 1444 .
All sections | Crafts for May 9
GCD for applications in the second junior group. Subject: "War plane". Target: Continue to teach children how to perform an application in an unconventional technique from rice cereal, cotton wool. To consolidate the skills of working with PVA glue, carefully perform. Strengthen the ability to maintain the correct posture ...
 Postcard for February 23 in the senior group Target: To form children's ideas about the holiday on February 23, to make a gift for dad with their own hands Tasks: 1. Educational: - To teach children to cut out the details for the postcard and arrange them neatly on the sheet. - Keep learning...
Crafts for May 9 - Photo report on the action "Postcard to the Veteran"
Publication “Photo report on the action “Postcard...”  From February 21 to February 23, pupils of the Special Boarding School in the city of Yelets, together with the local branch of the city of Yelets LRO LRO WFP "UNITED RUSSIA" took part in the "Postcard to Veteran" campaign, in which they congratulated Veterans of the Great Patriotic War and home front workers on the Day ...
 MAAM Pictures Library
 By February 23, an exhibition of crafts "Military equipment with their own hands" and an exhibition of drawings "Professions" were organized. Parents and children of the preparatory group "Sweet Tooth" participated in it. The children were happy to tell what kind of fake they made and with whom they performed it.
 Lego bricks stimulate the practical and intellectual development of children, do not limit the freedom of experimentation, develop imagination and communication skills, help to live in a fantasy world, develop the ability to interpret and express themselves. Lego - the designer gives ...
 Authors: Slobodyanskaya E.I., Chernyavskaya N.F., Bronnikova O.L. Master class "Military aircraft" Good afternoon, dear colleagues! So the holiday dedicated to the Defender of the Fatherland Day passed. In our group, as well as in each, many conversations were held on this topic, guys from ...
Crafts for May 9 - Photo report on the exhibition of applications of the junior group "Military aircraft of Russia"
 What kind of birds are in the blue sky High, high Airplanes are rushing. Far, far away The exhibition was prepared for the holiday on February 23. It was placed in the common corridor of our kindergarten so that dads of all groups could see and appreciate our creativity! The children of the younger group are small ...
 Craft for the holiday on February 23 "Defender of the Fatherland Day" - a gift for dad on the topic "Military equipment". They chose an airplane for work. The craft is made of a plastic bottle. The principle of making a toy using papier mache technique. First, the frame of the future crafts is drawn up, ...
 For the holiday on February 23, I decided to knit military hats for boys: a pilot, a sailor, a tanker. For work you will need: - semi-woolen threads (white, black, gray, khaki) - crochet hook - plastic bottle for pilot's glasses. I started knitting with a sailor's hat,...
 Patriotic education is an important component of the formation of a future personality. From birth, a child is not given a feeling of love for the motherland, respect for family and folk traditions, pride in their people and state. All these qualities are brought up by the family and society from childhood ...
Greeting cards dedicated to Victory Day are a must-have gift for your family members. Children know that in every house there were soldiers who went to the front, stories about the exploits of great-grandfathers are passed down from generation to generation. Kids express their love and appreciation with the diligence and awe that they put into their crafts.
On postcards, images of St. George ribbons and fireworks, bouquets of flowers bloom joyfully. The most popular for the theme of May 9: tulips, carnations, chamomile, lilies of the valley, roses, lilacs. The compositions are made in various techniques: appliqué, origami, paper construction, plasticineography, painting.
Children of older groups make three-dimensional layouts. The guys depict both invented compositions based on impressions from films, books, and real memorials, for example, Mamaev Kurgan. A mandatory element of each layout is the "Eternal Flame".
Our kids are especially happy to make symbols of the world. The dove of peace is present on many postcards, it is made using the origami technique, molded from plasticine and salt dough. Thousands of small messengers of peace on Victory Day are scattered from children's hands.
The educational portal site is an international Internet resource where teachers share ideas and best practices. If you're not with us yet, join us now.
The article will focus on working with different materials, you will see what can be made from improvised materials - paper, ribbons and even pasta.
In addition to having a good time with your child, you will contribute to the development of his creative skills, encourage a flight of fancy. In addition, thematic mastery is an excellent opportunity to tell your child about the great holiday - Victory Day.
Crafts for May 9 from napkins
Cloves from napkins - option 1
To make one carnation, prepare 5-7 napkins, a balloon stick, green corrugated paper and thin wire.
In the absence of a stick, you can prepare a thick wire pasted over with corrugated paper, and a thin wire can be replaced with threads.
- Lay the napkins unfolded on top of each other and fold in half
- Cut the edges of the stack so that you get cloves
- Bend the stack with an accordion and tie in the middle with wire. You should get a bow
- Cut out a circle from green crepe paper, make cloves around the edges. Thread the end of the wire from the bow into the center of this circle.


- Attach the flower to the stick with wire
- Spread napkins in one layer


You can make crafts from such a flower. Pass the end of the wire from the bow into the prepared St. George ribbon. You can use this craft as part of a voluminous appliqué or as a brooch.

Cloves from napkins - option 2
You will need 6-7 napkins, a marker or paint, a stapler, scissors.
- Stack the napkins
- Cut out a circle
- Paint over the edges with paint (in this case, you will need to wait until the paint dries) or with a marker
- Staple the center
- Make slits around the edges about 1cm wide.
- Spread the flower one layer at a time

Facing technique
Suitable for any crafts, from postcards to all sorts of collages.
- Cut napkins into small squares
- Roll the squares into balls
- Glue lumps to the surface along the prepared contour


You will need: cardboard, dove body template, napkins, glue, scissors.
- Cut out the body of a pigeon from cardboard


- Fold 3 napkins together and make wavy edges with scissors - this is a tail blank
- Glue the tail folded in half to the body
- Use a felt-tip pen to draw eyes and a beak.
Such a dove can be placed by making a base, or hung by attaching a thread to the body.

Crafts for May 9 from beads
An excellent gift for May 9 will be a beaded craft. Beads can be used in weaving or in the design of a picture or collage.
St. George Ribbon
You will need black and orange beads, thin beading wire.
- Bend the wire in half and string 5 beads, alternating orange and black
- String the same row on one end of the wire and thread the second end of the wire through it, tighten
- Align the 2 rads so that they lie flat against each other


- Continue weaving in the same pattern
- When finished weaving, thread the ends of the wire through the previous rows to secure

bead rocket
For crafts, prepare blue, red and yellow beads, thin wire for weaving.
- Bend the wire in half and string one yellow bead
- String 2 blue beads on one end of the wire and thread the other end of the wire through them.
- Tighten the row and trim it
- Continue weaving according to the scheme

- Run the ends of the rocket at one end of the wire, then thread it through the previous row, returning to the fire of the rocket and finish the product with two ends

You can make a ring out of wire. In this case, the rocket will turn into a great keychain.
Bead painting
Prepare an image as a base or make a freehand sketch. You will need beads of the flowers of the pattern, glass beads (long thin beads), sequins and glue.
- Start work from the center of the picture
- Apply glue to small areas and lay out the beads along the contour
- Let the work dry


Crafts for May 9 from the test
When working with dough, the same rules apply as when modeling from plasticine. You will need dough, paints. The easiest way to make dough is to mix flour and salt in a 2:1 ratio (2 cups flour to a cup of salt) and add warm water. Knead until the dough becomes soft and pliable.
It is better not to use large iodized salt, grains will interfere with work. For greater plasticity, when preparing the dough, it is recommended to add a little vegetable oil.
- Hands must be clean and dry while sculpting.
- Decorate the salt dough product with paints after drying, or add paint or food coloring when kneading. When mixing pieces of different colors, you can get new colors

- Lubricate the joints of the parts with a brush dipped in warm water
- In order to dry the product at room temperature, it will take several days. You can speed up the process by drying the craft in the oven at low temperatures.
- If you are painting the craft after finishing work, add some PVA glue to the paint. In this case, the product will not get your hands dirty
The choice of crafts from salt dough is quite extensive. It is suitable for creating panels, postcards, figurines, compositions by May 9th.


Crafts for May 9 from plasticine
Plasticine is a versatile material for creating crafts. You can make a tank or an airplane out of it (read more), applications or entire compositions.
Eternal flame
To create an eternal flame, prepare thick cardboard and plasticine in red, orange and yellow.
- Cut out an obelisk from cardboard
- Roll plasticine into small balls
- Take the ball, press it against the cardboard and spread it over the cardboard with your finger up. Do this for the first row.
- On top of the first row, start applying the second in the same way.
- Cover the cardboard with red plasticine to the widest part of the fire, then orange, leaving the flames intact. Finish the craft with yellow plasticine

 Eternal flame from plasticine
 Prepare a printed image pasted on cardboard or draw a postcard on colored cardboard. Roll the plasticine into small balls and attach along the contours of the pattern.

Composition
To create a complex composition, you will need 2 disks, plasticine, a knife or stacks for modeling, toothpicks.
- Prepare the bottom stand. Cover one of the disks with brown plasticine
- The second disc will serve as the background. Apply blue plasticine to it.
- Roll out several thin sausages from orange and black plasticine and lay out the St. George ribbon with them
- From white plasticine, make a cloud by rolling it into small balls
- Blind parts for a soldier, connect small parts, string large parts on a toothpick to give stability


- Place the soldier on the stand


Paper craft templates
I suggest you make a craft in the form of a soldier. Fold the circle in half and cover with corrugated paper or paint. Make the details of the soldier in 2 copies: one from colored paper, the second from cardboard.


If you glue the silhouette of a soldier only to the waist, and instead of cardboard, take a plastic plate as a base, then the figure will be able to stand if you slightly push the base at the bottom.


Templates of a three-dimensional star and dove of peace from paper can be found in
In order for the inscription on a greeting card or application to be even, use the templates:


 May 9 postcard template

Crafts for May 9 from pasta
Print or draw on the image. Cover with glue and lay out pasta of various shapes. So you get an original postcard or application. You can color the pasta in different colors beforehand, decorate a ready-made craft, or use multi-colored pasta.

Interesting crafts are obtained by gluing pasta of different shapes together.


You can use pasta as part of crafts made from other materials.

Crafts from ribbons by May 9
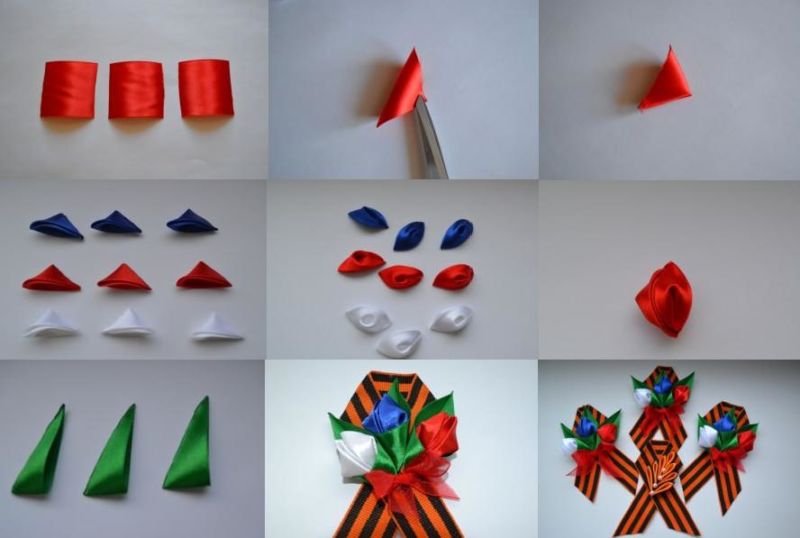
Kanzashi brooch
Brooches from the St. George ribbon in the kanzashi technique look very beautiful. Kanzashi are decorations made of satin ribbons or silk, in our case we will make flowers and twigs.
You will need: orange and black satin ribbons, St. George ribbon, scissors, glue (it is better to take hot, but regular super glue will do), beads, rhinestones or sequins to form the middle, a candle.
The technique is difficult for young children, so make the petals yourself or let the child help you, for example, cut or measure the ribbons, and then you will combine the details together into a single picture.
Kanzashi with round petals
- cut the orange ribbon into squares
- Bend the square diagonally and bend the ends of the triangle to the top
- Fix the result with glue or solder over the candle
- Fold the corners back and cut them off


- Do the same for the rest of the squares. For one flower you need 7 petals
- Secure the petals with hot glue, you can either sew them together or use a hot glue gun. Attach decoration to the center
- Glue the flower to the St. George ribbon


If you use ribbons of 2 colors at the same time, then you will get a flower with double petals:


kanzashi branch
- Cut the tape into squares
- Fold the square diagonally 2 times
- Connect the corners and cut the corner at the back
- Fix with glue or solder over fire

 Craft from ribbons for Victory Day
 - Make the required number of petals
- Fold them into a spikelet and fasten
- Glue the twig to the St. George ribbon
- If you use ribbons of different colors at the same time, you can get a lot of interesting options.


You can embroider a pattern with ribbons by making holes in the cardboard or taking a thick fabric for the base. To embroider an image, you will need tapestry needles. If you are embroidering on cardboard, you can solder a piece of tape and thread it through the pre-made holes.


Kanzashi brooch for May 9, video
Cardboard crafts by May 9
It is best to make military equipment from cardboard (tank, aircraft) or use it as a basis for crafts and compositions. Read how to make crafts for Victory Day.
Crafts postcards for May 9


The key symbol in the craft by May 9 is the St. George ribbon. You can take a white strip of paper and paint it in the appropriate colors. However, colored paper tape looks much more natural. For crafts, cut out a wide strip of black paper and stick thin orange stripes on it.
To create a postcard, any materials are suitable. Everything is limited only by your imagination. You can use cereal, paper, thread, plasticine, buttons, and even feathers. You can read more about what you can make postcards from and how to arrange them in


Postcard for May 9, video


