Crafts from small milk boxes. Tea house from an old milk tea bag. Containers for all sorts of things
Summary: Crafts from garbage with your own hands. Crafts from milk bags (milk bags). Crafts from juice boxes. Crafts from boxes with your own hands. Crafts from the package. Crafts from packaging material.
Milk cartons (juice, kefir) are a wonderful material for children's creativity. They can be used not only as pots for seedlings. If you show a little imagination, you can make a large number of useful crafts from milk bags that a child can use in their games. Such toys can, of course, be bought. But it's no secret that many kids enjoy playing with homemade toys. And often they are much nicer for them than purchased ones. Is it because these toys keep the warmth of your hands, the love of your hearts, a piece of yourself? It's not consumer goods, it's exclusive. And among other things, such homemade toys are very useful for the baby. They develop his imagination and creativity, because you need to do something pretend all the time, use substitute objects. This will not give any wonderful and realistic purchased toy.
1. Purse from a milk bag
Let's start, perhaps, with the most original, in our opinion, crafts that can be made from a milk bag - a wallet for storing various little things.
You can see detailed instructions for making this craft. On the same site you can download and print a wallet pattern >>>> Two halves of the pattern must be cut and glued together with adhesive tape, and then proceed according to the instructions.
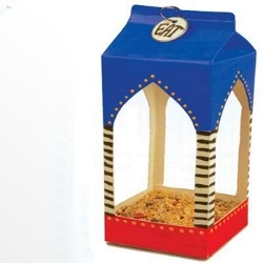
2. Bird feeder
The easiest craft to make from milk bags is a bird feeder. Cut a hole in the bag from one, two or four sides, leaving a rim at the bottom, and thread a string or wire from above to hang the feeder. Now it remains only to decorate the feeder to your liking.

3. Cubes
Another easy milk carton craft is building blocks. There are several ways to make them:

It is advisable to paste over the cubes with pictures cut out from old magazines and postcards, or you can paint them yourself. And from them you can make just such a toy-house, which your baby will collect floor by floor:

You can read more about the instructions for making a house from cubes at the link
4. Houses from milk bags
Let's continue talking about cardboard houses. Milk cartons make wonderful dollhouses.


In addition to the house, you can make a chair for the doll (see link):


5. Transport from milk cartons
The house for dolls has been built, now it is necessary to provide them with transport. Here are some more ideas for original milk carton crafts.
Homemade caskets and organizers from milk boxes are very popular today. We have already told you how you can make them a functional container for cosmetics. Today we're going to show you another way to use milk cartons. We offer you to make a beautiful and very comfortable box with compartments with your own hands. The materials are simple and the process is simple. With the help of this master class, you will learn how to make boxes, which are traditionally considered one of the most convenient.
The craft can be used for its intended purpose, or you can put in it not decorations, but various little things for creativity. By the way, milk cartons can be used not square, but oblong. In this case, the branches will simply turn out to be of a different shape.
What will we need?
- two or three milk cartons
- thick cardboard (about 40 * 22)
- fabric or any other finishing material (a little over half a meter)
- edging
- button or satin ribbon
How to make a box?
Wash and dry the boxes thoroughly. We cut them into pieces of equal height. In this case, the height is 7 cm. There are six compartments. Of course, you can make a box with nine, fifteen or more cells - see how it suits you.

We cut out two pieces of cardboard for the manufacture of the bottom and side parts. All sizes are shown in the photo.

We glue the boxes together, glue them on the sides with cardboard strips. Dry with clothespins. We glue the fabric at the same stage.

We glue together the bottom, lid and side of the box. We wrap them up right away.

Now we connect the two parts to each other, and for beauty we finish the cells with a border.

Some items can safely be used more than once. Very often, such things are simply sent to the landfill. That is why today we will talk about those very subjects that could be used again and again.
1. Birdhouses

Creative birdhouses made from old leather boots will become not only a temporary home for birds, but also a stylish decoration of the garden plot.
2. Garden lights

Wonderful garden lights with candles that can be made from the remains of old metal pipes, cans and glass vases or jars. To do this, all of the above parts must be fastened together with glue, and put candles inside the glass containers.
3. Lampshade

A charming lampshade that you can make yourself from unnecessary plastic bags in black and white.
4. Desktop organizer

Trimmed, painted and divided into sections, a plastic canister from juice, milk or something else is suitable for creating an original desktop organizer for stationery.
5. Piggy bank

A funny piggy bank that even a child can make using a plastic bottle, colored paper, cardboard and glue.
6. Pouf

From strips of plastic bags of different colors and any soft filler, you can knit very unusual poufs and coffee tables that will become practical and unique components of a modern interior.
Video bonus:
7. Magazine basket

An old tire can be turned into an original basket for magazines or any other trifles, which, despite its unpretentious and slightly rough look, will perfectly fit into a modern interior designed in industrial, rustic, Scandinavian or minimalist style.
8. Flowers

Wonderful three-dimensional flowers that can be easily cut out of an egg carton and used for wall decor, a mirror frame or anything else.
9. Containers for all sorts of things

Unused shoe boxes can be decorated with colored fabric and textile handles can be attached to them, turning them into convenient and cute baskets for storing children's toys, notebooks or any other things.
10. Outdoor planters

Original outdoor flower pots cut from old tires painted in various colors.
11. Wastebasket

A cute paper waste bin that can be made from glossy magazines cut into strips.
12. Magazine stand

A bright stand for correspondence, which can be easily made from an unnecessary tire painted with spray paint and thick wire.
Video bonus:
13. Organizer for bracelets

Unnecessary glossy magazines, rolled up and secured with tape, can be used as convenient coasters for bracelets and necklaces.
14. Pencil case

A stunning vintage pencil case that can be made from an old book hardcover, fabric and stiff handles from any unwanted bag.
15. Bag dispenser

A practical and original plastic bag dispenser that can be made from a cut and brightly colored plastic bottle.
Video bonus:
16. Mini vases

An original home decor composition that can be made from a small piece of plastic or wood, a few bottles of nail polish and miniature bouquets of artificial flowers.
17. Caskets

An empty face cream jar is perfect for creating an amazing jewelry box. To do this, you need to paint the jar in any color you like, and attach a small figurine from kinder or any other suitable accessories to its lid and paint it too.
Continuing the topic, the secret is about.
Crafts from boxes of juice and milk. The second life of unnecessary things. Links to detailed MK.Milk cartons (juice, kefir) are a wonderful material for children's creativity. They can be used not only as pots for seedlings. If you show a little imagination, you can make a large number of useful crafts from milk bags that a child can use in their games. Such toys can, of course, be bought. But it's no secret that many kids enjoy playing with homemade toys. And often they are much nicer for them than purchased ones. Is it because these toys keep the warmth of your hands, the love of your hearts, a piece of yourself? It's not consumer goods, it's exclusive. And among other things, such homemade toys are very useful for the baby. They develop his imagination and creativity, because you need to do something pretend all the time, use substitute objects. This will not give any wonderful and realistic purchased toy.
1. Purse for a child from a milk bag
Let's start, perhaps, with the most original, in our opinion, crafts that can be made from a milk bag - a wallet for storing various little things.
A description of the work and a detailed video instruction for making this craft can be viewed.
Wallet pattern: 

The two halves of the pattern must be cut out and glued together with adhesive tape, and then act according to the video instruction.
2. Bird feeder
The easiest craft to make from milk bags is a bird feeder. Cut a hole in the bag from one, two or four sides, leaving a rim at the bottom, and thread a string or wire from above to hang the feeder. Now it remains only to decorate the feeder to your liking. 

3. Cubes
Another easy milk carton craft is building blocks. There are several ways to make them: 
1st way - see link
2nd method - see link
3rd way - see link
It is advisable to paste over the cubes with pictures cut out from old magazines and postcards, or you can paint them yourself.
And from them you can make just such a toy-house, which your baby will collect floor by floor: 
You can read more about the instructions for making a house from cubes at the link
4. Houses from milk bags
Let's continue talking about cardboard houses. Milk cartons make wonderful dollhouses. 
By clicking on this link, you can download cute windows and doors for the future cardboard house. 
You can also make a garage for cars out of juice or milk boxes. See the link for more details. 
In addition to the house, you can make a chair for the doll (see link): 
And a well (cf.
Garbage stand. Wall pockets for pieces of paper or tools
Materials:
scissors, glue, juice or milk boxes, newspaper (several spreads), acrylic paint, brush, thick thread (linen cord).
First, take 3 juice bags. We cut off the tops, where the milk poured out. Unfold the entire package so that it becomes flat, wash and dry well or wipe dry with a cloth.


We begin to tear off the top glossy layer. It will easily and quickly come off if you pull it from the cut line, at the top. Be careful not to tear near the seam so that it does not come apart, if you pull hard on the layer of glossy paper, just do not sharply tear the paper near the seam!

Here's what we got, pretty fast! These are blanks, trim the cut edge so that all blanks are the same height.

We begin to glue the blanks. To do this, take paper or a newspaper, tear it into pieces that are not small and begin to stick blanks on the surface.

Let's not forget to process, glue the edges of the blanks, for this we take a long strip of newspaper and glue it outside and inside. Glue a strip of newspaper and turn inside the blank. Outside, everything will stick very well, but inside, it will stick, but very weakly, because inside we have a very glossy layer left, to which it is difficult to stick something, therefore, we do not pay attention to this, or we sew a piece of braid around the edge, or glue the fabric on the outside and turn it inside out. In this case, I just glued the edge and that's it.
We tint a little with white acrylic paint so that the text is not so conspicuous, and yet, the paint evens out the surface of the blanks.

Take a brush of black paint and dry it on a newspaper.
Let's go with an almost dry brush along the edges of the bags.
We fasten the pockets with a ladder using a glue gun.
Glue on different decorations and you're done!
Everything is very simple! You can just paint with bright acrylics and decorate with beautiful flowers, you get a completely different thing!
And there might be another option


