Print out the cube for gluing. How to make a volumetric cube from paper or cardboard. Regular and irregular stellated polyhedra
How to make a cube out of paper? There are two ways to quickly and easily create this equilateral paper hexagon.
The first method is to first draw and cut out the net of the cube and then glue it together.
If this method suits you, you need to prepare the necessary tools and equipment. In order to make a scan, you will need paper, a pencil, a ruler, as well as scissors and glue. This set of stationery will undoubtedly be found in everyone who needs to make a paper cube.
The diagram of a volumetric hexagon is very simple. Initially, you need to draw a figure in the shape of a cross and divide it into six equal-sized squares so that one side of the cross is twice as long as any other. Please note that there should be narrow stripes on the outer sides of each square.

With the help of these strips, it will be easy to carefully glue the figure together. This is one of the ways to make a cube out of paper.
The second method does not require the use of any special devices. The technique by which this polygon can be created is called origami. How to make a paper cube using origami? It's not difficult at all. You need to start folding a hexagon from a square piece of paper. First of all, you should fold the sheet into a standard origami figure - a double triangle. Such a figure will be obtained if you fold the paper in half, making a rectangular piece of paper from a square, and then fold it again, again getting a square. After this, we open the resulting figure so that we get a triangle on both sides. This is the first answer to the question of how to make a paper cube using origami.
Then you need to perform a few more manipulations with the double triangle.
Its edges on both sides must be folded towards the top. Again we get a square, the opposite corners of which are folded towards the center. So, we made a hexagon that has two pockets on each side. They need to fold two halves of paper at the top of the figure. Next, take a needle and make a small hole in the top of the hexagon, and then blow hard into it. This creates the desired volumetric body.
There is another technology for making a cube using origami. But it requires six pieces of paper, which are folded into a certain shape and then collected into a cube. Accordingly, the more materials are used, the less rational the volumetric body is, so we do not describe this origami method. The two options discussed above are less labor-intensive and therefore ideal.

Now you know two convenient ways to make a paper cube very quickly and without extra effort. But your theoretical skills can only be practiced in practice, so take a square piece of paper, the necessary equipment, and make this beautiful hexagon, which can be used not only as a visual aid, but also as an interior decoration!
- thick paper or cardboard (preferably colored);
- ruler;
- pencil;
- scissors;
- glue (preferably PVA).
- 12 pictures or photographs;
- Glue;
- 8 cubes with 4 cm sides;
- Scotch.
- Diagram 1 is your visual guide. You should resort to it every time the folding algorithm seems complicated. Take a paper square and fold it diagonally, then in half - it's all just markings;
- Focusing on the diagonal folds, form a triangle by bending the side planes of the workpiece inward (see diagram). 4 walking corners at the base of the triangle need to be bent to the top, 2 on each side of the workpiece;
- Bend the opposite side corners to the center - you have a vertical reference axis here. Repeat on the other side. The walking corners of one of the conical protrusions (on the second the corners are “closed”) are folded twice so that they can be carefully tucked into the middle pocket corners;
- Similarly, tuck the double-folded corners into the pockets on the back of the workpiece. The cube model is ready, all that remains is to give it volume. Find an open corner and inflate the model through it.
- Take a square piece of paper and fold it so that you get a visible division into 4 identical rectangular planes (see Fig. 2). Fold small corners along the diagonal corners of the starting square;
- Fold the “flaps” of the sheet, similar to closing window shutters. Using the corner guides (folded earlier), bend the previously unused corners inward, then tuck them inward on both sides. The result is a parallelogram;
- Turn the structure face down, bend the corners towards you so that you get a small square with triangular folded ears. Make 5 more pieces. such modules.
To make three-dimensional geometric shapes, the main thing is to have templates that can be cut out and then glued.
Can be made from white or colored paper. You can cut it out of paper with any designs or numbers.
I propose to make an unusual three-dimensional figure using the origami technique. Watch the video:
So that children can better remember what geometric shapes there are and know what they are called, you can make them out of thick paper or cardboard volumetric geometric shapes. By the way, you can use them to make beautiful gift wrapping.
You will need:
The most difficult thing is to develop and draw layouts; you need at least basic knowledge of drawing. You can take ready-made designs and print them on a printer.
To keep the fold line straight and sharp, you can use a blunt needle and a metal ruler. When drawing a line, the needle must be bent strongly in the direction of movement, almost laying it on its side.
This is a development of a trihedral pyramid
This is a cube scan

This is the development of an octahedron (tetrahedral pyramid)

This is the development of a dodecahedron

This is the development of an icosahedron

Here you can find templates for more complex figures (Platonic Solids, Archimedean Solids, polyhedra, polyhedra, different types of pyramids and prisms, simple and oblique paper models).
Volumetric geometric shapes are the best way for a child to explore the world around him. An excellent educational material/excellent teaching aid for studying geometric shapes is precisely three-dimensional shapes. This way, geometric shapes are better remembered.
The best material for making such three-dimensional figures is thick paper (can be colored) or cardboard.
For production, in addition to paper, you will also need a pencil with a ruler, as well as scissors and glue (cut and glue the developments).
You need to draw the scans in a similar way and cut them out:


After which they need to be glued edge to edge.
You should get the following type of volumetric geometric shapes:


Here are several schemes by which you can make three-dimensional geometric shapes.
The simplest one is tetrahedron.

It will be a little more difficult to make octahedron.

But this three-dimensional figure - dodecahedron.

Another one - icosahedron.

More details about making three-dimensional figures can be found here.
This is what three-dimensional figures look like not assembled:

And this is what the finished ones look like:

You can make many original crafts from three-dimensional geometric shapes, including gift wrapping.

Before you start making three-dimensional geometric shapes, you need to imagine (or know what it looks like) the figure in 3D dimension: how many faces does this or that figure have.
First you need to correctly draw a figure on paper along the edges that must be connected to each other. Each shape has edges that have a specific shape: square, triangle, rectangle, rhombus, hexagon, circle, etc.
It is very important that the length of the edges of the figure that will be connected to each other are the same length, so that no problems arise during the connection. If the figure consists of identical faces, I would suggest making a template while drawing and using this template. You can also download ready-made templates from the Internet, print them, bend them along the lines and connect (glue) them together.
Cone Pattern:

Pyramid template:

You will need to make three-dimensional geometric shapes both in school classes and for studying shapes with kids. This process can be turned into a game by making dense three-dimensional geometric shapes out of cardboard.
To make the figures we will need a pencil, ruler, colored cardboard, glue.

You can print out diagrams from the Internet, then apply them to thick paper, not forgetting about the fold lines that will be glued together.
You can use the following schemes:


But they are already in finished form.

This way you can spend time with your baby having fun and usefully studying geometric shapes.
By making three-dimensional figures from paper yourself, you can not only use them for entertainment, but also for learning.
For example, you can clearly show your child what a particular figure looks like and let him hold it in his hands.
Or you can print out diagrams with special symbols for training purposes.
So I suggest you familiarize yourself with this topic below dodecahedron, both simple and with small drawings, which will only attract the baby’s attention and make learning more fun and entertaining.


Also the diagram Cuba Can be used to teach numbers.


Scheme pyramids can help you understand the formulas that apply to a given figure.


In addition, I suggest that you familiarize yourself with the diagram octahedron.


Scheme tetrahedron Among other things, it will help you learn colors.


As you understand, the above templates must be printed, cut out, bent along the lines, and glued along special narrow strips adjacent to selected sides.
Three-dimensional geometric figures are simply necessary when teaching: they provide students with the opportunity to hold them in their hands and examine them, which is an important part of the educational process; they are simply necessary as a tool for studying the famous Euler theorem - clearly demonstrating that even with deformations and curvatures, the number of faces of a polyhedron , and therefore Euler’s relation, will remain unchanged:
In addition, solid figures can be an excellent tool to help explain to students how to find the surface area of a polyhedron.
So, using the templates below you can easily make the following shapes:
Triangular Prism

N-gonal prism

Tetrahedron

A hexahedron or cube is a polyhedron whose sides are all squares. Do you like riddles and puzzles? This article will teach you how to make a cube out of paper or cardboard. Let's consider such unusual products as the Yoshimoto cube and the transforming cube.
From the scan
Developments are called diagrams that allow you to make a three-dimensional figure from paper or cardboard. First, let's learn how to build a sweep. To make it you need paper, pencil, ruler and scissors.
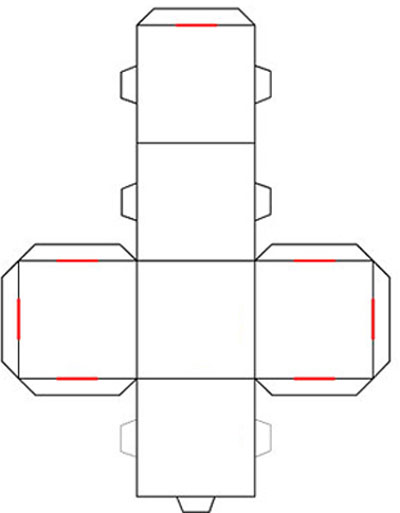
All sides of the cube are squares. So, first you need to draw a square on a piece of paper. At the same time, do not forget about the rules of geometry - a square has all sides equal, and the angles are 90°. Next, let’s remember how many faces the cube has – six. That is, there should also be six of them in the gluing diagram. Draw four squares around the central square. Where should I put another one? Just draw it on the side of one of the squares. The edges are in place, there are not enough allowances for gluing. They need to be drawn on three side squares. They are 0.5-1 cm.
Do not forget to cut their corners at an angle of 45°, so they will not interfere when gluing the figure.
The scan is ready! This is what you should get:

Now you need to arm yourself with scissors and glue and assemble the figure. Cut out the development using scissors. Next, you need to bend all the edges of the cube, as well as the allowances. Lubricate the edges with glue and connect the cube together. Volumetric paper cube is ready!

Origami cube
The origami technique is very ancient. Its appearance is associated with the production of paper in Ancient China. The Japanese adopted its secret, and it was there that the art of origami originated. Previously, figures made of paper had a sacred meaning. They decorated temples, wedding and funeral ceremonies. The Japanese believed that hanging balls folded using the origami technique above the patient's head would help ward off illness and evil spirits. Later this art began to be not only religious, but also entertaining.
Most origami patterns date back to ancient times, but modern masters have also made a significant contribution to the development of this unusual type of creativity. We invite you to try folding a cube using the origami technique. To do this, you need to take a square sheet of paper and make a fold in the center, and then bend the edges towards the middle. This initial figure is called a door.


Fold the edges toward the center and tuck the top and bottom corners into the pockets:


Turn the workpiece over and bend along the lines indicated in the diagram:

The result is a module. To collect a cube of such modules you need six. Each part has pockets; it is into them that neighboring modules are inserted. Connect the parts according to the diagram:


The origami cube is ready. For beauty, you can make each side from paper of different colors.

Unusual puzzle
Do you want to please your beloved children with an unusual puzzle or make an unforgettable photo album? Then a short master class on creating a transforming cube will be useful to you. On each side of such a cube you can place a picture or photograph, and inside there are as many as six more pictures.
To make such a cube you will need:
You can take the most ordinary children’s cubes or glue them yourself using this pattern:
First, look at the places where the cubes are attached:

It is important to understand! The whole secret of transformations of such a puzzle is in the correct gluing of pairs of cubes.
To make it more clear, let's look at this process step by step. First, glue two pairs of cubes together as shown by the yellow stripes in the diagram:

Place these four cubes side by side and glue them together in the places indicated in blue:

Place the cubes as shown in the diagram. In this case, the yellow glue will be on the side opposite the red one. Glue along the red lines:

The photo must be placed on the four cubes. The size of the photographs is 8 by 8 cm.
It is important to glue the photo carefully, especially if you do it with glue. Otherwise, you can inadvertently glue together those edges that are responsible for the correct transformation of the puzzle. So it's better to use hot glue or double-sided tape.
An unusual photo album from a transforming cube is ready! You can see in the photo how you can lay it out and view pictures.
Have you ever thought about how to make a cube out of paper and why it is needed? Let's say how to make a cube out of cardboard on your own, we will tell you and even show you. What useful functions will you give to the origami cube? Let's give you a hint: remember your children's cubes with letters, from which you learned to form your first words, not yet knowing how to write. And if you cover a paper cube with pictures from old children's books, you will get a construction puzzle no less interesting than in our distant childhood.
There are countless options for using a colored paper cube in games. And at the same time, you won’t have to worry about children hurting each other when throwing such a toy. Our wooden ones were heavier. We are ready to show you how to make a paper cube with your own hands right now. Ready to get started?
Simple paper cube
A three-dimensional hexagonal 3D cube is folded from a square piece of paper without glue. And you don't even need scissors here. Unless you cut off the extra “tail” from the A4 sheet to get a square blank. But the skill of inflating balloons will come in handy, because we will now teach you how to make an inflatable cube. Intrigued? Then let's start:

Cube made of modules: assembled cube 6 colors
We have already discussed how to make a cube out of cardboard on your own above, and for this modular cube, multi-colored paper of 6 colors (or 3 repeating ones) will be enough. Even without cardboard, it will turn out to be quite dense due to the algorithm for folding the modules (each separately and all together). Let's start understanding it step by step. Let us immediately warn you that the whole process will be divided into 7 steps - folding the modules and assembling the cube (you can use glue - it will be stronger). It will take some time, but the result will definitely please you: the cubes will turn out bright, colorful, and do not require additional decorations or painting.

Connect blocks into a cube by inserting the corners of the modules into the middle pocket planes of adjacent blocks. Be smart; in a pinch, a diagram will help. You have learned in practice how to make an origami cube from bright modules. Try gluing the cube from blocks at the assembly stage so that it is even stronger and does not crumble into modules in the game. You can, of course, take a standard cube pattern, simply print it out and glue it together - ready-made templates are always at hand. And if the standard pattern does not suit you and you need an original counting cube for the game, you can fold it yourself once or twice. It’s easier when you know how to make even more subtle tricks out of paper. You might be interested in folding patterns or.

You can find a lot of interesting things for yourself in those areas of science that, it would seem, would never be useful in the usual life of a simple man in the street. For example, geometry, which most people forget about as soon as they cross the threshold of school. But in a strange way, unfamiliar areas of science become very fascinating when you get closer to them. So the geometric development of a polyhedron - a completely unnecessary thing in everyday life - can become the beginning of exciting creativity that can captivate both children and adults.
Beautiful geometry
Decorating the interior of your home by creating unusual, stylish things with your own hands is an exciting creativity. Making various polyhedrons yourself from thick paper means creating unique things that can just be an activity for a day or two, or can turn into designer interior decorations. In addition, with the development of technology capable of spatial modeling of all kinds of things, it has become possible to create stylish and modern 3D models. There are masters who, by constructing patterns according to the laws of geometry, make paper models of animals and various objects. But this is quite complex mathematical and drawing creativity. It will help to start working in such technology
Different faces - different shapes
Polyhedra are a special area of geometry. They can be simple - for example, the blocks that children play with from an early age - and they can be very, very complex. Construction development of polyhedra for gluing is considered a rather complex area of design and creativity: you need not only to know the basics of drawing, the geometric features of space, but also to have spatial imagination, which allows you to assess the correctness of the solution at the design stage. But you can’t get by with just your imagination. To do It's not enough to simply imagine what the work should look like in the end. You need to be able to correctly calculate it, design it, and also draw it correctly.

The very first polyhedron - cube
Most likely, every person who attended school, even in elementary school, was faced with work in labor lessons, the result of which was supposed to be a paper cube. Most often, the teacher handed out blanks -scans of a cube polyhedron on thick paper with special pockets designed for gluing the faces of the model into a single whole. Primary school students could be proud of this kind of work, because with the help of paper, scissors, glue and their own efforts they created an interesting craft - a three-dimensional cube.

Entertaining facets
Surprisingly, much knowledge about the world around us becomes interesting not at school, but only when one can find in it something fascinating, capable of giving something new and unusual in everyday life. Not many adults remember that the same polyhedra are divided into a huge number of types and subspecies. For example, there are so-called Platonic solids - convex polyhedra, consisting only of only five such solids: tetrahedron, octahedron, hexahedron (cube), icosahedron, dodecahedron. They are convex figures without depressions. Star polyhedra consist of these basic shapes in various configurations. That's whyunfolding a simple polyhedron allows you to draw, or rather draw, and then glue a star polyhedron from paper.

Regular and irregular stellated polyhedra
By adding the Platonic solids together in a certain order, you can build many star-shaped polygons - beautiful, complex, multi-component. But they will be called "irregular stellate polyhedra." There are only four regular stellated polyhedra: the small stellated dodecahedron, the great stellated dodecahedron, the great dodecahedron and the great icosahedron. Developments of polyhedra for gluing will not be simple drawings. They, like the figures, will consist of several components. For example, a small stellated dodecahedron is built from 12 pentagonal isosceles pyramids, folded like a regular dodecahedron. That is, first you will have to draw and glue 12 identical pieces of regular pyramids, consisting of 5 equal faces. And only then can they be put together star polyhedron. Unfolding the smallest star dodecaer is a difficult and almost impossible task. To build it, you need to be able to fit 13 scans of different geometric volumetric bodies connected to each other on one plane.

Beauty is in simplicity
All volumetric bodies built according to the laws of geometry will look fascinating, including star polyhedron. The development of each element of any such body must be performed as accurately as possible. And even the simplest three-dimensional polyhedra, starting with the Platonic tetrahedron, are an amazing beauty of the harmony of the universe and human labor, embodied in a paper model. Here, for example, is the most multifaceted of Platonic convex polyhedra - the dodecahedron. This geometric figure has 12 absolutely identical faces, 30 edges and 12 vertices. To makeWhen developing regular polyhedra for gluing, you need to apply maximum accuracy and care. And the larger the figure in size, the more accurate all measurements should be.

How to build a scan yourself?
Perhaps, in addition to gluing a polyhedron - be it a star-shaped one or a Platonic one - it is even more interesting to build a development of the future model on your own, assessing your abilities in drawing, design and spatial imagination. Simple Platonic solids consist of simple polygons that are identical to each other in one figure. So, a tetrahedron is three isosceles triangles. Before constructing a net, you need to imagine how to correctly add flat polygons together to get a polyhedron. Triangles can be connected to each other along the edges by drawing one next to the other. For gluing The developments of the polyhedrons of the diagram must be equipped with special pockets or valves that will allow all parts to be connected into a single whole. A tetrahedron is the simplest figure of four faces. The octahedron can be thought of as a double tetrahedron and has eight garneis - isosceles triangles. A hexahedron is a cube familiar to everyone from childhood. The icosahedron is a combination of 20 isosceles triangles into a regular convex polyhedron. The dodecahedron is a three-dimensional figure of 12 faces, each of which is a regular pentagon.

Subtleties of work
Constructing a development of a polyhedron and gluing a paper model from it is a delicate matter. Of course, you can take a ready-made scan. Or you can, with some effort, build it yourself. But in order to make a full-fledged three-dimensional model of a polyhedron, you need to assemble it. The polyhedron is best made from thick paper that holds its shape well and does not warp from glue. It is best to press all lines that need to be bent first, using, for example, a non-writing ballpoint pen or the back of a knife blade. This nuance will help to fold the model more accurately, respecting the dimensions and directions of the ribs.

If you make different polyhedrons from colored paper, then such models can be used as decorative elements to decorate a room - a children's room, an office, a living room. By the way, polyhedra can be called a unique find for decorators. Modern materials make it possible to create original interior items based on geometric shapes.


