Beaded Christmas angel. Weaving pattern. Master class with photo. DIY Christmas decorations: bright and such soulful beaded angels
On the eve of the New Year, each of us wants something unusual, a magical atmosphere in the house. It is worth considering that the year of the Goat is approaching, which appreciates handmade jewelry and gifts for relatives and friends. As we have already told you, in this article we will look at how beaded angels are made.
By typing “beaded angel pattern” in the search engine, you can find a lot of interesting and exciting ideas, each of which will be attractive in its own way. Surely, you will find for yourself exactly what suits you, your character and preferences. And remember, when creating Christmas angels, your mood will improve significantly.
Flat beaded angels
Weaving angels from beads is quite simple. To do this, you will need multi-colored beads (you should buy more white, gold and silver), beads, fishing line, thin wire and other decorative elements. To begin with, you can weave a simple flat angel. This will require a wire of a suitable size, beads and a bead.
Let's consider this process sequentially:

This diagram is given to simplify the weaving process and better understanding.
So we got a kind of Christmas beaded angel. If you wish and have experience in beading, this scheme  You can add or change as you wish, creating a unique craft. Mindfulness, perseverance, patience and the desire to create beautiful things will become your main companions and helpers.
Volumetric beaded angels
Some may have a question, how to make an angel out of beads, but more voluminous? This process is somewhat more complicated and will require the ability to weave fabrics. To begin with, we make the body (weave a rectangle and sew). After that, we sew a bead-head, arms, legs, wings to the body. You can make hair if you want.

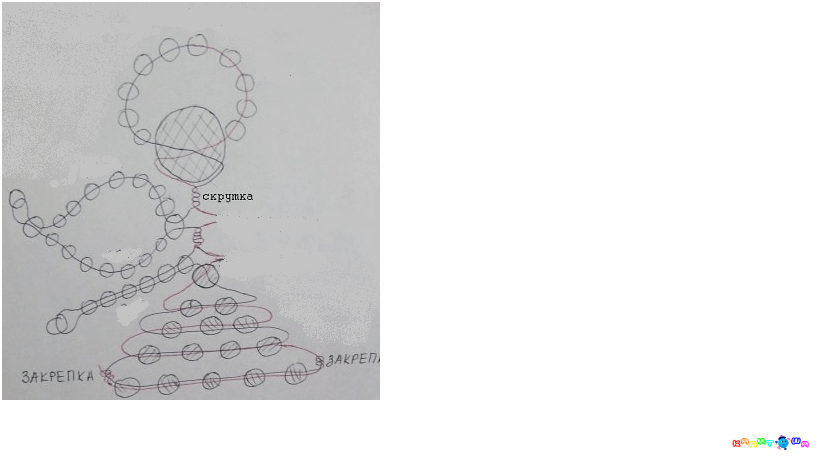
Scheme of the torso of a three-dimensional angel
 As a rule, voluminous beaded angels look the most attractive. If you want to make an angel from beads, the scheme will help a lot, especially for beginner needlewomen.
Regardless of which weaving scheme you choose, you will get a wonderful beadwork that will decorate your Christmas tree, complement the Christmas interior of the room, personifying the magic of this time. In addition, these crafts are ideal for gifts. You remember that a souvenir gift made with love and soul is the best. Having decided to make Christmas angels from beads, you can choose any scheme, combine several or even come up with your own. The Internet will also come to your aid, where you can find a lot of useful information, drawings, diagrams, tips and recommendations from experienced needlewomen. Try to create a miracle yourself and you will definitely succeed!
SELECTION OF IDEAS AND SCHEMES


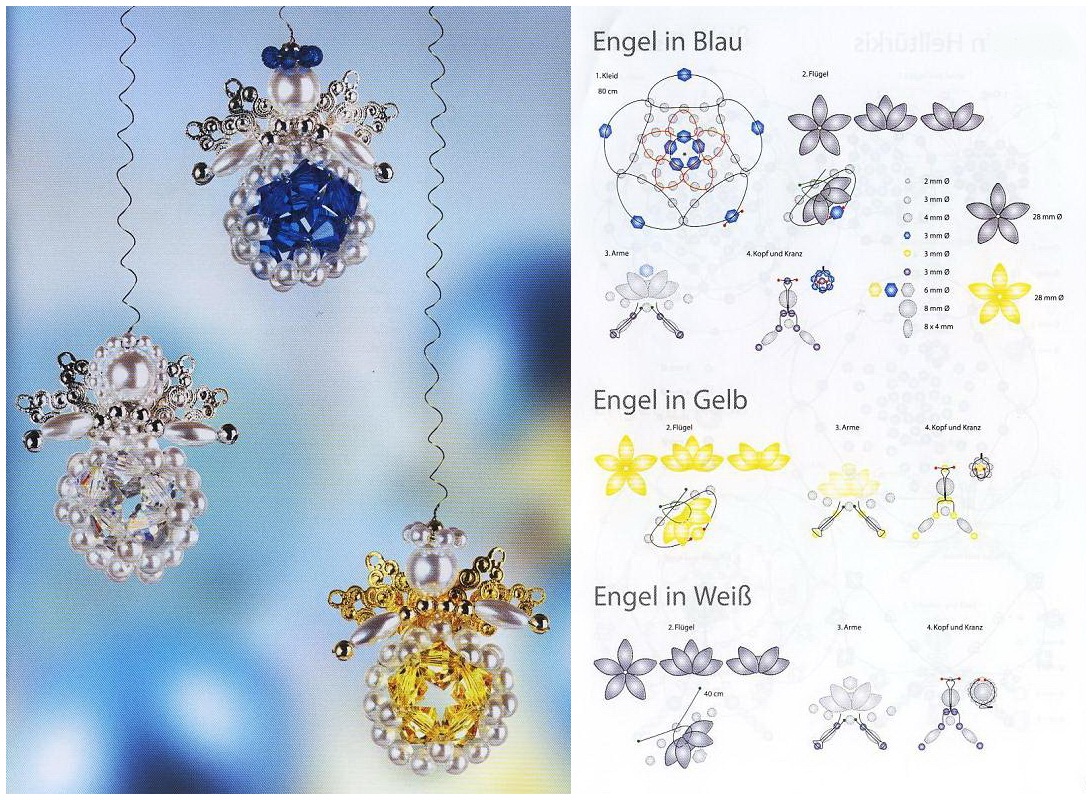
Continuing the current topic of Christmas decorations made of beads and beads, I am sharing with you another selection of cute angels. Their author is a dreamer Moras Ingrid (Moras Ingrid) . She has a lot of very simple and interesting schemes in her arsenal, which I will share with you, my dear ones.
To make angels you will need:
- Beads of different colors and sizes;
- Beads of different shapes, colors and sizes;
- Bugles of different colors;
- Thin wire (recommended diameter 0.33-0.4 mm);
- Elastic fishing line (recommended diameter 0.4-0.5 mm);
- Metallic thread (Lurex), thin cords or ribbons;
- Jewelry pliers.

We start weaving some angels with the preparation of a bead-bead base skeleton. We string a large bead onto the wire (it is advisable to use a teardrop-shaped bead with a hole shifted to the top, but ordinary round ones can also be used). Further, according to the scheme you have chosen, we string beads and beads for the wings onto the wire, pass the ends of the wire towards each other into the hole in the bead, then we string the beads and beads for the angel's pens. To prevent beads and beads from falling off the wire, we bend its ends with a loop using round-nose pliers.

If you use the most common round bead as a base, then immediately string beads and beads for wings and handles onto the wire and fold them low into a kind of bow, at the intersection - twist the wire tightly together or twist it with an additional piece of wire.
When the base skeleton is ready, weave clothes for the angel according to the pattern you have chosen. Weave a net-cloth of the desired size (depending on the diameter of the bead you have chosen in the base), then we close it into a ring and put it on the base skeleton. Clothes for an angel can be woven both on a thin wire and on an elastic fishing line.

Other angels are based on a braided bead (fullerene). You can weave both on a fishing line and a thin wire. It is very easy to weave, the main thing is to clearly follow the pattern. Next, wings and handles made on wire are attached to the fullerene.
Decoration of festive dishes
Every housewife wants her holiday table to look elegant. Table setting largely depends on the skill and taste of the hostess.
The best table decoration is skillfully prepared dishes. Try to make them not only tasty, but also attractive in appearance. Let's start with such a common snack as herring. Peeled and chopped herring is placed on a herring box or a plate so that it looks like a whole fish. You can attach "antennae" of green or onion to the head of the herring, and spread slices of boiled potatoes, beets, cucumbers around.
Good decorations for many dishes are obtained from butter. The easiest way is to make “carnations” out of it. To do this, take a not very hard block of butter and, holding its lower part wrapped in paper with your left hand, with the knife that you hold in your right hand, scrape the top of the block 12-15 times towards you. A fan-shaped mass forms on the knife. Remove it from the knife and connect the ends at the bottom. Lightly sprinkle the edges of the finished “cloves” with red pepper.
With the help of a teaspoon, which should be dipped into hot water from time to time, you can make a “chamomile” or “rose” out of the oil. Give the oil the shape of a truncated cone, then start making “petals”: press the spoon into the middle of the cone and, tilting it from the center towards you, jerk it out of the oil. The oval surface of the spoon gives the oil the shape of a petal. To get a "rose", in the intervals between the petals of the first row, but slightly lower, do the second and third rows. It is good to decorate caviar, pate and other dishes with butter flowers.
To decorate the vinaigrette, stars, circles and beautifully arranged slices of vegetables cut from boiled carrots or beets are suitable. When preparing a salad, the hostess thinks about how to decorate it on top, and usually selects for this the strongest cucumbers, the neatest slices of chopped eggs, even slices of meat, and sets aside one or two tablespoons of green peas. Having laid the salad in a pyramid or otherwise (this will depend on the shape of the dish), pour it with mayonnaise or sour cream, then the decorations will stand out more sharply. Arrange green peas and cucumbers, cut into slices or in the form of a fan, along the edges of the dish with salad, cutting the cucumber thinly across almost to the very edge, which secures the slices so that they do not disperse.
Meat salad is decorated with "bags" of sausage. Such “bags” are made from thinly sliced boiled sausage, best of all amateur. Putting several circles of sausage one on top of the other, with the tip of a knife, cut them from the middle to the edge and then wrap them in “bags”. You can put a little lettuce or a few slices of cucumber in the "bag".
Aspic from the tongue or fish can be prepared and beautifully served not only on a large dish, but also separately - in portions. Take several saucers with high edges (as many as you want to make servings), rinse them in cold water so that the frozen aspic comes out well; pour a little hot broth into the bottom of each saucer and let it harden; then lay on this layer the pieces of food soaked in the broth with which you decide to decorate the aspic, that is, slices of lemon, circles of a hard-boiled egg or cucumber, parsley, green peas. Place the meat here as well. When the aspic hardens, put it on small plates or on a large dish. The preparation of such an appetizer will require, however, a little more time, but the dish will be beautifully decorated.
On the eve of the Christmas holidays and the New Year, we offer you a master class with a weaving pattern, in which we will tell you how to make an angel from beads. It will be a great handmade souvenir for your family and friends¸.
Tools and materials Time: 25 minutes Difficulty: 3/10
- one bead to form the head;
- beads of two colors;
- decorative hat for beads;
- needle and fishing line (you can use thread).
Weaving step by step instructions

Step 1: make a beaded ring
To begin with, we take 8 beads of the main color and connect them into a circle. Further weaving will go in one thread, therefore we place our circle as close as possible to the beginning of the line segment.

Step 2: weave a skirt
Then we string 20 beads on the fishing line, and form a small loop by returning the needle to the very first of the strung beads. To fix the next petal of the base, we need to pass the fishing line through the next bead of the first circle (as you remember, we have only 8 beads there).


In total, in the end, we should get 8 such petals, according to the number of beads in the circle. Each petal consists of 20 beads, and is made according to the description located just above.


Step 3: Making the Body
This skirt will be the basis of our attire, so now you can start shaping the torso. To do this, we will again use the inner circle of 8 beads. Weaving will be a brick. That is, we string a bead on the needle, and send it to the next bead of the circle along the way, bypassing one.
Thus, we add beads through one, rising above the base. There should be 4 such rows in total. For the second row, we need to skip the beads of the previous circle, inserting new beads between them.


Step 4: Weaving the Wings
Now let's move on to the wings. For each wing, it is necessary to string 25 beads of a different color, and fix them on the bead of our body.

Step 5: attach the handles
Then the needle goes to the bead of the body, to which one of the handles will be attached. We string 5 red beads on it, and one white one, and return the needle to the strung one, bypassing the last white bead. On the other hand, we form the second handle symmetrically in the same way.


Step 6: Attaching the Head
The final touch is fixing the head. To make it not only hold well, but also look beautiful, we use a decorative bead cap for this. First we string a bead, then a hat, and a few more beads (5 pieces will be enough), and send the needle back through the hat and bead in the opposite direction, bypassing the beads.


Master class completed. Thanks to our detailed diagram, now you know how to make a beaded angel.


On the eve of Valentine's Day, many are racking their brains on what to give to a loved one. There is no better gift than one that is made by hand and in which all the love and good wishes of the giver are invested. That is why we offer to give a charm - an angel woven from beads. How to make an angel from beads with your own hands will be discussed in our master class.
For a beaded angel we need:
- a large transparent bead for the head;
- white wire - 1 meter;
- white beads of different diameters;
- golden beads;
- transparent and golden beads.

Getting Started
- What is an angel without a halo? That's it with him and start captivity. For a halo, string 17 golden beads onto the wire and place them exactly in the middle of the wire.
- We pass the ends of the wire through a large transparent bead towards each other.
- The head and halo for the angel are ready.
- We twist the ends of the wire several times - this will be the neck of our angel.
- Let's start weaving the body. First, take one large white bead and thread the ends of the wire into it.
- For the second row, we will connect two large white beads in the same way.
- Weaving two rows of the body, we proceed to weaving the wings of our angel. For each of them, take 23 transparent beads and string them onto the ends of the wire.
- Next, we string a golden bead - this will be the tip of the wing.
- We pass the end of the wire through the last transparent bead in the row and carefully pull it off.
- The lower part of the wing will consist of 19 transparent beads. Carefully string them onto the wire.
- Pass the end of the wire through two large beads - the second row of the body.
- Let's repeat all operations for the second wing. The wings of our angel are ready.
- Weave the hands of an angel from 6 white beads and 1 golden. Thread the beads tightly onto the wire.
- We pass the free end of the wire through all the white beads, bypassing the golden one. We carefully tighten the wire, evenly distributing the beads over it.
- We repeat these operations for the second hand. The hands of our angel are ready.
- We continue to weave the body. To do this, weave 3 large white beads into the third row, and each subsequent row we will make 1 bead wider.
- After five rows of white beads, weave the next row of golden beads. We needed 11 of them, but the number may vary, depending on the size.
- Weave the last row of 8 large white beads.
- We fix the ends of the wire by threading one of its ends through a row of golden beads. Twist the ends of the wire and cut.
- As a result, we got such a wonderful beaded angel, woven according to such a simple weaving pattern that even for beginners it will not be difficult to make it.
- In order for the angel figure to turn out to be voluminous, we make small adjustments to the weaving pattern. Having strung beads for each row of the body and passing the free end of the wire through them, we turn the figure over and repeat this operation from its reverse side. Thus, the beaded angel will turn out not flat, but voluminous. But in this case, beads for its manufacture will also need twice as much.
- After the end of the last row, the ends of the wire remain on different sides of the figure. We pass them through the last row towards each other, twist and cut off the excess.
- Volumetric beaded angel is ready.


Beautiful angels can also be sewn


