Knitting braids patterns and description of elastic band. Knitted braids - patterns with descriptions. Unusual elastic band with oblique loops
Almost every job involves the use of a so-called “rubber band.” It is convenient for processing the edges of sweaters, sleeves, dresses, making voluminous and warm collars, hats and scarves. Surely, you are already familiar with the simple options 1 x 1 and 2 x 2, so today we will master an unusual knitting pattern with elastic bands and a description of which is given below. So, how to knit elastic bands with beautiful patterns for beginners for all occasions?
Knitting French rib for beginners
This elastic band is reminiscent of the “corrugated” technique and, despite its simplicity, is quite different from the 1 x 1 and 2 x 2 we are used to. It can be used when finishing skirts and dresses.
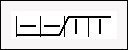
Schematic illustration
The number of loops is a multiple of 4 + 1 for symmetry.
For the sample, we cast on with knitting needles the number of stitches, cr. 4 + 1 + 2 cr. p. (in our case, 31 p.).
1 p.: *2 l.p., 2 i.p.*, from * to *, 1 l. P..
2 p.: *2 i. p., 2 l. p.*, from * to *, 1 and. P..
3 p.: start repeating from the 1st p..
Unusual elastic band with oblique loops

This treatment not only has a decorative effect, it is quite practical - elastic and springy, such an elastic band is suitable for processing the edge of a hat, sweater, jacket or dress.
We use knitting needles to cast on a number of stitches that are a multiple of 5 (in addition to the edge stitches).
Important! Our pattern consists of an odd number of groups of 5 loops. If you decide to knit a product with an even number of “fives”, make a shift by 1 stitch.
First cr. We remove the p., we knit the last one and. P..
1-2 pp.: *1 l. p., 1 i. p.*, from * to *.
3 p.: *skipping l. n., put in sp. into the hole below and. p., pull out the thread, yarn over, 2 p. on the left sp. we knit behind the back wall *, from * to *, l. P..
Repeat 3-4 pp. for the pattern.
Oblique elastic band 3 x 3

This double-sided pattern is universal and is also suitable for finishing the edges of products.
For the sample, we use knitting needles to cast on a number of stitches that is a multiple of 3 + 2 edge stitches, then follow the description.
1 rub.: *3 l. p., 3 i. p.*, from * to *.
2 r. and all even lines: according to the pattern - l. p. over l. p., i. n. over i. P..
3 r.: r.: 1 i. p., *3 l. p., 3 i. p.*, 3 l. p., 2 i. P..
5 rubles: 2 i. p., *3 l. p., 3 i. p.*, 3 l. p., 1 i. P..
7 rubles: *3 i. p., 3 l. P.*.
9 rubles: 1 l. p., *3 i. p., 3 l. n.*, 3 i. p., 2 l. P..
11 rubles: 2 l. p., *3 i. p., 3 l. n.*, 3 i. p., 1 l. P..
RUR 13: repeat from RUR 1..
Converging elastic band for beginners

It is rather an elastic, well-stretchable fabric, suitable for knitting hats and scarves.
Schematic illustration

1-2 pp.: regular rubber band.
3-4 pp.: shift the pattern by 1 p. (see diagram), continue as usual.
5 p.: again shift by 1 p. and continue in the same way until the desired length of the product.
Depending on which direction you shift the drawing, the diagonal will go in that direction. If you need to knit a pattern like in the picture, combine both patterns..
Bamboo

Diluted with garter stitch, this elastic band turns out to be quite elastic. It is used for knitting hats, scarves and sweaters.
Schematic illustration

1 p.: *2 i. p., 2 l. p.*, from * to *, finish 2 and. P..
2 rubles: 2 l. p., 2 i. p.*, from * to *, finish 2 l. P..
We alternate these two rows to create the desired pattern.
Elastic band for beginners

The pattern repeat is 5 points: 2 and. p. and 3 l. p.. To get a symmetrical pattern, we should use knitting needles to cast on a number of stitches that is a multiple of 5 + 2 symmetry stitches + 2 edge stitches..
1 rub.: 1 cr. n., *2 i. p., 3 l. n.*, 2 i. p., 1 cr. n. as i. P..
2 r. and all even pp.: according to the pattern, 1 cr. p., *2 l. p., 3 i. p.*, 2 l. p., 1 cr. n. as i. P..
3 rubles: 1 cr. n., *2 i. p., right sp. add between 2 and 3 liters. p., pick up the working thread and pull out a new p., 1 yarn over, knit 3 l. p.vm. behind the back wall*, 2 i. p., 1 cr. n. as i. P..
4 rubles: 1 cr. p., *2 l. p., 3 i. p.*, 2 l. p., 1 cr. n. as i. P..
Repeat 3-4 pp. for drawing.
Three out of three

This rubber band is very similar to the previous one, it differs in that in the 3rd p. 3 l. We knit together. Rapport is 5 + 2 symmetries + 2 cr. P..
“Three out of three”: enter sp. immediately in 3 liters. p., pick up the working thread with knitting needles and pull out 1 stitch as knit.. Then pick up the working thread on the other side, creating a yarn over on the sp., near the already received st..
Scheme 1, 2 and 4 pp. like the rubber band “spike”.
3 rubles: 1 cr. p., * 2 i. p., 3 l. p. we knit them three *, 2 and. p., 1 cr. P..
Repeat 3-4 pp. to the required length.
Norwegian gum

It is slightly different from the 1 x 1 we are used to: in this case we use the “under the eyelet” technique, which makes the knitted fabric more fluffy and elastic. This knitting is suitable for fluffy scarves and snoods.
Number of p. cr. 2 + 1 p. symmetry + 2 cr. P..
1 rub.: 1 cr. n., *1 l. p., 1 i. p.*, 1 l. p., 1 cr. n. as i. P..
2 rubles: 1 cr. p., 1 i. n., *1 l. p., 1 i. p.*, 1 cr. n. as i. P..
3 r. and all further pp. we knit “under a loop”: L. p. – “under a loop”, and. p. - in the usual way. For knitting l. p., right sp. we start not in the point on the left sp., but in the point located under it (the point of the previous row).
Corrugated


This two-color knitting pattern turns out to be quite soft and elastic, so it is ideal for any winter clothes and accessories. It is knitted only on circular sp., since during the work we will move the knitting, and not turn it, as on regular sp..
Scheme

Important! This description assumes that cr. p. at the beginning of the river It is not removed, as usual, but is knitted, as the diagram shows.
For the sample, we cast on an even number of stitches with knitting needles..
1 rub. (green): l. P..
2 r. (grey)? 1 l. p., *knit 1 l. p. for 1 rub. below, 1 l. p.*, do not turn, but move the p. to the other side of the sp..
3 r. (green): 1 and. n., *1 i. p., 1 i. p. knit for 1 p. below*, 2 and. p., turn the knitting.
4 rub. (gray): *1 and. p., knit 1 and. p. for 1 rub. below*, 1 and. n., move n. to the other side of the back..
5 rub. (green): 2 l. p., *knit 1 l. p. for 1 rub. below, 1 l. p.*, knit 1 l. p. for 1 rub. below, 2 l. p., turn.
For the drawing, repeat from the 2nd row..
Fantasy

Scheme

1 p.: * 2 i. p., 2 p. sn. (thread before work)*, from * to *.
2 p.: * 2 i. p., 2 l. n.*, from * to*.
We alternate 1-2 pp..
With tourniquet

Scheme

1, 3, 5, 13, 15 and 17 pp.: 1 i. p., *1 l. p., 2 i. p.*, from * to *, 1 and. P..
2 r. and all even pp.: along the loops - l. p. over l. p., i. n. over i. p., yarn over = i. P..
7 rubles: 1 i. n., *1 i. p., 2 l. p. change place from 1 and. n. to the left, slave. n. behind, knitting 1 and. p., 2 l. p., 1 i. p. swap places with 2 l. n. to the right, slave. n. behind, 2 l. p., 1 i. p., 1 i. p.*, from * to *, 1 and. P..
9 rubles: 1 i. n., *1 i. p., change 2 l. p. for 2 l. p. to the right, knitting all p. knits., 1 and. p.*, from * to *, 1 and. P..
11 p.: 1 i. n., *1 i. p., 2 l. p. swap places with 1 and. n. to the right, slave. n. behind, prov. 1 i. p., 2 l. p., 1 i. p. swap places with 2 l. n. to the left, slave. n. behind, prov. 2 l. p., 1 i. p., 1 i. p.*, from * to *, 1 and. P..
Flagella

Scheme

1st row: *1 st. with N out., 1 l. p.*, from * to *.
2, 4, 6, 8 and 10 pp.: *2 p.m. l. crossed, 1 st. with N out.*, from * to *.
3, 5, 7 and 9 pp: *1 st. with N out., 2 p. in. persons cross.*, from * to *.
11 r.:* 1 st. with N out., 2 p. inm. persons., 1 p. sn. with N out., 2 p. inm. persons., 1 p. sn. with N out., (2 p. vm. l., p. together with N we remove on the auxiliary sp. before work, we transfer the next st. to another auxiliary sp. for work, the next st. together with N wire . as l. p., p. from the 2nd sp. together with N, as p., knit from the 1st sp. n. with N and., 2 p. vm. l., 1 p. sn. with N and., 2 p. vm. l.*, from * to *.
Elastic band with medallions

2 r. and all even rows: according to the paragraph of the previous row, above the l. p. – l. n., above i. p. – i. p., N = i. P..
7 rubles: 1 i. n., *1 i. p., 2 l. p., change 4 p. 2 to 2 to the right, 2 and. p., replace 4 p. vl. 2 by 2, 2 l. p.*, from * to *, 1 and. P..
9 rubles: 1 i. p., *replace 4 p. 2 with 2 inc., 2 p. vm. ex., 1 N, 2 i. p., 2 p. vm. vl., replace 4 p. 2 with 2 vl., 1 i. p.*, from * to *, 1 and. P..
11 p.: 1 i. n., *1 i. p., 2 l. p., 2 i. p., 1 N, 2 p. vm. ow., 2 i. p., 2 p. vm. ex., 1 N, 2 i. p., 2 l. p., 1 i. p.*, from * to *, 1 and. P..
13 rubles: 1 i. n., *1 i. p., 2 l. p., 2 i. p., 2 p. vm. ex., 1 N, 2 i. p., 2 p. vm. ow., 1 N, 2 i. p., 2 l. p., 1 i. p.*, from * to *, 1 and. P..
15 rubles: 1 i. n., *1 i. p., replace 4 p. 2 with 2 vl., 1 N, 2 p. vm. ex., 2 i. p., 2 p. vm. vl., 1 N, replace 4 p. 2 with 2 vr., 1 i. p.*, from * to *, 1 and. P..
17 rubles: 1 i. n., *1 i. p., 2 l. p., replace 4 p. 2 with 2 vl., 2 i. p., replace 4 p. 2 with 2 vpr., 2 l. p., 1 i. p.*, from * to *, 1 and. P..
A selection of rubber bands patterns


Sizes: 38/40 (42/44) 46/48
YOU WILL NEED
Yarn (48% natural wool, 30% alpaca wool, 22% polyamide; 240 m/50 g) - 400 (450) 500 g col. rosewood;
Knitting needles No. 5;
Circular knitting needles No. 4,5 and 5.
Do you like the post? And would you like to see descriptions of sweaters more often? Let us know! Write about it in the comments!
PATTERNS AND DIAGRAMS
Rows in forward and reverse directions (rapport = 6 sts).
Front rows: alternately purl 3, knit 3.
Purl rows: knit loops according to the pattern. For the distribution of loops, see the instructions.
Circular rows: alternately knit 3, purl 3.
RUBBER FROM "BRAID"
The number of loops is a multiple of 48 + 24 = knit according to. scheme. It shows facial rows. In the purl rows, knit loops according to the pattern. Perform rapport 2 times, ending with loops to the arrow. Repeat rows 1–36 constantly.
Knitting density
27 p. x 29 r. = 10 x 10 cm.
Completing of the work
Cast on 141 (153) 165 stitches on the knitting needles and knit as follows: edge stitch, 8 (14) 20 stitches with an elastic band, while starting with 2 knit stitches, 120 stitches with an elastic band from “braids”, 11 (17) 23 stitches with an elastic band, At the same time, finish with 3 purls and 2 knits, edge stitch.
After 45.5 cm = 132 rows (43.5 cm = 126 rows) 41.5 cm = 120 rows from the initial row, close for armholes on both sides 1 x 9 p. = 123 (135) 147 p.
After 65 cm = 188 rows from the initial row, close off all the loops, with the middle 73 sts forming the neck, the outer 25 (31) 37 sts forming the shoulders.
Knit as for the back, but after 59.5 cm = 172 rows from the initial row, close off the middle 33 stitches for the neckline and finish both sides separately.
To round the inner edge, bind off 1 x 6 sts, 3 x 3 sts, 2 x 2 sts and 1 x 1 sts in every 2nd row. At the height of the back, bind off the remaining 25 (31) 37 sts of the shoulders.
Cast on 67 (73) 79 loops on knitting needles and knit with an elastic band as follows: edge, 1 p., k3, * 3 pur., 3 knits, from * repeat constantly, finish 1 purl, edge.
At the same time, add 11 x 1 sts to bevel the sleeves on both sides in every 8th row from the starting row and 6 x 1 sts in every 6th row (20 x 1 sts in every 6th row) in every 6 1st row 17 x 1 p. and in every 4th row 6 x 1 p. acc. pattern = 101 (113) 125 p.
After 50.5 cm = 146 rows from the starting row, cast off all stitches.
Sew shoulder seams.
For the collar, cast on 156 stitches on circular needles No. 4.5 along the edge of the neckline and knit with an elastic band in circular rows. After 7 cm from the beginning of knitting the collar, switch to circular knitting needles No. 5 and after 33 cm from the beginning of knitting the collar, bind off all the loops according to the pattern.
Slightly stretching, sew in the sleeves, sew side seams and sleeve seams.
Get prizes for your creativity! Take part in the competition for craftswomen! There is still time to submit your application. Find the details of the competition, its conditions and description of the prize fund!
Be active and get a reward! The competition for active commentators is in full swing! All you need is to be active! Make comments on publications, participate in discussions, be active! Every Monday we reward the most active! Perhaps next Monday you will see a congratulation addressed specifically to you! Read the competition details
Braids are always a great idea for any knitted item: they are universal, because they are suitable for children, women and men; There are a huge number of their varieties - there is always plenty to choose from; braids and plaits look wonderful on most models of knitted items, be it hats, sweaters, scarves, cardigans, snoods, mittens, sweaters, dresses, booties, vests, pants and much more.
Using diagrams with descriptions of knitted braids, you can almost always knit not just another thing, but a unique author’s product of its kind, which not only the craftswoman, but everyone around will be delighted with.
How to knit braids with knitting needles - diagrams and descriptions of patterns

It should be noted that there are specifics of work here, which you should definitely familiarize yourself with before starting knitting. So, how to knit with braids? For this auxiliary knitting needles are required, which come in different sizes. Their thickness should be selected according to a simple principle: auxiliary knitting needles should be slightly smaller than working knitting needles.
By what principle are braids knitted? During operation, the hinges are constantly moving. Several loops are transferred to the auxiliary knitting needle, leaving them behind or in front of the work, after which, in accordance with the selected pattern, a certain number of loops are knitted, and then the loops previously set aside on the auxiliary knitting needle are put into work.
To make it clear on what principle braids are knitted, let’s consider several options for working with knitting needles in this style, including for beginner needlewomen.
Popular articles:
Simple braid - master class for beginners
To understand the basics of knitting braids, let's consider the simplest option, ideal for beginners. This braid knitting tutorial assumes that the auxiliary knitting needles are replaced with a simple pin, which is extremely convenient if you have not yet acquired the necessary tools.
How to knit a braid - master class for beginners

Let's make a braid with 8 loops. Let’s cast on 14 loops for the sample (12 loops for the braid and its “framing” + 2 edge loops) and follow the diagram.
1st row: 2 purl, 8 knit, 2 purl;
From 2nd to 4th row We knit what the knitting looks like - we knit knit stitches above the knit stitches, and purl stitches above the purl stitches (photo 1).
5th row: Purl 2, 4 loops re-slip, without knitting them, onto an auxiliary needle and leave ahead of the work; knit the next 4 loops (at the beginning of knitting them, try not to have a large stretch between the loops). Then we slip 4 loops from the auxiliary needle onto the left needle and also knit them. It turned out that our loops seemed to cross with an inclination to the left (photos 2 and 3).
From 6th to 12th row - we knit according to the pattern.
Now let's look at more complex knitted braids - diagrams with descriptions will help in this difficult task for beginners.
Beautiful three-dimensional pattern

A voluminous braid with knitting needles will make any thing special, and will definitely add a little romance to the image. Just one voluminous pattern is enough, such as this wonderful braid, and the item already takes on a unique look.
The pattern shows the front and back rows. The width of the motif is 40 loops, repeat in height from the 1st to the 32nd row.
Braid knitting pattern and designations:

- purl (purl - in front rows, front - in purl rows)
- front (front in front rows, purl - in back rows).
 - cross 4 loops to the left (slip the 3rd loops onto an auxiliary needle and leave it before work, purl 1 loop, then knit 3 loops with an auxiliary needle).
- cross 4 loops to the right (slip 1 loop onto an auxiliary needle and leave it at work, knit 3 loops, then purl 1 loop with an auxiliary needle).
 - cross 5 loops to the right (slip 2 loops onto an auxiliary needle and leave them at work, knit 3 loops, then purl 2 loops with an auxiliary needle).
 - cross 5 loops to the left (slip the 3rd loops onto an auxiliary needle and leave it before work, purl the 2nd loops, then knit the 3rd loops with an auxiliary needle).
 - Cross 5 loops to the left (slip 3 loops onto a secondary needle and leave before work, knit 2 loops, then knit 3 loops from a secondary needle).
![]() - Knit 5 cross to the right (leave 2 loops on the auxiliary needle while working, knit 3 knit stitches, then knit 2 loops on the auxiliary needle.
- Knit 5 cross to the right (leave 2 loops on the auxiliary needle while working, knit 3 knit stitches, then knit 2 loops on the auxiliary needle.
![]() - cross 4 loops to the left (slip the 2nd loops onto an auxiliary needle and leave before work
, knit 2 loops, then 2nd loops with aux. knitting needles).
- cross 4 loops to the left (slip the 2nd loops onto an auxiliary needle and leave before work
, knit 2 loops, then 2nd loops with aux. knitting needles).
![]() at work
, knit 2 loops, then 2 loops with aux. knit the knitting needles).
at work
, knit 2 loops, then 2 loops with aux. knit the knitting needles).
 - cross 4 loops to the left (slip 2 loops onto an auxiliary needle and leave before work,
Purl the next 2 stitches, then the 2nd stitches with auxiliary stitches. knitting needles).
- cross 4 loops to the left (slip 2 loops onto an auxiliary needle and leave before work,
Purl the next 2 stitches, then the 2nd stitches with auxiliary stitches. knitting needles).
 - cross 4 loops to the right (slip 2 loops onto an auxiliary needle and leave at work
, knit 2 loops, then 2 loops with aux. knit the needles purlwise).
- cross 4 loops to the right (slip 2 loops onto an auxiliary needle and leave at work
, knit 2 loops, then 2 loops with aux. knit the needles purlwise).
 - Cross 5 loops to the left (slip the loops onto a spare needle and leave them before work, knit 3 loops, then knit 2 loops from a spare needle).
 - Knit 5 cross to the right (leave 3 loops on the auxiliary needle while working, knit 2 knit stitches, then knit 3 loops on the auxiliary needle).
Pattern for a hat

The braid pattern for a hat is a timeless classic of winter fashion. For a harmonious set, the braid is often also knitted on scarves or snoods, as well as on mittens - this makes the look complete. Well, for demi-season and winter hats, this simple pattern for knitting braids with knitting needles with a description will be useful.
Diagram and designations:

- purl loop.
- face loop.
- remove the double crochet stitch.
- knit two stitches together.
Braid for men's sweater

The image of a sensual man in the cold season is ideally complemented by a warm knitted sweater with cables - proven by many romantic comedies! Therefore, it’s time to knit a beautiful thing for your dear person.
This braid for men's sweaters is also knitted using an additional knitting needle.
Progress:
The number of loops is cast on the knitting needles, divisible by 11 plus 2 loops for symmetry of the pattern, plus 2 edge loops.
Rows 1,3,7,9: *2 purl, 9 knit *, 2 purl;
2 and all even rows: 2 knit, * 9 purl, 2 knit*;
5 row: * 2 purl, 3,4,5 loops are removed forward onto an additional knitting needle, knit 6,7,8 loops, then 3,4,5 knit loops, 3 knit loops *, 2 purl;
11th row: * 2 purl, 3 knit, 6,7,8 loops are removed back onto an additional knitting needle, knit the 9,10,11th loops, and then 6,7,8 loops from the additional knitting needle *, purl 2.

What to choose for a women's cardigan?

A braid for a women's cardigan can look different: large, small, repeating, combined with other braids or in a single copy, but it will always give the knitted item an original look.
Knitting pattern for braids and designations:

![]() — 10 loops cross to the left (slip 5 loops onto an auxiliary needle and leave before work
, knit the next 5 loops, then 5 loops with aux. knitting needles).
— 10 loops cross to the left (slip 5 loops onto an auxiliary needle and leave before work
, knit the next 5 loops, then 5 loops with aux. knitting needles).
![]() - cross 10 loops to the right (slip 5 loops onto an auxiliary needle and leave at work
, knit the next 5 loops, then 5 loops with aux. knit the knitting needles).
- cross 10 loops to the right (slip 5 loops onto an auxiliary needle and leave at work
, knit the next 5 loops, then 5 loops with aux. knit the knitting needles).
The diagram shows both front and back rows. We read the front (odd rows) from right to left, the purl (even rows) we read from left to right.
The width of the braid is 20 loops. We repeat in height from the 1st to the 12th row. The number of rows in the pattern in height can be increased, depending on the required pattern.
In the classic version, if we weave 5X5 braids, then between the weaves we knit 10 rows in height (including knit and purl). In this model, the number of rows in the pattern needs to be increased in height to 16 rows.
Pattern for mittens

A good mood and warmth this winter will be created by mittens knitted from braids, which you can knit for yourself, your sister, your friend, your mother.
This knitting pattern may be difficult for beginners, since the mittens need to be knitted using five stocking needles.
Progress:
We cast on 52 loops - 13 loops per knitting needle. We knit an elastic band 2x2, approximately 40 rows. Follow the diagram and description to understand how to properly knit braids on mittens.
We knit a finger on the 10th row. On the side of the small braids, add to the two middle loops - 3 times in the second row. Then in the third row 3 times. When there are 18 loops, transfer them to a pin and continue knitting the mitten. The finger can be tied later. It is knitted exactly like the mitten itself, only in a smaller size.
Next comes double knitting, in the first row on knitting needles we alternately knit one knit stitch and two knit stitches together. In the second row with facial loops, two loops together and so on until the end of the row. Pull all remaining loops.
Diagram and designations:


What pattern is suitable for a children's pullover?

A children's pullover with knitting needles can also be decorated with a beautiful braid motif. It will come in very handy for winter products, adding its own flavor when creating a sweater for a child. Let's take the central braid as a basis.

In the pattern according to which we will knit a braid, only the front rows are shown. In purl knit according to the pattern. The width of the motif is 36 loops. Repeat in height from the 1st to the 20th row.
Diagram and explanations:

- purl (purl - in front rows, front - in purl rows).
- front (front - in the front rows, purl - in the back rows).
- Cross 3 loops to the right (slip 1 loop onto an auxiliary needle and leave it at work, knit the 2nd loops, then knit the loop with the auxiliary needle).
- Cross 3 loops to the left (slip the 2nd loops onto an auxiliary needle and leave it before work, knit 1 loop, then knit the 2nd loops with an auxiliary needle).
- Cross 3 loops to the right (slip 1 loop onto an auxiliary needle and leave it at work, knit the 2nd loops, then purl the loop with the auxiliary needle).
— cross 3 loops to the left (slip the 2nd loops onto an auxiliary needle and leave them before work, purl 1 loop, then knit the 2nd loops with an auxiliary needle).
![]() - Cross 4 loops to the left (slip the 2nd loops onto an auxiliary needle and leave it before work, knit 2 loops, then knit the 2nd loops with an auxiliary needle).
- Cross 4 loops to the left (slip the 2nd loops onto an auxiliary needle and leave it before work, knit 2 loops, then knit the 2nd loops with an auxiliary needle).
 - Cross 4 loops to the right (slip 2 loops onto an auxiliary needle and leave them at work, knit the 2nd loops, then knit 2 loops with an auxiliary needle).
 - cross 4 loops to the left (slip 2 loops onto an auxiliary needle and leave them before work, purl the next 2 loops, then knit the 2nd loops from the auxiliary needle).
 - Cross 4 loops to the right (slip 2 loops onto an auxiliary needle and leave them at work, knit the 2nd loops, then purl 2 loops with an auxiliary needle).
- Cross 2 loops to the left (slip 1 loop onto the auxiliary needle and leave it before work, knit the 2nd loop, then knit 1 loop with the auxiliary needle).
Plaid pattern

Knitting a blanket with knitting needles from braids is a real challenge for a needlewoman, because this work takes a lot of time and requires a lot of effort and patience, but the result will delight the whole family for many years! What needs to be done to knit the family’s future favorite blanket? The answer is simple: a simple braid pattern that will add coziness to a knitted blanket.
Knitting a braid for a blanket:
The voluminous braid consists of 12 loops. The pattern repeat in height is 8 rows. Rows 1 to 8 form the pattern. In every 4th row, the braid loops overlap one by one.

Progress:
1st and 5th rows:*P9 p., 12 persons. p., 9 p. n. *, repeat from * to *;
2nd and all even rows: knit all loops according to the pattern;
4th row:* 9 p. p., 8 p. cross to the left (leave 4 p. on the auxiliary needle before work, knit 4 p., then knit 4 p. with the auxiliary knitting needle), purl 9. n. *, repeat from * to *;
8th row:* 9 p. p., 4 persons. p., 8 p. cross to the right (leave 4 p. on the auxiliary needle while working, knit 4 p., then knit 4 p. with the auxiliary knitting needle), purl 9. p., *, repeat from * to *.
Repeat the pattern, starting from the 1st row, until the desired height of the braid.
Video lesson
If the photos of patterns and products with braids knitted with knitting needles were not clear enough, a video lesson on knitting a voluminous braid with knitting needles will help you understand some important points.

The elastic band described is good not only for hats. It can also be used as a finishing material for various outdoor knitwear.
Technique for knitting a beautiful elastic band.
We cast on loops in multiples of 5 (except for edge loops). It should be taken into account that the sample contains an odd number of “fives”, and the entire description is focused on this number. If you have an even number of such groups, then you will need to shift by one loop.
Therefore, it is better to first knit a sample (there are 17 loops in the example) to understand the pattern, and then perform it on your product. We remove the first edge without knitting, we knit the last one purl.
Progress
1. The first and second rows are elastic *l, i*.
2. Having skipped the front stitch, we thread the knitting needle into the hole below the purl loop,

 pull out the thread.
 3. Yarn over.
4. Knit two loops on the left needle.


5. We continue the pattern from point 2 to point 4 for each pair of loops, the last one is knitted.

6. Turn and knit rapport *2 knit purls together, knit 1*,

 1 purl.
7. Continue with step 2.

8. The entire sample looks like this:
When knitting a beautiful elastic band for a headdress, the hat itself can be knitted in any way; here the main decoration is the elastic band. The rim can be made even wider than in the example. The hat does not need to be overloaded with details, so it is better if its fabric is even, then the charm of the elastic band itself, which turns out to be voluminous and quite thick, is not lost. And here is a video MK from YouTube by master Lina Yartseva.


