Do-it-yourself pattern for a women's turtleneck. Construction of a turtleneck pattern from slightly stretchable knitwear. We grind the back and shelf of the turtleneck along the shoulder seam
Finally got around to a turtleneck for my daughter. While I am posting a photo of mine, so that it is clear that we are sewing.
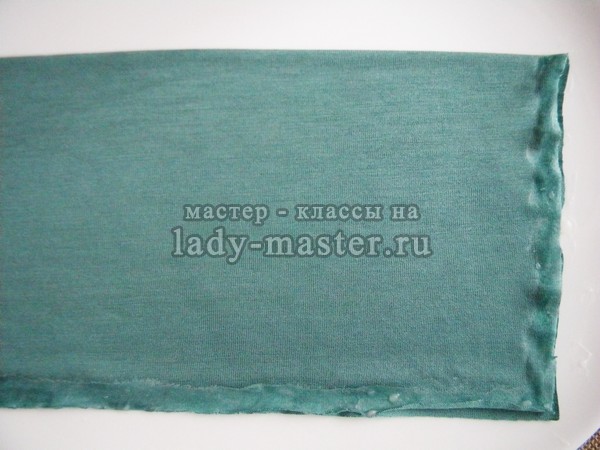
Highly stretchy jersey is suitable for sewing turtlenecks. The fabric should stretch in width by almost one and a half times. Otherwise, the head will not fit into the gate.
For children and girls with a chest girth of up to 96 cm, one length of the product (or sleeve, whichever is longer) is enough, plus a hem and plus a double neckline. I get 70 cm: length 60-65 cm, 5 cm for processing the neck. If the neck height is 5 cm, then you need to take 75 cm, etc.
Measure the width of the front, back and sleeve width at the widest point of the turtleneck that suits you. If the sum of all values \u200b\u200bis not greater than the width of the fabric, then we take one length. If more, then take the length and length of the sleeve.
Now I already have ready-made patterns, according to which I sew all knitted blouses for myself and my daughter. And you, in order not to suffer with the construction of a pattern, you can re-shoot them from ready-made blouses.
A simple, without complex calculations, the construction of a knitted turtleneck pattern for ladies next time.
In the meantime, how to reshoot:
1. Take a blouse in which you are satisfied with the width, armhole depth and shoulder length. Just put it on paper and trace around the outline. The front and back on knitted T-shirts are most often made the same and without darts.

2. Fold the drawn pattern in half, we need half, as we will cut the details of both the front and the back with a fold.
3. Measure the length of the shoulder, side, the length of the blouse, the angle of the bevel of the shoulder, the depth of the armhole of the pattern. They should match the corresponding lines of the finished blouse. Check that the bottom line is perpendicular to the middle line. Don't cut out yet.
4. In the same way, take off the sleeve pattern from the finished turtleneck. Lay the sleeve on the paper and trace around. Most often in knitted blouses, the front and back halves of the sleeve are symmetrical. Fold the paper in half and draw the sleeve to the whole.
5. We measure the length of the sleeves on the finished blouse and on the pattern. The values must match. If necessary, we fix it.
6. And now we check the coincidence of the length of the sleeve and the armhole on the patterns. The sleeve fit of a jersey turtleneck will be better if the sleeve length is 1.5-2 cm shorter than the armhole length. Unlike things from non-stretch fabrics, when sewing knitwear, the armhole fits a little. On the finished thing, this landing is practically not noticeable, but if this is not done, the shoulder will stick out ugly.
1. Procurement of raw materials
Let's take as a basis a sweater pattern (mod. 125) from Burda magazine No. 12/2004.
We will need 1.05-1.10m of knitted fabric with a width of 1.40-1.50m for 34-40 sizes.
2. Preparing knitted fabric for cutting
Knitwear containing natural fibers (cotton, silk, wool, linen, viscose) must be decanted. Since the turtleneck will have to be washed, it is better to soak the knitwear in warm water, wring it out in a towel and dry it in a straightened form. Then iron the cut from the inside strictly along the loop bars to avoid stretching it. Do not forget to choose the appropriate temperature regime depending on the composition of the knitwear. Viscose knitwear is ironed with a moderately heated iron without steam!
3. Determining the type of knitwear
Knitwear can be low-elastic, moderately elastic and highly elastic.
To determine which of them the purchased knitwear belongs to, it must be tested.
To do this, you need to take a cut, fold it across the loop bars at a distance of at least 10-15 cm from the cut and mark a 10 cm long segment on the fold. 
4. Testing 
Stretch this segment so that the loops are not very deformed.
If the segment has increased by 1.5–2 cm (by 15–20%), then the knitwear is low-elastic, by 3 cm (30%) it is moderately elastic, by 5 cm or more (from 50% or more), then the knitwear is highly elastic.
5. Preparing the pattern for cutting
Low-elastic knitwear does not require changing the pattern. It hardly stretches. Do not choose low-elastic knitwear for tight-fitting models!
If the jersey is moderately elastic, then it is better to take the pattern one size smaller in width.
For highly stretchy knits and a form-fitting model, it is better to take a pattern two sizes smaller in width.
It is better not to reduce the length of the pattern. When stretched in width, the turtleneck will shorten in length.
6. Correcting the size of the pattern
We remove the pattern of a smaller size only in width! You can even add a few centimeters along the length. The narrower the model, the more you need to add in length. Do not forget - knitwear jumps in length when stretched in width!
7. Determining the sleeve width
Since we did not shorten the length of the armhole, the head of the sleeve can not be reduced.
In order for the sleeve to fit the wrist, you need to narrow the sleeve to the bottom line.
To do this, measure your wrist circumference and set aside it along the bottom of the sleeve pattern.
From the points of the elbow (this is approximately the middle of the sleeve), draw new lines to the points obtained along the bottom of the sleeve.
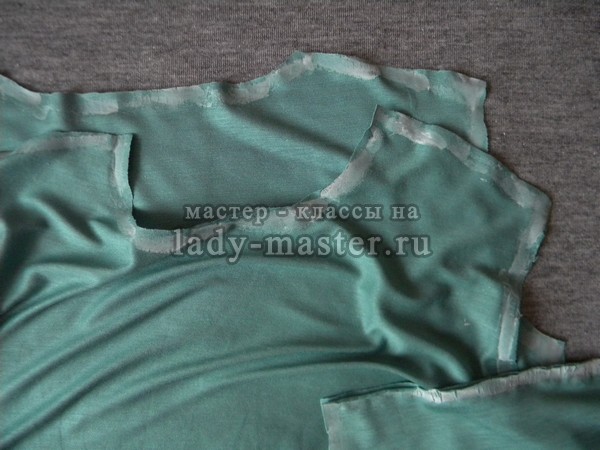
8. Cutting
Fold the cut along the posts so that two folds form and lay out the details of the shelf, back and sleeve on it.
The collar is best cut from one layer of fabric.
It is also better to cut out striped knitwear from one layer of knitwear, so that it is more convenient to combine the stripes.
Open the details of the turtleneck with allowances of 1 cm in all sections. Allow 2-3 cm to hem the bottom of the product and the bottom of the sleeve.
Cut out all the details with the same allowances so as not to mark the seams. Make small cuts in place of the marks. 
In order to prevent stretching of the shoulder seams in the sock, you need to cut out two strips 2 cm wide and equal to the length of the shoulder. Cut out the strips strictly along the loop posts! You can cut them along the edge if it is soft. Instead of stripes, you can take thin cotton braid, after wetting it and drying it.
9. Stitch adjustment
Before starting work on a piece of knitwear, adjust the stitching of the machine and overlock.
If the sections of the knitwear are stretched by the overlock, then you need to adjust the differential conveyor by turning its regulator counterclockwise.
If you do not have an overlocker, then you can do without it. In this case, the seams are sewn with a narrow, almost wavy zigzag stitch. The stitch width is 05−1mm, the stitch length is 2−2.5mm.
10. Choosing a needle and thread
For knitwear, it is better to take needles with a rounded tip. Such needles do not pierce, but push the threads of the loop column. These are Stretch or Jersey needles.
The needle number is selected depending on the thickness of the knitwear - the thinner it is, the smaller the needle number. For thin - needle No. 60-70, for denser - No. 80.
To hem the bottom, it is better to take a double needle with a step between the needles of 2-3 mm.
The threads must also match the thickness of the knitwear. The thinner it is, the thinner the thread. But here the rule is the thinner the thread, the higher its number.
11. Tailoring. Shoulder seams
Sweep and measure the turtleneck. Then spread out the sides and stitch the shoulder seams, placing strips of knitwear or braid under the line from the side of the shelf to strengthen them.
Iron the seam allowances on the back.
12. Hemming the bottom of the sleeves
Pin up and iron inside out the hem allowance at the bottom of the sleeve.
Sew the hem with any knit stitch or twin needle on your machine. Run the line from the front side according to the basting.
13. Stitching in the sleeves

Pin and tuck the sleeves into the armholes, lining up the marks. Stitch the sleeves, iron the allowances towards the sleeve. If you sew a sleeve without a basting, immediately along the pins, then do not forget to remove the pins in front of the overlock foot, otherwise you will damage the machine knife!
14. Side seam and sleeve seam

Pin the side seam and sleeve seam with pins ALONG the seam to avoid damaging the overlock knife. Stitch the sleeve seam and the side seam of the turtleneck with one stitch. If the seam is a little wrinkled, iron it first, and then iron the seam allowances on the back and back of the sleeve.

At the bottom of the sleeve there is a chain of overlock threads and a seam allowance that needs to be hidden.
The seam allowance of the sleeve is ironed on the back half of the sleeve. We hide the chain of threads under this allowance, and adjust the seam allowance on the sleeve (see diagram) to the height of the bottom hem. The threads in this case are hidden under the seam allowance and are not visible. 
15. Hem bottom
Pin and iron the bottom hem to the wrong side of the turtleneck and topstitch it from the right side. The stitch can be done with a twin needle or any knit stitch of your choice.
To prevent the machine from pulling the double stitch, it is better to slightly loosen the upper thread tension. If the machine is naughty when sewing with a double needle, then you can put a strip of AVALON under the seam - water-soluble paper for embroidery. It dissolves perfectly when rinsing the product in water. For the same purpose, tissue paper or tracing paper can be used.
16. Collar 
Stitch the collar into a ring, iron the allowances, turn the collar right side out and fold it in half right side up. Sweep open cuts. 
Stitch and tuck the collar into the neck, slightly stretching the collar sections if the neck is slightly larger. Stitch the collar into the neckline. Iron the seam.
In the photo - a view of the set-in collar from the inside. It remains only to unscrew the turtleneck.
All! Ready.:)
The range of knitted fabrics in fabric stores is impressive! Here and natural cotton, and viscose weaves, and various lacostes with interlocks. If you sew for children, you probably don’t experience any particular difficulties: the main thing is to choose the right thread, needle and sewing machine seam for the fabric. But when sewing women's clothing, for the manufacture of which thinner fabrics are used, problems can arise. The machine stretches the knitwear while sewing, the needle pushes the fabric into the hole under the foot, and the parts of the clothes are sewn crookedly, all the while sliding off the desktop ...
How to sew thin knitwear on a conventional machine?
There is a way out: you need to starch the edges of the fabric! We will now show how to do this using the example of making women's golf.
Materials and tools:
- Fine stretch viscose,
- Threads to match the fabric
- tailor pins,
- Fabric scissors,
- Brush - any, but not thin,
- Starch - 2 tablespoons,
- Water - 300 ml,
Manufacturing:
1. Surely, you have noticed that the edges of thin knitted fabric sold in rolls are usually treated with something like glue. Thanks to the hard edges, it is easier to wind such a fabric into a roll and, of course, then rewind the desired footage to customers. To imitate this miracle glue, folk craftswomen suggested using a paste or starch solution. The essence of both liquids is the same: first, the liquid mass can be applied to the fabric, and then, after drying, used as a fabric sealant. The paste is prepared from water and flour, but the starch solution is made from water and starch. Pour two tablespoons of starch powder into a small saucepan and add half a glass of water. Mix these ingredients well, turning them into a slurry.

2. Put the saucepan on a small fire and gradually add water, stirring the solution. After pouring out all the prepared water, wait until the starch solution thickens a little. Stir again and remove from heat.

3. Cut out all the details for golf from jersey: neck, back, front and two sleeves. Bend the neck rectangle in half (across the knitted grooves) and iron to get a full-fledged workpiece. Place the neck folded in half on a large tray and apply a starch solution to all its edges (except the fold) with a brush. It is necessary to cover with a solution at least 1 cm of the fabric from the edge, because it is important that the future seam falls on the starched parts.
4. Cover all other details, except for the neck, with such starch strips on all sides (after all, one way or another, they will all be sewn and sheathed on a typewriter). Carefully, so as not to smear anything with starch, hang the fabric parts to dry and wait for the starch to harden. Then (after it is completely dry) iron the edges of the fabric to even out the details.
5. Front and back fold face to face. Fix the shoulder edges with pins and sew on a typewriter with a knitted seam (it looks like a small inclined zigzag) with an interval of 2.5. Then, to process the fabric allowances, go over the shoulders also in a zigzag with an interval of 1.5.
6. Expand the neck piece and fold it in half already parallel to the knitwear grooves (face to face). Sew the side edge with a knitted seam, and then turn the neckline to the front side, folding it along the previously ironed center.

7. Lay in front of you in front of you and the back of the golf course, which you have already sewn at the shoulders. Turn the neck with the fold down and, slightly stretching it, evenly place it along the entire cut of the main part and fix it with tailor's pins.

8. Sew the neck to the main part with a knitted seam, and then finish the edges with a zigzag.
9. This is how the neck seam will look like from the inside:

10. Attach the sleeves with pins to the main part of the sleeve and sew them with a knitted seam, and then with a zigzag. At the same time, do not forget that the allowances of the shoulder seams should turn out to be wrapped in the same direction in which you wrapped them when sewing the neck (towards the back or towards the front).
11. Turn the golf inside out, clearly match the sleeves and sides, fixing them with pins. Sew these seams with a knit stitch and zigzag: from the bottom edge of the sleeves through the armpits to the bottom edges of the golf.

12. Tuck the edges of the sleeves twice and sew with a straight seam, stepping back from the edge of 1 cm.

06 Mar 2010
Once again, I want to emphasize: according to this pattern, you can only cut a blouse from knitted fabric, since during the construction there are no gains in freedom of fitting and there are no tucks.
Also, this pattern is not suitable for highly stretchy fabric (it can be stretched twice or more), on the contrary, you need to make negative increments. But, in principle, you can remove everything superfluous in the fitting.
Drawing on paper:
1. Draw a vertical line (from point O down). This will be the line of the middle of the back, it is the line of the fold of the fabric, along it the share thread of the fabric should pass. (Fig. 1)
2. Set aside for our vertical length line before waist. Draw a perpendicular from this point. (pic 1)
4. Draw a perpendicular from the point of the beginning of the vertical line (point O in the drawing). Set aside on it first 6.5 cm, then the length of the shoulder. Lower the end point of the shoulder by 3 cm. This is usually enough. If you have a more sloping shoulder, this can be corrected during the fitting. (Fig. 1)

5.From waist line along our vertical line set aside up side height. (Fig. 1) Draw a perpendicular from this point. Set aside ¼ of the chest girth on it. (Fig. 2)
6. Draw a line from the end point of the width of the chest to the end point of the width of the hips. On the waistline we make a bend of 1.5 cm. This is enough before trying on. (Fig. 2)
7. Set aside 15 cm from point O (for adults), draw a perpendicular. On it we set aside ½ of the width of the back. (Fig. 2)
8. The armhole line is smoothly drawn through the end point of the shoulder (point 3), the end point of the width of the back and the end point on the chest line. (pic 2)
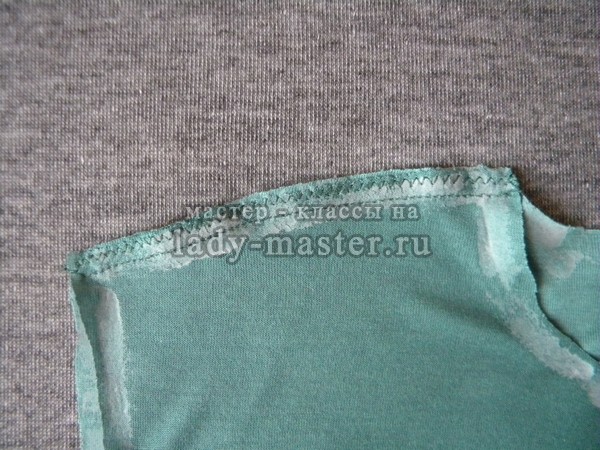
9. Neckline for the back 2-2.5 cm. We put this value down from point O. Draw the neckline of the back with a smooth line. (pic 2)
Hello, today we will continue the topic. If you have built a pattern, let's start cutting and sewing a sweater, there is nothing complicated here.
It is necessary to cut it so that two parts are obtained - the back and the shelf without middle seams. If the formation is completed without errors, there will be no bag at the back.
I think you remember, as I said in the last article, that it is better to draw the sleeves after the main elements are ready and the shoulder seams are connected. Therefore, we will cut them out together with the collar in the process of work. Well, we sew a turtleneck from knitwear?
We sew a women's turtleneck from knitwear
First, we will deal with the cutting of the main parts, and then we will proceed directly to tailoring, its principle is the same for women's sweaters, and for children, and for men.
Seam allowances
- Side, shoulder and sleeve seams - 0.5 cm.
- Armhole - 0.5 cm.
- Sleeve hem - 0.5 cm.
- The neckline cuts out without seam allowances.
- Hem - 2-3 cm.
cutting
- A back - integral without an average seam.
- Shelf - one-piece with a fold.
- Sleeves - 2 details.
- Collar - 1 piece.
You will also need an edge tape that matches the shoulder measurement on the pattern.
Sewing
Let's prepare the edge band. Where can I get it? No, I won't say what to buy. They don’t sell it by the meter, and as far as I understand, it makes no sense to buy in bulk. There is a solution, cook it yourself.
Any material is suitable for this, preferably, of course, cotton and not very dense. Each fabric has an edge, which we all often throw away, but if you cut it off before work, a full-fledged edge ribbon will come out.

The cut edge, of course, is loose, it is he who will go under the overcasting, and the fixed one remains open. That's how everything is solved without problems. Now that the edge is there, we begin sewing the shoulder seams. I grind everything.
We connect the shoulders facing inward so that the shelf is at the bottom and the back is at the top, and the third layer is laid out the edge band. To avoid shifting, pin everything across with pins and slowly remove them in front of the foot.
Under no circumstances should the edges be pulled. Correctly focus on the cut tape.

After sewing, iron the seams a little and iron them back.
We measure the armhole, cut the neck
Fold the product in half, strictly combining the seams and all sections, carefully fastening with pins, measure the armhole. The obtained data are necessary for the construction of arms. To correctly take a measurement, take a centimeter, put it on the edge, step back from the edge by 0.5 centimeters and take a measurement.

You will need three measurements:
- The length of the entire armhole is from the side seam to the side.
- On the back.
- On the shelf.
Record and save the data.

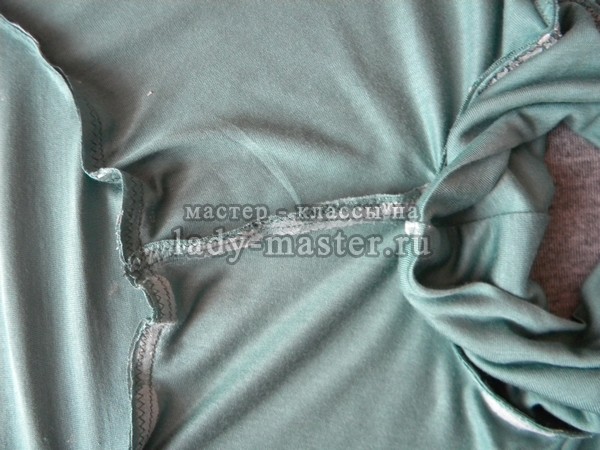
Now let's look at the neck. No matter how carefully you try to do the job, the machine will still stretch the seam a little, which is why the round shape is lost. It is desirable to fix this place with a remnant and trim.
We cut the sleeves
It is useful to learn how to build them, after they are cut, we are engaged in their manufacture. Do not forget to put control marks on the eye and armhole for a more correct alignment.
We process the bottom of the sleeves
To begin, overcast the bottom of the sleeve, and then bend it to the required size and iron it. We will not mark the fold line, sweep it and iron it. Let's cut out a small template from cardboard. A simple strip the same width as the hem.
You apply one side of it to the swept edge, and bend it along with the template and iron it.

It's not a complicated procedure at all, but it saves a lot of time. This treatment can be performed both before and after sewing in the sleeve.
Let's start laying the finishing line. If you have a rasposhivalka in this case, everything is fine. If not, then use a twin needle for a regular household machine or go through a small zigzag or other elastic seam.
Sew on the sleeves
To do this, it is important to clearly combine the shoulder seam and the point of the eye, control notches, as well as side seams.

We lay the product under the foot in such a way that there is an armhole on top, and the sleeve is at the bottom, then the machine will fit itself, because it will come out small. In the process of stitching, do not pull anything, just hold it with your hands.

Sewing the side seam
Before sewing the side edge, first of all we connect all the sections with the wrong side up. We clearly control the alignment of the stitching on the sleeves, as well as the seam - they must match perfectly. We chip and grind on the overlock.

We go along the seam with an iron, removing all the elongated places, and then iron it on the back.
We bend the bottom
The principle of ironing the hem is similar to the sleeves, only this time everything will happen in a circle. It is important that the width of the allowance is the same everywhere.

It remains to complete the finishing line. We lay it necessarily from the front side.

Let's mark the neck
In order to easily sew on the rack, you need to mark it. To do this, fold the product, combining the seams, divide the cutout in half and put marks.

The next step is to fold them to each other, and mark two additional points on the folds. We will put down a similar markup on the collar, but a little later.

Cut out the collar
Before you start drawing it, you need to measure the neck and then build a rectangle equal to the resulting one. We do not postpone the seam allowances yet, as we will need to make a small adjustment.
Decide on the height. I will not indicate a specific figure, because the height of the neck is different for everyone, we just measure it. Take a centimeter, find the jugular cavity. Measure the distance from her to the chin. Example: height - 7 cm.
Now think about what kind of rack you want with or without a lapel. In the first case, the height that we determined is multiplied by four.
7 x 4 = 28 + 1 = 29- height with lapel -28 centimeters and one for 0.5 seams on both sides.
In the second case, the height is multiplied by two.
7 x 2 = 17 + 1 = 18- height without lapel 17 centimeters and one for the seams.
We draw and cut, but that's not all. If you sew it in this form, it will be wide on your neck, so that this does not happen, do this. Fold the material to its height and wrap it around the head, stretching it. Imagine that you are shooting a thing over your head and it should go through. Where the fabric connects, put chalk lines - here is the seam.

Correct it on the table and add 0.5 cm of allowance on each side. Everything is now cut out.
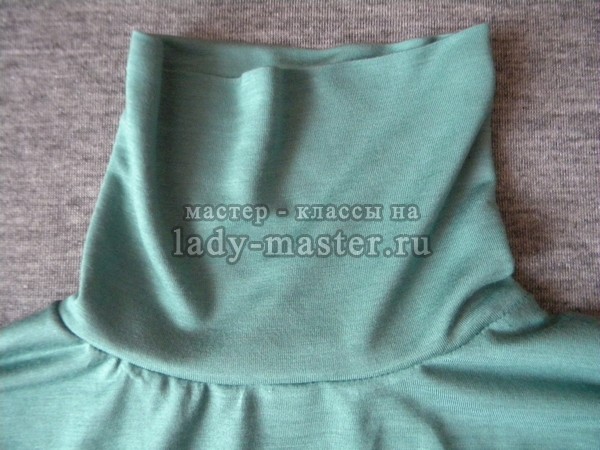
Sew on the neck
We fold the material along the length, grind and iron.

Then we bend it in height, joining the entire markup. Walk a little iron. The seam should be at the back. When you sew in the collar, pull it up to the size of the neckline, you let it in freely.

Then the same thing, first we sew everything that is stretched out, and then we smooth it on a sweater. This is how yours should look, without any landing.
To make it more clear to you how to sew a collar into the neck of a turtleneck, watch this video. In it, I showed this process in detail, step by step.
And in conclusion, I want to demonstrate my result.

I like the end result. Hope you like your result too. In addition to the article, I made a video on how to sew a turtleneck from knitwear, I hope it will help you finally understand this matter.
I wish you good luck, easy and pleasant sewing.


