Do-it-yourself cardboard animals. How to make various origami animals. What materials and tools are needed for origami classes
And again, voluminous paper crafts - forest animals: a hare, a fox, an owl, a monkey and a squirrel. The author illustrated very cute forest animals, the design is quite simple, but the model schemes themselves will still require some perseverance in assembly.
Gluing voluminous paper figures is very interesting and not difficult at all. Together with your children, you can collect and glue a lot of funny animals, and then populate a whole paper forest with them. In addition, it is useful for children to collect such models for the development of fine motor skills of hands.
Paper animal patterns
All children love to make, cut and glue funny crafts. But work on voluminous toys contributes to the development of the child's spatial thinking. I suggest joining the children and doing creative work with them.
Using ready-made schemes that can be downloaded on the Internet, it is easy to make many original volumetric figures of forest dwellers together with the guys. This entertainment will perfectly occupy the child and give many hours of useful and developing activities.
To perform such work, we need to download the diagrams and the assembly manual, print them on a color printer. Then, using scissors, cut out all the details and, according to the instructions that are attached, assemble and glue three-dimensional figures of animals or even a whole tree.
Let's start, perhaps, with the manufacture of a cunning fox out of paper.
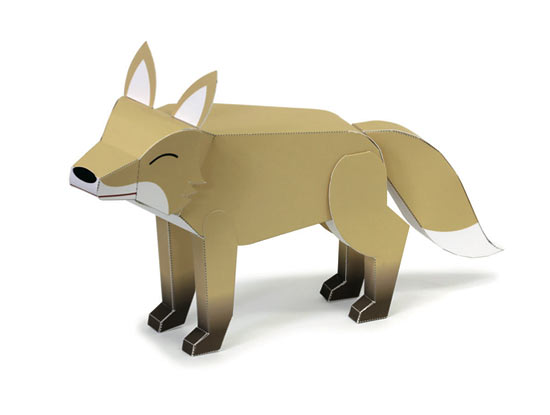
After we print the sheets with details, we take scissors and cut them out, taking into account the gluing allowances. Then we bend the parts along the dotted lines and glue them together according to the instructions and the diagram. We glue the ears, tail and as a result we get a real red cheat.
As we remember from fairy tales, the fox has always hunted a bunny and a paper bunny will keep our fox company.

The algorithm for creating a voluminous paper bunny craft is the same as when creating a fox. ,
print it out on a printer, cut it out, bend it along the marked lines, glue it and assemble the toy little animal.
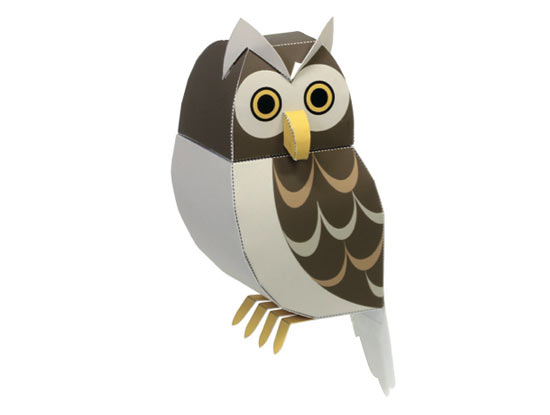
Not only the hare and the fox live in the forest, but also various birds. A voluminous paper bird is made in the same way,
And of course, what is a forest without trees? and assemble it as described above.

The ability to create paper figures will not be superfluous at all in life, especially if there are children.
Paper origami animals are the best children's toys, albeit short-lived. Such animals are able to decorate the house, becoming unique decorations, and the process of their creation can take even the most restless child for a long time.
In the absence of skill, you can start with a paper swan. This is the easiest DIY paper craft. You can also use other paper animal origami patterns.
First you can make a swan using one sheet of paper.
- To do this, take a sheet in the form of an even square and bend it in half obliquely.
- When the line has acquired sufficient clarity, the sheet is returned to its original state.
- Further, the parts of the paper that are below are brought to the created line.
- After that, the sheet is turned over, and the procedure is repeated. The bottom corners are brought to the line.
- The resulting figure is divided in half and the bottom corner is brought to the top.
- To make a swan head, the thinnest corner is bent down.
- Then the whole structure is again bent in half, but from its own side.
This is how the swan neck is formed. She rises, and her head is laid aside.
- To make the swan head more expressive, the inner folds unfold and fold along the fold lines.
- Then the fold of the beak is made - the bird is ready.
You can, of course, make not only swans. Today, there are various paper animal origami patterns for beginners.

Of course, this type of paper origami for beginners, when animals are made, is easier to create than volumetric paper animal origami for beginners, for example, the same swan, only created using modular technology. Such toys turn out to be very beautiful and interesting, for example, a hare or a toad, although they need to be folded for quite a long time, since each component is made separately, and subsequently fastened to each other.
Volumetric figures
To learn how to make 3D origami animals out of paper, you can search the Internet for a master class where people with experience show how to work in a modular style or provide diagrams.
There are many ready-made designs for a frog, wolf, dog, cat and many other animals. The whole process is described step by step. By strictly following the instructions, even a beginner can do such an activity.
A voluminous swan can be made using satin ribbons. The bird turns out to be very beautiful, elegant, most importantly, it will please the eyes much longer. But making a swan out of ribbons is incredibly difficult, as ribbons don't hold their shape like paper does.
Photo lessons for beginners with step-by-step instructions will help to make a three-dimensional animal.
From paper, you can not only fold animals, but also make a kite. This Chinese toy is very loved by children: they are happy to watch how the kite wriggles in the sky under the gusts of wind.

To make a kite, you need to have:
- For the frame - tubes or slats. Materials should not be heavy, otherwise the kite will not rise into the sky. Branches can also be adapted.
- Paper, cellophane, or a lightweight fabric is suitable for the surface material for the kite. They should be chosen based on the weather outside the window. If it is very windy outside, you can use a cloth, and if there is only a slight breeze, then paper or cellophane.
- You also need a coil. Anything that can be wrapped with rope will do.
- A strong thread or rope, as well as material for creating a tail.
The "monk" snake is very easy to make, and models of wild or domestic animals are made according to the same principle.
How to make origami paper animals, such as a snake? You will need a thick A4 sheet, PVA glue, threads and scissors.

Step-by-step instruction:
- A square is formed from a paper sheet.
- The square is bent diagonally. The longer side of the triangle is turned towards itself.
- The free corner of the triangle is pulled towards the fold to match the lines.
- Turn the craft over and repeat the process.
- The corner that has been released stretches to the previously outlined bend away from itself.
- Turn the craft over again and repeat the process.
- Then the very first bend should be straightened - the base is ready.
- A 30 cm thread is cut off, processed with glue and inserted into the resulting pockets. Until the thread dries, do not touch the toy.
To form the tail of a snake, you can take thin threads of 50 centimeters each. This is the most optimal flight length. Suitable thread for knitting. They need 5-6 pieces. Then the threads are tied into a brush. It should be fixed in such a way that the tail is at the tip. For fixing, glue and a piece of paper are used. A skein of thread is fixed for control - the toy is completed.
The simplest origami models are animal faces. Even children 3-4 years old can do them. The basis for such crafts is the basic form of origami "triangle". Explaining to children how to make a triangle, you can do without complex geometric terms. We simply fold a “kerchief” (actually a triangle) from a “handkerchief” (square). The muzzles folded from paper very vaguely resemble those animals that we make. Therefore, it is necessary to additionally decorate them - draw eyes, nose, mouth, etc. with felt-tip pens. If you are working with older children, then you can not draw details, but make an application.
Having made such faces, you can put them in an origami tower, send them on a journey on a fun train, make finger puppets or arrange a table paper theater.
Origami animal faces: cat.

Let's bend our triangle in half, outlining the center line. Then we unfold it again.


Let's flip the figure. Bend back the triangle at the top of the muzzle.


It remains to draw the details.

Origami animal faces: dog.
Let's add the basic shape "triangle".

Bend and then unfold the triangle, marking the center line.

Focusing on the center line, at an arbitrary angle, bend down the sides of the triangle, as shown in the photo.

Bend back the triangles from the bottom and top of the muzzle.

It remains to draw eyes and a nose with a felt-tip pen.

Origami animal faces: fox and wolf.

At an arbitrary angle, bend the edges from the center of the triangle upwards, as shown in the photo.

Let's flip the figure. The muzzle of the fox is ready. It remains only to draw the details.


The muzzle of an origami wolf is done in the same way, but from gray paper.

Origami animal faces: mouse and bear.
Now let's make the faces more complicated. Children 3-4 years old are unlikely to cope with these muzzles. But for 5-6 years just right.
Let's add the basic shape "triangle".

Let's fold the triangle in half.

Let's expand the triangle. Bend the corner as shown in the figure from the center of the figure (we marked the center in the previous step)

Let's bend the corner in the opposite direction. This is a mouse ear.

We will do the same for the second ear.

Let's flip the figure. Bend the triangle at the top of the muzzle back, as shown in the figure.


Fold back the corners of the mouse ears to make them more rounded. You can use scissors for this and round the ears.

Let's draw a muzzle.

The bear is made in almost the same way as the mouse. But we make the bear’s ears smaller (cut with scissors) and bend the triangle from below, forming a heavy bear jaw.

Origami animal faces: hare and frog.
Let's add the basic shape of a triangle.

Bend the triangle in half and straighten, outlining the center.

Fold the base of the triangle up.

Bend the small triangle at the top of the figure down.

Bend the bottom edges of the figure up, combining them with the center line.

Let's flip the figure. The muzzle of a hare from origami is ready.

Color the muzzle with felt-tip pens.

The frog is made in the same way as the hare. But you need to cut and round off the “ears” with scissors so that we get eyes. And from the bottom of the muzzle, we bend the triangle back - the muzzle will become more round.

Origami is the art of turning a sheet of paper into three-dimensional figures. For many, this seems like magic, because some do not understand how to stack flowers, animals and various cars. If you decide to comprehend the secrets of origami, you can watch a video where you will see how you can build figures of cats, dogs and birds. For example, such a funny goose can be made easily and simply:
If you have children, you can involve them in a joint origami lesson. After all, this is not only a pleasant pastime, but excellent gymnastics for the fingers and hands of a child. Making paper origami animals according to the patterns is easy, so the baby will be able to figure out with you how to fold the figures. In the future, he will not even need visual examples, he will automatically collect silhouettes using memory.
Children have a rich imagination, so they can complement the standard figures with a variety of elements. Origami helps children express their imagination and develop creative skills. So, let's start to figure out how to make animals out of paper.
Beginners do not need special materials. You need to take any paper and scissors. You can use not only office sheets, but also train on old newspapers, magazines, pieces of wallpaper. Crafts made from glossy sheets look more fun and your child will love it.
Origami animals: paper giraffe
Here is the product diagram:
- Take a square-shaped sheet and make a diagonal fold. Straighten.
- Connect the side corners along the diagonal fold line. Fold the workpiece in half along the previously made line (3, 4 steps).
- Lay the upper sharp corner and bend outward, fixing the folds.
- Form the head of the future African animal. In this case, the tip must be bent inward (7-9 steps).
- The tail must be hidden inside, stretching the tail.
- Cut out the legs with scissors. The giraffe is ready.
You can make animals out of paper by watching the videos in Russian offered in this article. So you will learn the correct terms that are used in the origami technique. If you do not have time to give your child a paper folding lesson, turn on a video clip for him.
The kid will try to repeat the actions of the master, and you will have some free time for your business.
Paper tiger
Here is a diagram of a paper tiger cub:

- Fold the square diagonally and straighten it.
- Bend the opposite corners and trim along the diagonal line.
- Bend the edges of the lower triangle slightly up (3, 4 steps).
- Bend the workpiece in half diagonally. Turn the corner out. Bend the top and straighten. Turn the corner towards you as shown in step 7.
- Lower the corner and press firmly. Fold the edge inward.
- From the side corners, form the ears by bending twice.
- Tuck the tail inward, pulling out a small corner. It remains to draw the eyes and mustache. The tiger is ready. To consolidate the material of the video lesson:
It is very fun to make paper origami: animals and birds in this technique are very similar to living ones. After all, then you can create a whole zoo for your child, where he will take his dolls.
Chick
Scheme for making a paper chicken:

- Bend the square in half diagonally.
- Center perpendicular sides.
- Bend the sides of the opposite triangle to the middle.
- Pull out the layer at bent corners and flatten. Tuck the corners up a little obliquely and press the tips outward (5-7 steps).
- Bend the workpiece in half and turn the triangle upside down. Bend the corner of the future chicken foot outward. Do this with the other foot (steps 8-9).
- Turn the left corner in and up. Form the head.
- Bend the tail as shown in steps 12 and 13. The result is a chicken.
Here is a video to help you:
Animals have a fairly simple folding scheme, so parents prefer to start teaching these figures to their children. In addition, children are happy to listen to such studies and fold a paper menagerie.
a lion
Elephant
Owl
Sea turtle
white-winged eagle
A great way to spend time with children in a fun and useful way is to engage in creativity together. Such games not only develop the child, but also bring you together. It is worth noting that creating various figures with your own hands is also useful for adults. Such original things will be able to decorate your home, and will also be a good gift for loved ones.
You can make a beautiful thing from almost any improvised materials. A master class with step-by-step production of animals will help you cope with the task of any complexity. Consider the most popular options.

Puff pastry
Everyone remembers very well how we loved to sculpt various figures from multi-colored plasticine in childhood. But there is an alternative to the chemical composition for modeling - this is salt dough. Such material for needlework is more convenient and safe.

Salt dough products will last for many years if properly processed. It is also worth noting that the price of the material is very low. Let's consider in detail what an animal can be made of.


To prepare the simplest version of the dough, you will need one glass of salt, one glass of water and three glasses of flour. It is better to purchase finely ground salt of the "Extra" category. Mix all the ingredients and knead the dough thoroughly.

Finished crafts must be dried. To do this, place them in the oven, set the minimum heating temperature and keep for several hours with the door slightly open.

Repeat this procedure for three days. Using this method, you can make crafts on the theme of animals of any complexity. Add food coloring to the dough if necessary. You can also color the finished product.

How to make animal figurines
When making a three-dimensional figurine from dough, it should be borne in mind that its size should not be significant. Thus, the dough can dry well.

If you need to make a larger figure, you should initially make a frame from wire, foil or other materials. The prepared frame is covered with dough and the necessary animal is formed.

The algorithm for making products from salt dough is the same. If necessary, you can use detailed instructions on how to make an animal. Initially, you need to make individual parts. Alternately fasten the parts of the animal's body, starting with the largest part.

We sculpt a pig
In order to make a piglet, you need an oval body. On one side, attach a small "pill" of dough, which will serve as a snout. And on the opposite side - the tail.


At the last stage, you need to cover the finished product with pink paint. Using a black marker, draw eyes and two dots on the snout.


Making a teddy bear
A cute teddy bear made with your own hands can be a wonderful gift. It is quite simple to make it, following the tips on the photo of crafts on the theme of animals.

From the prepared dough, form a round ball that will be used as a head. On it you need to fashion a muzzle and fix the ears.

Make an elongated body, front and rear legs of the animal, connect them together. To securely fasten the top and bottom of the product, you need a toothpick.


Insert a toothpick into the torso so that it replaces the neck and protrudes slightly above the surface. Fasten the bear's head on the protruding part of the toothpick.

To decorate the resulting figure, you can make a heart from salt dough, which is placed in the front paws of the bear. By placing a barrel of honey together with hearts, an ordinary bear will turn into the main character of the cartoon "Winnie the Pooh".

Using toilet paper rolls
To create original animals with your own hands, you can use any means at hand, as well as leftovers from household items. From ordinary bushings left over from a roll of toilet paper, you can make various toys.

To make a cute bunny, you will need a gray sleeve (can be painted), gray and pink cardboard, several bundles of straw, cotton wool.

A circle and two semicircles are cut out of a sheet of gray cardboard. They will serve as a head and paws for the product. Place the sleeve vertically, glue a circle on the lower base, at the bottom of which the paws are glued with the cuts of the circles down.


Next, you need to cut and glue two ears and a round nose from a sheet of pink cardboard. Glue some straws under the nose circle to make a mustache. Eyes for a bunny can be purchased at a needlework store or painted.

At the same level with the nose on the upper base, you need to glue the tail from a bunch of cotton wool. Such toy animals can be used as decorative coasters.

pom pom animals
The method of creating toys from pompons is popular among needlewomen. To make a pom pom you will need a sheet of cardboard, scissors and knitting threads (yarn).

From cardboard we cut out two identical circles with round holes, similar to a bagel. Fold the circles together and tightly wind the threads around their base.

Cut the threads along the top line, separate the rings a little and tie them with a thread in the middle. Pulling out the cardboard base, you will get a fluffy pompom.

From these blanks you can make different types of animals. The easiest way to make a caterpillar or a snake in this way. Fasten a row of pompoms with a thread, forming a chain. Attach the caterpillar's eyes, tongue or horns to the first pom-pom and the toy is ready. Many interesting options for crafts from pompons with a description of the rules for their manufacture can be found on the Internet.

Photo crafts animals


