Easy March 8th crafts for moms
The first month of spring comes unnoticed and immediately brings a lot of “concerns” for the male part of the population. After all, “on the nose” is the March 8th holiday! In connection with this significant date, there is a special rush in stores, because you need to have time to pick up gifts for your beloved mothers, grandmothers, sisters and colleagues. However, today, more and more often, handmade products are preferred as gifts for March 8th. When giving a woman such a gift, you can be sure of its “exclusivity”, as well as the quality of the craft - as a rule, famous needlewomen value their reputation. And with what pleasure children make surprise crafts for March 8th! Gifts made by children's hands carry a piece of the soul - a mother or grandmother will be extremely pleased to receive such a touching gift from her beloved child and grandson. So, how to make a gift for March 8th with your own hands? Today we have prepared for you several simple master classes with step-by-step photos on making a gift from sweets, paper, napkins and other available materials. Using our lessons, you can quickly make an original gift for your mother in kindergarten or school - here are educational materials for both very young children and schoolchildren. In addition, we recommend studying the master class on video from “Country of Masters,” one of the most famous sites about applied arts for adults and children. Following the advice of experienced needlewomen, a child can easily create a real masterpiece and please his mother with a wonderful gift on March 8th. Of course, at certain stages the kids will need help from their elders, but otherwise we wish you creative inspiration and success!
An original DIY gift for mom on March 8 made from napkins in kindergarten - a simple master class with step-by-step photos
Spring is a wonderful time of flowering, warmth, and the beginning of a new life cycle. And how many wonderful holidays we celebrate in the spring! Thus, the first “opens the season” on March 8, which both children and adults eagerly await. On the eve of the holiday, the kindergarten holds handicraft classes, where every child can make a beautiful gift for March 8 with their own hands for their beloved mother and grandmother. We bring to your attention a simple master class with step-by-step photos on how to create an original March 8 gift for your dearest and closest people. With the help of such a master class, you can make a beautiful delicate bouquet of roses for the holiday and present it to your mother or grandmother at a children's party.
Making a gift for March 8 for mom - materials and tools:
- white paper – A4 format
- white round openwork napkins
- colored napkins
- glue stick
- PVA glue
- stapler
- scissors
- ribbon for decoration
Step-by-step instructions for a master class for kindergarten - on creating a gift for mommy for March 8th, with photo:
- First you need to make packaging for future flowers - from a white openwork napkin, which needs to be folded in half. In this case, the folded area does not need to be smoothed too much, and the patterns should match as much as possible.
- Then fold it again.
- Unfold the napkin and cut out one quarter along the fold lines.
- Using scissors, make 4 to 5 identical cuts from the center of the napkin.
- The edges of the napkin need to be greased with a glue stick and glued together - in the form of a cone.
- We make a handle for the bouquet from white office paper. The sheet must be folded lengthwise, unfolded and cut into two halves.
- We roll up the resulting pieces of paper and fasten them with a glue stick.
- Now the paper roll needs to be inserted into the hole of the napkin cone - we glue the parts together with PVA glue. The result was packaging for a future bouquet.
- Let's start creating flowers. A napkin of any color (light, delicate shades are best - as in the photo) needs to be folded in half, and then again.
- Take a folded napkin and begin to twist it from the narrow side, giving it the shape of a bud.
- The finished flower must be stapled to maintain its shape.
- Cut a green napkin into 16 squares.
- Make a cut in the center of each square.
- The flower bud must be inserted into the cut and secured with a drop of glue. Forming green leaves. Thus, we get several pink flowers framed by sepals.
- Let's start assembling the bouquet. Each bud is lightly greased with PVA glue and placed inside the package. To make the bouquet beautiful and symmetrical, first place the flowers on the sides and then in the center.
- If there are empty spaces between the flowers, they need to be “camouflaged” with leaves from folded green squares. Photo 44
- All that remains is to tie the bouquet with a golden elegant ribbon and that’s it – you can give it to your mother or grandmother on March 8th! It is quite possible to give such a gift to kindergarten students, and in some cases a teacher will come to the aid of children’s hands.
How to make a gift for your mother on March 8 with your own hands from sweets - a step-by-step master class for kindergarten with photos
For every child, the March 8th holiday is an excellent opportunity to please their beloved mother with their good behavior and, of course, a touching gift. How to make a gift for mom on March 8 with your own hands? With the help of our step-by-step master class with photos, every child in kindergarten will be able to make a beautiful gift with their own hands - from their mother’s favorite sweets. The original presentation of “ordinary” sweets in the form of bright tulips will be remembered by mother or grandmother for a long time. A little patience and imagination - and you will get an unusual sweet bouquet as a gift for March 8th.
List of materials for the master class “Sweet bouquet of candies” for a gift on March 8:
- chocolate candies – 150 gr. (9 pcs.)
- wooden long skewers – 9 pcs.
- narrow tape
- double-sided adhesive tape
- corrugated paper – green and crimson
- scissors
A step-by-step description of a master class on making a candy bouquet for a gift to mom in honor of March 8, with photos:
- For such a surprise gift, it is better to choose large, but light in weight candies - for example, waffles or soufflés. The wrapper should match the color of the corrugated paper. First, each candy must be attached to a skewer with tape.
- We cut raspberry corrugated paper into strips (size 4 cm x 15 cm) in the amount of 27 pieces. Each “tulip” will have three petals, and you should get 9 flowers in total.
- We cut out leaves from green paper - 9 pieces, the size of each strip is 2 cm x 25 cm.
- Take a roll of green corrugated paper and cut a 1cm strip to wrap around the stems of the flowers.
- Let's start creating our festive “tulips”. The cut raspberry strip needs to be twisted twice in the middle.
- Now we fold each strip in half and carefully stretch it, giving the petal volume and convexity. The result is 27 petals.
- We begin to form a flower - we attach three petals to a skewer with candy, in the form of a tulip bud. For reliability, the base of the petals should be wrapped with tape.
- We wrap a long strip of green paper around the stem of the flower, firmly fastening its ends with double-sided tape. Do the same manipulations with the rest of the tulips.
- A strip of green paper for leaves must be twisted in the center, then folded in half and pressed into the desired shape with your fingers.
- We glue a piece of double-sided adhesive tape to the bottom edge of each sheet, trying to fix both layers of the strip together.
DIY gift for March 8th for school - quickly and beautifully, master class with photos
With the onset of spring, the nature around us transforms, and the aroma of freshness and warmth fills the air. Cheerful children's laughter can be heard on the streets, birds chirp, and from the blue sky the sun generously distributes its rays. In the first days of spring, everyone is preparing for one of the most favorite holidays - March 8th. What to give to your mother or grandmother on March 8? We have put together an interesting master class with photos for elementary schools on making a DIY gift for International Women's Day - a postcard with a teddy bear. Simple, fast and beautiful!
Necessary materials for the master class “Postcard for Mom on March 8th”:
- paper for printing
- double-sided tape
- scissors
- decorative elements
Making a gift for the holiday of March 8th at school using a master class with step-by-step photos:

A beautiful gift for March 8th with your own hands from paper at school - master class with photos step by step
It has long been known that the best gift for a woman is flowers. Therefore, by March 8, it will be nice for your mother or grandmother to receive beautiful paper flowers made by children's hands as a gift. Our master class on making a gift for March 8th with step-by-step photos is intended for elementary school children. However, it is quite possible to conduct such a wonderful lesson in kindergarten - with the help of teachers, the kids will cope quite well, pleasing their mother and grandmother with a touching gift on their holiday.
We are stocking up on materials for a master class on making a March 8 gift for school:
- office paper - pink, green, yellow
- glue stick
- template - for flower petals
- scissors
We make a paper flower with our own hands according to a master class for school, step by step with photos:

Such a beautiful paper flower will be an excellent gift on March 8th for your beloved mother and grandmother.
A touching gift for grandmother on March 8th with your own hands - master class on video for kindergarten, step by step
For the holiday of March 8, even the smallest child will be able to make a gift for his grandmother with his own hands - with the help of our video master class. Such a festive “eight” from a beloved grandson or granddaughter will touch every grandmother.
Video tutorial on making a gift card in honor of March 8th:
Master class from the “Country of Masters” - a do-it-yourself gift for the March 8 holiday for school, video
The famous website “Country of Masters” presents wonderful master classes from many experienced needlewomen. Thanks to a simple description and detailed step-by-step instructions, such a gift for mother and grandmother on March 8 can be made at a labor lesson at school or even in the preparatory group of a kindergarten.
Figure-eight magnet using the Kanzashi technique, for a gift on March 8:
How to make an original gift for March 8th with your own hands? Here you will find the simplest master classes with step-by-step photos on creating beautiful gifts for March 8th in kindergarten and school - from sweets, paper, napkins. We recommend that you pay attention to the video tutorial from the “Country of Masters”, where the author tells and shows the secrets of quickly making a beautiful gift in the shape of a figure eight. Such gifts can be presented to mothers and grandmothers on March 8th - from their beloved children and grandchildren!
As a rule, all children, under the guidance of teachers, make crafts for March 8th in kindergarten. The materials will be useful for children in the primary, secondary and preparatory kindergarten groups.
However, if for some reason the baby does not become part of a large children's group, he can make a surprise at home if one of the elders helps him with this.
To create an impressive craft for mom with your own hands, you can turn any detail that is at hand into an original and beautiful souvenir or postcard.
Card with chamomile for March 8
For March 8th, you can make a charming card with daisies. We make the base of the card by folding a pink sheet of cardboard in half. Glue a green circle to the front of the card. To make daisy petals, we need thin strips of paper, which we twist with a stick or pencil.

Glue the twisted strips onto the green circle. We decorate the center of the circle with a twisted curl of yellow paper. We have the first daisy - the upper part of the future eight.

We frame the outline of the bottom of the figure eight with green leaves. Glue a small chamomile onto each of the leaves. We make small daisies in the same way as a large one, only we fold the paper strips in half. We complement the craft with yellow flowers. Postcard for March 8th - ready!

Postcard with a paper tulip
You can make a very beautiful postcard with a voluminous tulip from colored paper. Cut out a circle from yellow paper.

Fold the green paper in half and draw half a leaf on the fold. When cutting out, we get an even leaf with the center on the fold. For the postcard we need two leaves.

Fold a sheet of red cardboard in half - this is the base of the postcard. Cut out tulips from pink paper.

We fold the yellow circle around the edges. We glue the pink paper blanks together to form a three-dimensional tulip flower.

Glue green leaves and a tulip flower to the top of the yellow blank. We cut out a narrow strip of green paper, which we twist into a spiral. The green paper strip will curl into a graceful curl.

Glue the curl to the bouquet. Glue the bouquet onto a cardboard base. A postcard with a voluminous tulip for March 8 is ready!

Bouquet with tulips for March 8
Flowers and tulip petals can be glued onto the paper parcel itself. We fold the bundle along the edges, forming a paper bouquet. We glue ribbons to the edges of the package and tie them with a bow. We got a simple and beautiful bouquet.

How many children there are, so many options for making a paper bouquet for March 8th. You can put together a real exhibition in honor of mothers!

Postcard with a picture for March 8
A stunning postcard for March 8th can be cut out of paper. Fold the album sheet three times. We cut out a figure eight on one of the parts, and cover the other two parts with a floral pattern.

We color the card in delicate pink and lilac tones.

After the paint has dried, we decorate the craft with patterns made with a silver helium pen. When all three parts are folded in front of us we will have a very beautiful postcard for March 8th!

Postcard with "eight" (with a surprise)


Postcard with "eight" (with a surprise)
Crafts with the “eight” for March 8
The classic version of the craft for March 8th in kindergarten is a figure eight made of paper. We cut out the base of the craft with a stand from thick cardboard.

We glue the stand and decorate the figure eight with patterns and flowers.

Another craft for the smallest kids is the “Eight” applique. The teacher cuts out figure eights in advance and prepares decorations from thin paper. The kids’ task is to glue the decorations onto the figure eight, trying to do it neatly and evenly.

Figure eight applique
From ordinary and metallized cardboard you can make very simple but colorful crafts “Basket with tulips” and “Tulips applique”.

Crafts for March 8 with flowers and bouquets
You can glue together a luxurious spring bouquet from colored paper folded like an accordion.

Using green and red paper you can create a spectacular “tulip” applique.

You can also make paper flowers out of a button. Such a bouquet will become especially original if you place it in a voluminous palm. To do this, we outline our hand, cut it out, glue only the base, on top of it - flowers, which we cover on top with our fingers.

Using the same principle, you can make the entire picture out of paper. And if you glue the fingers first, the brush will turn the other side.

You can turn cotton pads into equally impressive calla lilies. We make the stem from a cocktail straw, the core from a cotton swab, one tip of which is painted yellow. We wrap the core with a cotton pad and the stem with a wide sheet of paper. The flower is ready!

You can make a whole bouquet out of kaal and corrugated paper.

Cocktail straws are great for using as stems and for creating paper flowers, which make a beautiful bouquet when wrapped in wrapping paper.


An incredibly beautiful craft for your beloved mother - “ “.

Postcards for March 8th to kindergarten
A very beautiful craft for March 8th can be a postcard decorated with a tulip using the origami technique.

Folded burgundy paper makes spectacular roses. By placing the roses on the heart we will get a wonderful postcard for March 8th.

A lovely card with a heart can be made from colored paper. We make the bottom part of the card, not forgetting to write a confession for our beloved mother.

We decorate the top part of the card, decorating it with lace and flowers. We put a rivet or brad, allowing the card to open and close.

Paper card "heart"
Postcard for March 8 (with movable part)
A postcard with .

Heart with roses and ribbon
It’s very interesting to see a heart panel with roses. We fold the roses themselves using a stapler or glue according to the pattern.

Cut out a heart from red paper and make many holes around its perimeter. We insert the ribbon into the holes, processing the edge of the heart.

We glue the stems with leaves, as well as the roses themselves, to the heart, forming a festive bouquet. Glue a ribbon bow at the bottom. Panel with roses for March 8th - ready!

A very beautiful heart-shaped card can be made using the popular scrapbooking technique. The base of the card is a heart made from special textured paper with a print. The scrapbooking technique is characterized by volume and layering. Some of the card decorations you can find at home, and some you can buy in scrapbooking kits. Anything will do: figurines, flowers, ribbons, paper cutouts and pictures.

We place all the details of the craft on the base, trying to give the composition a finished, beautiful look. Scrapbooking postcard in the shape of a heart - ready!

There is another option for a luxurious postcard for March 8 using the scrapbooking technique. We make the base of the cardboard card. Cut out the front side from colored paper with a print. It should be 3-5 millimeters smaller than the cardboard base on each side.

Glue the ribbon along the card. We glue openwork paper figures, flowers and a congratulatory inscription to the front side. Some things you can cut out yourself, and some you can find in special scrapbooking kits. Postcard for March 8th - ready!

Craft for March 8th from corrugated paper
From paper and cardboard you can make a very impressive three-dimensional application for March 8th “flowers in a vase”. Cut out a vase from blue cardboard.

Glue flowers from corrugated paper.


A very beautiful three-dimensional applique for March 8th is made from yellow corrugated paper. We form a flower bud from yellow paper.

The buds rolled from yellow paper are wrapped in green paper. Green paper is rolled into a thin tube. We get a flower and a stem.

The flower is complemented by green leaves and attached to a round cardboard base. Volume applique for March 8th - ready!

You can make a three-dimensional card with a whole bouquet of flowers from corrugated paper.

Sweet crafts for March 8
The craft “bouquet of lollipops” looks interesting. Decorate the lollipops with paper flowers. We fix the sticks in a transparent plastic cup using plasticine. Those with a sweet tooth will surely enjoy crafts made from candies for March 8th. You can put paper flowers on lollipops and place them in a pot of plasticine.

You can use chocolate candies instead of lollipops for crafts. They will need to be pierced with a thin stick, which we will fix in the pot. We wrap the candies in corrugated paper and secure with glue. A luxurious bouquet of sweets for March 8th is ready!

Another lovely and delicious craft for March 8th “Heart made of candies”. It’s not at all difficult to make, and the result is tasty and beautiful. For a detailed master class, see ““.

Watch the video on how to make a beautiful bouquet of purple tulips candies
Craft for March 8th “Flower stand”
A very bright and interesting craft for March 8th is a “flower stand”. To make it, fold a green sheet of paper in half and make cuts of different lengths on it.

We glue the cut green leaf onto the base - an ordinary sheet of cardboard folded in half. We glue some of the protrusions onto the base, and bend some of the protrusions in the opposite direction (we do not apply glue to them).

Glue flowers onto the curved protrusions. We decorate the back and bottom of the craft with flowers, butterflies and congratulatory inscriptions.

Eight of ribbons - a gift for mothers and grandmothers
A very bright and beautiful craft for March 8th - a figure of eight made from ribbons. It is very easy to make, but looks very impressive and festive. First, cut out a figure eight from paper or cardboard.

We wrap the figure eight with pink ribbon of medium width “overlapping”. Fix the ribbon with glue.

When the entire figure eight is wrapped, we make a pendant loop in the upper part. From folded pieces of glued green and scarlet ribbons we get a festive bouquet. Eight of ribbons as a gift for mom - ready!

Bouquet of felt tulips for March 8
A very beautiful soft bouquet of tulips for March 8 can be made from felt. You can find a template for cutting out a tulip at the end of the article. For each flower, cut out two parts for the bud, two parts for the leaf and two parts for the stem.

Sew together the parts of the stem and bud. We leave one of the ends of the stem and bud unsewn and fill them with padding polyester. We insert the stem into the bud and sew them up with a hidden seam.

We sew together the parts of the leaf and sew it to the stem. We make several of these flowers. We made a charming spring bouquet for March 8th from felt!

You can make a beautiful bouquet of violets for March 8 from felt and thick drape. We make the pot stand from dense brown material rolled into a roll. Such flowers will never wither and will delight you for a very long time.

Craft for March 8 - painting from salt dough "Roses"
With the help of adults, you can make a very beautiful wall panel from salt dough. To do this, mix the dough with green and red paint. To prevent the dough from crumbling, add PVA glue when kneading. We prepare the base of the craft - a frame with thick cardboard. We start by making green leaves, which we glue onto cardboard.

We make narrow strips of red dough, which we then twist into buds.

We frame the buds with petals made of salt dough - we should get quite lush flowers. We leave the two buds as they are and glue them to the base in the same way, adding a small stem of green dough. We will get a wonderful picture with bright colorful flowers.

Ideas for crafts for March 8 from different materials.
Plasticine and a disk make a wonderful “Spring Rose” applique.


Any mother will surely love the elegant rhinestone “shoe” applique.

A very bright and simple craft is made from colored foam rubber (you can use a dishwashing sponge). To do this, we glue cardboard leaves onto the CD and place a foam rubber “figure eight” on top. The craft can be complemented with shiny rhinestones, beads or other decorations. Children in the preparatory group of kindergarten will be able to make such a craft.

Another beautiful applique with a figure eight is made from painted pasta.

You can make a luxurious applique of red and white buttons as a gift for your mother on March 8th. We cut out the base for the vase from white paper. Decorate the vase with white or transparent buttons. We draw the branches with a black pen. We decorate the branches with red buttons. The bouquet looks interesting if the red buttons are of different sizes and shapes.

An incredibly beautiful and delicate craft for March 8, “a bouquet of daisies,” is made from a very unusual material - plastic bottles.

Drawing “Mom on March 8”
There will probably be talented artists among us who can draw a beautiful portrait for my mother. First, we make a pencil sketch.

Pencil drawing of "mom"
Then we fill the drawing with color. You can find a detailed master class.

Drawing "mom" with paints
DIY drawings for March 8th (ideas from the Internet)


Template for cutting out “card heart”
Crafts for March 8th in kindergarten reviews:
Mommy is beautifully drawn, but I will never draw it like that))) (Sasha)
International Women's Day on March 8th is approaching, I would like to express my love, respect and gratitude to my mother. The best way to please your mother on this day is to give a good gift from the heart, made with your own hands. In this article we have selected the best gift ideas for mom on March 8th.
You will need: colored paper, scissors, glue.
Master Class

creative indoor flower

You will need: pot, foam, skewers, artificial grass, glue gun, candy bars, chewing gum, gift cards, etc...
Master Class

The creative indoor flower is ready!
Coffee mug

You will need: mug, coffee beans, cotton pads, thick white thread, brown acrylic paint, superglue.

Master Class

Coffee heart

You will need: coffee beans, paper, wire, thread, glue, cardboard, jute thread, sponge, iron can, brown paint, ice cream sticks, decorative elements - flowers, ribbons...
Master Class

The coffee heart is ready!
Ship made of money

You will need: 7 sheets of A4 format with images of different banknotes (euro, dollars, hryvnia, rubles), white sheets of A4 format, silicate glue, scissors, glue gun, thick cotton threads, skewers 20-30 cm long, polystyrene foam, a flat box of half as wide as the bottom of the ship.

Master Class
- Fold a boat from a sheet of paper as shown in the photo.

- Carefully turn the boat inside out so as not to tear it.
- Fold and iron the boat.
- Trace the outline of the boat on another sheet, then draw a dividing line and cut out 2 parts.

- Coat them well with glue and glue them to the inside of the boat to make two-layer sides.
- Cut the money sheets into 1.5 cm wide strips.

- Cover the boat with money stripes.
- Carefully coat the entire boat with glue for strength and leave for 2 hours to dry completely.
- Place identical bills side by side and glue them together. Make 3 of these - from five, from three, and from four bills. These will be the sails.

- Carefully thread the sails onto skewers and secure the joints with glue so that they do not slip.
- Take the boat and glue 3 pieces of foam inside.
- Insert skewers into the foam for the front and back yard. The front yard should be 1/3 longer than the back. Make sure the lines are level, then secure with a glue gun.
- Insert skewers with sails, placing them at the same distance. It is worth noting that the deck should be smaller than the stern.

- Fold the threads in 2-3 layers along the length of the sail and additional centimeters for the ties.
- Tie the threads to the skewers as shown in the photo.
- Cut 2 bills diagonally and fold the edges 0.4 cm.
- Glue the bills (sails) to the raking threads.

- Make sails on the stern in this way: do not twist the bill into a tube too much, bend the edge, then glue it.
- Fold 3 bills in half, shape them into flags, then glue them.
- Cover the deck with bills.

- Make a stand for the ship from a flat box.
- Glue the desired background onto the box.
- Glue the ship.
Vase from a bottle
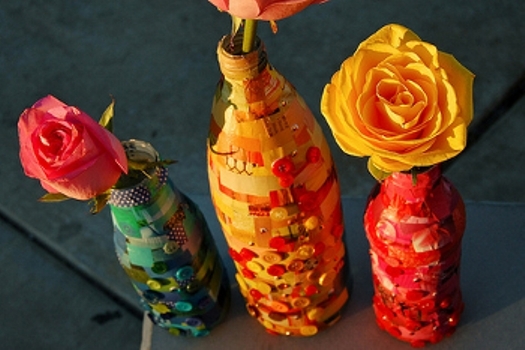
You will need: glass or plastic bottle, magazine, PVA glue, decorative elements (beads, buttons, sparkles...).
Master Class


You will need: a transparent glass, a ball, scissors, markers, a sheet of white paper, glue.
Master Class
- Cut the ball in half along the wide side.
- Pull the ball onto the glass so that the hole is centered and pointing down.
- Draw a cute picture, cut it out and stick it on the glass.

You will need: tin can, wooden clothespins, flowers, water, hearts for decoration.
Master Class


You will need: a sheet of paper 100x15 cm or glue A4 sheets together, 2 thick sticks, felt-tip pens, tape.
Master Class

Bookmark "Nibbler"

You will need: cardboard template, scissors, glue, decorative elements - felt-tip pens, paints, buttons, beads, glitter...
Master Class

We present to your attention original and creative gift packaging! You can put sweets, magnets, jewelry, money and other small gifts inside them.
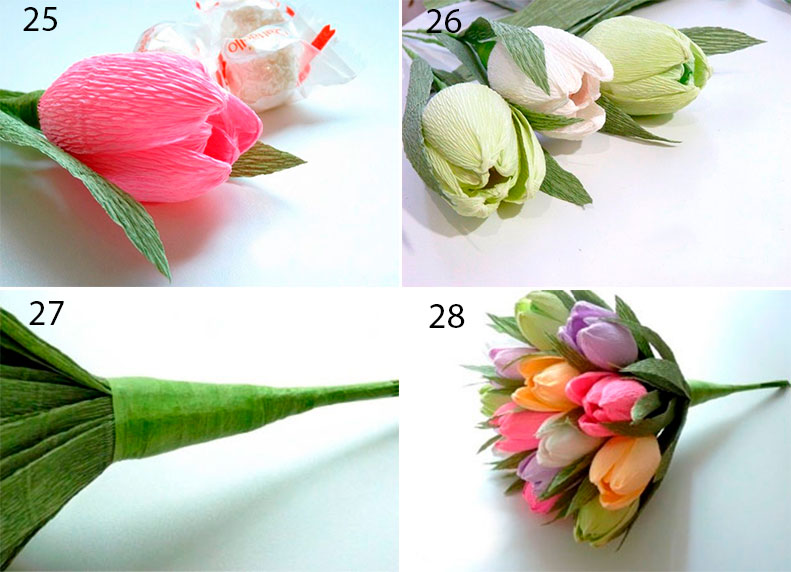
Candy tulips

You will need: corrugated paper of favorite colors for buds, green corrugated paper for leaves, Raffaello candies, double-sided thin tape, green tape, satin ribbon, packaging material for a bouquet, scissors, wire, pliers, a wooden stick, optionally, transparent beads to create dew , glue gun, tweezers.
Master Class
- Prepare the wire by making the required number of stems of equal length.

- Cut long strips of corrugated paper, cut the long strip of corrugated paper into 2 pieces, then cut into 4 pieces. You should get 8 strips, 6 of them will be needed for the tulip bud.
- Turn each strip over the center, folding it so that the right sides of the strip are pointing in the same direction.

- Make 6 blanks in the same way.
- Attach double-sided tape to the tip of the wire.

- Attach the candy to the tip of the wire.
- Assemble a tulip bud in this way: take the first petal and attach it to tape. Place the second and third petals near the candy and, holding them with your fingers, secure them with tape.

- Attach the remaining petals in the same way, forming a tulip bud and securing with tape.
- Trim the excess ends of the crepe paper at an angle at the base of the bud.
- Wrap the stem with tape.

- Cut a strip of green crepe paper.
- Cut into two almost equal parts.
- Fold each part 4 times and cut out the leaves.
- Pull each leaf out in a spiral using a wooden stick.

- Place a short leaf and a longer one below. Secure each leaf with tape. The tulip is ready! Make the required number of tulips of different colors.
- Assemble tulips into a bouquet in this way: connect 2 tulips and tie them with tape, then add one tulip at a time, placing the colors in a checkerboard pattern.
- Cut 20 leaves and place them around the perimeter of the bouquet, securing with tape.
- Wrap the bouquet in wrapping paper and tie with ribbon.

- Create dew drops on tulip buds by gluing clear beads using tweezers and hot glue.
Spectacular bracelet made of ribbon and beads
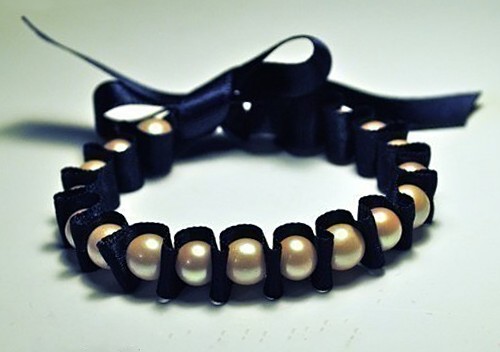
You will need: ribbon, beads, thread and needle.
Master Class


You will need: a cardboard template, scissors, decorative elements - felt-tip pens, paints, buttons, beads, glitter, ribbons...
Master Class


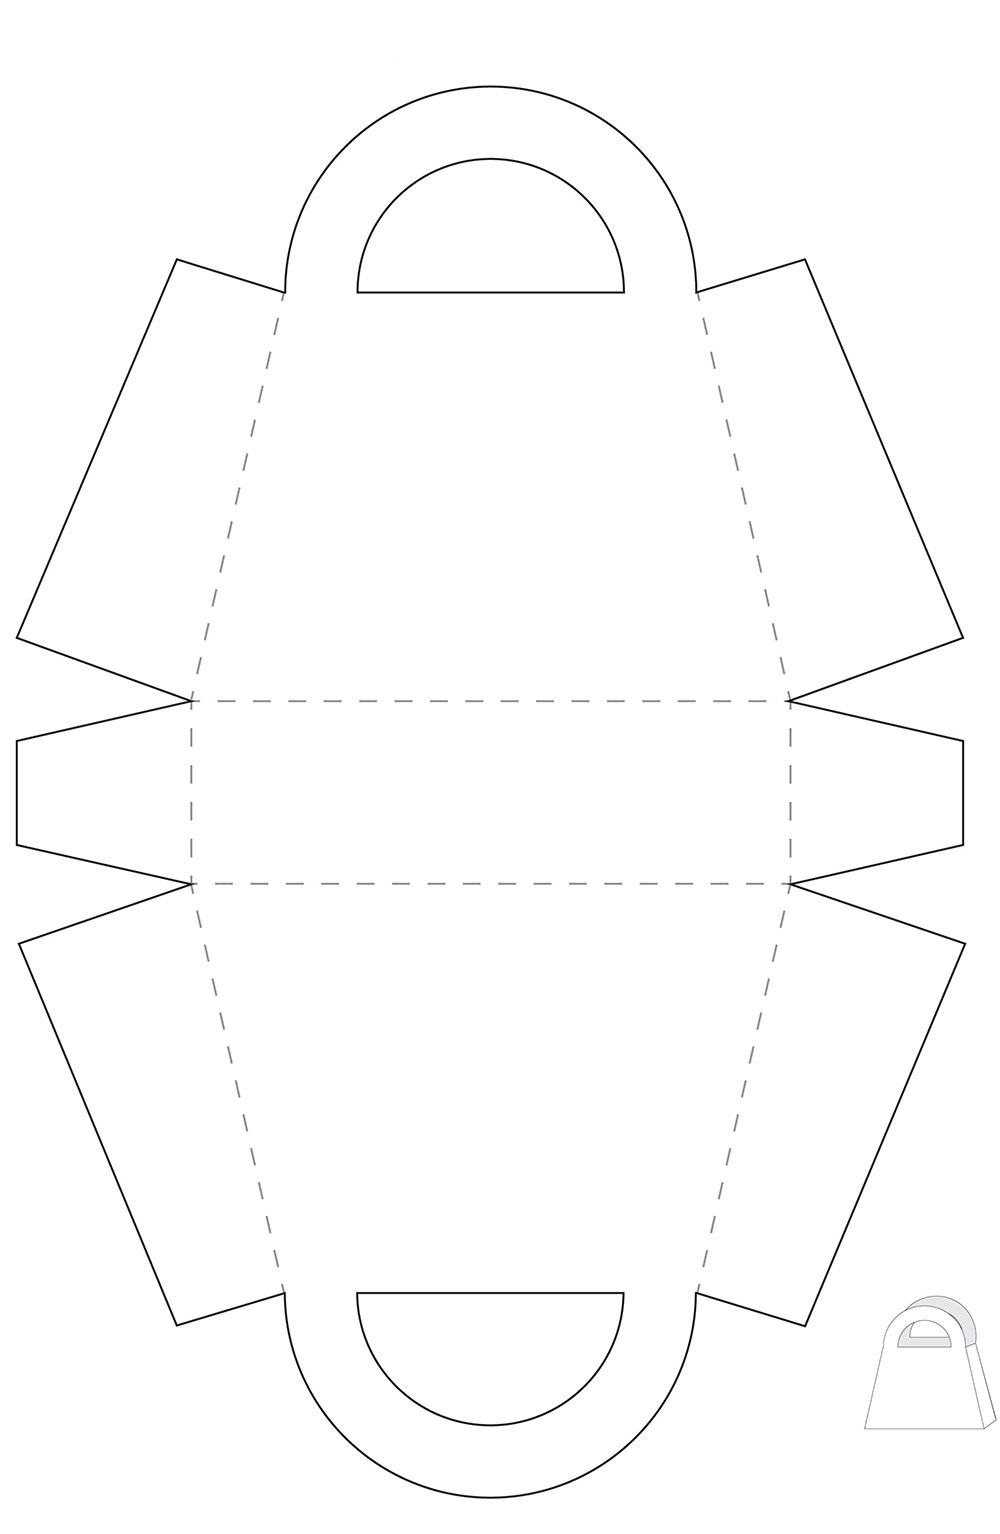
You will need: a printed bag template (listed below) or a redrawn one, scissors, decorative elements - felt-tip pens, paints, buttons, beads, ribbons, glitter...
Master Class
Paper shoes

You will need: a printed shoe template (listed below) or a redrawn one, scissors, glue, decorative elements - felt-tip pens, paints, buttons, beads, glitter...
Master Class

Paper cake
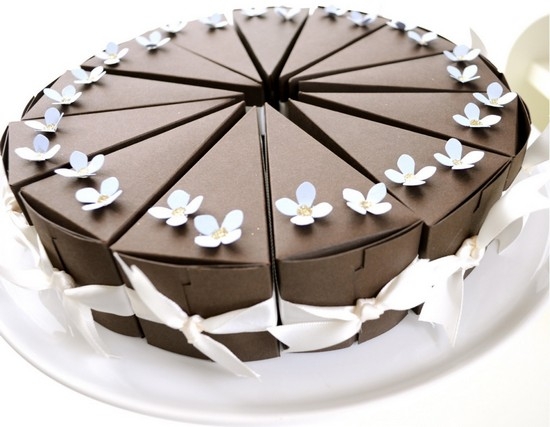
You will need: cardboard template, scissors, decorative elements - felt-tip pens, paints, buttons, beads, glitter...
Master Class

Head wreath made of foamiran

You will need: foamiran 0.5 cm thick (orange, yellow, cream, light green, dark green and red), scissors, toothpick, curly scissors, oil paint in autumn shades, sponge, sheet of paper, iron, floral wire, ruler, super glue, lighter, lilac clay (for blueberries) or beads, tape, foil, wire at least 2 mm thick and 60 cm long, ribbon or string, mold (leaf shape).
Master Class
- Print or draw leaf templates, then cut them out.
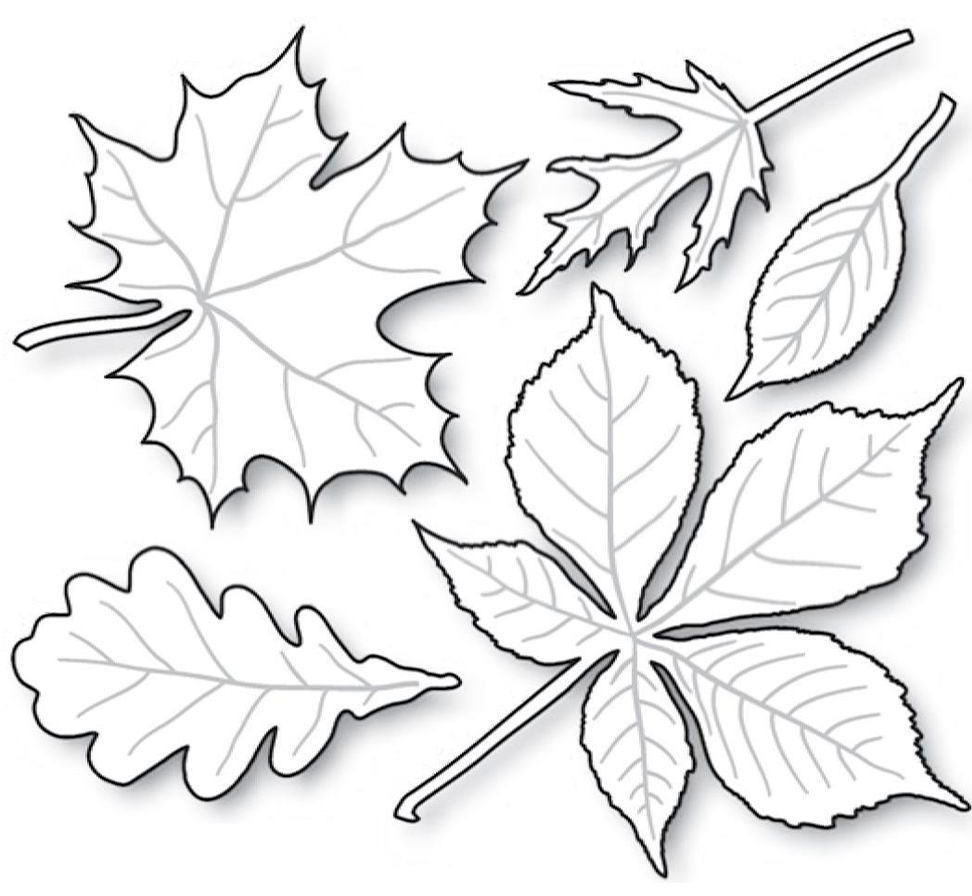
- Trace the templates onto foamiran with a toothpick, then cut them out.
- Make a sufficient number of multi-colored leaves, for example 60, remember, the more there are, the more magnificent and beautiful the wreath will look.

- Add realism to some of the leaves by trimming the edges with scissors.
- Scratch a small part of the leaves with a toothpick.
- Tint the leaves in this way: apply a little oil paint to the sponge, blot a sheet of foamiran, then remove the excess with a piece of paper.

- Combining colors: color the yellow foamiran leaf with light green and brown paint. Also, color some yellow leaves with orange, red and light green paint. Tint red leaves with brown, green leaves with burgundy, brown and dark green.

- Preheat the iron on the second setting, apply the sheet for 2 seconds, remove it and press it onto the mold to make an impression of the sheet. Repeat this process with all the leaves. Please note that this should be done quickly and very carefully, as foamiran is highly flammable. If you are new to this business, it is better to skip this point and proceed further.

- Cut the floral wire into 7 cm long pieces and make a loop at the end.
- Glue the floral wire to the front side of each leaf using super glue.

- Treat the edges of the leaf with fire using a lighter. The edges should be realistically curved. Repeat this process with all the leaves. Do this carefully, I remind you that foamiran is highly flammable.

- Roll a ball of purple clay the size of a blueberry. Make 15 berries, place each blueberry on a wire with a loop coated with super glue. Using the tips of a pair of scissors, score the tops of the blueberries and set aside to dry. Beads can be used as blueberries.

- Start assembling the wreath in this way: form small bouquets of leaves and berries, secure them with tape.
- Cut rose petals in the shape of a drop from red foamiran. One bud will require 10-15 petals. The number of buds depends on your desire; you can make from 3 to 7.

- Tint the edges of the petals with brown oil paint.
- Make the petals thinner in this way: heat the petal on the iron for 2 seconds, then fold it into an accordion and rub the petal with your fingers. Open the petal and create an indentation and curl the edge of the petal outward. Repeat this process with all the petals.

- Finish the edges of the petals using a lighter.
- Roll up a foil drop, make a loop on the wire, apply super glue and put on the foil drop.
- Glue 2 petals opposite each other and form a bud by gluing the petals in a checkerboard pattern, opening the flower slightly. Form the desired number of roses in the same way.
- Make the base for the wreath by cutting 60 cm of wire. Make loops at the ends.

- Cut the tape into 15 cm long pieces, fold each piece with the sticky side inward and cut lengthwise into 2 halves.
- Open the end of the tape, apply it to the base 10 cm from the edge and wrap the wire around it.
- Attach bouquets of leaves and berries, securing with tape.

- Weave them in the order you like best.
- Don't forget to insert roses in the spaces between the leaves.
- Attach a string or ribbon to the ends of the wreath.
Book safe

You will need: book with hard cover, pva glue, water, stationery knife, brush, pencil, ruler.

Master Class

Salt dough pendant

You will need: salt dough, glass, acrylic paints, glitter, brush, ribbon for hanging, cocktail tube, dog's paw for imprinting on the dough or your fingers, transparent glue, rolling pin.
Master Class

Cup made using papier-mâché technique

You will need: cardboard, scissors, newspaper sheets, tape, PVA glue, brush, paints, clear manicure polish.
Master Class

A holiday card can be a gift on its own, or it can be an addition to one already chosen. Children love to paint these cards; they will do them with the help of adults.
Adults should be involved in the process of preparing a child's holiday gift. This way the child can lead by example. Any creative ideas are suitable for a gift. Any ready-made examples can be decorated or supplemented with something in order to create something of your own.
A preschooler can also prepare crafts for mothers on March 8 with their own hands. Give him the idea to trace his palm. And although this is not at all difficult, a mother will be pleased to receive just such a gift from her son or daughter.
Older children can make paper appliqués. The result will be a very good, beautiful applique.


Crafts Paper flowers
The eighth of March without flowers is not a holiday. Of course, dad can congratulate mom with a bouquet of tulips. What should a child do? And he can prepare paper flowers for the holiday. It’s very nice to receive homemade flowers for the holiday.
The easiest way is to make a tulip from paper. All preschoolers can cut such a flower. Older children can cut out original origami from paper. All you need for this is a square sheet of colored paper. 


Flowers from scrap materials
In order to make holiday flowers, you can take more than just paper. Any available material will work perfectly. The most common are plastic bottles. There are probably a lot of them in any home.
In order to make original flower petals, you can use the bottom of a bottle. It can be painted in any bright color. The stem and leaves are also cut out of plastic.


Spring snowdrops are prepared from green plasticine, wire and pumpkin seeds. It is very easy to attach such seeds to plasticine using wire. And beautiful spring flowers are made from yarn and twigs. To do this, the yarn is turned into pompoms: the more intricate their shape, the more beautiful the flowers will be.
Flowers made from buttons will also be unusual. They will be bright if the “raw materials” are multi-colored. Just a few buttons are enough to make a beautiful bouquet.


DIY vases for mothers on March 8
You can also make a beautiful vase from scrap materials. What would it be like without her? After all, the baby can put his simple bouquet there, but made from the bottom of his heart.
A vase can be made from many materials. Best suited for this:
- Glass bottle;
- Plastic bottle;
- Paper or cardboard;
- Tin cans (or glass).
The easiest to make is paper wool. For decoration, it can be covered with multi-colored corrugated paper.
If we use glass materials, they must be transparent or translucent. If you glue corrugated paper to such a bottle, you will get a wonderful vase. It can also be varnished. You should choose light, spring colors for the paper.
When making vases from bottles, you can fill them with scraps of paper. So they will not only be colorful, but also voluminous. And on the bottle itself you can stick any image you like - for example, from a postcard.


And finally, you need to give crafts by March 8 sincerely, from the bottom of your heart. This will definitely create a festive atmosphere!
The arrival of spring in itself is long-awaited and evokes joyful feelings. And the presence of a gentle and beautiful women's holiday this season - March 8 - evokes even more positive emotions! Flowers and sweets are sold everywhere, there are long lines in shops, not only in those that sell cosmetics and jewelry, but also in craft stores. After all, it’s no secret that giving gifts is very pleasant, and if they are made with your own hands, then it’s doubly pleasant. Such a gift will definitely be unique and memorable.
In this master class I will show 10 options on how to make crafts for March 8th with your own hands with step-by-step unique photos. Such crafts will be a wonderful gift for your mother, grandmother, friend or colleague.
The spring women's holiday involves the presentation of gifts to all representatives of the fair sex. We have been following this tradition since childhood, when we started giving gifts to our mothers and grandmothers in kindergartens. After all, a gift made by children's hands is always highly valued and evokes only positive emotions.
At the same time, the process of making such gifts has a beneficial effect on the child himself, since it develops fine motor skills in his hands, promotes imagination and creative self-realization.
DIY crafts for mom on March 8
Sweet gift - candy grapes
In this master class we will make such a sweet gift.

For this we need:
- candies;
- wire;
- scotch;
- scissors and pliers;
- artificial grape leaves.

To give the candy the shape of a grape, use double-sided tape to glue one tail to the candy.


Using pliers, make a loop on the wire and screw on the candy.

Secure with tape.


We begin to collect 3-4-5 candies into a bunch.


Now we begin to collect a bunch of grapes.

We wrap the twig with green adhesive tape.


We attach the leaves.

All that remains is to decorate our gift - a low-tall basket is best for this.


Our candy grapes are ready!

Box “Dear Mommy” using decoupage technique
You can make such a box with your own hands as a gift for your mother using the decoupage technique. It is necessary to prepare suitable decoupage cards or napkins in advance.

We will need an empty box, we took a metal tea box.

We cover it with acrylic primer.

These decoupage cards can be ordered online.

We tear the map into uneven fragments.

Place it in water for a few seconds.

We transfer it to a transparent film (file) face down.

And carefully apply it to the box.

Cover the top with a brush with PVA glue.


When the box is dry, coat it with clear varnish.


Chocolate maker “To Mommy on March 8th”
A beautiful chocolate card, where you can put your sweet surprise, will complement the main gift in an original way. In addition, the chocolate bowl can also be used as an envelope for money, or you can put tickets for a concert or trip into it.
If you give just sweets, then after they are eaten there will be no memory of the gift, but if you present them in a chocolate bowl, then after the tea party you will be left with a beautiful postcard and a sea of pleasant impressions. Your beloved mother will be pleasantly surprised by an unusual handmade gift.

To make a chocolate maker using scrapbooking technique, we will need:
- Thick white cardboard;
- Blue paper with polka dots;
- A sheet of paper in a box;
- Glue;
- Ruler;
- Awl or sharp scissors;
- Scissors;
- The inscription “To Mommy”;
- Decorative paper flowers;
- Stamens;
- Gauze;
- Hair fixation spray;
- Pastel purple and blue;
- Half beads;
- Ribbon;
- Double-sided tape;
- Pendant "Heart".
To begin, draw a diagram of the chocolate bowl on a checkered sheet of paper, or print it out on a printer. This master class has a ready-made template. The dimensions of the postcard correspond to a standard chocolate bar.

Place a ruler along the fold line and draw the awl firmly to mark the fold lines so you can easily bend the cardboard.


Glue the chocolate bowl together.

Glue the chocolate bowl together. Glue a small strip of tape on the bottom to prevent the chocolate from falling out.


Let's start decorating the front side. Cut the cardboard with the pattern to the required size, cut out the inscription.

Now you need to tint the edges of the decorative cardboard. Use the sharp edge of a pair of scissors to rub together the blue and purple pastels. Dip a dry cotton swab into the pastel and rub it along the edges of the picture.


Cut a piece of gauze, spray it with hairspray and scrunch it up.


Twist the stamens together and glue them to gauze. Plant decorative paper flowers on the glue, add an inscription, and decorate the whole thing with half beads.


Using a ribbon, tie a metal heart to the gauze, tie a bow, and scorch the edges of the ribbon with a lighter so that they do not fray.


Make a bow at the bottom of the card and decorate it with half beads in the shape of a flower. Hide the edges of the tape under the back of the cardboard.


Using thick double-sided tape, glue the decor to the chocolate card. Thanks to this tape, a space is created between the card and the decor, and the finished product looks more interesting and voluminous. On the inside, glue thin satin ribbons to the edges of the card so that it can be tied.


Now you can write the warmest and most sincere words for your mother, put a chocolate inside, tie it on both sides and the gift is ready!


DIY gift for grandmother on March 8
DIY paper teapot
This teapot will be a wonderful gift for your mother or grandmother. Every housewife has beautiful plates and a salad bowl in her arsenal, in which she serves delicious holiday dishes to the table when guests arrive. An ordinary tea party with visiting friends is a completely different matter. It does not provide for the use of plates with appetizers and meat dishes, so it will not be possible to surprise guests with beautiful dishes.
What do you usually serve tea bags in? In a box or on a platter? This master class will give you an original idea for an unusual and beautiful presentation of tea bags.

You will learn how to make an extraordinary paper stand for tea bags. It is made in the form of a teapot. Interested? Then quickly prepare the necessary material:
- a piece of wrapping paper with a bright print;
- a sheet of white cardboard;
- glue stick;
- scissors;
- pen (pencil);
- stencils in the form of a teapot and a small cup;
- heat gun;
- ruler;
- braid, openwork flowers, bows and other ready-made decorative details.
First, take a sheet of cardboard and cover one side with brightly colored wrapping paper. To securely connect these materials, use a glue stick.

The result is a sheet of thick cardboard with a print in the form of roses.

Now prepare your stencils. Images can be found on the Internet and printed on a printer. If you know how to draw well, then draw the silhouettes of a teapot (teapot) and a small cup yourself.

Trace each stencil 2 times, placing them on the colorless side of the cardboard.

Cut out the blanks and cover them with wrapping paper on the other side.

You get these 4 parts that are needed for subsequent work.

Cut 2 strips from the remaining cardboard. One should be 5.5 cm x 15 cm in size, and the second should be 2.5 cm x 9 cm.

Cover each blank with wrapping paper with a picture of roses, and then fold it twice.

Now you need to assemble all the parts into a single structure. First glue the stripes using a glue gun. Apply glue to one of the parts of the teapot and fix the curved strip, as shown in the photo. Glue a narrow strip to the cup.

Glue the second part of the teapot and cup to the strips symmetrically to the first.

You get 2 blanks with deep “pockets”.


Now the cup needs to be glued to the teapot.

The main work is done, all that remains is to decorate the stand. You can use pieces of braid, bows and flowers.

Glue bows to the central part of the craft, flowers to the lid of the teapot, and place strips of braid on the bottom and top of the teapot.

This is what the finished craft looks like.


You can put napkins in a large “pocket”, and tea or coffee bags in a small one.

Or this option: in a large “pocket” place tea bags with different flavors and coffee sticks, and in the small hole of the cup there will be bags of sugar.


This original stand for bags of tea, coffee and sugar will become a real decoration for a tea ceremony. It will cause surprise and genuine interest among guests, and the tea drinking process itself will become twice as enjoyable.

Crocheted potholder for grandmother for March 8th
Another gift for grandma in the same red and white colors is an elegant potholder, which can also serve as a napkin for hot dishes, decorate the kitchen, and make it more comfortable. The potholder is knitted in two colors with single crochets using elongated loops. Leftover yarn can be used for knitting.

Materials and tools:
- inexpensive Karachay yarn in two colors;
- hook number 3.

Abbreviations used in the text:
- RLS – single crochet;
- Dc – double crochet;
- VP – air loop;
- runway – air lift loop;
- DC – double column.
We start knitting with the Amigurumi sliding ring. We work with red yarn.
1 row. We place the free end of the thread in the left palm, and wrap the working thread around the index finger of the left hand. Insert the hook into the ring, pick up the thread and knit a loop, securing it to the ring.

2nd row. 3 runways, 15 SSN. We tighten the ring tightly at the free end and knit the connecting loop into the third lifting air loop.

In this row, together with the runway, you should get 16 CCHs. Next, we knit the entire fabric with single crochets.
3rd row. 2 RLS, * 1 RLS, DC (i.e., we knit 2 RLS in one loop of the previous row)* Repeat the pattern between the stars until the end of the row. The increase in the following rows will always occur above the last of the doubled columns, which will divide the circle into 8 sectors. We finished the row with a connecting loop.

4 row. 2 runways, * 2 sc, US. Repeat until the end of the row. We finished the row with a connecting loop.
5 row. 2 runways, * 3 sc, double the fourth column. Repeat until the end of the row. We finished the row with a connecting loop.

6th row. 2 runways, * 4 sc, double the fifth column. Repeat until the end of the row. We finished the row with a connecting loop. When knitting a connecting loop, change the color of the yarn to white.
7th row. We knit with white thread. 2 runways, * 5 sc, 1 US. Repeat until the end of the circle. We finished the row with a connecting loop.

When knitting a connecting loop, change the color of the yarn to red.
8 row. We knit with red thread. 2 runways, * 6 sc, double the seventh column. Repeat until the end of the circle.

We finished the row with a connecting loop. When knitting a connecting loop, change the color of the yarn to white.
9 row. We knit with white thread. 2 runways, * 7 sc, double the eighth column. Repeat until the end of the circle. We knit a connecting loop and change the color of the yarn to red.
10 row. We knit with red thread. 2 runways, * 8 sc, double the ninth column. Repeat until the end of the circle. We knit a connecting loop and change the color of the yarn.
11, 12, 13, 14 rows. We knit with white yarn.

We double one column in each sector. Otherwise we knit similarly to the previous row. Each sector should have 14 single crochets. When knitting the connecting loop of the fourteenth row, change the color of the yarn. We cut the white thread and fasten it. We won't need it anymore.

15 row. In each sector after the double stitch we knit 2 sc, the next stitch we knit with an elongated loop into the stitch of the thirteenth row, the next – into the stitch of the twelfth row, the next – into the stitch of the thirteenth row.
On each of the eight sides of the polygon there are two groups of loops of different lengths. Between them we knit two sc, after the second group of loops we knit 3 sc. We finish the row with a connecting loop.

16th row. We continue to knit 15 sc each with red thread, doubling the sixteenth stitch. We knit this way in each sector.

17th row. We knit in the same way, doubling one stitch.
18th row. We finish knitting according to the same pattern, only after finishing the last circle, we knit a loop. We collect 16 VPs and, closing them in a ring, tie the ring with twenty single crochets.
Now you need to lightly steam the product using a damp iron, giving it a finished look. The potholder is ready.

The master class was prepared by Svetlana Chalkina
DIY crafts for a friend
If you want to give your girlfriend some jewelry or a scarf with flowers, but you think it’s not very interesting, then take it and make it yourself! Such a gift will be individual and will definitely not leave your friend indifferent. And you can put a piece of your soul into it, and at the same time show your imagination and love for your friend. In this master class prepared by Anna Moiseeva, we will crochet an easy necklace!

In order to knit such a necklace we will need:
- blue, light blue, white thread;
- hook 1.75 mm;
- scissors;
- needle;
- chain.
To knit such a product, it is better to take thin yarn. The thinner the better. Our necklace will consist of 7 circles. 1 of them will be the largest and will be located in the center. The remaining 6 are 2 sets of 3. The sets will be the same.
Let's start knitting from the central one, that is, from the largest circle. We knit 12 sc in a slip stitch with blue yarn. We close the circle with a joint and tighten the ring.


We knit 1 row with blue yarn, adding every 2 stitches in the row. Closing the row, change the thread to white. We perform a row, adding every 3 loops of the row.

And we just have to knit the last row. In it we make additions every 5 loops of the row. The central circle is ready.

The next circle will consist of only 4 rows. First, we form a slip loop with blue yarn and work 12 sc into it. We will consider this to be the first row.
Then we change the thread again, but now to white. Add through 2 loops. Once again we change the thread to blue and knit a row, making increases every 3 loops of the row.

We knit 1 more exactly the same circle. We just have to connect the last 2 circles. These are the smallest parts of the necklace.
Again we knit 12 sc in a slip stitch with blue thread. Then we change it to blue. We perform a row with an increase through the loop.

We knit the same circle again. Now we just have to assemble the necklace. To do this, you first need to lay it out to understand how to sew the parts together.
Then we sew 2 smaller circles to the central large circle. Sew on different sides.

And then we sew others onto these parts. And at the end we sew on the smallest circles.

The last step will be the chain. We attach it to the loops of the circles. The crochet necklace is ready!

Craft - surprise “Candy message” for March 8
When you don’t want to give your close friend a banal gift, the kind that others can give, your head is full of thoughts and wild fantasies, but nothing wise comes to mind, you can follow simple advice. The best solution in your situation is to prepare a gift with your own hands! For example, you can give a gift “Candy Message”. It requires little investment and half an hour of free time.

In order to make this gift, you need to purchase a vase for candies and the candies themselves, which, naturally, must be tasty and beautiful in appearance. You can also use a decorative box, a satin bag, a basket for small items, and more as a candy dish (instead of a vase).
Also, to make a gift you will need several short satin ribbons of any width (or thread) for winding scrolls and paper “scrolls” for wishes. Chains and beads, as well as various decorative elements, can be used as decoration and addition.

On the paper prepared for the scrolls, you need to write wishes, wrap the paper and tie it with ribbon or thread. The number and size of the scrolls should depend on the size of the vase and the number of candies. The color of the ribbons should be in harmony with the color of the candies and vase or be neutral.

Candies must be placed in a candy bowl, and scrolls with wishes should be beautifully placed between and on top of the candies. The gift is ready - stylish and fast!


Champagne with sweets
A traditional and at the same time banal gift for colleagues and teachers on March 8th is wine, champagne and sweets. In order not to change its essence, but to surprise with its design, you can create a unique bouquet of sweets or decorate the bottle in this way.

This one gift will contain champagne and goodies at the same time. It doesn’t matter what kind of candy you choose for this, chocolate or caramel, if you know the taste preferences of the woman to whom you will give such a bouquet - great! Well, if not, then it’s okay, take the most common ones and believe me, such a bouquet will definitely not leave anyone indifferent.
To work you will need colored corrugated paper, cardboard, a plastic yogurt jar, scissors, tape, ribbons for decoration, thread, champagne and 7 sweets.

Making a bottle skirt. Cut the corrugated paper to the width of the circumference of the bottle, two heights of the skirt. In this case, one edge should be 2 cm shorter.

Fold it in half and stretch the paper wide along the fold line. Using a short edge, glue the skirt to the neck of the bottle with tape.

We wrap the long edge with thread to match the paper.

Using a lid of a suitable size, draw a circle on the cardboard - this will be the base of the cap. We use a yoghurt jar to make the top of the hat.


We wrap the blanks in paper and glue them together.


We cut out rectangles measuring 5 cm by 8 cm from corrugated paper, rounding the upper edges with them. Using your fingers, we stretch the petals wide along the upper contour, creating a gentle wave.

We begin to wrap the petals on the candies. One flower will need 5-7 petals.


We combine the blanks into a product. Tie a ribbon to the hat and glue a candy flower. Additional decoration if desired.

Glue flowers to the skirt in any order.

Petals made from green corrugated paper will look beautiful with flowers. Decorate the neck of the bottle with a lace veil. The original gift set is ready.


A classic gift set for a woman can look like a real work of art. Such a gift will not leave any woman indifferent.


DIY postcards for March 8
As for the postcard, which does not require too much effort to make, you must use cardboard for its base, and the design can be done as appliqué, decoupage, scrapbooking or origami. It doesn’t matter what style such a card will be in, the main thing is that it should evoke tender feelings, be spring-like, bright, preferably with some flowers and contain warm words of congratulations. Usually there are no difficulties with materials for such a gift.
A fluttering and weightless butterfly landed on a postcard intended to congratulate loved ones on a wonderful holiday - International Women's Day. This gift is quite possible for a child to make if he is already a schoolboy. Mom will be happy to receive this elegant product, and the child’s efforts will be appreciated. Since the card was made for congratulations on March 8, you can get a little creative and make the central figure not quite ordinary.
Let the butterfly’s wings remain chic and spreading, bright and eye-catching. But let the body itself be made in the form of the number 8. This is the main highlight of the proposed present. Not everyone will dare to play with a simple insect figurine like this, but the result will be truly beautiful.

To create the same bright and unusual postcard, prepare:
- thick cardboard base;
- plasticine for creating a background, design, inscription and additional decoration;
- a toothpick that will allow you to draw on plasticine and also attach small balls.
Making a greeting card with your own hands
Take everything you need for work. A big plus is the brightness of the plasticine; the brighter and more attractive the color of the material itself, the more expressive the postcard will be. Selecting shades of plasticine is already half the success.

To begin, very carefully apply juicy green plasticine to the surface of the cardboard. Try to make the layer very thin and smooth the pieces in different directions. It doesn’t matter that the light surface of the cardboard will show through. This way we will create an unusual, slightly aged effect. In general, the craft will look harmonious.

Make a thin purple sausage. It should be long enough to form a number 8. Glue the ends together to make a ring, then cross over to create the desired piece. Make wings from bright orange plasticine. Knead the pieces of plasticine in your hands, then press them on both sides with your fingers, while simultaneously giving the wings a suitable carved shape.

Start assembling a beautiful insect. Of course, we only use the silhouette to decorate our wonderful card. Stick a figure eight in the center. Adhere to it on both sides of a pair of wings. Now we see a butterfly in front of us.

Roll out oblong white droplets from white plasticine. Make pairs of droplets of different sizes. These parts are intended to decorate the wings. Stick a few on each side.

Also, use a toothpick to glue red balls along the edge of the wings. Above the image of the insect, write “Happy Holidays!” In this case, there is no need to indicate March 8, because the number eight already appears on the postcard, so it is immediately clear what holiday the craft is dedicated to. Add patterns to the corners to complete the look.

A beautiful gift does not have to be expensive. The main thing is to do it from the heart and not spare your imagination. Pack the gift beautifully, tie a bow, and now present it to your loved one with beautiful words.


Greeting card with roses made of plasticine
It is customary to depict flowers on cards dedicated to International Women's Day. This is the most desirable and most beautiful gift for the fairer sex. And even if you don’t know what to give, flowers will always help out, it’s a win-win option.
But in this lesson, prepared by Elena Nikolaeva, we will not talk about how to choose a beautiful gift, but how to make it with your own hands. We offer an unusual three-dimensional option - a postcard decorated with a bouquet of plasticine. The central buds are roses, the additional branches are blue cornflowers. The card looks gentle and rich at the same time.

Materials for the postcard:
- thick cardboard;
- multi-colored plasticine: red, yellow, green, blue and white;
- thin toothpick.
How to make a beautiful greeting card with your own hands
There is a canvas in front of you. It doesn't matter what color it is. Pay more attention to its density and size. Choose the size for your craft, as well as the background color that will perfectly match the buds in the bouquet.

Fill the background completely with bright plasticine. Since you need to independently apply bright plasticine in a thin layer to the surface, the color of the cardboard is not initially important.

A beautiful bouquet can be made rich and beautifully complemented with simple wildflowers, such as cornflowers. Florists often do this. For small graceful branches, prepare thin green threads and green leaves, small blue beads.

First glue thin green twigs with leaves under one side of the card.

Then press down each leaf with a thin needle to make the surface more realistic and textured.

Collect small cornflower flowers. To do this, combine 4 blue balls together, press with your fingertips to get petals. Insert a white ball into the center. Attach the resulting flowers to ready-made branches.

Make 10-20 blue wildflowers. Stick in different places. Press down the white bead in the center with a toothpick on top, and also press down each blue petal.

Now move on to the rose leaves. They should be much larger. Make green flat droplets. Draw veins on top with a thin tool.

Assemble several combinations of thin green threads and the resulting carved drop-shaped leaves.

Glue green leaves randomly over the field branches.

For beautiful roses, prepare red plasticine. Cut small pieces from the block.

Press and smooth each piece so that you get a flat, oblong petal.

Start twisting the petals into spirals to form beautiful red buds.

Form 3 buds. This will be enough to fill the picture.

Attach all the rose heads to the bouquet. Now you have a wonderful flower arrangement.

To make the inscription “Congratulations!”, stick a pink stripe somewhere on the side. Make an engraving with the sharp end of a toothpick.

If desired, fill the empty space with small multi-colored plasticine balls to create a rainbow-colored picture overall.

A beautiful greeting card with a bouquet of plasticine flowers is ready.


Handmade gifts for any occasion are highly valued and arouse interest and tenderness towards them. Of course, you can’t say for sure that any woman will be happy with some small gift that you make with your own hands. After all, many expect chic and elegant gifts from their other halves. In such cases, a homemade gift can be given as a complement to the main and exquisite one.


