Sewing: House slippers in the Tilda style and Ballet slippers for the house by MK Tulip Accessories (Natalia). Sewing: House slippers in the Tilda style and Ballet slippers for the house according to MK Tulip Accessories (Natalia) How to make a pattern for warm house boots
slippers for sleepy angel Tilda
master class on sewing slippers for the Angel Splyushka =)
For sewing, I prepared: white fleece, cardboard, threads, a needle, non-woven fabric, and fabric suitable for the angel’s clothes (in my case, I took the same one from which the clothes were sewn)
You need to measure the length and width of the toy’s foot, with a margin of slightly less than half a cm in diameter. And then cut out the layout from cardboard. After that, the fabric is cut out according to the layout, so that the edges can be folded over and sewn on.


Afterwards, the membrane of the slipper is cut out, folded on both sides and stitched.

Then we roll it into a tube so that one edge touches the other and sew it to the sole of the slipper.
Then we take the fabric (the one that suits you to the toy) and glue the non-woven fabric on the inside. After that, we cut out the insole, the diameter is slightly smaller than the sole. And we sew it on top, after we have sewn the membrane (the top of the slipper).

And we decorate our slippers at your discretion =) In this case, we took pieces of fabric like on clothes. Glued onto non-woven fabric. Squares are cut out of them and sewn on top.
Well that's all =) I wish you all good luck!
Other Master classes from the section
If you only have one glove left in a pair, don’t rush to throw away the missing set! From the remaining glove you can sew funny toys, for example, a squirrel.If you like to make original and unusual bags, cases, mittens and other products with your own hands, then making home slippers will not be difficult for you. Moreover, you can sew slippers, warm children's boots, and UGG boots from any available materials, for example, from an old sheepskin coat or the tops of women's leather boots.
Don't forget that old things, clothes, shoes are free material for sewing new clothes and handicrafts. See What can be sewn from old.
This article provides two types of patterns for slippers, as well as the technology for sewing them. Advice is given on what and how to make home slippers and warm children's boots with your own hands.
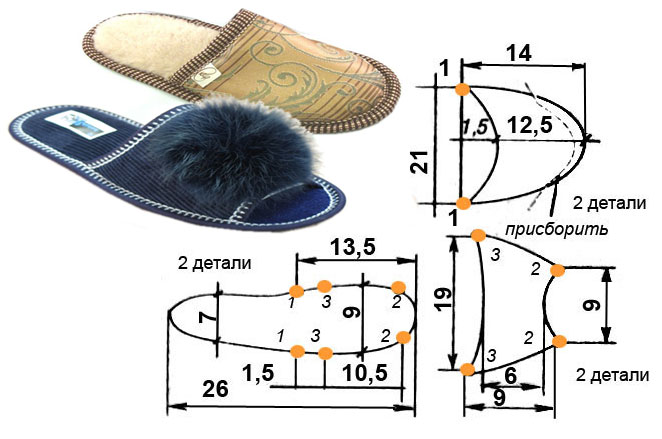
To make a pattern for flip-flops with open or closed toes, take a piece of paper and trace the outline of your foot. You can take old slippers (without heels) of a suitable size, put them on paper and outline the soles.
If you draw your foot on paper, it is better if it is in a sock or stocking and it is advisable to sit on a chair to reduce the load on the foot. Then the pattern will not distort the size of future slippers.
Draw the outline of the foot, and then check it. To do this, you need to measure the distance from the edge of the big toe to the heel with a measuring tape or ruler. This value should correspond to the size of your shoes, for example, for size 43 shoes this distance will be 28 cm with an error of half a centimeter.
To create a pattern for slippers, you can use the above calculations, adjusting them to your sizes. If you have slippers of the style you need, and you would like to sew exactly the same ones with your own hands, then you do not need to create this pattern.
Wrap the top of the slippers tightly with paper or fabric, draw the outline of this part with a pencil or felt-tip pen and allow seam allowances. After this, you can cut out this part, once again attach it to the top of the slippers and check whether it exactly follows its contour. Adjust if necessary.
2. What can slippers be made from?
To sew home slippers you need to use various materials. The right and left parts of the bottom of the sole are cut from shoe leather, split leather, or leatherette. The insoles (the upper part of the sole of the slippers) are made of split leather, suede or cloth. There should be another pad between the insole and the sole. Usually it is cut out of cardboard and batting (sintepon or thin foam rubber are also suitable).
The details of the top of the slippers are cut from leather and lining; they can also be duplicated with soft pads, then quilted.
If the top of the slippers consists of two halves, grind them down or join them with braid. They are glued to the gasket and lining, edged or braided around the sections (closed slippers have one cut, open slippers have two). Then decorative finishing is performed.
3. Threads and tools
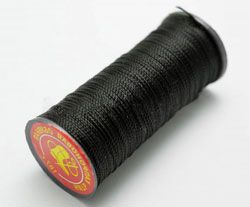
In order to sew durable slippers, you need to use special, especially strong threads. For sewing slippers, cotton threads in 6,9,12 folds No. 30, 40, 50 are suitable. Cotton lavsan threads No. 44 LH-1, 65 LH-1 or lavsan threads No. 22 L, 33 L, 55 L, 90 L. For stitching parts For the top of the slippers, nylon threads No. 65 K, 95 K are best suited. To attach the sole, stronger nylon threads No. 470 K, 565 K are needed.

The details of the top and the edging of the sections can be done on a sewing machine, but you will have to stitch the top and edging to the sole by hand. Therefore, purchase a special awl from a hardware store. With its help you can sew strong and durable slippers from any materials.
Once the pattern for the sole and top of the slippers is ready, you can begin cutting out the parts. When cutting soles, allow an edge allowance of 0.5 cm.
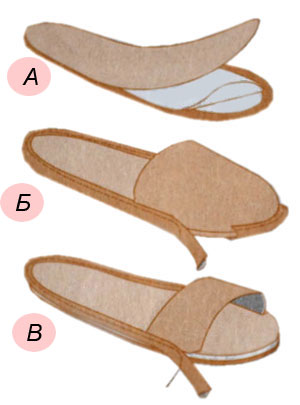
The gasket pattern is reduced by 0.7 cm along the entire contour so that the gaskets do not unnecessarily thicken the seam. Glue soles cut from leather, cardboard, batting, split wood and trim the edges evenly (Fig. A).
Glue the sole along the edge to the top of the slippers with the seam facing out (Fig. B), aligning the control marks. On a closed model, the excess length of the upper part is pre-fitted along the toe part. If with a closed top you can allow some freedom for the leg, then in a model with an open toe it is necessary to adjust the length of the upper part so that it fits snugly around the leg.
The upper is connected to the sole using edge braiding, edging, and straight stitching. The welt can be made in the form of an edging or lining along the edge of the sole made of a narrow leather strip (Fig. B). The seam can be closed with a decorative braid woven from thin leather straps, cords, ribbons, etc. To secure finishing elements, you can use a craft glue gun.
As in any work with paired products, operations are performed simultaneously on one and the other slipper.
5. How to make a pattern for warm house boots
 For those who prefer warmer house boots to slippers with an open back, the work will be more difficult. You already know how to make a sole pattern; just outline the foot and add a seam allowance along the contour. But to make a pattern for the top of such slippers (like Uggs) you need complex calculations. Therefore, we’ll better use the “wrapping” method.
 Since house shoes do not require a tight fit to the foot, but on the contrary, shoes or boots with flat soles can serve as a template for removing the pattern of the upper part and further modeling.
First, you need to crumple the paper so that it lays out better on the convex surface of the shoe. Then wrap it around your chosen shoe or foot. Wrapping the leg is not very convenient, but the pattern is more accurate. If you are satisfied with loose and spacious boots, then use shoes for the template.
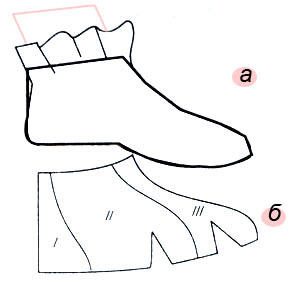
While wrapping the template, you can add folds, securing them with glue or paper tape or pins. Outline the line of connection with the sole, the middle line along the front of the boot and along the heel, the contour of the upper edge of the boots (Fig. a).
Remove the paper (without splitting the pins) if it does not lie flat. Notches are made along the line of connection with the sole in the toe area, and the pattern lines are adjusted. The resulting pattern can be divided into several parts depending on the model you have developed (Fig. b).
6. What and how to make home boots from
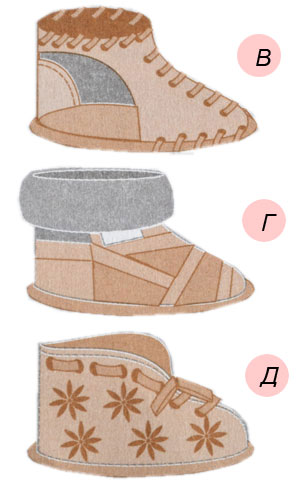
The details of the top of house boots are cut from leather, split leather, felt, thick cloth, leather set (from different pieces of leather). Pieces of tapestry, corduroy, cloth, and fur can be included in the details of the top. Don't forget about seam allowances of 0.5-0.7 cm.
The lining is cut using the same patterns, using split wood, cloth, flannel, woolen knitwear, and fur.
Sew together the top and lining parts separately. To prevent the heels from creasing, a leather heel pad is attached to the lining inside the boot. Along the edge of the boots, connect the lining to the upper part with an internal seam, then turn it right side out and add a securing stitch.
The edges of the neckline can be trimmed with braid or edging strip made of leather, leather braiding if the lining is made of split leather, fur or knitted cuffs (Fig. D).
The upper part of the boot is secured to the sole in the same way as slippers, placing the upper part in the toe area and slightly in the heel area. The seam is laid from the toe to the heel in both directions. If you sew in a circle, then due to the fit, the shape of the boot may become deformed and skew in one direction.
If the circumference of the upper part of the boot is larger than the sole, then the excess is taken into the heel seam.
To prevent children's house boots from falling off during active movements, sew ties to them or tighten them with a strap pulled through the holes punched in the upper part. If the lining is made of fabric, then place metal blocks in the holes.
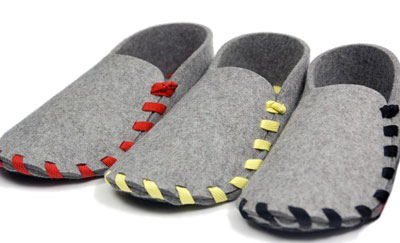
It’s not at all difficult to make these slippers with your own hands from felt or coarse cloth or suede. To do this, you just need to remove the upper pattern from any shoe and buy several meters of colored braid. Holes can be punched with a special flat punch or cut with a narrow and sharp knife blade. You can use any materials as a material, insulating them and strengthening them with pads, including sheepskin coat fur, and for the protective lining of the bottom of the sole - leather from the tops of women's boots.
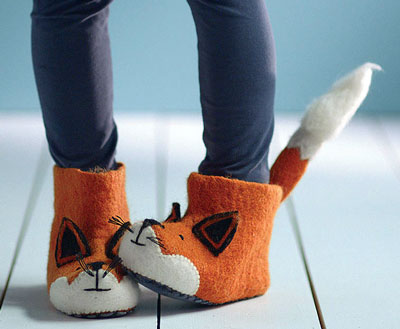
It will be a little more difficult to make warm house boots like these, but they will not only look original and stylish, but will also reliably warm your feet. First sew ordinary slippers, after you have studied the technology and working methods, it will be easy for you to sew other models of slippers with your own hands.
Who hasn't yet acquired the cutest and softest slippers in the world? The time has come! Spring is the time for new things not only in the wardrobe, but it’s the easiest place to start with the wardrobe. Moreover, you can make such slippers at home with your own hands. there is no need to go shopping and spend a lot of time choosing, you just need to take the fabric to your liking, and craftswomen usually have enough of this stuff! Don’t skimp or spare for your loved one, take a beautiful soft fabric - and go ahead!
The pattern consists of two parts:

This is the sole and half of the upper. You cut out the entire sole, and half of the top needs to be duplicated symmetrically along a straight line and cut out a double part. The diagram shows how to sew first along the inside, and then turn it inside out and tuck the top inside the sole, secure it with pins and trim it. The sole should be facing inward, just like the top of the slippers. Then turn it inside out and you're done!

You might want to decorate your slippers with delicate embroidery; Tony Finnanger’s book has several options (or you can come up with something of your own, unusual).

You need to embroider with floss threads (they are specially designed for this purpose and will best “lay” on the fabric), we hide the knots and remnants of threads inside.

We recommend using fleece for the inner fabric and thick cotton for the outer fabric. Classic Tilda colors are calm pastel shades; stripes or dots will look great.
Good luck to everyone in your creativity and if it works out (and with patience and accuracy it will definitely work out!!!), we advise you to sew such beauty for all household members!
These slippers are convenient because they can be easily washed (if you sew everything tightly, then even in a machine), and if they slip a lot, you can sew special insoles on the bottom, the kind sold in hardware stores (or just fabric with pimples or some thin rubber bands, there are many options, if you wish).

A little advice regarding sizing. You need to outline your leg with a pencil on a piece of paper. We advise you to wear a thin cotton sock and outline not end-to-end, but stepping back a couple of millimeters (although this is fabric and it will not press in any case). When you transfer the pattern to the fabric, take into account a couple of millimeters (usually 5-7) for indentations, if you are working with fleece - it is dense, when you turn the product out of it, it will become smaller, so you can safely indent 7-10 mm.
We wish everyone good luck and a creative spring mood!
http://tildamaster.ru/vikroiki-tild/domashnie-tapochki-v-stile-tilda/
We sew Ballet slippers for the home according to the Master class
Tulip Accessories (Natalia)

Today's master class on making simple indoor ballet slippers. They are simple in appearance, but in terms of complexity of execution - well, average. A little more complicated than my favorite topic “How to sew everything from rectangles”
The pattern I used is this:

I adjusted the size in Photoshop - you need to measure the length of the foot in centimeters and adjust the size of the pattern in the editor to this measurement, focusing on the distance between the patterns on the heel and toe, plus seam allowances. You can do this manually, simply by tracing the outline of your foot, and complete the top of the slipper yourself, making sure that the length of its lower side corresponds to the length of the semicircle of the foot.
The materials we need are cotton, padding and some artificial or natural leather for the sole.
Cutting out the details. Two cotton insoles, two leather soles, one upper of different fabrics on the outer and lining sides. And one insole and one padded upper part each - that's for one sneaker. For the second, no matter how paradoxical it may sound, there is the same amount of everything.

We take the part from the top, the outer side, and fold it evenly with the seal.

Place the sides of the heel facing each other and stitch.

Carefully, right under the seam, trim off the excess sealant.

We process the seam with a zigzag. This is important for all seams, as the slippers must be durable.

We turn the part with the fabric facing up and carefully pin it together with pins and a sealant, no matter how many pins you spare:

Now we take the leather sole and fold it with a seal.

Now we sweep away the details of the top and sole. Everything should be very even, this is the key to success

This is how the sour cream slipper turned out, on top:

And below:

Now we sew along the basting and pick it out:

Well, we trim the filler around the entire perimeter and stitch the edges:

Ready. We assemble the “inner” slippers that have the lining in the same way:

Here I trimmed the fabric a little in the instep area - to make the cutout deeper, the one that was cut out seemed too high to me, but this does not affect anything and is left at your discretion. We turn the lining part of the slippers face out and insert them into the outer part, sweeping away the perimeter of the top seam:

And this is how it turns out:

Sew, leaving an opening for turning. In my photo it is not very noticeable, but it is indicated by arrows, remove the basting, cut out the filler, and process the edge.

We turn everything inside out, straighten it, tuck it in, steam it as best we can. And we put a decorative stitch along the last seam, covering the hole for turning inside out.

Done, admire it and try it on


We have a special attitude towards house shoes. Slippers are associated with home comfort, relaxation with family, warmth and comfort for tired feet. Often, ladies who are forced to wear high heels in the office, those who wear boots or heavy shoes at work, and dandies in narrow boots dream about them during the working day. For some, a symbol of simple happiness is a dog greeting its owner with slippers in its teeth. Slippers begin their history in eastern harems, where soft, silent shoes were worn by their inhabitants. In Europe, elegant, cozy slippers, decorated with exquisite embroidery, have become fashionable in boudoirs. Well, in the 19th century, slippers became a familiar and necessary item for everyone.


And in order to sew such slippers, you can take a special pattern under the cut for printing on a thermal transfer. Its use greatly simplifies and speeds up the process and reduces to almost zero all possible difficulties and errors when cutting parts. 
In addition to the pattern, you will need light felt for transferring the transfer, any suitable (I only had white today) felt for the insole and, my main inspiration for this week, a cork sheet. In this case, 3 mm thick. Well, glue, I liked using “Moment Crystal” the most.

First of all, let's transfer the pattern to felt. Due to the fact that recently I have been asked more questions about translation technology, I will allow myself to say a little more about it today. 
To begin, we will need to place the pattern right side into the felt and heat the iron to almost maximum temperature. Using a hot iron, we begin to carefully iron the sheet, not missing the edges or corners. 
In my opinion, it’s better to overheat the iron somewhat and, while ironing, notice that the felt has begun to melt (this is not an instantaneous process and you will always have time to slightly reduce the heat, nothing bad will happen), than to iron everything with a cold iron and get a fragmentary translated image, the more thereby ruining both the pattern and the felt.
We stroke the entire structure for about a minute, then cool it to a slightly warm state and remove the top checkered layer of paper. The picture has been translated.

Cut out the details of the slippers without seam allowances.
Since I made the pattern as universal as possible, I adhered to the principle “more is better than less.” Therefore, at this stage of work, I recommend trying it on at least approximately and if it turns out to be larger than necessary, trim the sides, as shown in the photo. As a rule, there is no need to reduce the size of the top and bottom, only if these are slippers for a baby. 
Place the patterns for both slippers on a sheet of felt. You don’t have to take white anymore, you can use any color.

And we attach the parts with a semicircular seam. Only along the top edge.

Now we cut out the details along the contour, getting a double top for future slippers.


Now we need a pattern for the insole. It's very easy to get. It is enough to simply trace your foot on a piece of paper with a decent margin, or simply take any ready-made slippers that you consider the most comfortable and trace the sole with them.

We only outline the insole, but do not cut it out. I found it more convenient to sew in this order.
Now we baste the double top of the slipper. We baste in two approaches, starting each of them from the middle of the sock.

It will be very easy to stitch the top using sour cream. After machine stitching, you can pull out the basting thread.

Now the slippers with the insole can be cut out, retreating 2-3 mm from the edge of the stitching. We do the same with the second slipper.

Now it's time to begin the final stage. We will make the soles for slippers. After various searches for suitable material, I settled on cork. As practice has shown, this is a fairly easy-to-use material, very light. It is very practical to wear, especially in the glued version. Cork has good shock-absorbing properties and even a thin layer is sufficient to make the slippers comfortable to use.
Take the glue and properly lubricate the bottom surface of the felt insole. The glue, among other things, perfectly stabilizes the cork, reducing its fragility and preventing the possibility of cracks appearing when bent in the future.

Glue the insole to the cork sheet. We cut it out quite roughly, just to be able to install the clips.

The cork glues well and quickly, after the glue has firmly set, you can remove the clips and cut out the slippers along the contour of the insole.

You can stop at this stage of work or additionally sew the perimeter of the slipper on a sewing machine. The cork is very easy to sew, despite its thickness.

That's all, the slippers are ready. In the next photo I tried to demonstrate that cork glued to felt is quite strong when bending. 
The slippers turned out like this:


This idea for house slippers will come in handy for anyone who often has guests. After all, sharing your house shoes with guests is not only bad manners, it’s also unhygienic!
Using a basic pattern of slippers, you can sew as many as you need. Those that will be intended for men, immediately make them in large sizes. 
YOU WILL NEED:
- any dense fabric (felt, jeans, tarpaulin, leatherette...).
- paper for making a pattern.
- scissors, thread, needle.
- sewing machine.
PERFORMANCE:
- Draw the pattern on paper. There is no need to draw the left and right slippers separately, just turn the pattern over and cut out the blanks.
- Using a sewing machine, sew the edges of future slippers.
- The sole can be additionally sealed with felt insoles and sewn to the finished slippers using a regular overcast stitch.
- The slippers are ready!
Show your imagination! You can create a truly exclusive collection! A big plus of these slippers is that they can be washed in a washing machine.
Slipper patterns:


These patterns will help you sew wonderful indoor slippers. If necessary, you can change the size of the parts.
And finally, this master class will tell you in pictures how to sew soft house slippers. It’s very comfortable to walk around the house in such tapikas in the cold season, and putting them on your feet after bed is a pleasure - you don’t feel cold. All you need is a slate sole (new or used), terry towels (again new or old), faux leather and batting. 
Tools you will need:
Sewing machine, scissors for cutting fabric, marker for marks, needle (awl), breadboard knife, centimeter.
Progress
- We cut out the footprints from the leather according to the model of the slates.
- Now we cut out the sides.
- Using the footprints, we cut out blanks for the toe of the slippers.
- Now we need to sweep the sole and toe from the blanks. We put the batting in the middle of the terry blanks.
- At the next stage, we prepare the box for the slates; the soles of the slates will be inserted into these boxes.
- After the soft parts are assembled and sewn, we insert the slates into the body of the slipper through the unsewn part of the back, and then sew up the product.


