Spot manicure design. Rules and nuances of design using dots. Manicure with dots "Flowers" Photo and idea from Yagala
Usually, nails are covered with a standard brush, which is sold with varnish, but besides this, there are many different tools with which you can make beautiful designs on your nails. In this article we will talk about some of them. An interesting tool is a dots, which resembles a pen with a feather, but only at the end there is a rod with a ball. When painting nails, several sizes are used. Numbers 1 to 10 are the most common. The thickness of the line that is drawn on the nail plate depends on the size of the dots. Thin elements of the drawing need to be drawn in small dot sizes. Anyone can use this tool. After studying the instructions for painting nails with this tool, you will be able to professionally create a beautiful pattern of drawings.
Below are instructions for painting nails with dots.
First, we need to prepare the nails on which we will draw patterns. For the design we will need acrylic or tempera paint, a palette and a dots tool. Apply paint to the palette. To obtain the desired shade, mix several paint colors. After completely dipping the ball, apply paint to the dots. Drawing with dots is not difficult, it looks like a regular ballpoint pen. To learn how to draw, first try to put a dot, draw a straight or curved line, or some kind of hieroglyph. Are you sure? It’s not at all difficult for them to draw, you just need to understand the principle and everything will work out. The length of the line depends on the speed of movement of the dots. When moving slowly, the paint has time to drain from the dots, so the line turns out to be longer, and vice versa, faster - it will be shorter, since the line breaks off, becoming thinner at the end. Using a simple principle, you can draw all sorts of curls or petals. It is much easier to draw patterns with this tool than with a designer brush. And it’s much easier to draw lines and put dots using different colors of paint. Below are some dots designs on nails.
Let's look at an example of creating a beautiful pattern using dots. When using different shades of varnish, the palette can be immediately created directly on the nail. To obtain a contrasting pattern, first coat the nail with white varnish. Without waiting for it to dry, place three small drops of red on the nail. Next, we place white droplets of varnish on the same points. Then we take the dots tool and draw a line through two droplets, then another through the others. And so on several times. As you can see, the result is a bizarre pattern. Then we begin to draw petals and curls. In fact, there are a lot of tricks and techniques. Look at the picture below. It provides step-by-step instructions with examples of beautiful dots painting on nails.
Today, intricate and original nail art is more trendy than ever. Many fashionistas do not want to spend money and time on going to the salon and paint their nails themselves. To do this, you should once purchase several basic tools, stock up on colored varnishes and patience. Dots are considered one of the popular and simplest tools for manicure. Using nail dots, you can apply colored dots of different sizes to the surface of the plate, draw curls like commas, and create striking images from these simple drawings. Let's find out how to use and what kind of dots manicure can be done quickly and easily using this tool.
In the meantime, look at the dots design in the photo, illustrating the wealth of graphic techniques used: 


What are nail dots - types of tools
First, it’s worth understanding what nail dots are and what types of tools of this type exist. Dots are a metal stick with a ball at the end. Balls come in different sizes - for large and small designs. Typically, nail dots are made double-sided, so that with one tool you can draw two types of dots of different diameters.
This inexpensive device has virtually no shelf life, so be sure to buy it if you plan to continue designing your own nails. If you haven't purchased a dots yet, but you can't wait to try dotting a manicure, you can replace the tool with a regular hairpin or a ballpoint pen that has run out of ink. These things are in every home, and they also have a small ball at the end. 


How to do a dots manicure - theory and practice
This tool is extremely easy to use. Before doing a dots manicure, apply a small amount of polish of the selected shade to a piece of foil, dip the edge of the stick there and make an imprint on the nail plate. Usually, the nail is first coated with colored varnish, and then dots are placed with a coating of a contrasting shade.
The theory and practice of such design is quite extensive. You can make dots of different colors and sizes on one nail. Some girls dip the tool directly into a bottle of varnish, but this method is not very good - you cannot see how much varnish has accumulated on the metal ball. To make something like a comma on your nail, take a dot like you would a regular pen or pencil, place a dot on your nail, and then gently stretch it out to form a curl. A dots manicure can be done in minutes, don't forget to apply a top clear coat after the dots have dried. 


Dots nail design options (with photos)
There are various options for dots nail designs, among which every fashionista can choose the appropriate type. The simplest manicure is “polka dots”, it requires varnishes of only two colors, one for the base and the other – a contrasting one for the dots, which are placed in a checkerboard pattern. Flowers are made beautifully using dots - both the petals and the center are drawn with balls of different sizes and shades. By drawing curls, you can also recreate a plant or floral design on your nails. Many dots of different sizes and colors that completely cover the nail plate - this is a manicure called “dragée”; it is best done with pink, blue, and yellow pastel-colored varnishes.
Dotsom designs are new variations of classic manicure. Decorate only the edge of the nail with dots, and you will get an original French manicure; you can do a moon manicure in a similar way. Another luxurious trick is rings. Cover the nail with the chosen color, then place large dots in a random order with a contrasting shade, then in the center of each dot place a dot of a smaller diameter of the same color as the background.
Look at the photo of the dots nail plate design options - there are many amazing ideas for creativity: 


Try it and see - dots allows you to create a wide variety of ornaments, and any woman can use it, even without artistic skills. 


Most girls dream of a beautiful and neat manicure. However, not everyone has the artistic skills to create complex patterns. In such situations, dots will come to the rescue - this is a special device that allows you to get beautiful dots. To learn how to use it, you just need to be patient. With the help of dots you can create a variety of designs on your nails.
Why do you need a dot stick in manicure?
This term refers to a small thin stick that can be made of wood. It is also often made of plastic. The tip of this tool looks like a metal ball, and it can have different sizes.

Today, double-sided dots are increasingly being sold - at their ends there are balls of different diameters. Professional craftsmen will need a whole set. If you need a dots for home design, a small to medium size will suffice. Large instruments are used extremely rarely.
Dots is very easy and convenient to use. It allows you to quickly decorate your nails with dots, lace and other designs. It makes it easy to draw snowflakes or flowers. Dots are often used to create a small additional pattern. It can also be used for gluing rhinestones onto paintings.
How to use Dots: step-by-step instructions
To use dots correctly, you need to follow a certain sequence of actions:

- First, coat your nails with clear varnish, then wait for the base of the pattern to dry completely. It is also possible to use a colored coating.
- Apply a little varnish to the palette - foil or a plastic container is suitable for this purpose.
- Take a stick and fix it perpendicular to the surface, then dip the end into the varnish. It is important that the entire instrument is treated with a coloring compound.
- Apply a few dots on the nail and complete the design. To get the perfect dots, the dots should be directed perpendicular to the nail.
- The varnish applied to the palette dries quite quickly. To create a neat pattern, you need to periodically add the product.
- After completing the pattern, the dots can be cleaned of any remaining dye.
What patterns can you draw with a brush?
With this tool you can easily create a huge number of beautiful and interesting patterns. For example, a butterfly or a flower applied with dots looks great.
Lunar manicure
To perform a lunar manicure decorated with a floral pattern, you can use a dots. In order not to make it too pretentious, it is better to perform the pattern on only two nails - most often the middle and ring fingers are chosen for this.

Then you can paint your nails with varnish of the main shade and dry well again. After this, you can cover them with a second layer of varnish and use a dot to create a design. To do this, you need to drop a little varnish onto the foil and use a tool to draw a flower consisting of 4-5 dots. Then use a wooden stick to draw out thin lines to make the composition more voluminous.
Using a thin brush, create a semicircle at the base of the nail plate. First you need to make an arc, and then fill it with color. It is important that the holes are the same.
French
This classic manicure suits all girls. The French technique is considered quite complex, since it is not easy to create a neat white line. However, dots makes this task much easier.

First, you need to prepare the nail, and then cover it with base varnish. The main stage of such nail art is considered to be making a smile. To do this, the dots need to be dipped in white varnish and used like a pen. After applying the main design, the nails can be treated with a fixative.
spot flowers
The image of dots on nails is considered one of the most popular designs. With the help of dots you can create such a design quite easily. To do this, you need to dip the device in varnish and cover the dried base with dots. This way you can create designs of different sizes.

It is also quite possible to show your imagination and make various patterns from dots - for example, flowers. Thanks to the use of dots, you can get designs of different sizes and colors, which will make your nail art truly unique.
To make a beautiful flower, you need to put a large dot in the center, and use smaller dots to make the petals.
Lace
Lace designs on nails always look very gentle and feminine. To perform them you need to choose a varnish. Then cut out a wavy pattern from the tape, which will then become lace. It should be glued to the nail, and the free area should be covered with a delicate shade of varnish. After this, remove the tape.

Now you should use dots to make the lace, get rid of excess varnish and complete the neat design. To fix the pattern, the nails need to be covered with another layer of varnish.
How to replace a tool at home
Don't be upset if you don't have dots. Instead of this device, you can use any similar objects. A hairpin with a ball at the end is perfect. An equally effective pattern can be obtained using an ordinary ballpoint pen, a toothpick or an orange stick for manicure. The main thing is to apply the drawing as carefully and patiently as possible.

Possible options for replacing dots also include the following:
- sticks;
- pins with a rounded end;
- ordinary matches;
- hairpins;
- pencils that are not too sharp;
- toothpicks;
- carnations from a comb.
It is important to consider that small objects are not very convenient to hold when drawing. To solve the problem, you should use a regular pencil with an eraser at the end. To do this, just stick a pin into it.
Video: how to paint on short nails using dots
To create a beautiful and neat design on small nails, you need to arm yourself with dots and varnishes of two contrasting shades. Then apply one color of polish to your nails, then paint half of the nail with the second product. Using dots, make neat dots in a contrasting color. How to make this beautiful nail art? Watch detailed video instructions:
Photo ideas for nail design using dots
Dots helps to realize the most daring ideas in nail design, which is confirmed by numerous photographs. With the help of this simple tool, you can create a variety of designs on your nails - lace, floral patterns, geometric patterns. In any case, they will look neat and attractive.


A dotted manicure is a nail design created by applying neat circles. This can be done either with a professional tool or with a simple toothpick. Tips and manicure ideas are listed in this article.
Manicure with dots has been one of the most popular and relevant for several seasons in a row. You can do it not only in the salon, but even without difficulty at home. This does not require any special skills, abilities or materials. You will need regular nail polish, a toothpick or a special dots tool.
Dots (from English “dots” - dots) are a small stick with a wooden handle and an iron tip on which there is a small ball, comparable to that of a ballpoint pen. If you purchase a set of dots, you get about six sticks with balls of different diameters.
Dots tool set 
 set of dots for painting on nails
Dots leave a neat ball on a varnish base with a different contrasting varnish color. Some technologies also involve drawing various patterns and monograms with dots.
In the absence of a tool such as a dots, you can also use either a toothpick or a regular needle. Of course, these tools do not leave such a clear pattern, but nevertheless, they are necessary. To do this, they are also dipped in varnish and an imprint is applied to the base.
dots drawing on nailsDrawings on nails with dots step by step at home for beginners
No matter how difficult it may seem to you, drawing with dots is very simple. For this you will need:
- dotting tool (or toothpick)
- two contrasting varnish colors
- fixative varnish
Step-by-step drawing of dots on nails:
- Paint your nails after a thorough manicure with the base color of the polish, choose any color you like
- Wait until the base coat of varnish is completely dry; if necessary, apply a second layer of varnish and also wait for it to dry completely.
- On the work surface (a piece of paper, plastic or oilcloth) apply a drop of varnish of a different color, contrasting with the base one.
- Dip the dots into a drop of fresh varnish and transfer it to the base layer, making an impression
- As a result, you will get an even circle, each of which can be placed in a clear or chaotic order
- Using dots you can create polka dots, flowers, lace patterns, fades and much more.
- Also, by changing the diameter of the dots, you can make a variety of designs, each of which will be different in size
If you draw dots with a toothpick, then you should know that this tool quickly wears out: the tip of the wooden stick becomes flat, soft and saturated with varnish. For this reason, it is necessary to constantly change toothpicks.

 dots drawn
  dots drawn with a toothpick
 Drawings on nails dots schemes
To draw a beautiful design on the nails, both a novice artist and a professional master need not only desire, but also knowledge of some particularly advantageous patterns. Using such schemes, you can create a stylish and very beautiful design that will surprise others.

 Scheme No. 1 for drawing with dots
 Scheme No. 2 of applying dots to nails
 Dotted patterns should only be applied with fresh varnish. This will give you a clear, even and very round dot. If the varnish has dried out, it is better to apply a new drop to the work surface. If the varnish has dried on the working tool (dots), wipe it with a cotton swab dipped in nail polish remover and continue working.
Nail design with dots, ideas and options for dotted manicure
With the help of dots, you can create a very diverse and beautiful manicure every time, which will easily match any style and occasion. Try to choose colors for the drawing wisely: contrasting and bright.

 dots manicure version “reptile”
 Black varnish is an excellent base for applying designs with light varnish colors. You can change the shades of varnish and apply them completely randomly with tools of different sizes.
 drawing with dots and a needle “flowers”
  chaotic dots drawing
 dots drawing, design options
 dots drawing "polka dots"
 colorful dots pattern
 lace dots pattern
 original spot manicure
 feminine dotted manicure
 dotted manicure “Mickey Mouse”
 French manicure with dots, photo
You can make a beautiful French manicure (that is, a “French manicure”) in a completely unusual way, using a dot pattern. Use the tool that is convenient for you: dots or a regular toothpick. The dots should be applied on the usual part of the nail - on top, where there should be a white stripe.
Such dots must be applied close to each other so that at a distance your manicure is perceived as an ordinary French manicure. You can vary the diameter of the circles and change their location, as well as the color palette. You can also do a beveled French manicure or a moon manicure.

 the simplest version of French manicure with dots
 black and white original French manicure using a dot pattern
  beveled French using a dot pattern
  unusual French manicure made with a dot pattern
 Pink manicure with dots, photo
Pink manicure is always distinguished by its special femininity and tenderness. When making a bitmap, you should decide on the color policy of the design in advance. Pink nail polish goes best with:
- white
- black
- blue
- beige
- burgundy
It is best, of course, to choose a light base and draw pink dots on it, but pink can also serve as a base color on which you can draw white and black dots. You can decorate such a manicure with fixative varnish, silver or gold sand, and rhinestones.

 pink spot manicure
  Contrasting pink and white polka dot manicure
 avant-garde dotted manicure in pink tones
 Red manicure with dots, photo
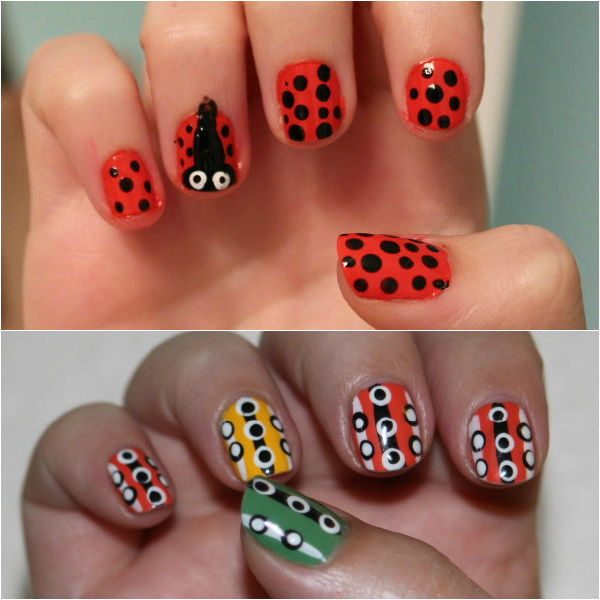
Red polish is a classic color for manicure. He gives the hands a special femininity and always speaks of the lady as a passionate person. One of the most successful dotted manicures is white polka dots on a red background. He always looks very advantageous and attractive. This manicure can easily be called summer. It should be combined with the same elements in the wardrobe and image, complementing:
- scarf or handkerchief
- hair tie
- dress
- beads and bracelets
- red lipstick
- shoes in the same style

 red manicure with blue dots
 red manicure with white dots and rhinestones
 red manicure with small and large dots
 very feminine red jacket with polka dots
 White manicure with dots, photo
White varnish is the best base for applying any tones and colors. Both light and dark shades go well with white. White polka dots will look just as good on any dark nail polish color (or even bright one). The neatest pattern is one that consists of small peas, so try to choose a tool with the smallest ball diameter. delicate manicure with a pattern of multi-colored dots
Black manicure with dots, photo
Black polish is another classic solution for a manicure base color. Almost any shade will look great on it. Apply peas using a dot or toothpick of any diameter, draw patterns and repeat patterns.

 black and white jacket with dots
 simple black manicure with white dots
 black manicure with multi-colored dots
 Video: “Painting with dots. Manicure at home"
Beautiful, neatly processed nails, decorated with a carefully selected pattern, which is made in fashionable shades - this is an important part of any look.
One of the most popular manicure options today is nail design made using a special tool called a dots. These can be a wide variety of dotted patterns, floral curls, abstract patterns, etc. You can create such a manicure yourself, the most important thing is to be patient and arm yourself with convenient tools. Naturally, beginners who have just begun to master the art of manicure will not immediately be able to draw neat dots, circles and curls, but after 2-3 sessions the patterns will become much better.


Dots for manicure: what is it?
What is this tool? Dots for nail design is a manicure tool that looks very similar to a double-sided crochet hook. The body of this instrument is most often made of plastic, although exclusive instruments with a handle made of wood or bone can also be found on sale. Dot tips are made of stainless metal; they are a thick needle with a ball at the end. It is this ball that takes part in drawing the pattern.
You can find it on sale dots for nail design With a different diameter of the ball at the end, it depends on the size of the dots and curls applied using this tool. Dots can be single-sided or double-sided, they are sold both individually and in sets. Very convenient set option dots for nail design – a set of removable tips with balls of different sizes and a comfortable handle in which these tips are attached.
Dots manicure
The good thing about drawings made with this tool is that their creation does not require any special artistic skills and even beginners can do it. In addition, using dots, you can carefully lay out rhinestones and other decorative elements on your nails.
Video dots for nail design:


How to use dots: step by step procedure
Use dots for nail design Anyone can create a beautiful and fashionable manicure. All you need to do is buy a set of dots or at least one double-sided tool with balls of different sizes on the tips (this will be quite enough for a start), choose nail polishes that match the color and get to work following the rules given below.
To apply any design efficiently and accurately using a tool, you must proceed in the following order:
- A hygienic manicure is performed to make the nails neat, clean, even out their length and remove hangnails;
- Apply a base coat to dry, grease-free nails and dry thoroughly;
- The first layer of base varnish is applied over the base, dried and dots, commas and other curls are drawn on top of it using dots, depending on the chosen ornament;
- Finally, a topcoat is applied and final drying is performed.
It is most convenient to hold the nail design dots like a pen or pencil. Although this, of course, is an individual question. When working with dots, you need to remember that it needs periodic cleaning of varnish. To do this, you can use an ordinary paper napkin, and if the varnish has already dried, you will have to use a liquid to remove it.


Spot Manicure Ideas
Drawings made using dots always look interesting and attract the attention of others, especially if they are done very carefully. Dotted nail design is equally suitable for young girls and older women, provided that the colors of the varnishes used are correctly selected.
For everyday wear, you should perform a manicure using nail design dots in discreet colors or limit yourself to a small number of dots. This could be a stylish two-color manicure, for example, coffee-beige or mint-white, done in a French style. In this case, coffee or mint is used as the main color, and neat dots are applied along the edge of the nail with beige or white. A regular manicure with polka dots all over the nails in discreet colors will also be a great addition to your everyday look.
When going to a special event, you can create a fashionable and bright design on your nails using various shaped elements - leaves, curls, spirals, etc. When drawing leaves and lines using dots, you need to remember that the faster the line is drawn, the longer and thinner it is it will work out.
Applying beautiful and unusual designs on your nails using dots is a pleasant, creative and very exciting process. If suddenly you really want to create neat dots on your nails, but you don’t have a dot on hand, a hairpin, a ballpoint pen that has run out of paste, or a sharpened pencil can temporarily replace it.
Dots for nail design photo gallery:


