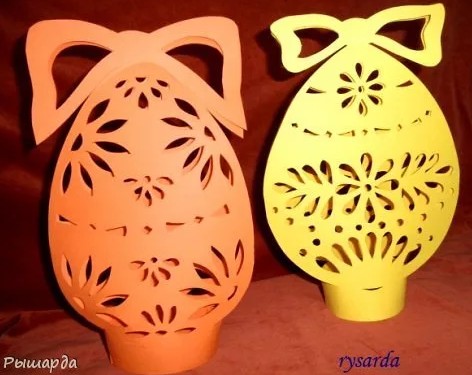
Original crafts for Easter. Easter crafts How to make an Easter egg craft for school
Easter is the most important holiday of Christianity. They prepare for this day, fast, and cleanse their body and soul. Traditionally, it is customary to visit and give gifts to family and friends. For children, this holiday is a anticipation of sweets after long restrictions associated with fasting. In anticipation of this bright day, they can make memorable crafts for Easter in kindergarten or at home with their parents. Handmade souvenirs will decorate the festive table and bring something new to the interior of your home or room.
Children's creativity
Applied creativity is not only exciting, but also useful. The interests of a child in preschool age change quickly as soon as he sees something new. Nobody knows what he will become when he grows up. A child will have more options for personality development if he is introduced to the basics of applied art in kindergarten. It is important that any creativity has a meaning. To choose a handmade idea, it is advisable to use holiday themes: New Year, Christmas, Mother's Day...
Crafts for Easter in kindergarten are not only an interesting activity, but also a useful lesson in terms of introducing them to the younger generation. Such creativity develops hand motor skills, trains memory and thinking, and teaches you to bring what you start to its logical conclusion. At the same time, in the process of communication, speech is easily and naturally practiced.

Crafts. Easter. Kindergarten
The bright holiday of Christ's Resurrection does not have a fixed date, but it always falls on a weekend and happens in April or early May. Waiting for a holiday for kids can be made less painful if, in anticipation of joyful moments, you engage in exciting arts and crafts with them. The result of such activities at home can be successful applications made from colored paper, greeting cards for Easter, and thematic compositions made from natural materials.
It will be much easier for kids to make crafts for Easter in kindergarten with their own hands if their parents prepare them well at home. It is important not only to be able to properly handle scissors, pencils, glue, brushes, felt-tip pens and other devices, but also to understand the meaning of the intended work. The ability to clearly and clearly express one’s thoughts and formulate one’s position on controversial issues is not easy to achieve. This ability is developed in and is also an important and integral part of applied art.
The creative process for preschool children has its own characteristics. At this stage, the end result is not as important as the classes themselves. Their involvement in the process will depend on how much educators manage to interest children. Whatever the result of the work, it will be important for the development of the emerging personality.
Crafts for Easter in kindergarten for different age groups should differ in level of complexity. Here a special role is assigned to educators. They, like no one better, see the degree of development of a particular child. In one case, they can tell you how best to proceed at a certain stage of the lesson, in another - they can do a difficult element for the child so that he does not lag behind the general group.

When a child makes crafts for Easter in kindergarten in the middle group, the participation of a mentor is required. But educators do not need to overly impose their help on the pupil. Without giving him the opportunity to express his individuality, you can miss the moment of manifestation of fantasy, and this is a component of talent. Even if his work is not perfect, the main thing is that it will be original, and that will make him proud of it.
Wreath made of colored paper
Simple DIY crafts for Easter in kindergarten are easy to make using the applique method. A wreath that can be hung on a wall, refrigerator door or cabinet will serve as a good reminder of the holiday.
To make it you will need thick cardboard for the base and colored paper. The composition is selected depending on the age of the baby. These can be flowers, butterflies, birds, insects cut out of paper. The number of elements to be glued and the complexity of their execution depend on the children’s ability to cut out small parts.
To speed up the process and not tire the kids with this activity, all the ingredients can be prepared in advance or you can give parents a homework assignment to help with this task. Their participation is also important, because not only kindergarten teachers will evaluate the results of their work.
The finished elements are glued onto a base made of cardboard or thick paper. The wreath frame can be round or oval. If you make a longitudinal jumper in the middle, then you can additionally stick letters pre-cut out of paper in sequence on it to make the words “Christ is Risen!”

Natural material
A traditional Easter gift is: You don't have to cook it. After removing the white and yolk from it, the shell washed with water can be stored for a long time. It can be decorated in various ways.
These kinds of souvenirs, decorated with various cereals, look original. Crafts for Easter in kindergarten (senior group) can already be made at a fairly high artistic level. The shell is coated with glue or paste prepared with flour. Cereals are selected in different colors, shades, sizes and textures. You can take semolina, buckwheat, rice, barley. Millet, lentils, and split peas are suitable.
These components can be placed on a shell greased with paste in rows in different sequences or laid out in the form of traditional Easter patterns. It is convenient to do this along pre-designed contours. You can use a stencil for these purposes. The color and texture of the cereals are chosen based on contrast. These Easter eggs look very original and elegant.

Hanging souvenir
Decorative crafts for Easter in kindergarten made from a blown egg look beautiful hanging on a thread or ribbon. In a child’s room, such a souvenir will constantly remind you of the first or next creative success. With each new holiday, the collection can increase and the decorative decoration becomes more complex. This will be a clear example of creative growth, changing preferences in the process of growing up and choosing new techniques for decorating crafts.
First, the blown egg is washed with water. The holes in the shell expand depending on the thickness of the thread or ribbon. Using a needle or bent wire, the suspension is passed into both holes. A beautiful knot in the form of a bow is knitted from below, and a loop is formed on top for hanging. The length of the thread is chosen arbitrarily. The decorative finishing of such a souvenir can be made with paints or appliqué.

Using scrap materials
To make a simple craft for Easter with your own hands in kindergarten from Kinder, you will need a plastic container-egg of this “surprise”. You will also need scissors, floss threads of different colors, beads, sequins, semolina, colored paper. You can fasten all this with either “Moment”. For ease of application, it is better to use a brush.
One half of the “egg” is smeared with glue and, until it hardens, it is wrapped in a spiral with threads, starting from the top. The layers are laid alternately. After the glue has dried, the procedure is repeated with the second part of the container.
The top and bottom are decorated with sequins. An Easter pattern in the form of a cross is laid out from beads in the middle of the egg. You can sprinkle semolina on top of everything, and cut out small flowers from colored paper and glue them at the junction of threads of different colors. Whatever the level of complexity of the Easter craft, a souvenir made by children’s hands will always be an expensive and pleasant gift for family and friends.
Why do we love holidays? Probably because it’s nice to prepare for them: think about gifts, set the table. But there are special, bright celebrations in our lives, such as Easter. On Easter, people give each other small Easter gifts: painted eggs, Easter cakes, baskets, Easter souvenirs. Children love to prepare crafts for Easter with their own hands; they are so interested in taking part in the preparation and work. We have selected the most interesting master classes for children and adults from a variety of crafts.
We offer crafts for Easter from the simplest materials, the purchase of which does not break your pocket; they are always available in any regular store.
This interesting basket for eggs can be easily made from a disposable plate, wooden clothespins and tape.
Cut a disposable plate with scissors:

Glue the sides together and seal the top with paper or tape. Separate the clothespins and glue them with Moment glue. We secure the top with a thin braid.

We cut strips of paper into the bottom and make a handle from cardboard. Decorate with a bow or several.

We print out the bunny template or draw it on a sheet of cardboard or thick paper. We paint on both sides, glue and place a beautiful Easter egg in the paws.


We make chickens from disposable spoons, cotton pads, and colored paper.
You can make the same funny bunnies:


More Easter-themed crafts: unusual egg plates. How beautiful multi-colored eggs will look on such an original plate! Cut out 4 legs and a bunny's head from white paper, and decorate the face. We put clothespins on a plate and glue paper paws to them. Place chopped white paper on the bottom of the plate.

We make a plate with chicken in the same way. Differences: yellow paper and the size of the paws.

DIY gifts for Easter
There are so many ideas for gifts for Easter, you’ll get tired of choosing. I would like to hope that our master classes will help you in your choice.
From paper
An Easter basket for the upcoming holiday can be made from a regular paper bag. Or from beautiful wrapping paper, maybe you have leftover candy boxes. There are many options. Multi-colored Easter eggs or delicious treats will look original in such an interesting basket.

To work you will need:
- Paper.
- Scissors.
- Ruler.
- Hot-melt gun or regular paper glue.
- Pencil.
If you took a bag for work, you need to cut off the bottom of it. Cut the side. Using a ruler and pencil, draw the paper into strips 3 cm wide.

We bend all the strips in half along the entire length.

We begin to weave a basket from the strips, as in the photo.


To prevent the parts from getting tangled, glue the strips to the top of the basket, then cut it all off. Glue the handle and glue the top of the basket.


We will make an interesting chicken stand for Easter eggs as a gift. There are several recipes for making dough.
Recipe for wheat flour dough:
- Flour - 2 cups.
- Extra salt - 1 glass.
- Cold water - 250 grams.
- Bag for storing products.
- 1 tbsp. spoon of sunflower oil.
Recipe for products made from rye flour:
- 3 cups (300 gr.) wheat flour.
- 1 cup (100 gr.) rye flour.
- 2 cups (400 gr.) fine salt.
- 250 ml water.
Rye flour gives the figures a warm bread color. To prepare any dough, mix flour and salt, then gradually pour in cold water and mix again. The degree of readiness of the dough can be determined as follows: if the dough stretches and sticks to your hands, it means there is a lot of water in it. Therefore, you need to add more flour.

To work you will need:
- The dough is salty.
- Stack.
- Peeler.
- Toothpick.
- Manicure file.
- Black peppercorns.
- Paints, brush.
- The varnish is transparent.
- Garlic press.
Roll out the flatbread to a thickness of 0.5-0.7 cm, this will be the chicken’s nest itself. We make the side parts of the nest using a garlic press. We form a “straw” by moistening it with water.

Leave the work to dry for 1 day so that the dough holds its shape well in the future. Let's start sculpting the chicken. We sculpt the body blank. We need the chicken as a stand for an egg, which means we need to make a recess for the Easter egg. We take a round shape, make a notch, and sculpt the breast and neck of the chicken. Use a vegetable peeler to feather the breast.

Insert a toothpick into the chicken's neck, leaving 1.5 cm. Connect the nest and the chicken's body. Roll out the dough, make wing blanks 1 cm thick. Draw the plumage with a vegetable peeler, attach it to the body of the chicken, moistening it with water.

Next, our task is to give the chicken a beautiful tail. We take an oval cake 0.7-1 cm thick as a basis. We make the plumage with a vegetable cutter. We trim the edges of the tail with a knife to resemble the pattern of feathers. Make the cuts neat, smoothing them with your fingers. Attach the tail to the chicken's body. Place something under your tail, such as a ball or an apple. After the product dries, remove the apple.

Roll into a round ball for the head. We shape the scallop using our fingers and a stack, giving it the desired look.

To make the eyes, you need to mark their location. Make dents for the eyes with a stack. Next, use a vegetable peeler to make dents so that the eye becomes shaped.

Insert a peppercorn instead of the pupil. We make a beak and sculpt it to the head.

We fasten the head and body by putting the head on a toothpick. We attach a small strip of dough to stabilize the head. Decorate the chicken neck with dough feathers. You can make “earrings” for the chicken from pieces of dough.

We sculpt chickens in the same way. Don't forget to wet the parts for better fastening.

We leave the product to dry for 1-2 days, placing them in a distant place, maybe even on a closet. After a day or two, when the chickens and chickens have hardened, we finalize the work: we plant the figures on leaves, moistening the centers with water. Leave it in the air for 1-2 days. We dry the products first in air, and then put them in the oven at a temperature of 50 degrees for 1 hour. After drying, paint and cover with clear varnish.

Another option: dough figures: we make Easter bunnies, hens, chicks. You can make fridge magnets out of them, or pendants on willow branches.
The fastest gift option is multi-colored paper napkins and ribbons. Wrap the boiled egg in a napkin and tie with a ribbon. Can be replaced with corrugated paper.

This funny and interesting Easter chicken can be crocheted.

To work you will need:
- Yellow yarn, 100% cotton or 50/50,
- Some orange and white yarn.
- Hook number 3.
We start knitting from the body. First 7 rows:
1st - 8 sc in an amigurami loop
2nd - knit 2 sc in each loop (16 sc)
3rd - 1 sc, 2 sc, and so on (24 sc)
4th - in every third loop add: 2 sc, 2 sc (32 sc)
5th - in each 4 p. add: 3 RLS, 2 RLS (40 RLS)
6th - in every 5 p. add: 4 RLS, 2 RLS (48 RLS)
7th - in every 6 p. add: 5 RLS, 2 RLS (56 RLS)


15th - knit the 5th and 6th stitches together (40 sc)
16th - we knit 2 rows without decreasing (40 RLS)
18th - knit the 4th and 5th stitches together to decrease (32 RLS)
19th - no decreases (32 RLS)
We fill the chicken with cotton wool or padding polyester.


20th - knit every 2nd and 3rd stitch together (16 sc)
21st - knit every two loops together (8 sc)
Cut the thread and carefully sew up the hole.
Wings (2 wings):
- 1st - dial 7 air. loops with yellow yarn, 1 sc in the second loop from the hook, 4 sc, 3 sc in one loop, 4 sc, conn. P.
- 2nd - 1 VP, 4 RLS, two times 2 RLS in one stitch, 3 RLS in one loop, two times 2 RLS in one loop, conn. P.
- 3rd - 1 VP, 1 sc in each loop
- 4th - 1 VP, 1 connection. p. in each loop
We knit the paws with orange yarn:
- 1st - 2 VP, 6 sc in the second loop from the hook (6 sc)
- 3rd - increase in every second stitch (18 RLS)
- 4th - row without changes (18 RLS)
Beak (1 piece)
1st - cast on 5 VP, 1 sc in the 2nd loop from the hook, half-dc, 1 dc, and 1 dc2h
Eyes (2 parts)
- 1st - 6 sc in amigurami loop (6 sc)
- 2nd - increase in each stitch (12 sc)
- 3rd - increase in every 2nd stitch (18 sc)
- The beads are different (colors are indicated next to the diagrams).
- 2 meters of thin fishing line or nylon thread.
- 2 beading needles.
We start weaving from the central row from number 1 to number 2, then we perform each part separately at different ends of the fishing line, using the table.

In the egg weaving pattern, notice the double rows (12 and 13 at the top, 13 and 14 at the bottom). For a chicken-shaped keychain in the upper part, we first weave the right wing (numbers 5 to 9), and then the left wing (numbers 10 to 16). Next, we move on to the design of the head (numbers 17 to 40).

What would Easter be without Easter cakes, Easter eggs, souvenirs and angels? You can make these original Easter angels with your own hands from ordinary pasta. Pasta can be anything: stars, cones, spirals, vermicelli. These angels can be hung on a willow branch or placed in an Easter basket.

To work you will need:
- Pasta.
- Ribbons or sticks.
- Hot-melt gun or Moment glue.
- PVA glue.
- Salt dough balls.
Use a glue gun to connect the head (dough ball) to the body. Next, glue the ribbon to the back. We select wings from pasta and glue on top of the braid.

Thickly coat the angel's head with PVA glue and dip it into small noodles or stars. This is the "hair" of an angel.

For hands, use openwork pasta. Apply glue thickly on the sides, near the wings and glue.

We paint with either simple golden paint or spray paint.

If you want to insert them into an Easter basket, insert a stick inside the pasta body and glue it, the crafts are ready.
Easter is coming very soon, and children love it very much. Firstly, because this holiday is very tasty and bright. On this day, the tables are always full of various delicacies - these are soft buns that melt in your mouth, sunny cheesecakes, and much more. And of course, we haven’t forgotten about, which you can use to fight and win tournaments in this simple activity.
This holiday also becomes memorable because many people want to do and make some kind of holiday craft with their own hands. And once you get the hang of it, even a few. These include baskets for eggs, eggs themselves, various stands, cute figurines of chickens and Easter bunnies. And also postcards.
Kids love to make different things from paper and various scrap materials. If their mother, grandmother, or older sister, or maybe even their father or older brother helps them, then they can do this for hours.
Crafts are now made in kindergartens and schools. And if in the garden, kids take their first steps under the guidance of a teacher, then in schools they even give homework assignments to create something for the holiday with their own hands. And then mothers begin to look for something interesting and original to do.
In today's article we will look at various ways to make various cute little things that can be made quickly and easily. Just a little perseverance, and your hands will make a cute craft that you can give to your family and friends, as well as congratulate teachers and educators with its help.
It will take no more than 5 minutes to make such a simple and at the same time necessary and beautiful egg basket. It will be made in the origami style beloved by many.
Any student can cope with this task. It just takes a little effort and perseverance. But what a great holiday gift you can make.

We will need:
- sheet of double-sided colored paper
- stripe in contrasting color
- scissors
Manufacturing:
1. From a rectangular sheet of paper, we need to cut a square. To do this, fold the sheet diagonally, connecting the two edges. It looks like two triangles are formed, folded together.

2. Cut off the excess piece of paper.

3. Expand the square. Now we will need to tuck all the corners to the center. There is no need to rush; all newly obtained triangles should be the same size and accurately connected at the central point.

Each internal figure folded into a triangle, and the overall result was a double square. We turn it over to the other side, that is, with the curved ends down.

4. The next step is to fold the edges up again, connecting them in the center.

You should end up with triangles, but with a cut in the middle.

5. Form the bottom of the paper basket. To do this, bend each corner to the opposite edge. Iron the fold line very well.

You should get a figure like this.

6. Turn the workpiece over again.

Roll each of the 4 squares into a triangle.

7. Now let’s give the workpiece the appearance of a basket. To do this, lift each corner up and bend it to form a three-dimensional shape. Then slightly lift the edges to form a box inside.

We iron the inner seam along the perimeter of the square with our finger to more clearly define the shape.

8. Now we need to make a handle. To do this, take a prepared strip of contrasting paper and cut a strip 1 cm thick. To make the handle stand out, it can be carved. To do this, you will need to cut the strip not with ordinary scissors, but with curly scissors.

9. Coat one side with glue and stick it onto the remaining red paper on one of the long edges. Cut a long strip with a total thickness of approximately 1.5 - 2 cm.

10. Inside the basket, or rather on its wall, there is a slot where you can insert the handles from the basket. And to create a more durable fastening, it is better to lubricate the edges with glue.

This will make it easier and stronger to hold on. After all, we will put an egg in the basket.

11. The basket can be further decorated. To do this, cut out small oval circles and paint them, just like you paint eggs. Glue on the bases of the handles and on the sides.

This is such a beautiful craft that resulted. You can put a painted egg in it, or something else, such as candy or cookies.
Easter craft from cotton pads for kindergarten children - easy and quick
Any child who knows how to hold scissors in their hands and draw faces can make this craft as a gift for their parents. The craft is original, very beautiful and uplifting.

And it’s very, very simple to do.
We will need:
- cotton pads
- a piece of bright fabric
- bow
- small plastic spoon
- felt-tip pen
Manufacturing:
1. Draw a perky face on the convex side of a regular white plastic spoon.
2. Cut long ears from cotton pads or pieces of white felt. Glue liners of a bright contrasting color into the middle, cutting them out of fabric.
3. Glue cotton pads on both sides of the spoon handle, thereby forming a body. Glue on the bow.
That's it, our bunny is ready.
To decorate a gift, plant grass in a bowl in advance. In a week she will grow up so beautiful and green. Stick the end of the handle into the ground, and the gift is ready!

It looks absolutely amazing. I can’t even believe that a small child could make such a craft.
Original craft made from felt and thread “Easter Bunny” (for students of grades 2 and 3)
You can make such a cute rabbit from threads and felt.

After reading the description, you will be surprised how easily this can be done. So get your materials and tools ready and let’s get started. And if you encounter difficulties, then ask your mother for help.
We will need:
- bright thick threads for knitting
- chenille wire
- eyes
- scissors
- hot melt adhesive
- cardboard
Manufacturing:
The technique for making such a cute toy is based on the ability to make pom-poms for hats. And if you know how to do this, you can do it without difficulty. And if you don’t know how, then learn to do two things at once.
1. To make a pompom, we need a piece of cardboard. From it you will need to cut out a round shape like this with a notch. To make the shape more durable and not bend, you can make it double by cutting out two templates. Their size should be 11 cm in diameter, with an inner circle of 3 cm.

2. Prepare thick, bright threads for knitting. Starting from the middle of the mold, wind the threads around it.

3. Cut them into two equal parts along the cardboard line.

The result will be such a fluffy preparation.

4. Then cut a piece of thread 30 centimeters in length, and insert it between the cardboard blanks and tie it tightly. Then remove the cardboards.

5. Trim the resulting pompom by aligning the threads to the same size. Cut off any remaining tail.

6. Cut out the paw parts from felt. To do this, we will need two pieces of material measuring 4x6 cm. Cut two ovals from them. Glue them with hot glue.

7. For the ears we will need more felt, two pieces measuring 6x2 and one strip of another, lighter color, 7x1.5.

From two strips of dark color, cut out two pointed ovals, giving them the shape of ears.

Fold the white strip in half and cut out the inside of the ears from it.

Apply glue to one of the ends and fasten both parts to make the ear voluminous.

8. Spread the threads on the pompom and glue the prepared parts. Use glue to glue on the eyes. They are purchased from us.

9. Cut the chenille wire into three equal parts.
Chenille wire is wire wrapped in lint. It is fluffy and bends perfectly.
We will make antennae from it. After cutting it into pieces, connect it in the center and twist it relative to each other so that it holds. Glue onto the pompom.

10. Cut out a round piece from felt that will be the spout. Glue it.

Let the toy dry. Everything is ready and very beautiful!
Easter egg using paper quilling technique for a school competition (master class)
And such a chic egg can be made using the quilling technique. With its bright and colorful appearance, it will certainly attract the attention of a strict jury, and they will linger near it for a long time, admiring its beauty. And maybe they will be awarded first place for this work.

This work requires accuracy, attention and a desire to achieve results. And then everything will certainly work out.
We will need:
- quilling paper
- PVA glue
- glue brush
- scissors
- pen refill
Manufacturing:
1. First, we need to stock up on eggs. This may be a product made of plastic or other material. But if this is not the case, then you can use just a hard-boiled egg for the mold.

You need to stick a thin strip of paper on it in the center, wrapping it around the egg twice. Glue the edges with glue.
In order for the glue to better hold the elements together, pour a small part of it into a mold, or simply onto a piece of cardboard. It will thicken slightly and will glue faster and better.
2. Also prepare paper. Ready-made quilling kits are sold. Today we have prepared a set of 3 mm thickness. This size will be ideal for a small egg, and the craft will look neater.

If you can’t find a set, you can buy double-sided colored printer paper and cut it into thin strips of the desired width and the same length.
3. First, you need to twist the blanks from strips of paper. To do this, take one of the strips and coat one edge with glue, then carefully screw it onto the rod. At the same time, try to ensure that the loops do not fall off and are positioned strictly one above the other. The more accurate the workpieces are, the more accurate the final result will be.

For one workpiece, wind one strip of paper.

4. Then remove the curl, put it on the table, and let it unwind a little to make it look more beautiful. It will also be easier to make leaves and petals from such a blank.

Place each subsequent workpiece on the table next to the previous one and allow it to unwind to an equal size. When this happens, fix it with glue, covering the edges.

Think over the design and colors. That is, how and in what color scheme you will get the craft.
5. We begin to decorate the egg from the center, namely from the base that we have already glued earlier. You can glue the blanks in the form we prepared them. Or you can give them the shape of a leaf. To do this, take the workpiece from both sides, stretch it to the sides and lightly press the edges to form a corner. You will get a figure like this.

Glue the first one onto the green strip of the base, then apply glue to the area next to it and the side of the first piece, glue the second one next to it, then the third one, and so on in a circle until the very end.

Let the first row dry thoroughly. To dry, it is better to place the egg on a stand. A cap from any plastic bottle will do for this.

6. Then move on to the second row. And while the first one is drying, we begin to twist the blanks for it. Choose a different contrasting color for this. We also give them the shape of a petal. To do this, squeeze the edge of the circle only on one side.

7. Place the second layer not in a row, but through one green leaf. Glue to the side of the leaves. Align so that the egg shape is maintained. And let it dry completely again.

8. In the meantime, while our beauty dries, roll up blanks of a different color. And give them the shape of leaves again, pressing them on both edges. Then fill in the empty spaces between the pink petals.
Then twist more circles and stick them next row. Give each row the opportunity to dry. And you can also fix them with rubber bands.

9. For the top, take a different color, and twisting the rounds, fill the empty surface with them.

Let the glue dry completely. Then carefully remove half of the craft from the egg.
10. But first you need to draw the tops of the lower half on the egg with a felt-tip pen. So that we do not make a mistake with joining the parts at the last stage.

While the first half was drying for the second, we had already prepared leaves, petals and circles. And by analogy with the first part, we repeat the same thing. You can use the same colors, or you can make them different and in a different order.

11. After drying, remove this half and glue both parts.

12. Then we make a stand and place our beauty on it.

But really, look how beautiful the egg turned out! “Live” it looks even more attractive.

Don't be afraid that you won't be able to repeat the result. The most important thing is to have patience. If it doesn’t work the first time, then go back to the stage where the error occurred. Fix it and everything will go swimmingly.
And there is one more small piece of advice. If you are making a quilling-style craft for the first time, then wrap the egg in cling film. And when you make the first part and fix it with glue, the film can be removed. The same can be done with the second part.
This will make fixing the parts easier.
Video on how to make a foamiran basket for decorated eggs
Working with a material such as foamiran requires accuracy and perseverance, especially when you make any small parts from this material. These are usually flowers and leaves. If you want to make them look like real ones, then in addition to careful cutting, you also need to diligently decorate every small element. Then combine them all into one composition.
And today’s craft is much easier to do. Although it also requires diligence and accuracy. This video shows how to make an Easter basket from foamiran. A beautiful pattern and accuracy in cutting out the pattern - and success will be guaranteed to you.
And if you also decoupage eggs using napkins and place them in a basket, it will be so beautiful that it will be difficult to look away.
If you make such baskets a little smaller, and put 2-3 decorated ones in each, or , then it will be nice to go on a visit with such a gift and present it. The recipient will be delighted with such beauty.
And the main thing is that even children in grades 2-3 can make such a craft, not to mention older children. Of course, younger children can make such a basket with the help of their mother or someone older.
DIY holiday card is easy and simple
This card is also easy to make yourself. Especially if you have a couple of ready-made felt figures. Or they can be replaced with cut out paper figures on the appropriate theme.

A postcard with good wishes will be a welcome gift for Easter.
We will need:
- double-sided colored cardboard
- contrast colored paper
- ribbon
- two felt figures
- double sided tape
Manufacturing:
You can choose the size and shape of the postcard yourself. And we will make it in the shape of an egg.
1. Cut out a folding egg shape from double-sided colored cardboard so that you get two halves on the spread. Subsequently, you can write a congratulatory text inside.

2. Then cut out a slightly smaller egg shape from contrasting paper.

3. Wrap it with ribbon crosswise.

Tie a beautiful bow on the front side. It is desirable that the color also differs from the main color of the postcard.

4. Attach double-sided tape to the wrong side of this part on four sides.

And glue the detail to the top of the future postcard.

5. Now all that remains is to glue the felt figures and the card is ready.

She turned out so beautiful!

Inside you can write a congratulation for the person to whom it is intended.
DIY Easter crafts made from pasta
If you want to make a beautiful and original thing for the holiday, you can make it from ordinary pasta. You get true pleasure and satisfaction from the very process of making this or that craft. Because the end result always amazes with its exquisite beauty.

Recently, some works have already been elevated to the rank of art. They make tea sets, luxurious vases, and formal candlesticks.
However, children do not lag behind, and also make simple, beautiful vases, coasters and decorate eggs for Easter.
To make any product, different execution techniques are used. Balloons are widely used. They are inflated to the desired size and then decorated with pasta using glue. After the glue has dried, the ball is pierced and removed. But the shape given from the pasta remains.

The second way is when using dishes. For example, a cup, saucer, or bucket. It all depends on what shape you would like to get in the end. The dishes are wrapped in cling film, and the future product is formed on it.

Then, when the product is completely dry, it can be removed from the used dishes.
Sometimes the product is left in the same form as it was made, but most often it is painted in various colors. Gold and silver colors are especially welcome in coloring.
Flour products of different formats, sizes and patterns are often used.

This allows you to create simply gorgeous masterpieces.

It's very nice to make such a beautiful thing. It would seem that what is wrong, some ordinary pasta?! But look how beautiful it turns out. It will be a pleasure to decorate your home for the Bright Holiday with such souvenirs, as well as make a present to your friends or loved ones.
Video on how to make a craft from scrap materials in the form of Easter cockerels
Skill and dexterity, wonderful ethnic music and just a little time, and these are the results of such beautiful Easter toys. And agree, everyone can repeat it. All you need is a little free time and desire.
Very beautiful, bright, colorful and positive cockerels can be used as an egg stand.
It may be a bit difficult to make these for small children, but they will undoubtedly want to take part in coloring them. And older children, of course, can handle it on their own.
In today's article, I tried to collect simple ideas for making various holiday cards and cute little things. Children can do all of them. And if at any stage they may have difficulties, then adults will always be able to help them. It’s even better that children do all the work together with their parents or older brothers or sisters.
Such joint work brings souls together, and what could be more important. Especially on such a wonderful spring holiday as
Happy Holy Resurrection to you. Give each other love and warmth, and at the same time little pleasant signs of attention in the form of cute gifts.
All the best!
What crafts can you make for Easter with your children?
- Not only adults, but also children look forward to the bright holiday of Easter.
- For kids, Easter is a special time of fun and joy. But most of all, children look forward to the moment of receiving symbolic gifts and presenting pre-prepared crafts.
- This article contains step-by-step descriptions of children's Easter crafts of varying levels of complexity.
- It’s up to you to prepare your own Easter souvenir from scrap materials a few days before the holiday or a couple of hours. Get inspired and start creating with your children.
DIY crafts for Easter from napkins
You can quickly make an Easter craft from napkins. You just need to wrap the boiled egg in a napkin and tie a beautiful ribbon. You can replace napkins with corrugated paper.
Another way to make crafts from napkins:
- Prepare a drawing on which a layer of napkins will be applied.
- Decide on colors and choose napkins in the right shades.
- Cut many squares from napkins measuring 2x2 cm.
Roll each square into a small ball. - Glue napkin balls inside the drawn outlines.
- You can make a card with a spread or cut out a figure along the outline.

An Easter arrangement would be incomplete without an egg stand. It can be done from napkins:
- fold a paper napkin diagonally


- bend the corners of the resulting triangle upward, connecting them with the upper corner

- roll the bottom edge of the resulting square with a roller approximately to the midline

Roll half of the resulting square with a roller
- turn the structure over and connect the lower corners under the roller

- secure them with a paper clip
- turn the future basket over again (the paperclip should be at the back) and straighten the ends of the workpiece

Options for crafts made from napkins:


Video: Do-it-yourself chicken and rooster made from napkins. Master Class
Video: Easter bunnies made from napkins
DIY Easter crafts made from pasta
Pasta is also used in making various crafts. We offer you several lightweight options for creating an Easter souvenir from pasta.
Method one: original Easter egg
Let's prepare the necessary materials and tools:
- wooden or foam eggs
- glue (it is better to use PVA, then there will be no traces of glue left on the finished craft
- tassel
- bright colors
- stand on which the finished product will dry
- pasta in the form of small stars
- dry glitter
Let's start creating!

- Apply a layer of glue evenly to the blank of the future Easter egg and begin gluing pasta stars in even rows (but only raw ones!).


- If desired, you can use small pasta of different shapes, and also glue them onto the workpiece in any order.
- Leave the egg for a while so that the glue dries well.
- We check whether the glue has dried and, if all the stars adhere well to the Easter egg blank, cover the product with paint. We use a brush for this.

- To decorate an egg with glitter, coat the desired area with glue and sprinkle with dry glitter. After the glue has dried, shake off the excess glitter.

- You can make these bright souvenir eggs with your child and decorate the room for Easter by putting the crafts in a basket.

You can make angels from pasta of different shapes.
For this craft you will need the following pasta:
- stars
- horns
- spirals
- vermicelli
A handmade angel can be placed next to Easter eggs, placed in a basket or placed next to willow branches.
We will need:
- pasta
- sticks
- glue (Moment or heat gun will do)
- PVA glue
- pre-prepared salt dough balls or hand-made foam or wooden rounds purchased in a handmade store
How to make an angel from pasta:
- Glue the pasta in the form of a wheel to a thick tube.
- Apply glue to a salt dough ball or foam piece and connect it to the body.
We glue a small ribbon on the back.


- We select pasta for the wings that is suitable in shape and size (for us it is bow pasta) and glue it on top of the ribbon.

- We use small vermicelli for the angel’s hair: we smear his head with PVA glue and immerse it in a bowl with vermicelli or lay it out in even rows.
- We use pasta horns for handles. We glue them near the wings.


- All we have to do is cover the angel with paint. You can use gold, white or silver paint.

- Why do you need a wand? To glue it inside the body of the angel and place it in the Easter basket.


Video: Crafts for Easter from pasta
Video: Pasta basket. Pasta products. Creative work
DIY Easter crafts made from cotton pads
Without the image of a chicken or an angel, it is difficult to imagine the Easter holiday. Let's try to make an interesting simple craft - a bright and cute chicken that can become an element of Easter basket decor or decorate a room during the holiday.
To work you will need:
- cotton pads
- yellow egg dye
- colored paper or cardboard sheets of the desired color
- scissors
- chenille wire
Let's get started:
- Dilute the paint with water and dip cotton pads into the solution. For one chicken you will need two yellow-painted disks. We leave them to dry.
- We will make paws from chenille wire of a suitable color.

- Cut out a comb from red or orange paper, wings and a beak.
- We place the parts cut out of colored paper between two cotton pads and glue them.
- For the chicken's eyes, you can use toy blanks or cut them out of paper and draw a black pupil. We glue the eyes on both sides.

You can make angels from cotton pads that will complement any interior.
How to make an angel from cotton pads?
- Divide the cotton pad into two parts.
- Place the bead in the center of one of the parts of the cotton pad.
We process the edges of the cotton pad with zigzag scissors for a more aesthetic appearance of the product.

We tie the button with thread
- We bend the disk with the bead inside in a circle and wind the thread under the bead. We straighten the resulting “skirt” from a cotton pad.
- Fold the second part in half. We wrap the edges of the workpiece at the same distance from the center. After this, we wrap the edges towards the center.

Making the wings and body
- Having dipped a toothpick in glue, unfold the slightly twisted cotton ball and glue it inside.
Glue the wings to the body.

We connect the parts with glue and apply shiny paint on the dots on the wings.
- All that remains is to apply a halo stripe on the head and dots on the wings using paint with glitter and the delicate angel is ready!

Other options for crafts made from cotton pads:

Easter crafts from cotton pads


What quick crafts to make for Easter with your own hands?
In this section you will find descriptions of Easter crafts that can be done in 15 minutes:


Paper chicken
To work you will need:
- paper plates or cardboard
- paints
- colored paper

- Cut out a circle from a paper plate.
- Bend the circle in half
- Cut out wings, eyes, comb and beak from colored paper
- Glue it to the plate


Easter egg stand:
This craft can be done with children in kindergarten.
To work you will need:
- white and green colored paper
- white yarn pompom
- scissors, pencil, glue
- pink marker
- shell or wooden egg

- To make an egg stand, we transfer the outlines of a rabbit onto paper: this is a figurine with ears, paws and a strip for fastening around the egg. Let's paint the middle of the ears pink.

- The length of the strip should be such that the egg is on the stand, which will be obtained after gluing wide strips of the workpiece. Let's cut it out.
- Draw a strip of grass on green paper and cut it out. We will paste this strip over the white stripe stand.
- Let's bend our hind legs forward. Glue on the pompom tail.

- Place the egg on the stand and glue the front legs together.
- The craft is ready. If you wish, you can finish drawing the rabbit’s face and draw a few flowers on the grass.

Other options for making an Easter egg stand


Easter themed card
- A greeting card can be made from a sheet of cardboard. Draw or cut out a chicken, bunny, or Easter egg from colored paper, felt. You can decorate the card with lace, applique, pieces of felt, and buttons.
- If you are not interested in making a regular applique, then create a three-dimensional one where the paper is folded. You can make movable joints, or make a chicken peeking out of an eggshell. To do this, cut out the top of the shell from thick cardboard and attach it to one side of the postcard.
- A postcard that you or your child made with your own hands will bring special warm emotions to the one who receives it as a gift.


Crafts made from salt dough for Easter
We suggest making simple but beautiful Easter crafts from salt dough.
To work you will need:
- salty dough
- glass of water
- several different brushes
- stack
- paints (preferably gouache)
- rolling pin
- plungers or suitable baby molds
- a raw egg
Let's get to work!

- First you need to blow out the contents of the egg by making holes at opposite ends.
- Let's make long sausages from salt dough and roll them out into flat ribbons using a rolling pin.

- Take one ribbon and wrap it around the egg. Take the tape again and glue until half of the egg is hidden under the layer of dough.
- We make an egg stand using a juice or plastic bottle cap and place a wooden egg on it.


- Using molds or a plunger, we prepare flowers for decoration and, after moistening the place where each flower will be attached with water, we place the cut-out decorative blanks.
We complement the composition with leaves cut out from salt dough.

Cut out flowers for decoration. We use plowers or baby molds for this.
- Inside the egg there will be a bird, chicken or candle, which also needs to be molded from dough.

- We dry the product. To make the drying process faster, place the product in the oven and dry it over low heat with the door open for 2 hours. Then leave with the door closed until it cools and repeat until the product is dry enough.


- Remove the egg shell from the dried product.
Inside the craft we place the previously prepared salt dough figurine.

- We decorate the craft, decorate it with beads or seed beads, and cover it with varnish. Easter chicken made from salt dough
To work you will need:
- ready-made salt dough
- paints
- tassel
Let's make a flat cake from salt dough - the base of the nest.
- We will make the walls of the nest with a weaving effect by passing the salt dough through a garlic press. Lay out the resulting strips around the perimeter of the nest.

Preparing the cake - the base of the nest

- Let's start making the body of the chicken. Let's make a flat cake again and pull the edges up to form a neck. We stick a match inside the neck to then secure the head to it.

- The chicken's head is spherical. Add black pepper eyes, make a comb and beak.

- We attach the head to the body. We place the chicken in the nest. We dry the structure.


- We make wings and attach them to the body of the chicken.
We make a tail and also attach it to the body, beautifully straightening the edges.


You can make your own Easter egg for the chicken. To do this you will need a Kinder surprise egg. You just need to wrap it in salt dough and dry it. After this we apply a layer of paint and an inscription. We cover the entire craft and the egg with varnish.
Another way to make an Easter egg stand:


DIY felt crafts for Easter
What you can make from felt for Easter with children - watch the video.
Video: Felt chicken. Detailed master class
Video: Easter egg made of felt
Video: DIY felt Easter baskets
DIY Easter crafts from corrugated paper and cardboard: diagrams


Easter chicken made of paper


Video: DIY Easter crafts made from corrugated paper
Crafts from foamiran for Easter: templates


Templates for flowers from foamiran
Fabric crafts for Easter: diagrams
Textile Easter hen bags:
- Such chickens will decorate a holiday table or become a bright element of kitchen interior decor. This chicken can be given as a souvenir for Easter to family, friends and friends.
- A real or decorative egg is placed in the chicken purse and the chicken becomes the keeper of Easter eggs. In addition, the needlewoman always has a lot of colorful scraps of leftover fabric that it’s a pity to throw away.
- A great way to use them is to sew original souvenirs.
To work you will need:
- scraps of fabric
- floss threads
- scissors
- needle and thread that will be used to sew seams
- ruler
- pattern
The entire manufacturing process is shown in the photo.


 Tilde bird
A cute textile bird made on the principle of a tilde doll will be a cozy craft for Easter. Such a bright gift can be given to loved ones or acquaintances.
To work you will need:
- pieces of cotton of the same or different colors
- a piece of dark fabric for the beak
- filler (sintepon, holofiber)
- 3 buttons
- ribbons and lace
- acrylic paint
- threads
- needle
- scissors
- a piece of chalk or soap for a pattern
- wooden stick
- sewing machine (if available)

How to sew a tilde bird
- We draw and cut out a pattern from paper: body, wings (if desired, you can make a bird without wings), beak.
 We immediately fasten the beak between the two parts of the bird, stitch it, leaving room for turning the workpiece inside out. Using the same principle, you can sew Easter bunnies and chickens. Templates for making patterns will be useful to you:


Hat with bunny ears for Easter egg

Here's how to sew a bright souvenir - an Easter egg.
To work you will need:
- scraps of fabric (you can take chintz, cotton, linen with ornaments and patterns)
- pattern (its size can be changed depending on what kind of egg you want to sew: life-size, small for a pincushion, a little larger or very large, which will then be used as a sofa cushion)
Draw the pattern on paper and cut it out.
- We apply the pattern to the fabric on the wrong side and trace it with a pencil or chalk. We cut out, simultaneously transferring the points from the pattern to the fabric.
- We fold the two parts with the right sides inward, point to point, and stitch.
- Repeat with the second pair of flaps.
- Place the two halves of the workpiece side by side and turn one of them right side out. We put the turned part inside another part.
- We connect the parts with pins. The main thing here is that the edges do not extend beyond each other. Sew, leaving an opening for turning.
- Turn the Easter craft inside out.
- We add volume to the Easter craft by filling it with padding polyester.
- We close the left hole with a blind seam.


Turn it inside out


Crafts for Easter from kinder eggs
You will find out what crafts you can make for Easter from Kinder eggs by watching the video.
Video: Making chicken from a container from Kinder Surprise
Video: How to make an Easter chicken: DIY Easter crafts
DIY Easter crafts from ribbons
How to make Easter souvenirs from ribbons? The video below reveals the secrets of creating original Easter eggs.
Video: Easter eggs made of satin ribbons
Video: Easter souvenir using artichoke technique
Plasticine crafts for Easter
The video tutorial will tell you how to make an Easter bunny from plasticine.
Video: DIY Easter crafts
From the video you will learn what plasticine crafts you can make with your children to decorate your home for Easter.
Video: Three super cool crafts for Easter with kids
DIY Easter crafts for the competition
The videos below will inspire you to create an original Easter craft for the competition.
Video: Easter composition - Nest with a bird. Master Class
Video: DIY Easter decor
Good morning everyone! Just a little more and another Orthodox holiday will come, which will be celebrated by all residents of Russia, and not only. We are talking about Easter, namely about what crafts can be done together with children of preschool and school age for this day.
You can make such wonderful souvenirs and creations with your children right at home, because all you need is your desire and desire. Therefore, I suggest you think about this topic now and choose what you would like to do, and then give it to someone or simply decorate your home.

If you want to find a more complex thing, then perhaps you will like this version made from salt dough.

I also love compositions that have a lot of toys and are bright and eye-catching.

Master class on making eggs from foamiran
Are you familiar with this fabric material? I think yes, how cool it is, just like felt, I’m in love with it. I suggest making this craft in the form of a refrigerator magnet. You can, in principle, hang it on a string like a pendant.
We will need:
- Styrofoam egg - 1 pc.
- scissors
- cutter
- foamiran (1 mm) 2 colors - yellow and white
- magnet
- glue gun
- factory eyes

Stages of work:
1. Take a hairdryer and heat the fabric, and you need to do this quickly, and stretch it over the egg.

2. They pulled it like this, and then applied a hairdryer, held it for 11 seconds and that’s it, turned it off, waited until the fabric cooled down.

3. These are the blanks you will get.

4. Now, using a cutter or utility knife, cut the stencil in half.

5. First put the egg into the yellow foamiran.

6. And then cut off the excess fabric into white.

7. Then cut the white one in half, you can imitate cracks as if by cutting them in a zigzag, there are also special wavy scissors.

8. Then prepare the eyes, make the legs and beak themselves.

9. Well, now the most important thing is the assembly. Carefully glue the yellow template first.

10. Then move on to the white.

11. After starting to design the legs, eyes and mouth, glue the parts with a glue gun.

12. What a wonderful baby he turned out to be, pee-pee-pee.

13. Glue a magnet on the other side, you can take a vinyl one.

14. You get two young weirdos, you can make a boy and a girl, and pin on more bows or other patterns to your taste.

As an option, you can do something else, for example, such a charm in the form of a flower with a handle.

Original crafts for Easter for a school competition
Any student approaches this issue quite responsibly and he really wants his work to become the best. You can come up with a whole lot of options. But, of course, it will be better if you make Easter symbols. For example, these funny chickens, which are made from ordinary woolen knitting threads.
You can use this step-by-step instructions as a basis.

You can use another option. In any case, the result should please you. Here they even made a mother chicken, and also wove a stand in the form of a plate from the same threads.

You can also make Easter eggs from threads, are you surprised? But I don’t, after watching this video you will learn how to make things.
For elementary school children, you can make a mischievous cockerel, which is made from a paper cylinder.

Or I was still hooked by such a brilliant idea, to make chicks out of what they say was. And I had cases for Kinder Surprise. This is such a funny little family that turned out to be yellow))).


You can also make something like this in the form of chicks from cardboard and thread.

And if you want to make a splash on everyone, then make a product from plaster. I think that the commission and jury will definitely appreciate such a cool souvenir and reward it with a gift.

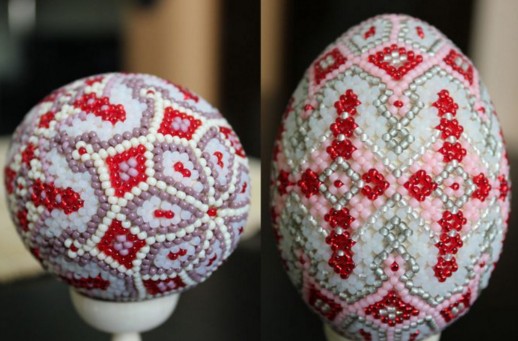
There are also ideas for souvenirs and gifts made of beads, but I will say this too, a lot of work and skill, I remember as a child I was fond of this type of activity, now I don’t have enough hands to sit down. But just for you, I found an easy way of weaving, or rather, it will be specifically for beginners, you just have to put beads or beads on a thread, and then glue the eggs onto the surface.
Of course, this will make your actions much easier. After all, you can also weave, but to do this you need to understand the diagrams and all the symbols. And here, any beginner can handle it, so catch it.

The main thing is to take a very good glue, for example PVA, and one more thought, you can not put it on the thread, but simply glue each bead separately, but this is more difficult.

As for the patterns themselves, in case you are a master and know how to weave, I suggest making a grid like this.

It turns out just great, class!

Or do you like the mosaic technique? I have a diagram from her).
How do you like this work? Wow, it’s breathtaking.

But if you still have any questions, then it’s better to take this model and do the work together with this author of this master class.
Of course, if you are interested in needlework or knitting, then you can also make a souvenir, for example this one. If you need a diagram, I will be happy to send it to you, it was taken from one magazine. What cute and cheerful little beadies they turned out to be, or little Easter cakes for needles.

But, by the way, you can also make knitted lilies of the valley, because it already smells like spring!

If you are good at drawing, then make a picture out of paints.

Or with the help of glue and cardboard, as well as all kinds of cereals, such an Easter masterpiece.

And here’s another thought for you: if you have multi-colored pasta lying around the house, then you can also make this kind of work out of them. What a delight, isn't it?!

How to make quick and easy Easter gifts from paper
In my opinion, these are the types of works that are most popular, because these are the materials everyone has in their home. The first thing that comes to my mind is egg cups. Well, they drew it, cut it out, then gave it to the kids to color and another children’s miracle masterpiece is ready.


Make these oddballs yourself, cut out the details and paint them, if you need templates, please ask, I will send them by email for free. Not really funny little animals.


Well, as always, you can’t do without my favorite vytynanki. This is just a custom or tradition. See what Easter bunnies can come out, plus decorate them with satin ribbons, if you need a template, write at the bottom of the article, I’ll send it for free.

In general, it will be cool and cute.

You can also take any sheet, fold it and glue it into a cone and the result will be something that resembles a bird.

With our youngest kindergarten representatives, I suggest making a paper craft using a base in the form of circles.

And those who are older will like the hatched chick.

The work is also good in the form of an applique; you can do one in a labor lesson with elementary school students.


You can, of course, combine two types of activities: Art and Technology.

By the way, you can just take regular colored pencils and do this, I also have a template for this stand in my piggy bank, so if anyone needs it, write to me.


You can make a product in a very original way without using glue, but instead take a stapler and fasten the parts together, see what comes out.

What do you think of this idea for a stand? It looks really cool, and can you imagine how much pleasure your kids will have making it?

I can also suggest printing out such a blank template.


Or this black and white version on your printer.

A great option would be a souvenir on a stick.


Or this green meadow with birds.

I also liked such a simple idea as a refrigerator magnet that can be decorated with rhinestones or scrapbooking materials.

Well, in conclusion, I would like to show the stages of work of a three-dimensional craft.

Step-by-step instructions for creating crafts from cotton pads and sticks for Easter for children
We'll probably start creating right away a small and very charming little yellow naughty boy called Tsypa. We will need a bunch of cotton swabs, or rather their tips. You will need to paint some yellow by dipping it in gouache, and leave some white. Make this craft, that is, make the base from plasticine, and then simply stick the sticks into it.
Important! You can draw the eyes yourself or find a picture and print them out.

For the next job you will need your good mood and, of course, materials.
We will need:
- cotton pad
- disposable spoon
- colored paper
- felt-tip pen
Stages of work:
1. First of all, make the blanks, that is, cut out the beak and scallop from colored paper. In this photo everything is visible and shown.

2. Next, draw the wings and then glue them onto a cotton pad. Place a spoon in the center and cover with a second cotton pad. Draw a face and voila, such a beauty can sit in your pot with your favorite flowers and crow).
What other interesting things can you do? I had ice cream sticks lying around, so I connected them together and glued on the eyes and beak, it turned out to be a wonderful animal. By the way, don’t forget about the paws either.

The easiest option would probably be this product, which can also be made with a child of any age; you need to paint the discs with gouache or watercolors, and then build such beauty.

You can design this in the form of an applique, and using cereals, it also looks great, and it resembles the painting A bird pecking at grains.

In general, choose according to your taste and color, and do not forget to write your reviews and wishes.


Look what a baby chicken it turned out to be, though it’s white.

You can also make a picture, together with willows and also from cotton pads. Doesn't it really look cool? Yes, it’s unusual and beautiful!

Beautiful crafts for Holy Sunday for kindergarten
Of course, preschoolers need ideas for what is easier. so that the kids themselves can cope with the task and can amaze everyone.
What could be easier and faster if you teach them this funny toy, also called a walker. Once, by the way, we did it with you, remember? When it came to puppet theater, I gave you ready-made templates.


Ha, and when I saw this face, I actually blossomed, I never cease to be amazed that so many crafts have been invented from the ordinary little hands of our kids, it’s simply too many to count.

You can, together with the children in the preparatory or senior group, engage in visual arts and make just such a chicken (cockerel) that will have multi-colored wings.

And for children of the second junior and middle group, here is such a simple masterpiece. In just one thing, you can repeat what kind of bird this is, and where its eyes and other parts of the body are.

Or this funny design made from a baby’s leg and paints.

You can also make applique on regular paper plates.

Here's another unusual pencil holder.

You can even make it using the origami technique, although you only have to fold the sheet once. Just right for young talents.
And finally, this type of work such as felting or dipping anything, for example, a dish sponge or soft balls. Moreover, this can be done with an ordinary clothespin. It looks bright and stylish, simply beautiful and original.
I also liked the idea of a fun family activity that you can do with your kids as a group.

By the way, you can combine paper products with threads, or use cereals instead of threads.

I was also captivated by this work, so simple and at the same time original.

And I propose to make this beauty a common or joint activity at school or kindergarten.

Easter crafts made from felt
In general, felt toys have become in demand not only among children, but also among adults, because sewing such a gift is always easier than taking any other material; felt in this regard is an unpretentious material that is easy to work with because it does not crumble. And even beginners can make patterns.
I had a separate one on this topic, from it, if you are interested in this type of activity, you will find a lot of useful information, I am sure it will be useful to you.
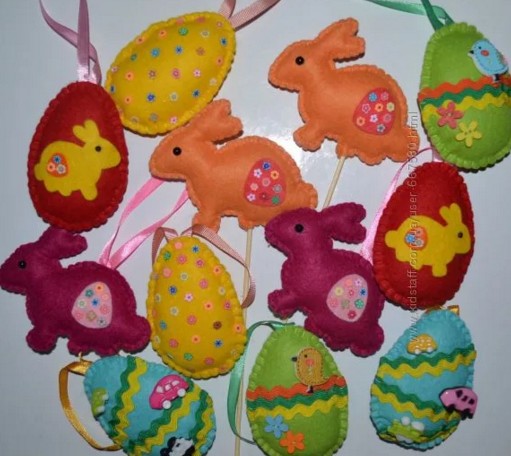
In this post I will show you finished products. How do you like this family?

But, I still want to show you one master class that may be useful to you someday.
We will need:
- scissors
- needle and thread
- buttons and rhinestones
- cotton wool or padding polyester
- lace
- vinyl magnet

Stages of work:
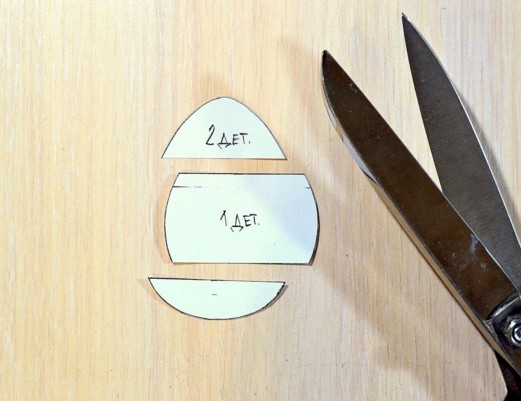
1. Draw a sample egg, or you can print it out on a printer.

2. Then attach the stencil to the felt and outline with a pencil. Cut out the resulting parts with scissors; you need to make two eggs.

3. Then take and cut the template into three parts, as shown in this picture.
4. Place the center on the green felt and trace it, then cut it out.

5. Sew this green decoration onto the egg.

6. Sew and decorate, one might say decorate with lace or some other decor. It looks amazing right away.

7. Then draw the letters with a pencil and embroider the inscription, you can probably guess what it is, of course ХВ.

8. Then sew on buttons, sequins, or you can take beads for scrapbooking, basically whatever you have.

9. Go through the edges with a seam, but you can also put padding polyester or cotton wool inside, and then proceed to the next step.

10. Take Moment glue and glue a vinyl magnet, this will be a gift for you or your friends on the refrigerator.

Of course you can do it on sticks.

And also in the form of a pendant or keychain.
In general, such beauty will not leave anyone indifferent, that’s for sure.

Master class using improvised materials Easter tree at home
I want to tell you right away that you can make such a craft quite quickly if you use these step-by-step instructions.

In fact, the work will be quite creative and your children will also not be able to resist this task.
Just don’t forget to wash the eggs well with water and soda. For 1 liter of water, take 2 tablespoons of baking soda.

Use a toothpick for piercing and acrylic paints for coloring.


Prepare everything you need for work:

Then place the napkin in front of you and twist it into a rope in this way. Secure the middle with threads.

And then turn the product over to the opposite side.

And voila, crumple it in half.

A couple more touches and hand movements:

And you will see an animal that resembles a bunny.

Give him eyes and a tail.


And needlewomen can still sew carrots quite well.

Video on how to make an egg from pasta for a competition
I’ll tell you honestly, I was shocked when I saw this awesome video, can you imagine it’s really true, such a miracle, it’s just amazing and out of ordinary noodles. Cool! Share this information on social networks, just click on the button at the bottom of this article.
Well, in conclusion, I was about to say goodbye to you and came across such a masterpiece, which is made of papier-mâché, I was very interested in this design, I’m showing it to you.

Still, sometimes you are surprised how something like this comes out of almost nothing.

DIY egg stand made of paper and sisal
You will get a very wonderful and cute little thing if you use this MK, which is presented in pictures with a description and sequence of actions.


That's all for me, I'm ending this post. See you in the next articles. Write reviews, comment, come visit more often, a lot more interesting and completely new things await you that you have no idea about. Goodbye everybody!
Sincerely, Ekaterina Mantsurova


