Master class “Volume pencil made of colored cardboard. DIY paper pencil Volumetric cardboard pencil step by step
The master class is intended for preschool teachers. These pencils can be used to decorate group rooms.
Tools and materials for work:
Pencil pattern;
A sheet of colored cardboard, A4 format;
A sheet of white coated cardboard;
PVA glue;
Narrow double-sided tape or glue gun;
Dry pastel or gouache in beige and light brown colors (for tinting white cardboard to look like wood).
Step-by-step manufacturing instructions:
1. On a sheet of colored cardboard, draw a pencil pattern and cut it out (don’t forget about the allowances).
2. In order for the edges to bend well, you need to go over all the edges with the sharp edge of the scissors. Next, bend as shown in the picture.

3. We begin gluing the pencil from the tip (part “1” is glued to part “*”).

4. Glue the point to the pencil and use double-sided tape or a glue gun to glue the pencil.


5. Cut out two parts from white coated cardboard (don’t forget to leave allowances at the base of the pencil). To better bend the edges, we also use scissors.

6. Now you need to tint the white parts to look like wood. You can use gouache, I tinted it with dry pastels. The crushed pastel (you can mix several colors) should be applied to the cardboard with the help of a damp cloth, in the direction from the center to the edge.


7. Glue the parts together (just like a pencil point - glue part “1” onto part “*”)


For the beginning of the school year, I offer you an interesting idea on how to make a pencil out of paper with your own hands. This wonderful craft can be a classroom decoration, an interesting surprise for children, containing sweets inside.
Materials for work:
- Colored paper, but better not very thick cardboard. A paper pencil can be of any color, but still the eraser looks better pink, the lead – black or gray, near the lead – a beige area;
- Paper towel roll. If this is not observed, such a roll can be made from any cardboard;
- Silver material. It could be paper, adhesive tape, foil, or even a candy wrapper;
- Scotch tape, if you plan to place objects inside the pencil;
- Scissors, glue stick, simple pencil.

How to make a pencil out of paper with your own hands?
Making an eraser
Trace your roll on pink cardboard or paper, just not too close, but a couple of millimeters more.

Around this small circle, draw a slightly larger circle. No special effort is required, it may not be very even, the edges will still bend.

Cut along the contour of a large circle, cut a strip from this pink paper, approximately 5.5-6 cm wide. The length should correspond to the circumference of your roll.

Make slits on the outer large circle, extending to the small circle, and fold them over.

Apply glue to the bent parts or to the roll and glue this part.

Glue the prepared pink strip of paper on top. The eraser is ready.

DIY paper pencil - color choice
The next stage of work is the middle part of the pencil.
But, it should be noted that if you need a complete pencil, you do not plan to put anything inside, then before pasting the entire pencil with the desired color, you first need to make the area of the lead. And then stick the paper on top of the middle part of the pencil.
If you plan to place something in a craft, measure the required dimensions and cut out the required part from colored paper.

Glue the paper using a glue stick to the roll.

Next you need to make a silver eraser holder. To do this, cut a strip from silver paper, wrapper or foil and glue it in the area where the paper meets the eraser. If you have a silver adhesive plaster, the work is greatly simplified.

Making the stylus area
Cut out a circle from beige cardboard, approximately its size can be no more than half an A4 sheet. You will also need a circle half the size of black or dark gray paper.

If you do not plan to open the pencil, the beige circle should be larger, taking into account the folds that will later need to be glued to the roll. That is, you first need to make a large cone, measure the required size for the area near the stylus, and cut the rest of the part, as in working with an eraser, and glue it.
In this case, this size of circles is sufficient.
Bend the circle in half, find the middle and cut along the fold to this middle.

Make a cone, carefully matching it with the size of the roll; the edges should completely match or be just a little larger, a couple of millimeters.
Make a black cone in the same way, after trying it on a beige one.

Apply glue to the tip of the beige cone and glue the lead.

Fill the middle of the pencil with candy or small office supplies (eraser, sharpener, real pencils, pens, etc.). Glue a conical piece with a stylus onto small pieces of tape on top in two places.

This is how you can make a pencil out of paper with your own hands. Children will also love making this pencil maker, because giant school supplies are fun and interesting.


DIY cylindrical pencil holder made of cardboard. Master Class.
Shvedkina Elizaveta, 7 years old. Kindergarten No. 90. City of Tyumen.Supervisor: Kovalchuk Valentina Nikolaevna. Educator. Kindergarten No. 90. City of Tyumen.
Description: The master class is designed for children of the preparatory group of preschool educational institutions, primary school age and their parents.
Individual cups for pencils are necessary for visual arts. And for artistic and creative activities, cups for pencils should be varied, externally different from each other. Of course, you can use plastic glasses as pencil holders, but you will agree that it is much more interesting to make a pencil holder with your own hands, not only for yourself, but also as a gift.
Purpose: Gift, practical use - pencil holder.
Target: Making a cylindrical pencil holder.
Tasks:
To consolidate the ability to analyze the cylindrical shape of an object as a whole and its individual parts, to create a cylindrical object from individual parts.
Develop the ability to roll rectangular cardboard into a tube.
Develop the ability to create patterns and decorative compositions.
Reinforce techniques for cutting out several objects or parts thereof from accordion-folded paper.
Foster independence and creativity when applying.
Develop a sense of color and composition.
Necessary materials:
Colored cardboard
Colored paper
Glue
Scissors.
Ruler
Simple pencil
Stencils
We'll color the whole world
In blue, in red, in yellow.
On a green lawn
Pink bunnies are jumping.
How good are they?
The guys have...(pencils)
Progress
Choose the type and color of cardboard for the pencil holder (smooth or rough).
Red pencil holder

1. Determine the height and circumference of the pencil holder.
On a strip of cardboard for the outer side surface of the pencil holder, we mark the place of gluing, make cuts along the entire length of the strip of cardboard to glue the side wall to the bottom.

2. You can decorate the pencil holder with applique now or after gluing, depending on the decor.

3. We roll up the strip of cardboard for the outer side surface and glue it together (spread glue on the shaded part). You can also fasten with tape from the inside or use a stapler.
We bend the cuts.

4. We cut out two inner and one outer parts of the bottom (the diameter of the outer part is 2 - 3 mm larger).

5. We spread the inner part of the bottom around the perimeter with glue and glue it to the cuts (we bring it inside diagonally).
Glue the outer part of the bottom. We cut off the excess.

6. We cut out the inner part of the side surface of the pencil holder (the height is 2-3 mm less than the outer part, and the length is equal to the length of the cardboard sheet).

7. We roll the inner part of the side surface of the pencil holder into a tube with the colored surface inward and insert it, securing it with glue (you can insert another inner part to make the walls thicker).
We insert the second circle inside for the bottom with the colored surface facing up (you don’t have to glue it and you can always change it).

8. Finish, if necessary, decorating the pencil holder.
The following pencil holders differ from the red one only in decoration.
Yellow pencil holder

Decoration
1. Cut out a strip of white paper equal in length to the side surface of the pencil holder (the height may vary).
2. Bend the strip like an accordion, outline the pattern, and cut it out.

3. Smooth out the cut out pattern and paste it onto the side surface.

Pencils can live together in such pencil holders


My pencil is bored:
- Why won’t you give me the paper?
And I stand without work,
But he could create a landscape!
Don't you need a portrait?
Yes, such a thing - which doesn’t exist!
Contact me, don't be shy,
Well, listen to my advice!
I can build a house
He will be next to the pond,
Here is the window, here is the porch,
It will be comfortable to live in it!
And draws with a pencil:
For me - a portrait, for you - a landscape,
And he’s building a house for someone,
Maybe this house is yours!
I. Efremov
Paper panel "Colored pencils". Master class with detailed description.
Berdnik Galina Stanislavovna, primary school teacher of the KhMAO-Ugra "Laryak boarding school for students with disabilities."
Description: This master class is intended for children of primary school age, additional education teachers, educators and creative people who love to create beautiful crafts with their own hands.
Purpose: The work can be used as interior decoration or a holiday gift.
Target: Making panels from colored paper.
Tasks:
1. Strengthen skills and abilities in working with paper.
2. Cultivate a desire to make a product with your own hands.
3. Cultivate the habit of working independently, carefully, and bringing the work started to its logical conclusion.
4. Develop creativity, imagination, fantasy.
5. Develop compositional skills and aesthetic feelings.
Materials and tools:
1. Colored paper.
2. A simple pencil, ruler, scissors, glue.


How to choose pencils. Advice for parents.
The color of a pencil depends on the color pigment added to the lead during production. These pigments may contain heavy metal salts. To protect your child’s body from cadmium or lead, pay close attention to the packaging. Look for the letters CE on it, which confirm that the pencils meet European quality standards and have passed all safety tests. Correct pencils are made from softwood, and they smell like wood, not solvents.
Estimate the diameter of the lead. It is desirable that it be 3 millimeters. This indicates that the lead is well centered and resistant to stress. There are two types of stylus. Waxes may contain harmful organic solvents. Water-soluble leads are safer. You can understand which copy is in front of you by wetting a sheet of paper with water and drawing a line on it. The wax pencil will leave a barely noticeable mark. Water soluble – a clear line.
High-quality pencils undergo seven-layer coloring. Therefore, the seam from gluing wood is not noticeable on them. Advice for young parents! It is better to give triangular pencils to children under three years of age. They develop fine motor skills of the fingers well.
Stages of completing the craft:
This master class presents the idea of making a pencil using the Origami technique.
1. The pencil is made from single-sided colored paper. Take a sheet of colored paper. Fold it in half lengthwise and cut along the marked line.

2. Fold the edge of the rectangle about 1 cm.

3. Turn the workpiece right side out.

4. Fold the workpiece, right side inward, in half lengthwise.

5. Expand. Bend the extreme corners to the intended line according to the principle of making an airplane.

6. Turn the workpiece wrong side out.

7. Fold the workpiece in half widthwise, leaving a white triangular sheet.

8. Turn the workpiece again.

9. Bend the bottom edge of the workpiece, directing it towards the middle.

10. Do the same with the top edge.

11. Connect the valves to each other by inserting the corners into the resulting pocket.

12. “Sharpen” the pencil by bending the edges of the white canvas towards the middle. For strength, connect the valves with a drop of glue.

13. So, the blue pencil is ready.

14. It is fashionable to use such pencils instead of bookmarks.
But we moved on. They were connected to each other using glue.

15. Added small paper flowers and leaves. And now, the collective panel of paper pencils is ready.

Thank you for your attention! We will be glad that our idea is useful.
A universal selection of gift ideas for any occasion and occasion. Surprise your friends and loved ones! ;)
Greetings, dear friends! Today I’m in a hurry to come to you to tell you how a pencil holder looks and is made with your own hands. I will show you several master classes and just interesting photo ideas.
A few months ago it was my husband's birthday. In this regard, I decided that in addition to the main gift, I wanted to give him something special, made with my own hands. The choice fell on a pencil holder, since Danil is interested in calligraphy and, accordingly, has a bunch of accessories for this type of creativity.
How to make a pencil holder with your own hands: master class
I'll show you how to make a pencil holder with cute characters from the cartoon "My Neighbor Totoro". In fact, this technology can be used for any type of pencil holder.
To create a pencil holder you will need:
- Tin can (from any canned food)
- Any fabric of your choice for wrapping the jar (I used fleece and Miki fleece)
- Felt for finishing
- Threads in the color of the fabric
- Scissors
- Glue with a thin spout or glue gun
- Plastic eyes
- A piece of padding polyester
First of all you will need to measure:
- circumference of the can,
- height of the can,
- bottom diameter.

In accordance with the measurements obtained, cut out 2 pieces of rectangles from the fabric with the parameters: (can height + seam allowance 0.5 cm) x (circumference length + allowance).
For both rectangles, first sew the back seam (with a back stitch or on a sewing machine) to create a closed surface. Sew the bottom to the rectangle along the contour. Turn one part out and leave the other.

Set the resulting cylinders aside. Now cut out 18 pairs of animal parts from the fabric - in my case, small totori. I don’t provide patterns, since it’s easy to draw the outline yourself - an oval shape with ears))
Sew paired parts together, you will get 9 animals (don’t forget about the holes for turning them inside out).

In place of the future eyes, draw dots and make crosswise cuts, as in the photo.

Turn the animals inside out and stuff them with padding polyester.

Now add a little glue along the contour into the resulting holes. Be careful - next you will have to insert the eyes into the holes. Insert until the side of the eyes is completely buried in the fur.

Sew up the hole at the bottom.

Ooh, little eye


Cover the jar with padding polyester parts using an over-the-edge seam. This is necessary to prevent the pencil holder from knocking on the table. You can skip this step if you wish.
First, sew the edges of the padding polyester wrapped around the can. Sew the bottom as well.

Pull one of the cylinder parts onto the outside of the can. In my case, it does not reach the top edge a little - a special effect.

I also put a padding pad at the bottom of the pencil holder (I glued it so that it wouldn’t move out).

Place the second (unturned) cylinder inside the stand. If you wish, you can also add a little glue to the bottom to keep the inside in place.

Sew one cylinder to the other with a blind seam.

This is the kind of pencil holder I make)) If you wish, you can stop at this stage or decorate the product as described further.

Glue or sew all the animals over the entire surface.

Cut out several leaves from felt and embroider characteristic lines on them using a backstitch. Glue the leaves to the resulting pencil holder. You can also embroider patterns on the bunnies themselves.
We admire the result


From cans
Apple
A very fun way to make a pencil holder is to take a jar, liquid acrylic paints, paper, a plate, string and a faux petal with a glue gun.
Pour paint into the jar and shake. Drain off any remaining paint and let dry. File edges if necessary. Wrap the carving with cord and decorate with a leaf - voila

Lego guy
The method is identical to the previous one, only at the end you will need to apply a face with a black permanent marker.

Minion
The favorite of all kids, welcome!) Here you will need a tin can and colored EVA polymer (foamed rubber, which can be purchased in the form of plastics in craft stores). By the way, the polymer can be replaced with soft felt.
Cut out all the parts according to the template and wrap the jar with a yellow rectangle. Also glue a rectangle on the inside to hide the metal part. Glue the muzzle and pants. Don't forget about the mouth.

From plastic bottles
Pears
To make these cute pencil holders, you only need a few oblong bottles, scissors, tape, acrylic paints and a photo frame for mounting (optional).
Cut off the thread of the bottle and cut out part of the top, as in the photo. Cover the central part with tape on both sides, leaving an empty space in the middle. Paint the empty space and decorate with the remaining lids, also painted. You can glue it to the frame, or you can leave it as is.

Monsters
This is where a shampoo bottle will come in handy. Cut off the top with the lid, choosing the shape as you wish. Cut out handles from the remaining part. Glue funny faces from felt or paper.

Made from cardboard and paper
Cylinders
The easiest way to make a pencil holder out of cardboard is to use cylinders from clothing rollers, paper towel rolls, or toilet paper. Wrap them in newsprint and glue them together if desired. All

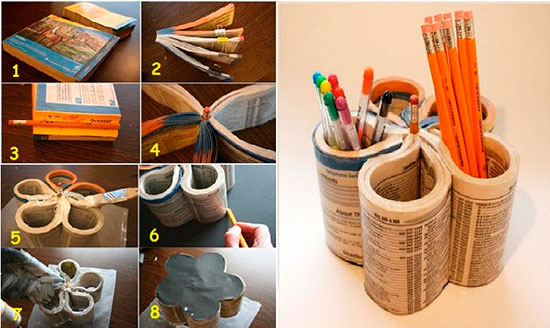
book flower
A very unusual and bright idea. Take an old thick magazine or reference book. Divide all its pages into 5 equal parts. Glue the pencil to the side. Wrap the book around the pencil so that it is in the center and glue it together.
Prime the top with white acrylic paint. Cut out the bottom from thick cardboard, tracing the pencil holder. Glue the bottom.
Made of wood
Or rather, not even from wood, but from wooden pencils. To do this, you just need to glue a few pencils together to form a wall. You will need 4 such walls. At the bottom, glue a bottom made of thick cardboard.

But I described the 10th pencil holder in an article about New Year’s decorations. I highly recommend checking it out, there are a lot of interesting ideas there.
By the way, the minky fleece from which the outer green background of the first pencil holder and the white tots are made was purchased Here. I advise it, since it is very, very difficult to find it in woven fabrics.
Subscribe to updates and share your impressions! See you soon!
Sincerely, Anastasia Skoracheva


