How to sew fur boots for the home. How to sew liners in rubber boots
Most often, we are used to buying shoes, even indoor ones. However, many craftswomen fell in love with making these wardrobe items themselves. Especially when a child appears, and you want to do something unique, interesting, and safe for him. You will be surprised, but boots are comfortable and warm shoes for indoors in winter. But, of course, not their street look, but a cozy and homey option. These boots look like the now trendy UGG boots, and by the way, they are very comfortable to wear, and the thick leather sole will turn them into practical slippers. Next, we will focus on how to sew homemade slippers-boots with your own hands - it will not be difficult for you to make patterns with product sizes based on step-by-step instructions.
First option: elegant boots “Snow White”
To begin with, we note that we will take as a basis the parameters corresponding to foot size 37-38.
Important! It is not difficult to adjust patterns to a different size. What you need to pay attention to is the disproportionality: changing the size affects the length of the product, but the width of the boots practically does not change.
Basic elements
A do-it-yourself pattern for boots made of fabric is applied to graph paper. It consists of the following elements:
- The foot is the sole of the shoe.
- Toe-heel part.
- The circle as a decorative element of the finished product.
- Boot top.
To sew slippers and boots with your own hands, patterns should be prepared in the following quantities:
- To make the sole, cut out: from fleece - 4 elements, from padding polyester - 2 elements, from raincoat fabric - 2 elements.
- For the heel and toe part, prepare: 4 fleece parts, 2 from synthetic padding.
- Upper: 4 fleece elements.
- Circles, which, in fact, will be a decoration in the form of a flower, cut out six pieces. They are made from fleece.

What materials should you prepare?
For this model of slippers we will use:
- Fleece is white or milky.
- Insulation. Batting or padding polyester.
- Raincoat.
How to sew house boots with your own hands - patterns step by step
The work algorithm will be detailed and therefore easy to implement.
Let's start with the sole
To determine its length and width, take measurements. To do this, outline the ankle on a piece of paper.
Important! Hold the pencil straight and perpendicular, do not place it under your foot. To the resulting drawing we add approximately 2 cm in length - this margin is determined by the padding of the product with synthetic padding.
Another option is to outline your own shoes, such as fall flats. But in this case there is no need to add additional centimeters. From the resulting sketch we build a pattern for our sole.
Important! The length from the middle of the toe to the center of the heel should be 25-26 cm.
Toe-heel part:
- From the middle of the sock to the top of the boot, the distance is about 12.5-14.5 cm, and this value is suitable for any size.
- Another important indicator for creating a pattern is the height between the center of the heel and the shaft, which is 6.5-7 cm.
- The next step is to measure the perimeter of the foot pattern. Divide the resulting value by 2 and add 1-1.5 cm. This reserve is necessary for adding the heel and toe.
Bootleg
This element of the shoe has the simplest cutting. It is a fleece rectangle measuring 18 by 32 cm.
Important! The width of this part of the boots does not change. But the height can be modified depending on your preferences and tastes.
Circle approximately 10 cm in diameter.
Important! In the process of creating diagrams of parts, apply marks that will be extremely convenient for you to navigate in the future. These points are: the center of the heel and the center of the toe on the sole.
Sewing
Well, the most crucial moment is assembling all the parts together:
- We fasten the upper toe-and-heel element of the boots with insulation, and machine stitch them along the edge.
- Then we form the sole, which is a multi-layer element. This can be done manually or on a sewing machine. Try to connect materials evenly. We recommend steaming the synthetic winterizer just a little through a damp, clean cloth.
- We attach the toe-heel parts to the boot. The result is four connected elements.
- Sew the back seams.
- It is necessary to leave small unstitched areas on the lining, through which we will later turn our boots right side out.
- Now we sew the soles into the resulting four parts.
- Turn the top of the product to the right side, and the lining to the left.
- Well, now it’s quite simple: we put the front boot on our hand and insert it into the lining. At the same time, carefully align the heels and toes of both parts.
- We connect the upper edges in the direction from the back seam, fix and sew.
- We turn the product inside out through the unsewn sections of the boots and close them with a stitch.
- We install the lining inside, straighten and align the fabric. It's best to put the boots on your feet and pull them so that everything straightens out as best as possible.
DIY boots are ready! All that remains is to decorate them.

Decorative finishing
In this regard, you can be guided by your imagination and decorate your shoes with whatever you want: beads, flowers, bows, rhinestones, etc.
In this master class we look at the design in the form of flowers, three for each shoe. They are located in the center.
Flower assembly diagram:
- Armed with a needle and thread, we assemble it in a circle, then tighten the thread.
- We pass the needle through the center of the circle and through the edges again to the center.
- We do this four times, the distances should be equal.
- We slightly tighten the thread, getting petals.
- Decorate the flower in the center with a beautiful shiny bead.
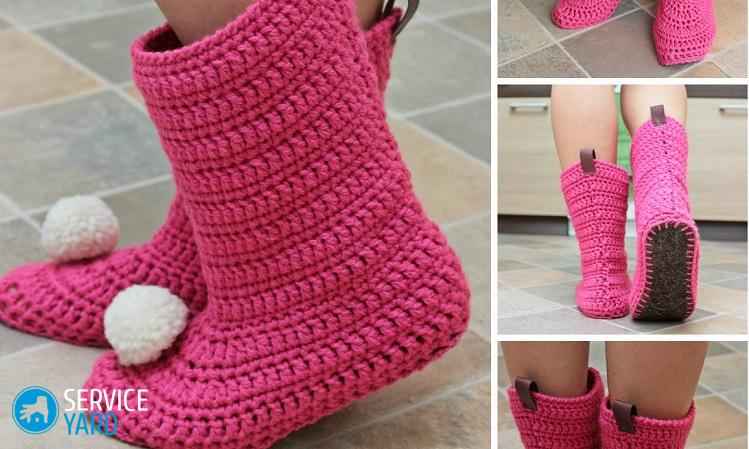
Second option: fitted boots
You can sew home boots with your own hands in this manner. This model is distinguished by a more fitted shoe silhouette. Note that the assembly of elements and sewing do not differ from the previous version. The difference lies only in the pattern of the product, namely in the boot:
- Its length increases by approximately 50 cm, and the top expands.
- Half of the boot at the top is approximately 23 cm.
Again, it should be noted that these parameters are arbitrary and you can change them at your discretion.
On the boot we form an assembly of four elastic bands - they are sewn parallel and at an equal distance from each other. There should be a gap of 4 cm from the elastic to the edge of the boot.
Important! The insulation for the toe part of this model should be very thin. We recommend choosing fleece or velor as a suitable material for shoes.
Third option: shoes with ears
How to make boots with funny ears? Such house shoes will look very original and cute.
Materials for work
To create it you will need:
- Textile. It will be fleece in two colors - black and red.
- Insulation – synthetic winterizer.
- Sharp scissors.
- A piece of leather.
- Patterns - ears, sole, toe-heel part, boot, bows.
Sequencing:
- Based on the patterns, we cut out parts from fleece and padding polyester. And the sole is made of leather.
- We form the ears. To do this, we connect the black and red pattern elements and sew them together. In this way we create all the ears - 4 parts.
- Turn them right side out and stitch them at a distance of half a centimeter from the edge.
- We connect padding polyester elements in pairs with black fleece parts.
- Sew the base of the boot with the toe.
- We sew the edges of the main pattern so that there is a small opening through which you can turn the product right side out.
- Attach the sole.
- We perform the same manipulations with red fleece parts.
- Sew on the leather sole.
- We attach the ears to the red shoe with the black side to the product.
- We sew together the red and black parts of the product.
- The sole of products of both colors is combined, processed with three fastenings at the back and front.
- We turn the resulting boot inside out and sew up the opening.
Important! As decoration, you can make a bow for each slipper:
- We make a pattern in the form of a rectangle measuring 6 by 10 cm - you need two such parts.
- We sew both elements of the fabric along the edges, leaving a small segment through which we turn the rectangle inside out.
- Then, in the middle, with a needle and thread, we make a beautiful gathering and form a bow, which is attached to the back of the boot.
- We repeat the steps and sew a bow on the second shoe.
Boots for children
How to sew boots for a child from fabric? You can make home slippers for your baby using the same methods, the main thing is to correctly outline the pattern. But the assembly principle and manufacturing technique are similar.
Important! This product is not suitable for constant wear, but serves as a prop and accessory.
Materials for work
To create soldier boots you need to prepare:
- Leatherette. If you can’t find a suitable material, you can use a thick tarpaulin.
- Dense base for the sole.
- Glue.
Important! The peculiarity of these boots is that they are worn over the child’s shoes, i.e. like a stocking.
Sewing technique:
- The base of the boot is made in the form of a pipe, which must be installed vertically directly on the boot. Make several cuts in the front of the material, which will simplify the formation of the boot, since the upper part will lie more evenly.
Important! The width of this part should allow the foot to pass freely in the shoe.
- Place the second piece of fabric on the toe of your child's shoe. Position this piece so that the cuts are hidden. Trim the excess fabric along an arc.
- Secure the parts with pins and sew them on a machine.
- Now let's move on to the sole of our boot.
- We make a template based on the shape of the shoe, transfer it to the fabric, and cut out four such parts from dense material.
- Place one element of the future sole on the sole of the shoe itself, make several cuts in the fabric up to the foot line. Using a needle and thread, pull the edges towards the center. There shouldn't be anything sticking out on the sides.
- Then generously coat it with glue and place the next element on top of the sole. Press tightly and leave to dry.
- When the product is completely dry, remove the resulting boot from the child’s shoes. Treat the inner edges of the sole with glue, secure and leave to dry.
Important! To make it easier to secure the elements, turn the boot inside out. A zigzag seam at the junction of the parts will only add reliability to the product.
- And at the end we design the boot top, namely its upper edge. We carefully bend it and make a beautiful stitch on the machine.
DIY boots for the young soldier are ready! The material of the product is quite durable for gentle washing and gentle wear.
Important! Using this technique, you can make other models, for example, stylish cowboy boots.
You don’t have to stop at such decorative items, but sew children’s boots from fur with your own hands - patterns can be found on the Internet or you can safely use the above master classes. The main thing is to choose the right size and buy high-quality, beautiful material.
This article provides a pattern and explains how to sew slippers and boots. These indoor slippers can be made from terry cloth, velosof or fleece. The pattern of one boot consists of only 2 parts that need to be printed. For two boots you should have only 12 pieces cut out, since they will be double. These are women's slippers and boots.
When patterning a freebie for a boot, the fabric needs to be folded face to face for one boot; and a face with a face for another boot, so that the details for each boot are symmetrical. Thus, you should have 8 parts for freebies of two boots. And four more parts are the soles for two boots.
Before cutting, be sure to check whether the given boot size is suitable for you. If you need more, add, if less, remove from the patterns.
The pattern of slippers and boots given below will help you connect the patterns after you have printed them. You can sew these slippers and boots with your own hands; you will find the patterns in the article. This pattern of house slippers and boots is in a reduced form.

Download the pattern
Now let's sew slippers and boots with our own hands.
Sewing boots.
1. How to sew house slippers and boots. Fold two symmetrical pieces face to face, aligning their edges, then pin them across the seam (Fig. 1). Sew a seam width of 1 cm (Fig. 2).

2. We repeat operation No. 1 with other freebie parts. To turn the boots inside out, on the two freebies, which should be inside the two boots, we leave an unstitched distance in the middle of about 10 cm, not forgetting to put bartacks at the ends of the lines, they are shown in green in the picture. In total you should have 4 stitched top parts (Fig. 3).

3. Sew in the insole (Fig. 4). We take one sewn part and pin one insole in a circle, aligning the sections of the sewn freebie and the insole (Fig. 5).
We sew in a circle, since we pinned the seam with a seam width of 1 cm (Fig. 6).

4. We repeat operation No. 3 with other freebie parts. In total you should have 4 stitched top parts (Fig. 7).

5. Take one piece sewn with an unsewn 10cm hole and the second fully sewn (Fig. 8). We turn any one part inside out and put it in one boot, which is turned inside out, and align the upper sections of the boot. In this case, you should succeed. that you put two boots face to face (Fig. 9). We chop in a circle (Fig. 10). We sew a seam width of 1 cm (Fig. 11).


6. We repeat operation No. 5 with two other freebie parts. After sewing two parts at a time, you should end up with only 2 sewn boots (Fig. 12).

7. We turn two boots on the face through the unsewn holes in the freebies (Fig. 13).

8. We sew up the unsewn holes in 2 boots with a seam width of 1-2 mm, while tucking the seam allowances inward (Fig. 14)

9. We put the boot that was made in operation No. 8 inside and thus get one boot. We do the same with the second boot (Fig. 15).

10. To slightly fasten the two boots so that they do not fall out, we fold the seam exactly with the seam and sew along the face directly into the seam so that the stitching is not visible. At a distance of 5-6 cm from the top of the boot. We do this on one side of the boot and on the other side, I showed this in the picture with a red solid line. We do exactly the same with the other boot (Fig. 16)

11. Putting the seam of the connection of the top of the freebie on the edge, we fasten the boot with another finishing stitch with a seam width of 0.5 - 1 cm from the top of the freebie, stitching in a circle. We do the same on the second boot (Fig. 17). This is how we get warm house slippers and boots.

12. That's it! Our boots are ready! Now you know how to sew slippers and homemade boots with your own hands.
|
It's only a matter of finishing details and your imagination. This is what the pattern itself looks like:
|

Foot-sole, toe-heel part, circle - flower (with a bead in the center) for decoration. The elongated part is a bunny ear for the “Bunny” slippers.
Attention! This same circle is also a bunny tail, if someone wants to sew “Bunny” slippers, the basic pattern is the same.
Construction of the pattern:
1. Sole. We take a sheet of paper, put it on the floor, stand with our feet and trace our foot. We trace along the edge holding the pencil evenly, perpendicular to the surface, no need to bend it under the foot. We add about 1.5-2 cm to the length, you can outline autumn shoes without heels, shoes are best, then without adding centimeters. The length from the center of the toe to the center of the heel for sizes 37-38 should be 25.5-26 cm, for sizes 38-39 approximately 26.5 cm. Check these dimensions in accordance with your foot and shoes. We build a template for the sole, focusing on the photo, level it, round it, etc.
An increase in centimeters is needed, because we will insert padding polyester (or other insulating material), and it “takes up” no less than a whole size, plus the leg needs some freedom.
2. Toe-heel part. The length from the center of the sock up the leg to the shaft (the center of the front of the detail) is equal for all sizes from approximately 12.5 to 14.5 cm, as desired!! The height from the center of the heel to the shaft is 6.5 - 7 cm. Next, we measure our sole (foot) pattern around the perimeter, divide by two (at the same time we make reference marks for the center of the heel and toe on the sole itself - this will be very useful when assembling parts) and add Approximately 1-1.5 cm for the fit of the sock and a slight fit at the heel. The resulting length should be equal to the bottom line (where we sew it to the sole), line up the bottom line approximately as in the photo. The top line is 16-17 cm.
3. Circle for a flower or tail I have a diameter of 9-10 cm. Ears are optional in length and width, I make them 4x14 cm.
And this is a pattern of the main parts on graph paper for size 37-38. Up to size 39 or 36 is quite easy to adjust. Keep in mind that when changing the size, the pattern changes more in length and less in width, that is, not proportionally.

Now about the number of parts for the “Snow White” model, it is sewn from fleece of the same color
Sole- 4 parts made of fleece, 2 parts made of raincoat fabric, 2 parts made of synthetic padding (or other insulation but not hard and not very thick, for example thin batting)
As an option: instead of raincoat fabric and padding polyester, you can use ready-made quilted jacket fabric, artificial leather (not thick, soft)
Heel-toe part- 4 parts made of fleece, 2 parts made of padding polyester
Bootleg- rectangle 18*32 - 4 fleece pieces
Note. 32 cm - width and does not change
18 cm - height and varies at will (and the shape of the top may not necessarily be straight either, use your imagination)
Flower- circle with a diameter of 9-10cm, 6 fleece parts
This is roughly what it all looks like after cutting, don’t forget to mark the centers and other points of the parts for assembling the boots in the future:


Let's start assembling parts
When assembling, we combine the designated points - the centers of the parts with the corresponding marks of another part
First, we connect the upper toe-heel part with padding polyester (insulation) and fasten it with a machine stitch along the edges. Then we assemble the sole like a puff pastry. I simply fasten the sole by hand over the edge, making sure that nothing is warped. You can do this on a machine, but then leave a little more in the allowances to even it out, trim off the excess, if you can’t sew it evenly, there are still a lot of layers and they are voluminous. Parts with padding polyester are lightly steamed through a damp cloth, lightly!! We crush the synthetic winterizer with an iron.


Then, as in the photo, we connect the toe-heel parts with the boot, you get 4 connected parts. Then we sew the back seams, leaving small sections unsewn in the lining, see photo, through which we will turn our boots inside out. And after that we sew the soles into all 4 parts.


We turn the upper part of the boot to the right side, leaving the inner part - the lining - on the left side. Just like in a puppet theater, we put the top, front boot on our hand and insert it into the lining, matching toe to toe, heel to heel, accordingly. We also combine the upper sections starting from the back seam, chop them off and sew them together.

Through the remaining, unsewn sections of the lining, we turn it inside out, pull the boot out from the inside, align it, stretch all the seams, and stitch the open unsewn area in the lining to the edge.


Now we insert the lining inside, align everything, put it directly on the leg, pull and pull wherever necessary. From the inside, I make four thread fastenings on the top of the boot with the lining so that the lining does not fidget)
2 fasteners in the sock: at the center of the toe and at the boot, and two fasten on the heel, where the back seam connects with the sole and boot.


All!!! Next is your will: flowers, beads, in the center, along the cuff (bend it if you want) on top, etc. In this model "Snow White" there are three flowers in the center, you mark the center directly by putting the boots on your feet. When sewing on flowers, under each flower I make a tuck of 1.-1.5 cm, which results in an easy gathering in front.
The flowers are assembled very simply: you gather them in a circle with a needle and thread, and pull them together. Pull the needle through the center and over the edge (from the center around the flower and again into the center, pierce the needle and pull the thread to form petals. This must be done 4 times to get 4 petals. Sew a bead into the middle.
Well, try it. I wish everyone GOOD LUCK!
House boots. MK from Alena Maslova.
It's time to warm up and today I will show you a simple way to buildhouse slippers boots. I had been using natural sheepskin on a knitted base for a long time; such knitwear is used for sewing blankets and children's products; I found a piece for two pairs of slippers. Having searched the Internet for patterns, I found a large number of them, but none for my size, and I’m too lazy to remake them, and the result will not always be as expected. That’s why I made everything very simple; this pattern can be made to fit any size, even a child’s.
These are the boots we will make by hand.

And so the leg, remember how in the movie “Office Romance”, such a simple leg. I didn’t want the boots to be clingy, so I put on a knitted footprint and wrapped a scarf around my shin, otherwise I would have to insert a zipper or change the pattern, which I don’t like; long-time visitors to my site remember my simple recipes.

With tape, as in the case of making a mannequin, wrapping the foot and lower leg in several layers, it is important to remember that the foot must be placed with an “iron”, or rather, check the angle of the foot as if standing.


The blank is ready, you can start making the pattern.

Let's draw construction lines along the bend of the foot to the line of the sole, along the heel in its most concave part, as well as along the middle of the upper part of the foot to the top cut of the boot. Cut off the upper part from the future sole, cut the boot along the marked lines of the heel and the bend of the foot.

To lay out the part, cut it in the middle, trace it, mark the connection points with the sole and the upper part. Align uneven sections. On this part, you must mark the inside and outside so that when assembling with the sole, you do not sew the left boot to the right sole.

Let's make a boot with a seam at the back, to do this, lay the top part, folding together the previously cut ones on the inside, circle. For accuracy, I folded it lengthwise in the middle and aligned the lengths of the concave parts with each other and shortened the boot to the desired height. Do the same with the heel part, here make a small incision 1.5-2 cm from the bottom in the middle of the heel (no photo). Align the sole part so that it is pleasant to look at, mark the connection points (I recommend doing this for all parts of the boots) and cut it out. At all stages, compare the sections of the pattern so that the distance of the heel fits exactly in length into the arc of the back part of the boot, and the sock clearly coincides with the line of the arc of the boot and heel.

The pattern is ready. These boots can be sewn from fleece or an old sweater, with a tail, nose, ears and eyes attached.

Cut the boots according to this pattern with seam allowances of no more than 5 mm; these boots took about 40 cm by 80 cm of fabric. Cut the sole so that it does not wear out too much from the remnants of the leather; even a thicker piece of jeans or a boot from an old boot will do. By combining the dots, slightly seating the toe and heel parts, we connect the parts of the upper with the sole. I did not sew a dart on the heel, because the fabric is soft; if you are sewing boots like this from jeans, I recommend sewing a dart.

For greater warmth and density of the structure, insoles were cut out from felt inside.

These are so cozy home slippers boots in the end it should work out.

There are no words for how warm they are. While I was sewing, I remembered the remnants of a sheepskin coat I had once shortened and decided to sew myself boots with a zipper, but more on that in the following articles.
Warm slippers and boots for your feet, my dear needlewomen!


