How to sew a fabric handbag with your own hands. How to sew a bag with your own hands. Various models, master class with patterns from leather, jeans, fabric, umbrella, beach, travel, patchwork, sports. Folding bag patterns
Greetings to everyone gathered now on the blog! Today I will tell you how to decorate your life and the lives of those around you with the help of such a simple item as a handmade bag.
There are a lot of bags, handbags, clutches, etc., etc. sold in stores. But it’s so great to do something like this yourself, to experience the process of creating a product, right? Many will agree with me, I think. Therefore, today we will make a bunch of handbags, cute and funny)
How to sew a bag with your own hands
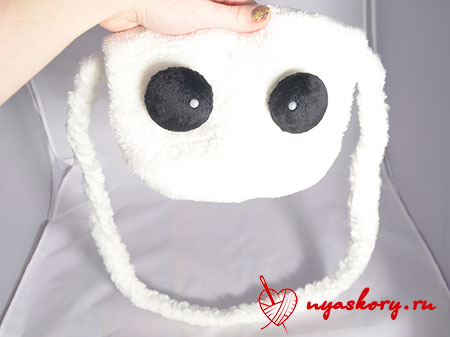
First of all, I suggest you sew a cute fluffy handbag that you can give to a little girl or girl.
List of materials:
- faux fur (for the outer part of the bag);
- fleece (for lining and for covering buttons);
- threads in the color of the fabric;
- two round buttons;
- two small white rhinestones or half beads;
- padding polyester;
- paper for patterns;
- needle;
- second glue;
- pencil;
- pins (for pinning patterns);
- scissors.
You can download patterns for the future bag here: eyelet And warp. Let's deal with them.
What kind of patterns are there:
- one-piece bag pattern (lid + back) - the entire pattern area;
- the front of the bag is everything below the side insert;
- width of the side insert - we will sew the side part into the bag, this is its width. The length is the length of the outline of the front (excluding the straight top).
As for the side insert: it should consist of two equal parts, the direction of the pile of which will be directed against each other. But this is only for fur! From fleece, simply cut one strip of the required width; you can ignore the direction of the pile.
How to sew a bag: a detailed master class
First of all, we will work on the side of our product.
Take two pieces of fur side and sew them together along the edge. Sew them so that the pile of the pieces is directed towards each other.
Why do I suggest doing this? I answer: fur has a long pile, which should go in one direction. And this can be achieved just by sewing two pieces together

Trim off any excess. And sew the side part to the front of our future bag.

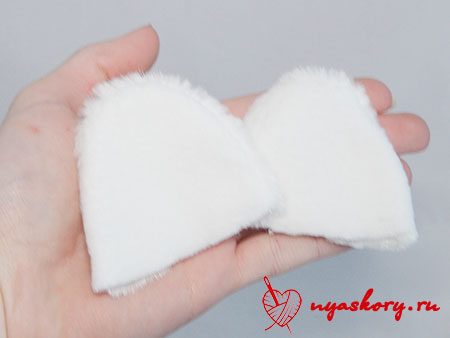
Now let’s sew on the back of the bag! The lid is already in sight
Trim the edges of the seam allowance. See why:
By the way, here's the back view of the bag:

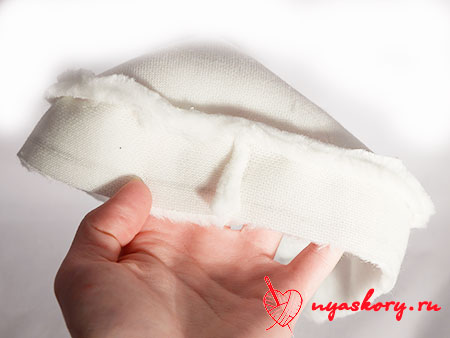
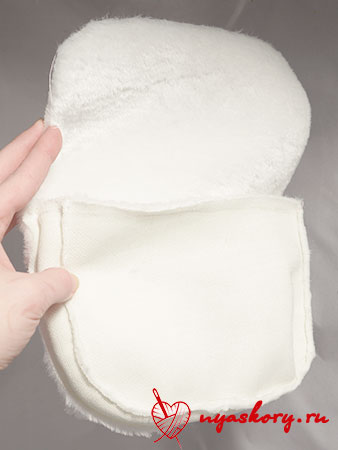
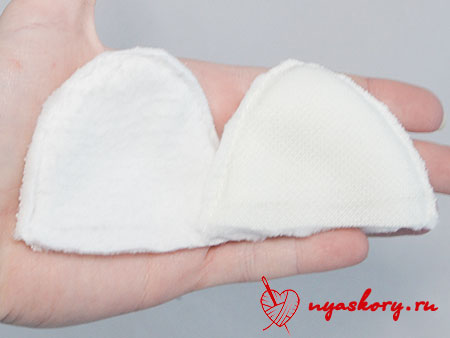
Sew a fleece “handbag” in exactly the same way. This will be the lining - the inside of the bag.

How to sew a lining to a bag? To begin, place the fleece and fur parts with the right sides facing inward.

This photo seems to make it clearer

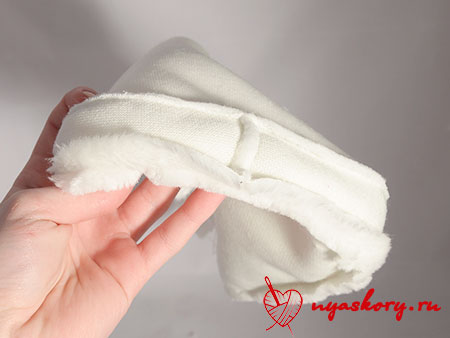
And just sew the covers of both parts together.
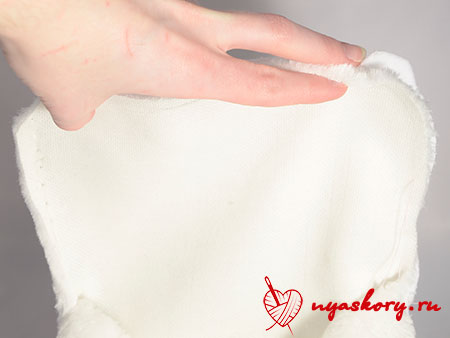
Screw the inside into the bag.


Sew the remaining edges with a blind stitch.

To decorate our bag, I suggest you cut out these ears:
This is how you should get them:
Now let's make a strap for the bag. To do this, cut three strips of fur of such length that it will be convenient for you to then put the strap on your shoulder. Weave them into a braid (tie at the end and at the beginning so that it does not come apart).

Remember we left holes for fasteners? Now you need to insert the resulting braid into them and carefully sew it up with a hidden seam.


But our bag doesn’t have fastenings yet! There are several options: you can sew in a zipper (which is better to do earlier), you can use Velcro and buttons.
I decided to go with the last option.
Cut two black circles larger in diameter than the button from black fleece and take the button.

Place a little padding polyester on the button.
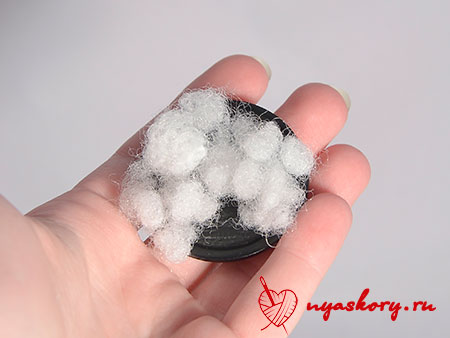
And into a fleece circle, along the edge of which run a running stitch without securing:

Put them together.
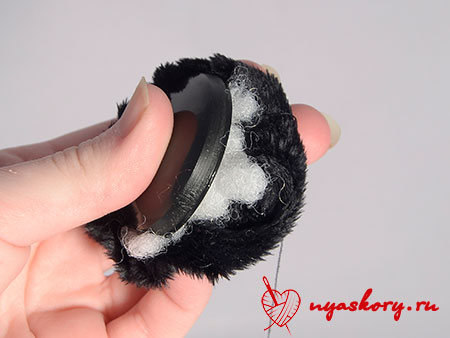
And pull the thread.
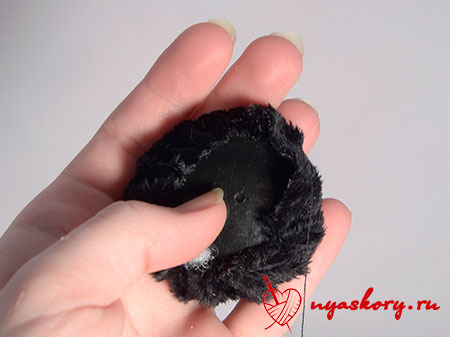
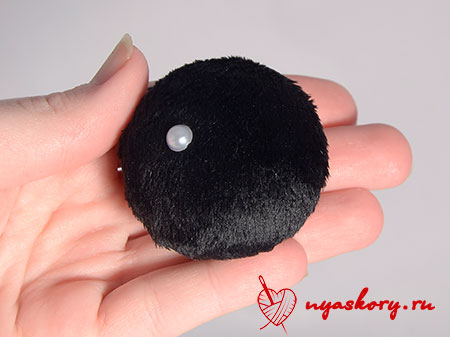
The button for attaching the bag to the back should look something like this:

Glue a small rhinestone highlight on the front.
Now place the clasp on the lid of the bag to see where you will need to cut the loop.

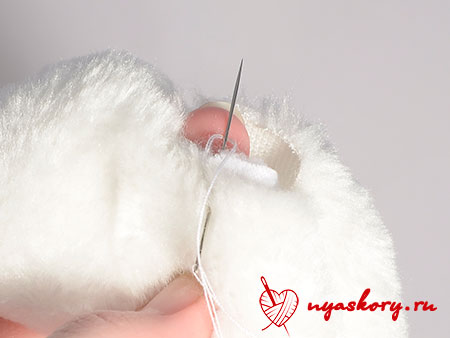
Draw a line down the center of where you want the button to be. Make a cut along the drawn line.

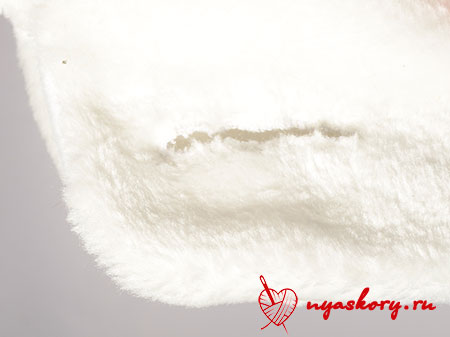
To make the cut beautiful and neat, sew it with a buttonhole stitch so that each stitch fits as closely as possible to the previous one.
This is what the bag will look like after finishing:
Sew button eyes to the bag:
Well, now let's get back to the ears! Fold and hem their edges.

And sew them where you would like them to be.

Ta-dam! The bag is ready. It turned out to be a cute kitty)

DIY leather bags
Leather is one of the most interesting and durable materials for sewing bags. Therefore, I present to your attention several master classes using this material.
Bag - cat
For this simple but very cute model (somewhat reminiscent of the previous one) you will need leatherette, scissors, an awl, thread and a thick needle.
This can be worn by both a young girl and a small child.

The simplest leather bag
No, you definitely need to get one. You will need leather, scissors, a strap, tape, a marker and (optional) a special tool for cutting several holes in a row (you can get by with an awl). All you really need to do is cut out a circle, make holes, pull the ribbon through them and attach a strap. All)

Envelope
Reminds me of the processing method of a cat bag.

Chanterelle
A lovely model)) Prepare leather or thick leatherette, braid and rivets for it. You don’t have to sew the chanterelle, just glue it along the edges and hide these places under the braid.

DIY jeans bags
However, the following models can be made from both jeans and old jeans.
Network
For this, cut the jeans into strips and weave the fabric, as in the photo. Sew it together in a bag (folding a piece of fabric in half) and sew on the handles.

Simple Denim Bag
If you have a denim leg, go ahead and make a bag! You will also need a buckle, a leather strap, scissors and thread with a needle.

Elegant handbag made of jeans
Here you will need two trouser legs, scissors, thread with a needle and a zipper.

DIY fabric bags
Rectangular
For it, take several pieces of cotton fabric, a zipper and accessories.

Clutch
An interesting idea is to use thick pieces of processed cardboard for the lining. I would recommend using plastic boards from Fix Price or juice packaging as a thick base.
Present such a handbag to your mother - she will definitely be happy))

Clutch in a semicircle
Cut two round pieces of cotton fabric and a circle of padding polyester from the fabric. Fold them into a “sandwich” and sew several times at right angles. Sew around the edge with bias tape. Fold the piece in half and sew a zipper into the bag. Decorate.

Handbag
This is where cotton fabric, lining, fasteners and floral decorations come in handy. A young lady, say 17 years old, will definitely appreciate such a gift.

Sportswear bag
For it, prepare thick fabric, braid, scissors, pins, fasteners, zipper and thread. In addition to sportswear, you can also put camping things in this bag.

Mini handbag
Using the scheme described below, you can make both a very miniature accessory and a larger item.

Remaking old things
For the first of two photo workshops you will need a long soft cloth bag, and for the second - an old T-shirt.


Photos of handmade bags
I want to show you how using the same patterns you can get many bright and unusual products.
Sandwich bag
Cute handbag made of fleece. It's quite simple! And this design can easily be implemented into a cat bag.

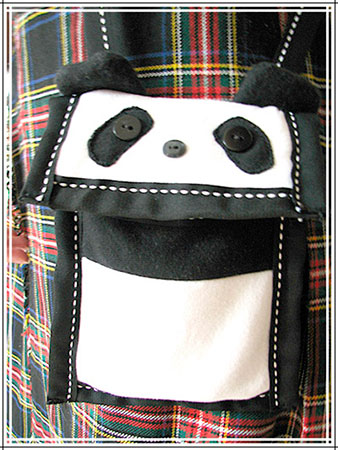
Panda bag
Cute panda design
Simple and elegant bag
The handbag is quite simple and is made according to similar patterns from the very first one.

Knitted bag
Although this bag is knitted, its design can easily be implemented in fabric.

Leather bag

Octopus bag
The bag, again, is knitted. But it is very similar to the first one (at the beginning of the article). You just need to add tentacles to it and remove the ears.

By the way, I bought fleece for the eyes of the “cat” bag Here. You're unlikely to see one like this in a store.
This concludes the article. I hope you enjoyed looking at all the bags and took something interesting for yourself. See you soon!
P.S. Subscribe to updates!
Sincerely, Anastasia Skoracheva
Women's bags are an indispensable accessory, without which the image of the fair sex looks unfinished. In it, representatives of the fair half of humanity carry with them everything they need: keys, a mirror, a phone, napkins, lipstick, and so on.
A woman needs a lot of bags, and the family budget, as you know, does not allow such luxury. Therefore, the best solution would be to make this item yourself. Even material for this needlework can be found if you thoroughly shake up your wardrobe.
So by choosing this activity, you will not only get an original, unusual new thing, but also free up your closet.
Before you start creating, you should decide on a model. Then select the necessary materials, tools and decor. And only then start making the little thing. Below we have tried to collect the necessary useful information and interesting ideas, diagrams and photos for your creativity.
What fabric to choose for sewing bags 
Sewing a fabric bag can be made from any material, the main thing is that it has sufficient strength.
Common materials
But there are certain options that are used most often by craftswomen.
- Jeans (denim). This versatile material suitable for creating products of different styles. Durable and wear-resistant, it does not electrify and looks very attractive. The only negative quality of denim is its ability to lose color (fading) over time.
- Gabardine. This wonderful material has a number of advantages. It does not wrinkle, is resistant to moisture and abrasion, does not stretch or shrink. The characteristic is complemented by the fact that the material is quite light and soft.
- Polyester. This synthetic fabric has a versatile look. Its surface can be imitation cotton or silk. But at the same time, it costs significantly less, and at the same time it is practical and wear-resistant. The only negative is that the material does not allow air to pass through.
- Nylon. The most unpretentious and low-maintenance fabric. But at the same time it has pleasant tactile characteristics and allows you to make attractive products.
- Thick cotton. Products made from it are best suited for the warm season. Easy to care for, lightweight and comes in a wonderful range of bright colors.
Additional selection
There are several more options that are not as common as the previous ones, but suitable for creating a women's accessory.
These include such paintings.
- Cordura- American high strength fabric.
- Canvas- modern a type of canvas.
- Lake- imitation patent leather.
- Oxford- came to us from Scotland something like a matting.
REFERENCE. In addition to the listed fabrics that are used for the outer part of the bag, there are a couple more options for the inner part. Most often, nylon or twill is used for this. You can also use plain calico or satin.
Types of bags that you can sew yourself
The existing models of this thing can be listed endlessly. But let's focus on the most famous variations that are easy to sew with your own hands.
- beach bag-mat;
To create these items you you will need some fabric (you can use things that you no longer wear), scissors, a sewing machine, as well as a little imagination and free time.
Shopping bag
Our mothers also sewed shopping bags themselves. It's perfect for grocery shopping. And her sewing is quite simple.

The material for its manufacture will be old, but still quite strong clothes.
Manufacturing process
- Unravel the clothes at the seams and cut out the details according to the basic drawing.
Pattern

- Finish the edges of the parts using an overlocker or a zigzag stitch.
- Make connecting side seams.
- Sew on the bottom piece.
- Sew on the handles.
- If desired, decorate the finished product with decor.
ADVICE! To make the product stronger, use a double seam.
We sew a beach bag-mat
The benefits of such a product are undeniable. Firstly, you don’t have to drag an uncomfortable rug with you, because the thing is equipped with a pair of convenient handles. Secondly, you can put the necessary small things in it (by sewing on a special pocket).

To implement it, you will need thick fabric (you can use terry), twill, large (35 cm) and small (14 cm) zipper, Velcro, padding polyester for the middle layer and 1.5 cm wide braid.
Basic pattern

Pocket pattern

Getting the job done
- Using the given pattern, cut the fabric.
- Sew zippers into the pocket details.
- Sew pockets onto the outer piece.
- Sew the handle straps of the product.
- Stitch the front and inner parts, placing spacer material between them.
- Sew on Velcro.
Shoulder bag - backpack 
Kids love this versatile item. They are happy to carry their things and books in it. And it’s even more pleasant for a child to receive an original item made by his mother.
For work you will need the following materials: fabric (main and lining), material for stiffening, zipper, fixing elements and decor.
Pattern

Work order
- Transfer the pattern details to the material and cut them out.
- Sew the side seams of the outer part.
- Connect the top piece to the bottom.
- Sew straps and flap.
- Sew in the lining.
- Sew in a zipper.
- Install the fixing elements.
- Decorate the product.
Clutch handbag
And finally, an invariable attribute of a women's festive outfit is a small clutch handbag. Made with your own hands, it can give your appearance a unique charm and personality.

To create it you will need fabric (main and lining), fabric or leather to create a flower, leather bias binding, dublin, magnetic button and a metal ring for attaching the handle.
Pattern

Description of manufacture
- Using the basic pattern, make outer and inner parts from the main and lining fabric.
- Glue the dublin to the outer part from the inside.
- Strengthen the place where the magnetic button is attached on the inside with a dublin.
- Install a magnetic button.
- Cut out two blanks for the inner pocket.
- Fold the blanks with the wrong side and stitch, leaving an opening for turning inside out.
- Turn the piece onto the face and stitch along the outline.
- Sew a pocket to the lining.
- Sew the outer and inner parts on three sides facing inward. At the same time, place the ring for fastening the handle in place.
- Turn out the workpiece and steam.
- Edge the bottom, which remains unstitched, with trim.
- Use a single stitch to process the valve and stitch the sides of the product.
- Install the second part of the magnetic button.
- Decorate the finished product with an artificial flower.
Attention! This clutch, instead of a flower, can be decorated with a finished applique or beaded embroidery.
Useful tips for sewing fabric bags 
- Many models of fabric bags require a rigid frame. It can be created by laying solid material on the sides and bottom, between the main fabric and the lining. Cardboard is used as the main material for these purposes. You can also (especially to strengthen the bottom) use household linoleum. Another popular method is to use flexible plastic office folders.
- You can strengthen the seams of the product using a laid cord and processing the resulting structure with bias tape or fabric.
- To decorate a shopping bag, you can use bright braid or iron-on stickers..
- Instead of a clutch handle, you can use a thick chain. It is sold by the meter at a craft store.
- When transferring the pattern details to the fabric, do not forget to add seams. Usually they are one and a half centimeters.
- To prevent the zipper slider from jumping out during use, when sewing, sew fixing pieces of fabric on both edges. They seem to be supposed to wrap around the ends of the zipper.
- If you use old clothes as material, when cutting, watch the direction of the main thread of the fabric.
- Decor plays an important role in the visual appeal of a product. The main thing is that there is not too much of it and that the overall style of the item is preserved.
We hope you are convinced that sewing a bag with your own hands is within the capabilities of even a novice craftsman. The main thing is to choose the right model and show a little patience and diligence. And everything else will follow. I wish you smooth lines and creative flights of fancy!
Hello Craftswoman!
On this page I will tell you about my inspiration, which, oddly enough, came from a shopping bag I saw on the “weird moms” website.
I make this butterfly using the reverse appliqué technique in different handbags; my clients and my mother loved it. I also wanted a faux leather bag like this.
I share the dimensions, pattern of the bag and the stages of its creation:
The size of the finished bag is height 31.5 cm, width at the top 36 cm, width at the bottom 25 cm, bottom depth 12 cm.
We need faux leather, fabric for lining, zipper for back pocket, zipper for bag.
Cut:
1. Top parts 2 pieces, size 38*35 cm (mark the corners of the bottom 6*6 cm).
2. Top bar 2 pieces, size 38*4 cm.
3. Lining 2 parts, size 38*32 cm (mark the corners of the bottom 6*6 cm).
4. Handle part 115*6 cm.
5. Bar for handle – 2 parts, size 26*7cm.
6. Back pocket lining, 2 parts, size 24*18cm and 24*20cm
7. Pocket for lining, size as desired.
Detailed pattern of my bag, how I made it.
On the main part we mark all the necessary marks and lines:
- Corners of the future bottom
- Middle line for future application
- Line of the future pocket (from the top edge 5-6 cm, 20 cm long)
- Along the top edge we mark marks for the bar into which the handle will be pulled. When finished, it is 22 cm, which means we set aside the width from the side edge by the side seam allowance + 11 cm (1\2 strips).
We sew pockets onto the lining if desired. I have a double, open pocket + cell phone pocket.
Sew the zipper to the back pocket lining details.


We make appliqué on the outer part of the leather bag. I have a butterfly made using the reverse appliqué technique.


We sew the upper strips of leatherette to the upper edges of the lining, inserting a zipper.


Connect the sides and bottom, leaving an opening for turning. We stitch in the corners to form the bottom.


Prepare the hole for the back pocket. Insert the pocket lining with a zipper.


We connect the sides of the top part of the bag, stitch the corners, forming the bottom.


In my version, the handle did not turn out to be one-piece and I will join 2 parts together, the seams will be hidden in the upper strips. Forming a handle


We wrap the edges of the handle bar 2 cm towards the wrong side, laying a fastening one. A line. Fold it across and attach it to the top strip of the lining, keeping the middle of the strip piece aligned with the side seam of the lining.


We turn the outer part of the bag inside out and put it inside the lining face to face, matching the sides and middle of the parts. We stitch connecting them.
Turn the bag inside out through the hole left when stitching the lining.
We lay a finishing stitch and thread the handle into special strips. We connect the handle into a ring and hide the seam inside the bar.
Sew up the hole in the lining.
Sewing a bag from genuine leather with your own hands is quite difficult. Therefore, for beginners, I recommend that you first sew a bag from artificial leather. The technology for sewing it is not very different from sewing a bag made of fabric or jeans, with the exception of finishing front seams.

A leather bag always looks elegant and fashionable and the price of a genuine leather bag is always high. Maybe that's why many people try to sew a bag or handbag, but, as a rule, they fail. The fact is that sewing bags and leather haberdashery is a separate direction in the sewing business, much like sewing shoes, so it is not surprising that many people are unable to sew a bag with their own hands.
In this article I will not explain how to sew a bag step by step. There are thousands of models of bags and it is impossible to make a universal video or master class in the form of a photo. But you can give universal advice on how to make a pattern for a bag model you like, perform one or another technological operation, how to install accessories with your own hands, etc.
How to sew a women's bag from genuine leather. Bag with lining and zip fastening. You will learn many useful tips on how to work with natural leather.

It is difficult to sew any products made of genuine leather, especially bags with a rigid frame. And this is due primarily to the special technology of sewing genuine leather, the presence of special tools and a sewing machine, the use of special applied materials, and, of course, the presence of experience.

First of all, you will need a sewing machine capable of sewing leather. Modern models of sewing machines cannot be used for sewing rough materials such as leather; read the instructions carefully. The only option is to find an old Podolsk-type machine from friends or relatives, maybe even with a manual drive. By the way, you can even buy it from an advertisement, but not more than 1000 rubles.


A construction knife with a replaceable blade can also be used for cutting leather. Do not forget that the blade of such a knife is not only replaceable, but segmented. Using pliers, carefully break off the dull part of the blade, and it will become sharp.
Paired with such a knife, you will also need a piece of plywood or board on which you will cut out the leather parts of the bag.

If your bag model has a lot of metal fittings, buy a punch like this in the store right away. Using it, it will be easy to make a neat hole for buttons, rivets and other accessories.

Instead of leather glue, you can use this adhesive tape.
This is not the entire list of tools necessary for working with genuine leather, but the most important ones. Without them, you will not be able to sew a high-quality leather bag. In addition, look at the general photo, you will need a special hammer, awl, thread, sewing needles, etc.

In addition to the main parts for the bag, you will also need many small elements, which are quite difficult to take into account at once. I will explain everything in detail as I assemble the bag. For now, just keep in mind that all skin scraps, even small ones, need to be saved; they may be useful to us in the future.

Make patterns for any parts of the bag immediately with allowances. Leather is quite an expensive material to forget about allowances when cutting and make other mistakes.
Seam allowances 0.7-1.0 cm.

The remaining parts have a rectangular shape and it is not necessary to make a pattern, at least use graph paper for them. However, perhaps you will decide to sew just such a model from fabric in the future, then ready-made patterns will make your work easier.
Two options for soft shaped bag patterns

It is not necessary to create a pattern for a bag from paper, but it won’t hurt to make a pattern of the main parts. The fact is that it is almost impossible to determine the size and shape of a bag using a paper pattern. In the sewn state, the bag acquires volume and, therefore, changes its calculated dimensions and shape. Therefore, make paper patterns of the main parts of the bag, pin or glue them and make sure that the shape and size of the bag suits you. If not, feel free to adjust the pattern and try it on again.

The consumption of genuine leather for sewing a bag must be calculated accurately. Moreover, you always need to buy more leather, since sometimes you have to “work around” various defects in the leather (crumpled areas, holes, abrasions, etc.)
But on average, to sew a bag made of genuine leather, you will need a skin measuring 100-120 square decimeters or approximately 1.0-1.2 square meter.
Depending on the model, the presence of finishing elements, pockets and other details, and most importantly the size of the bag, you can keep within 180-100 dm/sq. But in any case, you need to lay out the details of the cut, since leather is often sold with defects (stains, holes, folds, dents, etc.)
Don't forget about the finishing details of the bag. Because if you don’t have enough of a small piece of leather, you won’t be able to buy a small piece. Genuine leather is sold only as whole skins. By the way, sometimes it is the size of the skin that determines the model and size of the bag.
If you don't have enough experience, don't start sewing a bag from new leather right away. Find an old raincoat or jacket in your wardrobe. Take it apart and try to match the remaining areas of leather for parts of your bag. As a last resort, such leather can be combined with pieces of artificial leather or fabric, such as corduroy.

The connecting seams are sewn down with allowances of 0.7-1.0 cm. Do not forget to check the degree of pressure of the presser foot on the fabric and the height of the rack. Leather is a fairly dense and rough material, and in order to avoid damage to a household sewing machine, it is better to sew it on an industrial machine or an old manual sewing machine such as Podolsk, Singer.
To make it easier to pierce several layers of leather, you can buy special sewing needles for leather at a sewing supply store. They have a special blade shape and such a needle does not pierce the skin, but cuts it.

Not always, but often, the seam allowances of the stitched parts of a leather bag need to be glued. For this operation, you can use regular rubber glue and a brush. But it is better and more careful to glue the allowances using adhesive double-sided tape.

Tear off the paper protective strip and press the seam allowance.

To ensure that the seams on the front of the bag look even and smooth, you will need a hammer. Tap lightly along the seam with a hammer or the handles of heavy metal tailor's scissors.

It is very difficult to make finishing stitches on leather, since a regular presser foot will “slow down” the top layer of leather, the stitch will be “shallow” and even a tear in the leather may form due to frequent piercing with a needle. This is a responsible operation; treat it as responsibly as possible, since the skin cannot be stitched twice. You must do the finishing stitch the first time without mistakes or rework.
Therefore, be sure to change your regular foot to a Teflon-coated foot. There are a number of other devices for sewing leather, but this Teflon foot is the simplest and most inexpensive way.

And if you also play it safe and rub the seams with moistened soap, the seam will be flawless.
See Decorative stitching on a tricky area.

After the base of the leather bag is assembled along with pockets and other finishing elements, proceed to making the belt. Determine what type of clasp you will use, what hardware, and how you will attach the strap to the bag.

Do not use accessories that are too expensive and difficult to install. Metal zippers, metal rings, rivets, zippers, and buttons are easy to install with your own hands. And they definitely need to be used when decorating a leather bag. Metal gives natural leather greater solidity and attractiveness, emphasizing the noble properties of natural material.

And to install the fittings you will need this kind of punch No. 3 or No. 4. You can even buy a set of these punches if you regularly sew leather items, especially bags.
When punching a hole in the leather, place a thick wooden spacer on the back side. You cannot punch holes on a metal surface; the punch blade will quickly become dull. And make sure that other parts of the bag do not accidentally fall under the punch.
For shopping
Four rectangles: two for the front and back sides of the bag, two for the handles (see diagram below, for a bag-package). This is how the simplest shopping bag is cut out, which is usually used for shopping. Most people prefer to replace it with plastic bags, but if you are concerned about the environment or want to look more elegant, then it is better to use this simple pattern to sew a nice shopping bag from a more noble material: leather and fabric, for example, as in. Or from fabric with individual decor, for example, with weaving from ribbons - as described in, so in addition you can creatively use the remains of various ribbons and ribbons. You can also come up with your own version: from embroidery to patchwork appliques, as users of our portal Katerina-777 and Leukocyte did.
Super simple for every day
Using the same simple pattern, you can sew a lot of different bags, not only for shopping, but also for walking and even for the office, by sewing a zipper to the top edges and, if desired, sewing instead of two, one long handle on belt loops to the side seams. An example of such an easy to sew bag of the most basic cut is a magnificent model in the ethnic style from. The choice of material and fancy finishing in a certain style will give the bag a representative look.
To make the bag more spacious and look like a package, stitch the bottom corners diagonally, as described in. Then your bag will have a rectangular bottom, and things will not pile up.
Bag-package
Instead of stitching the edges, you can sew a real bag bag by stitching 3 more parts between the sides of the bag: side inserts and the bottom.
The size of the side inserts is calculated by the height of the side sections of the bag part, plus the required width is added, usually 6-8 cm. Folds can be sewn along the top of the side inserts for convenient flat folding. For the bottom, two parts are cut out; their width should be equal to the width of the side inserts, and at least one part of the bottom is duplicated with a gasket, preferably a rigid one (gasket materials can be used). If you don’t have a rigid pad at hand, strengthen both parts with a regular adhesive pad, and between the two parts insert a piece of cardboard cut exactly to the size of the bottom. The top of the bag can be fastened with a zipper. To do this, you need to cut out 2 more strips for facings along the top side of the bag and, on one side, stitch them to the top edge of the bag after hemming along the top edge, and on the other, stitch the zipper tape to them from below.
By the way, there is a simpler pattern for a bag-package - it is given in. Or by .

Bag with flap
Using approximately the same pattern: front and back sides plus a handle, a standard bag with a one-piece flap is sewn. For the flap, you just need to increase the size of the back side of the bag and, accordingly, if desired, round the edges of the flap or draw them in the shape of a triangle. You can find a super simple pattern for a flap bag in.
Please note that if desired, the details of the bag can also be rounded, drawn in the shape of a trapezoid, or given any fancy shape, for example, the shape of a butterfly, flower or fruit. You will find the pattern for the curly side part, for example, in.
Bucket bag
A very convenient and popular pattern of a soft and comfortable bucket bag with a long, wide, one-piece handle is cut out of just two parts. For it, you can combine different fabrics, as in the master class on sewing a bag with turquoise decor, sew pockets, side linings, insert zippers, decorate with tassels, pendants, decorative stitches, etc. - see also the options below.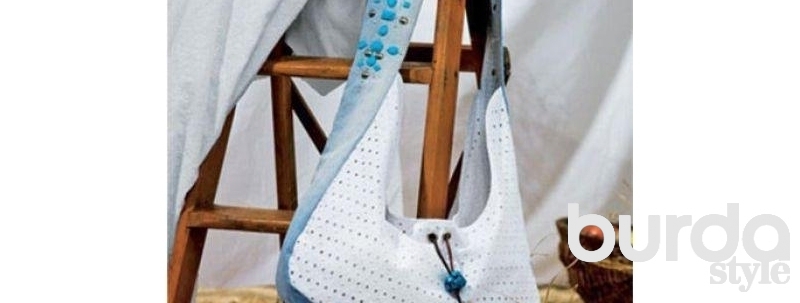
Lined bags
A bag with a flap (like many other models) must be lined. The lining fabric pieces are cut out from the existing top pieces, with the exception of the handles, with the same seam allowances. When connecting the bag itself to its lining, a hole is left in one of the seams of the lining (the usual side seam) for turning inside out, which is then sewn up by hand using blind stitches.You can see a detailed description of sewing a bag with linings in.


Sewing your own bag for cycling is also not a problem, see the description. For active recreation and sports, a pocket bag on the belt is also useful - a small and roomy model, just like a backpack, leaves your hands free, it is better to familiarize yourself with the pattern and sewing in detail, and then choose the right model for yourself.
For relaxing on the beach
The beach bag-mat is sewn according to one of the very simple patterns described above. Its pattern consists of one large rectangle, folded 4 times, and a strip for two handles. A large rectangle will need to be cut out 3 times: 2 parts from fabric and 1 part from a thick pad or sheet of foam rubber. Ours offers an option to sew a beach bag from a terry towel. Another option for a beach holiday is: an original solution for two problems at once: you simply sew a valve for beach accessories and a carrying handle to the pillow.
And for those who like to relax on the beach doing their favorite handicraft, you just need to sew a model in which you can put everything you need: from scraps of fabric and patterns to scissors, needles, threads and a thimble.

City backpacks
Lately, women's city backpacks have been very popular; they are small, but roomy and comfortable. Details for fashionable backpacks or transformable bags (those that can be carried both in the hand and over the shoulders - see) can also be drawn yourself. Using a similar pattern, you can sew a variety of models: to sew a glamorous accessory, to where you can combine a tapestry with leather - a stylish addition to an image in an ethnic style.
Clutches and evening bags
And finally, evening handbags - primarily clutches, as well as handbags with a clasp clasp (see pattern and description of sewing in) - all their variety is based, as a rule, on the original finish. Handbags on a chain or a long handle that hang around the neck and hold nothing more than a powder compact and lipstick are a hit this season; they are super easy to sew according to the description in
To sew a couple of dozen different clutches, you can use just a few patterns: from the simplest one to the original clutch or the original soft clutches presented in the master class on sewing three models at once. When sewing such clutches, it is very important to carefully sew on the zipper or make another fastener.
Decor
So, we already realized that sewing a bag is not so difficult. However, to make your model different from others - after all, it is not for nothing that it is handmade, focus on the choice of memorable fabrics and materials and on the decor.
Appliqués made of fabric with embroidery, motifs cut out of leather (including logos), contrasting or tone-on-tone piping, tassels, patchwork techniques, voluminous patchwork (trapunto technique), huge rhinestones imitating precious stones and exquisite floral motifs lined with rhinestones, braid with pom-poms combined with mirror sequins, fringe, a patch pocket made of leather in a contrasting color with a beautiful clasp, a handle in a contrasting color, decorative belts with blocks or a row of blocks in the form of beads.
In youth fashion, a variety of inscriptions, funny bright applications are relevant; clutches in the form of boxes of sweets, books and other items have not gone out of fashion.
You can find it on our website.
Accessories made with imagination and taste will make your look unique!


