Crafts Christmas trees from different materials. Ideas for creative DIY Christmas trees from scrap materials: photo. Craft Christmas tree made of organza
Click Class
Tell VK
We continue to decorate our home for the winter holiday. We have already made various ones, hung them on the windows and walls. Now we want to give symbolism to the holiday. And this, of course, is the main princess of the celebration - the Christmas tree. I know that many people feel sorry for the trees and replace them with artificial analogues. But sometimes you just want to make something yourself in order to get satisfaction from the action and an accent in the decor.
All craft ideas are easy to do with your kids. To make the job easier, prepare the basics in advance. And try not to skimp on decor. Buy more different beads, ribbons, ribbons, beautiful buttons. Collect small toys from kinders and decorate with them. And they will go to work and will not wallow.
You can create beauty from everything you have at hand. The main thing is to apply a bit of imagination and all your accuracy to this. With modern devices, such as a glue gun, you can give the product original shapes and fix different textures and materials.
I know that corks from wine bottles and ice cream sticks are also used. Well, we don’t have any traffic jams at home, and the sticks have long been sold out for various needs, so we move on to materials that any housewife will definitely have - pasta and yarn.
Let's start with pasta. I know that they make various snowflakes. It turns out that they are also suitable for a Christmas tree.

We will need:
- A pack of pasta (it's better to take feathers)
- Glue gun
- Sheet of cardboard
- Dye
- Decor
It is better to prefer the “feather” or “spiral” shape. Choose a good manufacturer so that all the pieces are even and the same length.
First of all, we glue a cone out of cardboard. I do this by simply twisting the sheet around my hand. To prevent the workpiece from falling apart, we fasten it with a stapler.

And now we trim the base so that the tree stands straight and not crooked.

We always start from the foundation. The first two rows are “put down”, i.e. Glue them so that they lie on the surface, so the product will be more stable.
And subsequent rows need to be raised exactly on the previous ones by an amount equal to half the “spiral”.

When you finish the top, we begin to cover the entire craft with paint.

You can take green, or you can buy gold or silver paint in a can. Only then you need to spray it not at home.
I really like the result. It doesn’t take much time, but it looks very elegant.

Now it’s the turn of yarn and cord.
To make a Christmas tree out of yarn, you need to wind the threads exactly above each other on a paper cone. Periodically fastening it with hot glue to the base.

Decorate with decor.

This product is made even faster than from pasta.
You can decorate them with buttons.


We will need:
- Wire
- Decor
First we select the wire. It should be tough and not thin. From it we roll up a cone-shaped spiral. We check for stability. The bottom can be wrapped twice.

We begin to string the cord onto the wire.

Dry and decorate.
The glue will give the structure additional strength and will not allow the cord to slide down along the frame.
Volumetric Christmas tree made of paper
Paper is always the first thing the word “craft” is associated with. And from it you can create not just one Christmas tree, but an entire spruce forest, in which not a single tree will be the same!
Let's say we want a paper tree to make us happy on the kitchen table. Then you need to make it fluffy and voluminous. And also as stable as possible.
So, I have selected several detailed master classes with a clear description of the process.
Option 1
We will need:
- Cardboard cone
- Green paper in different shades.
We cut out many circles of the same size from paper.
And we begin to glue their edges to the cone, observing the rows.

The first layer always goes at the base.
This craft is accessible in terms of complexity, even to a two-year-old child. And it looks quite rich because of the different shades of the same color.
Option 2. Terry cone herringbone
Cut out 4 semicircles. Each of them is 2 centimeters smaller in diameter than the previous one.

Glue the blanks into a cone and slightly cut the edges around the perimeter to get volume. Fold the terry edges a little.
Now we glue a smaller cone onto the largest piece. And so on downward.
That's the whole simple process.
Option 3. Let's make a spruce out of paper circles
Cut out 4 circles. Each of them is 1 centimeter smaller than the previous one.

Then fold each circle in half 3-4 times.
We also make a base from paper. You can wrap green paper around a pencil or kebab stick.
We string the round blanks onto the trunk in descending order of size.
To give stability, you can place the trunk in plasticine, wax or wine cork.
Option 4
We mark 15 circles, each time reducing the diameter by 1 centimeter. Then we divide each circle into 12 equal parts, drawing lines through the center.

From the center, mark half the radius and draw a circle. Now we cut the lines clearly to the drawn circle.
Glue the ends of each petal together.
When you have completed all the levels, start assembling the Christmas tree from the widest row to the smallest.
How do you like the ideas, I think you will find ideas for yourself.
Crafts from cotton pads for the New Year in kindergarten
Was your child dumbfounded by the task that you need to bring a craft to kindergarten tomorrow? And outside the window, of course, it’s already night. Then you can use a package of cotton pads. In most families they are actively used.

We will need:
- Packaging of cotton pads
- Cardboard for cone base
- PVA glue
- Decor
We roll up the cardboard frame and connect the edges with a stapler.
Take a cotton pad and fold it in half.

Then we place two ends of a cotton semicircle on harmless PVA glue.

And glue the workpiece to the base, having previously smeared its fold with the same PVA glue.

We do this row by row. It is better to glue the cotton pads closer to each other so that there are minimal gaps.

All that remains is to decorate the delicate beauty!

Children in kindergarten will definitely like your product, and they won’t be ashamed in front of other parents.
DIY craft from napkins
Another very affordable material is napkins. You can use the most inexpensive and plain ones.
We take white, red, blue and green holiday shades.

We fold the napkin several times to get a square shape, then we cut the folds and crosswise fasten the middle with a stapler.

Now we bend each layer, forming a pompom.

We lay out the first row on the frame with these balls. Then we glue the balls and other Christmas tree decorations onto double-sided tape.
And fill the entire surface of the frame with napkins.
Everything is pretty fast.
By the way, you can see how to make one from napkins here. It also turns out very beautiful.
Christmas tree made from candies
A craft made from candies would be a wonderful gift: buy a box of good candies in a beautiful package at the grocery store.
It is made of two parts - a base for candy and a barrel.

Glue the base with a side of 23 centimeters. When cutting, make 1 cm indents along the bottom edge and at one edge. We will apply glue to them.

We decorate with beautiful paper or film. Glue the bottom to its base.

We make a trunk, decorate it and glue it to the frame.

Now we evenly place candies, braid or Christmas tree beads onto the hot glue.

Use the same color scheme for the base and candies.
Making a New Year tree from pine cones
Natural material always adds the right zest to the decor. Your home will immediately smell fresh and resinous. Will give symbolic meaning to this winter holiday.
The cones are also suitable for various crafts.
You can create a Christmas tree from only pine cones, or you can dilute them with sisal balls, decorative flowers or fir branches.
The combination of pine cones and dried citrus fruits also looks unusual.

Glue the pine cones onto the base using hot glue. You don’t have to think about the side you have them on. This will add a slight, mesmerizing carelessness to the product.

We alternate pine cones with Christmas balls or other decor.

Cover with artificial snow or white enamel from a sprayer.

Everything is quite easy, and the result is incredibly beautiful.
Light tinsel Christmas tree
We cannot imagine the New Year without tinsel! There are all sorts of decorations on it now: stars with balls, and multi-colored tips. It is used to decorate windows, curtains, walls and, of course, is used as a material for crafts: wreaths and Christmas trees.
Since most tinsel manufacturers put it on thin wire, it easily lends itself to various bends and shapes.
A spruce tree is made from it in three minutes!
We will need:
- Tinsel
- Sheet of cardboard
- Double sided tape.
We make a cone-shaped base from cardboard and cover it with double-sided tape.

We remove the protective film from the first row and begin gluing the end of the tinsel, wrapping the frame tightly.
If you don’t have enough tinsel, then glue the end with tape, and put the next fluffy ribbon of the same color on top of it.
Fluffy beauty made of pompoms
Pom-poms have also long been loved by our craftswomen. Previously, we made a dog out of them, but now we will create a fluffy beauty.
The balls themselves can be made in two different ways: by winding 20 layers on a fork or by using two round blanks.

We will go with the second method.
Take cardboard or plastic and cut out two identical rings.

Now, having stepped back 5 centimeters from the edge of the thread, we begin to wind the yarn very tightly.
Then we cut the outer fold between the blanks.

Using the remaining thread tip, we tie the middle of the pompom so as not to lose all the threads.

Now we look for a thick wire and roll it into a spiral. Leave the base wide. We string pompoms onto it.

If the wire is not found, then we use the experience of previous products and form a triangular or conical base.
Felt Christmas tree ideas
Felt is also popular among our craftswomen. It can be used to make educational toys and Christmas tree decorations. Today I will give you a few ideas for creating a spruce tree.
From the simplest options to the complex.
Option 1. Cut out 10 Christmas trees of the same size from felt. Fold in half and glue the fold to the trunk.
We use branches, tree cuts (preferably spruce or pine).

Option 2. Cut out many identical triangles from felt.

We glue them to the frame in rows. The top triangle fits between the two bottom ones!

Option 3. Prepare 5 squares of different sizes: 9 cm, 7 cm, 5 cm, 3 cm, 1 cm.
We make five of each size.

Now we string the largest squares onto the thick one, distributing them diagonally to each other so that there are no voids.
We pass all the squares like this.
New Year's beauty made of fabric
And two more ideas for fabric beauties. The ends can be finished with a decorative stitch using a thick contrasting thread. Sew buttons or beads onto symbolic branches.

Use several fabric colors and textures. For example, take velvet on one side and linen fabric on the other.

You can also choose different designs in the same color scheme or, on the contrary, play with companion colors.

You can fill the Christmas tree with holofiber, padding polyester, or pieces left over from your creativity.
If the product is small, fill it with cotton wool.
My dears, I tried to select for you the most interesting and accessible materials for creativity. I would really like to know your opinion in the comments!
Tweet
Tell VK
A universal selection of gift ideas for any occasion and occasion. Surprise your friends and loved ones! ;)
DIY Christmas (and not only) trees: master classes
Almost all the Christmas trees presented today are made using different materials. Some are very unusual, artsy, rich. I would even say elite. And others, on the contrary, are as simple and minimalistic as possible in their design. A la Ikea, so to speak.
DIY paper Christmas tree
The largest group today. You will see many representatives of the beautiful spruce species. Each one is different from the others, so choose
Origami
The simplest version of a paper Christmas tree is using a square. Fold the square in half (diagonally), bend the opposite sides to the center (like in an airplane) and that’s it.
Tip: Use this simple trick to decorate a greeting card or fold napkins beautifully.

Angular
First of all, fold a square of paper as shown in the photo. Then:
- Fold the structure so that the side corners are inside. This will result in a square four times smaller than the original one.
- Bend the right corner to the center,
- And left.
- Fold the right corner to the right.
- Fold this corner under yourself.
- Do the same with the second one.
Now turn the structure over and repeat steps 2-6 only for this side. All that remains is to trim the sharp lower tip and make a few cuts on both sides. Then bend each cut end and place the Christmas tree on the table)
Circles
To create this spruce, take paper and draw a circle on it, outlining it as necessary, as in number 1. Next, cut out the circle and cut each section to a small circle. Now wrap each of these small sections on both sides with the tips inward and glue them together. Process the entire circle in this manner.
For spruce you will need several rows. In the photo, for example, you see a beauty made of 15 layers with a cone top. The layers, by the way, are assembled onto wire by piercing the centers of the parts.

Panel for kindergarten
In kindergarten, were you given the task of making a spruce tree together with your child? Then this option is the simplest. Take thick cardboard and colored paper. Cut out triangles from cardboard, cut the paper into strips and overlap them. Even a child can handle this. Cut off the excess. You can glue a skewer at the bottom and stick it into the padding polyester.
Tip: the resulting product can be used as a bookmark.

Making crafts using available materials
To create this semblance of a fluffy-coniferous creature, you will need a long metal pin on a stand and lots and lots of scrap paper. Feel free to use newspapers, old magazines, etc.
Tip: Additional decoration of the Christmas tree can be done using paint in a can, which can be sprayed on the leaves. This will make them stronger and more durable.

Big tree of knowledge
The next beauty will be the spruce tree that brings knowledge. For it you just need to stack all the available books in a pyramid. I highly do not recommend hanging an electric garland, as in the photo: fires happen very often on New Year’s, so don’t neglect it. It’s better to put regular tinsel and balls on the ledges.

From tubes
Incredibly simple technology. Suitable for decorating cards and walls. Prepare several tubes rolled from paper rectangles. Glue each one in the intended place. The tubes can be made gradually smaller or with a “brush” (sometimes placing longer elements higher than necessary).
Glue button or sequin decorations on top.

Fluffy
For it you will need many, many paper strips, which will need to be glued in layers to a paper cone. And put on a cute cone hat on top. An excellent craft that can be done with children too.


For those who are passionate about quilling
Do you like to twirl paper spirals? Then prepare several strips of paper of the same thickness. Roll 17 pieces into a spiral and narrow one end of each. For the trunk, simply roll 4 tubes and place on a skewer. Glue all parts according to the photo. The ends of the “branches” can be decorated with cylinders of a different color, similar to Christmas tree decorations.

Vytynanka
I remember my sister once mentioned that she liked the so-called vytynanki - one of the types of Slavic folk art in which amazingly beautiful things are cut out of paper. They are often glued to glass to enhance the festive atmosphere.
And they are made like this: the desired pattern is drawn on paper in advance. In this case, a spruce tree folded in half. And then, using a well-sharpened stationery knife, all unnecessary parts are cut out. For the spruce you will need two parts folded in half, which can later be sewn in the center using a sewing machine or by hand.

Corrugated paper
Continuing the paper theme, I want to show you three simple Christmas trees. The first one, with blue roses, which are made of tissue paper (like corrugated paper, but much thinner). Each rose is created using a strip that is tightly curled at the center and slightly looser towards the end. Thanks to the properties of paper, roses easily straighten and become lush.
The base is again a cone.

The next spruce tree is very similar to the previous one, but here the strips used to create the flowers are cut along the edge, making them very fluffy. They are again rolled into a flower, but they do not try to give the appearance of a rose, but simply soak them as much as possible.

From cupcake tins
Well, that's an interesting idea. I have just a bunch of these molds that seem to never be useful to me (I would rather buy silicone ones). Cut the bottom off each and cut from one edge. And stick it on a paper cone.
By the way, you can use scraps to make a flat Christmas tree for a postcard, as in the photo in the master class.

Fabric Christmas trees
Floral
This beauty will require a lot of circle flowers. For them, cut out several circles of fabric and burn the edges. It is better to take organza, veil or something similar. Then collect each flower on a string and decorate the center.
Spruce again from a paper cone at the base

From felt
To create these tree pendants, use soft (for the base) and thick (for other elements) felt and beads. Patterns can be made directly from the photo. All that remains is to cut out the parts from felt, which then need to be sewn with a running stitch and stuffed. Well, decorate, of course
You can give such a Christmas tree to a guy - it will be very touching

From satin ribbon
Prepare beads, satin or grosgrain ribbon (or maybe even lace?), thread and needle. All you need to do is string beads and ribbon loops onto the thread alternately. The main thing is not to forget to secure it at the beginning and end of the product.

From balls
The essence of creating this wonderful Christmas tree is to create a huge number of fabric balls. For each of them, cut out circles and tie with thread, laying a running stitch. Put a little padding polyester inside and pull it off. Each such ball must be glued to the base.
The base can be a foam cone, a paper cone, or sewn from fabric. You can also decorate the spruce tree in the form of a topiary; for this you will also need a pot of polymer clay and sprinkles to create the effect of an earthen mound.

I came up with such a charm in a nautical style:

Other materials or need for invention is cunning
Sorry, dear readers, I in no way want to offend anyone. It’s just that this expression best describes the impossibly diverse number of materials with which people manage to create Christmas trees :))
From beads
A rather complicated, but interesting Christmas tree. To create it, prepare chopped beads, a couple of beads and thin wire for working with beads. First, string the top, as in photo 1. Then make four upper legs - this will be the top.
Now prepare the branches, in each of which make several loops - smaller for the upper branches, larger for the lower ones. Collect them all into one trunk, wrapping it across with thin wire.
From plastic bottles
I respect this master class for its respect for nature and waste recycling. Take a plastic bottle, cut off its smooth central part, which you cut into fringe. The lid will go on the top, the bottom can be used as a supply. Glue all the cut elements to the central rod.

From spools of thread
My friends, if you have a number of wooden thread spools, then know that you are the owner of a treasure with which you can make an amazing tree. To do this, clear all the spools of thread and glue the very bottom row onto a round dense base. Then glue row by row onto the existing ones below. Simple and stylish

From candy
The base will again be a paper cone. Attach a row of regular tinsel to it, then a row of sweets, then again tinsel, etc. You can glue the most delicious candy to the top (as a star). One minus - there will be nothing left of the tree quickly

From the bark
Strict Nordic Christmas trees. Which can be made if you have a paper cone and a little (okay, a little more than a little) bark on hand. The pieces need to be glued in rows so that the tree looks like a spruce.
I just ask that you don’t spoil living trees for this. Better look for something that has already been knocked down by a thunderstorm. By the way, the method with small pieces can also be used with CDs.

From sticks
Let's continue the theme of nature. This time we are decorating holiday boxes. Use chopsticks to lay out a semblance of a tree, which, in turn, decorate with threads, buttons and other decorative details.

From clothespins
I definitely need to make one like this for the New Year))) I have a dozen or two clothespins with hearts, it will be cool) In general, all you need is to build a rod with a stand. For example, a lid with a spoke. And put “branches” on the knitting needle. You can insert lollipops into the edges.

Bohemian
And we will make this spruce using feathers. The principle is the simplest - glue the feathers in rows from the bottom. By the way, feathers can be purchased in woven ones. But I don’t know what they used to paint it green. Maybe someone can tell me?

From wire
Build the frame like this: wrap three circles of wire around something round (cans, buckets, etc.), so that each next circle is smaller (or larger) than the previous one. Then take three pieces and use thin wire to tie them together at the top and in the same place on each circle.
All this can be wrapped in a beautiful garland. If you get creative, you can even hang a few Christmas tree decorations.

Made from mesh (and sisal)
Such a Christmas tree can be built in a few minutes. To do this, take a mesh or a sheet of sisal (read what it is). Place on a paper cone and wrap in several layers. Secure the top with a cord, wrapping it in a spiral around the spruce. Decorate with Christmas tree decorations.

And now is the time for the most minimalist Christmas trees, which will decorate the house and won’t take up much space.
Made from... Christmas balls
Here's a pun - a Christmas tree made of Christmas balls. Nevertheless, it looks great. For some reason I immediately imagined such a structure at some cool corporate event of a large company - it looks very status-worthy.
Making one is not at all difficult: take several dozen green (or whatever you want) balls and tie a thin thread or fishing line to each one. The most difficult thing is to measure the length correctly. Do this: Determine for yourself the required number of balls for each row and, based on this, estimate the length of the thread. The higher the ball, the shorter the thread.

Symbol
This is exactly what the next two coniferous trees can be called. The first is located on the wall and is made up of pieces of tinsel imitating fir branches. You can attach it with double-sided tape so that the ends do not stick out.

The second one was simply skillfully assembled with the help of many paintings, badges, souvenirs, etc., which were collected in the likeness of a spruce tree. Notice how some elements seem to imitate toys that are located on the tree. An interesting idea, by the way, for an original gift for February 14th - winter will still be in force, so a Christmas tree will be quite appropriate.

Well, dear readers, it’s time for me to say goodbye to you. The spruce hit parade is over, share your impressions: what inspired you, what you will take note of, etc. Be sure to tell your friends on social media. networks using the buttons below. Bye!
Sincerely, Anastasia Skoracheva
On New Year's Eve, window sills, tables and exhibition stands of kindergartens are filled with festive crafts. What is there: bright toys, elegant Christmas trees, New Year symbols, drawings, postcards, garlands! Joint creativity with children on the eve of the New Year brings true pleasure, adding a festive mood and increasing the anticipation of the holiday. Subject crafts for the New Year in our kindergarten was like this: make a Christmas tree craft from paper, cardboard, fabric, waste materials with your own hands. Because the to kid our 5-6 years, we chose not too complex options crafts made from colored paper. The son took an active part in making the craft, which means we can safely recommend that readers make one themselves Christmas tree for kindergarten.
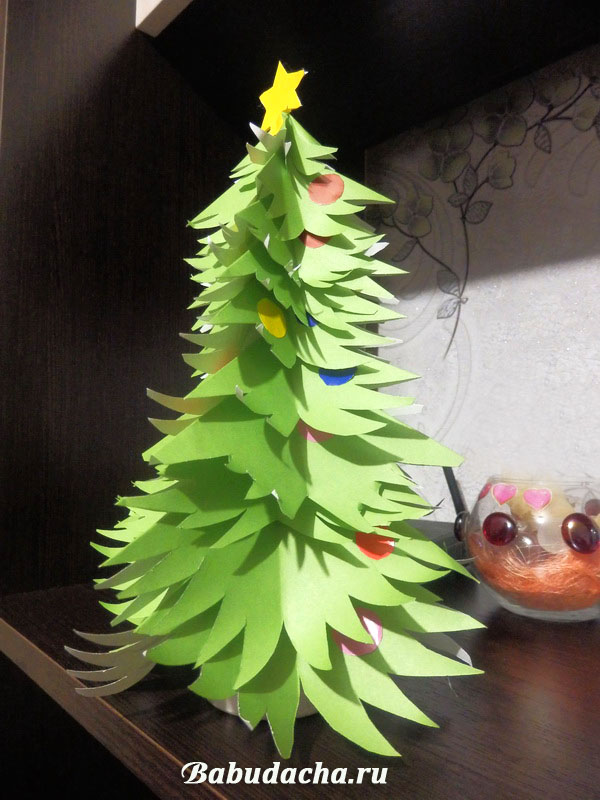
Our Christmas tree made of colored paper:
We made this Christmas tree out of colored paper in one evening, without much effort. The child himself cut out the “needles” according to my drawing, glued the “balls” and “star” himself, and put the parts on the wooden frame himself.
How to make a Christmas tree craft
We took this photo master class as a basis:

But we unfolded the “branches” a little differently and added our own “toys” to the tree. The hardest part of this craft is folding the paper to cut out the branches. Therefore, I took a photo of this process especially for the article. The green paper is over, so out of the red one
1. We make “branches”-tiers. Cut out a square from colored paper. We did not measure using a ruler, because later it is possible to align the sides. The squares are cut out in different sizes because the branches of the Christmas tree are of different sizes. In total, we needed 10 squares and got 10 tiers of “branches” (see photo above).


2. We hang “balls”. We glued toy balls made of self-adhesive paper onto the finished “branches”. But you can do it from the regular one, but it seemed faster to us.
3. Making a “trunk”. We glued a piece of modeling dough into a small plastic jar (plasticine will also work), put some cotton wool and stuck our “trunk” into the “ground” (we used a sushi stick).
4. Place the “branches” on the “trunk”. At the top of each tier we make a SMALL cut with scissors and place the tiers one by one on a stick. For strength from the inside, each tier at the cut site can be coated with glue.
5. Put a “star”. We also made a star on the top of the head from self-adhesive paper. We cut out a star in 2 copies and glued it to the top of the head.
It’s a pity that we weren’t able to photograph the Christmas tree during the manufacturing process step by step. The idea to write this article came to me later, when the craft had already been taken to kindergarten. But we hope that our master class was clear
Please note: there are two options for the Christmas tree. The first is to arrange the tiers of branches as we have (symmetrically) and as in the original version (checkerboard). In any case, it turns out beautifully. The Christmas tree comes out cute, bright, and downright fluffy.
New Year's DIY Christmas tree craft. Miniature sesal Christmas tree.
How to make such a craft is shown in the photo. For this craft you need the following: sisal cloth, wooden skewer, bottle cap, coin, piece of natural fiber fabric, glue and beads.
The tree stump will be made of cork.
We cut the bottle cap in half and glue a coin at the bottom for stability.
In the center of the upper part we make a small hole for the barrel. 

The barrel will be made from a wooden skewer (any length to your taste - break off the size you need) Let's make a barrel. The skewer needs to be strengthened in the cork by 1 cm and glued with glue. 
Decorating our tree stump. Using a compass, draw a circle on a piece of fabric, the radius of which is equal to: the diameter of the hemp + its height + 1 cm for the assembly. We cut out a circle. We gather the edge of the fabric with a “forward needle” seam, departing 0.5 cm from the edge. Leave the ends of the threads on the front side of the fabric. We place the barrel in the middle of the circle and tighten the thread around the barrel, tying a bow. You can put beads on the ends of the threads.


We form the crown. We cut the sisal fabric into strips of different widths, depending on how “fluffy” we want the Christmas tree to be. We cut each strip into equilateral triangles and arrange them according to size. 

Everything is ready to make our craft. We put triangles on the skewer, starting with the smallest. In order for the Christmas tree to be fluffy, the legs (corners of the triangle) must be directed in different directions, randomly. 
Decorate the top of the Christmas tree with a bead and all the leaves too. To keep the beads in place, they are glued with glue.
The craft is ready! Let her make you happy on New Year's Eve.
Greetings, friends! When you start to think about the coming of the magical winter holiday of the New Year, you immediately think about miracles and gifts under the Christmas tree. After all, every family has such a tradition. In addition, the Christmas tree is the main attribute of New Year's Eve and its absence is simply impossible to imagine. Therefore, I propose to talk about it today.
Previously, people always cut down the forest beauty and destroyed trees just because of a few. Now everything is a little different. Real Christmas trees have been replaced by artificial and homemade ones. The artificial option is good because once you buy the product, you install it every year. But DIY Christmas trees will be different from all others and will somehow decorate your home in a special way.
In addition, homemade Christmas trees are usually not large in size. And this allows you to solve the problem of installing a forest beauty in an apartment that does not have much space. Also, products can be placed on window sills and create a single composition with New Year's window decor. And if you have very active children who can tear down a tree, then the idea of a homemade product is perfect for you. After all, a small Christmas tree can be easily placed where children cannot reach it.
I would like to bring to your attention a large selection of photo ideas and master classes on making a decorative Christmas tree with your own hands. The products can not only decorate your home, but also serve as a creative gift or decorate any thematic exhibition.
How to make a Christmas tree with your own hands for the New Year? 30 photo ideas
As always, first I want to invite you to look at the finished works and understand what and from what you can create our hero of the occasion. And, in fact, see with your own eyes already realized ideas.
I note that you can make a Christmas tree from various available materials. We will consider all options, and in detailed master classes. Therefore, read the post to the end, there will be a lot of interesting things!
The most popular way to create trees is from threads and PVA glue. Makes great crafts. Moreover, such works are easy to decorate, for example, using beads and paper.

Also do not forget about such material as fabric. You can sew different Christmas trees from satin types. By the way, please note that the fabric blank is fixed to the cone with glue. This idea is present in many crafts. You can use felt and stuff it with cotton wool.

You can also use pasta, and first you can color it green. And for a festive touch, alternate rows of pasta with tinsel.

And here is a paper beauty. You can create it from ordinary colored paper, which is cut into strips and glued together in the form of droplets.

Now I propose to do the work from tinsel and delicious sweets in shiny wrapping.

But there is only one fluffy tinsel and real ball toys.

Or it would be great to weave a souvenir from beads. And this is done in an elementary way. All you need are wires and the beads themselves. Here's a look at the finished work.


And here are the weaving patterns closer to you.


Spruce can also be collected from truffle sweets. The basis is also a paper and cardboard cone.

And how cool the crafts look with lighting. Simply magical! In this work, ordinary mesh fabric or floral mesh is used.

Make a beauty like this from a paper cone and buttons. A great idea for a craft for kindergarten or for a school exhibition.

In addition to fabric, ribbons also work well together in trees. Cheap, creative and festive!

And look at the next picture. I would never have guessed that this souvenir was made of paper. It turns out to be a very voluminous craft.

I completely forgot about the easiest way to make trees. When two blanks are made and inserted into each other. I'll talk about this option a little below.

Here is another step-by-step diagram for creating a Christmas tree from threads. Interested in this idea? Then scroll below and read the master class. And of course, then turn everything into reality.

I really liked the next souvenir. My daughter and I will definitely make such a forest beauty. And let her decorate her room.

Here is another work for children's creativity. Natural material in the form of cones - both simple and tasteful!

If you have accumulated toilet paper rolls, don’t rush to throw them away. After all, you can make a green tree from them.

Or use feathers. They can always be purchased at a hardware store. This product is very quick to make and looks impressive and airy. Ordinary white feathers can be colored using food coloring.

And I also found a job made from pasta. I really liked it. So I'll leave it here too.

Also, don’t forget about the Christmas trees. They are very cute.

You can always sew green trees from felt.

Or make it from foamiran.

And what a blessed material sisal is. Create endlessly!

And a wooden tree. Great idea!

And if you are a very creative person, then make a tree out of books.

As you can see, Christmas trees can be made from anything. In this case, a cone is taken as a basis, which is subsequently pasted over and decorated with various materials. You can also make products from plasticine. But since we are considering options for replacing real wood, we did not take plasticine work into account. Although they are just right for children's creativity.
Christmas tree made of fir cones and pine cones
Now let's move on to the master classes. And first of all, I want to show you how you can make a tree from pine cones. So the smell will remain in the house, and the mood will certainly become festive.
Collect pine or fir cones in advance. Choose open, but at the same time strong and whole fruits.

You will need: cones; hot glue; heat gun; cardboard; scissors; tinsel and toys; flowerpot; spray paint.
Manufacturing process:
1. First, decide on the size of your future spruce. Then cut out the base from the appropriate size cardboard.

2. Clean the cones from dust and sort them by size.
3. Now start laying out the pine cones in tiers in a circle, using the larger cones first. Connect the pine cones and tiers together using hot glue.


4. As shown in the photo, assemble the entire product. And at the very top, fix the cone vertically.


5. Decorate your beauty with any decorations. You can also paint the cones with spray paint. To ensure that the tree stands firmly on the floor, glue its base to the flower pot using the same hot glue.


I would also like to suggest you make a souvenir from cone scales.

You will need: cones, sharp knife, cardboard, glue, cloves, brush, acrylic paint, glitter.
Manufacturing process:
1. Clean the cones from dirt and dust and separate the scales. Do this carefully with a sharp knife.


2. Roll the cardboard into a cone and glue it on the side. Trim off any excess cardboard at the base.


3. Now glue the scales in a circle, starting from the very base of the cone.

4. When you reach the top, glue a clove on top.

5. Wait for the glue to dry and start painting. Take acrylic paint and paint the scales.

6. Grease the ends of the “twigs” with PVA glue and sprinkle with glitter.


7. You can leave the product as is or further decorate it to your liking.

Now that you know two simple ways to make coniferous trees with your own hands, I can show you ideas for their design. Look and choose!


The easiest way to make a spruce from a cone is to decorate one cone, because it looks so much like a forest beauty.


Master class on making a Christmas tree from candies and corrugated paper

You will need: tinsel, corrugated paper, candy, stapler, thick paper, newspaper, glue gun, wire.

Manufacturing process:
1. Take a sheet of thick paper and roll it into a cone. Glue the seams and secure with a stapler.

2. Level the bottom of the cone so that it stands firmly on the surface.

3. Then trace the bottom on thick paper and add allowances for later gluing. Cut out the bottom.

4. Crumple the newspaper and fill the cone tightly with it. Glue the bottom.

5. Carefully insert the wire into the crown and secure it with a glue gun.


7. Make another one exactly the same as you did before, only from corrugated paper.

8. Glue the corrugated paper bottom onto the regular bottom.

9. Now make strips of corrugated paper 50-60 cm high and 5 cm wide. Wrap (glue) the cone with these strips.


10. Glue the bottom tier of tinsel onto the glue gun. Glue candies on top of the row of tinsel.

11. Glue the next tier and the next portion of candies.

Glue the candies in a checkerboard pattern.
12. Continue in the same spirit, alternating a row of candies and a row of tinsel. Moreover, towards the top the number of candies will decrease to two.

13. Cover the end of the wire with tinsel and decorate with a bow.

14. This is the extraordinary beauty that results.

Take note of this method. After all, this is a great gift!
And as a gift, take as a basis not a cardboard cone, but a bottle of champagne.

Now see how you can create a spruce tree only from corrugated paper.

You will need: corrugated paper; cardboard; scissors; thread and needle; heat gun; beads and sequins.

Manufacturing process:
1. Cut a blank from cardboard in the form of a rectangle or square.

2. Roll it into a cone and glue the part. Level the base.

3. Cut strips of corrugated paper 5 cm wide. And then sew them with thread along the entire length as shown in the picture below.

To find out the length of the strips, measure the circumference of the cone and multiply by two or three.
4. These are the “ruffles” you should get.


6. Then glue them to the cone, starting from the base. At the same time, step back a little from the base.


7. Glue all the “skirts” all the way to the top of the head, slightly retreating from the previous edge.

8. Then glue on decorations in the form of sequins or sparkles.

Making three-dimensional paper Christmas trees at home
The easiest way to make souvenirs and home interior decorations is considered to be work made from plain paper. It is better, of course, to take high-quality and thick paper.
So, here are your options for creating paper Christmas trees.
Cut out two blanks according to the template. Cut one tree exactly along the middle from the bottom, and the other - from the top to the middle. Then insert both halves into the slots.


Make patterned trees in the same way. Only here you will need a special stencil.


And here is the template itself, for example.

By folding and gluing paper according to the pattern, a super voluminous craft is obtained. The most convenient way to connect the workpieces is with wire. Attach any decoration on top.


You can even simplify the manufacturing process. And connect simple circles. Look how colorful this product looks.

I also found an option to make it from regular strips. In my opinion, it also makes a worthy souvenir.

Well, or you can create these little accordion Christmas trees.

Also, don’t forget about the quilling technique.

DIY Christmas tree for New Year 2019 from plastic bottles
You know, I would never have thought that the forest beauty is made from plastic bottles. It turns out that the options from this material at hand are very diverse and exceeded all my expectations. Don't believe me? Then admire it for yourself! Watch the video, I'm sure it will interest you.
And for work, in addition to bottles, you will also need: acrylic paint and glitter. And the required dimensions of the branches are 8.5 cm x 6 cm; 7 cm x 6 cm; 6.5 cm x 6 cm; 6 cm x 6 cm; 5.5 cm x 6 cm; 5 cm x 6 cm; 4.5 cm x 5 cm; 4 cm x 5 cm; 3 cm x 3.
And at your summer cottage or in the yard, all together make such a large craft).

Here's a way to cut bottles and create fluffy branches. 

Or these miracles of cutting. How do you like this idea? I think it looks great!

Well, here are the works from solid bottles. If you want to make such creations, then start saving bottles now.


Or crumpled bottoms. And they just can’t come up with anything.

I hope I surprised you a little with these products.
Ideas for making Christmas trees from napkins and cotton pads
You can make cool crafts from ordinary white and colored napkins. And I will now show you how this can be done. The work is not difficult, but painstaking and long.

You will need: paper napkins of different colors - 92 pcs. (the quantity depends on the size of the Christmas tree); pencil glue; stapler with small paper clips; thick paper for the cone; scissors; scotch.
Manufacturing process:
1. Fold the napkin in half, and then in half again. And fasten the middle of the resulting square with a paper clip.

2. Now cut out a circle from the blank.

3. Make a lot of these circles.


5. Do this with each layer.

6. As a result, you should get a bud.

7. Spread it out with your fingers.


8. You need to make a lot of these flowers.

9. Then cut out a sector of a circle from thick paper and roll it into a cone. Glue or secure the cone with tape, and secure it at the bottom with a stapler.

10. Glue the flowers onto the cone so that there are no gaps. Your floral napkin product is ready.
And one more option using the same technology.

Also, do not forget to decorate not only your home, but also the festive table. And here are the variations of decorations.


Oh, I also found Father Frost and the Snow Maiden. This composition looks very cool.

And now I propose to build soft Christmas trees from cotton pads. They are usually folded and then also glued to the cone base. Next they decorate. The discs can also be painted with regular paint. Or just glue snow-white circles together.
Look at the photographs and see everything for yourself. The manufacturing technology is identical to those we have already discussed above, so I won’t go into detail.


The good thing about such crafts is that the material for their creation is always available at home. 🙂
Christmas tree made of threads. Master Class:
And now we will make a festive attribute from threads. The manufacturing technology is the same: glue threads are strung onto a cone and dried. Then they are removed and decorated. In general, let's look at everything in detail.

You will need: sheet of cardboard; a skein of green thread; PVA glue; scotch; beads; scissors.

Manufacturing process:
1. Take a sheet of cardboard and cover it with tape.

2. Then roll it into a bag to make a cone. Next, level the base.

3. Then, using scissors, make teeth that will hold the thread.

4. Dilute the glue in a small plate with water until it becomes liquid.

5. Take the threads and tie a knot at the end. Dip the thread into a bowl of glue, it should be thoroughly soaked. You can also lubricate the cone with glue.

6. Now wrap the thread around the cone in any order. At the same time, do not forget to dip the thread in glue.

7. Once you wrap the cone so that there are few gaps left, cut the thread and leave the workpiece to dry completely.

9. Now decorate the product with beads.
If you understand all the details, then everything is done quite easily and even a child can handle it.
Christmas tree craft for kindergarten and school competition
In addition to the fact that the forest beauty should decorate our home, educational institutions also assign special importance to this attribute. And they always organize exhibitions of children's works. Therefore, I want to offer you products that your children can create.
You can also use the ideas described above and make Christmas trees with your children.
Here is a common paper work with a snowman made of cotton wool.

Or a creative idea with regular transparent bags. Class!

Options for inserted paper trees.

Work from tinsel, snow-white mesh fabric, as well as from a wire base and decorations.

Idea for kids. Make a cone, cover it with tape and stick a regular mosaic into it.

And here is the whole composition from last year's exhibition.

Video about how you can make a Christmas tree with your own hands
In fact, there are a lot of ways to make homemade Christmas trees. Only I offered you about 100 photo ideas. And what are they made of? I tried to sort out all the options as much as possible so that you can definitely choose your beauty and build it with pleasure. Finally, I have selected one story that contains different versions of hand-made Christmas trees. So to speak, for your inspiration).
Well, all I can do is wish you creative success and a festive mood. And Happy New Year, friends!


