What can be made from large cardboard. How to make simple cardboard crafts quickly and beautifully: examples of work for all ages (59 photos). Cardboard box
Today we have an extremely interesting topic that has the most practical significance for making gift wrapping with your own hands: we will turn ordinary cardboard and ordinary paper into cardboard and designer paper. The method that will be discussed has already been covered more than once in RuNet, but it is so simple, elegant and effective with minimal material and time costs that it is certainly worth continuing the relay of master classes. Moreover, we will immediately use the result for its intended purpose and make wonderful gift boxes.
So let's get started, friends. For the intended transformation we will need:
- ordinary white cardboard for children's creativity,
- decorative napkin,
- cling film,
- scissors,

The idea is based on a type of decoupage known as napkin technology: the top layer of a three-layer decorative napkin is glued to the surface of the cardboard, but instead of traditional glue, cling film is used, which melts when heated and perfectly holds the materials being joined together. Created this way designer cardboard(or designer paper) perfectly retains its mechanical properties, while transforming into a completely new quality.
I show you the whole process step by step.
1. The selected napkin must first be thoroughly ironed to remove wrinkles (if the iron’s capabilities allow, you can spray the napkin with steam if necessary)

2. After this, separate the top layer with the pattern from the napkin

3. Place cling film, napkin and gauze alternately on a sheet of cardboard

4. Carefully and slowly iron it all with an iron. There is no need to skimp on temperature. I set the control to the “Clap” position, and it was just right. Particular attention should be paid to corners and edges where it is advisable to hold the iron for a few seconds.

5. Turn the cardboard over and trim off the excess film and napkin with scissors. It may turn out that the napkin did not grip well at the corners. No problem, we’ll fix this problem at the next stage.

6. Iron the cardboard again from the front and back sides


The result is a solid sheet of cardboard with a beautiful pattern and pleasant to the touch texture.

And it only took about 10 minutes to do everything.
Using this napkin technique, you can also make colorful designer paper from ordinary office paper, white or colored.
But if we talk about cardboard, the best results are achieved when using high-density photo paper.
The photo below shows 2 sheets of cardboard decorated using decoupage. One (on the left) is made on the basis of ordinary cardboard for children's creativity, the other (on the right) is based on Lomond matte photo paper with a density of 230 g/m² (the density is approximately the same as cardboard).

As you can see, the second option naturally turned out to be brighter, but another undoubted advantage of it is the pure white color of the reverse side.

If desired, the reverse side can be easily tinted by applying the desired color on a computer and printing it on a printer.
By the way, using Lomond photo paper will not cost much more than using regular cardboard. Judge for yourself: one sheet of uncoated cardboard for children's creativity costs an average of 2.5 rubles, and the cost of 1 sheet of photo paper in my case was 4 rubles (but you can find cheaper ones). Obviously, in terms of price-quality ratio, Lomond is unrivaled. But this, as they say, is food for thought.
And here are a couple more sheets of designer paper (Lomond, density 120 g/m² (for comparison, the density of regular office paper is 80 g/m²)) frankly New Year themed

Stocks of designer cardboard and designer paper have been replenished - you can start making gift boxes. We'll continue tomorrow. Don't forget your designer cardstock. :)
When purchasing large household appliances, food, shoes and other goods, packaging appears in the house that must be stored until the warranty period expires. Then you can throw them in the trash, but there is a more constructive solution - make them into interesting decorations for the interior of a child’s room, or gifts. Ideas about what can be made from cardboard come spontaneously. They are driven by the shape of packaging materials, the need to complement a gift with an unusual form of packaging or an interesting postcard.
And if you think that you can’t make something really cool out of cardboard, take a look on the Internet, look at pictures with examples of finished work, or on YouTube, where moms and dads post their homemade products and show off entire toy furniture sets the size of a child, where There is everything from kitchen cabinets to mock-ups of microwaves and gas stoves - thick packaging cardboard from boxes is ideally suited for these purposes. And what cool three-dimensional animal figures it makes – your child will definitely love them! And you can make a lot of useful things - a stand for stationery for school, organizers for closets, boxes for handicrafts and jewelry, and much more.
As a rule, cardboard is remembered when it is necessary to make a carnival costume that must keep its shape.
Dinosaurs, tractors, corn farmers, robots, cell phones – such life-sized and symbolically designed costumes will delight kids. They are necessary not for carnivals, but for the game. With the help of such costumes, children can be captivated by a new game, learn new songs and poems with them. Everything that kids fail to learn when studying under the strict supervision of their parents, they will remember better in a playful way.

As a rule, cardboard is remembered when it is necessary to make a carnival costume that should keep its shape

For studying history, costumes of knights, gladiators, and historical figures are more suitable. True, such costumes are more complex in execution. Cardboard can be painted with gouache. The only drawback of this paint is that it gets dirty even after drying. It is better to cover boxes made of corrugated cardboard, from which voluminous suits are made, with colored paper.
For decoration, you can use large buttons, badges and other lightweight elements made of wood or plastic.

What can you make from colored cardboard with your own hands?
Colored cardboard is not very durable; it is best used for making cards and gift boxes.
DIY cardboard card
A postcard based on this sketch is made from two sheets of contrasting cardboard. The lighter cardboard should be smaller than the bright cardboard on each side.

A postcard based on this sketch is made from two sheets of contrasting cardboard
- The light sheet is folded in half.
- Stepping back 2 cm from the edge, you need to mark a line 6 cm long on the outside of the sheet. At a height of 3 cm from the first line, draw a strip parallel to it, of the same length.
- Above it, after 2.5 cm, the next line 4 cm wide is marked.
- The third and final line will be at a height of 2 cm from the previous one. Its length is 2.5 cm. All marked lines are cut.
- Now they need to be turned inside. To make them look like a stack of gift boxes, they need to be decorated with longitudinal strips of contrasting paper with small elements made of foil glued on.
- The edges of the card are also decorated with shiny stripes.
- Letters with the name of the holiday to which the card is dedicated are cut out of foil or velvet paper and pasted onto a cardboard base.
- All that remains is to glue the decorated light sheet of cardboard onto the colored one. They fold backwards.
- The corner elements of a larger sheet are cut out in squares so that when folding its edges onto the outside of the decorated sheet, a neat frame is obtained.
On the outside of the resulting address, you can paste a holiday symbol (tree, date) or the word “congratulations.”
Gallery: cardboard crafts (25 photos)


A toy book for a child made by parents
When using cardboard, painted on both sides, you can make a book for your child with three-dimensional elements. To make the base of the protruding elements, the same strip cutting technique is used as when creating a postcard.

When using cardboard, painted on both sides, you can make a book for your child with three-dimensional elements
Crafts from cardboard tubes
Thick cardboard tubes are the most fertile material for creating home decorations. They can be cut with a construction knife into elements of the same length. This allows you to create furniture with a glue gun that can serve a person in everyday life. For an open gazebo, you can make a table and chairs from cardboard tubes without much expense.
- For sitting you will need 64 pieces of pipe, 38-40 cm high - this is the standard height of chairs.
- The tubes are glued together 8 pieces in a row. There are also 8 such plates. They need to be glued together.
- To form the armrests, you will need pipes with a height increased by 20 cm. There are also 8 of them in a row. Each armrest consists of two rows. 58 cm elements will require 32 pieces.
- The back of the chair is glued together from 15 80-centimeter elements.
- The base of the table is formed from tubes glued together. A tabletop made of laminated thin fiberboard or glass is glued onto it.

For an open gazebo, you can make a table and chairs from cardboard tubes without much expense
Curved bench
To make this type of furniture you will need not only cardboard, but also pressed wood.
- Two identical parts are cut out of wood. They will serve as the legs of the bench.
- When using tubes of different diameters, it is necessary to drill appropriate holes for them in the legs. Their height varies depending on the design. To make the seat comfortable, the line of the holes should be smooth.
- The length of the tubes is chosen arbitrarily.
- The ends of the tubes, lubricated with assembly or carpenter glue, are inserted into the holes.
- Wooden bases are strung onto tubes. This bench will look more interesting if the edges of the tubes protrude slightly outward.

To make this type of furniture you will need not only cardboard, but also pressed wood
Such a bench will decorate not only a gazebo in the garden, it will become indispensable in the hallway of an apartment and even in the living room. It can also be used in the kitchen when peeling potatoes.
Glowing openwork hemisphere
You can use this decoration in landscape design by installing it in front of a homemade waterfall or illuminated fountain or under a street lamp. Thanks to the mirror used at the base of the structure, the light will be reflected, creating the effect of glowing from within the ball. In the absence of external light sources, the hemisphere can be used as a candlestick.
To make it you will need thick-walled cardboard tubes, a large round mirror, glue and varnish that protects from moisture.

You can use this decoration in landscape design by installing it in front of a homemade waterfall or illuminated fountain
Preparation method:
- Tubes of different diameters are cut into circles with a width of 3 cm.
- Before installation, each element is coated with several layers of varnish on all sides. This preparation can take a long time.
- Assembling the hemisphere begins by gluing the elements of the bottom row to the mirror surface.
- At the end of the first row, the only element with the largest diameter is glued.
- A frame is created around it from alternating narrow and medium elements with a slight shift inward.
- Then the work continues in a circle. The first few rows have a slight deviation from the vertical into the sphere.
- When the wall is equal in height to the largest structural element framed by the frame, the bevel will be steeper.
- The top center ring is installed last.
This openwork decoration will glow not only in the evening, the sun's rays will also enliven it.
Teremok for a baby
Smooth cardboard tubes are very similar to logs. It is much easier to use them than to make a little tower for a child from wood. It will be much more interesting than the fabric tent that commercials push on parents.
- To make the “log house” spacious, it is enough to take tubes 120 cm long.
- It is necessary to make slots in the tubes, at both ends, equal in width to the diameter. The tightness of the tubes to each other depends on the depth of the holes.
- All that remains is to fold the house and decorate it with a roof made of thick corrugated cardboard.
- The door and windows can be cut after assembling the house, or you can form openings from shortened pipes during the process of folding the elements.

Smooth cardboard tubes are very similar to logs
Using the same principle, you can assemble fairy-tale towers for dolls and other toys. Only the diameter of the pipes needs to be chosen smaller. And the material may not be so dense.
A few more ideas for using cardboard pipes in the interior
Cardboard tubes with strong, thick walls have many practical uses. They are used as organizers for pencils, pens and other necessary items. They are used to make shelves for equipment, for storing clothes and soft toys.

Cardboard tubes with strong, thick walls have many practical applications


Crafts made from white cardboard
The simplest crafts made from white cardboard are appliqués. To make them you will need a sheet of white cardboard and a colored base. Having cut out the silhouettes from white material, they need to be glued onto a colored sheet. When depicting a white poodle, bear, or swan, additional materials will be required that will give the image texture. This could be: cotton wool, scraps of napkins, wool fibers.

The simplest crafts made from white cardboard are applications
It is a little more difficult to make the applique convex without using additional means of expression.

It's a little more difficult to make the applique convex
Using the example of a squirrel, you can see that in order to obtain a three-dimensional figure, it is necessary to cut out individual elements, bend them and connect them together with glue.
From white cardboard you can make a three-dimensional figurine of a hare, a polar bear, a cat, or a dog.

From white cardboard you can make a three-dimensional figurine of a hare, polar bear, cat, dog
To make the body, a strip of paper is cut from the sheet and glued together with a tube. The parts of the legs are attached to it from below, and the head from above. It is cut out along with the ears. To make the animal’s muzzle convex, the workpiece is folded lengthwise and crosswise. The fold lines converge at a point that forms the bunny's nose. All that remains is to draw his eyes, nose, and mustache.
Silhouette paintings look very impressive.

Silhouette paintings look very impressive
Pieces cut with a blade will not stick to the background sheet. They are attached to a three-dimensional frame, which can be a candy box. The peculiarity of such interior decoration is that when the lighting angle changes, shadows will appear on elements not adjacent to the sheet, the picture will come to life and be filled with new colors. If you look at a girl on a swing, it may seem that she is actually swinging. This effect will be enhanced by the flames of a candle burning on the side of the image.
A white openwork house cut out of seven sheets of cardboard will become a spectacular decoration of the mantelpiece. To make it you will need two templates with drawings.

A white openwork house will be an effective decoration for the mantelpiece.
One with an image of wall decor, the second with an ornament of the roof and lower part. Edges are added to the pediment side walls for bonding to the pieces on all sides. After cutting out the openwork elements, the remaining parts of the product are attached to them.
What can be made from thick cardboard
Using several layers of thick cardboard, connected with glue, and decorated on top with a blanket stitch made with thick thread, you can make partitions for a box with an attached lid.
It is also easy to make from thick cardboard:
- The longitudinal partition is cut from top to middle.
- The transverse ones are cut from below to the same distance.
- The resulting grooves are a lock; they will securely hold dense parts.
- Upholstery fabric is used as a decorative outer layer - tapestry. Before gluing it onto the cardboard, a beautiful button is sewn to the front of the bar.
A thin elastic loop is glued to the lid. The treasury is ready.

A wicker vase for small items is made from a blank of thick cardboard.
- After drawing a heart or a circle for the bottom, you need to cut out two identical parts.
- By visually dividing the perimeter of the workpiece into equal sections, it is necessary to determine the weaving step.
- In accordance with this parameter, strips 5-7 cm high are cut out of cardboard.
- In their upper part, in the middle, round holes are made using a hole punch. They will be needed at the end of weaving to decorate the top edge.
- The lower ends of the planks are glued between the bottom blanks.
- Weaving is done from the bottom up.

Wicker vase for small items
What does corrugated cardboard look like and what can be made from it?
Corrugated cardboard is a dense packaging material consisting of at least three layers - two smooth outer layers and a curved inner layer that creates cells. The second type of corrugated cardboard is specially produced for handicrafts.
Large, practical items can be made from packaging cardboard. For example, a doll house.

Large practical things can be made from packaging cardboard
You can use a box of loose cookies as a basis. To model a doll's home, it is enough to cut window and door openings in the body. The window elements are not completely cut out; they can be decorated as shutters. The window frame bars are glued from the inside.
The door can also be left, pasting it with colored paper. The roof is formed from the remains of cardboard.
Chest for gifts from Santa Claus - a fabulous casket
- It is made from two packaging boxes of equal length.
- The lower one remains virtually unchanged.
- The upper part is cut out of three parts - two semicircles and one straight part.
- It is better to make halves of a circle from one circle. It is drawn with a diameter 2-3 centimeters larger than needed for the side parts.
- The required part size is marked on the workpiece. Triangles with a base width of 1-1.5 cm are cut out of the “extra” strip.
- The remaining teeth on the workpiece are bent. The top part of the casket lid will be attached to them.
- It is better to paint corrugated cardboard after priming it twice. Otherwise, the colors will appear faded.

Money box
A piggy bank made of corrugated cardboard is made without glue. It folds and is secured at the corners from the inside with a decorative cord. At the bottom of the piggy bank, the hole is sealed with paper or postal tape.

A piggy bank made of corrugated cardboard is made without glue
Fake fireplace made of corrugated cardboard
A fireplace made of cardboard is not just a decorative thing. It is intended to support the tale of Santa Claus. Made before the New Year. It is hardy enough to withstand a decorated Christmas tree.
- The portal is assembled from a former packaging box;
- Strengthened from the inside with slats;
- The outer part is decorated with foam elements;
- The false fireplace is secured with slats on a foam pedestal;
- It is painted together with decorative elements in white with a blue tint or ivory.

A fireplace made of cardboard is not just a decorative thing


Toys made of corrugated cardboard will be an excellent decoration for the New Year's fireplace. Only for their production is used a special - ornamental material created specifically for quilling.

Corrugated cardboard toys will be an excellent decoration for the New Year's fireplace.
Many types of cardboard can be used to make crafts. Thin cardboard is suitable for making appliques, postcards, and baby books. It is more advisable to use denser ones for making stable toys. Corrugated cardboard is suitable for making scenery for amateur theaters, including home theaters. Corrugated cardboard for quilling allows you to create absolutely fantastic crafts.
DIY bright desktop organizer made of cardboard (video)
Nurturing creativity in children is the key to their all-round development. Creating various products with your own hands shapes your thinking and helps you study different material textures, colors, shades. The little man learns to work with glue and scissors. Paints, pencils and felt-tip pens enable children to express themselves creatively. Children as young as 3 years old can make crafts from cardboard.
This type of crafts is very popular in preschool institutions due to the availability of the material, the durability of the products, and the ease of creating creative works.
Until recently, making cardboard toys was considered the prerogative of children. Nowadays, DIY cardboard crafts have become a favorite pastime for many adults. Cardboard is used to make postcards, panels, packaging boxes and even furniture and much more.
Beautiful elegant boxes, houses for dolls and babies, frames for paintings and photographs - many of these works will decorate the interior and add originality to the design.
For creativity you need to prepare the following materials:
- Cardboard: technical, corrugated or ready-made colored.
- Scissors (for babies with rounded ends so that children do not get injured).
- Stationery knife. Be sure to check the knife lock so that the blade does not come off during operation and injure the child.
- PVA glue, glue gun, as well as narrow and wide tape.
- Stationery: markers, felt-tip pens, pencils, colored paper, stapler, clips.
- The following are also used to decorate cardboard products: colored ribbons, beads, and decorative cords.
- A ruler and compass will definitely come in handy.
- Templates, layouts.

First works
Cardboard crafts for children are quite diverse. They will interest both boys and girls. At first, the help of adults is especially necessary for the little ones. Cutting out of cardboard is quite difficult for kids, so the help of adults is invaluable. The very first job that a baby can easily do with the help of adults is an airplane.
To create it, you will need a toilet paper roll; if you don’t have one, you can glue it yourself. Also prepare a stationery knife or scissors, brads, a sheet of cardboard, preferably corrugated, an awl and paint.
Children under 5 years old are not entirely confident in using scissors and a stationery knife, so an adult should take on the job of cutting out the elements of the craft. Let's look at the step-by-step production of an airplane.

Step one.
Draw the elements of the toy yourself or find samples on the Internet and print them.
Step two.
Make symmetrical holes in the roll for the wings and tail. Using an awl, carefully make holes in the middle of the circle and the future airplane propeller.
Step three.
Help your child assemble the parts correctly. Connect the propeller and the circle with brads. Leave a small gap between these parts. Insert the resulting workpiece into the sleeve. The airplane is ready.
The kid can paint the plane with paints or stick colorful pictures. The resulting toy will bring a lot of joy to your child. The child will be proud of a handmade craft.
Together with your children you can make toys with moving parts. The little one will be delighted that he made a bear and it moves its paws.

This teddy bear is made very quickly. You need to copy the details of the bear onto cardboard. Cardboard can be pre-painted. You can find a diagram of the teddy bear on the Internet or draw it yourself.
All received elements, except the upper legs, are cut and glued. In order for the teddy bear to move its upper legs, these parts must be connected to the body with buttons on the front and back sides. We connect the resulting structure with a stick.
The teddy bear can be painted with paints or the surface can be smeared with glue and covered with cereal. Pieces of fabric are suitable for decoration.
Cardboard houses
A special place in making DIY cardboard crafts for children is occupied by the creation of houses, castles, and towers. Every child needs a place that he considers only his own, so that he can retire there and play without the constant supervision of adults. This desire of the baby intersects with the desire to imitate adults, to try on adult life.
To make a house, prepare packaging boxes for equipment: TV, computer, refrigerator. To add individuality and color to your craft, use colored paper, markers, and paints. Discuss the appearance of the house with your child. Look for ready-made diagrams on the Internet.
So you have:
- several cardboard boxes in which household appliances were packaged;
- house diagram (ready-made from the Internet or created independently);
- a stationery knife, as well as scissors for cutting out parts;
- tape, glue and glue gun for fastening structural elements;
- felt-tip pens, paints, pencils and markers.
You need to transfer the house template onto cardboard, cut it out and glue it together. The house can be made into one room, or you can build a real castle.
When manufacturing, consider the following:
- To prevent the baby from feeling cramped, the door should not open inward.
- For greater structural stability, use cardboard pipes. These are available in stores or you can make them yourself.
- Do not let your child cut out the details. Technical cardboard is a very dense material, and to cut out a part according to a template, you need to apply force that kids don’t have. Trying to help, the restless person may not be able to hold the knife in his hands and get hurt.

After the house is assembled, decorate your craft together with your baby. From the box you can also make a ship for your child, doll houses for your daughter, or a real kitchen like your mother’s.
By imitating adults in play, children undergo socialization in society and try on the role of mom and dad. For girls, from several boxes you can glue together a multi-story house where dolls will live.
The master class presented below on how to create a dollhouse with your own hands will provide a step-by-step basis for such crafts.
To make such a craft, you do not need large financial expenses and a lot of time.
Prepare:
- a cardboard box that can hold 2-3 floors for dolls;
- multi-colored tape;
- stationery knife;
- white paint for windows;
- pieces of fabric, wallpaper, as well as felt-tip pens and paints for decorating crafts.
Step-by-step instructions for creating a house.

Step one.
Cut the box into two halves along the tape line. The top flaps of the box must be cut off.
Step two.
We use two cut pieces to create the second floor and the triangular pediment of the attic. We attach the received parts with tape.
Step three.
From the second half of the box we cut out the roof, stairs and another floor.
Step four.
Cut out windows and doors according to the markings. Glue the stairs to move to the next floor.
Step five.
Use white paint to paint the windows and steps on the stairs. You can make furniture for dolls from leftover cardboard.
Such a house can be covered with colored paper, pieces of wallpaper or painted with paints, built up or expanded to the side.

Types of crafts
There are crafts made from colored cardboard, which are often used in children's creativity. In preschool institutions, children learn to create cards, appliqués, various gift boxes, as well as boxes for storing small items, such as jewelry or small cars.
When doing creative crafts with children, they often combine several types of materials. An interesting result is obtained when plain cardboard and colored paper are used together with corrugated paper. Products made from corrugated cardboard, such as postcards made using the quilling technique, look very beautiful.
- Application.
- Finger puppets. Cut out the figure and make two round holes for the fingers at the bottom of the craft. In this way you can assemble your child's first puppet theater.
- Crafts made from corrugated cardboard: postcards, panels, toys. Typically, floral motifs are chosen for postcards and panels. The quilling technique is more difficult to learn. Work in this technique requires more perseverance, scrupulousness, and accuracy. Children's crafts using the quilling technique are available to children from 5 years old.
- Boxes of different shapes and types. Can be round, square or triangular. Colored ribbons, beads, and embroidery are used for decoration.
To create a round box you will need:
- corrugated cardboard;
- glue;
- scissors;
- ruler;
- round form;
- materials for decoration: beads, flowers using quilling technique.

Step one.
Cut a strip from cardboard. The width of the first stripe will determine the height of your piece. Wrap the strip on a flat shape with a round base, for example a glass; a roll of tape will also work. Cut off the excess strip. Secure the ends of the strip wrapped around the mold with glue.
Step two.
Carefully cut out the second strip, which will become the side of the lid. Wrap it over the first strip and secure the ends with glue. After the glue has dried, remove the blanks.
Step three.
Apply glue to one of the edges of the workpieces. Place the greased edge against the cardboard. Press firmly. When the glue dries, cut off any excess with a utility knife.
Articles written
Useful tips
If you still have cardboard boxes after purchasing electronics or other items, there is no need to throw them away.
You can make a huge number of crafts from cardboard, both for home and for children.
Here you can learn how to make 5 very interesting and useful things from cardboard, and also see what incredible crafts some masters of their craft make.
DIY cardboard garland

You will need:
Sequins on the dress (sequins)
Stationery knife
Superglue or hot glue
Rope.

1. Draw straight letters, geometric shapes or patterns on cardboard and cut them out.

* To get a letter on cardboard, you can simply use a ruler and a pencil, or you can print the letter on paper, place the paper on the cardboard and use a utility knife to cut out the letter, tracing it along the outline.
2. Prepare sparkles (sequins) and start gluing them to the cardboard. You can use different types of sequins and it is not necessary that the sequins be on a thread.


3. When all the letters or shapes are ready, place them on a flat surface back to front and in reverse order and glue the thread to them.

When the glue has dried, the garland can be hung.

How to make a desktop organizer out of cardboard

You will need:
25 sheets of cardboard (25 x 25 cm)
Ruler
Pencil
Stationery knife
Glue brush (if necessary).

1. Using a ruler and pencil, draw on one sheet of cardboard the places where you want to make indentations (for pens, small items, etc.), leaving at least 2.5 cm from the edge of the cardboard.
2. Place the finished sheet of cardboard on a new sheet, trace where you made the holes and cut them out of the new sheet.

3. Repeat the same steps with other sheets, but leave 5 sheets untouched at the end.

4. Start carefully and evenly gluing together all the sheets with holes. You can use a brush to apply glue. You can first glue 5 sheets, then five more, and so on until the end.

5. Glue 5 untouched sheets together to make the bottom of the organizer.
6. Now all that remains is to glue the bottom of the organizer to the cut out part of 20 sheets.

Let the craft dry overnight and then you can use it.

DIY cardboard crafts: geometric lamp

You will need:
Thin cardboard
Scissors
Stationery knife
PVA glue or hot glue
Ruler, compass and pencil (to draw a pentagon)
LED light bulb (it is important that there is an LED light bulb so as not to burn the cardboard)
Lamp socket.
1. Start drawing pentagons (a figure with 5 identical sides) on cardboard. To begin with, you need 11 pieces, later about 10 more. In this example, the side size of each pentagon is 6 cm, but you can choose a different size, the main thing is that all the figures are the same size.

How to draw a pentagon (video)
To draw an even pentagon, watch this video:
Once you have drawn and cut out the pentagon from your cardstock, use it as a template to trace and cut out the rest of the pentagons.
2. Inside each of the 11 pentagons, draw 5 smaller pentagons. In this example, the distance between them is approximately 6 mm.

3. Using a utility knife, cut out all the shapes from each cardboard pentagon (see image). This is the longest process, but it is quite simple.

4. We begin to collect parts.
Prepare one group of 5 pentagons. Place the largest one on the table, and glue the next largest one on top of it so that its ends touch the sides of the large pentagon. Continue in the same style until all the pieces have been glued.


5. Repeat step 4 with the remaining groups of pentagons.
6. Assembling the lamp.
When all the parts are assembled, you can assemble the lamp. Place one piece on a flat surface and begin gluing the remaining pieces to its sides. Try to glue so that adjacent parts also have glued sides (see image).

*You will have to lift the pieces up a bit. You will get something similar to a vase.


7. Now you need to make the base for the lamp. To do this, you need to draw a few more pentagons (in this example there are 8 of them) and cut them out.
Inside each shape, draw another pentagon (1 cm from the edge) and cut it out. Remove the cut out part and carefully glue all the other parts together.


8. For the light bulb, you need to cut out another pentagon and make a hole in it for the lamp socket.


9. Glue the part from step 8 to the base of the lamp.

10. After attaching the light bulb to the base, place the lamp where it should be (on the base) and make a small cut (or hole) for the cable. You can add a little glue to better attach the base to the lamp.


DIY cardboard wall decoration (diagram)

You will need:
Scissors
Pencil and ruler (to draw some squares)
Acrylic paint or spray.
1. Cut cardboard (cardboard box) into several squares of different sizes.

2. Color all the squares. In this example, metallic color was used.

3. Prepare a large sheet of cardboard and paint it.
4. Start painting all the other squares and gluing them to the large sheet.

*Glue however you like.
5. You can stick the work to the wall using double-sided tape or simply place it on a shelf near the wall.


DIY cardboard furniture: cloud-shaped shelf

You will need:
Several sheets of cardboard
Stationery knife
Pencil
Scissors.
After the text instructions, you can find video instructions for creating this shelf.
1. Take one sheet of cardboard and draw a cloud on it. It is better to draw so that one side of the cardboard sheet serves as the bottom of the cloud (see image).
2. Cut out your cloud with scissors.
3. Use a cardboard cloud to make several more of the same blanks - trace it on each sheet and cut it out.

* In this example, 23 sheets of cardboard were used - 3 sheets will follow the shape of the cloud and 20 will be "inside" the cardboard structure and they have a similar structure, but they can save cardboard (see video).
4. Cut the unused cardboard into small pieces that need to be glued between the cloud pieces
5. Start gluing carefully and one by one all the parts of the shelf, not forgetting to glue pieces of cardboard between the parts (see picture).

6. To hang a shelf, you first need to attach one hook and one nail (see video) and hang the shelf on them.
How to make a shelf out of cardboard (video)
DIY cardboard chandelier (photo)


Crafts made from paper and cardboard: mirror decorated with cardboard parts
All the little parts are made from cardboard paper towel or toilet paper rolls.
First you need to cut the roll into rings of equal thickness, and press down these rings with a hammer. The resulting parts can be used to make beautiful jewelry and crafts.
Quick navigation through the article
Cardboard is easy to bend, cut, paint, glue, stitch and hold its shape, and it is always available. What you need for children's creativity, development of fine motor skills, hand-eye coordination, logical thinking and imagination! In this material, we presented 13 super ideas, 100 photos, 1 step-by-step master class and a selection of video tutorials on making cardboard crafts with your own hands.
Where can I get cardboard?
To make children's crafts, in addition to sheet colored or corrugated cardboard from the store, you can use the following scrap and scrap materials:
- Cardboard boxes (you can ask the warehouse workers at your nearest store);
- Disposable paper tableware;
- Rolls for toilet paper and paper towels;
- Packaging of cereals and sweets, such as corn flakes;
- Egg packaging (it’s good to use cells);
- Packaging of dairy products.
13 ideas for cardboard crafts + Master class
Idea 1. Construction toys
The good thing about cardboard “constructors” is that they are easy to make and decorate, fun to assemble and, of course, play with. You can come up with and design such a toy yourself, or you can make it using a ready-made diagram from our article or found on the Internet.


Click on the photo to download the templates for these figures

Click on the photo to download the templates for these figures


Idea 3. Puppets or just dolls with moving parts
Making a puppet out of cardboard is very easy and at the same time interesting. You just need to draw the details of the man, cut them out and fasten them with mini pins (sold in scrapbooking stores).

- Instead of special fasteners, you can use thin wire (for example, for beading). Simply cut a piece of wire 2 cm long, thread it through the holes of the parts and twist its ends on the front and back sides as shown in the photo on the right. You can also use metal rings as fasteners.
If you want the figurine to become a real puppet, then you can:
- Connect the arms and legs with a single thread, as shown in the photo below, or with two threads (one thread connects the legs and the other - the arms).


- Tie a rope to each arm and leg, then tie all 4 ropes to the ends of sticks folded crosswise. An example of such a puppet is shown in the following photo.


Idea 4. Finger puppets
Finger puppets are made even easier and faster: a small figurine is drawn, then two holes are cut out in its lower part. Woo-ala, the first “actor” for the puppet theater is ready! In the following selection of photos you can get some ideas for finger puppets.


Idea 5. Land, air, water and space transport
A car, plane, bus, ship, boat or rocket made from cardboard is no worse than one bought in a store. After all, making such a toy with your own hands together with your parents already seems like a fun adventure. And when you get tired of the cardboard vehicle, you can use it to make other toys and crafts.


Idea 6. Mini kitchen
If you have a couple of square shaped boxes, why not use them to make a mini stove and sink?


You can make a refrigerator from one elongated rectangular box.

If there is enough space in the room, a washing machine can complement the kitchen.


For a master class on how to make a cardboard craft in the form of kitchen furniture, watch the following video.
Idea 7. Toy equipment and household items
Do you need props for role-playing games or things to decorate a cardboard house? We suggest making them from cardboard with your own hands.


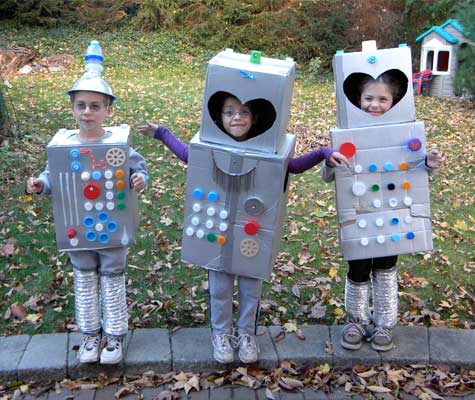
Idea 8. Masquerade costumes
Is there a matinee or performance coming up at a kindergarten or school? Or does your baby just love transformation? You can make an amazing outfit from cardboard. Here are photo examples of cardboard fancy dress costumes for boys.


And here are photo examples of cardboard costumes for girls.


Idea 9. Bookmarks
To make bookmarks, it is better to use not too thick colored cardboard, and in order for the craft to last as long as possible, it should be laminated with transparent tape.


Idea 10. Aquarium with fish
Cut off the lids of the cardboard box and paint its inside in blue tones; if desired, decorate the aquarium with applications made of plasticine, glitter, colored paper, etc. Cut 3-5 holes along the top of the box and pass a thread through each hole. Next, cut out 3-5 fish from colored paper. Attach a large button (from the outside of the aquarium) and a fish to each thread. That's all, the aquarium is ready.


Idea 11. Town in a box
You just need to trim the sides of the box and paint them on the inside and... voila! You get a city with roads, with which the child will play for hours, moving cars and figures of men.

Idea 12. Three-dimensional toys made of corrugated cardboard using the quilling technique
Volumetric crafts can be “twisted” using the quilling technique from corrugated cardboard. Having mastered the skill of forming various figures, the child will be able to experiment with shapes and colors and even create figures of their favorite cartoon characters.

Materials and tools:
- Cardboard box;
- Tracing paper or white tissue paper;
- Black cardboard (you can paint regular cardboard with a thick layer of black paint);
- White pencil;
- Wooden skewers, straws or wire;
- Scotch tape and/or glue;
- Scissors;
- Stationery knife.
Step 1. First we need to make the theater body. To do this, cut off the lids from the box, and then cut out its bottom.
Step 2. Cut a piece of tracing paper larger than the box size. Carefully glue it to the sides of the theater with slight tension, as shown in the photo.
Step 4. Now it’s time to cut out the characters for the future play from black cardboard. Keep in mind that the more detailed the silhouette of the figure, the more realistic the shadow theater will be. Therefore, it is best to draw figures using templates found on the Internet and printed.

Step 5. The shadow theater is almost ready, all that remains is to glue the figures to wooden skewers or wires. You can glue them as shown in the photo below or perpendicularly to make it easier to control the characters.


