Knitting a sleeveless vest for a 2 year old girl. Lessons on knitting vests for girls of different models. Knitted openwork vest
Now, like last year, large designs on knitted clothes are relevant. A knitted vest for a girl will not be out of place in your child’s wardrobe. You can wear a vest or without it. A detailed diagram will help you knit the pattern.
The vest is suitable for a girl 4-5 years old.
We will need:
- yarn - 100% wool or wool with acrylic - 300 g. blue, 50 gr. white and a little green, in two thick threads
- knitting needles - 3.5 mm
Knitting the back
For the back, cast on 66 stitches, knit 2/2 rib (k2, p2) 4 rows. We continue to knit in stockinette stitch, while lowering 1 loop from each edge at intervals of 20 rows. This is necessary for the best shape of the vest. For the armhole, we knit 2 loops together at the beginning and end of the row in 6 rows. Then we knit without changing to the neckline. Next we leave 18 loops on the auxiliary needle, lower 10 loops, and knit the next 18 in this way:
1st row - no changes
2nd row - lower 1 loop from the neck side
3rd row - lower 2 loops
4th row - lower 1 loop
Row 5 - lower 2 loops
6th row - lower 1 loop
7th row - lower 1 loop
After this, we knit 2 rows without changes. We got one shoulder. We do the second in the same way.
Before
We cast on 66 loops. Elastic band 4 rows. Continue with stockinette stitch for 10 rows - no change. Starting from the 11th row, we begin to knit the Cat according to the pattern. We knit the eyes with green yarn.

In this case, we lower the loops on the sides, as on the back (in every 20th row). When knitted to the armhole, in the next 6 rows we knit 2 loops together at the beginning and at the end of the row. Next 14-15 rows without changes. Then we divide the loops into 2 equal parts (use an auxiliary needle). Next: cross 2 loops from the auxiliary needle with two loops from the main needle. We knit the loops on the main knitting needle, adding after the loops with the auxiliary one. We knit in stockinette stitch up to the neckline. We should have the same shoulders as on the back. We close the loops. We make a hood of the required size (take any of your child’s children’s items as a sample) If it’s difficult to figure out: a hood can be just a rectangle. The width of the rectangle is the neck of the vest: 2. We knit a striped hood: 4 rows of blue, 4 rows of white.
Sleeve
We cast on 36 loops, knit rows 1 and 2. In rows 3, 5 and 7, knit the first two and last two loops together. After this, starting from the 9th row, perform such decreases in each row until 4 loops remain. Close the loops. The second sleeve is similar.
Assembly
We tie the edge of the hood with a 2/2 elastic band. Sew the side and shoulder seams. Sew on the hood and sleeves. The vest is ready.

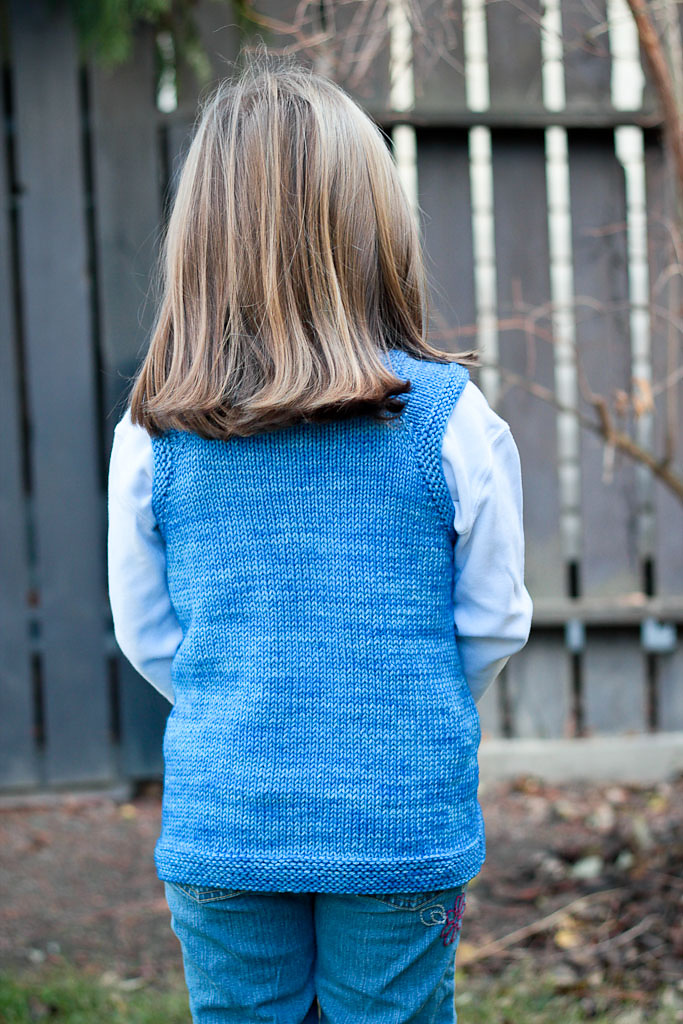
Blue vest Kitten
Warm vest for girls, knitted simply and quickly. The Kitten drawing serves as decoration. Age - up to 3 years.

We will need:
- yarn 50/50 wool + acrylic (70 grams dark blue, a little pink, white, black and gray)
- knitting needles number 3mm
- hook number 3 mm or circular knitting needles
Pattern: knit stitch: (row - knit stitches, row of purl stitches, etc.). Garter stitch: (in the beginning) knit stitch only. Knitting density: 22 loops / 26 rows = 10 / 10 cm.
Before
Cast on 72 stitches with dark blue yarn and knit in garter stitch, alternating: 2 rows of dark blue, 2 rows of pink, 2 rows of dark blue. Next we knit in dark blue stockinette stitch. At a height of 10 cm, in the middle, we knit a pattern according to the diagram.

Decrease 1 stitch on both sides in every 10th row = 66 stitches. At a height of 22 cm, for the armhole we close 3 loops on 2 sides, then in each 2 row 1 time 2 loops, 1 time 1 loop = 54 loops. At a height of 28 cm for the neckline, bind off the central 14 loops. We leave one half on the auxiliary knitting needle. To round the neck, close in each 2nd row 2 times 2 loops, 2 times 1 loop. At a height of 35 cm. Cast off the remaining 14 shoulder loops. The second side of the vest, which remains on the auxiliary needle, is knitted symmetrically.
Back
We knit as before, but without a pattern and not with such a deep neckline. To knit a shoulder at a height of 33 cm from the beginning of knitting, close the central 22 loops and knit each side separately. For the neck, close 2 loops in row 2. We knit the second side symmetrically.
Assembly
Sew up the side and shoulder seams. Tie the edges of the neckline and armholes with a crochet hook or on circular needles with an elastic band. Colors: 2 rows of dark blue, 2 rows of pink, 1 row of dark blue.
We embroider the cat's face with threads and sew on a bow. The bow is knitted like this: we knit a strip with pink yarn, pull it in the middle, as shown in the photo, and sew it on.
Even for the youngest girls, one year old, it is very important to remain beautiful. A knitted vest for babies is a beautiful garment that can be worn to school or for a walk. A school vest is the dream of all girls; it is very easy to knit, and you can also find patterns and designs for such projects on the Internet.
It is very important for even the youngest girls to remain beautiful.
A knitted sleeveless vest is an excellent children's clothing that can be worn both in autumn and spring. Of course, sleeveless vests are also worn at other times of the year, even in summer, when the evenings are quite cool.
Knitting sleeveless vests is an easy and interesting activity. Mothers love to pamper their children, so why not learn how to make vests yourself?
Description of work:
- Before you start knitting, you need to determine the number of loops you need to cast on. To do this, knit a sample and take measurements from the child.
- After this, you can start casting on loops. The vest will be knitted in two parts - front and back. This means that the number of loops obtained during the calculation must be divided by 2.
- In order for the sleeveless vest to fit well, you need to make an elastic band. We knit an elastic band about 3 cm long. This is quite enough. You can make an elastic band 1 by 1 or 2 by 2 (alternate the front loop with the back loop). It depends on the thickness of the thread; if the thread is thin, then it is better to make a 2 by 2 elastic band, and vice versa.
- Once the elastic is knitted, you can start knitting the part. The vest is knitted in a straight line up to the armhole.
- When the product is knitted to the armhole, you will need to decrease the loops in each front row. This will allow the vest to be comfortable. The craftswoman must determine for herself how many loops she needs to remove; if the yarn is thick, then she should remove a few loops.
- Then the rest of the loops are divided into 3. The two parts are the shoulders, and the part in the middle is the neck. The shoulders should be knitted above the neckline. It is recommended to use a auxiliary needle to remove the stitches for the neckline, since this part just needs to be closed.
- It is enough to knit the shoulders 2 cm above the neckline. They can also be closed.
- The front part is knitted in the same way as the back. They should be the same.
- At the last stage, you should sew two products to get a sleeveless vest.
Knitted vest for girls (video)
How to knit a vest for a girl under 2 years old with knitting needles
Girls under 2 years old are very sick (especially girls under 1 year old), they can catch a cold from any hypothermia, which is why it is recommended to use wool yarn for such work.

Knitting beautiful vests is impossible without first knitting a sample
Master Class:
- The first step is to take the child’s measurements. Length is measured from shoulder to bottom. The length of the product depends on this measurement. The chest circumference is also measured. The obtained values need to be written down on a sheet and pay attention to them as you knit.
- Knitting beautiful vests is impossible without first knitting a sample. This is necessary to determine the knitting density, as well as to determine the required set of loops.
- When the loops are cast on a long knitting needle, you should make a small elastic band. Since the product is small, the width of the elastic should not be more than 2 cm.
- Then comes garter knitting, that is, the front row is knitted on the face, and the purl row is knitted on the wrong side. You can do it differently, but this is the simplest option.
- Don't forget about the armholes. Several loops will need to be removed from the right and left edges. The back and front parts should be rounded due to this.
- When the back part is ready, you can start knitting the front part.
- Both parts must be sewn together on the wrong side.
At the last stage, the protruding threads are cut off.
Beautiful sleeveless vest for school knitted
Things knitted by parents always delight children, especially little girls. How to knit a beautiful sleeveless vest for school?
Diagram below:
- The girl's measurements are taken. After that, they are written out on a sheet. When a craftswoman knits a vest, she must pay attention to the written measurements in order to avoid mistakes in her work.
- First, the back part of the sleeveless vest is knitted. The entire fabric should be made with a 2 by 2 elastic band. This product stretches very well. What thickness of thread should I use? Either thin or medium.
- There is no need to make armholes in such clothes. The product, knitted with an elastic band, sits very well on the shoulders without armholes. Therefore, you can tie it to the neck and cover the knitted shoulders, and then the neck itself.
- Important: the shoulders should be 3-4 cm higher than the neckline.
- The front part is knitted a little differently. The head should be knitted in a triangle, forming a small neckline. When the working needle is in the middle of the product, you should turn the work to the wrong side and decrease 1 stitch. Next, only this part, half, is knitted. It is knitted to the shoulder. In every 3 rows you need to decrease 1 loop.
- The second part is knitted in the same way.
At the end of the work, the two blanks are sewn together.
Knitted vest for a 5 year old girl
Master Class:
- Measurements are taken and stitches are cast on.
- It is recommended to use 2 colors of yarn. Each product will be knitted with stripes.
- After knitting an elastic band, you need to alternate one color of thread with another. This will make the work colorful.
- When the knitting reaches the armhole, you need to decrease a few stitches on the right and left sides.
- After the back part, the front part of the vest is knitted. They should be the same.
- Both blanks are sewn inside out. You can use a hook for this.
- At the last stage, excess threads are cut off.

You can choose a variety of colors
What materials and tools do you need to prepare?
For this type of work you will definitely need:
- Yarn. It is selected individually. It is recommended to make winter sleeveless vests from warm woolen threads, and summer ones from viscose or acrylic.
- Knitting needles. The main tool in knitting.
- Hook. It is convenient for them to sew products by pulling loops.
- Scissors. Using scissors, trim off excess threads.

You don't need many tools for this job.
How to correctly calculate the required number of loops?
When knitting clothes, it is very important to cast on the stitches correctly, because if there are too few of them, the product will turn out dense or small, and if there are too many loops, the clothes will hang shapelessly on the body. So, in order to make the correct calculation, you need 2 numbers: chest circumference and the length of the pre-knitted sample.
The following proportion is drawn up:
- number equal to chest circumference - x cm (unknown number)
- a number equal to the number of loops of the sample - n cm (we measure the sample)
The number x is the desired one. The identity of the chest circumference and the size of the sample must be divided by the number of loops that were needed to knit the sample. The result will be the number of loops that need to be cast on.
However, there is one nuance that is not in the formula. The sleeveless vest is knitted in two separate parts, which are then sewn together. That is why the first number in the formula (chest circumference) must first be divided in half.
More professional knitting involves knitting the front part, the number of loops in which would be 2 or 3 more than the back part. Why? The little girl's chest is slightly wider than her back. That's why you need to knit a pattern.
Knitting is an ancient craft that has long served not only for practical purposes. Even in our time it has not lost its value. After all, every woman can show her imagination, ingenuity and skill here. Even novice needlewomen can knit an original item for themselves or their child. And if you wish, you can improve your skills, develop your skills and learn to create real masterpieces.
For every woman, the greatest pleasure is knitting for her child. The best knitted items are created by mothers and grandmothers for their babies. After all, it is very important that children’s clothing is not only beautiful, but also warm and comfortable.
In addition, related products can grow with your children from year to year. Besides, knitted items never go out of style. Their variety is great. These are sweaters, sleeveless vests, dresses, suits, sundresses, tunics, hats, mittens. On our website you will find patterns for every taste and age, as well as models for beginner needlewomen. Knitting a sleeveless vest is easy!
An item in the wardrobe of a child aged one year and older
Every mother knows that a sleeveless vest is an essential element of every child’s wardrobe. It will come in handy on cool summer evenings and cold winters, and in the off-season you simply cannot do without it. After all, sometimes you don’t know how to dress your baby so that it is not hot or cold, and most importantly, comfortable. In addition, you can’t have too many sleeveless vests; you can find the necessary patterns for every season on our website.
See below for an excellent pattern for beginners on knitting vests for children:


Also, knitted sleeveless vests are perfect for schoolchildren’s wardrobes. The assortment in stores is not particularly encouraging with the variety of school uniform models, especially for boys. With the help of a vest, you can not only provide your child with warm clothes, but also emphasize his individuality and distinguish him from the gray mass of clothes of the same type. On our website you will always find many original models of vests knitted using knitting needles. Our collections are constantly updated, don't miss out on new items.
Before starting knitting, especially beginner knitters, you need to familiarize yourself with some nuances. We suggest starting your creativity by creating a children's sleeveless vest with knitting needles.
It consists of only two fabrics, which are then sewn together, and for beginner knitters it will be easy.
And after you have a vest, you can move on to knitting more complex things.


1. To knit a vest for children, we will need two sets of knitting needles of different thicknesses, for example No. 4 and No. 6. Thinner knitting needles need to be used to knit elastic, and thicker knitting needles will be used to knit the main fabric of the product. Next, you need to take measurements from the person for whom the sleeveless vest will be knitted. Based on the desired length of the item, we take measurements of the circumference of the hips, waist or chest. We divide the result in half and get the width of our product. For example, our hip volume is 60, which means the width of the canvas should be 30 centimeters. Based on this indicator and the thickness of the knitting needles, we determine the number of loops that need to be cast on the knitting needles to knit one front of a sleeveless vest.


2. Next we knit a sample of elastic. To do this, just knit a piece of 10 by 10 centimeters. We measure the width of the resulting sample. For example, there are 3 loops in one centimeter. We multiply the required width of the canvas (ours is 30 centimeters) by three. We get 90 loops that we need to cast on. We add 2 edge loops to them, for a total of 92 loops.
3. We cast on the loops on 2 knitting needles folded together. Then we take out one of them and start knitting an elastic band. To do this, alternately knit 2 knit and 2 purl loops, about 10 centimeters high. In the last row you need to switch to thicker knitting needles.


4. It is necessary to knit the front from the desired length of the product. It is recognized by simply measuring the person for whom you are knitting a sleeveless vest. You also need to measure the length from the hip to the armhole and from the armhole to the shoulder. Based on these dimensions, the first shelf, usually the back one, is knitted. For the armhole, we begin to close the loops evenly on each side of the shelf, 1-2 loops in each row, in the amount of 6-7 loops. Next, we knit the product according to the measurements up to the shoulder. We close the row and the first shelf is ready.
5. The front part of the sleeveless vest for children is knitted in the same way. The only difficulty is that you need to make a neck in it. Its shape and depth must be decided in advance. For a beginning knitter, the easiest way to make a v-neck. Having measured the length from the hips to the beginning of the neck in advance, we carefully monitor so as not to miss the right place.


6. Having reached it, we divide the knitting into two halves, marking it with a pin. We knit one half, gradually closing one loop in each front row. Having tied it to the shoulder, close the last row. We put the loop remaining on the pin on a knitting needle, tie a thread from a skein to it and knit it in the same way as the right half. Our product is almost ready.
7. Next, it is recommended to wash and steam the two halves, then carefully sew them together. To finish the product, you need to process the armhole and neckline. To do this, you need to tie 4-5 centimeters of elastic, having previously measured the width and sew it into place.

This was the easiest option for knitting a sleeveless vest for just beginning needlewomen. Subsequently, you will be able to diversify your work with interesting patterns, complex cuts and your own original styles. They will delight you and all your loved ones.
Watch a video about knitting vests for children.
Here is another pattern for knitting a children's vest from a year and older:


 Vest for girls
 The voluminous “braid” immediately draws attention to the pale pink vest. Knitted vest for a 2 year old girl with description and diagram.
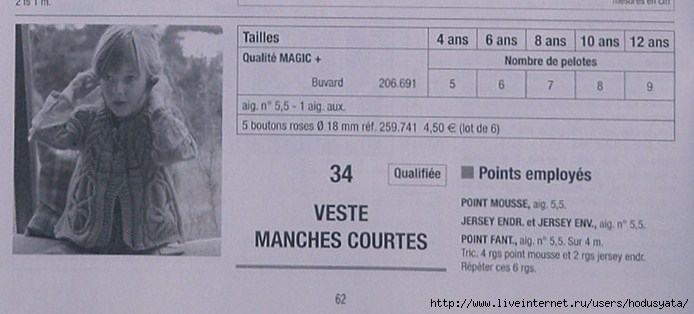
DIMENSIONS: 62/68 (74/80) 86/92
YOU WILL NEED: yarn (100% superfine wool; 105 m/50 g) – 200 (250) 300 g pink; knitting needles No. 4 and 4.5, circular knitting needles No. 4; 2 light gray buttons.
Pattern for placket (garter stitch): knit front and back rows.
Basic pattern (pearl pattern, knitting needles No. 4.5): alternately 1 knit, 1 purl. In each row, shift the pattern by 1 loop.
Braid pattern (width approx. 11 cm): knit according to the pattern. It shows only the front rows. In purl rows, knit all stitches according to the pattern. 1–12th r. repeat constantly.
Knitting density: main pattern – 19 p. x 34 r. = 10 x 10 cm.
BACK:
On knitting needles No. 4, cast on 52 (60) 66 stitches and knit 5 r. pattern for the plank. Then switch to needles No. 4.5 and knit, distributing the loops as follows: chrome, 4 sts in garter stitch, 42 (50) 56 sts in the main pattern, 4 sts in garter stitch, chrome.
After 17 (20) 23 cm from the initial row, close on both sides for the armholes by 3 stitches, while extending the garter stitch further by 3 stitches. In each next 2nd row. also emphasize decrease on both sides 3 (5) 5 x 1 p.
For accentuated decreases, at the beginning of the front row, knit the last loop of garter stitch together with the 1st stitch of the pearl pattern with a slant to the left (= slip 1 stitch, as in knitting, pull 1 knit and slipped stitch through it), as well as the last loop pearl pattern, knit together with the 1st stitch of garter stitch = 40 (44) 50 stitches.
After 26 (30) 34 cm from the starting row, close off the middle 12 (12) 14 stitches for the neckline and finish both sides separately. First, continue knitting 14 (16) 18 sts along the left edge = end of the row and at the beginning of each next front row close 1 x 4 sts and 1 x 2 sts.
After 28 (32) 36 cm from the initial row, knit another 1.5 cm for the placket on the remaining 8 (10) 12 stitches in garter stitch, then bind off all the loops. Further
continue knitting for 14 (16) 18 p. on the right edge = the beginning of the row and at the beginning of each next purl row close another 1 x 4 p. and 1 x 2 p. After 28 (32) 36 cm from the initial row, close the remaining 8 ( 10) 12 shoulder stitches.
BEFORE:
On knitting needles No. 4, cast on 54 (62) 70 stitches and knit 5 r. pattern for the plank. Then switch to knitting needles No. 4.5 and knit, distributing the loops as follows, while for the “Braid” pattern, evenly distributing, add 2 sts: chrome, 4 sts in garter stitch, 9 (13) 17 sts in main pattern, 30 p. braid pattern, 9 (13) 17 p. main pattern, 4 p. garter stitch, chrome. = 58 (66) 74 p.
After 17 (20) 23 cm from the initial row, close on both sides for the armholes by 3 stitches, while extending the garter stitch by another 3 stitches. In each next 2nd row. underlined, decrease another 3 (5) 5 x 1 sts on both sides.
For emphasized decreases at the beginning of the front row, knit the last stitch of garter stitch together with the 1st stitch of the pearl pattern with a slant to the left, and also knit the last loop of the pearl pattern together with the 1st stitch of garter stitch = 46 (50) 58 stitches.
After 22 (26) 30 cm from the starting row, close off the middle 14 (14) 16 stitches for the neckline and finish both sides separately. First, continue knitting 16 (18) 21 sts along the left edge = end of the row and at the beginning of each next front row close 1 x 4 sts, 1 x 2 (2) 3 sts and 2 x 1 sts.
After 28 (32) 36 cm from the initial row, close off the remaining 8 (10) 12 stitches of the shoulder. Then continue knitting 16 (18) 21 sts along the right edge = the beginning of the row and at the beginning of each next purl row close another 1 x 4 sts, 1 x 2 (2) 3 sts and 2 x 1 sts.
At the same time, after 26.5 (30.5) 34.5 cm from the initial row, continue knitting for the placket in garter stitch and, knitting 2 more rows, evenly distributing, make 2 holes for buttons (= 2 stitches knit together, 1 yarn over) . In the purl row, knit yarn overs. After 28 (32) 36 cm from the initial row, close off the remaining 8 (10) 12 stitches of the shoulder.
ASSEMBLY:
Stretch the parts, pin them onto the pattern, moisten and let dry. Use a mattress stitch to sew the right shoulder seam and side seams. For the neck strap, using needles No. 4, cast on 76 (76) 84 sts along the edge of the neck and knit with the pattern for the strap. After 1.5 cm, loosely close all the loops. Sew buttons.
Every mother wants something interesting and beautiful for her little princess. Those who have the desire and opportunity to knit a wonderful thing can find many different options and choose the best one. A knitted sleeveless vest, the pattern of which can be simple and uncomplicated, can easily pass for an expensive item from a decent store, with only one difference - it is several times cheaper. So let's make a sleeveless vest for a little girl together using knitting needles, which is easy to knit with the pattern!
Two-color sleeveless vest for girls, knitted for ages 1 to 1.5 years
For such a sleeveless vest you need: 50 g of white Begonia yarn, 20 g of blue, number 3 knitting needles, number 2 crochet hook.The stockinette stitch is knitted - the front rows are knitted with knit stitches, and the back rows are knitted with purl stitches.
Pattern: the number of loops should be a multiple of 9. From the 1st-4th, 6-10th and 12th rows, knit in stockinette stitch.
5th row - *3 knit stitches, transfer 3 loops to an additional knitting needle before work, knit 3 knit stitches, and then 3 knit loops from the additional knitting needle, repeat from *.
11th row - * leave 3 loops on an additional needle this time at work, knit 3 knit stitches, then 3 loops from an additional knitting needle with knit loops, 3 knit loops, repeat from *. The pattern must be repeated from the 1st to the 12th row.
Garter stitch - all rows with knit stitches.
Before:On a knitting needle you need to cast on 74 stitches with blue thread, knit 5 rows of elastic, one knit, one purl (1x1). Next you should continue to knit the pattern. After 9 cm, change the thread to white and knit 2 more rows. Then add a blue thread to the work and continue knitting the pattern, while replacing 3 white loops with 3 blue loops in each front row. Measure 13 cm and cast off 5 stitches on both sides for the armholes and knit straight another 10 cm.
To cut the neckline, you need to close 20 loops in the middle and knit each side separately. To round the cutout line from the inside, in every second row you need to close off 3 loops once, 2 loops once. Close the remaining shoulders at a distance of 14 cm from the armhole, knit the other side of the neckline symmetrically.
Back:It is knitted from two parts, they are knitted exactly the same, only when knitting the left part you need to make buttonholes. Cast on 28 loops of white thread, knit ribbing in 5 rows 1x1, then continue knitting in stockinette stitch. But it should be remembered that the outer 6 loops, excluding the edge loops on the inside, must continue to be knitted with a 1x1 elastic band. After 4 rows you need to make the first loop - yarn over, knit 2 stitches together. Next, at approximately equal intervals, knit 7 more loops in the same way. At an armhole height of 13 cm, close off 5 loops on the side for the armhole. Continue knitting straight 12.5 cm.
To cut the neckline, you need to close 10 loops on the inside, then, to round the neckline, you need to close two more loops and one loop in every second row. All the loops left are 15, close at the height of the front. The second half is knitted in exactly the same way, only without loops.
Sleeves:Using white thread, cast on stitches from the middle of the front armhole to the middle of the back armhole, knit in garter stitch, in every 6th row you need to decrease one loop. Crochet the edges of the sleeves and armholes with blue thread in one row of single crochets.
Assembly:Make side and shoulder seams. To make a collar, you need to cast on loops along the edge of the neckline with white thread and knit in garter stitch. In the sixth row, add one loop every 6 loops. Knit until the collar height reaches 6 cm, cast off all stitches. To replace the buttons you need to knit 8 small flowers and sew them in place.
This version of a children's sleeveless vest for girls is very light, and even a mother who is not very good at knitting can easily and quickly knit such a wonderful and interesting outfit for her princess.
There are also wonderful options for sleeveless vests for girls 2 years old:


You can look for sleeveless vests for any age, the same applies to 3 years:


Each model is quite interesting and should definitely please the child, because it was the mother who knitted it herself, putting all her soul, tenderness, love and care into it. When choosing which sleeveless vest to knit for your child, you should first of all decide on the time of year when the child will wear it. The thickness of the threads, the knitting density, the pattern and style, as well as the color of the product depend on this. For children, bright, but not poisonous colors are best; everything should be in moderation. Usually for girls they choose floral motifs, or various fairy-tale characters, animals - dolphins, cats, dogs. Each child is individual and you should not knit two identical vests; their children may simply don't want to wear it. According to mothers with extensive experience in this matter, you can knit a children’s sleeveless vest in just a few days, because it is much smaller in volume than an adult’s.


