Christmas tree made of satin ribbon. DIY Christmas tree made of satin ribbons and beads. New Year trees using the kanzashi technique made from round petals
These original Christmas tree decorations in the form of Christmas trees made of ribbons with beads can be placed on the lush branches of your New Year's beauty with the approach of the holiday beloved by many - the New Year.
 Making such a Christmas tree is very simple. And the materials necessary for its manufacture may be in your closet. Ribbons, bows, decorative braid, summer belts, bright-colored laces and strings, as well as old broken zippers are suitable materials for making.
 By the way, lightning makes the most original Christmas trees. Before starting work, unravel the zipper so that you have two parts independent of each other, from which you will make an unusual Christmas tree toy, following our detailed instructions.
Necessary materials:

- threads;
- beads;
- ribbon, braid, laces, bows, belts, etc. to choose from;
- needle;
- scissors.
Manufacturing:
The first step is to thread the needle and tie a knot. Now take any beautiful bead and thread a needle and thread into it - this activity should remind you of making simple beads.
Instead of beads, you can use foil balls. Tear regular food foil into pieces and roll them into tight balls. Foil balls can be easily pierced with a needle and shine beautifully on the Christmas tree.
Now take the tape and heat it towards the end. You can cut off the tip of the ribbon or make a beautiful tongue (be sure to treat the edges of the ribbons with a candle so that it does not fray).
Then use the bead again, and then heat the tape (see photo). Each time make a loop of ribbon a little smaller than the previous one so that you get the silhouette of a Christmas tree.
 Using this technique, you can make Christmas tree decorations not only in the form of Christmas trees, but also in other interesting shapes.
 Attach the most beautiful and largest bead to the top of your ribbon Christmas tree, which will symbolize a bright star.
But in this article we will talk about New Year’s crafts made from satin ribbons. Crafts can be simple or made using a special Japanese technique - kanzashi.
Herringbone
Let's start our crafts according to tradition with the symbol of the New Year - the Christmas tree. Some people prefer to put up a large Christmas tree, while for others such a pleasure is an unaffordable luxury (pets or small children consider it their duty to knock over a forest beauty decorated with lanterns and New Year’s garlands). It’s okay, you can decorate your apartment with a miniature Christmas tree, which can be made from satin ribbons.
#1 Making a Christmas tree from ribbons with children
If there are small residents in the house, they must participate in the decorating process. Plus, creating together is a great time! Every child can make such a simple Christmas tree from a dry stick and various ribbons.
#2 Miniature Christmas tree made of ribbons
And here is a more complex version of the Christmas tree made from ribbons. This craft can be used to decorate not only your home, but also, for example, your desktop. To make it you will need ribbons, a foam cone, a lot of safety pins and a bow for the top. See the picture below for a step-by-step master class.

#3 Christmas tree made of ribbon and beads
You can make a Christmas tree from ribbon, combining it with large beads. This craft can be hung on a real Christmas tree or given to someone as a souvenir. See step-by-step photo instructions below.

#4 Christmas tree in kanzashi style
And here is a mini Christmas tree made using the kanzashi technique. You will have to tinker with such a craft, because Japanese technology is for patient needlewomen. This craft will take a lot of effort and time, but the result will be truly impressive! Petals made from satin ribbons are glued onto a paper cone using glue. Additionally, the finished tree can be decorated with beads. By the way, the Christmas tree does not have to be monochromatic; you can combine colors to your taste.

#5 Christmas tree made of flowers using the kanzashi technique
But here is a very similar craft to the previous one, but there is only one difference: Christmas tree No. 4 is made from individual petals, and this Christmas tree is made from flowers. First you need to make petals from ribbons, then glue the flowers (5 petals each), and only then glue the flowers to the paper cone. See step-by-step instructions with photos below.

#6 Christmas tree hairpin using kanzashi technique
Using the kanzashi technique, you can make various decorations, in particular hair clips. For this hairpin you will need: hair clip, ribbons, beads. See below for how to make a hairpin.

#7 Herringbone ribbon hairpin
Here is another original way to decorate a hair clip with ribbons. The result is a miniature Christmas tree that will perfectly complement the New Year's image. How to make a hairpin, see the picture below.

#8 Herringbone hair clip
You can also decorate a hairpin in this simple way: with an ordinary narrow ribbon and a star-shaped bead. It’s so easy to make ordinary hair accessories truly festive, and our step-by-step master class will help you with this.

#9 Kanzashi Christmas tree made from ribbon - a souvenir for the New Year
#10 Christmas tree made of ribbons
Look for more Christmas trees:
Snowflakes
From ribbons, especially using the kanzashi technique, incredibly beautiful snowflakes are obtained. You can decorate not only a room with such a craft; a snowflake made from ribbons can be hung on a New Year tree or used as a decoration.
#1 Simple snowflake using kanzashi technique
It is best to start your creative journey in Kanzashi with simple crafts, such as this snowflake. You can master two types of sharp petals without much difficulty. By the way, you can glue the petals in your own way. Well, look at the author’s version on the step-by-step MK.

#2 Another simple kanzashi snowflake
And one more option for a not-so-complicated snowflake using the kanzashi technique. By the way, such a craft can be attached to a headband or hairpin and complement the New Year's image with an unusual handmade decoration.

#3 Snowflake kanzashi on the headband
Need to complete the look of a little snowflake? A snowflake using the kanzashi technique on the headband will cope with this task with a bang. Step-by-step MK in the picture below.

#4 Snowflake using kanzashi technique with several types of petals
This craft is more suitable for experienced needlewomen. To make a snowflake, a large number of petals are used, the production of which requires special skills. Well, if you are confident in your abilities, then watch MK and create!

#5 Snowflake made of ribbons and beads
And here is a version of a kanzashi snowflake with bead decoration. In addition to painstaking work with ribbons, you will also have to work with beads and weave a small flower. Please note that this craft includes several types of petals, each of which has special manufacturing features. See the picture below for a step-by-step master class.

#6 DIY snowflake made from ribbons
Snowflakes made using the kanzashi technique look unique, but a snowflake made from pieces of ribbon looks no less impressive. To make it you will need tape and a lighter (you can use a candle) to solder the parts.

#7 Christmas tree toy Kanzashi Snowflake
#8 Double-sided Snowflake made of narrow satin ribbon
#9 New Year's snowflake kanzashi with curls
#10 Headband Snowflake kanzashi made of satin ribbons
For more snowflakes, see the article:
Wreath
The Christmas or New Year's wreath is an exclusively Western tradition that came to our homes from Hollywood films. Well, for those who accept Western values, we have prepared several master classes on creating wreaths from ribbons.
#1 New Year's wreath made of bows
A very simple ribbon wreath for the lazy. To make it you will need a base and ribbons of different colors. Tie the ribbons into bows around the base and the wreath is ready!

#2 Braided ribbon wreath
You can weave a wreath from ribbons. This product looks very impressive, but in fact there is nothing complicated in its manufacture. Follow the step-by-step instructions and you will succeed!

#3 Miniature New Year wreath using kanzashi technique
A mini wreath can be made from kanzashi petals. You need to make basic petals from ribbons, glue them in threes and connect them into a circle. The finished wreath can be decorated with a miniature bow.

#4 Miniature wreath made of ribbon and beads
A miniature wreath made of ribbon and beads can be hung on a Christmas tree as a decoration, or you can give it to someone as a handmade New Year's souvenir. To make it you will need fishing line, ribbon and beads. You can also use additional decorative elements, such as a pendant and a bow.

#5 Ribbon wreath for kids
Surely in kindergarten they gave me the task of doing some kind of New Year's craft with the children. Take note of this simple Christmas wreath. You will need: a base for a wreath, many pieces of different ribbons, glue.

#6 Christmas wreath of satin flowers
And here is a version of a New Year's wreath made of satin flowers. The flowers turn out to be very realistic and it seems that making such a wreath will take a lot of time. Actually this is not true. Making such a craft from ribbons is quite simple. You can verify this through MK.

#7 Ribbon wreath: making New Year’s crafts with children
Here’s another great option for a New Year’s craft that kids can handle. You will need: a base, many ribbons of different colors and sizes, scissors. Cut the ribbons into strips of equal length and tie in knots around the base. The wreath is ready!

#8 Simple wreath made of satin ribbons
a very simple wreath made of satin ribbons. To make it you will need: a foam base, tape, safety pins or glue. Wrap the piece with ribbon and decorate it as you wish: with a bow, a snowflake, or leave it like that.

#9 Christmas Wreath Kanzashi
#10 New Year's wreath “Snowman” made of ribbons
You'll like it:
Balls and other Christmas decorations
Ribbons make very beautiful Christmas tree decorations, for example, balls, bells, cones, lanterns and more. We have found simple and complex MKs for you, with which you can create the Christmas tree of your dreams!
#1 Simple New Year's ball made of ribbons
To create such a Christmas ball you will need: ribbons, safety pins, foam blank. Roll the ribbons into a ring and secure them to the workpiece with a pin. Continue until the entire ball is decorated with ribbon rings.

#2 Christmas ball made of satin ribbons
To make such a ball you will need: a foam blank, tape cut into strips slightly larger than the diameter of the blank, two safety pins.

#3 New Year's ball made of ribbons using the artichoke technique
And here is a slightly more complex version of the craft. The whole difficulty actually lies in the fact that you will have to spend your time. You can arrange the colors to your taste, and you can learn the secrets of the “artichoke” technique from the step-by-step MK.

#4 Christmas ball made of ribbons
Here is another option for decorating a blank with a narrow ribbon. This MK uses glue instead of safety pins, and there is no need to cut the tape itself into pieces. The tape is wound obliquely through two points on the surface of the ball. Each time you pass the tape through one of these points, drop a drop of glue and secure a new layer. Step-by-step photo instructions are given below.

#5 Artichoke style cone
From ribbons you can make not only a ball, but a cone, for example. To do this, you will need a special blank, ribbons of a suitable color and safety pins in large quantities. Cut the ribbons into equal squares, wrap them into a triangle and secure them to the workpiece with a pin.

#6 Ribbon cone
And here is another version of a ribbon cone, only easier to make, but no less effective. To make it you will need a cardboard blank, a narrow ribbon of a suitable color and glue. The step-by-step process of making the craft is shown in the photo below.

#7 Icicle for Christmas tree made from ribbon
A very simple craft. To make such an icicle you will need a narrow ribbon, a pencil and thread. Wrap the tape around the pencil, secure it and leave it overnight. In the morning, remove the ribbon, sew on a thread and you can decorate the Christmas tree!

#8 Bell and lantern made of ribbons
#9 Kanzashi lanterns
#10 Kanzashi Christmas tree cones
#11 Christmas balls for the Christmas tree made of narrow ribbon
#12 Kanzashi Christmas balls without base
#13 New Year's ball kanzashi
See more ideas for New Year's balls:
Angels
Angels for the New Year also came to us from the West. However, the New Year holidays are followed by Christmas, and if your family is one of the believers, then why not make a craft for the future, especially since the ribbons make very cute angels.
#1 Simple angel made from ribbons
If you do handicrafts with children, especially those of preschool or primary school age, then be sure to take note of this simple but completely original craft made from ribbons. You will need tape, a stapler and beads.

#2 Angel for the Christmas tree or for table decoration
Here’s another very interesting craft that can be hung on a Christmas tree or decorated with a Christmas table. You will need a wide ribbon, a bead, a piece of wire (for the halo) and decorative elements.

#3 Angel using kanzashi technique
#4 New Year's Angel
#5 Mini Christmas Angel Kanzashi
Bow
What's New Year without gifts? What is the most important thing in a gift? Well, of course attention and packaging! A beautifully wrapped trinket will bring much more pleasure! A chic bow, which you can make yourself from ordinary ribbons, will help complete the gift wrapping.
#1 Christmas ribbon bow
A variation of the classic Christmas bow made from thin ribbons. This bow will be a great addition to any gift. How to tie a Christmas bow from ribbons, see the photo instructions.

#2 Double ribbon bow for gift wrapping
Or here is another original version of a double bow. It’s quite simple to tie, but it makes a lasting impression! You will find a step-by-step MK below.

#3 Bow flower
A delicate bow in the shape of a flower will be an excellent addition to a gift for a loved one: mother, sister, best friend. You will need a satin ribbon, a needle and thread and a bead for the core. See below for how to make a bow.

#4 Large ribbon bow
And here is a big bow to decorate a massive gift. This bow can be used to decorate absolutely any gift, for example, for a loved one or a work colleague. It looks cool and is very easy to do. Step-by-step photo instructions are given below.

#5 Flower bow made from narrow ribbon
You can make a charming flower bow from a narrow ribbon using glue and a button. The perfect addition to a gift for your best friend, sister or daughter.

#6 DIY voluminous bow
Here is a version of a universal bow that can be used to decorate any gift. You will need tape and our master class.

#7 How to tie a simple bow
#8 How to tie a fancy ribbon bow
You will also like New Year's packaging ideas:
Other crafts
You can make an incredible number of different crafts from ribbons and collecting them all in one place is simply impossible. But we tried to find as many different options as possible so that you can get inspired and create your own masterpieces. And next year, perhaps your master class will be on our website!
#1 Crown
Crowns for little snowflakes and princesses can be made from ordinary ribbons. The crown can be made using the kanzashi technique (for more experienced craftswomen) or a simpler technique.

#2 Crown made of ribbons and tulle
#3 Kanzashi crown made of narrow ribbon
#4 DIY New Year's crown, tiara made from bias tape
#5 Postcard
You can make a New Year's card from ribbons. For example, folding a narrow ribbon in the shape of a Christmas tree. You can decorate with beads or colored buttons.

More New Year cards:
#6 Candy
As a mini souvenir for the New Year, you can make candies from ribbons. You will need a narrow ribbon of two or more colors, and then it’s a matter of technique!

#7 New Year's garland of ribbons
You can use ribbons to make a cool New Year's garland for room decor. To create this you will need wide ribbons of different colors and thick thread. Finished flags can be glued to a thread or sewn on. But sewing by hand takes a long time, so if you have a sewing machine, be sure to take advantage of its capabilities.

You may be interested in:
Help us improve: if you notice an error, select a fragment and click Ctrl+Enter.
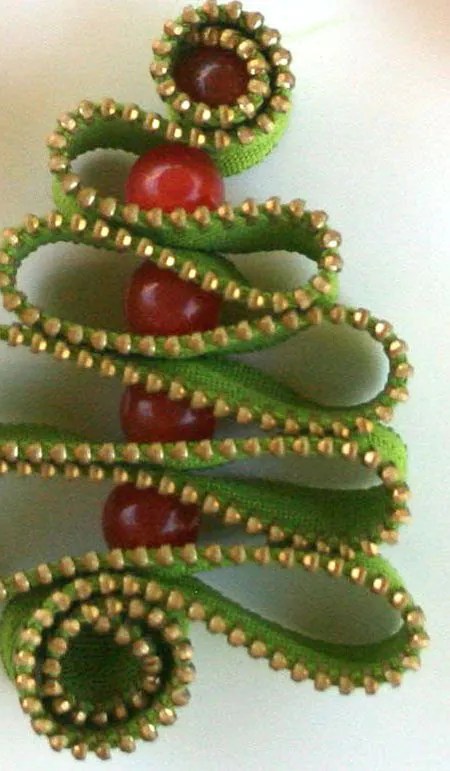
To create such a pendant you will need a small piece of thick and elastic tape, a few beads (for example, left over from other crafts), a little glue and a piece of colored cardboard.
Helpful advice: It would be nice to starch the ribbon before making the pendant so that it holds its shape better, but you can go the other way - take a ribbon not made of fabric, but of colored paper, which florists use to decorate bouquets. Such ribbons are very bright and shiny, which, in general, is what is required when creating Christmas tree decorations.
The process of assembling the Christmas tree pendant is visible in photo 1: first, we attach the bead to the threads and begin to collect the loops of the ribbon, alternating them with beads.

Photo 2 shows that after completing the main part of the assembly, the thread on which the “trunk” of the Christmas tree is assembled must be glued between two cardboard stars, along with a loop for hanging.
Helpful advice: Instead of a bead, with which the assembly of a Christmas tree pendant begins, you can take a button, and according to the taste of the master - with holes all the way through or in the shape of a fungus. In the second case, choose the one whose leg has a minimum height. You can also get creative with the top of the Christmas tree - don’t glue threads into a cardboard star, but choose a bright plastic bead of an interesting shape.
Video on the topic
Tip 2: DIY artichoke style ribbon Christmas tree
A small DIY Christmas tree is perfect for interior decoration for the New Year holidays. You can use the artichoke technique. As a result, you should have a nice souvenir made from satin ribbons.

Artichoke-style Christmas tree: necessary materials
Various New Year's crafts and decorations are often made in the artichoke style - balls, Christmas trees and much more. To create an original New Year's souvenir in a similar style, you will need paper from which the frame will be made. You can use cardboard or watercolor paper. Also prepare a hot silicone glue gun. For creativity, you will definitely need an emerald or brown-golden satin ribbon. But the organza ribbon can be of any color at your discretion.
The process of creating a Christmas tree from satin ribbons
Work should begin with the manufacture of the frame. Take some pre-prepared cardboard and draw a circle on it. Just don't do it by hand, but use a compass. If you don’t have a compass, you can use some kind of round template, for example, a plate. Decide on the diameter yourself. In fact, its size will determine the size of the future Christmas tree.
Then the cardboard circle should be cut and glued. You should end up with two frames. Take a satin ribbon and carefully cut it into small square pieces. Make miniature blanks from these squares. To do this, use the artichoke technique. According to this style, triangles should be folded from squares, and then triangles again.
Attach the resulting blanks to the frame for the Christmas tree. This needs to be done one at a time, and not sculpt everything onto the frame at once. It is better to glue the blanks overlapping from bottom to top. It is also recommended to alternate rows during the process. To secure it you will need a heat gun. You need to work with such a tool very carefully. The silicone adhesive melts and its temperature rises quickly. Watch the hole from which it will come out. In principle, you can use regular PVA glue. But then the structure may turn out to be fragile.
Christmas tree decoration
You’ve already got the Christmas tree itself, but without decorations it looks a little unfinished. You can sew small flowers from prepared organza and attach them to the Christmas tree. You can decorate a New Year's souvenir using small white beads and sparkles. They should cover the entire Christmas tree.
If you attach an organza ribbon to the top of the product, it can easily be hung somewhere or used as a Christmas tree decoration. You can create a designer Christmas tree if you decorate it with a large number of such toys.
This article will offer several master classes on creating Christmas trees using the kanzashi technique.
The history of this art of silk origami began more than 400 years ago. It was during this period of time that Japanese beauties changed their hairstyle. Smooth, even hair was replaced by tall and intricately styled strands. To hold all this beauty, various combs, pins and sticks made of wood, tortoiseshell or ivory, gold and silver were used.
Since the traditional outfit of Japanese women was very closed and did not allow wearing bracelets or necklaces, hair clips became the main decorative element and decoration. Craftsmen begin to fold small pieces of silk into flowers of amazing beauty and grace; they turn ordinary combs and hairpins into a work of art. It is silk ribbons, thanks to the richness of colors and shades, that allow you to create masterpieces.
Hair decorations made from silk flowers also played an important social role. They were a reflection of the position of women in society. Looking at her hairpins, one could easily determine whether she was married or single, how many children she had, even her age. Beautiful hairpins (kanzashi) with flowers demonstrated the refined taste and financial status of their owner. Often, such hairpins could exceed the cost of even a silk kimono embroidered with precious threads.
Such amazing, beautiful and delicate art is still used today. Of course, kanzashi no longer have the same meaning as before. Now these are just beautiful hair decorations. At the same time, the imagination and creativity of needlewomen have found use for small petals in a variety of directions, for example, using the kanzashi technique you can make a New Year tree. Decorate it with beads, rhinestones and bows. This beauty will be a wonderful interior decoration or a wonderful gift.
The tradition of decorating the Christmas tree came to us from the pre-Christian era. In ancient times, evergreen trees were considered especially beloved by the gods. People, trying to gain prosperity and good luck, gave offerings to spirits and gods on the days of the winter solstice (the period from December 25 to January 8). Garlands of vegetables, fruits and ears of corn were hung on the most beautiful and fluffy Christmas tree. In this way, people asked the spirits for the harvest in the coming year. Now the New Year celebration is simply a fun and hectic time, and a beautiful Christmas tree occupies an important place in it, along with gifts, outfits, home decoration and refreshments.
A beauty made from ribbons using the kanzashi technique will definitely become a decoration for your home, and we will tell you in detail how to make it.
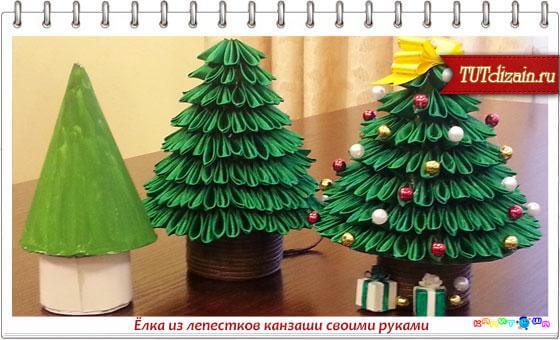
Christmas tree made of satin ribbon using the kanzashi technique made of sharp petals
You will need:
- Satin ribbon 5 cm wide and 15 m long, pine green color;
- Green cardboard;
- Green paint (if you don’t have green cardboard on hand, but only regular white);
- Candle or lighter;
- Sharp scissors;
- Tweezers;
- Glue gun or glue moment crystal;
- Decorative elements (beads, rhinestones, etc.).
You need to twist and glue a cone out of cardboard. If necessary, paint it green. Now you need to take a piece of satin ribbon along the length of the base of the cone and paste it over it, as in the photo. One edge of the tape should go along the inside of the cone. We put aside our Christmas tree base preparation for a while and get to work creating the needles. In order to make it convenient to glue the petals to our base, you can draw lines (rows) on the cone.

We roll up future branches with sharp petals. We will need from 250 to 320 pieces, depending on the size of the cone. Of course, the number is approximate. You can make a Christmas tree larger or smaller, and the number of petals will change accordingly.
In order to make a sharp petal we need a square of satin ribbon. We cut the blanks and begin folding the petal. For more accurate work, it is better to melt the edges of the squares over a fire. This will prevent them from fluffing up.
Take the square and fold it diagonally with the shiny side facing out. The fold line is located at the top. It turns out to be a triangle with the base at the top and the apex at the bottom. Now we fold the right and left corners. All that remains is to melt the lower part over a candle or lighter and the petal is ready.

When all the blanks are completed, we take our cone and begin to glue the very first row of petals along the lower edge of the cone where the tape is glued. Apply glue to the melted edge of the petal (see photo).

The second and all subsequent tiers must be glued in a checkerboard pattern relative to the previous row.

To form the crown, you need to glue 4 petals together.

When the glue has dried, you can start decorating the Christmas tree. Glue bright red and clear rainbow beads onto the tips of the petals. You can arrange them diagonally or in artistic disorder. In any case, the Christmas tree will turn out festive and elegant.

If you don’t have beads on hand, you can use ribbons. Tie beautiful bows and glue on the petals. The crown can also be changed, for example, to make a bright ball.

To make the bows beautiful, neat and identical, there is a little trick - they are tied on a fork.
You will need:
- Thin ribbon;
- Fork (regular, from a kitchen cabinet with 4 tines);
- Scissors;
- Lighter or candle.
Turn the fork with the convex side facing you. Take the ribbon right side out and place it on top so that the short edge faces the lower right corner. In the photo it is designated as end A. The second end (B) goes around the fork from the concave wrong side. We wrap it on the face from right to left. The ribbon passes over end A. Now you need to thread end B between the middle tines of the fork and then thread it into the loop formed by end A on the front side and end B on the back. Don't tighten it too much just yet. Now we need to thread end B from bottom to top into the loop that was formed during the very first turn of end B to the front side. Now you need to tighten it tightly, and the bow is ready.
All that remains is to cut off the excess ends of the ribbon, melt the tails of the bow so that they do not fray, and you can glue them to the Christmas tree.
New Year trees using the kanzashi technique made from round petals

To create such a Christmas tree you will need the same materials and tools as for the first Christmas tree.
Materials:
- Cardboard for the base;
- Green satin ribbon;
- Gold ribbon for decoration;
- Beads for decoration;
- Candle or lighter;
- Scissors;
- Glue.
The difference with the previous product is how the pieces of satin ribbons will be folded. If in the first Christmas tree we used sharp petals, then in this one we will also use one of the round petal options.
Take a square of satin ribbon and fold it diagonally with the shiny side facing out. Place the fold line at the top. Now take the right and left corners and bend them to the bottom corner. To be safe, you can apply a drop of glue to this corner or melt it over the fire so that all the corners stick together. We got a figure that looks like a diamond. Take the right and left corners of this diamond and bend it back. If you look in profile, you get a figure similar to a right triangle. Now we take scissors and cut off this very right angle. We melt the edges of the workpiece over the fire and get a round petal.

Now we roll a piece of cardboard into a cone, glue it and wait until it dries. Similarly, glue a piece of tape along the base of the cone.
The next step is to attach the petals. Alternate round and sharp petals, as in the photo. Or come up with your own system and options. After the glue has dried, decorate the Christmas tree with beads and bows. You can also make a bow on the top of your head.
You can make a stand for your Christmas tree. Any plastic bottle or even a glass will do for this purpose. They just need to be cut to the desired height and decorated. You can cover it with fabric, colored paper or ribbons, wrap it with laces, twine or sisal.
Another important point in creating such crafts is the possibility of working with children. The next option for folding the petals can be entrusted to children. Of course, it is important to make sure that they do not smear glue all around, and leave the melting of the edges of the petals for themselves. Perhaps not all of the child’s “twigs” will turn out smooth and neat, but that’s not the main thing. It is important that the child gets a lot of pleasure from creating crafts. In addition, such activities develop fine motor skills in children, which has a positive effect on the right hemisphere of the brain, which is responsible for speech, fantasy, memory and creativity. And by making crafts, children learn perseverance, accuracy and the ability to concentrate. And of course, a Christmas tree created by children’s hands will be an excellent gift for grandparents or godparents.

In order to make such a Christmas tree together with the kids, you need all the same materials and tools:
- Cardboard for the base cone;
- Green ribbon for branches;
- Glue;
- Candle or lighter;
- Decorative elements (beads, bows). You can also use jewelry huggers and small Christmas tree decorations for the top of the Christmas tree.
We begin to roll the ribbons, as for round petals. First, diagonally in half, and then the right and left corners down. You can apply glue to this lower corner so that all layers of the workpiece are held together. Your child can do all these manipulations independently. Help will only be needed when the edges melt.

The Christmas tree doesn't have to be green. If you want to use it as an element of room decor, nothing prevents you from making it blue, red, white or gold.
If you have created a Christmas tree with a stand, such a product can be decorated with cotton wool to imitate snow. Make gifts from tiny pieces of foil and you will have a whole New Year's composition in miniature.

Beautiful Kanzashi Christmas trees can be made not only from ribbons. Any fabric that can be cut into squares and folded into petals is suitable.
Felt Christmas tree using the kanzashi technique

This soft Christmas tree can be used as a Christmas tree decoration or part of a garland.
You will need:
- Felt. For the base cone it is better to take a thicker one, for the petals the thinnest one (it is better to give preference to acrylic or viscose felt);
- Threads and needles. Denim threads and needles with a narrow eye are well suited for stitching.
We roll and sew a cone from thick felt. We roll sharp petals from thin felt, as shown in the first master class. When you have made 3 - 4 petals, measure how many pieces you get in one tier and how many tiers will be needed to cover the entire cone.
Now that you have the number of petals of each tier, string them onto a thread like beads and close them in a circle on a cone. We sew this tier and move on to the next one. We string the petals on the thread again and sew them to the cone. Do not forget that the petals in each subsequent tier should be staggered relative to the previous one. Finally, you can decorate it to your liking.
Advice! If you want to decorate your Christmas tree using the kanzashi technique in a new way every New Year, instead of gluing decor in the form of beads, bows and sparkles, use pins. They are also called jewelry pins. They are pins with different heads. They are available in the form of loops, beads and caps, like carnations. You can string beads and beads on them and stick them directly into the petals. You can even compose compositions. To do this, you will need tools for working with wire: round nose pliers and wire cutters. We string a bead or bow onto the pin. We measure out about another 0.7 - 10 mm of the pin, and cut off the rest. We wrap the end in a loop and we get a full-fledged miniature Christmas tree toy.
Such decorations will be removable; they can be attached using the same pins, hooked onto a loop.

Who among you can imagine the New Year without a Christmas tree? The answer is obvious: no one. New Year necessarily requires the presence of a Christmas tree. Today you can not only buy them in stores, but also, thanks to useful articles, make them yourself. The most popular is a Christmas tree made of satin ribbons. Probably because we associate the ribbon with a holiday and a joyful mood, although it is also very popular. A hand-made Christmas tree, given to friends and relatives, will certainly become a decoration of the New Year's interior.
So, how to make a Christmas tree with your own hands.
Today we will teach you how to make a Christmas tree with your own hands.
Prepare the following items:
- ribbons 1 cm wide. It is advisable that they be of three colors;
- beads of different colors: red and gold;
- scissors, glass;
- a simple pencil;
— burner;
- ruler;
- cardboard in A3 format.
 If you have never used a burner, read the instructions first.
The first way to make a Christmas tree from ribbons with your own hands.
We use a ruler and a burner to cut 10 cm ribbons: you will need a lot of them. Everything must be done on glass. We make loops by connecting the two edges using the same burner. The ruler should be free at this time.
Next, we make a cone from the prepared cardboard. Every 2.5 cm. Mark with a pencil. The most convenient option is to take a pencil, wrap it with thread, pulling it tight, and draw a circle of the required size. Using a compass, you should draw arcs of the smallest diameters. Now glue the ends of the cone together. The base is ready. 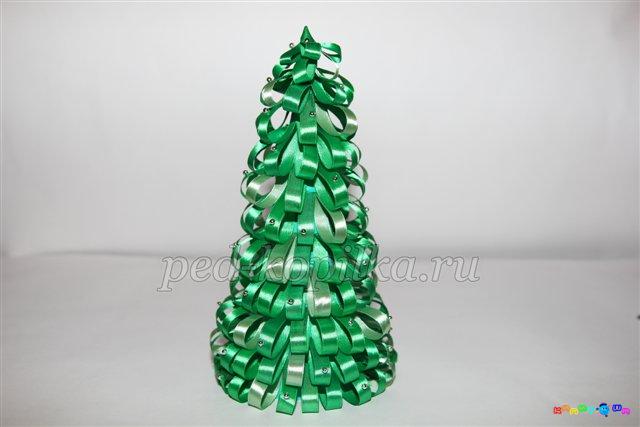 We begin the most painstaking work of making a Christmas tree from satin ribbons: gluing the loops. Try to do this carefully so that excess glue does not spoil the work. If you take several shades of green, then alternate their colors. Having reached the very top, you should glue the loops more tightly to each other, overlapping. For the top of our beauty we will make loops of 8 and 6 cm in various colors. Here we are even more careful. The last loop should be in the shape of a bag.
Christmas tree decoration made of satin ribbons.
Let's get to the most interesting and creative part of the work: decoration. Each of us loved since childhood, having assembled the frame of a Christmas tree, and decorating the Christmas tree with toys. In our case, beads will serve as an alternative to glass toys. We take the prepared decorations and begin to glue them in a chaotic order. Combine red and gold colors. You can glue one large bead to the top.
How to make a Christmas tree with your own hands. Second way.
Let us introduce you to another option for making a Christmas tree from ribbons with your own hands.
We will need:
- foam cone,
- transparent green ribbons,
- small pins,
- decorative beads,
- ribbons,
- Garlands.
1.
Take a finished foam cone.
2.
Since our cone is white and the ribbons are translucent, the base should be painted green.
3.
Then you should cut the ribbons into small pieces (8-10 cm wide).
4.
Assemble the Christmas tree starting from the bottom using pins.
5.
Leave a few free oases for other decorations: golden cones, red balls.
6.
Decorate the tops of the tree with a composition of bells or any other Christmas decoration you like.
SELECTION OF IDEAS