DIY Harry Potter Magic Wand: A Step-by-Step Guide. How to make a Harry Potter wand out of paper and glue
It is the tool with which magic is performed. Anyone who has the ability to make objects levitate with the spell "Wingardium Leviosa" or open locks by saying "Alohomora" at the age of eleven receives his own magic wand. Some especially powerful magicians can do without this device in certain cases.
In the UK, only one master is engaged in the production of magic wands from the world of Harry Potter - Mr. Ollivander. American magicians, on the other hand, can safely do without them, but in order to produce spectacular spells high level, such a tool is still needed. In general, there are four wand makers in America.
Harry Potter wands
The magic wands of all allow you to focus the attention of the wizard on any object and direct the effect of the spell on it. Hermione's wand was made from vine with a core of dragon sinew, and Ron used a magic wand that he inherited from his older brothers, it was an ash tool with unicorn hair. Due to the fact that this wand did not choose the Weasley, it did not have all the possible power and hardly obeyed him.
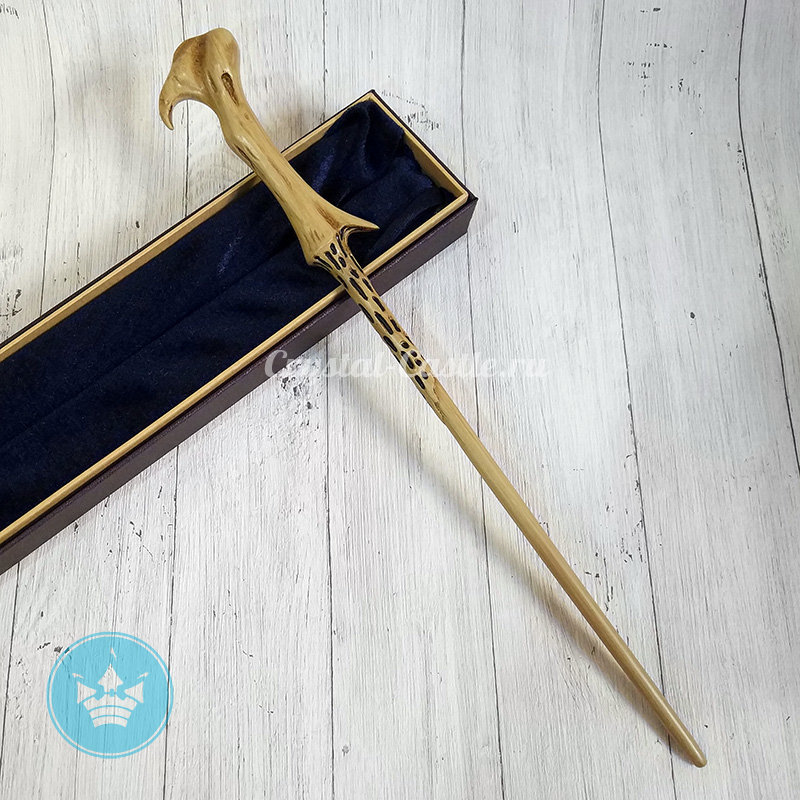
Magic wand Harry Potter was eleven inches long, made of holly. Inside it was a phoenix feather that belonged to the headmaster of the School of Witchcraft and Wizardry, Albus Dumbledore. The twin of Harry's wand was the tool used by the main villain - Voldemort or "He Whose Name Must Not Be Named." The only difference is that Tom Riddle's wand (later he changed his name to a more sinister one) was made of yew.
Magic wand manufacturers
The most famous (and only) manufacturer of Harry Potter wands was Garik Ollivander. This old master owned a shop in Diagon Alley, where he sold his unusual goods. It is known that his family was engaged in the manufacture of these magical items long before the advent of our era.
At the beginning of the story, the owner of the shop is already very old, but his mind is still clear. It's amazing, but Mr. Ollivander remembers absolutely all the wands he sold. He is a real expert in his field, but Ollivander's knowledge is rather narrow. This is confirmed by the fact that he knows everything or almost everything about the most powerful wand in the world, but has not heard anything about the other Deathly Hallows.

There are four wand makers in America. One of them is a native of the Choctaw Indian tribe, Shikobo Wolf. He makes magic wands with a feather core of a bird that looks like a phoenix. His tools are very powerful, but not all magicians can handle them. They are preferred by specialists in transfiguration.
Another master is Johannes Jonker. The Wizard comes from a Muggle family. It manufactures sticks with a wool core wild cat Wumpus. His magic wands are expensive and of high quality, with mother-of-pearl inlays.
The third master is called Chiago Kentana. It uses the translucent backbone of an Arkansas river monster in production. His wands are very stylish and powerful. True, after the death of Chyago, the production of magical items stopped, since only he could lure the river monsters.
Wand maker Violette Bouvet of New Orleans uses heartwood from swamp hawthorn wood and the hair of a rugaroo, a dog-headed monster that lives in the swamps of Louisiana. These magical items are more often chosen by dark magicians, but many ordinary members of the American magical community also own wands from Violette Bouvet.
The most famous magic wand
The most famous magic wand in the world of Harry Potter - Elderberry - one of the Deathly Hallows. According to legend, it was a gift from Death itself to one of the Peverell brothers. It could only be obtained by defeating the previous owner in battle. Often, new owners received a wand in very bloody and dirty ways: they killed in a dream, attacked an exhausted or sick opponent, and so on.
According to the book, Professor Dumbledore became the owner of the Elder Wand after defeating the evil wizard Grindelwald. But very interesting is its transition to the next owner. As it turned out later, in order to become the legal owner of this, it is not at all necessary to kill the opponent, it is enough to disarm him. Albus Dumbledore was disarmed by Malfoy in the sixth part of Harry Potter, but then no one imagined that the wand would pass to a new owner in this way.

The Elder Wand was later buried along with Albus Dumbledore. The Dark Lord defiled the grave of the great sorcerer and took the tool. Further, the circumstances were such that Draco Malfoy (the true owner of the wand) lost to Harry Potter in battle. The wand itself remained with Voldemort, while the boy who survived now became its owner. In the decisive duel between them, she disobeyed the Dark Lord's spell and went over to Harry, and the murderous spell ricocheted just in the direction of Tom Riddle.
DIY Harry Potter wand
To get a wand, fans of the Harry Potter universe do not have to try to find Diagon Alley or defeat any wizard in an unequal battle. You can make it yourself. Wizards made these magical tools only on the growing moon, at midnight. According to the ancient books of the magical universe, it was necessary to go around the tree three times, which gave wood to a stick, thanking him, praising his power and strength. Then you need to “give the tree” a scarlet ribbon, tying it, and next to pour red wine or water on the ground and bury bread or a precious stone.
Preparation of materials and tools
How to make a Harry Potter wand? First you need to prepare necessary tools and materials. Magicians make wands from wood, and the core can be a dragon heartstring, hair from a unicorn's tail, a phoenix feather, or anything else that carries a magical component. Unfortunately, complete methodology crafting these magical items is only available to wizards, so the core will have to be discarded only if you do not decide to make your own paper wand.

So, a tree can serve as a material for manufacturing (you will need one branch of a suitable length and width, fairly even), Chinese chopsticks for food or a tightly rolled long roll of paper. You also need to prepare:
- Glue gun with a rod.
- Several brushes.
- PVA glue (for paper crafts).
- Acrylic paints "under the tree".
- Small beads or buttons for decoration (optional)
- Fixing emulsion for acrylic.
In addition, you need to take care of the cleanliness of the workplace.
Sanding and shaping
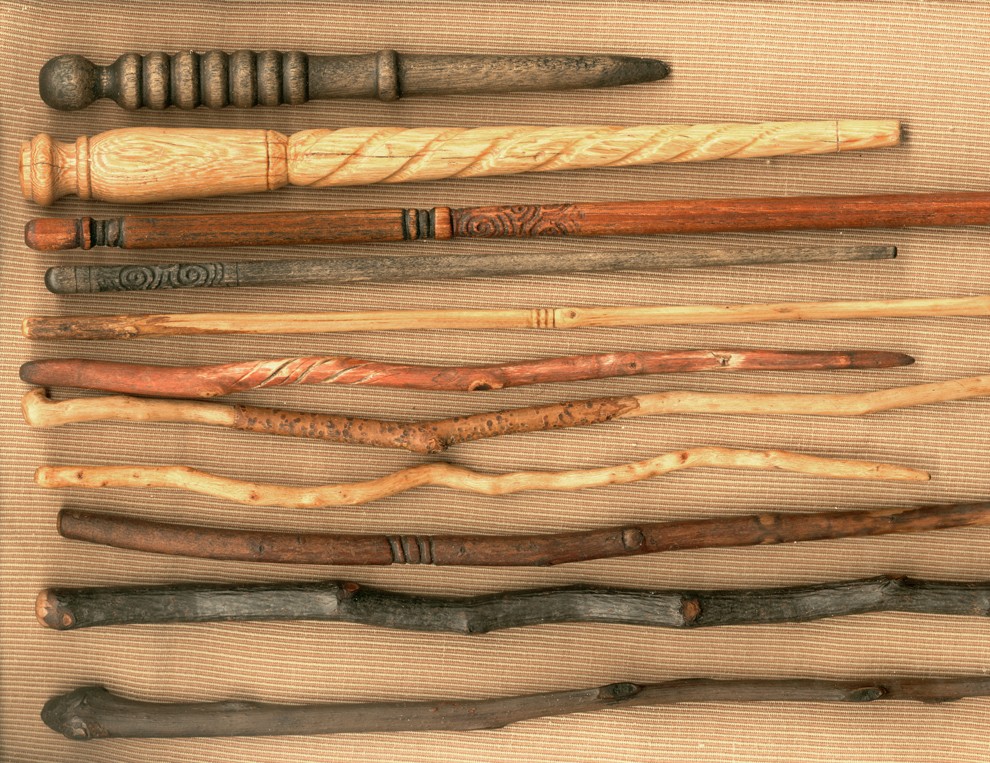
If you decide to make a wooden stick, choose a branch 28-36 centimeters long. The long one will be inconvenient to use, the short ones are more suitable for children. As for the width, it is optimal to choose a branch no thicker than your finger. Of course, you should look for a stick that is fairly even, without bends.
One end of the workpiece must be sanded so that it becomes rounded. You can even try to taper the branch so that it tapers a little towards the tip. Start working better coarse-grained sandpaper, and put the finishing touches on with fine-grained sandpaper. It is worth removing all growths and sharp notches from the branch, the bark can be left if desired.

Decorating and shaping the handle
Some wands (such as Hermione Granger's wand) have a handle, but this is optional. If you decide to form a handle, then make it approximately equal to the length of your finger. You can make this element with a glue gun. Apply the glue and let it dry, and then apply two to three more layers later. Additionally, you can cut out any patterns.
In addition, you can glue a bead or a small button to the base of the stick. Some sticks have such elements. So that the decoration is not too massive, pick it up the same width as the base of the stick. You can also apply a spiral pattern to the rest of the magic tool with a glue gun. Instead of a glue gun, you can use polymer clay.

Coloring and fixing the result
It is better to paint a Harry Potter magic wand (you can see a photo of it in the article) acrylic paint. Most of these magical items are made in shades of brown, but you can make a black or white wand. To give the color depth, it is worth applying several layers. You can, for example, use light and dark shades of brown plus black. If you dilute acrylic paint with water, the natural texture of the wood will be visible.
To achieve the effect of aging, you can fill more than dark shade all cracks and chips, and light - to emphasize the protruding areas. Good for this jewelry work fit small brush for painting with a hard bristle.
After the paint has dried well, you need to apply a fixing emulsion. It is not necessary to use a fixer, but it will keep the paint from coming off too quickly. You can choose a glossy or matte fixative depending on the desired effect.
Stick with a core
A stick with a core can be made using paper as a base. Paper right size start rolling into a tight roll, stop as soon as you reach the middle of the sheet. At this point, you can invest the core. Wizards usually use a phoenix feather (any bird's feather can be used), dragon heartstring (red yarn), or unicorn hair (the silver hair of a New Year's garland).

Glowing magic wand
It's a bit more difficult to make a glowing Harry Potter wand. To do this, you need a small flashlight. You need to pull out the LED element and do not forget about the battery. Then the luminous element must be glued to the tip of the magic wand blank. To make it convenient to pass the wires through the workpiece, it is better to make it out of paper. Then it remains only to attach the switch to the handle of the magic tool.
Some caveats
Since a hot glue gun is used in the work and in the process it may be necessary to process the wood with a knife, it is impossible for the child to make the Harry Potter wand himself. Adult help is required.
Also, do not trust children to cut wooden blanks. If a child wants to make a stick completely with his own hands, it is better to choose the option with a paper base.
Such a Harry Potter magic wand, of course, will not perform spells, but it will be an excellent accessory for a brand new robe.
The incomprehensible, but such bewitching words that Harry Potter uttered in moments of danger and in witchcraft lessons are memorized by many schoolchildren. Joan Rowling's book has long become a desktop, and the young magician's magic wand has become a talisman.
The uniqueness of the Potter wand
When Harry first learned that he was to be trained in the school of great wizards, he was a little confused. All famous magicians, in addition to knowledge and experience, had a personal wand that suited their temperament. Thanks to the generosity and kindness of Hagrid - guide and mentor - the newcomer got his own tool for spells.
Harry's wand is made of holly, and in the core is the feather of a Phoenix rising from the ashes. This product is unique as it has a twin brother. A boy from a kind of good magicians becomes the owner of a powerful thing. But her abilities more than once protected the owner from mortal danger and bailed out of trouble.
What do you need to create Harry's artifact?
Recreating a rare relic, for the possession of which many sorcerers fought, is truly an exciting activity. You can make a similar stick with your child, connecting him to the process of decorating and choosing color design basic materials. Of course, it is unlikely to be able to make exactly the same wand, since it is impossible to find the feathers of a resurrecting bird, but any master can bring a copy as close as possible to the original.
To do this, it is not necessary to look into Diagon Alley, you can get by with improvised means or inexpensive parts from the nearest hardware store. The design of the wand assumes the presence of:
- tree branches;
- brown paint;
- transparent varnish.
It will take only four tools to fit the stick to a specific size and give it symmetry - a ruler, a saw, sandpaper, a glue gun. As decorative elements fit small beads dark tones. It will give the product nobility and elegance.
If desired, LEDs can be placed in such a stick. Then the wooden base will need to be sawn and the backlight placed inside the workpiece. Install a switch invisibly on the surface.
Step-by-step algorithm for creating a stick
To make a magical inventory, you do not need to invent or invent anything. A series of master classes in video and printed versions are posted on the Internet, following which it is very simple to make a magic wand.
The most popular way is to manually process the branch. If its length is more than 11 centimeters, you should shorten the workpiece, and then grind the wood and bring the surface to optimal smoothness without roughness. Next, proceed to the formation of the relief at the end with a glue gun. The handle of the weapon that does the will of the magician should be slightly thickened with smooth bending lines. Small decorative fittings are subsequently mounted on it.
It is desirable to paint the product in brown or another dark color under the imitation of natural wood. After painting, the stick should be fixed with a colorless varnish and allowed to dry.
And other ready-made magical attributes - you can in our online store "site" at budget prices. Order products High Quality from a trusted supplier!
Our world is amazing in itself, but sometimes you want to bring a little more magic and magic into it! Few people know that you can make a real magic wand yourself !!! Well, how? Do you want to learn how to make a magic wand, observing everything magic rules and the secrets of how to handle and store it? Follow our instructions exactly, and you will have a personal magic wand that will certainly cheer you up, serve as a beauty and make you feel like Harry Potter or an excellent Hermione.
A real magic wand should be exclusive and individual! Since she herself chooses her own, so to speak, owner and copyright holder. It acts as a conduit for the energy of magic and wonder.

Material selection
Few rules, but they are. Mr Ollivander confirms!
Firstly, the stick must be natural, i.e. made from wood. It must be chosen in the forest, since city trees are weak when it comes to vitality tree. Such trees have a broken connection with the elements.
You need to go to the forest or park for a branch with positive attitude and complete harmony in the soul. At this moment, you should have the desire to merge with nature. Also time your trip and making a magic wand with the growing phase of the moon.
In addition, the tree itself must give you a twig. To do this, you must mentally sincerely turn to the tree with a request.

Then you must take a twig in your hand and feel exactly your wand. Close your eyes and listen to your feelings: has the branch become, as it were, an extension of your hand ...
Do not forget to thank the tree and give it some of your positive energy. So the wand will retain its connection with the forest and will generate its energy in itself.

Since ancient times, it was believed that elder and hazel are endowed with magical qualities.
Cut the branch carefully and quickly with a sharp knife. The size of the wand should be equal to the length from your middle finger on your hand to your elbow. It is better to hide the selected branch from prying eyes and bring it home. In the house, she should be nourished by your energy.
Manufacturing technology
Making a wand is a whole sacrament, so it must be hidden from prying eyes.
Clear the branch of your choice of bark and knots. Sand it gently with sandpaper to make your wand smooth. At the same time, you need to say the magic words to yourself:
“I conjure you, O almighty branch (oak, maple, etc.) by the forces of the four elements - Earth, Air, Water and Fire! Embrace their strength and power. Be my faithful assistant!
Next, at the base of the branch, you need to make a hole. It can be done with a screwdriver, screw, nail or drill. Do it especially carefully so that the stick does not crack. A magic core must be placed in the hole made. But what kind of core it will be, you need to determine yourself.
If you want to be helped AIR energy, then you can put it in a stick bird feather but not a black crow or a rooster.
Crystal or pebble give your wand energy of the EARTH. Perhaps you will choose a stone that has certain properties or suits your horoscope.
You can also use field herbs. For example, rosemary symbolizes long memory, sage wisdom, lavender devotion, laurel glory.
Attention! Under no circumstances should curry powder be used to create sticks.
Small ember fill the wand energy of FIRE.
WATER the most complex element, it is unchanging in its variability, therefore it can be symbolized wire, spring washed ashore amber or small soldered flask with water from the source of your choice.
After you have placed the core in the stick, you need to seal the hole in the stick. It is necessary to seal the wand on consecrated water. Draw on the print initial letter selected element. different schools the occult have various options writing the four great elements, choose the one that is closest to you.
decoration
Some magicians cover the wand with varnish. It's not forbidden, but it's not encouraged either. It is better to cover it with natural, pleasantly smelling oil, wrap it in a scarf and leave it like that until the next full moon.

However, it all depends on the magician, so you can decorate the wand with beads, stones, or give it the necessary shape with hot glue and paint it with paint. This is more clearly presented in the master class. igrateshka for beginner wizards:
Also, the stick can be decorated with feathers.

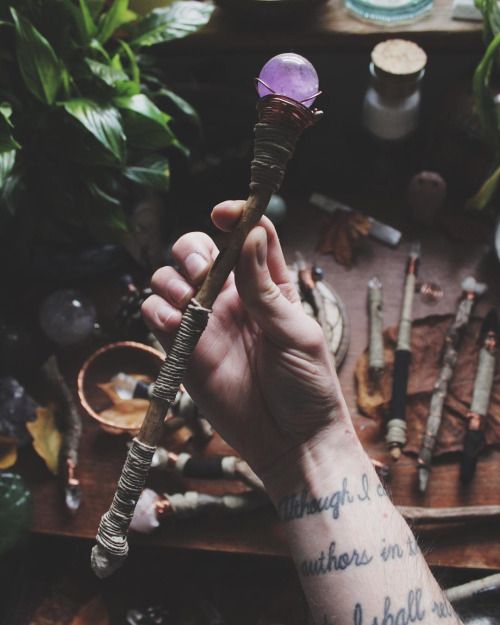
Wrap with magic twine and add a magic crystal.
Acorns, elements of marine fauna - all this can be useful in the decor of your wand.

Copper wire will also help with this.

If you own art, then perhaps you can create a magical masterpiece.

Rite of passage
This is the final stage in the creation of the wand, one might say, the launch of its magic to life. It is recommended to dedicate the wand on Beltane or Walpurgis Night (May 1) or You Saiman (October 31). To do this, at midnight, the magic wand is placed on a clean white cloth. A lit candle is placed nearby.
In this case, it is necessary to pronounce the following words: “Become a guide, helper and keeper!” Next, the candle must be extinguished in water and buried in the ground. The ritual must be done completely.
In this case, the owner of the magic wand must remember:
Wishing and doing evil - the wizard will lose his strength. It will happen suddenly and irrevocably!

Don't hurt anyone with your wand. Better wish well-being, health, prosperity and joy to your loved ones and friends!
Do not throw it anywhere and do not point it at anyone! This important rules while using it!
Magic wand for a little fairy
Little fairies also need a real magic wand. You don’t need to do it according to all the rules, because children have the power to change the world with the help of fantasies, so the wand should only help you feel like a fairy fairy!


Take a piece of ribbon or fabric and cut it into narrow strips. It will be more interesting to look if the stripes are different colors. The more there are, the more magnificent the magic wand will be, or rather its top. Gather the cut strips into a fluffy pom-pom. It can be complemented with beads and satin or silk ribbons. We wrap the stick itself with tape or paint it in desired color. We assemble our stick by attaching our pom-pom to it! The wand is ready, even a child can make this!
Watch the master class TullnieShtuchki how to make a fancy magic wand:
In the same way, you can make an astrologer's wand:

In company with a stick, you can make a small or, with or.
Lace is also relevant in the magical theme!

Beads, rhinestones and feathers will also come in handy.

Do not forget about, perhaps the wand belongs to the flower fairy.


We turn a simple pencil into a real magic wand!
This is the easiest way to make a stick at home. First, do not look for a branch on a tree. Secondly, it is easy and simple, and there is a pencil in every home.
We take a pencil, it is better to pick it up with a hardness index "T" or "T2" and sharpen it, and then decorate the stick satin ribbon or other thick cloth.

You can combine ribbons of different colors. Fasten the ends of the tapes with glue.


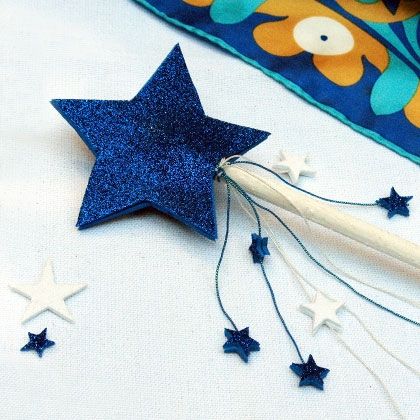
We cut out stars from felt or felt paper that match the color of our stick.

We fasten it all to our stick.

The wand is ready, you can go to conjure!

The simplest magic wand is made of paper
A magic wand can also be made from plain sheet A4 paper. In addition, you will need: PVA glue, glue gun, scissors, acrylic paints, brush and sparkles.
We take landscape sheet A4, about 2/3 of it is coated with PVA glue and we begin to carefully twist diagonally into a tube. In this case, the tube should acquire a conical shape, tapering towards the bottom. We give our future stick to dry and cut off the extra edges with scissors.

We take a glue gun and fill the void of the stick from the side of the wider edge. Instead of glue, it can be filled with cotton wool or paper, which is more convenient for you to work with.
After the glue has hardened, you can start decorating the stick. To do this, we use a glue gun to make monograms and intricate patterns on a stick. We are waiting for the pattern to dry.

We cover the top of the stick with acrylic paint, decorate the bulges of the pattern with sparkles.
Paper magic wand is ready!
You can see this process in more detail and clearly in the master class. lusciousbus:
How to make different magic wands from sushi sticks and old brushes, see the master class children's channel Veta and Harry:
Every day, the beloved character of the famous film Harry Potter wins the hearts of children and teenagers, immersing them in the world of ancient spells and learning magic. IN Lately Harry Potter's magic wand is becoming more and more popular, which you can make with your own hands at home, without even resorting to magic.
Join the discussion
What do you need to create a magic wand?
Then, when girls dream of a fairy costume, young sorcerers would be happy to take possession of a personal magic wand with which they can go to Hogwarts for training. And if the owl with a message has not yet arrived to you, you need to prepare for this event. Making a child's dreams come true and making a Harry Potter wand at home will not be difficult if you use the photo and video tips.
Typically, the length of this magic item fluctuates around 25-30 cm. The thickness is selected individually, but usually it is also approximately equal to the diameter of the pencil, it can be a little thicker.
Necessary materials
- Glue gun filled with hot silicone glue
- Wood blanks
- sticks
- Beads, pebbles, beads
- Acrylic paints (brown, grey, black or others)
DIY Harry Potter Magic Wand: step by step guide
DIY Harry Potter magic wand can be made in several ways: both from wood and from paper, as in this video.
Connoisseurs believe that such a magical item requires a special initiation process in order for you to exchange energy with it. Well, if you don’t believe in all this, but Harry Potter’s wand was created at home as an addition to children's costume for a holiday, it is enough just to put your love and faith in goodness into it. And who knows, maybe this device will become truly magical and bring success to your child. The main thing is to believe! Good luck!
The magical power contained in artifacts is capable of transforming reality not only in fairy tales, but also in Everyday life. How it works and how to make a real magic wand with your own hands - this will be discussed in this article about real magic.
Many enterprising businessmen, after the release of the saga of the young wizard, began vying to offer to purchase the “Harry Potter magic wand”. However, a real magic wand, as we all know, is a one-piece, exclusive and “live” product. The wand itself chooses its owner, so it is impossible to buy a valid copy in the store.
A true wizard finds his wand intuitively, but you can learn how to make a magic wand from an unsightly twig. And it's better to do it right now!
How to make a real magic wand
Have you noticed that wishes come true? This is the magic that everyone is endowed with to one degree or another. By itself, the wand is just a wand, an antenna that accumulates and amplifies the magician's energy. How to make a magic wand that is obedient to its owner and "pretends" to be an ordinary branch for everyone else?
A real magic wand - piece goods, exclusive and "live"
Let's start with some simple truths:
- The wand should be natural to keep the memory of the tree's vitality. This can only be found in the forest or in the park, since the trees planted in the city are weak and have no connection with the elements.
- A branch broken by a wizard loses its strength, “dies off”, so the tree itself must give a branch after a sincere request and an honest promise not to use magic to harm living beings. If this condition is violated, the wand will never pick up necessary strength and will take energy from its owner.
- Each tree is endowed with unique qualities, but the magician must feel “his” wand. To do this, just pick up a twig, close your eyes and feel its weight in the palm of your hand. If one gets the impression that the wand has become an extension of the hand, then it is “the one”.
- Say "thank you" to the tree. Even science has already proven that sincere gratitude has magical property, so these are not just familiar words, but the first spells available to everyone, the meaning of which for the majority has been lost. Give the tree some of your energy and wish it well. In this case, the wand will not lose touch with the forest and will be fed by its pure, inexhaustible energy.
And now you can start making a magic wand!
How to make a magic wand at home: affordable magic
Ash, birch, cedar, maple, chestnut, alder, hazel ... In general, there are no trees completely unsuitable for creating magic wands. Nevertheless, there are specimens that take energy away (well, that's how they are arranged, what can you do?): aspen, spruce, pine. The branch chosen by the inner instinct (seen by the “third eye”) must be hidden and brought home. In the wizard's house, the wand will be saturated with his energy even before it becomes truly magical.
 A beautiful pebble or crystal will fill the magic wand with the inexhaustible energy of the Earth
How to make a magic wand at home? It's not technically difficult, but not as easy as it might seem!
- The mystery of creating a wand does not tolerate prying eyes, so the magician should not allow it to be seen before the rite of passage.
- A wand carefully peeled from the bark must be treated with sandpaper (sandpaper), pronouncing the spell “I conjure you, oh, all-powerful branch (birch, cedar, etc.) by the forces of four elements - Earth, Air, Water and Fire! Embrace their strength and power. Be my faithful assistant!
- At the base of the wand, you need to make a hole (with a nail, screw, screwdriver) so that it does not crack, in order to place the magic core. Fairy-tale "cores", alas, are not available modern wizards, but the magic spilled everywhere is just waiting to be realized! A feather (but not a black crow or a rooster!) will fill the wand with the power of the Wind, a beautiful light pebble or a real crystal will give energy from the bowels of the Earth, an ember will fill it with the power of Fire, and fish scales with the power of Water. Choose an element close in spirit, and it will help you everywhere.
- piece of wood or salt dough on the consecrated water, seal the magic core tightly, sealing it with a ring or inscribing the initial letter of the patron element (A - air, air; E - earth, earth; W - water, water; F - fire, fire).
- Some cover the stick with varnishes. It's not forbidden, but it's not welcome either. It is better to cover the magic wand with natural fragrant oil before initiation and, wrapping it in a scarf, leave it until the next full moon.
- The final step is the initiation of the wand. You can dedicate the wand to the full moon or to one of the fire festivals held by the magical community on May 1 (Beltane) or October 31 (Samhain, Celtic New Year). To do this, at midnight, a magic wand is placed on a snow-white fabric, a candle is lit and they make a wish “Become a guide, helper and keeper!”. Then the candle is extinguished in water and buried in the ground. All these manipulations are a tribute to the ritual. It is important to understand that the wand is only an attribute, the magic is inside the wizard and only concentrated in amulets and other artifacts.


