Do-it-yourself cardboard tugger toy. Cardboard twitch toy: an easy way to make
Making it is extremely simple, and the result will exceed all your expectations! You can simply play with Tergunchik, you can make him a character in a home theatrical performance, or you can present him as a gift to kids.

1 DOLL.
We will need:
cardboard (sheet size depends on what size doll you want to make)
PVA glue
paints (acrylic or gouache)
brushes
decorative cord or thick thread
awl or nail.
Let's start with preparations. You can repeat our silhouettes, you can come up with your own. So, we have two characters, each of which has a pair of arms (consisting of two parts), a pair of legs (also consisting of two parts), a torso and a head.

We mark the places for the holes, as shown in the photo. Important: in the upper part of both arms and both legs we will make two holes - one under the other. Using an awl or a carnation with a hammer, we make holes in the intended places.

Let's get to the decor. We decided to make Harlequin and Mister in a top hat, imitating vintage toy. To do this, after the main decor was finished, we went over the drawing with a dry brush with contrasting paint to create a “worn” effect.

We got the antique spats by going over the white paint with a dry brush with yellow pigment. To get a "decorative" blush, we used a dry brush with red pigment. We draw eyes - a mirror of the soul of our characters :)

After the final touch is put in the decor of our Twitchers, we start working on the mechanism of their movement. We stretch the cord with a knot at the end into the lower holes of the “shoulder” parts of the arms and fasten it with a second knot on the other side. Important: a piece of cord with knots should not tightly fix the arm to the body - later this will interfere with its free movement. By the same principle, we fix the hands in the elbows.

Stretching the cord into the upper holes of the upper parts of the legs, we fasten them to the body (do not forget about the knots and loose fit). It's time to take advantage of the top holes in the arms and legs. We stretch two segments of the cord into them, while observing their strictly parallel position to each other. Important: when you do this operation, lower the legs and arms of Twitch "at the seams".

It remains for us to fasten the cord, pulling which Twitch will amusingly move his arms and legs. To do this, we attach a long piece of cord first to the top vertical stripe, and then to the bottom, as shown in the photo. For the remaining free part of the rope, we will pull the Twitch, thereby setting it in motion! We fix a loop on the head (to hang the doll on a carnation in between performances :)) - and the fun is ready!


1. Circle the torso according to the template, arms 2 parts, upper part legs 2 parts, lower part legs 2 parts
2. Mark the holes for the rope and screws on the control.
3. Punch holes. In order for the holes to have smooth edges, they must be pierced on the body from the front side, and on the legs and arms (in pairs) from the wrong side, since the front colored side will have a clean look.
4. Place the parts of the arms and legs against the body, check whether the holes for the screws on the parts of the body match the markings on the parts of the arms and legs.
Here is such a funny toy-twitch in the form of a dog, you can make it out of plywood, or you can make it out of thick cardboard. The principle of such a toy, in general, is simple - you need to pull the rope down and the toy starts to move. We already had such toys on the site: and.
The dog template is absolutely purebred, so you can color it as you wish :)
This toy won me over with its ease of manufacture, because with such a master class, which was published by the author Tatyana Pirozhenko, even a child can do the work.
A small master class on how to make such a twitch with your own hands. And for those who want the same toy dog for themselves, there is
So, to make a jerk, you must first decide who you want to make and which parts of the figure will be movable. We decided that our Dalmatian would have paws and a tail.
Then you need to draw your figure, divide it into parts. And cut out the resulting details - we get a template.

We will need:
cardboard, scissors, paper glue, adhesive tape, wire and three buttons (or bards), string, rubber band (or Hungarian), bamboo skewer.

Progress:
1. Cut out parts of the template, trace them on cardboard and cut out the resulting parts.
2-3. In the places marked on the template, we pierce through holes with an awl.
4. In order for the parts of the dog's body to move, you need to connect them movably. For this, it is best to use carnation bards. But I didn’t have them at hand, so I made fasteners with my own hands from a button and a piece of wire (I once spied this option from Veronika Podgornaya).
5. We string parts on the fasteners - first the body, then the limbs (note that for this we use those holes that are circled on the template with a double circle).
6. This is how our dog will look from the inside out after attaching all the details.
7. Before you fix the wire, you need to tie the limbs sequentially with each other with pieces of elastic thread, threading its ends into the remaining holes. Tail - with a hind leg. Hind leg - with front leg.
8. To the middle of the elastic band passing between the paws, it is necessary to tie one end of the rope, for which we will then pull the toy.
Twitch toys have been known since ancient times. These mechanical figures of people or animals, which, thanks to a simple articulated mechanism, have funny jerking arms, legs or paws, have always enjoyed special love among kids.
Initially, jerks were made of wood, in Rus' they were called "dancers". Subsequently, the manufacturing technology was greatly simplified due to the use of paper and cardboard. With the advent of color printing, twitch patterns drawn by artists began to be published in magazines, which made it possible for everyone to make colorful toys.
Well, the Internet has made the possibilities for creating a variety of jerks almost limitless. :) I invite you to make with me a mechanical toy made of cardboard in the form of the famous fairy tale hero- Puss in boots. And at the end of the master class, another version of the twitch awaits you - the Monkey.
Master class: cardboard toy "Puss in Boots"
Materials and tools:
- sheets of A4 office paper (for printing templates);
- packaging microcorrugated cardboard (1.5 mm thick) or cardboard for children's creativity;
- a sheet of thick white paper A4;
- standard (clerical) knife;
- scissors;
- awl;
- paracord (4 mm in diameter) or other fasteners;
- kapron thread, narrow ribbon;
- glue stick;
- glue "Moment Crystal";
- double sided tape.
So, we start with the preparation of cardboard parts for the base of the twitch toy.
We print contour templates on office paper. Cut them out with small allowances.
We stick pieces of double-sided tape on the wrong side and glue the templates to the wrong side of the cardboard.

IN this case microcorrugated cardboard 1.5 mm thick is used. But now I want to draw your attention: the contours of the parts here are quite curly, with small elements, so it can be difficult to cut out of microcorrugated cardboard out of habit. And here you can go two ways:
1. neglect small elements and smooth out the contours when cutting;
2. use thin cardboard (for example, cardboard for children's art; for greater rigidity, you can make 2 layers); the toy in this case will also be quite functional, below you will see an example of such a performance of a twitch.
Next, with an ordinary clerical knife, we cut out the details of the base. We immediately make holes for fasteners. I used a 4mm punch. If a punch is not available, you can cut holes with a knife or awl.
The diameter of the holes may differ from the original, depending on what kind of fasteners you will use.

On thick white paper (on the front side) we print out color templates of Puss in Boots. Cut out.

Alternatively, the cat can be colored with pencils or felt-tip pens along with the child. For this, a special set of templates is provided.
Using a glue stick, glue the colored parts onto the cardboard bases (on front side cardboard).

We fold the paws in pairs (on top of each other). And with an awl we pierce small through holes on upper edges as shown in the photo. These holes will be used to control the paws.

For attaching the paws, a white paracord with a diameter of 4 mm is used here. Cut off 4 small pieces (the length is such that you can tie 2 knots).
We tie a tight knot at one end, melt the tip with a lighter. We pass the cord through the holes of the body and paws.

The legs should be under the body.

This is just one of many mounting options. For a movable fastening, you can use, for example, brads, buttons, wire, etc. - whatever you like best. The main thing is to make sure that the limbs of the twitch toy rotate freely in the same plane!
Let's get to ourselves milestone- creation of a mechanism for controlling paws. In fact, everything is extremely simple here. It is necessary to tie the paws in pairs with a nylon thread through small holes. With the thread stretched, the limbs should be in the lower position.

And now we tie a long thread (you can fold it in half) or a thin cord to the horizontal threads, both to the top and to the bottom, as shown in the photo.
We tie knots on the paracord from the wrong side of the toy. We check whether the paws rotate freely enough. We melt the ends of the cord.

We cut out 2 circles with a diameter of 2.5 cm from cardboard. If you are using microcorrugated cardboard, make a slit in the middle on the wrong side of one circle and place the end of the thread there.

We glue both circles with Moment Crystal glue.

Alternatively, instead of cardboard circles, you can attach a large bead - for convenience and beauty.
We glue a cardboard circle with a diameter of 3.5 cm to the head from the wrong side on a loop of a narrow ribbon. 
The cardboard twitch toy is ready!

Here is such a cheerful and agile puss in boots turned out. The kids will be delighted! :)

A set of templates (contour, color and for coloring) for making a Puss in Boots twitch toy can be purchased at the Kartonkino store:
I already mentioned above that such toys can also be made from thin cardboard for children's creativity. These charming monkeys, created, are made in just such a way.

Please note that the monkey on the right does not use a string to control its paws, but a tail. Rather, the lace is also there, it's just glued between the halves of the tail. Very interesting option, agree.
And this is what the underside of the monkey looks like. Everything here is quite traditional.
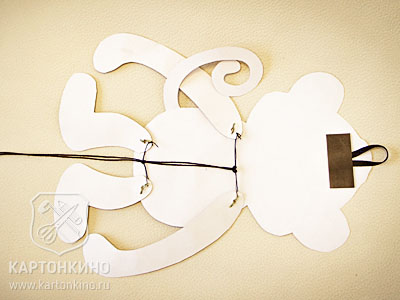
The paws are attached with the help of brads. It looks very good, and the attachment process itself is easier than with paracord. Do not forget that when using brads, the holes need to be made smaller, it is enough to pierce with an awl.
It is worth noting that the tail on the side was not the most good decision- it interferes with the movement of the paw. But there is a choice: if you want - do it with a tail on the side, if you want - from below or without a tail at all (not completely, of course, without a tail, it seems to be in the background and simply did not come into view).
Templates for the monkey toy-twitch can be downloaded here:
By the way, Anya Shidenko has many others interesting patterns for the manufacture of various products for children, as well as holiday accessories. You can find them by clicking on .
Well, now you know a simple and working way to make a do-it-yourself cardboard twitch toy. You can even, by analogy, draw your favorite character yourself - some kind of hero folk tale or cartoon.
Or use ready-made templates. I have already shown you two variants of the toy. And one more - Kitty - you will find in the 9th issue of the electronic magazine "Masterklassnitsa".

We wish you pleasant creativity, cheerful and useful games with kids!
Yours, Inna Pyshkina and the Kartonkino team.
Actually, I don't really like jerks. But once I saw a picture from an old book, where there was a description of how to make a children's hanger - an Owl. She opened her eyes when clothes were hung on her. And I wanted to make such an owl-twitch.
Most of the time, this owl sleeps peacefully, but as soon as you pull the thread, it will open its eyes and flap its wings. And maybe even shout “Whoo!”.

Materials and tools:
- Thick cardboard or packaging corrugated cardboard (boxes are made from it)
- colored paper
- Colored cardboard (yellow)
- PVA glue
- Scissors
- Thick threads
- Marker or marker
A4 pattern sheet.

We cut out the body of an owl and two wings from cardboard (in mirror image).

Cover them with brown paper. Dry under pressure (put a heavy book on top).


We glue the details of the head from colored paper, dry it.

Cut out a piece with pupils from yellow cardboard. We outline the location of the pupils and eyelids with a pencil.

Glue on it the lower eyelids of paper of the same color as around the eyes.

With an awl we pierce the shoulder and wing at the junction. It is convenient to do this on a hard rubber mat or on an unnecessary album (magazine).

We make a wing mount. You can use special scrapbooking clips, or make your own from a button and a piece of wire. We fasten the wings, they should move freely.

We stretch the first thread through the holes in the upper part of the wings and in the lower part of the part with the pupils. We stretch the second thread only through the holes in the lower part of the part with pupils.

We fasten the upper part of the part with the pupils with an elastic band. Securely sew it to the "ears" of the owl.

By adjusting the size and tension of the threads, you can tie them together. To the end of the thread we tie a button or a ball, for which we will pull.


With a black marker or felt-tip pen, draw feathers on the wings and finish drawing the eyes.

This is not just a horse, it is a horse with moving parts, a twitch horse. You pull the thread, and she seems to be running, raising her legs high and lifting her fluffy tail. The manufacture of such crafts is included in the Perspective program, a technology notebook for grade 2. But not every second grade student will understand without detailed instructions how to make such a craft, where to thread the threads so that the horse runs. Now we will understand everything: from what and how to cut, how to fasten, how to give the horse movement. At the end of the instructions - detailed video about how to correctly connect the moving parts of the figure.
What you need to make a horse for a technology lesson
Horse template (from workbook technology for grade 2), colored cardboard, colored paper, pencil, scissors, glue, thread, needle.
How to make a cardboard horse
We cut out a template from a notebook according to technology. If you are not making a horse for a lesson, you can print and cut out this template:

When the details of the template are cut out, we transfer them to colored cardboard. To make it more accurate, we will circle from the inside out. From brown cardboard we make the body and legs of the horse, from yellow - the tail.

We cut out the details along the contour. On colored paper, we outline separately the template of the mane and hooves of the horse, also cut it out.

We glue the mane to the head, and the hooves to the legs, using glue.

Now you need to attach the moving parts - legs and tail - to the body. Please note that crosses and dots are marked on the template. We mark them on the wrong side of our parts. We make holes in the center of the crosses and dots with an awl or a needle. Crosses on the body and on moving parts. We will need to connect them so that the crosses on the body and the details match, and we will do this as follows:
We take a needle and thread, tie a large knot at the end of the thread. We see a cross at the horse under the chest (the horse is turned to us with the colored side). We stick a needle and thread into it. We put on the front legs on the same needle, also hitting the middle of the cross. We pull the thread until the knot rests on the cross.

We turn the horse inside out towards us and stick the needle into a point on the leg. There is no need to start a needle in the body in this place, the point is only on the details of the legs. We thread the needle and thread to this point completely, then remove the needle from the thread, and leave the thread hanging. Do not cut it, we need it, we will pull on it so that the horse moves.

Attach the second pair of legs and tail in the same way. We lower the threads down, connect them with each other and tie a knot at the bottom. From the inside, a properly fastened craft will look like this:

We pull the strings, and the horse seems to be running, raising its legs high and lifting up its wonderful tail :)
Video how to make a twitch horse
If you wish, you can decorate the horse by gluing sparkles and stars on it. The pulling horse is ready. Let's go get five!
Such a cute horse can be made not only for a technology lesson, but also just so that it is interesting and useful to spend time and please your parents with your craft or younger brothers and sisters. And if you dream up, you will come up with a whole sea of different little animals-twitchers, drawing instead of a horse's head, for example, a dog or cat face and changing the tail.


