Easy patterns for beginner barbie dresses. Work technology. Simple and beautiful for an ordinary ballerina
Learn how to sew clothes for Barbie and Monster High. The article contains ideas, patterns, tips, master classes.
Dressing up a doll is one of the components of the role-playing and directing children's games. Favorite girls Barbie and Monster High, which comes with a change of clothes, are very expensive. And dresses for fake dolls are of the same type and of poor quality. If you have a daughter, sooner or later you would hear from her a request to sew backgammon for her doll. Master classes from this article will help you cope with the task and please your baby.
How to sew a dress for a Barbie and Monster High doll with your own hands for beginners: a master class
If you do not have skills in cutting and sewing, it will be difficult for you to sew a dress for Barbie or Monster High according to a pattern. Do not count on the fact that it will turn out to be really elegant, stylish and unusual. To get started, try something simple, get your hands on it. Later on, move on to sewing more complex outfits.
Handmade outfits for Barbie.
IMPORTANT: If you want to sheathe a Barbie doll, you should know her parameters. And they are as follows: height (excluding hairstyles) - 290 cm; chest girth - 13 cm; chest width - 7.5 cm; back width - 5.5 cm; waist circumference - 8 cm; hip circumference - 13.0 cm; neck girth - 6 cm. If you do not have the original, do not be too lazy to try it on measuring tape parameters may vary slightly.

 Monster High dolls in homemade dresses.
 Dress for Barbie and Monster High from a sock
For example, different beautiful outfits for dolls can be sewn from ordinary baby sock! You will only need:
- baby socks
- scissors
- thread
- needle
- marker
- string or ribbon

 simple dresses from socks for dolls.
 If you decide to make an outfit and a sock for the doll, the sock itself should be new and beautiful. The good news is that socks come from different fabric: from terry you can make Barbie a cozy winter sweater, from thin cotton - light summer dress.

 Outfit for Barbie from a sock: a manufacturing scheme.
 - Lay the sock on the table, take the marker. Look at the picture how you will need to mark it.
- If you decide to make a set of a T-shirt and a skirt for the doll, you will need to cut off the elastic band (the one on the lapel) and the toe from the sock.
- If the sock does not fray, you will only need to make sure that the skirt is kept on the doll's thin waist. Make a few slits in the elastic and pull a string or ribbon through them to make a belt.
- If the sock is fraying, you will need to seam the bottom edge of the skirt.
- Cut the shirt according to the scheme from the toe of the sock. If necessary, suture all cuts.

 Scheme for making an outfit for Barbie from a sock.
 And according to this scheme, from a sock you can make a swimsuit or a set of underwear for a doll.

IMPORTANT: If your daughter is still small, but really wants to make clothes for Barbie or a monster girl herself, offer her an easy option - a seamless sock dress. Just make a couple of cuts in right places, use a hair elastic as a belt. The dress will turn out to be quite pretty, the girl will surely remain satisfied with her first creation.
Vintage dress for Barbie
You can sew a simple dress for Barbie according to the pattern in the figure below. Pay attention to the scale! You take the square circled in red for 1 cm, in accordance with this, increase the entire pattern.
Prepare:
- paper
- pencil
- scissors
- soap
- tailor's pins
- tissue flap
- lace
- braid
- threads
- needle
- Velcro

 Dress pattern for Barbie.
 - Cut out the pattern, attach it to the wrong side of the fabric flap. Circle the details.
- Leave seam allowances.
- Cut out fabric pieces.
- Take care of the skirt: tuck bottom cut and sew with a seam. Sew on lace if desired.
- Finish both side cuts. Finish the top edge with a criss-cross stitch.
- Proceed to processing the shelf. Sew the neckline with double thread. Make notches.
- Fold the fabric as shown in the picture, pin it with pins. The width of the shelf between the grooves should be 3.5 cm, from the bottom - 1 cm. Sew the grooves. Remove the pins, process the undercuts with a zigzag.
- Process two parts of the back. Sew the neckline with double thread.
- Make straps: cut off the lace (details 2 by 8 cm). Sew them along the armhole of the front sleeve and the corresponding part of the back. If you do not want lace, make straps from braid or a thin satin ribbon.
- Sew the front and back pieces along the side cuts.
- Stitch the bodice and skirt of the dress.
- Attach the Velcro strip to the back of one side of the dress and to the front of the other side.
- Make the Velcro long enough to hide the doll's buttocks. As an alternative to Velcro, you can use hooks or buttons.
- This is such a cute vintage dress your doll should have.
 Simple dress for Barbie: steps 1-2.
 Simple dress for Barbie: steps 3-5.
 Simple dress for Barbie: steps 6-8.
  Simple dress for Barbie: steps 9-10.
 Simple dress for Barbie.
 Simple dress for Monster High doll
IMPORTANT: Monster High dolls are fundamentally different from Barbie-type dolls. Most of them have a standard teloid with the following parameters: height - 21.5 cm; girth m chest - 7.5 cm; girth under the bust - 5.5 cm; waist circumference - 5-6 cm; hip circumference - about 10 cm. Monster dolls have an unnaturally large head, narrow shoulders, Long hands and legs. Their waistline is not clearly marked, the back has a complex curve. Therefore, it is very difficult to sew something “according to the figure” for them.
Also, don't forget the monster glam doll style. Choose flowy fabrics for them rich colors such as satin or jacquard.
Prepare:
- tissue flap
- threads in color
- contrasting color satin ribbons
- scissors
- paper
- pencil

 Basic patterns dresses for monster high dolls.
  Dress pattern for Monster High.
 - You cannot sew a dress for a student of the School of Monsters without a pattern and fittings. Therefore, choose the pattern that you like the most, which you "pull".
- Cut out the details of the pattern, transfer it to the fabric, not forgetting about the seam allowances.
- Sew the details of the back to the shelf. Finish the top and bottom cuts.
- Also process the cuts on both parts of the back.
- Consider a clasp. Use Velcro, hooks or buttons as it. It will turn out very nice if you make the bodice of the dress look like a corset. Then sew from above to the right and left parts of the back satin ribbons. Make holes in the details, pass the ribbons through them so that the corset can be laced up.
- Sew the bottom of the bodice on the back by 1 cm.
- To make a multilayer fluffy skirt, cut out several petals from the same fabric. Fold each of them in half in length and attach with a thread.
- Sew the petals randomly onto the bodice to make the dress look like a rose.
- Put the dress on the doll, lace up the corset and put ribbons around the doll's waist. It will turn out very nice.
 Dress for Monster High: pattern.
 Dress for Monster High: step 1.
  Dress for Monster High: step 2.
 Dress for Monster High: step 3.
  Dress for Monster High: step 4.
  Dress for Monster High: step 5.
  Dress for Monster High: step 6.
 Dress for Monster High: step 7.
  Dress for Monster High: step 8.
 Dresses for Monster High.
 VIDEO: How to sew clothes for a monster high doll from a sock?
How to sew a ball gown for Barbie and Monster High dolls
According to legend, Barbie is a girl who cannot sit at home. She is always involved in some events, including evening ones. For such, she will definitely need an appropriate outfit - luxury dress from noble fabrics. Use an atlas!
 Pattern of an evening dress for Barbie.
 Prepare:
- tissue flap
- Velcro
- a bead or a beautiful button
- threads
- needle
- simple pencil
- ruler
- scissors

 Evening Dress for Barbie, which is sewn without a pattern.
 You will make the pattern yourself. All you need is to draw on paper or already directly on the fabric three rectangular parts with dimensions of 19 by 30.5 cm, 6 by 21 cm, 6.5 by 16 cm.
 Evening dress for Barbie: step 1.
 Start by making a skirt. Fold up large rectangle in half and cut as shown in the photo.
 Evening dress for Barbie: step 2.
 Manually or on a typewriter, zigzag the sections of the skirt part and the middle rectangle.
 Evening dress for Barbie: step 3.
 Evening dress for Barbie: step 4.
 Pull the thread through the top edge of the skirt, pull it off to make a frill.

 Evening dress for Barbie: step 5.
 Attach the middle rectangle to the doll's chest. Pull its edges on the back of the doll with pins. Directly on the doll with pins, mark the places where the grooves will be. Sew the undercuts from the inside out.

 Evening dress for Barbie: step 6.
 Sew or stitch the bodice to the skirt.

 Evening dress for Barbie: step 7.
 Sew or topstitch the sides of the skirt.

 Evening dress for Barbie: step 8.
 Sew Velcro on the back.

 Evening dress for Barbie: step 9.
 From a small and long rectangle, make a decorative detail for the neckline, as shown in the picture.

 Evening dress for Barbie: step 10.
 Decorate the dress as you wish.

 Evening dress for Barbie: step 11.
 VIDEO: HOW TO SEW A DRESS AND MAKE A PENDANT FOR MONSTER HIGH?
How to sew a wedding dress for Barbie and Monster High dolls
One day wear white Wedding Dress is the dream of many girls. Little, they often play Barbie and Ken's wedding, their dolls need formal outfits.

 Handmade wedding dress for Barbie.
 You can sew a doll wedding dress according to the pattern presented above. You can also use this one.

 Wedding dress for Barbie.
 This beauty is sewn for Barbie.
 Pattern of a wedding dress for Barbie from a magazine.
  Wedding dress for Barbie on a pattern.
 The heroines of Monster High are still students of the school. But why not dream up and “marry them” in such beautiful dresses?

 Monster High in a wedding dress.
 Elegant wedding dress for Monster High doll.
 VIDEO: HOW TO SEW A WEDDING DRESS FOR MONSTER HIGH?
How to sew a dress with sleeves for Barbie and Monster High dolls
Again, from the sock, its upper part, you can do unusual dress with long sleeves for Barbie or Monster High.

 Dress with long sleeves for a doll: steps 1-2.
 Dress with long sleeves for a doll: steps 3-4.
 - Cut off the part you need. Its length will depend on the length of the doll's dress you want.
- Outline the lines of the sleeves. Try not to miscalculate with their length. But if the sleeve turns out to be short, do not be discouraged, cut it under three quarters. It will also turn out very nice.
- Cut the part of the sock along the lines you marked. Turn out the sock.
- Sew the sleeves and the dress itself buttonhole stitch. Finish the bottom slit of the dress.
- Turn the neck of the dress to the front side, hem with straight stitches.
 Pattern of a dress with long sleeves for Barbie.
 How to sew a skirt for Barbie and Monster High dolls?
Barbie doll is a slender beauty, a skirt of any style and any length will fit perfectly on her. You can use the patterns below to sew a new dress for her.

 Skirt pattern for Barbie with blind vent.
 Skirt pattern for Barbie.
  Skirt pattern for Barbie with a slit.
 If a doll skirt is your first sewing experience, don't bother cutting it.
Prepare:
- 2 pieces of fabric (19 by 10 cm, 19 by 1 cm)
- elastic band
- threads in color
- scissors
- pencil
- lace or ribbon as desired
Fold the pieces of fabric facing each other, sew, process the seam with a zigzag.
 Skirt for Barbie: step 1.
 Tuck and finish the bottom edge of the skirt.

 Skirt for Barbie: step 2.
 Sew or stitch the elastic to the waistband of the skirt, stepping back 1.5 cm from top cut. Make sure that the fabric is slightly gathered.
 Skirt for Barbie: step 3.
 Turn the top edge of the skirt over so that it covers the elastic. Sew it up.
 Skirt for Barbie: step 4.
 Fold the skirt in half, step back from the unsewn edge 1 cm, sew it. Process the resulting seam.

 Skirt for Barbie: step 5.
 Skirt for Barbie.
 Skirts for Barbie.
 For a monster doll, you can sew a similar skirt, only multi-layered. Let the top layer be from thick fabric, and the lower one is guipure, lace or mesh.

 Sewing a skirt for Monster High.
  The wrong side of the skirt for Monster High.
 layered skirt for Monster High.
 VIDEO: HOW TO SEW A LEATHER SKIRT FOR A MONSTER HIGH DOLL?
How to sew a T-shirt for Barbie and Monster High dolls? How to sew a jacket for Barbie and Monster High dolls?
Sewing T-shirts and blouses for Barbie dolls and monster dolls is the most difficult. First, these garments are not easy to cut. Secondly, the parameters of toy fashionistas are such that it’s hard to sew the top so that it sits “on the figure”, somewhere it doesn’t turn out to be small, but somewhere it doesn’t bristle. But why don't you try your hand?
 T-shirt pattern for Barbie.
 Prepare:
- 2 pieces of fabric
- scissors
- threads
- pencil
- pins
If you use a pattern, transfer it to the fabric, give allowances for the seams, cut out the details.
If you can't find a pattern or don't know how to customize it, just attach the doll to your patches and circle it.

Carefully cut out the neckline and armholes. Do not damage the pieces of fabric left after cutting the armholes, they will still be needed.


Turn and sew the bottom of the T-shirt. Finish the neck. Sew a T-shirt over the shoulders.

 T-shirt for the doll: step 4.
  T-shirt for the doll: step 5.
 Process the remaining semicircular patches along the lower edges, and stitch them to the armholes with the upper ones.
Sew the sides of the shirt, sew the sleeves.
 T-shirt for the doll: step 6.
  T-shirt for a doll.
  Pattern of a shirt for a doll.
 How to sew velvet pants for Barbie and Monster High dolls?
Take advantage ready-made pattern to sew Barbie or Monster High velvet pants, leggings or jeans.

 Plain jeans for dolls: pattern.
 IMPORTANT: If you want the pants to look realistic, you have to work hard. You will need a machine to make the product look neat. But in hard-to-reach places, you will have to work manually.

Open the details of the front and back halves, yoke, pockets, belt, belt loops.

Sew the yokes to the back halves of the trousers. Treat cuts immediately.


Optionally, make decorative stitching on the pockets. If you are not lazy, it will be very beautiful. Turn the top edges over and sew.


Turn the bottom and side allowances on the pockets and iron them. Then sew the pockets to the back halves of the trousers.

 Pants for the doll: step 4.
 Pants for the doll: step 5.
 Fold down the back of your pants front side to each other, sew the seam of the seat and process its cut.

 Pants for the doll: step 6.
 Pants for the doll: step 7.
 Pants for the doll: step 8.
 Working with the front halves, first sew in pockets from burlap. Topstitch with front side. Sew to the burlap of the barrel.

 Pants for the doll: step 9.

Topstitch the front seam to where it meets the closure. Pants for the doll: step 13. Pants for the doll: belt.  Trousers for a doll.
VIDEO: JEANS WITH TURNS for dolls without a pattern!
How to sew a fur coat for Barbie and Monster High dolls? How to sew a winter jacket for Barbie and Monster High dolls?
Sew for a doll outerwear not easy. But if you have a piece of fur, a piece of denim or raincoat fabric, everything will definitely work out.


To sew a short white fur coat you will need:
Fur coat for Monster High: step 3. Do the same on the lining fabric.
Lay the pieces of fur and lining also face to face, sew the corresponding pieces of the hood to them in the neck area.
The same pattern can be modified to make a warm jacket for Barbie or Monster High. The lining is only needed for the hood. You will also need to cut and sew pocket details, sew a snake into the product.
Closed swimsuit for a doll: pattern. 
 Separate swimsuit for a doll: pattern.
- Cut out the details of the swimsuit from paper. Transfer them to the fabric, leaving allowances for the seams.
- Sew the details of the bra.
- Sew the details of the bottoms along the side seam.
- Optionally, sew straps to the swimsuit or decorate it.
VIDEO: How to make an open swimsuit for a doll?
The favorite toys of girls of all generations are dolls! You can't argue with this fact! And for several decades now, the well-known favorite Barbie has remained a favorite among little mischievous girls. How to create Patterns step by step will help you understand the process and allow you to create more and more new masterpieces. Two options for making a pattern for sewing things of varying complexity will allow the development of the girl's design abilities and, maybe, sometime in the future, the basics of the cut will be useful for tailoring her own clothes.
Until then, what could be more interesting than the process creating an outfit for a cute toy girlfriend? How to create a chic doll wardrobe for Barbie and other dolls will be discussed in this article.
Create a template
How is a pattern built? Clothes for dolls with your own hands can be sewn according to the same principle as for people. You can start by taking measurements with the help of the only thing you need to change is the unit of measure, and write down the measurements not in centimeters, but in millimeters.
For many, the second option will seem easier. Here, for do-it-yourself dolls, it is done by wrapping the figure with foil for baking.
Both the first and second methods involve the participation of parents in the process of making patterns, but the child will be able to sew clothes for dolls with his own hands, the patterns of which will already be ready.
Building a pattern using measurements
It doesn't matter if it's plastic or porcelain. In any case, it is possible to measure the girth of the chest, waist, hips, back width, armhole and chest height, shoulder width, sleeve length and bottom of the product, take other additional measurements indicated in the description of the drawing. It is these measurements that will be required to get things that are suitable in size. Then it remains only to understand the principle of how clothes for textile dolls are created with your own hands.

Patterns of clothes are the basis. It is worth creating one template and on its basis it will be possible to model various styles dresses, blouses, skirts and jackets.
Description of drawing construction
In order to develop a pattern on a sheet of paper, draw a rectangle. Its vertical side should be equal to the length of the doll from the shoulder to the foot. It is best to make a base pattern in full height. This will make the design easier later on. The other side is half the bust measurement. In this embodiment, the drawing will show half of the back and half of the front shelf for straight dress fitted silhouette floor length.
After that, you will need to retreat down a distance from the upper left and right corner, which is equal to the measure of the height of the chest. It is measured from the shoulder to the very protruding part of the chest. If this textile doll without roundness, then you need to take this measure approximately. The two resulting points should be connected to get the chest line and the border of the armhole for the sleeve. After in the upper corners you need to draw the neck, in front the cutout should be twice as deep. You will also need to set aside the width of the shoulder, a little obliquely, repeating the bevel in accordance with the torso of the doll. Then comes the turn of the design of the armhole. First, you should mark half the width of the back along the chest line, then divide ½ of the measurements of the chest girth into 4 parts and set aside given value on a straight line, starting from the point of the edge of the width of the back. The resulting segment will be the armhole area, where you will need to draw rounded lines from the shoulder to the chest line.

Here it becomes clear how the pattern is built. Do-it-yourself clothes for dolls are created by simply transferring measurements onto paper. And the next stage is the designation of the waist line. It is located in accordance with the measurements of the length of the back and front to the waist. Here, on both vertical sides of the rectangle, set aside the length of the back and draw a line parallel to the chest. If the length of the front is longer, then the middle of the straight line is found and another additional straight line is laid from it to the front. Next, the difference between the waist measurement and the length obtained is calculated, and the tucks are distributed along the line, which will need to be picked up for a good fit of the clothes. Next turn behind the line of the hips. Usually their width is greater than at the waist, and sometimes more breasts. In this drawing, after constructing the side sections, taking into account the size of the hips, the parts will overlap. After determining the level of the hip line from the vertical sides of the rectangle on the left and right, I set aside ¼ measurements of the hip circumference and put points. Next, it remains to draw a side cut, connecting the central point of the armhole, the points of the side tucks of the waist, hips and draw lines down.
Foil pattern
How else can a pattern be built? DIY doll clothes can be sewn using patterns made by wrapping the doll in baking foil. This option is perfect for Barbie and other plastic dolls. The toy is wrapped in a rather thick layer, after which a marker is taken and all future seams of the product are drawn. Next, the foil is cut with nail scissors and removed from the doll. After the whole template is divided into elements.

Fabric selection
Clothes for a Barbie doll with your own hands, the patterns of which can be built in the two ways described in the article, can be sewn on a typewriter or manually. It all depends on the level of skill and the type of material. If the fabric is loose, then it will be very difficult to handle it manually. If it is knitwear, then hand sewing is perfect. In addition, this option, due to the fact that the fabric stretches, will hide minor cut defects. But in any case, the fabric for the doll should be colorful, bright and beautiful. For ball gowns it is best to choose material with sequins or embroidery. Here you can use various lace, tulle, mesh, brocade, sequin fabric, velvet, velor and other expensive materials.

Clasp design
How to make a fastener, and how should the pattern be changed for it? Clothes for dolls with their own hands can be decorated with Velcro, buttons, buttons or hooks. Everything depends on the idea. If it is necessary to fasten a sufficiently long incision, then it is better to give preference to Velcro, and if it is a thin strip of fabric, then fit small button or hook. As a rule, the fastener for dresses, skirts and sundresses is made on the back, starting from the very edge of the product and below the hip line.
Now you know the necessary base. Good luck with your creativity!
It's autumn outside, everything around is gray and dull. And our doll wanted something warm and beautiful. It's too early to wear a fur coat, so you should have a coat.
I dug through scraps and came across scraps pink coat. Once upon a time, the coat was shortened and a narrow strip of either thin felt or just thick wool remained. The color was so delicate, not bright, that the image of a fitted coat was immediately born in my head, later I added pieces of fur and the coat began to play. Here, the doll is still tied with a silk scarf.

Walking in the winter garden

And it's raining outside. (Back view)

I tried to make the coat not hang like a shapeless bag, but fit the figure.

To the coat, I sewed boots and a bag with fur. The bag is "real" you can put something in it. She's pretty roomy.
I decorated the edges of the boots with glitter glue.

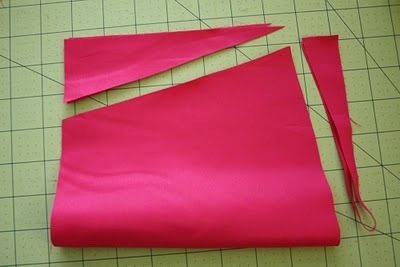
The piece of material was holly and long, but rather narrow, so I sewed a little non-standard.
1) First of all, I wrapped a piece around the chrysalis, cut it off to the desired width.
2) I tried it on a doll, the upper edge of the material was at chest level.
3) I figured out where to make grooves.
4) Then I cut out the sleeves. (In the picture, the sleeve is from the bottom right)
5) I sewed the sleeves separately, then sewed the lower edges of the sleeves to the top of the material.
6) And between the sleeves I sewed a rectangular piece of fur. ( bottom edge rectangle is sewn to top edge fabric as shown in the picture.) In the picture it is a small rectangle that is drawn over a large one and is called "COLLAR fur back"
7) Then I sewed the "collar 2 front" (this part is in the upper right corner), sewing them on the top of the sleeves and fastening with a fur rectangle at the back.


