Baby animals from kinder eggs. How to make a surprise from a kinder surprise? An original Kinder surprise gift
As children, many of us wore a Kinder Surprise egg around our necks, where caring mothers and grandmothers put killer doses of garlic so that the child would not get sick. However, you can make much nicer accessories and toys from plastic eggs with your own hands. We are offering to you large selection master classes, with the help of which you and your children can make a lot of interesting things.
Most of the lessons will be very simple, so preschoolers and children of this age will be able to handle crafts from Kinder Surprises primary school. Some tutorials will be more complex and you will have to do most of the work yourself. You probably already have all the craft materials on hand, so pick something you particularly like and get started.
Crafts with plasticine
If your child is not too old, then you will like this simple master class. To make a funny chicken from a kinder surprise with your own hands, you will only need plasticine and blank plastic eyes.

If your child already knows how to work with plasticine, just show him this picture and ask him to repeat it - he should be able to do it himself. Please note that the Kinder egg has two eyes; they are attached to a small piece of plasticine. If you don’t have anything suitable, you can cut them out of paper, or you can simply draw them with a permanent marker or make them entirely out of plasticine.
Developmental rattle
You can make this craft from Kinder Surprises yourself, and your child will already play with it. This toy is good for developing ingenuity and logic. Making a rattle from an egg is quite simple.

Make a small hole in the bottom and insert either a pencil or pen, or a lollipop stick into it. You can secure it in the inside with superglue or simply push it all the way so that it goes through the entire egg.
For the educational game you will need several types of cereals of different formats: millet, rice, peas, etc. You need to pour cereal into the egg and shake it - the child will guess what is inside. It is very useful.

A Kinder egg can be painted to make the toy even more interesting. And if you don’t want to make a rattle, and you just need a regular rattle, tie a kinder with thread - it will turn out very beautiful.

Knitted animals
This master class is no longer for children: how to do knitted toys You will be the one to make the most of the Kinder surprises. Although, of course, your child will play with these funny dolls.

Additionally, you will need thin threads or felt, as well as artificial eyes made of plastic or beads, plus any decor.
The Kinder egg needs to be crocheted from top to bottom using regular circular knitting. Try to change colors to make the toy look more colorful. However, the choice of thread depends on who you are going to make.
Take a look at the proposed ideas - they are quite easy to repeat. Try making your favorite ones fairy-tale heroes your child or any animals.

If you don't like to knit, you can cover the Kinder Surprise egg with felt or woolen fabric. Add some decor to it and you will have a great toy.
Minions
If you have accumulated a lot empty eggs from kinders, you can make from them with your own hands a whole army of minions - heroes of the popular children's cartoon. If your child likes these funny creatures, he will definitely appreciate their miniature versions.

To make a minion, we need to take blue and black materials, as well as an artificial eye.
You can paint the material with whatever you have on hand. These can be acrylic paints, permanent markers or even nail polish. If there is nothing like that, take pieces of fabric and glue them onto kinder surprises. If this option is also not suitable, you can stick regular plasticine on plastic eggs.
You need to shape the overalls, hairstyle, arms and legs. By the way, if you want, you can poke two holes in the bottom of the egg, insert lollipop sticks, and then mold shoes from plasticine - you’ll get a long-legged minion.
The eye can be made from pill backing and a tiny piece of black fabric and then glued on with superglue.

If you have a lot of kinders, make the whole “army” at once - it will be easier. If your imagination runs wild, you can make the leader Gru for this company.
Bees
From Kinder eggs you can make a large toy beehive with your own hands, which will be interesting for your child to play with. Additionally, you will need a sleeve or cardboard, paints, threads and a few more accessories.

Bees can be different. How to make them from Kinder eggs depends on what you have on hand. Stripes on the bee’s body can be made from “fluffy” decorative wire, black thread or thin colored tape, or simply drawn with acrylic paints or a marker.
Glue the eyes onto the Kinder egg using plasticine or glue, or you can simply draw them. The basis here can be plastic blanks, beads, fabric or paper. We make wings from paper, plastic folder or wire.
To make the honeycomb to which we will then attach our Kinder Surprise bees, we need to divide the sleeve into rings of equal width. Place 5 pieces in the center, then a row of 4 pieces on top and bottom, and then a row of three - glued with PVA or stapled, and then painted with yellow paint.
You can also make artificial bees to explain to your child how these creatures turn pollen into honey and organize an interesting game for him.
Kinder Zoo
Perhaps the most favorite children's toys made from Kinder eggs are various animals from which you can assemble a whole zoo. Take a look at this photo - you can easily make any of these heroes with your own hands!

To make a cat out of a Kinder egg, you can paint the body with acrylic paints or markers, and then make plasticine ears, paws and a tail for it.
All other animals are completely sculpted from plasticine, and the basis of their eyes are black beads. We advise you to choose plasticine for such crafts, which does not stain your hands and surfaces - now there are a lot of such options in craft stores.
Of course, these toys will not be durable (if you sculpt them on a plastic egg and do not paint the body), but it is easy to clean off the plasticine and cover the Kinder Surprise with a new layer to get a new “zoo” resident.
Keychain
You can make some very funny, beautiful keychains with your own hands from Kinder Surprise eggs. In this video master class you will find simple instructions, with which you can easily repeat the craft.
By the way, if you are one of those who likes to ward off colds from your child with garlic, you can repeat this lesson, but make a pendant out of a Kinder egg - just insert a longer chain or thread. In addition, you can add any interesting design to the craft and make a character that your children like the most.
Choose any of the proposed master classes and stock up on Kinders! Of course, your child will really enjoy such lessons, because he will receive a delicious dessert and two toys at once: one ready-made, and the second home-made. Imagine, experiment and change any lesson to suit you.
Views: 2,748
All children like such a treat as Kinder Surprise. And this is not surprising, because the child immediately receives both a sweet and a souvenir, a kind of 2-in-1 gift. Small figurines of fairy tale and cartoon characters that come across chocolate egg, become favorite toys. But where to put the plastic containers from them? Sometimes there are a lot of them. Don't rush to throw them away. In this article we will tell all mothers and fathers how to make interesting products from such boxes. Making crafts from Kinder Surprise is very exciting. Involve the kids in this activity; they will really enjoy “transforming” an ordinary trinket with their own hands into interesting toy. What can be made from Kinder Surprise? We will find out this from the following sections of the article.
Caterpillar
If you have about a dozen containers, use them to make a toy in the form of a caterpillar or snake. It can serve not only as an attribute for entertainment, but also as decorative element decorating a large flowerpot with indoor plant. To make this from Kinder Surprise, we will need plastic boxes (at least 5 pieces), narrow tape or cord (1 meter), wooden or acrylic beads and an awl.
Let's start making the toy. Using an awl, we pierce holes in the containers on the end sides. Remember that in the two boxes that will serve as the head and tail of the caterpillar, you only need to make one hole each. Next, we assemble all the individual parts of the Kinder Surprise craft into a single structure. We stretch the ribbon into the first container (head), tie a knot, and close the box. Next we string a bead onto the ribbon. Then we attach another plastic part. In this way we hook all the containers, placing beads between them. We put the last box (tail) on the ribbon and tie a knot inside and close it. Now you need to give the caterpillar a face. Cut out eyes and a mouth from colored paper and glue the elements with transparent tape. You can also decorate the body with appliqué (draw spots or stripes). The craft turns out to be flexible and can be twisted and bent. The baby will really enjoy playing with it.

Puppet show
Are you thinking about what to make from Kinder Surprise? Why not use sweet egg cartons to make heroes? puppet theater? Such toys will always be relevant. You and your whole family will be able to act out entire theatrical performances. Let's look at examples of making similar toys on the Halloween theme. For creative process We prepare the following materials: chocolate egg containers, wooden skewers, an awl, acrylic paints or markers, plasticine, pieces of braid, ribbons, laces.
Pumpkin - Halloween themed toy
To make a craft from Kinder Surprise in the form of a pumpkin, select a container from a yellow or chocolate egg orange color. We pierce a hole in its lower part and insert a wooden stick into it. From the inside, we string a piece of plasticine onto its tip. It will serve as a holder and will not allow the skewer to fall out. If you want to make the mount more durable, use hot glue. Close the container. We paint the pumpkin's face. We make a hat from plasticine and glue it on top part plastic container. In the place where the skewer comes out of the box, tie it or braid. The craft is ready.

Spider
We continue to study ideas on the topic “Crafts from eggs from Kinder Surprise.” From the following description we will learn how to make a spider. It can also serve as a decorative decoration for pots with indoor flowers or the walls of an aquarium.
We paint the plastic egg completely black. Next, with a hot awl, we pierce a hole in its lower part, approximately in the middle (on the long side). Insert a skewer into the hole and secure with hot glue or plasticine. Now let's start making the paws. To do this, use an awl to pierce parallel holes on both sides in the lower part of the product. There should be six of them (three on each edge). We pull the laces through these holes. Their length should be 7-8 centimeters. There are nodules at the ends. On the end side of the container we make a spider's face. Using acrylic paints or corrector we draw eyes and a mouth.
Using the same principle, you can make other crafts from Kinder Surprise for the puppet theater.

New Year's toys
Chocolate egg containers - excellent material for the manufacture of Christmas tree decorations. In our master class we will tell you how to make a toy pendant in the shape of a fish with your own hands. For work you will need the following materials:
- plastic container for a sweet egg;
- thin decorative ribbon for decorating gifts;
- golden or yellow beads;
- accessories “eyes” or two small buttons;
- golden braid with sequins - 50 centimeters;
- heat gun or "Titan";
- thin fishing line;
- needle;
- awl.
We make a fish (decoration for the New Year tree) according to following instructions. To make the ponytail, cut the decorative tape into pieces of 8 centimeters. We put these blanks one on top of the other. Using a needle with a fishing line threaded through it, we pierce a stack of ribbons from one edge. Using an awl, we make two holes on one end side of the container, placing them close to one another. We pull the ends of the fishing line through them and tie them into a knot from the inside. To make the fastening reliable, we drip glue onto it. We close the box. Next, we cover the entire surface of the plastic container with braid with sequins, applying it in a spiral. We form a fin on the back of the beads, first stretching a piece of fishing line through them, which will serve as a loop. IN in the right place glue on the eyes. We tie the fishing line protruding from the fin into a knot. The New Year's fish toy is ready. You can do other crafts from Kinder Surprise in a similar way. With your own hands you can make a whole set of toys to decorate the Christmas tree.

Original crafts from Kinder Surprise toys: box
You already know what to make from empty chocolate egg containers. But where to identify the toys themselves if the child is tired of them and is just lying around in the box? They can be used to make a box. How? Let's talk.
For work we prepare: a wide plastic container for cream, a Kinder toy, Secunda or Moment glue, silver or golden color. We attach a toy to the middle of the lid. Let the glue dry. We decorate the box with spray paint. That's all. Casket self made ready! A figurine made of a sweet egg serves as both a handle and decoration.

Afterword
Make crafts from Kinder Surprise with your kids! Photos of similar products presented in this article demonstrate that there are no limits to imagination. Let them bring you a dose of inspiration and a charge of creative mood. Have a nice time crafting!
Crafts from kinders are relevant in our time, since every home where there are small children probably has many of these chocolate egg containers. You can use them to make many useful things. Many housewives store useful things in such mini-boxes: these can be beads, small buttons, seed beads, etc. Kinders can be used in another way.
For the little ones
A small child will not always help in making crafts from Kinder eggs, but for him you can make original toy which will save your family budget. A small list of what can be made for kids:
- Montessori rattles.
- Baby sling beads.
- Original garlic pendants.
Kinder garden pendant with garlic
This pendant will come in handy during epidemics. viral infections. It is known that many microorganisms do not tolerate garlic, so when sending your child to the garden, hang a funny garlic pendant around his neck.
To work you will need:
- kinder egg;
- scissors, awl, needle and thread for work;
- cord, it can be colored, if this is not the case, then a thin ribbon will do;
- accessories for decorating pendants.


Poke an awl into different places Kinder surprise box. Thread a colored lace or ribbon through the holes at the top. A clove of garlic is placed inside the box.
Advice! To decorate the craft, thread a thread at the bottom on which beads or other beautiful things are strung.
Every morning before going to the garden, do not forget to change the garlic in the container.
Baby slings
Do-it-yourself baby sling beads are made from yarn and kinder surprises; original and safe rattles are made.
Prepare the following tools for work:
- multi-colored threads and a crochet hook;
- several Kinder boxes;
- cord, thin ribbon or other dense thread;
- awl, needle and scissors;
- small pebbles, cereals, peas, beads.


Fill the containers small objects. The first may contain rice, the second - small stones, the third - beads, peas, etc. The number of boxes will depend on the purpose of using the toy. If you intend to hang baby sling beads on the stroller, then make a lot of links. If the child plays with them, you can make smaller rattles.
Holes are made on both sides of the box to thread the lace through. Now each container is tied so that the child cannot open it.
A train made from tied kinder surprises
This is one of the options for a sling bus, only in the form of a train. The creation technique is the same: containers are filled with cereals, beads, nuts, and pebbles. A whistle is sewn into the locomotive using reinforced threads. After this, each part is tied with colored threads. Buttons are sewn onto the trailers as wheels. The child will really like this toy, as you can whistle into it. By the age of 2, you can already start learning colors using this little train.
 You can even make a train out of a Kinder container
 Crafts for kindergarten children
When the child is older, he can already take part in making funny things from kinder surprise with your own hands:
- Made from plasticine and kinder eggs. Offer to make your favorite minions from the animated series. Prepare a picture of this cartoon character and use plasticine to make panties, eyes, etc. Using the same scheme, a bee, a frog, a dog, a cockerel or a hen, a chick and other characters are made from kinder.
- Invite your child to make a fish from kinder and colored candy wrappers. Make a hole in the top of the container yourself and thread a loop through it, then you can use it to hang the fish on a Christmas tree or just on the wall for beauty. A hole is made in the tail part, where a shiny candy wrapper is inserted and the tail of the fish is formed. The fins are made from the same candy wrapper; they are attached at the junction of two parts of the kinder box. The eyes are cut out of shiny paper in the form of a circle, and a smaller black circle is glued in the middle. These parts are attached to the body of the fish using glue.
- Children enjoy making massagers. You can invite your child to make it for their grandmother on March 8th as a gift. To do this, several Kinder packages are connected with a strong rope. Make holes on both sides of the container and thread a thick thread or cord through it. The result is a kind of beads. Now on both sides you need to attach handles from large plastic bottles, an old jump rope or from a toilet paper roll.


Can be created great craft from kinder eggs in the form of a double massager.
Devices for work:
- kinder boxes (even number from 14 to 20 pcs.);
- fishing line or other strong but thin rope;
- tape or other material suitable for handles;
- scissors;
- an awl or knife with a sharp end.
 Kindergarten massagers are often made in kindergartens.
 On a note! All kinder containers must be the same size. They will serve as massage rollers in the future.
Make a hole on both sides in the center of the kinder. Thread fishing line or other strong thread so that the boxes can rotate.
Handles made of durable lace or tape must be attached to both sides. 2 rows are made from Kinder Surprise containers, the threads are connected crosswise. When the structure is ready, you should thread the second handle.
Funny people made from kinder surprise eggs
Children can make such a toy school age. Multi-colored eggplant lids are added to the kinder containers. To work, you will need a strong rope on which containers and lids will be strung. Holes are made in them first. The man's head, feet and hands are made from containers, and the arms and legs themselves are made from corks strung on a thread. The case consists of a Kinder Surprise capsule.
 You can create your own collection funny figures little men
 Naughty gnomes on the Christmas tree
New Year's holidays are the most the right time for using kinder surprises as crafts. You and your child can make Christmas decorations in the form of gnomes. First from multi-colored threads make winter hats, you can knit them or gather the threads into a bun. The container itself is decorated funny face, a cap is put on top or better glued on top, which already has a loop for hanging. The Christmas tree toy is ready.


Goldfish from kinder eggs
Such a fish can also be hung on a Christmas tree or used as a pendant in other places.
 gold fish from kinder it will look very beautiful
 Prepare the following material for work:
- Kinder egg;
- ribbons used to decorate bouquets, gold and pink;
- three gold beads, they are needed to secure the tail section;
- eyes (ready-made or made from beads or buttons);
- golden sequin braid;
- decoration on the back of the fish;
- fishing line, needle, thimble for a child;
- glue gun or regular PVA.
 A simpler version of a goldfish made from ribbons and kinder
 Sequence of work:
- Pull the golden ribbon over scissors to form spirals, then fold it so that 4 ends come out.
- A hole is made in the kinder at one end.
- From the inside, a fishing line is passed through the hole, onto which a tail and a bead are strung, this is done 3-4 times until the tail is ready.
- Now the body of the egg is covered with sequin braid.
- After the glue dries, the eyes, nose and mouth are glued to the body (pink tape is used for the mouth).
- You can glue another decoration to the top of the body, the whole thing is secured with fishing line in the form of a hook, and you can hang the toy on the Christmas tree.
Using Kinder Surprise for crafts, you give your child the opportunity to imagine. He is developing fine motor skills and thinking. On early stages Throughout his life's journey, the baby is already accustomed to work.
Very cute craft can be made from plastic bottle Green colour and containers for kinder surprises. This will be an almost real delicious strawberry that can decorate your home or country cottage area. A whole bush of such luxurious strawberries with berries and flowers looks beautiful.
To make this craft we will need a lot of things:
- wire,
- cases for kinders – 5 pieces,
- green plastic bottle – 1 piece,
- scissors (for leaves you can use curly scissors),
- acrylic paint red, black and yellow,
- brushes for applying paint (medium and thin),
- green insulating tape,
- a little foam (so that it sits tightly in the pot you are using),
- a small flower pot or any suitable jar,
- a little green sisal
- candle,
- decor of the pot - optional.
So, let's begin:
To begin with, I prepared a pot for planting our strawberries, which can be decorated in any way in an accessible way. First we place a piece of foam inside and decorate it. I decorated it with jute rope; for children's crafts, you can use corrugated paper and other suitable materials.

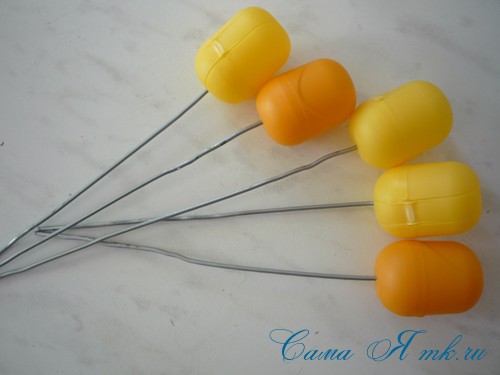
Each Kinder Surprise container must be pierced with scissors or an awl and a wire inserted into this hole and bent slightly.
Close the container and so on for all 5 pieces.

These are the preparations...
Coloring acrylic paint…

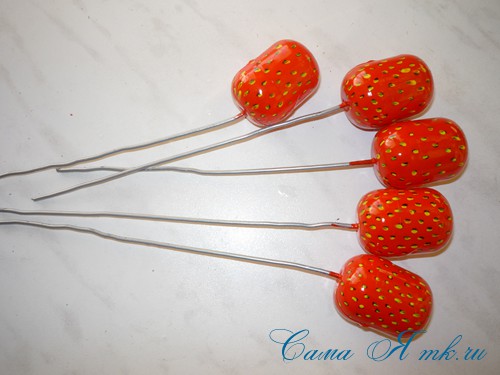
The leaves must be cut with cuttings to make it easier to attach them to the stem.


The sepal and leaf blanks can be slightly heated over a candle so that they are slightly deformed and take on a lively appearance.

We pierce the sepals with an awl or scissors in the center and put them on a wire for each berry.

Then, using green insulating tape, we wrap the stem-wire in a spiral, attaching the leaves. Insulation tape can be replaced corrugated paper, tape or green yarn.

From such blanks we make a bouquet by piercing the foam in the pot with wire.

Let's add a few flowers for beauty.
They can be made from any available material, I have white felt and ready-made flower centers. You can use a white bottle or yogurt jars. We also use any suitable material as the center; you can even cut it out of a bottle and paint it with yellow acrylic paint.
We fix the flower on the wire... Depending on the material used, the wire can be slightly bent at the tip, and the middle can be glued on top of the glue. We wrap the wire stem with electrical tape and plant it in a pot.
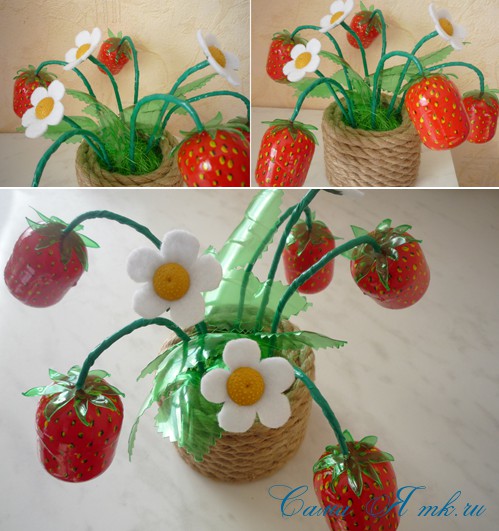

An attractive strawberry bouquet of kinder surprises will look good both in the interior and on personal plot. It can also be wonderful souvenir gift, made with your own hands, for example, by March 8!
Have fun creating!
I was glad to help!
The confectionery product “Kinder Surprise” has been delighting us since 1972. The inventor of this candy was Swiss designer Henry Roth. Today, the inventors of crafts from plastic eggs Thousands of people on Earth become Kinders. We have prepared 10 useful life hacks with Kinders, with which you can not only entertain your baby, but also organize your life.
1. Minions
- The first thing that comes to mind when looking at a container from Kinder is “This is a minion!” Indeed, minions from Kinder are the leaders in the TOP of crafts. How to do it? A small upgrade will be required: eyes with glasses and a blue jumpsuit. To make eyes and overalls, any available material will do - buttons, plasticine, fabric, markers. A little imagination and time, and your baby will have new friend- funny minion. Or not alone!
2. Travel-size jars
- When leaving home for a couple of days, it is inconvenient to take all the full-size jars and bottles with you. What to do if there are no special travel-size containers at hand? Thick textures (creams) and tablets/vitamins can be transferred to Kinder containers. For transportation of liquids cosmetics(lotions and tonics) life hack is not suitable.

3. For a picnic
- Salt, pepper, and for some, sugar, are indispensable at a picnic. Unfortunately, it is inconvenient to take bulk products with you. In order not to carry a salt shaker, a pepper shaker and a sugar bowl, pour one, another and the third into plastic Kinders. Containers are sealed!

4. Storage for small items
- Kinder boxes will be useful not only on the road, but also at home. And if you are in a permanent state of stress, where to store all the little things (beads, buttons, pins, fish hooks, guitar strings, etc.) - relax! Eat the chocolate egg and adapt the container!

5. Garlic beads
- Our grandmothers knew that garlic is the best preventative against colds. Modern moms We came up with a life hack for this - garlic beads that will protect your baby from ARVI, no matter where he is. How to do it? Pierce the Kinder container with an awl, put pieces of garlic in the container and hang the “pendant” on satin ribbon. Decorate to your taste!

6. Pincushion
- You can make almost everything for your home with your own hands. The pincushion is no exception. We invite you to make a simple but very convenient needle bed from Kinder. Glue a pincushion into one half of the “egg” and place a thimble into the other. All!

7. Headphone case
- No matter how carefully you twist the headphones, you will certainly get them out of your pocket tangled. And if rolled up headphones are placed in a Kinder egg every time, the problem of the “Gordian knot” will be solved once and for all.

8. Smartphone stand
- From two identical halves of a Kinder egg you can build a stand for your smartphone. To do this, cut through plastic containers holes and fix the phone in them.

9. Kinder with a surprise
- An engagement ring or a condom - your significant other can find anything you want in a chocolate egg! You'll have to work hard, but the effect is worth it. Carefully remove the wrapper, cut the egg with a sharp knife, replace the toy in the container and solder the chocolate halves together with a hot knife. Wrap the surprise egg in a wrapper. Give and enjoy the effect produced!

10. And for dessert – scrambled eggs!
- Turn chocolate halves from Kinder eggs into dessert scrambled eggs. All you need is yogurt and physalis berries. You can decorate dessert scrambled eggs with dry buds and coconut flakes. Aesthetic and gastronomic pleasure!


