Do-it-yourself house for Barbie: make the wishes of the princesses come true! How to make things for a doll? Homemade things for dolls
This is where Barbie can store her shoes and jewelry. To make a chest of drawers you will need:
- 3 matchboxes;
- cardboard and thin paper;
- PVA glue;
- acrylic paint.

What do we have to do:
- Glue the matchboxes in such a way that they stand on top of each other, and the boxes slide out easily.
- Paste the fixed part of the chest of drawers with paper and paint it.
- Decorate drawers.
- Cut out handles from cardboard and glue them to the boxes.
Advice. The chest of drawers will look more colorful if you make drawers different color.
shoe box cabinet
This is where Barbie doll can store her outfits. What you need to create a cabinet:
- shoe box;
- wooden stick;
- 2 large beads;
- thick foil;
- glue;
- thermal gun;
- scissors.
What do we have to do:
- Take the lid from the box, cut the folds in width and cut it in half exactly in length - this is a blank for cabinet doors.
- Cover the doors with foil. Glue a piece of foil on one of them to make it look like a mirror.
- Cover the entire box with cling film.
- Glue the doors to the cabinet using the remaining bends.
- Using a heat gun, glue the beads to the doors to make handles.
- Make 2 holes in the box and stick a stick through them to make it convenient to hang things.
Advice. It is easy to make “hangers” for Barbie outfits from wire.
Plastic bottle chair
You can make 2 or more chairs so that the doll can invite guests for tea. What you need to make:
- plastic bottle;
- cotton wool or foam rubber;
- scissors;
- thread and needle;
- colored fabric.

What do we have to do:
- Cut out the shape of a chair from a bottle.
- Measure the workpiece and sew a chair cover.
- At the seat, fill the bottle with cotton wool or foam rubber.
Advice. The larger the volume of the bottle used, the larger the chair will be. For Barbie herself and her friend Ken, it is better to take 1.5 liters, but for Barbie children, 0.5 liter bottles are suitable.
plastic table
To make Barbie's tea party convenient, you can't do without a table. What will be needed for it:
- flat plastic;
- glue;
- 4 sticks with a diameter of 5 mm;
- scissors.
What do we have to do:
- Cut out 2 identical countertops from plastic and glue them together.
- Glue the legs to the tabletop.
- From beautiful and fine fabric make a tablecloth.
Corrugated Bed
Of course, Barbie can not do without a large and comfortable bed. Moreover, the material for it does not need so much:
- corrugated cardboard;
- paper;
- self-adhesive film with wood imitation;
- scissors;
- stationery knife;
- simple pencil;
- PVA glue and "Moment";
- metal wire;
- fabric, thread, needle;
- cotton wool

What do we have to do:
- With a pencil, draw templates on paper: a couch, a headboard and a prefix to the side where the legs will be.
- Attach templates to corrugated cardboard, and cut out blanks with a clerical knife. You need to cut several identical blanks to make the bed stronger.
- Glue a few beds, headboards, etc. together, put under a press and wait until they dry well.
- Using wire, connect all parts of the bed.
- Cover the bed with foil.
- Sew a mattress and pillows from fabric and stuff them with cotton wool.
All of these instructions are very simple. They do not require any special skills or expensive materials. But mom will be able to have fun with her daughter. When the furniture is ready, you can start sewing clothes for Barbie together.
How to make a sofa for a barbie doll: video
IN modern stores toys you can find a lot of houses for dolls - for every taste and color. But parents very often make such houses on their own, showing their creative imagination and ingenuity. After all, in fact, making a house for Barbie with your own hands is not so difficult.
First, decide what place you can allocate for the house. Its design will largely depend on this:

Two-story house against the wall

Horizontal arrangement of the house on the floor

The house is open on all sides, stands on a stand
There are two options for how to make a house for Barbie with your own hands. The first one is simpler - making a house from improvised materials (boxes, an old bookshelf, etc.). The second - more difficult - making a house from scratch. Let's consider both options.
But first of all, take a look at the pantry. Surely you (or your friends) have some materials left after the repair: pieces of laminate, wallpaper trimmings. All this is perfect for making a house. In addition, you can use scraps of rags, wooden sticks (for example, from ice cream), parts from the designer, and much more.
Making a dollhouse from improvised materials
The option is quite simple and easy to deal with. We need one or more cardboard boxes or a couple of old wooden shelves. We glue the boxes, decorate with wallpaper, pieces of fabric or just paint.


For the horizontal version, we need flat box(for example, from a TV) from which you want to cut off the top cover. From the cut cover we make partitions, which we glue to the walls.

Making a dollhouse from scratch
In this option, you can independently come up with the layout of the house. Then all the details must be cut out of plywood or cut out of thick cardboard and glue.
Consider, for example, the manufacturing process of such a house:

We cut out the details from plywood (be careful, the dimensions are in inches, 1 inch \u003d 2.54 cm. However, you can take your sizes, keeping the proportions):

Do not forget about the safety of children! Every detail needs to be well crafted. sandpaper so that the child does not get hurt.
We collect parts according to the plan.

Back wall (A), two side walls (D), front wall (E) are attached to the top of the base (B). The windows measure approximately 9 inches by 6.25 inches, except for the triangular window, which is the same width. Its height and the shape of the long side must match the angle of the roof (see photo of the detail drawing). Windows are sawn with a jigsaw.

To assemble the house, you will need small finishing nails and a hammer. If gaps form between the parts, they must be covered with a primer.


We paint the house in the desired colors.

From within Dollhouse for Barbie, you can paste over the remnants of wallpaper or self-adhesive film.

We lay a piece of carpet, fleece or felt on the floor. Or maybe a laminate?

We furnish the house with furniture and invite your favorite doll to a housewarming party!
In addition, opening doors can be made at the Barbie house.
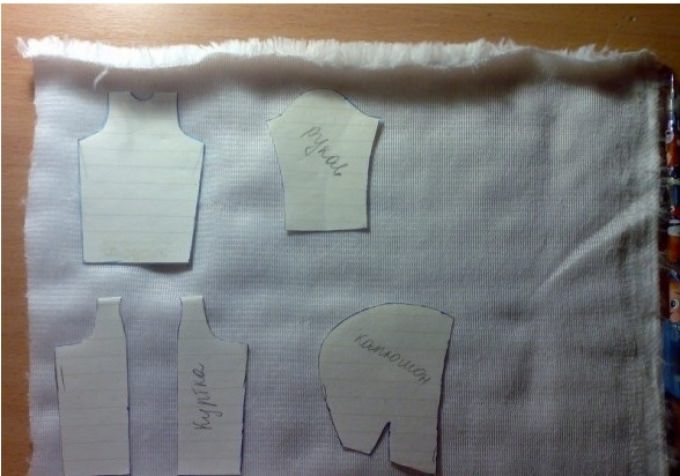
The favorite toys of girls of all generations are dolls! You can't argue with this fact! And for several decades now, the well-known favorite Barbie has remained a favorite among little mischievous girls. How to create Patterns step by step will help you understand the process and allow you to create more and more new masterpieces. Two options for making a pattern for sewing things of varying complexity will allow the development of the girl's design abilities and, maybe, sometime in the future, the basics of the cut will be useful for tailoring her own clothes.
Until then, what could be more interesting than the process creating an outfit for a cute toy girlfriend? How to create a chic doll wardrobe for Barbie and other dolls will be discussed in this article.
Create a template
How is a pattern built? Clothes for dolls with your own hands can be sewn according to the same principle as for people. You can start by taking measurements with the help of the only thing you need to change is the unit of measure, and write down the measurements not in centimeters, but in millimeters.
For many, the second option will seem easier. Here, for do-it-yourself dolls, it is done by wrapping the figure with foil for baking.
Both the first and second methods involve the participation of parents in the process of making patterns, but the child will be able to sew clothes for dolls with his own hands, the patterns of which will already be ready.
Building a pattern using measurements
It doesn't matter if it's plastic or porcelain. In any case, it is possible to measure the girth of the chest, waist, hips, back width, armhole and chest height, shoulder width, sleeve length and bottom of the product, take other additional measurements indicated in the description of the drawing. It is these measurements that will be required to get things that are suitable in size. Then it remains only to understand the principle of how clothes for textile dolls are created with your own hands.

Patterns of clothes are the basis. It is worth creating one template and on its basis it will be possible to model various styles dresses, blouses, skirts and jackets.
Description of drawing construction
In order to develop a pattern on a sheet of paper, draw a rectangle. Its vertical side should be equal to the length of the doll from the shoulder to the foot. It is best to make a base pattern in full height. This will make the design easier later on. The other side is half the bust measurement. In this embodiment, the drawing will show half of the back and half of the front shelf for straight dress fitted silhouette floor length.
After that, you will need to retreat down a distance from the upper left and right corner, which is equal to the measure of the height of the chest. It is measured from the shoulder to the very protruding part of the chest. If this textile doll without roundness, then you need to take this measure approximately. The two resulting points should be connected to get the chest line and the border of the armhole for the sleeve. After in the upper corners you need to draw the neck, in front the cutout should be twice as deep. You will also need to set aside the width of the shoulder, a little obliquely, repeating the bevel in accordance with the torso of the doll. Then comes the turn of the design of the armhole. First, you should mark half the width of the back along the chest line, then divide ½ of the measurements of the chest girth into 4 parts and set aside given value on a straight line, starting from the point of the edge of the width of the back. The resulting segment will be the armhole area, where you will need to draw rounded lines from the shoulder to the chest line.

Here it becomes clear how the pattern is built. Do-it-yourself clothes for dolls are created by simply transferring measurements onto paper. And the next stage is the designation of the waist line. It is located in accordance with the measurements of the length of the back and front to the waist. Here, on both vertical sides of the rectangle, set aside the length of the back and draw a line parallel to the chest. If the length of the front is longer, then the middle of the straight line is found and another additional straight line is laid from it to the front. Next, the difference between the waist measurement and the length obtained is calculated, and the tucks are distributed along the line, which will need to be picked up for a good fit of the clothes. Next turn behind the line of the hips. Usually their width is greater than at the waist, and sometimes more breasts. In this drawing, after constructing the side sections, taking into account the size of the hips, the parts will overlap. After determining the level of the hip line from the vertical sides of the rectangle on the left and right, I set aside ¼ measurements of the hip circumference and put points. Next, it remains to draw a side cut, connecting the central point of the armhole, the points of the side tucks of the waist, hips and draw lines down.
Foil pattern
How else can a pattern be built? DIY doll clothes can be sewn using patterns made by wrapping the doll in baking foil. This option is perfect for Barbie and other plastic dolls. The toy is wrapped in a rather thick layer, after which a marker is taken and all future seams of the product are drawn. Next, the foil is cut with nail scissors and removed from the doll. After the whole template is divided into elements.

Fabric selection
Clothes for a Barbie doll with your own hands, the patterns of which can be built in the two ways described in the article, can be sewn on a typewriter or manually. It all depends on the level of skill and the type of material. If the fabric is loose, then it will be very difficult to handle it manually. If it is knitwear, then hand sewing is perfect. In addition, this option, due to the fact that the fabric stretches, will hide minor cut defects. But in any case, the fabric for the doll should be colorful, bright and beautiful. For ball gowns it is best to choose material with sequins or embroidery. Here you can use various lace, tulle, mesh, brocade, sequin fabric, velvet, velor and other expensive materials.

Clasp design
How to make a fastener, and how should the pattern be changed for it? Clothes for dolls with their own hands can be decorated with Velcro, buttons, buttons or hooks. Everything depends on the idea. If it is necessary to fasten a sufficiently long incision, then it is better to give preference to Velcro, and if it is a thin strip of fabric, then fit small button or hook. As a rule, the fastener for dresses, skirts and sundresses is made on the back, starting from the very edge of the product and below the hip line.
Now you know the necessary base. Good luck with your creativity!
Surely, many mothers are familiar with such a situation when their daughter asks to buy outfits for her doll. And since any girl has a Barbie at home, in most cases she needs clothes. Then a bunch of questions arise, namely: how many things do you need? How can I choose outfits so that my daughter likes it? How to guess the size? How much will Barbie clothes cost? These questions will not arise if the doll's things are done at home. What is required for this and how the work is done can be found in this article.
To sew clothes for this doll, you will have to get to know her in detail. Barbie is a girl with unbending and bending arms and legs.
Her height is about 25-30 cm, and her hair is mostly white, about 5-6 centimeters long. Neck girth - 2 cm; chest girth - 11 cm; waist circumference - 7.5 cm; hip circumference - 12 cm.
Back length - 5 cm; arm length - 12 cm; brush girth - 3.5 cm; leg length - 16 cm; wrist circumference - 2 cm, foot length - 2 cm.
DIY clothes for Barbie
It is known that clothes can be both sewn and knitted, so models and fabrics must be different. The easiest thing to sew is a simple dress or blouse, and the most difficult is Wedding Dress or overalls.
Gallery: clothes for Barbie and Ken (25 photos)


Classic embroidered dress
If you decide to sew something for a doll, then it must be a dress. Firstly, the doll's dress is the basis of her wardrobe, and secondly, it is sewn very quickly. The dress should not be made chic if you are not going to take the “girl” to the podium or hold a photo shoot for her. It will be enough to sew an ordinary classic dress V life size. What will be needed?

If you decide to sew something for a doll, then it must be a dress.

- Fabric (chiffon, silk or gabardine is usually welcome) - 0.5 × 0.5 m;
- Scheme;
- Zipper (10 cm) or buttons or Velcro;
- Threads;
- Scissors;
- Needle.
To make such a dress, you will need an A4 pattern (you should print it or copy it), according to which you will cut out the details from the fabric. Next, sew the pieces, process the ends and insert a zipper or sew on buttons. If you don’t get smart with the design of the dress or additional details, then it can be sewn quite quickly - about 30 minutes.
If the dress is one of the easiest outfits to make, then the coat is much more difficult to sew. It is also worth considering that the coat can be both sewn and knitted. Let's consider both options.
How to sew a coat for Barbie
To sew a coat, you should purchase:
- Fabric (wool, crepe, diagonal, boucle) - 0.5 × 0.5 m;
- Scheme;
- Threads;
- Needle;
- Scissors;
- Faux fur (collar);
- Belt (as an accessory) and buttons.

The coat can be sewn or knitted

Work like this: print out the diagram, mark everything on the fabric, cut out, connect, sew everything together. And it's done!
How to knit a coat
It is worth working with a knitting coat, because it is a very painstaking work. But if you approach it with responsibility and a special desire, then everything will work out quickly.
To knit a coat, you should purchase:
- Woolen or acrylic threads (not thick, different colors) - 30g;
- Hook number 2;
- Buttons.
Knitting goes from top to bottom.

It is worth working with a knitting coat, because it is a very painstaking work.

We tie the edges of the sleeves and the collar with threads of a different color. Sew the sleeves, sew on the buttons and you're done!
What else should a doll have in her little wardrobe? Of course, skirts, blouses, pants, a lot of shoes and certainly a fur coat! But how to make a “girl” a fur coat, and what kind of fabric is needed for this
Beautiful fur coat for Barbie
It will require:
- A piece of fabric (needed for lining);
- Ribbon;
- Velcro;
- felt-tip pen;
- Scissors;
- Threads;
- Needle.


Everything works in the same way as in the previous versions: it is cut out and sewn together.
Buttons can be attached as desired.
Boots for Barbie with foam soles
- Fabric (some kind of elastic);
- Scissors;
- Coffee can (to make insoles);
- Threads;
- Needle;
- Styrofoam (for the sole).
Progress:
- First you need to cut out something similar to stockings from the fabric (the main thing is that they are 1.5-2 times larger than the doll's leg itself). Next, cut out the insoles from the jar and sew them to the stockings from the side of the foot.
- Further actions depend only on you and your imagination, since it is at this stage in the manufacture of shoes that you will have to cut out the foam sole. What will be the sole of the doll, you decide!
- Then glue the made soles into the "stockings", and the boots are ready!
The main thing is to treat this matter very carefully and patiently.
Light knitted slippers
How can a woman do without cute slippers? Of course not! That is why here is the knitting option for this wonderful shoe. If you follow the scheme correctly and do not be distracted by anything, then you can perform this work in a few hours.
- Threads (wool or acrylic) - 30 g.
- Scissors;
- Ribbon - 1 m.

If you follow the scheme correctly and do not be distracted by anything, then you can complete this work in a few hours.
The color of the threads and ribbon is chosen independently. Then it remains only to follow the scheme. It is worth paying attention to the picture in the middle. This very figure shows the foot with which you need to start knitting. Next, the sides are knitted in a circle.
Pumps with high heels
And finally, the shoes! Their manufacture is considered one of the painstaking work in the field of footwear. How are doll shoes made? It is worth considering a simpler version.
- Fabric (any will do) - 10 × 10 cm;
- Cardboard;
- 2 pieces of wood for heels;
- Glue;
- Scissors;
- 2 beads;
- Thin elastic band;
- Sealant for processing (if you took a loose fabric).


First you should use the scheme, then cut the fabric along it. Glue the “insole” of the fabric onto the cardboard (which is also cut out along the foot). It is necessary to glue the back of the shoes, then the toe, then the heels. Next, attach a bead for beauty to the clasp (beads or sequins would work well). Everything, shoes for our beauty are ready!
Ken doll
Ken is Barbie's boyfriend.
In terms of height, he is the same as the “girl”, but a little more in physique (after all, a man), so the clothes for him should be larger than for Barbie.
The girth of his hips is 15 cm; chest girth - 13 cm; arm length - 12 cm; leg length - 14 cm; foot length - 3.5 cm; shoulder width - 8 cm.
Come to think of it, what can Kena sew? You can wear a T-shirt with shorts or pants, a T-shirt, shirt or pajamas. A set of T-shirts and pants is sewn in almost the same way as pajamas, only from a different fabric. For ordinary clothes, gabardine works well, but for pajamas, as for clothes in which to sleep, cotton is great. As you can see, a pajama set does not always include a t-shirt. Most likely, there is something like a jacket. You can verify this by sewing such pajamas.
DIY pajamas for Ken
To make such clothes, you need:
- Fabric (cotton, bamboo, silk) - 1x1m;
- Scheme;
- Button or Velcro or elastic band (inserted into the belt);
- Needle;
- Scissors;
- Threads.
In order to get such beauty, you need to make a pattern, sew, then insert an elastic band or fasten it with Velcro or sew on a button. Everything is made quite simply, so with a lot of patience, pajamas will be ready in just a couple of hours.

To sew the top, take the rest of the fabric, cut out the pattern again, mark everything on cotton or bamboo and sew. You can make a jacket without sleeves (as shown in the diagram), or you can sew on sleeves. Each sleeve should be 8-10 cm.

Other things are sewn on the same principle. Only for each thing there is its own fabric, so you should choose it correctly. If you are in doubt about which fabric is suitable, then you should find out what material clothes are made of for people, then everything will become clear.
Very simple dress for Barbie doll (video)
How to sew a shirt for a Ken doll (video)
The main thing is diligence and patience, because sewing (or knitting) clothes for dolls is quite difficult, despite the fact that they have the same physique as humans. You need to cut out the smallest pieces of fabric, sew them or glue them, and this takes a lot of time and effort. But if you still decide to continue doing such a thing, then you can only envy!
Crafts for dolls - great idea joint creativity child and his parents. Although today you can buy any miniature piece of furniture, independent production toys helps to save family budget. In addition, needlework contributes to the development of perseverance, accuracy and aesthetic taste.
How to make doll furniture from improvised materials
Do-it-yourself furniture for dolls can be made from a variety of improvised materials. In every house there are cardboard, paper, newspapers, pieces of wood and plywood, cans, corks, wire, fabric scraps and interesting, but unnecessary things. It takes inspiration, a little patience, and uncomplicated raw materials turn into elegant interior items. Tiny armchair, chairs, desk, coffee table, a bedside table with a TV, a refrigerator, a sofa and a crib make the two-story dollhouse beautiful and cozy.
DIY cardboard furniture
Do-it-yourself miniature pieces of furniture for dolls are made from unnecessary cardboard packaging. To make a dressing table, you will need materials:
- a small cardboard package (a box of hair dye will come in handy);
- ruler;
- simple pencil;
- foil;
- stationery glue;
- paper (colored, white or decorative).
Procedure:
- Cut the box at a height where the doll can sit comfortably in front of the piece of furniture.
- Make a drawing of a mirror on the remaining part, coinciding in width with the table. Cut out the blank, glue it to the base.
- Checkout upper edge patterns or just round it.
- Cover the table with paper.
- Decorate the product with painted drawers and doors.
- Cut out a "mirror" from foil, drawer and door handles.
- Stick the elements on the table.
From paper

Do-it-yourself furniture for dolls is easily made from paper. To make a miniature table with a mosaic top, you will need:
- cardboard or paper of high density;
- ruler;
- simple pencil;
- awl;
- scissors (a clerical knife will do);
- colored cardboard for mosaic;
- wooden skewers (you can take toothpicks) for the legs;
- thick threads;
- office glue.
Procedure:
- Cut out the base of the table top.
- With an awl, make neat holes for the legs and racks that are needed to decorate the table with weaving.
- Cut out small squares from colored cardboard. Glue them in a mosaic pattern to the top side of the countertop.
- Insert the legs into the holes, fix them with glue.
- Glue the end of the thread to the bottom near one post. Braid the legs. Decorate the table with a decorative braid of thread.
- Tie two threads crosswise to the legs or glue the sticks.
- Lay a thick sheet on the base, fix it with glue.
From newspaper tubes

doll furniture from paper tubes resembles real interior items made of vines. To make a wicker sofa from this material with your own hands, you will need 200 blanks 30 cm long, a side cutter, a ruler, clothespins, colored cardboard ribbons. Before you make things for dolls, you need to prepare the main material - newspaper tubes. Procedure:
- Cut the newspaper into equal-sized sheets.
- Coat the paper with glue.
- Take a needle (knitting needle, pen core). Roll a sheet over it.
- Take out the thin base.
- Let the tubes dry.
Let's start creating a sofa:
- Weave the bottom on 13 transverse and 5 longitudinal posts.
- Make a side of 5 rows.
- Increase the stands, make 6 legs.
- Cut the blanks.
- Add skewers to the middle racks.
- Break the first blanks at a distance of 4-5 cm, the second - after 5 cm. Secure the racks with glue, clothespins.
- Cut off the legs.
- Insert racks at the back. Weave 3 full, 2 short rows.
- Shape the height with strips of cardboard.
- Weave 3 rows, close.
- Glue the crossbar, crossbars.
- Wrap your legs.
- Decorate the sofa with a pigtail.
From plywood

A rounded coffee table for a plywood doll is simple. To make such a craft with your own hands, you need plywood, a device for cutting it (jigsaw), glue, acrylic paint or varnish. To get this doll interior item, do the following:
- Cut out two round pieces. They will become the surface of the table and the shelf.
- Make racks for shelves and legs.
- Connect the parts together with glue.
- Cover ready product paint or varnish.
from wood
For the manufacture of do-it-yourself furniture for dolls, wood is successfully used. To make a sofa, you will need:
- planks approximately 1 cm thick;
- tools for work;
- glue;
- stretching material.
Procedure:
- Cut out the elements of the sofa: the base (6 by 16.5 cm), the back and base of the same size (6 by 14 cm), two armrests (4 by 6 cm from the bottom and 7 cm from the top).
- Glue the parts together, excluding lower part.
- Cut the fabric upholstery to fit the sofa pieces. Stick it on the tree.
- Cover the seat, place it on the base.
Matchbox toy furniture

Do-it-yourself doll furniture is easily made from matchboxes. For a glamorous chest of drawers that is convenient for storing jewelry and hairpins, you will need the following materials:
- matchboxes - 3 pcs.;
- paper, cardboard;
- stationery glue;
- stop the pencil;
- stationery knife;
- toothpicks;
- wire;
- pieces of a used rod from a fountain pen or a bead;
- paints for decoration appearance products.
Procedure:
- Make the base of the chest of drawers. You should get a design with a table top, side walls, bottom, partitions between the drawers.
- Insert matchboxes into the frame of the product.
- Glue the toothpicks to the front of the chest of drawers. Cut off the excess.
- Make handles, attach them.
- Paint the craft, fill the piece of furniture with small "treasures".
It remains to start the game with new furniture.


