DIY Santa Claus house made of paper. Winter New Year's houses
December 16th, 2012 , 02:35 am
It's time to start actively preparing for the upcoming holidays, and therefore today's master class will be devoted to how to make such a house with surprises, or in other words, an advent calendar, although, of course, it is not entirely correct to call it a calendar, because... there are no numbers on it, but that’s not the main thing here ;)
Before we start, I’ll say that this can really be done in 1 day (and if you get help, even faster) and it’s much easier than it seems!
Initially, I wanted to make such a house out of wood, but as always, not having time to do anything, I decided to make do with cardboard. I'm lucky! I found a perfect puzzle box! If you don't have one, just assemble something similar from separate pieces of cardboard

First, let's deal with the bottom of the box. Let's draw it out into the number of squares (future cells) we need, leaving space at the top for the “scene”. Top edge cut the box from its bottom and cut the resulting strip in the middle. This is our future roof, which we extend and connect using a strip of cardboard of the same width.

Now we need to make a grid for the cells. To do this, cut the cardboard into strips required length and width, then at the intersections we make cuts to the middle of the strip. Assemble your mesh to ensure the correct placement and depth of cuts.
If you, like me, use cardboard “from under something”, prime it, after which you can decorate it. Personally, I covered everything with decoupage paper, but... I’m far from a great decoupage artist, I didn’t take pictures of the process;))

Now the lid of the box. It needs to be cut off in that place. where will the “scene” be, so that when you close the box again it will be visible;)
Again we draw out the places for the cells and, most importantly, the doors! Then we make cuts taking into account how you see the doors opening. I cut it like this. that would bend like a regular door, but it can open up and down!

We assemble, or rather close, our box, having previously coated the sides of the box with glue, and tightly wrap it with thread for better pressing. Leave to dry.

And while our box is drying, we cut out a triangle from cardboard to cover the hole and glue it. I glued it with masking tape, but you can also glue it with regular paper.
By the way, the photo shows that a window has already been cut out in the box (as well as a door, which is not visible here). It's really better to cut them out during the box assembly process.

We make a floor inside the “stage”; I also secured it with masking tape.

When the glue is dry (check that everything sticks), prime the box thoroughly. There are already 2 layers of soil in the photo! But there are almost no traces of the previous box pattern =)

Now that preparatory stage finished (yes, that was just a preparatory stage, because anyone can assemble a box into a house, but what to do with it next!?)))) we move on to creating the decor.
I always advocate using the materials that are already in the house, the main thing is to understand how best to use them!)

After rummaging through my child’s construction set, I found great windows, a door and a fence! Now we need to give them the right type! Because The plaque doesn’t really like to be painted, I recommend that you first prime it and then paint it in as many layers as needed for beautiful view(I needed 2 layers)

It's all in the little things! So let's do something like this nice little thing like a Christmas wreath on the door. To do this, we’ll make a ring out of wire, wrap it with a strip of green corrugation (we’ll secure the tip with glue), make a bow and glue it to the ring.

I will not modestly say this detail, I consider it my find! Using beads and buttons we will make handles for the doors.
We “momentarily” glue the bead to the button and when the glue dries, cover them with gold paint.

In order to make a Christmas tree for the house, I used green corrugation, a light bulb as a base and plasticine into which the light bulb is stuck to obtain stability. By the way, and here I was lucky, I found plasticine from the child, which dries hard, but, of course, such plasticine is not necessary, the main thing is just to fix the light bulb.

The corrugation really doesn’t like water (and anything liquid), so I secured it with tape and only glued the very top with glue.

Sled! What's Santa's house without Santa Claus? And what kind of frost would it be without a sleigh!
We take matches and cut off the sulfur, put the sticks in the parts we need and coat them WELL with PVA. When everything is dry (leave it for an hour, just to be sure), we assemble the parts together and paint them.

Again, I was lucky, I found a deer (broken) in the Kinder Surprise toys, but since there is a sleigh, a deer is also needed. The deer was brown, I painted it gray, then silvered it, painted the antlers gold and sprinkled it with gold glitter (sparkles).

We will need thick cardboard, cut out squares the right size, glue them together, cover the sides with a strip of paper and... draw a fireplace =)
To make it even more beautiful, you can cut out socks from felt =)

TO back wall glue something transparent to create a glass effect. I glued cellophane, which is usually used to wrap flowers.

We glue corrugated cardboard to the roof. First you need to paint the cardboard to match the paper. We cut snow out of fleece and glue it too =)

We glue a window, a door, if necessary, make “jambs” =)))
It's time to arrange and glue everything we came up with
Having done this work, I will say that if it weren’t for the soil, the result would have been much worse, so I still recommend purchasing it if you don’t have one. Or you can use white gouache... a lot of white gouache. But it must be dried well, otherwise when you apply a layer of already colored paint, it may mix.
Be sure to use a sharp knife so that the cuts are even and not ragged. I didn't have a very sharp knife and the result was ragged edges that I had to sand down to improve the look.
To do everything quickly, don’t lose everything, while the house is drying in glue and soil, make a stuff!
Before you start doing it, rummage through your resources =) to understand what and how you can make from what you have =)
The number of cells can be any, you can do it like I did, you can do it like a calendar, the numbers don’t have to be from the 16th to the 31st
(2 weeks before New Year's Eve), this could be, for example, from 31 to 10, in general, these could be any numbers that you want to make a holiday for your child (or whoever you will celebrate there))))
And... the legend... what should I tell the child?
We said that we made a house for Santa Claus, who will arrive on the night of December 15-16 and will live in our house until the new year. For every day that he lives with us, in gratitude, he gives us small gift. Once a day you can come up and open the door, taking a gift.
That's all! I hope you find it useful and... Happy New Year;)
Natalia Kirpicheva

Hello, Dear colleagues! The holiday that they love is coming soon All: both children and adults! This holiday is called New Year! My parents helped us decorate the group, and I decided manufacture New Year's craft . And this is what came of it.
For we will need crafts: box, scissors, stationery knife, double-sided tape, cloth, cotton buds, foam ceiling tiles, glue for ceiling tiles and cotton wool (in my case, padding polyester, fabric, sequins.
Carefully cut off the side of the box.

Then we cover the inside of the box with fabric. I glued stars - sequins - onto the fabric.

We lay it down and glue the padding polyester to the bottom of the box using double-sided tape. (you can use cotton wool).

House Santa Claus I made it from ceiling tiles. The parts were glued together with tile adhesive.

Glue the halves to the roof cotton pads. Then we cut off the cotton swabs and use them to make railings for the balcony on which Grandfather will stand Freezing.

Santa Claus I printed it out on a printer, and glued a skewer to the back of it, which I stuck into the tile with a sharp edge. It holds up very well and is invisible to others.
This is the kind of house I ended up with.


Here's how craft looks in our group.
Publications on the topic:
 Well, preparations for the new year have begun. We were tasked with making a craft for the New Year. As before, I did not stand aside and decided to participate.
 Master class on making Christmas decorations“Santa Claus's House” Size: 14.5 cm by 10 cm Materials: 1. Barney cookie box 2. Colored.
 New Year is a magical holiday! At this time, many ideas, desires and the strength to fulfill them appear! To please your kids.
 To make such a Santa Claus you will need: 5l plastic bottle, plastic spoons (about 40 pcs., red tape, not big.
 I offer a master class on making Father Frost and Snow Maiden from plastic yogurt bottles. For designing New Year's ones.
 Good Grandfather Frost has a full beard. He is in too much of a hurry today, Together with his granddaughter, to the children. To make a figure of Santa Claus for us.
 Dear colleagues, friends, guests of my blog, I offer you another master class on creating three-dimensional forms for painting from plaster. In shops.
Hello, dear readers! Before the main New Year's celebration, the question often arises of how to create festive mood?! In fact, everything is elementary, start preparing for the New Year, the pre-holiday bustle is so “dragging” that there is simply no time left for depression. Moreover, if you slowly start decorating your home, the festive mood will not keep you waiting! We remind you that we recently studied and also studied the topic (we recommend reading), but today we will “build” a house, or rather a house! In this review, we will look in detail at how to make a winter house for a Christmas tree with your own hands. In principle, this decorative house It doesn’t have to be placed under the Christmas tree; it will look great on a windowsill, mantel, flower stand, table, etc. Moreover, this craft will not take up a lot of your time, and upon completion it will delight you with its excellent appearance! We will get such a decorative house with our own hands as a result:


How to make a house craft.
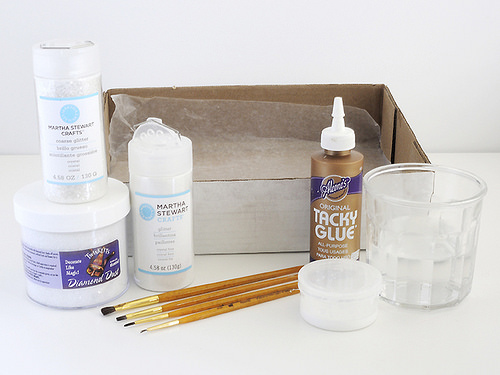
To work you need to prepare following materials:
✓ Thin foam sheet (backing for laminate) or thick cardboard;
✓ Pencil;
✓ Ruler;
✓ Scissors;
✓ Stationery knife;
✓ Transparent glue moment;
✓ Spray can with gold paint;
✓ PVA glue;
✓ Rhinestones and small beads.
We draw a house blank on plain paper (you can see blank templates below). Need to prepare next quantity parts: floor 1 piece, side walls 2 pieces, end and rear walls 1 piece each, roof 2 slopes. 


Below are the cut out blanks of the house, please note that the dimensions are indicated on each sheet (when creating your own house, you can be guided by these parameters). 


We cut out the blanks with scissors, apply them to a sheet of cardboard or foam plastic, trace them with a pencil, and cut out the real details of the house using a stationery knife. Next we cut out the windows and door. We glue all the parts of the house into a single whole.


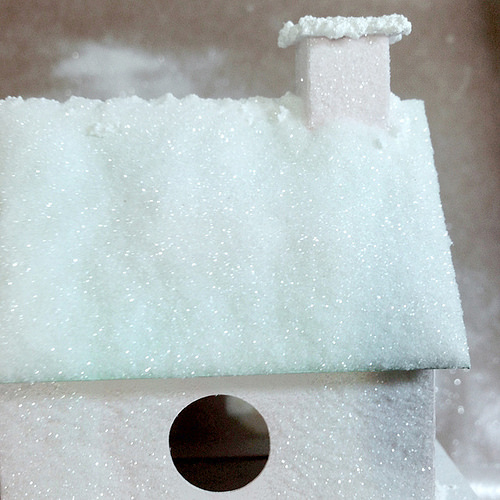
Let's get down to the details, draw a chimney on paper (see photo), cut it out and glue it, then apply it to one of the roof slopes and use a pencil to create a mark - the level of inclination of the chimney, cut off the excess paper along this line, glue our chimney, apply the template to the foam plastic sheet, trace with a pencil, cut out all the details, and then glue them into a single whole. Glue the resulting chimney to the roof.


The door can be made to open using paper tape; we cut a hole for the door in one of the walls of the house, glue pieces of paper tape to the door leaf, with which we glue the door to the house, we get a kind of door hinges that allow the door to open. On this product the door does not open; it is simply glued to the wall of the house.
Thresholds. We draw the future thresholds on plain paper, cut them out, apply the template to a foam sheet, trace with a pencil, cut out the parts, which we then glue together to form steps. We glue the resulting thresholds to the wall with the door.

We paint the house gold using a can of spray paint. ATTENTION: if you took a sheet of foam plastic as a basis, like ours, then paint the house from a great distance - in layers, i.e. Apply one barely noticeable layer, leave the product until completely dry, after an hour apply the second layer, after another hour - the third layer. Perhaps even two layers will be enough! The fact is that spray paint corrodes the foam; if you rush, it will simply “melt” your house.

Additionally, you can make a ladder, cut out two strips 10 cm long, 8 mm wide, and rungs 8 mm wide, 2 cm long. Glue and paint the product.

Let's start with the decorative part, pour PVA glue, slightly diluted with plain water, into a saucer, create small layers of cotton wool, which we immerse in the adhesive solution, after which we glue it to the roof of the house, simultaneously forming small folds (simulating snow caused by a blizzard). Don’t forget to cover the chimney, partly the walls and bottom part house. A winter house will look more harmonious if you use a little “snow” (cotton wool).

We leave the product until the PVA glue is completely dry (usually it dries completely overnight), after which we glue rhinestones and small beads to the roof slopes; in addition, they can be dispersed over the surface of the walls and thresholds.

As you can see, making a house craft with your own hands is not difficult, and the result is truly impressive. And if you put an LED candle in the house, then at night it will beckon with a warm light! As for the decor, here you can show all your creative potential, cut out a bench, a stepladder, a well from paper, put up a fence, “plant” a couple of Christmas trees, “blind” a snowman or a snow fortress out of cotton wool, and also place Santa Claus’s sleigh near the threshold; we looked at how to make such a sleigh in, which by the way is presented many more interesting ideas on production Christmas tree decorations from paper.
The height of the decorative house turned out to be 22.5 cm, the “snow” looks very natural, the rhinestones create the effect of snowflakes shimmering in the sun, and the golden undertone of the product looks great when exposed to artificial or natural light!


Dear readers, now you know how to make a craft house. I hope you liked the Christmas tree house and will decorate the interior of your apartment with such a cute craft! Don’t forget to subscribe to receive the latest news from the “Comfort in the Home” website.
Today we will tell you about how to make a New Year's house out of cardboard with your own hands. In this we can step-by-step master class, diagram and template that can be downloaded (see below).
Tools and materials Time: 4 hours Difficulty: 7/10
- 1 sheet designer cardboard suitable size for the house (you can use cardboard in two colors: one color for the walls, another for the roof and decoration of windows and doors) and 1 more sheet for the base on which the house will stand;
- a piece of transparent film to imitate glass in windows;
- template for a New Year's house made of cardboard (you can draw it yourself or download a drawing);
- scissors;
- glue;
- white small sparkles;
- flat and round brush;
- artificial snow.

Nowadays you can even find ready-made kits for making these cute decorations on sale, but it’s much more fun to do everything yourself from start to finish, enlisting the help of kids who will definitely enjoy this activity.
Step-by-step master class
Step 1
Draw or print out a template and use it to cut out a blank for the house (walls, roof and chimney) from cardboard.

Step 2
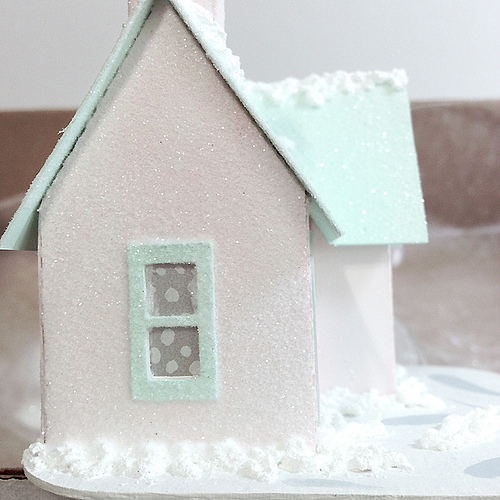
We bend the cardboard blank along the fold lines and glue it together. To make window shutters and doors look more voluminous, it is better not to just draw them on the walls, but to cut out additional parts of the required shape from cardboard and stick them on. We seal the inside of the window openings with a film that imitates glass.

Step 3
Let's start applying snow. A jar of artificial snow can be purchased at any craft store. In places where we will have snowdrifts, apply a little glue and lay out piles of snow on top of it with a round brush, giving a realistic volume. Remember what the roofs of houses look like in winter, and this will help you in your work.


Step 4
When the work with snow is completed, let the product dry thoroughly, after which we begin to create shining icy frost on the walls of the house. To do this, coat each wall in turn with a flat brush and completely coat it with glue and sprinkle it evenly. thin layer white sparkles. Surplus glitter powder we blow it away.
Our fairytale decoration house is almost ready. All that remains is to decorate the shutters and doors to your taste, and also glue the craft to the cardboard base.
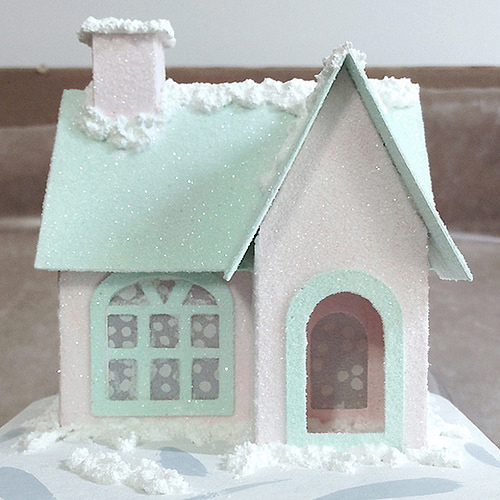
Alternatively, the house can not be glued, but simply placed on top of a base, additionally decorated with homemade trees. And in the evenings, try lighting a battery-powered LED candle inside it. It looks amazing and really looks like a fairy tale!
After installing windows and doors, cuttings often remain polyurethane foam. Usually they are thrown away along with other construction waste, and no one even thinks of using them.
Don't rush to throw them away! From them you can make such an “ice” house.
To do this, in addition to scraps, you will need:
- Box of pins;
- Construction adhesive "Dragon";
- Acrylic paint for interior work(for painting ceilings and walls);
- Acrylic paints for drawing or blue pigment;
- PVA glue;
- Nail glitter;
- Checkered paper;
- Knife for cutting cardboard;
- Pencil and brushes.
Manufacturing sequence:
1. First, we decide on the dimensions and draw something like this on paper in a box:
This diagram will help you determine the size of the parts in the future. The perimeter of the large quadrangle will correspond to the internal perimeter of the future hut. Marking into squares and triangles will help you measure the height of the walls and do it correctly top part pediment.
2. We begin to make walls. To do this, measure the length of the scraps according to the pattern, cutting off the excess with a knife. We select pieces of the same width; if the piece is larger, we cut it lengthwise. In short, we select another piece to increase it to the desired length.

3. Place the resulting pieces one on top of the other and fasten them with pins.

The spacing of the first row of pins will follow approximately the lines of the drawing, the second row will be shifted so that the pins do not interfere with each other.
Make sure that the layers lie evenly. All the convex parts of the scraps go outward, the cut parts go inward, so as to remain invisible.


4. Don’t forget to make window and door openings in the walls.


5. “Adjust” the walls to each other, if necessary, trim with a knife.

6. We coat the already assembled walls with “Dragon” glue from the inside.

Since we don’t have “ice logs” perfect shape, the glue can easily flow into the cracks and hold them together. A little glue may leak out, so we leave the product to dry in such a way as not to stain the table with glue. We dried it on a board for working with plasticine. Excess glue can be removed with a knife if desired, or not removed, it will only add an icy shine to the house.
7. We glue the outer corners with pieces of polyurethane foam to hide the ends of the cuts. When the glue is completely dry, remove all visible pins. Those pins.

8. Now let's move on to the gables and roof. The large triangle in the drawing is the shape of the top of the pediment. We make them in the same way as walls.

9. You need two of these parts.

10. We connect them together with a crossbar that corresponds to the length of the house.

11. Glue, dry, remove pins.
12. Now we glue this part to the house.

We seal the open ends with thin strips of hardened polyurethane foam.
13. We make the roof by gluing strips of polyurethane foam and attaching them with pins. We glue icicles to the roof overhangs. The house is ready. All that remains is to paint it.


Both artistic acrylic paints and construction paints are suitable for painting. White paint for ceilings and walls. Sometimes it remains after repairs, but you can also buy it specially. The minimum packaging volume is 1 liter (1.4 kg). The paint is initially white, the colors are created by adding pigments (sold where the paint is sold). We used a few drops as pigment acrylic paints for drawing.
14. Paint the entire house with white paint using a brush or spray. A foam sponge is not suitable for these purposes - it has a very textured surface. Don't forget to put something under the house so as not to stain the table with paint.

15. Leave to dry for 5-10 hours, depending on the air temperature. The paint must be completely dry. The house still looks like plaster.
16. Now prepare the blue color and paint the roof, corners of the house, windows, doors and icicles with a brush. There is no need to paint everything evenly. We draw with small strokes.

Leave to dry. It's still a couple of hours.
17. Make the color tone a little darker. Paint lightly over blue. Dry again.

18. When the paint is completely dry, take PVA glue and apply it to the icicles and ice and sprinkle with glitter.

The house is completely ready. As soon as the glitter glue dries, you can place it under the Christmas tree, spreading cotton wool “snow” around it.


