Crafts from cardboard. How to get “designer” out of ordinary cardboard and why is it needed? How to make a desktop organizer out of cardboard
Good afternoon, today I decided to collect in one article all ways make paper crafts that kids can do. For the DIY season of 2017 - it turned out to be a decent photo piggy bank of ideas that a child can make out of paper with their own hands. These paper crafts can be used for kindergarten or school (grades 1-5). There will be easy crafts for preschool children(from 3 to 7 years old) - for junior, middle and senior group. And there will also be crafts and more complicated ones that require more long school lesson (for 45 minutes) - suitable for labor lessons for children in grades 1, 2, 3, 4. As well as heads of creative circles " skillful hands» in a kindergarten or school they will find many useful ideas paper crafts.
- We will do flat crafts-applications.
- Volumetric colored paper crafts corrugated cardboard.
- craft toys from cardboard or thick paper.
- crafts using various techniques(half disks, fan, symmetrical fold, postcard).
On this moment we already have thematic articles on the site with paper crafts,
And also a lot of ideas for paper NEW YEAR crafts in the article:
And in this article - we will look at different techniques that can be used for paper crafts for children of different ages.
So let's see what paper crafts I have collected in this piggy bank.
Origami
In the technique of HALF DISK.
Colored paper crafts that we meet in kindergarten and at school most often look like applications. I myself really like effect applications 3D. There are quite a few ways to create bulges on the application.
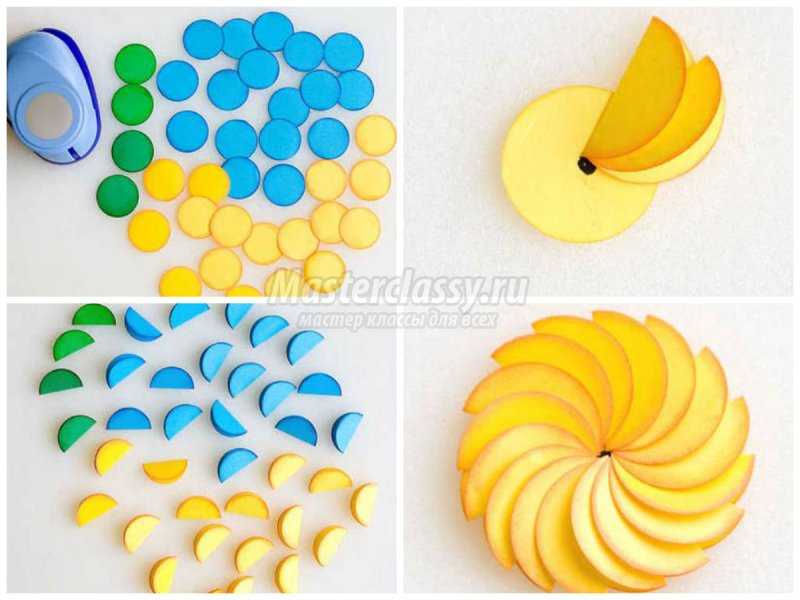
In this article, I want to highlight a technology that is interesting in its graphics - these are crafts from round paper discs. When all the work is laid out in the form of whole or folded in half paper rounds.
Such a mosaic application from round parts fits for children 3-4 years old. It is just right for them in terms of pedagogical tasks of this age, when children still do not know how to work with scissors, but are already happy to glue ready-made template modules from colored paper.
Such crafts-appliqués look bright and unusual due to PARTIAL GLUE of modules - we put only half of the disk on the glue, and its second part sticks out in a fold.

And from circles or ovals bent in half, you can make not only flat applications, but also paper crafts-toys. Here's one for inspiration caterpillar of ovals bent in half- children from 3 years old cope with this task, if you help them fold the ovals in half. Children 4 years old will fold the ovals themselves, and even cut out a few of them. And for children 5 years old, you need to distribute colored rectangles, they themselves will cut the corners of the rectangles, thereby turning them into ovals, they themselves will bend them in half and fold them into a caterpillar.

Be smart and think WHAT ELSE can be constructed from paper semi-circles or semi-ovals. Surely you can make a frog, a panda, a giraffe, a hippopotamus, a penguin from such half-discs of a round or oval shape.
VOLUME application
From paper blades.
And here is another technology for convex paper applications. When the parts are glued in advance into the BLADES, and then such a bladed paper craft is glued with its blades onto the application cardboard.
Blades are obtained if Bend 3-4 identical parts in half, and then the bent walls of adjacent parts are glued to each other.
For example, the ladybug in the photo below consists from three paper circles. Cut out three circles, bent them in half. First, glue the halves bent in half on the left and right. And then the third kruglyash lays down like a book on the protruding halves of the glued kruglyash.
Craft "Ladybug" is suitable for children 3 years old. And the craft " Balloon» with a large number of blades suitable for children 4-5 years old.

Any form of paper can be turned into a paddle part, the number of blades and the splendor of the part depends on how many parts you use in your bulk gluing.
In the same way, you can do paper crafts in three-dimensional form (in the form of objects) with your own hands - like these paper fruits in the photo below. Watermelon is suitable for crafts in the older group of kindergarten.


Origami
ON SPRINGS.
And here's another paper craft with a bulging effect. Here, the volume of the application is transmitted by embossing a strip of colored paper bent into three folds. Such autumn application easy to do with your own hands - suitable for children of the middle and older groups (5, 6 years).
In the center of the upper fold, we cut a hollow and place the silhouette of an owl inside. To make the owl hover at a distance from the back wall of the hollow, you need to stick a paper spring on the back of the owl. How to make a spring you will now understand, using the example of the following paper craft with a three-dimensional effect.

Here below we see paper craft BEAR. The bear's paws are also glued at a distance from the body. And this distance between the paws and the body is achieved by sticking paper springs. Everyone in childhood made such spring worms. Below we see a master class that shows the process of creating such a paper spring and the whole craft as a whole.

The BEAR craft is suitable for children 3-4 years old (if all the details are already cut out and the springs are folded). Children 4 - 5 years old you can slowly cut out the silhouettes yourself. Children 5-6 years old already able to fold the springs themselves (and the lesson can be divided into 2 parts- in the first lesson we make springs and cut out part of the silhouettes - in the second lesson we cut and assemble everything together.
In the same way, you can do any craft. Below we see that the crown of the tree is made according to this principle. But with the same success, you can do bunch of balloons on greeting card. Or bouquet of flowers from paper, where each flower will be at its convex level.
You can highlight with a bulk spring any details of paper crafts - bird wings, tiers of thorns on a hedgehog (photo below).

Or hares in thick grass (spring crafts in the photo below).

You can also make this paper craft using springs inside. It turns out beautiful effect. And also legs-stands for multi-layer applications can be made not from paper springs, but from purchased thick double-sided tape. Such a plump adhesive tape is for sale - it has a thick, as it were, foam tape and it is sticky on both sides. It can be cut into stumps and glued between layers of crafts.

From such springs, you can make not only applications, but also independent paper crafts. Make a spring and beat it with other paper parts. For example, attach an oval muzzle, round ears, paws at the bottom and a long stripe-tail - and now it all starts to look like a paper mouse.

But paper penguins crafts based on the same spring. Or crafts-bugs. There is always unused black paper in the kindergarten in a set of colored paper - you always don’t know what to make of it - but here you are, black bugs, penguins and little crows.


Origami
WITH FAN.
A paper fan is often used in children's crafts as a way to quickly create the desired shape of a part. Most often, the gluing fan is used as tail unit paper birds (or like wings).


Spread fan blades may remind you of wings bat. Children's craft on average age(4-5 years).

The fan looks like a lampshade table lamp- it means that it will make an excellent do-it-yourself lamp craft (craft for children from 3 years old)
The fan can become the basis for children's crafts in the form fairy tale characters- friends of penguins or northern bears (craft for children 5-7 years old).

If we fold the fan in half - and unbend its blades into 2 semicircles - and glue the semicircles that meet with glue, then we will get a ROUND FAN.
From such a blank, you can make a lot of paper children's crafts. The simplest and fastest are apples (add a stalk and a leaf) or birds (add a wing, an eye and a beak).

Ready-made blanks of round fans are used in classes with children 3-4 years. And aged 5 years the child is already given the task of creating such a round fan out of colored paper.
By adding various details to the paper fan, we can get the image of any paper animal (a black cat, or a red, white bunny (as in the photo with children's crafts below).

You just have to teach children how to make a fan with their own hands, practice several times. Then teach them to bend the fan in half and unfold both halves into two semicircles - and glue these semicircles with a glue stick. And then the children themselves will surprise you, they will throw up more and more new ideas for crafts, I turn a round paper fan now into a snowman, now into a mermaid's bra, into a round red nose of a clown.
And if you make several round fans of slightly different diameters at once and string them on a wire, then we can get a voluminous spherical paper craft. The fan ball can become an apple, a pumpkin, a snowman, a sheep, a white rabbit and any other children's character.

Children's crafts
on an accordion stand.
There are some more original way make crafts for kids paper material. Below we see the principle of creating such crafts. From cardboard, we fold an ordinary accordion. And we use it as TIERS for sticking paper parts.
In the photo of the children's crafts below, we see how the accordion turned into a cake craft. Each row of an accordion is a tier of a cake with candles.
Note, the side high part of the craft in the photo below (where the balloons are) is not necessary.

In the same way, according to this principle, we can use the rows of an accordion like rows of Christmas trees in a forest. And between them put a deer or a snowman, or hide a bunny.
Rows of pots can be used as streets on which to place houses.
Or the rows of such a stand can be folded from blue paper and designed as SEA WAVES, and then it remains to stick dolphins or rows of boats on them. Or peeping sharks.

Origami
on a flat cardboard template.
And now we will see crafts for children, where all the elements are pasted on a silhouette cut out of thick cardboard.
For example, we take cardboard and draw a silhouette of a shark on it. Any child from 4 years old is already learning to cut with scissors - he cuts out the silhouette himself with his own hands, slowly crooked, but he should already myself cut along the line holding the scissors in a stationary hand, and rotate the sheet of cardboard as the cut line rotates along the silhouette ..
When the silhouette of a shark is cut out of blue cardboard, we give the child a round blank of white paper - the task of the child is to cut it into teeth (just stuff the triangles obliquely with scissors, and then bend every tooth so that it protrudes inside the general circle. And this paper mouth remains to be glued onto the silhouette of a shark. And we'll get awesome crafts for children 4-7 years old. Sharks are great crafts for boys. Little brave men will be happy to tame a dangerous sea predator.

Application details do not have to be from colored paper. For example, a scarf on a polar bear below is cut out of a cover from colored paper (the cover was in a box). And the carrot on the craft with the hare is white cardboard, which was previously painted with gouache (they painted yellow-orange-red stripes).

You can peep ideas for the same applications on a cardboard silhouette in children's cartoons, or see them on a children's coloring book.
Such paper crafts for children 5 years old can be the basis for children's theater. If you stick on the back of each craft long handle made of thin wooden lath(you can buy it in the building department of the store) - or the pen can be rolled up from a sheet of paper and wrapped tightly with tape for tightness.
Children, hiding behind a screen and holding their characters on sticks, can put on performances entertaining parents, grandparents with homemade reprises of famous fairy tales.

And you can also cut round holes for children's fingers in such a craft - then you can already play the scenes of the TABLE THEATER. Here in the photo below we see a sheep and a hare made of paper with such slots for fingers.


Also, your paper characters can have a special PAW GRIP, and you can insert a candy or a pencil and a small gift for someone into this grip.
By the way, here's a good idea - such a character can be pasted on a postcard and give him a paw rolled up 100 dollar bill- it will turn out gift card with money for a friend's birthday.

Such crafts from flat cardboard can be supplemented with BEND elements (as on the bunny in the photo below), or TWIST elements (as on the snail below). Or additional ENTOURAGE elements (as with the cat below).

Children's crafts
with paper stripes.
Also, the application can be made voluminous if you use LOOP FROM PAPER STRIPS. Colored paper is cut into strips, and each strip is smoothly folded and glued at its ends. Such curved stripes can be the petals of a lush aster or a modest chamomile.
Or such paper loops can serve feathered swan- left photo below. This craft is suitable for children ages 4 and up. They themselves glue the already cut strips into loops and stick them in rows on the tail of the swan.

But the peacock (in the right photo above) is already craft for older kids. For grades 1-2 - because in a lesson in kindergarten, children in 25 minutes will not have time to make a peacock from start to finish. But in 45 minutes of a school lesson, children will just cope with this task.
Please note that the peacock is made of paper from strips of different lengths. The yellow strip is the shortest - it is the first to bend into a loop. Then the green strip is glued to the loop with one edge and also bent to the place where the yellow loop-strip is glued. Then we do the same with a slightly longer blue stripe.
Thus we get EIGHT THREE-COLOR LOOP for the peacock tail. They all stick together ribs to each other- in one bunch-bouquet. And at the junctions of their gluing, we attach peacock spots. Then we attach to the back cardboard silhouette of a peacock. Great creative piece.
Below we see how flower crafts are created according to the same principle. In the same way, we make a tail for our peacock from the photo above.

Or a paper craft for girls - SHOES-SANDALS - here the strips serve as straps to create a woven toe of paper flip flops.

And if you cut strips of the SAME LENGTH, then it is convenient to make a spherical braid out of them. Such a braid in the form of stripes crossed in a circle can serve as a shell for a turtle, balloon, or middle lush flower or a snowball from a snowman.

Or it can be a delicious apple bitten off the side (left photo below). And inside such an apple, you can put a worm from a paper spring (see above for the method with a spring).

If you glue the strips crosswise in the center ... and pierce holes from the ends with a hole punch ... and lift these ends with holes up ... and collect them on a thread, then we will get a paper pear craft (look at the right photo above).
And if take NOT SEPARATE strips - but cut a sheet of paper into strips NOT CUT TO THE EDGE - like a long fringe. And then arrange this long striped fringe in the form of a paper craft-hat.

By a similar principle, beautiful paper crafts are made in the form bird cages. Such a craft only at first glance seems complicated. But in fact, everything is available for children from 4 years old. And even a child of 3 years old can cope with the help of an adult who will show, then smear with glue and where to stick it.

Below we see this cage in the blank (photo-master class). First, these are paper strips on a wide strip of the base. Then we wrap the base in a ring. And we bend the strips sticking up into an arch, each relative to each other. Quick and easy craft. It remains only to make a paper bird and hang it on a string under this paper roof.
That is, such a craft is easy to do with your own hands for children even 3-4 years old.

And you can also make paper children's crafts based on a BALL from strips. A ball of stripes is collected on a needle and thread. Since you can’t give a needle to children, you can go the other way and make holes in three places of each strip in advance with a hole punch - along the center and along two edges.
The strips are folded crosswise onto the central hole - a thread is threaded into it from a suspended bead from below. A large bead at the bottom prevents the strips from slipping off the thread. Next, a few more beads are strung on the thread (see carefully inside the lamb, they are visible in the photo). And then the same thread is threaded into all the holes at the ends of all the strips - THIS IS THE BALL. If anyone does not understand, there is a photo-master class in

You can attach any details to such paper balls, turning them either into frogs or hares (as in the photo of children's crafts below). With your hands and your imagination, you can make a variety of animals.

These are the chickens and the hen made by craftswoman Tatyana. What characters will you invent? Such crafts from stripes can be done in the 1st, 2nd, 4th grade of the school. And it is also suitable for diligent children of 5-6 years old.

Origami
in the quilling technique.
And paper strips can be wrapped in a tight roll-twist. Then give this twist the shape of a petal or a leaf and make paper applications of flowers with such twists. The technique is quite well-known, called quilling. The technique is suitable for children from 5 years old, when the fingers are already dexterous enough to hold the twist on the holder rod.
Below we see how the usual round twist is attached different forms(clamp it with a finger from the right sides) and the twist becomes tear-shaped or cup-shaped, or triangular. And from such twisted modules we add a quilling application.
Below we see children's crafts made of colored paper using this technique. You see, paper consumption does not have to be large - the craft itself looks miniature and can decorate a postcard self made. The child will be pleased to give his mother a handmade card.

Within the framework of a school or kindergarten, the time for doing such crafts is limited - and we can only make a few of these modules. The process is laborious for children's fingers and takes time. You can break the craft into 2 classes - on the first we make modules, on the second we form crafts.

Children's crafts in the form of a cupcake are very popular with girls.
Cupcake and bird very quick craft because it does not require many twists. Such crafts can be done by children in grades 1 and 2 - slowly, gently twisting and gluing the twist tails.

But a bear or a bunny is already a paper craft for children who have gotten their hands on simple quilling tasks. For grades 3, 4, 5 - this level of complexity of do-it-yourself crafts is just right.

By the same principle, you can make larger twisted crafts - if you take not a thin cut strip, but a folded sheet of paper. The thick folding of the sheet will allow you to get large twisted parts and you can make big applique- for example, such a penguin or an owl made of paper.

And also large twisting crafts are obtained from corrugated cardboard. Due to the ribbed relief, such a corton forms wide volumetric parts and can be used to make 3D paper toys. Craft for the older group of kindergarten or for school (grade 1,2,3,4).

Origami
based on the CONUS.
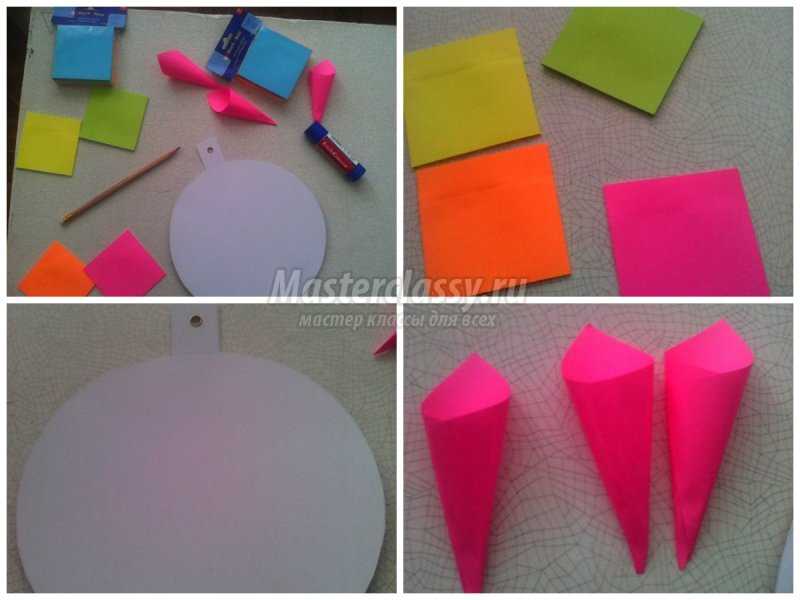
A paper cone is also a good base for children's craft ideas. We all made a Christmas tree from a cone in kindergarten with our own hands. And now we can already make any character out of paper in the form of a cone craft.

So that the cone is not too wide and not too narrow - its razmerka (flat pattern) should be an angle of more than 90 degrees - usually 120 degrees (as in the photo below) - that is, a third of a full circle.


For a giraffe, you can make the cone thinner and sharper. Then we need a quarter of a circle (that is, not 120 degrees, but 90 degrees is enough).

Origami
folded in half.
But children's crafts that are made from a sheet of paper that was bent in half and cut out the silhouette - as a result, we got a double-sided craft with the same symmetrical sides.


And paper birds can also be made using the same technique. In the bird (pictured below), we see that the wings are a fan made of paper or napkins. And in the fold of the upper part of the bird, we make a slot and insert the fan there.

For animal crafts, elephant ears can be inserted into such a slot. And also, for example, a lion's mane made of cardboard or thick paper.

To such BENDING CRAFTS, you can attach not only wings, but also a head - which will be perpendicular to the body. See the photo below with an example of a children's craft "Black Cat" made of paper.

The head of this cat is attached according to the same principle as the wings-fan of the bird above - ALSO IN THE SLOT. If you look closely, you will see that the head has fold too, which divides the head into 2 planes (posterior and anterior).
THE BACK PLANE OF THE HEAD continues with the ears, AND THE FRONT PLANE OF THE HEAD contains the glued eyes and whiskers of the cat.
A slot is made in the back of the cat (as in the bird above for wings) - and the BACK PLANE OF THE HEAD is inserted into this slot. And the front plane simply hangs in front and is not inserted into the slot.
A very simple paper craft for older children (age 5-6 years). And for children in grades 1-2, it’s also great do-it-yourself work.
It is possible to provide for such a craft scheme addition in the form of a tummy- like these hares below. To do this, you just need to draw additional processes of paper in the abdomen area, which then, after the silhouette is folded, WRAPPED WITH A ROLL and fastened with a stapler or glue.

You can slightly modify this principle of crafts - leaving between the two halves-bochins the UPPER BACK PLATFORM. That is, at the top of the part, make not one fold, but two folds at a distance of 1-2 cm from each other - this is how we get the back.
These bears made of cardboard (or thick paper) have just such a back.

And these paper birds (pictured below) also have a back. And thanks to this site, we were able to provide for the tail part (it became a natural continuation of the dorsal part of the bird).

Both birds and bears according to this scheme can be drawn in advance on a template made of paper, then circle this template on a sheet of cardboard by drawing in advance the internal fold lines (those that go along the back). And the task of the child is to cut the silhouette of the template and bend it along the internal lines. That is, the craft is available to children from 5 years old, and is suitable for middle and older groups of kindergarten and for school lessons creativity and labor.
Origami
SIMPLE ORIGAMI.
For young children, it is difficult to make multi-step origami crafts. So it's better to start with simple circuits, which are then supplemented with cut out elements, giving them a resemblance to the intended character. So we get easy crafts.
You yourself, with your own hands, you can experiment with a sheet of paper - fold it this way and that, and then think about what this folding sheet might look like ... but what if ears are here, eyes are here, and nose is here .... wow, this looks like a great MOUSE.

Here's another simple folding of paper along diagonal lines that makes it possible to get a fold for the Ladybug craft. Spots and a muzzle can be drawn with a marker or cut out of colored paper.

The simplest thing to do Small child is to fold a sheet of paper in two folds and get base-blank for a character made of paper, whose mouth opens, and therefore you can make him not only a muzzle, but also a mouth with teeth and tongue.


This children's craft is suitable for classes in paper design in kindergarten. She needs double-sided colored cardboard or the same thick paper. It is good to buy office colored paper for such crafts - it has a higher density than standard children's colored paper.
Or children can make their own hands like these easy folding bed crafts. To do this, a sheet of paper (A4 format) is cut along a beveled diagonal. And then it folds into 2 folds (to get 3 parts). The wide side of the folded paper is not glued onto a sheet of colored cardboard and then decorated according to the design of the sketch.

Children's paper crafts.
DROP template.
If we roll a wide strip of paper with the ends together, then we get teardrop-shaped twist.
Based on such a simple blank, you can also make the most different designs crafts - a whale made of blue paper, a ladybug (glue wings to a drop).

From paper template in the form of a drop it is convenient to make mice, or a hedgehog.

Can i to such drop-shaped details add on top round paper roll- to make a head. So even more options for simple and easy crafts - bunny, duckling, swallow.

Turn on your imagination and multiply ideas.
And if you connect a whole series of strips together like CHAIN LINKS, then you can get such a green crocodile from paper loops.

And here's another simple crafts which are based on a wide strip, bent into a ring or into navicular shape.
In the craft with the boat - we first do holder at the bottom of the boat- it's just a small rectangle of paper, which has small sides bent on both sides. And then we glue the REAL BOARDS OF THE BOAT FROM BLUE PAPER to these bent sides. Rectangle with edges in the center will not let the sides of our boat collapse towards each other.

The craft is suitable for children from 5 years old.
And here is a children's paper craft, where white paper strips also imitate the body of a swan. Here the form holder is a roll of white paper twisted into a long tube. Craft for children 5-6 years old.

Crafts-postcards
from paper.
And of course, if you like to make children's paper and cardboard crafts, then opener cards suitable topic For children from 3 years old. Ideas for opening crafts can be very different. For example, an aquarium with a fish. Or craft-valentine with spring birds.

You can make a simple children's craft in the form of a castle - the gates of which will be opened for boys by knights and soldiers, and for girls by beautiful princesses hidden inside a paper bastion.

Crafts postcards can be great gift for March 8, made by hand. For example, here is a cup with tulips. The handle for the cup can be cut out as a separate piece and glued to the side of the mug.

Or you can make an apron craft with carved paper lace (lace can be obtained from ready-made paper napkins, or cut a snowflake out of paper, cut off its lace edge and we will get a border for the apron.
You can cut out the silhouette of the can on the craft - glue it thin layer file (on double-sided tape). And stick a pocket of paper ( back wall crafts) and put hearts in this transparent front pocket.
Here is another technique VOLUME POSTCARDS. She is simple. Fold a piece of paper in a fold. And on the edge of the bend we do 2 notches scissors (any length and width). And then we simply push the place between these incisions with a FINGER into the postcard - and it BUGS out in the form of such a rectangular stand.
And now we stick any element on this stand. For example a cupcake.
If you make three pairs of such cuts - push them with your finger inside the postcard, then you can stick a cupcake on each of them. And checkboxes on top. Here is a simple children's craft and ready. Interesting and non-standard.

To get started, practice on a piece of a regular sheet - bend in half, cut it twice and push the incised part inward. You will see that it is simple.
And you can show your kids the same way. And then on such a stand (already pushed inside the postcard) you will stick any craft (butterfly, dinosaur, rocket).

Any original ideas can be realized in this technique of voluminous postcards. That is, this is another field for children's fantasy paper crafts.
The longer you make paired cuts, the further the strip-stand will be curved inside your postcard. You can see this in the example with the postcard craft in the photo below.

Crafts openers can have a surprise in the form of a folding fan. Under such a folding bed, you can arrange a peacock with a magnificent tail.
Of course, such a complex carving (as in the photo below) is difficult for a child. But for children, you can simplify any idea - let the fan be not carved, but simply cut out the peacock spots separately and stick them on the fan blades.

Or a cot inside the postcard can be in the form folding chain of symmetrical elements- butterflies, flowers (that is, the main thing is that there is a symmetry of the folds).
We cut out any identical details - butterflies, flowers, hearts. The main thing is that the left half and the right should be like mirror reflection friend of friend. And then these parts can be glued in halves to each other (not all the halves should be smeared with glue, but only the outer edges). And then we get a multi-colored accordion of parts. And paste this accordion into a postcard. Also a beautiful craft - night butterflies, bright but against the background of a dark sky.

These are the ideas I collected and systematized - for your future paper crafts. I am sure that now you will not only be able to repeat the crafts presented here with the children, but also CREATE YOUR OWN AUTHOR'S WORKS for each of the proposed METHODS.
After all, when you understand the method, and when you see that it allows itself to be widely interpreted - multiplying the same technical idea in the form of the most various crafts- then you just have to CONTINUE THE CHAIN OF IDEAS.
And I wish you the most original creative finds. And the children will be very happy to implement them in the most diligent and inspired way.
Good luck with your children's crafts.
Olga Klishevskaya, specially for the site
If did you like this article
And you want to thank our author for this painstaking work,
then you can send any amount convenient for you
Helpful Hints
1. Prepare a cardboard box, rotate it as shown in the image and cut off the top of it (see image). Set aside the cut pieces of the box.


2. Put the box on its side and connect the sides using tape.

3. Turn the box over and tape the pieces together where the yellow arrows point.

4. We make the roof of the house. Prepare those parts of the box that you got rid of at the beginning. Use adhesive tape to connect these parts in the place where the arrows point.


5. Tape the roof to the main body of the house.

6. dotted lines (yellow color) indicates where to cut the cardboard.


7. Connect the parts indicated by the yellow arrows (see image).


This is the house you will get.


How to make a house (castle) out of cardboard
Making such a beautiful castle is not difficult at all. You can easily fold it and store it conveniently.

Such a house can be placed on any surface (floor, table)
You can make both a castle and a simple house, a fire station or a store - it all depends on what exactly you want.
You will need:
plain paper
Scissors (clerical knife)
Pencil
Acrylic paint (felt-tip pens, pencils, crayons)

1. On plain paper, draw a diagram of future walls. Adjust to desired dimensions.
2. Make windows and doors large enough for a child's hand to fit through.
3. Decorate the walls to your liking. For this, use acrylic paint (gouache), pencils, felt-tip pens and even pieces of fabric that can be glued with PVA glue.


4. When all the walls are decorated, simply insert them into each other, making cuts in the middle of each wall - one wall on top, the other on the bottom.

* Cuts must be made to the middle of the wall.
Another do-it-yourself cardboard house


Model of a house made of cardboard (photo)


How to make lamps (chandeliers) out of cardboard
Such a simple and very inexpensive cardboard lamp can decorate a kitchen, a veranda, a pantry and even a children's room.

You will need:
Bulb
Paint (optional)
Scissors or utility knife (if necessary)


Cardboard crafts on the theme "Arctic"
Easy and inexpensive to do These are such beautiful toys made of cardboard.The cold climate is home to a wide range of wildlife, including deer, polar bear, and Siberian husky, all of which can be made from cardboard.

For complete picture you can make sleighs and Christmas trees.


Draw diagrams of all the details and cut them out, then assemble them.

What can be made from cardboard: gift bags
If you turn on your imagination, then you can make original gift bags out of nondescript cardboard packaging.

You will need:
Cardboard (can be from old boxes)
Scissors (if needed)
bright ribbons

DIY cardboard toys: "Slides"
You can make this cardboard craft with your child. He will like to participate in the creation of an interesting toy, which he will continue to play with pleasure.

You will need:
A small cardboard box (you can use cereal or rice)
Scissors
Tennis balls (or any balls not big size and weight)


Crafts from paper and cardboard: "Big slides"
This toy is made according to the same principle as the previous one, only the sizes are larger here.

You will need:
Scissors or utility knife
Part of a large cardboard box or packaging
Cardboard cylinders (from toilet paper or paper towels)
PVA glue (you can "Moment")
* If the cardboard cylinder is not too long, try gluing several cylinders together with tape.

* If necessary, cut the cylinder with a utility knife.

* You can cut the cylinders in half to see how the balls descend on them.
* Apply glue to the side of each cylinder (or halves of the cylinder) and glue the "hill" to the main cardboard part (see image).

* you can roll tennis balls, small cars, etc.


How to make craft "Town" out of paper and cardboard
If you have a large cardboard box left, several boxes, a cardboard sheet, or several cardboard sheets, then you may well not Big city ok for a child.

This toy is very good for general development child.
* When using a large box or sheet, all you need to do is cut off the extra details and start drawing the road.
* If there is no big box, then use tape to connect all the details to make a big city. It is worth noting that you need to glue the adhesive tape with reverse side cardboard, otherwise it will be inconvenient to draw with a marker.

* After you have drawn the road, paint with bright colors several houses, important city buildings (fire department, for example), railway etc.
DIY cardboard layouts: catapult

You will need:
small cardboard box
Tight rubber ring (or hair tie)
Pencil
Matchbox
Toothpicks (matches)
Scissors and/or utility knife
Adhesive tape (adhesive tape)

1. We make a basket (from which the "shells" of the catapult will fly out).
cook Matchbox or a small piece of cardboard.
Use duct tape to stick the basket to the pencil and set the blank to the side.


2. Prepare a small cardboard box.
Make the necessary cuts with scissors and fold it so that you get a figure, as in the image


Make a small hole in the middle on the side (for a tight elastic band)

Make the same hole on the opposite side.
Pass the elastic through one of the holes

Insert a few toothpicks (matches) into the loop formed and tighten the loop to fix them

Repeat the same on the reverse side

* It is worth noting that the elastic must be well taut for the catapult to work well.
3. Start twisting the elastic inside the box (see image). Do it in the middle.

4. Gently insert the pencil with the basket into the twisted rubber band.

5. Now you can lower the catapult and release it.

Cardboard has become a very popular material, which only is not made from it, the current paper and cardboard crafts may be completely unexpected. If earlier, mainly children in kindergarten and primary school schools (and their parents, of course), now all ages are submissive to this occupation. Furniture, and absolutely non-toy, sculpture and even houses - and all this is made of cardboard. Gift wrapping and a variety of boxes, toys and dollhouses, photo frames and wall panels from cardboard will be able to decorate the interior, entertain the kids and serve as a present.
DIY cardboard crafts available to everyone. After all, sometimes you don’t even need to buy material. Cardboard packaging boxes, cylinder liners from rolls of toilet paper and towels, cardboard from packaging of tights - you can’t list everything. And literally from garbage, if desired, you can create very interesting things. Colored cardboard and paper can be purchased in the stationery department of stores. Sometimes special grades of paper and accessories may be needed. You can find them in specialized stores, scrapbooking departments. You don't need any special tools other than scissors and a craft knife. Glue, paints and various auxiliary materials - this is already at your discretion.

Crafts from colored cardboard in the form of voluminous postcards are unusually elegant. To make such a postcard, you will need several colors of cardboard and a printer. Copy the diagram, enlarge it to the size you need and print it on a printer. Next, transfer the drawing to cardboard and cut it out with a breadboard knife. It remains only to stick it on a cardboard base of a different color. It is cut out in such a size that the volumetric part of the folded postcard fits completely inside. Most often, the base is in the form of a rectangle, unless the design of the postcard provides otherwise. The rectangle must be divided into two equal parts. To make the cardboard easier to bend, the fold line can be made with a pen with an empty rod or a thin crochet hook. Next, put a ruler at the bend, this will greatly facilitate the whole process. The denser the cardboard, the more carefully you need to iron the fold line from the outside. front side postcards can be decorated with the most various means: paper application, beads, rhinestones, bows, etc. On the Internet, you can pick up a wide variety of drawings for any holidays. A deer, a Christmas tree or a snowflake, a snowman - they are quite suitable for the New Year or Christmas. The volume part of the proposed postcards is best made from thick paper or thin cardboard. Volumetric postcard It can nicely complement a gift or even serve as a simple gift itself.

The most varied can be crafts from cardboard, colored paper made in the application technique. Such cute little things can decorate the walls of the nursery, they can be hung over the baby's bed, and older children will be delighted with such an elegant toy. A four-piece panel "The Seasons" can be made with a plywood frame if you have a craftsman in the family who can handle it. The frame is cut with a jigsaw from 3-4mm plywood, the edges and surface of the frame will need to be sanded with sandpaper and if desired, can be covered with a layer of colorless varnish. But it's good enough for making it. thick cardboard. The frame in this case is made of two parts. Bottom part cut out in the form of a square, on which an application of colored cardboard is pasted. The upper part is made in the form of a frame itself, its size is slightly smaller than the size of the square, so that the lower one looks out from under the upper one by 1-2 mm. The upper part of the frame is also decorated with appliqué. A simple and uncomplicated technique allows you to create a very pretty little thing, and all that is required is only accuracy and extortion. quality material. What beautiful flowers can be made from paper, you can find out in ours.

Cardboard crafts for kids and made together with children from cardboard boxes and rolls of toilet paper or paper towels are extremely diverse. Look what a wonderful castle turned out from those very cardboard cylinders and toilet paper. Liner cylinders are attached to the cardboard base, which are then supplemented with roofs in the form of cones cut out of cardboard. In some turrets, the top is simply cut with teeth. You can dock the towers with the fortress wall, also cut out of cardboard, using slots made in the cylinders with a breadboard knife. You can create a textured surface of the turrets using toilet paper moistened with PVA glue. Doors and windows are also cut out with a breadboard knife. The assembled structure is allowed to dry thoroughly and painted acrylic paints. The boys will be happy to place knights in such a fortress and play battles. And your little princess will be very happy to get a home for her dolls.

It is not so difficult to make it from several boxes. Connect the boxes together with a stapler, construction tape or glue. Windows and doors are cut out with a breadboard knife and decorated. The decor doesn't have to be fancy. IN this case the tiles are simply drawn with a white marker. You can make most of the furniture out of cardboard, and in some places you can use ready-made suitable boxes, painting them accordingly. Cover the walls with leftover wallpaper or printed paper, furnish your home in a creative way. And then a table made of champagne cork, a chair made from the metal part of the same cork, a tea strainer and other little things will find their place there. Cylindrical inserts made of cardboard can become a material for boxes and toys. A little imagination, scissors, glue, paints or colored paper - and the man-made miracle is ready. Moreover, the insert can be used both as an internal and as an external part of the box. It is made in two layers so that you can put on the lid. Inside, such a box can be pasted over with colored paper or cloth, and outer side dealt with in a variety of ways. Curly details of boxes can be made from papier-mâché. If you paint such a box, then you should varnish it later so that it lasts longer and maintains a beautiful appearance. And the kids will be happy to take part in the creation of all this.

How to make a cat house out of cardboard.
Everyone knows how cats love to hide in boxes, boxes or basins. Why not make a cozy house for our smaller brothers, which will serve them as an excellent sleeping place, and sometimes for games. To make it, we need corrugated cardboard, and you can use packaging from a TV, refrigerator or other household appliances. Next, we mark circles on cardboard using a compass (or a suitable bowl). It is very easy to make a compass out of a carnation or a sewing pin, thread and a pencil. Such a house, as in the picture, is made of several groups of circles. different size and glued with PVA glue. The hole cutting pattern is shown in the figure. The house does not have to be conical. The puff construction allows you to create different shape, for example, first expanding like a bowl, and then tapering upwards. It is not necessary for the hole to reach the very bottom. If you don't have the right amount corrugated cardboard, it is quite possible to build a semblance of a toy house from a suitable box, cut out windows and a door, decorate the outside with any decor of your choice.

Corrugated Cardboard Crafts can be very varied. These can be flat sculptures cut out of layered corrugated cardboard. To do this, find a picture of an animal with an expressive silhouette and copy it. Transfer the silhouette drawing to cardboard. It remains only to carefully cut it with a breadboard knife. The transverse parts, which are fastened with slots, will give the figure stability. They can mimic grass or ice, like penguins. The slot is made up to half the height of the stand in both fastened parts. The figurine can be painted, but even without coloring it looks quite expressive. The corrugated cardboard airplane shown in the figure has only details, and the main part of the body is a cylinder from a toilet paper roll. And you can make figurines using the quilling technique from colored corrugated cardboard. Material in the form of sheets of colored corrugated cardboard or ready-made strips in sets of various colors is on sale. The very process of creating figurines is very exciting for both adults and children, somewhat reminiscent of technology.

New Year's crafts from cardboard can be performed in the most various techniques. These are, of course, snowflakes, flat and voluminous, Christmas trees, Christmas decorations and garlands. This also includes various gift boxes and other packaging New Year's gifts. Cutting snowflakes is the most affordable way to make Christmas crafts. You can use ready-made templates, which you will find a lot on the Internet, or you can give free rein to your imagination. Ready made snowflakes you can decorate the Christmas tree, the interior, glue them into garlands or use them as an applique to decorate the packaging of New Year's gifts.

Snowflakes do not have to be flat, you can make them voluminous. Unusually beautiful snowflakes made using the quilling technique. It is not necessary to buy a Christmas tree, live or artificial. It is very easy to make a Christmas tree out of cardboard and paper. Let's make a cone from cardboard of any height and cut green paper into strips. It is better if the paper is in several shades. paper strips fasten in the form of loops. This can be done with glue, double-sided tape or a stapler.

And then we will make a fringe of eyelets in several rows on our cone. The bottom of the top row should cover the attachment point of the bottom row. You can also attach the fringe in various ways using glue or tape. At the top row of loops we will sharpen upper part. You can decorate the Christmas tree with a homemade top, toys and garlands. You can also cut out a Christmas tree using a template made of paper or thin cardboard. The more details you cut out, the more magnificent it will turn out, but at least three are enough.

In the picture, the Christmas tree is decorated with carved toys. But making them yourself will be very difficult, especially if the tree is small. It doesn't matter, the toys can be cut separately and colored paper and just stick them on the Christmas tree. Glue and glitter will allow you to simulate snow on the branches. Can be made from paper interesting toys to decorate a real Christmas tree. The technique for performing them is quite simple and is quite clear from the above figures. Children will be proud of their own hand-made balloons, garlands and lanterns. From cardboard, you can make a model of a small snow-covered house and put it under the Christmas tree. If you insert an LED candle or a battery-powered flashlight inside, then it will look even more spectacular.

Craft school from cardboard
At school, in labor lessons, paper and cardboard are often used. Crafts from cardboard grade 4 can be very diverse, because at this age, children are already very skillful. The technique used is very different. For manufacturing in the lesson, you can choose toys, boxes, postcards. You will find a detailed master class with paper crafts for children.

Cardboard crafts, schemes the manufacture of which is given in our material is completely simple. Just copy the drawing and then enlarge it to the size you need. Even if you do not have a printer, it is not difficult to transfer it to paper by simply attaching a sheet to the monitor. For simple details, such as balls or flowers, you can make a template yourself.
It would seem that it could be easier than paper and cardboard crafts! This type of creativity is familiar to every child with early years, and the kindergarten teacher talked a lot about various ways creating paintings, applications and figurines from these simple materials. At school, a child can discover paper art from the other side: to show that crafts do not have to be primitive at all, they can have functional significance, bring aesthetic pleasure from the work done.
Technology: paper and cardboard crafts
An important component of school discipline in the primary grades technology - paper and cardboard crafts. This occupation, like other types creative activity younger students are extremely important for comprehensive development child. At the beginning of each lesson, where the children will be asked to work with their hands and create paper flowers, figurines and other crafts, the teacher should interest the pupils in this process.
If we are talking about creating a certain type of flowers, then a few words should be said about this plant, give an example of where it grows and where children could see it. Often used in technology lessons is a presentation with a visual demonstration of not only the introductory part of the lesson, but also step by step master classes. Thanks to visualization, schoolchildren better absorb the material covered, and a presentation with a master class will attract their attention and arouse interest.
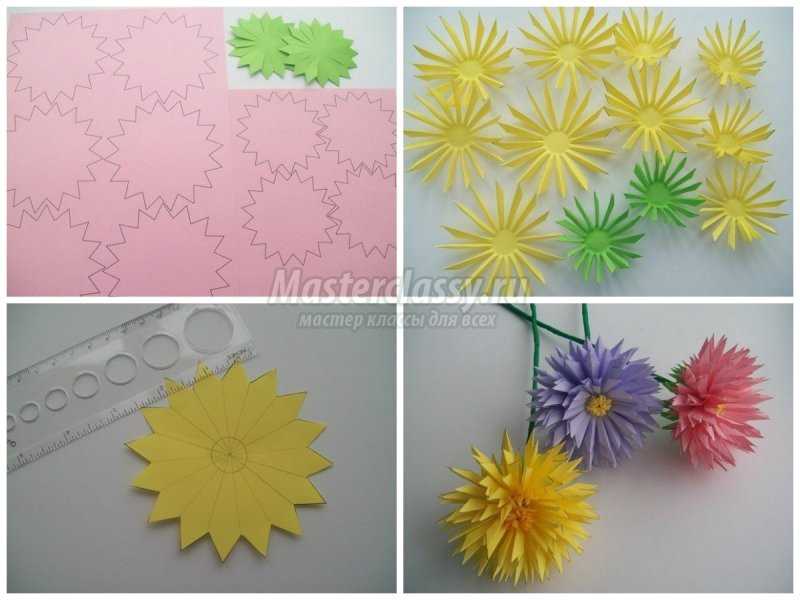
Dahlias - an easy option crafts from colored paper and cardboard. A paper dahlia can be used to decorate a classroom if made large. The main thing is that the same master class allows you to make a small or huge flower, while using the simplest and most affordable materials.
Dahlia consists of many acute-angled paper tubes, which are glued to the cardboard base in layers. Looks very impressive big flower at a distance, so it can be pasted on the walls on the eve of a school holiday or a spring ball, but it is also impossible to look away from it, looking at it up close.
If you decide to make such voluminous flowers that can become an element of decoration homemade postcard or floral applique, without the help of a hole punch, then you will need a simple pencil and scissors. The task will not be easy: each circle must first be drawn on paper (you can use a small pen as a template), and then cut out one by one.
cardboard circle
Colored scrap paper
Flowers are very beautiful if you use colored embossed scrap sheets for work, but ordinary bright colored paper is also suitable, but it must be painted on both sides.
We only need cardboard to cut out the base circle, it should be the same diameter as the rest of the circles. All prepared paper circles must be carefully folded in half diagonally. At the lesson, children will also be able to acquire the first knowledge about geometric shapes and geometric terms. In the presentation, they should tell and show on the slide what the diameter of the circle is. When all the blanks are ready, you can start creating a flower.
On a cardboard base, it is necessary to mark the middle - put a dot with a marker, and then start gluing the blanks. One edge of the workpiece should touch the middle. Each blank should be glued so that the half is glued to the base, and the second half remains free, it will create the volume of our flower. The next blank must be glued so that it is nested in the previous one. The result is a voluminous flower, beautiful and original, and you can decorate the middle with a bead, rhinestone or a drop of glitter.
A blooming bud can be made using the same half blanks. For such a bud, you will need only four circles for petals and another green cardboard circle. The cardboard circle should be folded in half, and four blanks should be glued into it, as demonstrated in the master class. You can glue the petals-blanks in two rows, in this case it is better to use circles of different sizes: for the first row - small, for the second - large.
If you plan to make, for example, postcards for Easter or March 8, then you can decorate greeting cards with such flowers.

Crafts from paper and cardboard Grade 3
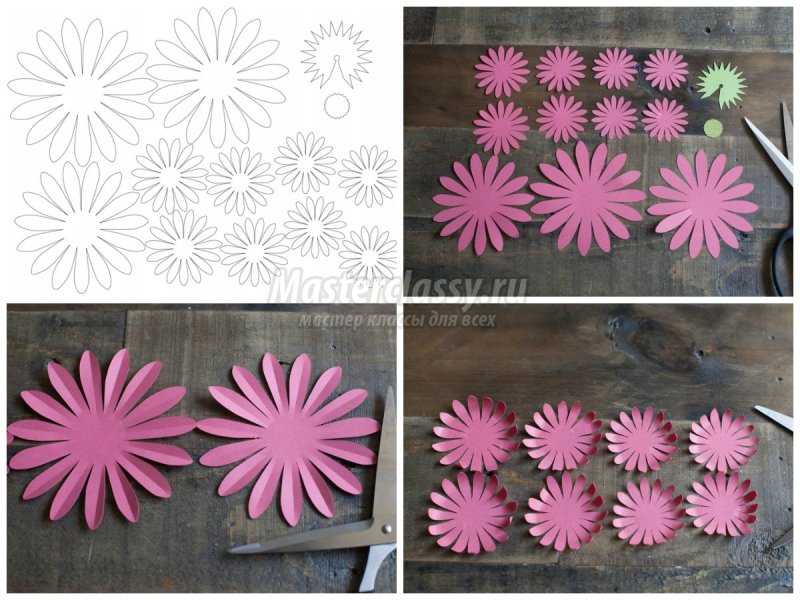
In some cases, when it comes to crafts from paper and cardboard, templates may be needed. Typically, templates are used when there is a need to cut many openwork details of the same shape or size. For example, when making multilayer gerbera flowers, you need blanks with petals, and to make the craft as accurate as possible, you can download the template desired shape, print it on a sheet, and then cut along the contour with scissors.
You can also redraw the template on a sheet, attach it to the monitor and circle it with a soft pencil along the contour, then transfer this template to cardboard and cut it out. You will have a cardboard blank ready, which can be circled on colored paper, getting the petals of the desired shape.
At first glance, it seems that the cutting technique is very simple, and schoolchildren have long known how to create paper and cardboard crafts. 3rd grade you can teach not just the technique of cutting and gluing, but open them in principle new way work with well-known materials and tools. Schoolchildren can appreciate that they are not at all primitive, but may look like a work of art. You can further interest the kids in paper art if you tell them about a modern super-toy.
Paper and cardboard crafts for kids
We will make bright, colorful gerberas - this is paper and cardboard crafts for kids and for adults who are able to open fundamentally new technology work with those materials that are known to everyone from kindergarten. After looking at the list of materials needed for work, you will see for yourself:
Colored thick paper
Glue gun
It's all basic set which will allow us to make a paper work of art. The proposed master class also used floral tape and wire, as well as wire cutters, but these materials can be called auxiliary, since they were used at the stage of forming bouquets from ready-made flowers.
Pay attention to the template: it contains 11 flowers, among them 3 are large and 8 are smaller, while the small templates are not all the same size, among them four are larger and four are smaller. Thus, you can make a beautiful layered gerbera. The petal template should be printed on bright paper, the color you chose for the gerbera. Two more small details should be printed on a green sheet - these will be the details of the sepals and the middle.
| Cardboard crafts
Master class on making cardboard toys "Symbol of the year - pig" Synopsis on master class with parents and children "Toy from cardboard. Symbol of the year, pig. Target: Make a toy out of do-it-yourself cardboard. Tasks: Create a friendly atmosphere. Develop communication and interaction of the child with adults and peers. Imagination development and...
Master Class cardboard crafts by February 23. "Mug for beloved dad on February 23". I present to you a master class for making a gift for dads on February 23. Material: *dense color double-sided cardboard; * colored paper; * a simple pencil; *scissors; *ruler; * scissors;...
Cardboard crafts - Advice for parents "The importance of paper and cardboard construction for the development of a preschool child"
Publication "Counseling for parents "The meaning of construction from paper and ..." Advice for parents The value of paper and cardboard construction on the development of a preschool child. Design and manual labor have great importance for the development of the child and his preparation for learning for school. These activities will broaden your horizons...
 MAAM Pictures Library
Abstract of a lesson on paper design with children in the preparatory group for the school "Winter Forest of Tsar Cardboard" Goal: create conditions for development artistic ability in children, to be interested in making crafts - an openwork crown of a tree and snowflakes. Learn to fold paper crafts slowly, carefully ironing the folds, develop an eye, strengthen the small muscles of the hands. Bring up...
Innovative technologies in preschool educational institutions. Tangram - cardboard puzzle Innovation - innovation, innovation. The use of innovations in kindergarten involves the introduction of updated, improved and unique ideas obtained by the creative efforts of the educator. The purpose of innovative activity in a preschool institution is ...
Presentation "Volumetric Christmas tree made of cardboard" A do-it-yourself Christmas tree made of paper is a very good and, most importantly, timeless idea when the question arises: what can be done and presented for the New Year. A good gift combines sophistication of style, originality of ideas and warmth of the soul. Of course, all these traits are especially good...
Cardboard crafts - Master class "Airplane made of cardboard"
 This version of the aircraft is the most time-consuming, and a small child is unlikely to be able to independently carry out this undertaking. The help of an adult will not be superfluous. If your baby is young, then this version of the technique can be made for games by parents or older children in ...
 Hello dear visitors of my page. When working with preschool children, I often read various fairy tales to them. For better assimilation of the material, after reading a fairy tale, children draw illustrations for fairy tales. But this time, I decided to do something different and make a baby book. For this I...


