Lunar manicure step by step. How to make a moon manicure at home? Red moon manicure
Nail art is great way revive the style and add a little extravagance to the image. A perfect solution would be a moon manicure, which gained popularity in 2013 and became the main trend of 2014-2015.
What is a moon manicure
The moon or hole is a white area near the nail bed, which indicates the transition of the plate to the base. Earlier traditional healers according to the state of this area of the nail, the health and lifestyle of the patient were determined. In ancient times, girls tinted the hole with white to create a snow-white effect.
Second wave of popularity moon manicure came at the beginning of the 20th century. In the 1920s and 1930s, women of fashion deliberately painted over their nails not along the entire length in order to visually reduce them and give them a certain roundness.
The technique for performing such nail art is similar to an inverted jacket or Shanghai manicure. To cover the plate with varnish, a special stencil is used, only it is attached not to the end of the nail, but to the base, creating a stylish and cute semicircle.
Advantages moon manicure:
- This is a great way to enhance the beauty of square or rectangular nails. Visually, they will become less sharp;
- If you are planning to attend a retro-style party, such nail art will be the perfect end to a vintage look;
- It is very easy to perform at home, even with minimal experience;
- Building up is not a problem for adjustment this style. You can also not be afraid of cutting nails, because the tips are practically not involved in creating the desired design.


Video: stylish moon manicure
Video: elegant manicure
Video: moon black and white manicure
How to make a moon manicure
To create this style at home, you will need to prepare templates for yourself. Many craftswomen cut out circles from cardboard, paper or tape. With adhesive tape, you need to be as careful as possible, because if the varnish is not completely dry, traces will remain on the nail. You can buy stencils at a beauty supply store. Also suitable for strips classic jacket.
After you need to decide on a combination of colors. The following combinations look very beautiful: red-black (this is the most popular moon manicure of 2015 after Valentino's show), black-silver, beige-white, blue-purple. All colors look great with gold. Naturally, before doing nail art, you need to decide on the general image so that the nails fit organically into the style.
Instruction how to make a moon manicure step by step:
- Erase with nail plate the remnants of the old varnish, file in right places Be sure to remove the cuticle. To do this, you can use tools for unedged manicure;
- Cover the nail with the base coat that is needed to level it, let the varnish dry;
- Now apply the selected color for the moon on the nails, this will be the basis of the nail art;
- After that, close the painted moon with a stencil and paint the nail with the main color;
- It remains only to fix the manicure transparent or matte varnish. A good option is to cover the plate with glitter to create a holographic effect.


This year is very Fashionable style ombre. It is used to tattoo lips, dye hair and eyelashes, and now also to create unique nail art. To do moon ombre on nails, You will need:
- Clean and prepare the nails, as described above;
- Now paint the moon using the stencil;
- After that, you need to take a piece of a simple sponge (you can even take it for washing dishes). On the sponge, apply several colors of shades of the selected varnish. For example, for green it will be: light green, turquoise, green, dark green. Using gentle pressure movements, apply paint to the plate. Make sure that there are no stains, if necessary, walk around the site again;
- Glitter looks very nice on such a manicure - they do not clog the color gradient. They can be used as a fortifier.
You can use not only shades of the same color, but also contrasting palettes. Then you get a very beautiful and cute nail art. But at the same time, it should be noted that a monochromatic ombre looks more impressive than a multi-colored one.


Tips for creating a moon manicure:
- Many fashionistas cover their nails with foil, paper, or glitter on the moon. This gives them luxury;
- For creating unique style you can also attach a piece of lace or mesh to the place of the hole;
- How darker colors- it will be more effective manicure;
- If you want the manicure to "live" as long as possible, then the nails need to be painted with Shellac varnish or coated with a special gel;
- Depending on the season, event or mood, you can draw patterns on the hole. Let's say if it's spring now - let it be a leaf, summer - a juicy slice of fruit, autumn - a leaf, and winter - a snowflake;
- To create a cute style, we recommend attaching rhinestones, beads, sparkles, or glass pebbles to the moon.
Experiment with different colors and styles to get your perfect moon manicure. Any beauty salon can provide you with such a procedure, while the cost is quite low. In the average salon of Russia and Ukraine, the lunar trendy manicure will cost $10. And, say, in Voronezh or Kyiv, about 9 USD.
Lunar manicure calendar
Before doing any nail art, it is right to look at the moon phase calendar. All beauty procedures are very dependent on which lunar day and month they are performed. Depending on your zodiac sign, you need to be able to choose the right day.
- In ancient times, they said that cutting your nails after sunset on Friday is for money;
- Regardless of what your horoscope says, it is undesirable for girls not born on Sunday to do any cosmetic procedures;
- Avoid nail salons during your period.
The phases of the moon are not determined by months. This calendar depends on what sign the satellite is in now. Pisces, Gemini, Taurus are considered the most unfavorable. "Good" astrologers call the signs Capricorn, Sagittarius, Aquarius and Aries. Libra, Virgo, Leo are neutral. At the same time, Cancer and Scorpio are more positive than negative.
But at the same time, in the winter months - January, December and February - a suspension of growth is possible, which is in no way connected with the phase. In the spring, the body suffers from beriberi, so March, April and May are the months of nail foliation. But in summer and autumn (from June to November), nails grow quickly, they are strong and beautiful. July, August, September is a great time for any beauty treatments. And in October it is better to devote more attention vitamin baths.
In 2007, the fashion world was excited interesting event: an unusual moon manicure has become the trend of the season. Some experts called it mirror French, others - fantasy ... Indeed, the moon manicure looks quite interesting: a “smile” is drawn at the base of the nail in one color, and the rest of the nail is covered with a different color. In this case, the varnish is applied in stages in two layers, ensuring complete overlap and opacity of the color. Lunar manicure is performed in different techniques and using absolutely any colors - both contrasting and one gamut.
Lunar manicure in pastel shades is also popular. Lunar manicure is universal, because it not only matches perfectly with any style of clothing and suits any type of appearance, but in the process of creating it, you can use ordinary varnishes, gel polishes, glitter, shimmer tops, mica and even decorative foil.
Lunar manicure is universal and fits any style of clothing.
To be fashionable to the tips of your nails, you don't have to visit nail salons, because, despite the exquisite appearance moon manicure, making it yourself is very simple. A few colored varnishes, a glossy top, stencils, a brush, some free time - and your nails will become fashionable and attractive! If this is your first time doing a moon manicure, pay attention to the following color combinations:
- White with red;
- Beige with white;
- White with turquoise;
- Blue with gold;
- Black with gold.
How to make a moon manicure?
The first and easiest way to draw a moon manicure is with the help of special self-adhesive stencils. Just don't confuse moon stencils with stickers for french manicure! They are radically different in shape. Stencils for moon manicure are round and allow you to draw a perfect rounded "smile" at the base of the nail.
 For beginners, it is better to use stencils to create a moon manicure.
 There are two types of moon manicure - classic and so-called moon eclipse(or reverse moon manicure). For creating lunar coverage you will need:
- Nailfile;
- Nail polish remover;
- Base coat;
- Self-adhesive stencils;
- Two multi-colored varnishes;
- Top coat;
- Moisturizing oil.
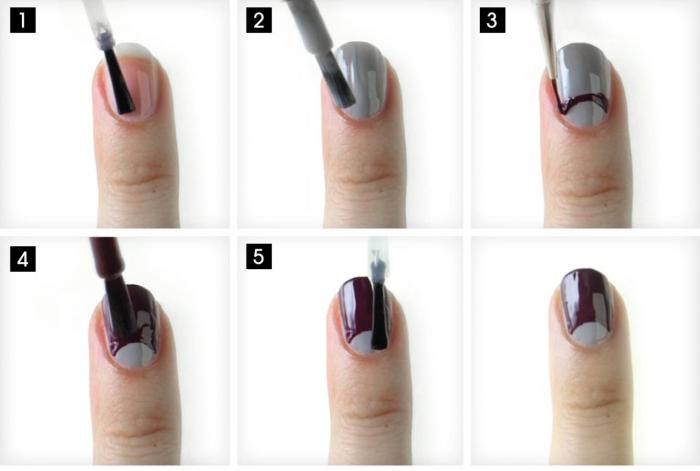
Step-by-step instruction
- Step one. It is necessary to carefully prepare the nail plate. To do this, use nail polish remover to wipe off the old coating. Please note: the liquid must not contain oil, otherwise your new manicure will not last long, because the fat prevents the normal adhesion of the varnish to the nails. With a slightly sharpened orange stick, push back the cuticle, thereby lengthening nail bed. Using a file, give your nails the desired shape. Then apply a base coat on your nails and wait for it complete drying.
- Step two. With the varnish that you have chosen to draw the hole (the base of the nail), evenly cover all nails. Dry the varnish completely so that it does not deform during the process of drawing the “smile”.
- Step three. The most important step. Stick the stencils on your nails so that they cover approximately 3mm of the base of the nail. If desired, you can stick the stencils with a convex or concave side, making a regular or reverse moon manicure. Press the stencils firmly so that the varnish does not flow under them.
- Step four. Cover your nails with the second varnish of your choice, partially covering the stencils and achieving a perfectly even coverage. Remember to carefully paint over the tips of the nails so that the varnish stays on the nails longer and does not chip off. Also pay Special attention side parts of the nails - they should be varnished up to the side ridges of the skin, because only in this case the “smile” line at the base of the nail will look complete and harmonious.
- Step five. Without waiting for the varnish to dry completely, pick up the edge of the stencil and slowly remove it from the nail. If you overdry the varnish, then the “smile” line will turn out to be too convex and may crack, and if you do not dry it enough, the varnish may spread. You should get the perfect transition between varnishes.
- Step six. The final stage of creating a moon manicure. After all layers are completely dry, apply a top coat on top. You can also experiment with the top by choosing top coat with sequins, glitter or mica. After the top has completely dried, rub moisturizing oil into the cuticles for a more well-groomed appearance.
 Step-by-step instruction how to create a moon manicure with stencil stickers
 Lunar manicure with a thin brush
If the stencil method does not suit you, try another method for creating a moon manicure - using a thin brush . Drawing lines requires a steady hand and some practice: how smoothly you draw a line depends general form manicure. But manual drawing has an undeniable advantage - it saves time, because to create a "smile" line, you do not need to wait for the first layer of varnish to dry completely. To create a manicure you will need:
- Orange tree sticks;
- Fine contour brush;
- Nailfile;
- Cotton buds;
- Nail polish remover;
- Base coat;
- Two multi-colored varnishes;
- Drying-fixer;
- Moisturizing cream.
Step-by-step instruction
- Step one. Prepare your nails for applying polish. To do this, remove the old coating with nail polish remover, push back the cuticle with orange sticks. Also, carefully clean the side ridges of the nails from the overgrown cuticle, since when staining with a brush, varnish may flow onto the cuticle. File your nails to the desired shape, trying to file your nails in one direction to avoid delamination of the tips. Then apply base coat on your nails and let it dry.
- Step two. Apply the base coat all over the nail, paying particular attention to the area near the cuticle. Let the varnish dry completely.
- Step three. Using a brush, carefully draw a convex or concave line at the base of the nail with the color of the second varnish. Then fill with varnish the entire area above the drawn line. If you accidentally stain your cuticles, use a Q-tip soaked in nail polish remover to wipe the polish off your skin.
- Step four. Apply one or two layers of fixative on top and wait for it to dry completely.
- Step five. Apply moisturizer to your cuticles and rub it thoroughly into your skin.
 Lunar manicure with a brush is suitable for people with a well-placed hand
 If this is not your first time practicing a moon manicure, then perhaps your hand is already hard enough to draw a “smile” without using a thin brush. All you have to do is cover your nails with base coat and color base, and then draw a “smile” line by hand directly with the brush of the second color polish. But, again, this manipulation requires some practical skills, since there is nothing worse than a sloppy manicure done by a non-professional.
Lunar manicure with foil
If you like to experiment, try creative option moon manicure using foil. To create it, you will need a special ultra-thin nail foil, which very easily takes the desired shape and completely merges with the surface of the nails. In addition, the use of foil does not require perfectly smooth transitions, which means that making such a manicure is easier and faster. You will need:
- Cotton buds;
- Orange tree sticks;
- Nail polish remover;
- Nails glue;
- Special ultra-thin foil;
- Europemza;
- Base coat;
- Colored varnish;
- Top coat;
- Nourishing oil.
 If you like to experiment, try the foil moon manicure.
 Step-by-step instruction
- Step one. Do hygienic manicure using orange sticks. Move the cuticle as far as possible, while cleaning the nail plate from the overgrown skin and thoroughly clean the side ridges. Remove the old coating from the nails, and cut off the burrs with the help of europumice.
- Step two. Apply a thick layer of base coat on your nails and let it dry slightly.
- Step three. Apply thin layer glue at the base of the nail, where the "smile" line will be. Without waiting for the glue to dry, immediately stick a small piece of foil on the nail. Use an orange stick to remove excess foil from the border of the nail and cuticle. The nail foil is very thin and can be easily torn off. With a cotton swab, completely smooth the surface of the foil, achieving a glossy finish. On the sides of the nail, carefully file off the remaining excess foil with euro pumice.
- Step four. Apply a crescent-shaped polish on top, leaving 3 mm of foil unpainted at the base of the nail. Do not worry about the fact that under the varnish tubercles from the foil are visible - after applying the top, all the bumps will be completely smoothed out.
- Step five. Apply a top coat in one or two coats. After the fixer dries, moisturize the cuticles with nourishing oil.
As you can see, a moon manicure is no more difficult to create than a French one. You only need a little practice, and over time, creating a moon manicure will take you a minimum of time!
In this article, we will talk about how to do a moon manicure at home. This good way to beautifully decorate rectangular or square nails to make them less sharp. Such a manicure is easy to perform, without special experience, it will harmoniously complement any look, in particular retro or vintage. Caring for him and correcting him on extended nails is also quite simple.
This nail design is not new, but a return to an earlier idea.
This design got its name due to the technique of applying varnish, in which the base of the nail, forming a hole, remains unpainted. There are options in which the beginning of the nail plate is highlighted in a different color, emphasizing the shape of the crescent.
Options with photo
This season, moon nail design is one of the current species nail art. This nail design was popular back in the 20-30s of the last century, but it was not very diverse. Now it is one of the fashion trends that has many original options.
Popular types of moon manicure can be performed in any color scheme. They can be supplemented decorative elements corresponding to a special occasion.
Lunar design looks best on long nails. Visually, it makes them shorter and neater. But for short nails There are also options, using pastel shades. You can experiment with nails absolutely different lengths, the main thing is that it be the same on all fingers.
The color for this style of nail art can be chosen at your discretion. Combinations of contrasting shades and thematic drawings look good, relevant to the season drawn in the lunar area.

The color scheme can be absolutely anything - to the taste of the customer
A frequently used design that combines French and moon manicure is one of the main trends. The main nuance of its implementation, both crescents should look in the same direction. Although the bend of the hole itself can be anything.

In this design, the degree of accuracy of the master is immediately noticeable.
To keep the design with the moon on the nails as long as possible, it can be done with shellac or gel coated. Which is also not difficult to do at home with a special lamp.
Other options for moon manicure with photos can be easily found on the Internet.
Execution technique
Now we will take a closer look at how to do a moon manicure at home. . The technique is similar french style, only the pattern is applied in reverse. It is often called an inverted jacket.
First of all, you should decide on the way that nail art fits harmoniously into it. And then you can already proceed to the procedure itself.
It is necessary to remove the remnants of the old varnish, move or remove the cuticle, give the nails the desired shape. It is also worth getting special templates.

They can be cut out of cardboard, paper or tape. But with the latter, you should exercise some caution - otherwise sticky marks will remain on the surface of the nail. Therefore, you should wait until the varnish dries. You can purchase ready-made stencils in the store or use the same ones as for the classic jacket. They should be placed at the base of the nail plate.

For ease and accuracy of this design, special stickers are used.
An important point is the choice of color combination. It is best to play on contrasts or choose pastel shades. The design with the moon looks good using silver and gold varnishes. They can be combined with red, white or black.
The execution technique largely depends on the type of coating used and the method of applying the pattern. For those who love and know how to draw, a brush is well suited. In other cases, it is better to use stencils. If you want to get a beautiful glossy shine and a long-lasting result, shellacs and gel will be relevant.
Lunar manicure gel polish
Let's move on to practice and figure out how to make a moon manicure gel polish . You will need a nail dryer, brush, primer and base, gel polishes and top coat.

All necessary fixtures for gel nail polish
As in the case with conventional varnishes, it is necessary to perform preliminary cosmetic procedures - clean the nail plate and give it a shape. Then a primer is applied. It must be well absorbed. The next step is to apply the foundation and dry it in a lamp.
Next, a tone is applied to its intended place, which will be located in the nail hollow. With a brush contrasting color hole is drawn. Then the same color is applied to the rest of the nail, after which everything is dried again in a lamp.

Step-by-step instructions for painting nails with gel polish
It is worth making sure that the nails do not shine through during the coating. The top is applied as the last step and it is also sent to dry in a lamp.

A special lamp for lacquer ears - an apparatus that cannot be dispensed with
Lunar manicure technique gel polish
It is easy to see that such a design technique with the moon gel polish is no different from the usual gel coating. The stages and drying time are similar.
Above was an example of how to do a moon manicure with gel polish using a brush. An easier option is to use special stencils for an even and neat hole. Watch the tutorial how With do a moon manicure with a gel polish stencil in the video below.
Lunar manicure with shellac
They are very popular - they allow you to maintain a spectacular appearance for 3-4 weeks. Any coating made with their use will retain its coating for a long time and will delight its owner with its impeccable gloss.
Many fashionistas would like to know how to do shellac moon manicure at home. Minimum set for this procedure consists of ultraviolet lamp and gel polishes.
To perform this nail design at the salon level, you will have to get a primer, top and base coats, degreasing liquid. You will also need special stencils.
First of all, doing hygiene procedures nails and a primer is applied, followed by a base coat. It dries in a lamp.
Then the main color is applied, which will be visible at the base of the nail. It should dry well before sticking the stencils. They are located at the base of the nail plate. They are followed by the main tone, after which they are carefully removed and the nails are sent to the lamp
At the finish - the finished drawing is covered with a top coat and dried again thoroughly.

Options color solution design with moon
Lunar manicure without a stencil
Let's consider another interesting way how to make a moon manicure without a stencil. If you don’t have special stickers at hand, you can replace them with similar French circles or make your own. But you can just do without them, using foil, which any housewife definitely has.
First, all the necessary hygiene procedures are performed, after which the foundation is applied. She needs to dry out a bit.
A piece of foil is fixed on the nail from its base to the middle and smoothed out with a cotton swab. The protruding parts are cut with scissors.

Combination of black and gold a win-win especially for an evening event
The final touch is the application of the fixer. And your original moon design is ready. At good quality varnish, it will reliably adhere to the foil and will be worn for a long time.
Lunar manicure with a brush
The last option that we will consider is the technique of moon manicure with a brush. As noted, this method is good for those who have certain skills in drawing. But even if they are not there, you can always practice doing this design with a brush in order to achieve the most even and beautiful crescent at the base of the nail.
This will require two varnishes. different colors, thin brush, lacquer base and top coat. You can also complement the nail design with rhinestones.
Hygiene design first, followed by foundation or immediately base color, which will be visible along the entire length of the nail.
With the help of a thin brush in the growth zone of the nail plate, crescents are drawn with a varnish of a different color. The same crescents, by analogy with a jacket, can be drawn on the tips of the nails.

Experienced craftsmen can do this design with a very small brush.
At the end, the nail plate is covered with a finishing layer. It can be decorated with rhinestones for greater effect.
Below you can see how a moon manicure with a brush is done in the video.
The popularity of gel polishes is growing every day. An increasing number of girls dream of learning how to work with shellac at home in order to create manicures and pedicures on their own. This is a truly amazing coating that allows you to create any nail art, from the simplest to the most complex. One of the fashion trends of recent seasons is the moon manicure with gel polish on the nails.
If you consider yourself a fashionista, then you need to know how to make shellac moon manicure. What materials will be required, the technique of the procedure, harmonious combinations- all this and much more is told by the masters of the nail service.
Lunar manicure, reverse jacket, Hollywood nail art - all these are variations of its designation. Such design is not a product of modern thought, but reborn from the past. In the distant 30s of the XX century, the girls thought, why not leave the hole unpainted. The masses liked this trend very much, but soon it was undeservedly forgotten.
The second wave of popularity hit the moon jacket after the incomparable Dita Von Teese, the queen of burlesque, appeared in public with marigolds of a similar plan. The paparazzi did not leave this feature of the manicure unattended, inflating the hype, and literally the next day the holes became a trend.

The epithet "Hollywood" was attached to the design thanks to the love of celebrities for this nail art. They now and then flaunt on the red carpet with a reverse jacket, and also often use it in everyday life.
Unlike the classic jacket, when only the free edge of the nail plate was highlighted in white, the moonlight implies highlighting the base of the nail. As a rule, two colors are used, and the hole is made arched and smooth. However, it is increasingly common to see triangular hole, a hole made of rhinestones, foil, etc. So, lunar design is a testing ground for your imagination without iron canons and clichés.
Creation technique
How to make a moon manicure with gel polish is a frequently asked question in search engines. Many girls tend to carry out the procedure at home, mastering the art of nail art on their own. The key to the success of the event is the observance of technique, therefore it is recommended to follow step by step without deviations.
First of all, check if you have all the materials in stock. You will need:
- Base coverage.
- A couple of colored gel polishes.
- Top shellac.
- polymerization lamp.
- Degreaser.
First, prepare your nails: remove the cuticle, shape the plates, trim the length. Degrease the surface. Cover the nails with the base and dry the layer under the lamp. Next, apply the first gel polish, the hole will be its color.
The coating is applied to the entire nail and dried under ultraviolet rays. All layers should be thin. Following the screen sticker, the hole is covered and the second colored shellac is used. The layer is also dried in a lamp. At the end, a top coat is applied and dried too.

There is also a slightly different way to create moon jacket. Unlike the first, a stencil is not used here, and the hole is drawn by hand. This requires some skill. The steps are identical, the surface is degreased, a base is applied, dried, then a colored layer, again under the lamp.
Now, instead of a sticker, you need to draw a hole of the desired shape, dry it. Cover the nails with top and fix under the lamp. If you want the hole to remain transparent, accordingly, you need to draw with only one colored shellac and cover the entire nail with it except for it.
Some use foil when creating a Hollywood jacket. To do this, after the base and color, the place of the hole is treated with glue. When it grabs a little, the transfer foil is attached to the site, they wait a little and remove it with a sharp movement. It turns out original and interesting. The combination of a dark deep nail color with a foil hole is considered especially attractive.

According to nail service masters, shellac is a unique coating. His ability to keep a manicure intact for two weeks is amazing. Glossy shine, lack of chips, a beneficial effect on the nail plate are the main advantages of gel polishes over acrylic and gel modeling and conventional decorative coatings.
Making a moon manicure with gel polish at home is easy. Knowing the features phased technique performance, even a beginner can handle it, professionals admit. However, it is important that the materials are High Quality, and the technology was strictly observed, otherwise you cannot avoid detachments.
Not the last role is played by the competent process of removing a manicure, so it is better to rely on the master and go to the salon. In fairness, we note that the shellac moon manicure at home is not inferior in showiness to a professional one, if you do everything right and have necessary tools and materials.

At the peak of popularity now, such combinations for lunar design as gold and black, matte and glossy textures, the use of additional accessories such as rhinestones, pebbles, sparkles. Lunar manicure with shellac can be done on both long and short nails.
Experts say that it looks even better on short ones, so this is a great nail art for those who have a hard time with natural length. Reverse French is appropriate for solemn occasion, vacation trips and gray everyday life.
For almost ten years now, the moon manicure with gel polish, made in various colors, has not lost its popularity among fashionistas. color scheme and decorated additional elements, accessories. It is not difficult to make a similar design on your own, choosing the right tools and connecting the imagination to make a unique manicure.Preparatory stage: tools and basic ways to create a pattern on nails
Drawing holes on the nails is a design option that first saw the light of day at the beginning of this century. And if then it was customary to use the most neutral varnishes, and paint over the holes with a colorless coating, leaving them transparent, then modern fashion trends dictate slightly different rules. are now much better.Lunar manicure, which is also called an inverted jacket, can be created using several different colors and shades of varnishes, decorated with additional elements, such as rhinestones or drawings, stickers. By doing something like this unusual design for every day or for a solemn image is not difficult. Choosing gel-based products to create such jewelry, you don’t have to worry that nail art will quickly crack.
To successfully make a moon manicure design with gel polish, you need to stock up on some patience and a certain amount of time. In addition to this, separate tools will also be required, in particular, to create an inverted jacket with gel-based varnish. This kind of varnishes are not able to dry, fix on their own, to fix them, you need to have a special UV lamp at home, which is available in nail design stores.
Necessary tools to draw your own moon manicure:
- some bottles of gel polishes different shades, depending on the desired combination of colors;
- drying lamp;
- coatings in the form of base and top;
- tools that will create holes on the nail plates;
- additional decorations for nails at will in the form of rhinestones, pebbles, sparkles and so on.

How to draw the desired pattern on the nail plates:
- using a thin brush for nail art and contrasting varnish for holes;
- using special stickers for nails; if there are none at hand, you can use any adhesive tape, paper tape, after cutting out the details you need in shape from them;
- to create a moon manicure design with gel polish, you can also use nail stickers, cutting out the necessary shapes from them; this method excludes the use of two or three shades of varnish, if additional drawing on the nails is not planned;
- quite simple and interesting option applying an inverted jacket becomes foil; it can be translated, in different shades, with patterns, or plain silver, gold, matte; V this case it is also necessary to purchase a special glue for nails, on which the shiny material will be attached;
- as unusual options to create a lunar pattern, dry sparkles, glitters, rhinestones and other small decorations with which the moon is laid out are suitable; for fixing on the nail plate, the glue mentioned above will also be required.
Simple instructions for drawing a moon manicure
Having abandoned the use of conventional color coatings for nail plates, you must first learn how to properly apply and fix gel polish on nails. It is worth remembering that this kind of thick coating is applied even layer several times, while each layer is dried separately, fixing, in the lamp for about 2-3 minutes. On top, it is necessary to cover the nails with a top, dry again and then carefully remove the sticky top film.When applying gel polishes, you need to be very careful. The coloring thick mixture should not get on the skin or cuticles. Previously, the skin on the fingers can be lubricated with oil or cream. You should also have tampons on hand. cotton buds to remove excess gel before it hardens.
Lunar manicure gel polish step by step: general instructions for creating a design
- Nails are being prepared for the creation of a new manicure: removed old varnish, the cuticle is trimmed, the necessary shape is given to the nail plates, polishing is performed. At the same stage, it is required to paint over the nails with a special degreasing coating.
- The next step is to apply a base coat to the nail plates, which will even out the surface of the nail plates and prepare them for applying the gel.
- After drying, the base color is applied. Depending on the desire, it can be the base for the holes or for the entire manicure.
- When the first varnish is dry, a pattern is drawn on the nails in the chosen way (using a stencil, brush, and so on). When the drawing is finished, the nails are dried again in the lamp.
- The final touch is the coating of the nail plates with top and drying. If applied additional accessories in the form of rhinestones or other elements, they are also stained with a top coat for fixing.
How to make a moon manicure with gel polish: drawing options
Using foil. When the nails are dry, a small layer of glue is applied to the chosen place where the holes should be located. As soon as it dries a little naturally, a transfer or figuratively cut foil is superimposed on it. Gently straightens and presses strongly against the nail. If the foil is transferable, then after 1-1.5 minutes it must be sharply torn off from the nail plate. The photo shows the final version of the moon manicure using foil.
Drawing a pattern with a brush. Having dipped a thin brush in a contrasting varnish, it draws a concave or convex line along the nail. Then the space under it or above it, depending on the wishes and imagination, is carefully painted over. With the help of a brush, you can create drawings of an unusual shape, and make a hole, for example, triangular. In the photo you can see the stages of creating such a design.
Using stickers or analog handy tools. When the base color is applied to the nail and dried, they are attached to the nail plates adhesive stickers. Next, the desired area of \u200b\u200bthe nail is painted over with an additional shade. The stickers are removed and the nails are dried in a UV lamp. Photograph from step by step creation a similar manicure is presented below.

Creation of unshaded wells. This design can be called classic. You can make transparent patterns using all the same stickers. Another option is to use adhesive tape, the edges of which can be cut into triangular or oval shapes. The sticker is attached to the nail, covered clear varnish. Unclosed area is painted over the right tone, the sticker is removed, the nails are dried. The stages of creating a manicure with an improvised tool are shown in the picture.

Inverted jacket with stickers, sparkles, other decorations. The creation technique is very simple. After applying and drying the main tone, holes are created on the nail plates in the chosen way. For sparkles and rhinestones, glue serves as the basis, as is the case with foil. Stickers just cut out. desired shape and attached to the nails. An example of a nail design option with animal print stickers is shown below.

A visual aid for creating a lunar design (video instruction)
simple and fast way creating a manicure with holes, complemented by a strip on the edge of the nail, can be seen in the video. In this embodiment, the creation of a pattern occurs with the help of gel paint and a brush for nail art.Examples of inverted jacket designs for nails of different lengths
This kind of drawing looks good on the nails perfectly various lengths and forms. In the case of short nails, the manicure looks neat, visually lengthens the nail plates. When the nails are long, you can place the pattern anywhere on the nail plate, adding additional decorations. For inspiration and awakening the imagination to create such nail art, you can see the thematic photos below.Lunar manicure design with gel polish on short nails


