Salted dough rooster for children. Making cockerels from salt dough: master classes
You can, without worrying about whether those for whom the gifts are intended will like it. Because it is known that everything that is made with one’s own hands is filled with love and the soul of the creator of the creation. Truly loving person will always appreciate the time spent on pleasing him.
Year of the Fire Rooster
As is known next year fire rooster If you believe Eastern legends, the year will be quite memorable. Why not do something with the symbolism of this proud bird, thereby buttering up the owner of 2017.
By Chinese calendar, each new year is accompanied by its own patron. One of 12 signs. It is he who will influence destinies throughout the year. Therefore, we need to prepare for a meeting with a new symbol. If you please the new manager properly, then next year, that is, twelve next months, will go extremely well. Since the fire monkey gives up his throne fire rooster it is worth considering it as an idea for various kinds, crafts.

What can you do in the shape of a red cockerel?
You can find a huge number of fascinating ideas on the Internet. From paper applications before volumetric figures in the form of a colorful rooster, knitted and hand-embroidered toys, made of cardboard and paper, puff pastry figures, painted with all kinds of paints. Below you can learn how those bright salt dough figures are made. When working with salt dough, you can involve children.

This activity is great for developing fine motor skills hands, abstract thinking, patience, perseverance and accuracy, and also allows you to channel children’s energy into a safe channel, away from pranks. Be sure to make sure that the children finish what they start. They will definitely enjoy sculpting, cutting and painting, and you will keep children's hands occupied creative activity.
How to make a craft rooster from salt dough 2017 with your own hands
You will need:
· A glass of flour
· Half a glass of salt
· A third of a glass of water
· Tablespoon of oil
· A tablespoon of PVA glue
Knead the dough:
Mix all the ingredients, you should get a homogeneous dough without any lumps. You can use a mixer, the dough will be softer. After kneading the dough, set it aside, cover it with film, and start creating.

Preparing the template:
It can be drawn or printed. Once the outline is ready, cut it out of paper. Now let’s roll out our dough into a cake that matches the design. Place the cut out cockerel on the rolled out circle.
Now we cut out the outline of our dough cockerel. If a child wants to participate in cutting, for safety reasons it is better for him to use a stick, but you can use any sharp object you wish. Here, our master class puff pastry rooster, which we are analyzing, has taken the desired shape. Now you need to draw the eyes, comb, feathers on the wings and tail. You can use a needle or toothpick for this.

It is not advisable to let your child use these items; it is better if you draw all the necessary details yourself. For the next stage we have two ways:
· The first way is to dry the dough
· The second way to bake our dough in the oven
In the second case, bubbles may appear in our test in the form of a cockerel, this is to our advantage, because an uneven surface will only enliven our craft, adding volume. As soon as the dough sets in heat, remove from the oven and let it cool.

Coloring:
For coloring you can use acrylic paints or watercolor. If there is an artist in the house, or perhaps you have oil paints you can paint the figure with them. The outline of the feathers will be voluminous, the cockerel will look like it’s alive. Pay special attention to the tail, it should be colorful and bright. When painting, let the paints dry so that they do not spread at the borders of the colors. The plumage pattern can be at your discretion. If nothing comes to mind, just copy it from the picture you like. Finally, when the paints have hardened, use clear nail polish to treat the surface of the craft. The varnish will protect it from moisture and give it a glossy shine.


Now you know how to make a rooster from salt dough. Most likely, with your manipulations you will attract all household members to help. They will be happy to take part in making colorful figures. As a result we will get something amazing Christmas decoration, which can be given as a gift or hung on the Christmas tree by attaching a pendant from a ribbon or just a string. If you prepare a small, thin magnet in advance, you can make a New Year's decoration, for example, for a refrigerator.

From salt dough you can make not only a cockerel, but also Christmas decorations, in the form of balls or bows. If you color them in the same style, you can decorate your home Christmas tree with toys. own production and design. For example, around the rooster, the symbol of 2017, with your own hands from salt dough, hang bows or toys in the form of candles from the same salt dough. Once you have everything you want to decorate the tree with, invite everyone to help you hang it. Such wonderful moments as family decoration of the Christmas tree incredibly unite household members. When winter is raging outside, summer reigns in your home Have a good mood and positive. Don't forget to take memorable photos.
Are you ready for the upcoming New Year celebration? If you haven’t bought gifts for everyone yet, you can please your loved ones with very beautiful and unique souvenirs that you make yourself. Do-it-yourself rooster, master classes on making the symbol of 2017, suitable for both experienced needlewomen, and for beginners. We have 6 original techniques for making cute Cockerels: stuffed toy, papier-mâché rooster, newspaper tubes, from candies, from salt dough and even from cardboard egg trays. Find out for yourself which of these master classes you like best.
Stuffed toy cockerel – a caring father
The original image of a rooster, instead of a hen, hatching an egg, will certainly appeal to people with good feeling humor.
For work you will need: polystyrene foam; multi-colored pieces of fabric; tailor's chalk; threads; buttons; felt fabric (for decoration small parts); stationery knife; decorative ribbons and beads; padding polyester or any soft filler; hot glue.
How to do?
Papier-mâché handsome rooster
You will need: cardboard; plastic bottles; scotch; PVA glue; wood varnish; watercolor; gouache or any paints for painting; brushes; stationery knife; thin paper or newspapers; hot water and a saucepan. The dough for the papier-mâché rooster master class needs to be cooked a little on the stove.
 How to do?
- We assemble the base frame from bottles and cardboard, as shown in the figure, connect them well with tape.
- Prepare the papier-mâché dough: tear the paper into small pieces and pour hot water for soaking. For thin parts, the paper will have to be cooked over a fire. When the paper gets wet, squeeze out the water and mix with PVA glue.
- We gradually apply layer by layer, giving the papier-mâché the shape of a rooster. Each layer must be thoroughly dried.
- Now you can paint the cockerel and, to secure it, coat it with wood varnish so that the paints do not spread and stain your hands.
Rooster from egg trays
For the master class on a rooster made from egg trays you will need: pearlescent acrylic paints; cardboard egg trays; balloon IR; PVA glue; hot glue; newspapers; paper; brushes; scissors; stationery knife; simple pencil.

How to do?
- Cut out separate parts from the trays for feathers, beak and everything else, as shown in the picture.
- Gradually glue the feathers onto the cardboard base using hot glue and assemble the parts of the cockerel - head, wings and tail.
- Make the abdomen using the papier-mâché technique from newspapers; to do this, cut the newspapers into strips, coat them with PVA glue and cover the balloon with them in several layers. The top layer should be made of white paper.
- When the paper on the ball has hardened, pierce it and cut the shape into two unequal parts, as shown in the picture. Insert the smaller half into the larger one and secure it with strips of glue.
- Fasten all the parts and paint every feather, every detail with multi-colored pearlescent acrylic paints, changing shades. You can imagine with your children.
Candy rooster
What you will need for the candy rooster master class: lollipops - roosters on a stick; a scattering of different chocolates; skewers; cling film; basket; decorative ribbons; artificial flowers; Styrofoam.
How to do?
- Wrapping chocolate candies cling film and thread onto skewers.
- Glue a piece of foam plastic to the bottom of the basket.
- We beautifully distribute the skewers with candies and lollipops on the foam.
- We place the flowers last to cover the entire bottom of the basket.
- We decorate the skewers and the basket with bows and multi-colored ribbons.
Rooster made from newspaper tubes
What you will need for the master class: a rooster made from newspaper tubes: newspapers; PVA glue; stationery knife; knitting needles; paints for painting;

How to do?
- Fold the newspaper lengthwise and cut it, bend it again and cut it again so that you get four strips from one sheet. Using a knitting needle, twist the paper at an angle of 30 degrees to create a long thin tube. Towards the end of the work, remove the knitting needle and tighten the tube, lightly gluing its edge. Paint the dried tubes in different colors.
- Place ten tubes together. Twist the tube from the middle around the bundle three times and divide them in half. Leave the tip to the side.
- We braid the two halves with a figure eight.
- From one bunch we make a rooster's tail. Let's straighten the tubes, flattening them.
- We will continue to braid the second bundle with the tip of the middle tube, creating a neck.
- We bend a piece of tube in the middle and weave it into the neck, this is the beak.
- We wrap the bundle over the beak three more times and hide the tip of the tube inside.
- For the stand, take a new wet tube and screw it onto the bottom of the bundle, adding glue. Trim the protruding ends with a knife.
- The wings need to be made in the middle of the figure; to do this, use a knitting needle to widen the hole between the tubes and insert three multi-colored bent tubes into it.
Salt dough rooster
What you will need: a glass of flour; half a glass of salt; half a glass of water; PVA glue 20 grams; toothpicks; paints; brush.
 Making a rooster from dough is very simple, you can do it with your children. Knead a soft dough from water, flour, salt and glue, preferably with a mixer, so that the mass is more homogeneous. You need to immediately start sculpting the parts of the cockerel; toothpicks are needed to draw small details, feathers, pupils on the eyes. Connect them together and dry them near the battery. After drying, you can start painting.
The cockerel is ready! We wish you creative inspiration! And may he bring good luck to your home and cheer everyone up throughout 2017!
If you liked our site or found the information on this page useful, share it with friends and acquaintances - click one of the buttons social networks at the bottom of the page or at the top, because among the heaps of unnecessary garbage on the Internet it is quite difficult to find truly interesting materials.
Modeling from salt dough is an extremely exciting activity. Children and adults enjoy making souvenirs from such a pleasant-to-touch material.
On the eve of the New Year 2017, it would be a sin not to make a rooster out of dough, which is why we are dedicating a photo master class to this craft and we will step by step sculpt a rooster out of dough with you.
How to make a cockerel from dough with your own hands: MK with photo
First prepare the dough:
Mix 1 cup of flour with 0.5 cups of fine salt, mix, add 1 tablespoon vegetable oil and water. Add water gradually, knead the dough and add more if necessary.
The consistency of the dough should be elastic. If the dough crumbles, add water; if it sticks to your hands, add flour and knead well.
Now the dough is ready and we can start sculpting the cockerel.
To do this, print out the cockerel template on paper and cut it out.
Roll out the dough to a thickness of 1-1.5 cm and place a template lightly moistened with water on top of it. This is necessary so that it sticks to the dough, this will make it easier to cut the cockerel out of the dough.
Take a knife and start cutting off the unnecessary dough around the workpiece.
The final touch at this stage is drawing the contours of the tail, wings and other elements of the cockerel. This can be done using the same knife.

Now we put our Petya in the oven. Flour a baking tray and place the dough on top. Crafts made from salt dough need to be baked for 10 minutes at a temperature of 190°, then you need to reduce the oven to 150° and bake until done. This will prevent the craft from swelling.
When the rooster is browned, you can remove it from the oven. Now let it cool, as we will then paint it with paints and open it with varnish.

For coloring we used regular gouache.
First we tint the craft with red and white, then add the rest of the colors.

Afterwards, it is advisable to coat the cockerel with colorless varnish. If this is not done, the craft will become saturated with moisture from the room and will quickly fall apart. We varnished the rooster regular varnish for nails.
After this, the cockerel literally began to sparkle. Don't believe me? See for yourself! 🙂

On the eve of the New Year 2029, or just to suit the mood, let's make a cockerel out of salt dough together. The idea of the craft is very simple, so even a 6-year-old child can handle it (tested in practice). Such a cockerel can serve as a bright New Year's souvenir which can be used to decorate New Year's table, or become an element unusual panel in the kitchen. Or maybe you want to make a cockerel magnet for your refrigerator? As you can see, there is something to think about... But for now, let's prepare everything necessary for the master class and tune in to a positive wave creative handicrafts and good mood.
How to make a cockerel from dough with your own hands: master class with photos
To make a cockerel we will need:
- Play dough,
- cockerel template;
- paints and brush;
- nail polish.
Initially, we suggest you make dough for crafts according to the following recipe. While you are preparing the template, do not forget to put the dough in plastic bag so that it does not start to dry out, because then it will not be suitable for riveting and the product will not work out.

Now that the template is ready, take out the dough and get to work.

Roll out the dough on a flat surface. The thickness of the pancake is 1-1.5 cm.

Cut the cockerel out of paper, lightly moisten it and apply it to the dough.

Take a knife and start cutting. If a child is making a craft, then the knife can be replaced with a plasticine stack.

After completing this stage of the craft, you should end up with a dough piece like this.

We remove the paper and get the next figure.

We don't take writing pen or a pencil and make contours inside the figure: separate the cockerel’s wings, tail and others necessary elements. Don't forget to make two holes for the cockerel's legs.

Now take a tray or baking dish, lightly sprinkle it with flour and...

And we place the craft on it.

Place our dough in the oven and bake at 190-200 degrees for 20-25 minutes. You can judge the readiness of the craft by the slightly golden brown crust that appears.
We take our cockerel out of the oven, let it cool, and start painting.
Regular gouache is perfect for these purposes.

Apply red color to the body of the cockerel.
 Head and neck of a rooster - white, tail - shades of yellow and red.

Now we cut out the other elements and put everything aside until completely dry. This usually takes 5-6 hours, but if possible, you can speed up the drying process by placing the workpiece hot on the battery.

Then we paint the second side and wait until it is completely dry.
 After that we open every detail clear varnish for nails and wait until it dries.

Insert the ropes.

And attach the legs using a glue gun.

Now we attach the wing and beard.
All that remains is to attach the string to the rooster’s comb and tail. And voila, the cockerel is on the wall.


Rooster made from salt dough: video master class
Every day new year holidays closer and closer, and you can gradually begin to prepare for them, for example, think through the menu for festive table or make your own Christmas tree decorations. One of these toys can be a rooster made of salt dough, as a symbol of the coming year.
Flat figurine of a rooster
Salt dough as a material for crafts attracts many due to its accessibility, and making the figurine itself can be turned into exciting collective work for the whole family and a great way to spend your weekend hours. There are several stages in the work process that can be assigned to everyone: mom will knead the dough, dad will cut out the figure according to the template, grandma will bake finished toy, and the children will paint it with paints.
If you are already thinking about how to make a rooster out of salt dough, let’s first find a suitable picture for the template (you can use the Internet) and prepare the material itself. For this we need:
- 1 tbsp flour;
- 0.5 tbsp salt (fine);
- 0.5 tbsp water;
- 1 tbsp. l. vegetable oil.
Place the components in a container and mix well, you can use a mixer. The dough should be free of lumps and not stick to your hands. So that we can succeed beautiful rooster from salt dough with your own hands, you need to follow this sequence of actions:
- Cut out the template. Roll out the dough from the dough and place the finished picture on it.
- Carefully cut the outline of the design along the dough.
- When the workpiece is ready, mark on it the comb, eyes, tail feathers, legs, wings and place in the oven until dry.
- Take out the bird and, using your imagination, paint it in different colors.
- At the final stage, open the figurine with varnish: acrylic, artistic, construction or transparent for nails.
When the cockerel dries, glue the hanger to it and you can proudly hang it on the tree.
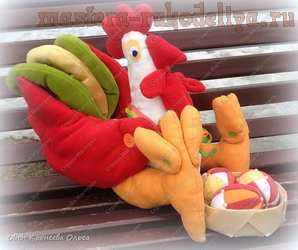
Volumetric rooster made from salt dough
 Three-dimensional characters can be made from the same dough. This is not at all difficult, and after making a rooster from salt dough in the master class, you can introduce your kids to this. In addition to the test, the recipe for which we are already familiar with, you need to acquire:
- toothpicks;
- with a fork;
- funnel;
- tassels;
- paints;
- toothed wheel for pasties;
- bottle;
- stack.

We begin to make a rooster from salt dough and a chicken in the clearing:
- Wrap the bottle in rolled out dough and moisten the joint. Place some more dough at the bottom and smooth out the joints.
- Using a pastry wheel, cut out wings from the rolled out dough.
- Make an isosceles triangle from the dough, which will become the tail. Place three circles on the edge moistened with water (the base of the figure).
- Apply stripes to the tail and make indentations in the centers of the circles using a funnel.
- Attach the wings to the body, apply a pattern on them with a wheel, and on the body with a fork.
- For the head, make a small ball of dough and in it - a depression the size of the neck of the bottle, moisten this place with water and put it on the bottle.
- Make a beak, eyes, comb and beard. After they dry, attach them to the workpiece, after wetting the attachment points with water.
- Moisten the side of the tail with water and attach it to the bird.
- For the chicken you need to roll two balls and wings.
- After the parts have dried, you need to stick a toothpick into the larger ball and put the smaller part on it, glue the eyes, beak and wings.
- Use a stack of dough to cut out a clearing, and use pasta to make flower prints on it.
When all the elements of the composition are ready, all that remains is to arrange them beautifully and connect them together. This is how easy it is to get original jewelry for home :)


