Paper boxes. A4 paper box
A simple version of a paper box. This is my first instruction here and I tried to make it as clear and understandable as possible. It was difficult for me to explain some steps in a way that was clear, but I think that everything will be clear from the photographs. If you have any problems, write in the comments and I will try to explain better.
I know that there are several versions of A4 paper boxes, but I didn't see my method here, so I hope it will be useful to you. Enjoy!
Stage 1: Materials

You will need:
- 2 sheets of plain office paper (box + lid)
- Scissors
- Pencil
- Ruler
You may also need some glue.
Stage 2

We fold a sheet of paper as shown in the photo.
Stage 3

Draw a line with a pencil, tracing one of the sides of the resulting triangle.
Stage 4

Cut a sheet of paper along the line.
Stage 5

Now you have a square (you can throw away the extra piece of paper).
Stage 6


Now you must fold the square along the other diagonal and unfold it again.
Stage 7


Then fold all 4 corners of the square towards the center.
Stage 8


Fold one of the sides of the square towards the center (as shown in the photo), then fold the opposite side in the same way.
Stage 9


Now we bend the just bent sides of the square. We turn it 90 degrees and bend the other two sides of the square in the same way.
Stage 10


Make cuts as shown in the photo. The cuts should only be top and bottom, they should not be too deep or short.
Stage 11


Expand the top and lower part as shown in the photo. Bend the other two sides so that you get a box.
Stage 12


The final stage of the box assembly. We bend the remaining two sides. Ready!
Stage 13


Now, if you have a desire, you can make a bottom for our box, i.e. the box we made in the previous steps will become the lid (it will be difficult to insert one box into another if they are the same size). In order for the lid to be easily put on the box, we need a ruler.
It's pretty simple. First, follow steps 1 to 5, and then measure and draw a line with a pencil indented 5 mm from the top and right edges of the square. After that, cut off these thin strips. Now the bottom and lid will fit perfectly into each other.
It remains to repeat steps 6 to 12 and the box with a paper lid is ready!
Stage 14


If the inner triangles bend down at the top, then they can be fixed with glue.
Stage 15


All that's left to do is connect the boxes together.
A paper box is a very valuable item because it can be used as a place to put a gift. And to give a person a gift not openly, but in a gift box, that is, in a box. It’s even more interesting, since any secret intrigues and arouses interest. Or you can store some of your things in it, for example, shoes. Almost everyone can create a paper box. There is nothing complicated in its creation.
How to make a paper box (1 way)
You will need: paper, jewelry, scissors.
1. First we make a lid from the box. To do this, we take paper measuring 21.5 cm by 21.5 cm and draw it diagonally. Lines connect opposite corners.

2. We bend one of the corners so that it looks to the center (to the place where our diagonal lines intersect). After that, we bend it again so that the edge of this fold is flush with the strip drawn in the center. Then we dissolve the figure and see that folds have formed, which we will need later.


3. The same thing that we did in paragraph two, we do with all other corners.

4. We make cuts on both sides as shown in the picture.

5. And we proceed to fold our craft in stages.


6. After creating the lid from the box, we proceed to create a bottom for it. To do this, we take a piece of paper with dimensions slightly less than 21.2 cm by 21.2 cm. The bottom is made in the same way as the lid. When creating it, one-color paper is taken, unlike the cover, when it is best to use something colorful, containing several colors, perhaps even some kind of picture.


So you made a paper box using our simple instructions. You can take other sizes for the box, but do not forget to make the bottom of the box 3 mm smaller than its lid.

How to make a paper box (2 way)
It will take a little patience and time, as well as thick paper of any color (can be used with patterns, or plain).
1. Since we are making a box square shape, then a sheet of paper, before starting to create crafts, also needs to be shaped like a square.
2. It is necessary to bend the paper square in half across and carefully smooth the fold line so that it is clearly visible. Expand the square and repeat the same, this time bending the sheet vertically. Unfold the workpiece. You should have a square with two intersecting lines.

3. Bend the square diagonally in half. Then straighten it and repeat the same for the other diagonal.

4. Bend each of the 4 corners of the square towards its center to form a diamond.

5. Bend back the two opposite corners of the rhombus so that the figure looks like something like a “candy”.

6. We bend vertically the side parts of the "candy" (that is, those that do not have sharp peaks) to form a right angle. We bend vertically in the same way as its sharp edges.

7. We bend both tops of the “candy” inside the box (first one, and then the second).

8. So you made a box. True, without a lid. The lid will also have to be done in the same way, but to create it, you need to take a square of paper a couple of millimeters larger so that it can close the box. To decorate the box in the future, you can use paints, ribbons, pieces of fabric or sparkles. Here you can show your imagination to the fullest.

How to make a paper box (3 way)
Such a box looks quite stylish and can become a real decoration for your room. To create it, it is preferable to use either colored or textured paper.
1. Fold a square sheet of paper in half.

2. Fold the resulting triangle in half again.

3. Expand the edge as shown in the figure below.


4. We do the same on the other side. The result is a double square.

5. We bend the corners in the same way as it is done in the figure below. We do the same on the reverse side.

6. At this stage, you should have such a figure (see picture).

7. Unbend the bent corner along the marked lines.


8. We do the same on the other side.

9. Turn the figure over.

10. We bend the edges in the same way as shown in the picture.

11. When you do these actions from all sides, then you should get a figure, as in the picture below.

12. We bend the corners.

13. You should get a similar figure. A little more and the craft will be completely done.

14. We turn the figure and proceed to unbend it, creating volume.


15. Very simply, the box unbends and becomes stylish model, which are called - origami star box.
By the way, if you round the corners with a pencil or make a double fold at the corners, you can get a wonderful box, for example, like this picture below.

Watch also the video on how to make a paper box!
Now you know how simple and easy it is to create a paper box! Happy crafting!
What is a holiday? - ask you once. And you immediately answer with a smile: - This is when everyone is happy, they say good wishes, give gifts ... And in response to you: - So, if today you give someone a gift and wish something wonderful, will it be a holiday? And it's true ... And you can even give a handful of sweets. The main thing is how to do it. Perhaps you should start with unusual packaging. DIY paper box great idea for an original gift or surprise. Even clean symbolic gift will be admirable if you present it in its own packaging.
Materials and tools
So, what may be needed in the manufacture of all kinds of boxes.
- Paper. It is best to take scrapbooking paper - it is good because it can be double-sided, and with a different pattern on each side. Suitable also dense designer paper, pastel colored paper, cardboard (weight 200-300 g/m2), plain paper or watercolor paper that you can color or tint yourself. You can also use "yellow" note paper (or an envelope from it), wrapping paper ... and any other that you can use for decoration.
- Corrugated cardboard
- Napkins (preferably thicker)
- Ribbons, ribbons, laces
- Beads, buttons
- Ready labels
- Scissors, stationery knife
- Double-sided tape, glue stick
- Superglue or glue "Moment" universal ( transparent gel) for fixing beads and other
- Ruler, pencil
- Compass
- Hole puncher
- Nail file (for creasing)
Useful advice. Before taking directly on the paper from which your box will be, try to assemble it from plain paper. You will understand where to cut, how it is more convenient to make folds, how to assemble the box. Plus, you can estimate what size box you need. Often, after all, the first pancake is lumpy - so let this lump be made of simple cheap paper. Decor. As for the elements for decoration, here you can not limit yourself: make flowers from fabric and paper, combine ribbons and raffia, lace, whatever you think of. The main rule is not to overdo it. And now for the boxes themselves. There are a lot of options, models and schemes for their manufacture. We offer you the most popular ones - from classic round and square boxes at the base to unusual bonbonnieres. But first things first.
square box
You can give anything in it. From sweets and cookies to soap self made and decorations. Naturally, for each gift there should be an appropriate decor of the box. IN this case the packaging is stylized as a postal parcel. This gives it a special romance, because the services of traditional mail for sending letters and gifts are used less and less today. If use colored paper with a picture - the box will have a completely different mood. Choose yours!

We redraw the scheme of the box on paper. We think over in advance right size. Cut out.

Carefully bend the workpiece along dotted lines that are shown in the diagram. If the paper is thick enough to make it easier to fold, you can creas it first. To do this, attach a ruler to the fold lines and draw along them with a nail file (with the tip of a compass, the tip of scissors). You should get a groove - a recess along the line. Now all the folds will be clear.

Glue the strips of double-sided tape as shown in the figure. Instead of adhesive tape, you can use a glue stick, but adhesive tape is still more reliable and more convenient.

We decorate the walls of the box from the outside, while it itself is still dismantled. And then we glue it. It remains to invest a gift and bandage the package!
Round base
The box of this model is more suitable for gifts for women. Although everything again depends on the gift and decor. It can be presented with both beads and a tie (if twisted with a snail), as well as an aromatic candle, christmas ball or even a cupcake! Such a do-it-yourself paper box can later serve as an excellent box for small things (buttons, beads, etc.).

So let's get started.

Select the desired radius of the circle at the base. We draw with the help of a compass 4 such circles on thick paper and 2 on corrugated cardboard. We measure 3 strips on paper. Their length will be equal to the circumference of our circles (yes, you have to remember your favorite formula 2πR). The widest strip will be the height of the box, another one will be 1 cm narrower, and the third strip will be the narrowest - for the height of the future lid. It is difficult - just while you are reading this, you should start doing it - and everything becomes simple and understandable!


Paste circles from corrugated cardboard paper. We got the bottom and base of the lid.

We glue the first and second strips, as shown in the figure (vertical shift is approximately the thickness of the bottom of the box, horizontal shift is 1 cm). Front side paper should be facing out. We decorate the future wall of the box.

We glue the bottom of the box in a circle with a double strip of paper. Then we glue the base of the lid in a circle with the remaining narrowest strip. The box is ready! We place a gift inside and close the decorated lid. Separately, you can not decorate the lid, but tie the entire box with a ribbon. For example, like this:

Graceful boxes and not a drop of glue!
Is it possible to make a paper box with your own hands quickly and without any glue? Voila! There are more examples of such packages than you can imagine. Everything is made from one sheet of paper. The main thing is to carefully cut the workpiece and bend it correctly. At first glance, the schemes for some boxes are tricky, but in fact everything is much simpler. Each next box will be easier to collect. We recommend that you practice first. plain paper! When working with thick paper, creasing will again help you a lot. Let's try!
1. Strict box - male version.
Although if you make it larger, made of paper with a delicate print and decorate with a flower, it will be just right for giving lingerie.


Ideal for sweets and anything lush and airy. In order to thread a ribbon or lace, make holes in the workpiece in advance with a hole punch.

Suitable, for example, for loose aromatic tea. Or for some bottles, candlesticks.

It looks very concise, perfect for a men's gift.


And with a brighter decor - it will be a good option for a gift to a woman.

Lovely bonbonnieres
Bonbonnieres are a special kind of boxes. Bonbon in French - candy, and the name of the boxes comes from the word "candy box". It is bonbonnieres with sweets or sweet dragees that the newlyweds give to the guests at the wedding - in response to congratulations. Ordering a bonbonniere for each guest is not a cheap pleasure. But it will not be difficult for the bride and her bridesmaids to make bonbonnieres in the style and tone of the wedding.
1. One of the easiest options

2. Elegant.
Reminiscent of a box or a small chest. Quite a bit more difficult than the first. We make slots in them with a clerical knife, holes, if we want to pull in a ribbon or lace, with a hole punch.


3. Unusual and delicious.
As a rule, bonbonnieres are located on a special separate table and often on a dish or tray. You can play beautifully with this situation and make bonbonnieres in the form of cake slices. And you need to place them together, as if it were a paper cake.

To begin with, we draw a large circle (the plane of the cake) and divide it into sectors in order to know the parameters of our pieces. Then, according to the dimensions, we draw a diagram of the scan of the piece. Doing right amount reamers, cut them out and glue them. You can decorate before gluing, or after - it all depends on the idea of your decor.
On the eve new year holidays shop windows are full of gift boxes, decorative bags, wrapping paper for every taste. Smiling sellers helpfully offer packaging services New Year's gifts. And it seems to be all great, because you must admit, it’s much more pleasant to get a New Year’s trifle in beautiful packaging. But on the other hand, the whole meaning of the gift is lost, the very gift that should be intended specifically for you.
The recipient of the gift will be doubly pleased if, in addition to choosing a gift, you spend a little more time wrapping it. In this article, we will teach you how to make gift boxes from paper or cardboard with your own hands. It is not at all difficult to do this, because all the crafts presented with us are accompanied by ready-made schemes, templates and step-by-step master classes. You will only have to choose suitable option boxes, print the diagram and glue the paper box according to the instructions. By the way, some of the boxes presented by us are made using the origami technique, which means that you don’t even need glue!
So, before we get started, let's check if everything is ready for you. To make a paper gift box with your own hands, you will need: beautiful wrapping paper (you can get by with plain white paper and then decorate it), scissors, a pencil, a ruler, glue or double-sided tape, a clerical knife. Everything is? Well then, let's get creative!
#1 Box "Herringbone"
A great way to pack a small trifle to friends or relatives is such a themed christmas box. By the way, it's very easy to do. You will need green paper and punching tongs (although you can do without them). Well, any rhinestones, beads, sequins, in general, to your taste are suitable for decoration!
#2 Gift box "Mint Lollipop"
And here's another one original version a gift box that is very easy to make with your own hands, especially with our step-by-step master class. You will need red thick paper (for the box itself), as well as White paper for decor. top you can make boxes with appliqué or just paint a white sheet with pencils or felt-tip pens. By the way, the top does not have to be a lollipop. You can fantasize about New Year theme and decorate the box on top, for example, with a snowflake, christmas ball or red mean M&M's.

#3 Box with lid (diagram)
Well, if there is no time or desire to fiddle with the box for a long time, you can use a simple ready-made template. You need to download, print, cut and glue it. Voila, the box is ready! Please note that we have prepared 2 schemes for you: square (5x5 in size) and rectangular (7x6x4 in size).

#4 Cup with a gift
But the option of gift packaging for those who want to surprise with originality is a gift box-cup. It's pretty easy to do, but it looks amazing! To create you will need thick paper, scissors and glue. And of course our step-by-step instructions!
#5 Christmas box "Cake"
If new Year party planned in big company, for example in a circle big family, it makes sense to pack gifts for everyone in one big composite box. packing box the cake consists of 8-10 pieces, each of which is a separate paper gift box.

#6 Gift box with lid for muffins and other little things
On New Year's holidays, edible gifts are quite common: various sweets and pastries. An original gift will be a muffin made by hand in an author's gift box.
#7 Christmas box "Diamond"
You can pack a New Year's gift in a gift box in the shape of a diamond. With our scheme, it will not be difficult to make such an intricate package. It is enough to print the box template, cut and glue it according to the instructions. Everything is simple!

#8 New Year's package "Santa"
Very cute New Year's packaging will turn out from the usual paper bag decorated with paper Santa. Download Santa's diagram, cut it out and glue it on the bag. New Year's packaging ready with your own hands!

#9 Harry Potter boxes
Fans of stories about Harry Potter will come to indescribable delight, having received a piece of their favorite hero as a gift. By the way, such a box with magical sweet beans can be a great addition to a set of books about the adventures of a young wizard.

#10 Box "Gingerbread House"
The well-known symbol of the Christmas and New Year holidays from Hollywood films is the gingerbread man. You can make a box of paper in the form of a gingerbread man's house. By the way, putting the gingerbread men themselves in such a house will be very symbolic, but if you also make them with your own hands, there is no price for such a gift at all! The Gingerbread House box is made according to a special scheme, which you can download below. Also below is a master class on making a box with your own hands.
New Year's time is coming - the time of miracles, when everyone can feel like a little helper ...
#11 Box "Heart of four parts"
A cute package of four boxes can be made using our scheme. Giving your loved one not one, but four New Year's gifts at once is a real manifestation of love. You can download the scheme with four boxes and the basis for them below.

#12 Origami box
To make such a gift box, you will not need a diagram or a template. To make a paper box with a lid, you only need a piece of paper. The main condition is that the sheet must be square. Strictly follow the instructions of the master class and in 10 minutes you will have the cutest handmade origami gift box ready.

#13 And another version of the origami box
Such a box looks very similar to the previous one, but the manufacturing method is slightly different. In the manufacture of this box, you will need scissors, but the scheme is not needed: only a square sheet of paper. Follow the instructions of the master class and you will succeed!

#14 Origami box “Volumetric triangle”
If you want to chill and ready-made templates not for you, then be sure to pay attention to this difficult and very effective gift box. You will need paper and patience. Well, then follow the instructions and everything will work out!
If you like to make gift boxes without templates, glue and scissors, but only with the help of the correct paper folds, then you will appreciate this box as well.
#16 Origami resealable box
Well, another version of the origami box. It is quite easy to do, especially if you follow the instructions. By the way, the steps for making the box are described below in the photo instructions.
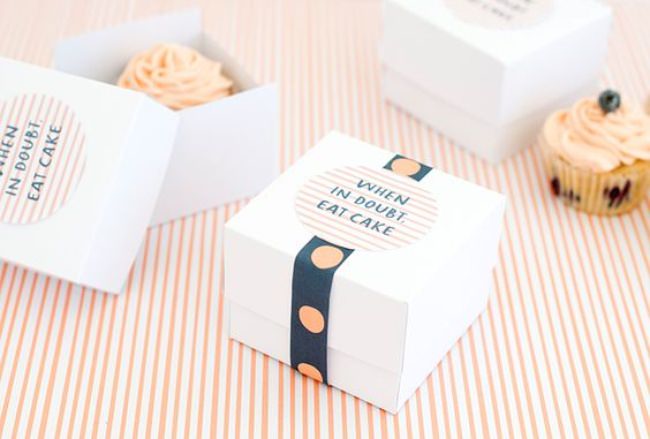
#17 Box "Cupcake"
original gift box for a gift for New Year will become a box in the form of a cupcake. It looks very impressive, but the creation will have to work a little. In general, there is nothing complicated in creating this box, all you need is patience and imagination! A step by step wizard see class below.

#18 And another cupcake
And here is another variation on the theme of a gift box in the form of a cupcake. The manufacturing scheme is very similar to the previous one, but you might like it!
#19 Gift box for cookies
A ready-made scheme for making a cardboard box with your own hands. All you need is to use our ready-made scheme, which you need to print, cut out of cardboard, and then glue in accordance with the master class.

#20 Chinese style gift box
In such a box, made with your own hands, you can put anything you want. And most importantly, it is done quickly and easily. You can download the box diagram from the link below.
Download scheme

#21 Gift box in the form of a cup

Really original wrapped gifts are valued much more than gifts in the usual gift bag. Pay Special attention on this charming paper box, which you can make with your own hands using our scheme.
How to make a cup

How to make a lid

#22 Box "New Year sweater"
Here is such a beautiful gift box can be made by hand. To do this, you will need a diagram, which you can download on our website, scissors, glue and a little patience.

#23 Box with bow closure
Pretty simple to make, but very original gift box. You will need a square sheet wrapping paper, glue and master class instructions. 15 minutes - and your gift box is ready!

It is very easy to make a cardboard box for a New Year's gift, but for this you will need not only cardboard, but also scissors (clerical knife) and glue or double-sided tape (for secure fixation). Below is a step-by-step manufacturing master class, following which you can quickly and easily make a cardboard box with your own hands.

If you want to donate delicious gift in the form of cupcakes or muffins, then the ideal packaging for such a gift would be paper tray for eggs. Cut out the desired number of compartments, decorate the box on top decorative elements, tie with ribbon and voila! The gift is ready!

You may be interested in:
#26 Original box "Package of milk"
Another incredibly cool Christmas box that will amaze anyone. You can pack a simple trifle in this unusual box. It is quite simple to make it if you use the ready-made scheme, which you can download on our website.

#27 Box with lid
Using our simple scheme, you can easily make a gift box with a paper lid with your own hands in just a few minutes. You can put anything in such a box as a gift: from a cute trinket to handmade sweets. You can download the box diagram below.

#28 Packing box with flower clasp
A simple diagram of a cute packaging box with a flower clasp. Fast, beautiful, original. Surprise your loved ones with a handmade gift. You can download the finished scheme from the link below.

#29 Gift box "Petals"
You can make a wonderful box for a New Year's gift with a lid in the shape of petals with your own hands. In fact, the manufacture of such charms will not only take a lot of time, but will also delight you with its sweetest
#30 Gift box for New Year's cupcake
You can make a very cute cardboard box with your own hands. It will turn out no worse than the store. In the box, you can make a special bottom for the cake. Putting your little delicious gift in a special stand, you don't have to worry that all the cream will remain on the box. To make such a cardboard box with your own hands, you need to print out the template and follow the instructions of the master class.

#31 Gift box for children "Ice cream"
A New Year's gift should be packed not just well, but tastefully. In the gift box "Ice cream" your gift will be appreciated! With our scheme, making a delicious box will only bring pleasure!

#32 Packing box "Candy"
Another option for "tasty" packaging will be a box in the form of a candy. To create a New Year's atmosphere, the packaging can be slightly enlivened by adding eyes and a mouth to it. Download the diagram, print it out and glue the box in the right places.

#33 Gift box "Cheerful bunny"
Dear and close people always want to give special gift. And best of all, when this gift is not only special, but also in a special package that emphasizes the significance specific person. It will not be difficult to make such a paper box with your own hands if you download the diagram from the link below.
Download scheme

#35 Box "Cheerful frog"
Another very cheerful and positive box for New Year's gifts is the "Cheerful Frog". Done quickly, gives a lot of emotions! Download the scheme and please your loved ones with a cheerful New Year's box.

#36 Box with a face
You can also pack a gift in an original way in a box of plain white paper, drawing on it some details in the form of an eye and a mouth, thus, as it were, reviving the gift. With our ready-made scheme, making such a box is not at all difficult. Just download the diagram, print and glue.

#37 Gift box "Birdhouse"
Let's start with perhaps the most unusual paper gift box. Making such a birdhouse is quite simple when there is finished circuit. The scheme must be printed, transferred to suitable paper, cut and glued in certain places. Complex and intricate at first glance do-it-yourself boxes will be ready in 10-15 minutes. 
#38 Box "Apple"
The original will be a gift in a paper box in the form of an apple. With such a box, picking up a gift is quite simple - gelatin worms will come in handy. Making such a box with your own hands with the corresponding scheme is very simple, the manufacturing process will take no more than 10 minutes!

#39 Box "Christmas wreath"
There is no limit to your originality, we only give you direction, and then you create yourself. On the New Year theme, you can come up with a lot of boxes, for example, in the form of a Christmas wreath. Very symbolic!
Well, what is a real New Year without the Nutcracker and music from the famous ballet P.I. Tchaikovsky? Great gift becomes a bag of nuts with a nutcracker tag attached. Himself fairy tale hero You can draw it yourself, but if there is no inclination to draw, you can find the image of the Nutcracker on the Internet and print it out, then cut it out and attach it to the bag.

Continuing the holiday theme dedicated to Halloween, we want to offer you an assembly of origami boxes in the shape of a gravestone. You can attach a previously folded cross to such a paper stone, and you will get a whole mystical installation for the holiday. Shall we start?
Surely, many of you have often encountered unpleasant situation, associated with headphones tangled in a pocket or bag, which take a very long time to unravel and take away from you precious time. Origami master and ingenious inventor Jeremy Shafer decided to solve this problem in his own way. He came up with a simple box in which these headphones of yours will be stored, and from which the wire will stick out. Thus, you can very quickly get the headphones and insert them into the phone jack.

Boxes are very good for getting to know the world of origami. Firstly, they are quite easy to fold, and secondly, they can find a lot of applications. For example, such boxes can serve as gift wrappings or simply be a decor in your interior. Today we invite you to fold simple box in the shape of a pyramid.

IN Lately gained particular popularity various products handmade, which are customary to give to relatives and friends, as well as decorate their homes and workplace. Today we offer you a master class on assembling a simple prefabricated box in the form of a candy, in which you can put any little thing and present dear person For a present. Shall we start?

We present to your attention a wonderful box with two hearts on the lid from origami master Tadashi Mori. Such a box will be an excellent package for some small gift. In addition, such a box made of beautiful thick paper can itself become a gift.

Surely, many of you have seen simple, but very convenient and functional tool boxes or tool bags more than once in your life. Today we will fold a paper model of such a box according to the Hans-Werner Guth scheme. Of course, you can’t put any heavy objects in such a box-box, but small ones stationery or hairpins - easy!

We meet another wonderful box on our website! Today, together with you, we will fold a voluminous, very beautiful and quite easy-to-assemble box from the origami master Garibi Ilan, which he himself called the StarPuff Box or simply the Star Box. You can use this box anywhere - as gift wrapping or even for storing some small things.

Continuing the theme of cute gift boxes, we want to offer you another wonderful model for assembly. This time we will fold a small nine-sided box in which you can put small gift or just write nice message close person.
It is not necessary to purchase gift wrapping in a specialized store, it is quite possible to make it yourself! Today we will show and tell you how to make an origami paper box.
The finished box can be decorated with rhinestones, voluminous bow or ribbon, depending on your desire and preferences. Well, let's not delay, let's start recreating it.
How to make an origami box.
For work you will need:
- Two square sheets of paper (one of which should be 2-3 mm smaller than the other);
- Scissors;
- Ribbon;
- Ruler and pencil.
An origami box made of paper can serve not only as a gift wrapping, you can put some of your household trifles into it.
Stages of creation.
1. Take one of square sheets paper, and using a ruler with a pencil, draw lines from corner to corner (see photo step No. 1).
2. We bend the lower left corner to the center.
3. Then we bend the same part again to the center.
4. We straighten the workpiece.
5. According to this scheme, we act with all the corners of the future box, i.e. We bend each corner twice to the center and straighten it.
7. Bend the free two side parts to the center (right and left).
8. At the level of the bottom, we create folds that form the walls of the box.
9. We bend the upper and lower walls inward.
10. On top of them we lay the left side and the right.
Similarly to the method described above, we proceed with the second sheet of paper. Then we connect the two boxes together, and as a result of such elementary manipulations, a magnificent box is obtained.
We put the prepared gift inside and tie a ribbon, tying a bow or knot with protruding ends on top. And do not forget about the manifestation of individuality, because you can lay out the name of the person to whom this surprise is intended with rhinestones or pin a note with warm regards. Box with tied ribbon.


