Spruce from colored paper. Trees made from cardboard tubes from toilet paper. Christmas tree with a cone
Click Class
Tell VK
Let's decorate our home winter holiday. We have already made various ones, hung them on windows and walls. Now we want to give the holiday symbolism. And this, of course, is the main princess of the celebration - the Christmas tree. I know that many feel sorry for the trees and replace them with artificial counterparts. But sometimes you just want to make something with your own hands in order to get satisfaction from the action and accent in the decor.
All craft ideas are easy to do with the kids. To make it easier to do the job, make the basics in advance. And try not to skimp on decor. Buy more different beads, ribbons, ribbons, beautiful buttons. Gather small toys from kinders and decorate with them. And they will go into business and will not wallow.
You can create beauty from everything that is at hand. The main thing is to attach to this a share of imagination and all your accuracy. With modern devices, such as a glue gun, you can give the product original forms and fix different textures and materials.
I know that traffic jams from wine bottles and ice cream sticks. Well, we didn’t have any traffic jams at home, and the sticks had long since sold out. different needs, so let's move on to materials that any housewife will definitely have - pasta and yarn.
Let's start with pasta. I know that various snowflakes are made from them. It turns out that they are also suitable for the Christmas tree.

We will need:
- A pack of pasta (better to take feathers)
- glue gun
- Cardboard sheet
- Dye
- Decor
It is better to prefer the shape of "feathers" or "spirals". choose good manufacturer so that all the little things are even and the same length.
First of all, we glue a cone out of cardboard. I'm doing it simple twisting leaf around the arm. To prevent the workpiece from falling apart, we fasten it with a stapler.

And now we cut the base so that the tree stands straight, and not crooked.

We always start from the bottom. “Lay” the first two rows, i.e. glue them so that they lie on the surface, so the product will be more stable.
And the next rows need to be raised exactly on the previous one by an amount equal to half the “spiral”.

When you finish the top, we begin to cover the entire craft with paint.

You can take green, or you can buy gold or silver paint in a spray can. Only then you need to spray it not at home.
I really like the result. It doesn't take much time, but it looks very elegant.

Now it's the turn of yarn and cord.
To make a Christmas tree out of yarn, you need to paper cone wind the thread evenly over each other. Periodically fastening it with hot glue to the base.

Decorate with decor.

This product is made even faster than pasta.
You can decorate them with buttons.


We will need:
- Wire
- Decor
First, we select the wire. It should be firm and not thin. From it we turn a cone-shaped spiral. We check for stability. The bottom can be wrapped twice.

We begin to string the cord on the wire.

Dry and decorate.
Glue will give the structure additional strength and will not allow the cord to slide down the frame.
Volumetric Christmas tree made of paper
Paper is always the first thing that the word "craft" is associated with. And from it you can create not one Christmas tree, but a whole spruce forest in which not a single tree will be repeated!
Let's say we want a paper tree to delight us on the kitchen table. Then you need to make it fluffy and voluminous. And also the most stable.
So, I picked up a few detailed master classes with clear description process.
Option 1
We will need:
- cardboard cone
- Paper of green color of different shades.
We cut out many circles of the same size from paper.
And we begin to glue their edges to the cone, observing the rows.

The first layer always goes at the base.
This craft is available in terms of difficulty, even two year old. And it looks quite rich because of the different shades of the same color.
Option 2. Terry cone herringbone
Cut out 4 half circles. Each of them is smaller than the previous one in diameter by 2 centimeters.

We glue the blanks into a cone and cut the edges around the perimeter a little to get the volume. Fold the terry edges a little.
Now glue a smaller cone on the largest workpiece. And so in the direction of decreasing.
That's the whole easy process.
Option 3. Let's make a Christmas tree from paper circles
Cut out 4 circles. Each of them is 1 centimeter smaller than the previous one.

Then we fold each circle 3-4 times in half.
We also make the base out of paper. You can wrap green paper around a pencil or a kebab stick.
We string round blanks on the barrel in descending order of size.
To give stability, you can plant the trunk in plasticine, wax or a wine cork.
Option 4
We mark 15 circles, each time reducing the diameter by 1 centimeter. Then we divide each circle into 12 equal parts, drawing lines through the center.

From the center mark half the radius and draw a circle. Now we cut the lines clearly to the drawn circle.
Glue the tips on each petal.
When you have completed all the levels, start collecting the Christmas tree from the widest row to the smallest.
How do you like the ideas, I think that you will find ideas for yourself.
Craft from cotton pads for the new year in kindergarten
The child was taken aback by the task that tomorrow you need to bring crafts to kindergarten? And outside the window, of course, it is already night. Then you can use packaging cotton pads. In most families, they are actively used.

We will need:
- Packing of cotton pads
- Cardboard for the cone base
- PVA glue
- Decor
We fold the cardboard frame, connect the edges with a stapler.
Take a cotton pad and fold it in half.

Then, on a harmless PVA glue, we plant two tips of a cotton semicircle.

And we glue the workpiece to the base, after smearing its fold with the same PVA glue.

So we do row by row. Better cotton pads glue closer friend to a friend, so that there is a minimum of gaps.

It remains only to decorate the delicate beauty!

To the kids in kindergarten you will definitely like your product, and you will not be ashamed in front of other parents.
DIY craft from napkins
Another very affordable material is napkins. You can use the most inexpensive and monophonic.
We take white, red, blue and green festive shades.

We fold the napkin several times to get the shape of a square, then we cut the folds and crosswise fasten the middle with a stapler.

Now we bend each layer, forming a pompom.

Lay out the first row on the frame with these balls. Then we glue balls and other Christmas tree decorations on double-sided tape.
And fill the entire surface of the frame with napkins.
Everything is pretty fast.
By the way, you can see how to make from napkins here. It also turns out very nice.
Candy Christmas tree
A craft made from sweets will be a wonderful gift: buy at grocery store box good candies in beautiful packaging.
It is made of two parts - a base for sweets and a barrel.

We glue the base with a side of 23 centimeters. Make indents when cutting bottom edge and one rib has 1 cm. We will apply glue on them.

Decorate beautiful paper or film. Glue the bottom to its base.

We make the trunk, decorate it and glue it with the frame.

Now we evenly put sweets, braid or Christmas tree beads on the hot glue.

Use the same color scheme for the base and candies.
We make a Christmas tree for the New Year from pine cones
Natural material always gives the right zest decor. It immediately smells of freshness and resin at home. Will give a symbolic meaning to this winter holiday.
Cones are also suitable for various crafts.
You can create a Christmas tree from only cones, or you can dilute them with sisal balls, decorative flowers or fir branches.
The combination of cones and dried citruses also looks unusual.

Glue the cones onto the base with hot glue. You can not think about the side that you have them. This will give a slight bewitching negligence to the product.

Alternating bumps with Christmas balls or other decor.

We cover artificial snow or white enamel spray.

Everything is quite easy, and the result is incredibly beautiful.
Light tinsel Christmas tree
Without tinsel we cannot imagine New Year! There are no decorations on it now: stars with balls, and multi-colored tips. It decorates windows, curtains, walls and, of course, is used as a material for crafts: wreaths and Christmas trees.
Since most tinsel manufacturers thread it on thin wire, it can be easily different kind curves and shapes.
A spruce tree is made from it in three minutes!
We will need:
- Tinsel
- Cardboard sheet
- Double sided tape.
From cardboard we make a base in the form of a cone and glue it with double-sided tape.

We remove the protective film from the first row and begin to glue the end of the tinsel, tightly wrapping the frame.
If you didn’t have enough tinsel, then glue the end with tape, and put the next one on top of it fluffy ribbon the same color.
Fluffy pom-pom beauty
Pompoms have also long been loved by our craftswomen. Previously, we made a dog out of them, now we will create a fluffy beauty.
The balls themselves can be made in two different ways: by winding 20 layers on a fork or using two round blanks.

We will go with the second method.
We take cardboard or plastic, cut out two identical rings.

Now stepping back from the edge of the thread 5 centimeters, we begin to wind the yarn very tightly.
Then cut the outer fold between the blanks.

With the thread end left, we tie the middle of the pompom so as not to lose all the threads.

Now we are looking for a thick wire and turn it into a spiral. Leave the base wide. We string pom-poms on it.

If the wire is not found, then we use the experience of previous products and form a triangular or conical base.
Felt Christmas Tree Ideas
Felt is also popular with our craftswomen. No matter what they do, educational toys and Christmas tree decorations. Today I will give a few ideas for creating a spruce tree.
From the most simple options to complex.
Option 1. Cut out 10 Christmas trees of the same size from felt. Fold in half and glue the fold to the trunk.
We use branches, saw cuts of trees (preferably spruce or pine).

Option 2. Cut out many identical triangles from felt.

Glue them to the frame in rows. The upper triangle lies between the two lower ones!

Option 3. We prepare 5 squares of different sizes: 9 cm, 7 cm, 5 cm, 3 cm, 1 cm.
We make five of each size.

Now we string the largest squares onto the thick one, distributing them diagonally to each other so that there are no voids.
We pass all the squares like this.
New Year's beauty from fabric
And two more ideas of fabric beauties in the piggy bank. Ends can be finished decorative seam thick contrast thread. Sew buttons or beads onto symbolic branches.

Use several colors of fabrics and textures. For example, take velvet on one side and linen on the other.

You can also choose different patterns in one color scheme or vice versa to play with flowers - companions.

You can fill the Christmas tree with holofiber, synthetic winterizer or cuts, the remnants of your creativity.
If the product is small, fill it with cotton wool.
My dear, I tried to find for you the most interesting and affordable materials for creativity. I'd love to hear your opinion in the comments!
tweet
Tell VK
New Year is the most fun and most children's holiday. Even adults are not afraid to look ridiculous in red Santa Claus hats and with a bunch of gifts. What can we say about the children, who in this joyful mess are trying to participate in all matters! The main attributes of the New Year are Santa Claus and a Christmas tree. Traditionally big Christmas tree decorate with toys and tinsel, dance around her. But what if you make an unconventional Christmas tree? A beautiful do-it-yourself paper Christmas tree will not pretend to be the centerpiece, but it can decorate a nursery or become a souvenir gift. Believe me, such a Christmas tree will find a use for itself. 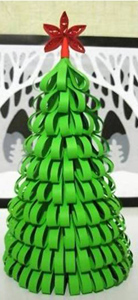
Is being done Christmas tree paper, cardboard, color and corrugated paper, tinsel and any other improvised materials. It is easy and fun to do: the kids take part in the work with great pleasure. Two-year-old children, for example, can roll up plasticine balls, which then become a toy, or glue a small piece in the place indicated by adults. And the memories of joint craft enough for a few days.
There are at least a dozen ways to make a paper Christmas tree with your own hands, but in any case, you will need:
- Paper (colored, corrugated, thick - whatever)
- ruler pencil
- Glue and stapler
- Scissors
- Sometimes a compass
Model No. 1. Volumetric paper Christmas tree
First, the base of the Christmas tree is made - a cone. If the tree is planned to be large, the cone is made of whatman paper (it can be replaced with four A4 sheets glued together). In the center of the wide side, the center is marked, from it we draw lines to two bottom corners, cut off (do not forget to leave an allowance for gluing), cut off the semicircular base, glue it, check whether it is even. On this basis - a cone - you can make several different options Christmas trees. You can get a big Christmas tree out of paper if you make a large cone, and a small one on a small cone. A different ways the manufacture of needles will generally be misleading: it may seem that these are different Christmas trees.
 To make the blank cone look like a Christmas tree, we make needles from colored paper. Traditionally, the needles are green, but it can be assumed that there is snow or frost on the branches - the choice of color is up to you. We outline the rectangles: for the lower needles, the width of the rectangle is 7 cm. We make a trapezoid from the rectangle: the upper side is cut off. The wide side is folded into a triangle and fastened with a stapler or glue, it is convenient to glue the top to the cone.
 Bulk needles can be replaced with circles glued behind upper part. If you cut circles different shade green, the tree will look more original.
The needles are glued in rows, starting from the bottom. To make the Christmas tree look beautiful, every three rows we reduce the size of the needles. That is, we first draw rectangles of 6.5 cm, then 6 cm and 5 cm. We draw the top of the Christmas tree with a small cone, the bottom of which we cut with triangles. If desired, the Christmas tree is decorated with sparkles. You can use ready-made sparkles, you can finely chop the tinsel. Apply glue to the needles and sprinkle glitter on them.
The second version of the Christmas tree-cone
We build a frame, cut thin short strips from colored paper, wind each strip on a pencil. The stripes take on a twisted look. With a certain skill, you can twist the strips of paper with scissors: gently draw the blade of open scissors from one end of the strip to the other, while pulling the strip. Glue the twisted strips to the cone. You can decorate the Christmas tree with anything: sparkles, bows, balls, stars.
The third version of the Christmas tree-cone
 Glue drop needles onto the prepared frame. We make needles from strips of green (or any other) paper, glue their ends together - we get a drop. Glue larger drops at the bottom of the cone, smaller ones at the top.
The fourth version of the Christmas tree-cone
Wide strips of paper cut into fringes are glued to the base. Again, the strips are wider at the bottom (respectively, the needles are longer), at the top the strips are narrower. The color of the needles can be any: green will make it natural, multi-colored - decorative. We cut the strips into small “needles”, not cutting to the end about 1.5-2 cm. After the glue dries, the needles can be bent upwards - carefully draw a scissor blade from the base of the needles to the ends. Such a Christmas tree made of corrugated paper will look beautiful.
Model number 2. Christmas tree made of paper and cardboard
Cardboard will need double-sided. We fold a sheet of cardboard in half, draw the outline of the Christmas tree. We draw exactly the same contour on another sheet. We cut out both contours, then we make cuts along the axis to the middle: on one Christmas tree from above, on the other from below. We insert the parts into each other. We decorate with tinsel, balls (glass or paper), sparkles - anything. In the photo - slotted toys.
A similar Christmas tree can be made from colored paper. It will require 4 sheets. Fold each sheet in half, cut out a triangle. The resulting parts are glued together and cut at an angle of the needle. You need to twist them before the glue has dried.
Model number 3. Christmas tree made of colored paper
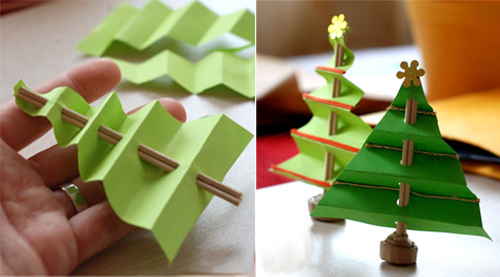 For this model, you will need thick paper. It is done simply: cut out a triangle, fold it with an accordion, make through hole, into which we insert a stick-rod. To make the Christmas tree stable, the stick can be inserted, for example, into an eraser. Such a Christmas tree can become a small souvenir or decorate workplace. Christmas mood she will definitely create.
Model number 4. Christmas tree in papercraft technique
 How such a Christmas tree is made of paper, the diagram shows clearly. It is necessary to cut several circles of different diameters (the bottom of the Christmas tree - from circles of a larger diameter, the top - from circles of a smaller one). Circles are drawn and cut, needles are folded. Finished tiers are strung on a rod. We decorate the Christmas tree with sparkles, beads, foil bows - the fantasy is limitless.
Model number 5. folding herringbone

For such a Christmas tree, several circles of different diameters are cut. The diameter and number of circles depends on the desired size of the Christmas tree. Fold each circle in half 4 times, unfold and straighten the circles. The trunk of the Christmas tree can be made from an old pencil, a straw for a cocktail, a wooden stick - all this is wrapped in colored paper, the tip is glued. In the center of each circle we cut a small hole (it should be smaller than the diameter of the trunk in order to hold on tighter). Circles-tiers are strung on the trunk, starting from the bottom. A Christmas tree stand can be made from a wooden coil, cork, lid from plastic bottle, plasticine, glued from thick paper.
Model No. 6. Paper origami - Christmas tree
In this popular technique, you can perform any figures, including christmas trees. How a paper tree is made using the origami technique, the video will demonstrate better than any words. We offer two options.
But the third option is more difficult.
Model No. 7. Christmas tree in a hurry.
For this Christmas tree you will need a color printer, paper, scissors with glue, hands and a few minutes of free time. We print a Christmas tree template from paper, cut it out, fold it, glue it.
The New Year is already very close! And he must be met with full force! Ready to decorate with us? Today we will have many options! Choose what you like best and repeat each step according to the photo! So, let's get started - do-it-yourself paper Christmas tree!
CHRISTMAS FROM PAPER OWN HANDS
Let's start our work with this wonderful Christmas tree! Here, it seems, every step is painted, but something is not right ... Apparently, only origami lovers can understand these works! After all, origami is an art! 
CHRISTMAS FROM PAPER VOLUMETRIC
Christmas tree made of paper with your own hands from circles. Now this is a completely understandable option! Preparing a large number of circles of different diameters. We cut the circle, as shown in the figure, glue it into a flower. And he puts our blanks on the wire. Not bad! The tree turns out unusual and beautiful!

HOW TO MAKE A CHRISTMAS FROM PAPER
And this is an example of how to make a garland of Christmas trees! You may well not waste time on tinsel, but fix our blanks on the existing tinsel. We simply cut out an uncountable number of Christmas trees, fix them on threads and carefully hang them on tinsel. And the Christmas tree made of paper with your own hands is ready!

HOW TO MAKE A CHRISTMAS FROM PAPER WITH YOUR HANDS
And this is another one more difficult option work, which refers to such a type of creativity as origami. Fold, unbend, bend, fold, unfold ... In general, let's repeat all the steps in the photo and see what happened to someone? How do you like the idea?)) A little lower you can watch a video on how to make this Christmas tree out of paper with your own hands.

And this is a continuation of our Christmas tree made of paper. The Christmas tree, of course, turns out to be indescribably beautiful! No glue, no chemicals... With these Christmas trees, you can safely decorate a baby's room and be calm for his health!

AND HERE IS A VIDEO HOW TO MAKE THIS PAPER CHRISTMAS WITH YOUR HANDS!
3D PAPER CHRISTMAS
Below we have prepared for you 3 more options for Christmas trees made of paper. Agree that it turns out very elegant and beautiful! Such Christmas trees will decorate New Year's Eve and will give you a lot of positive emotions!

And this do-it-yourself paper Christmas tree is made of openwork details. Very nice!

The article was prepared specifically for the site
In autumn, more and more often you begin to think about the coming of the New Year with its festive mood, meetings with friends and family and, of course, gifts. In addition, the New Year has been associated with the Christmas tree for all of us since childhood! Let's talk about her.)
Fortunately, people are increasingly thinking about what not to cut live Christmas tree for the sake of a few public holidays. "Cross" and I fully support this decision and believe that a do-it-yourself Christmas tree is much more interesting and humane! In addition, this great options for those who have nowhere to put a big Christmas tree (for example, there is no free space, or on this free space active young child).
We bring to your attention large selection master classes on creating decorative Christmas tree with your own hands, which will serve as a wonderful decoration for your home and original gift for a wonderful holiday!
Christmas tree made of cones
Very original Christmas tree can be made by hand pine cones. But we will not use the whole cones, but only their scales, so that the Christmas tree is not too bulky.

So, to begin with, we will separate its scales from the cone. This can be done with a sharp knife, wire cutters or secateurs.

Be careful, take care of your hands!

The next step is to make a cone from thick paper or cardboard, which will be the base of our Christmas tree. We turn the paper into a cone, glue it on the side and cut off the excess at the base.


Then we just take the scales in our hands and glue them in a circle, starting from the base of the cone.

You can glue each new row in a checkerboard pattern, you can, as here, one above the other.

You can glue a clove on the top of the Christmas tree (such a spice))

After the glue dries, you can start painting our beauty. To do this, you can take spray paint or regular acrylic paint.
If you choose acrylic paint with a metallic effect, then your Christmas tree will look much more spectacular.

Then we cover the ends of the "twigs" with PVA glue and sprinkle sparkles on them.


This beauty is obtained as a result of these uncomplicated actions:

Exactly according to the same principle, you can decorate the cone with chains and beads, decorative cords, ribbons, braid, etc.

Another very popular way of making artificial Christmas trees with their own hands is their weaving from beads. This is perhaps the most painstaking way, but for lovers of beading, nothing is impossible!
The detailed process of weaving Christmas trees from beads cannot fit in one article, so we share with you links to master classes previously published on "Cross".


Christmas tree made of paper and cardboard
If you have nothing to do in the workplace) or just want to add a little holiday to the office, make a Christmas tree out of paper. What's easier?)

And this Christmas tree is very similar to the design one, don't you think? It's all about color designer cardboard, which is so beautiful and bright that you don’t need to decorate the Christmas tree with anything else) which simplifies the process of making a Christmas tree with your own hands.


Secondly, for the manufacture of a designer Christmas tree, you can use threads that are wound on a paper cone using the technology for making openwork balls.

Third, flower mesh and mesh for bouquets.

The manufacturing technology of these three Christmas trees is very similar, so the process of their creation is shown in one master class.
Feather Christmas tree
Yes, they do too! You can buy feathers in hardware stores, or maybe you have stocks of bird feathers? They can be dyed for brilliance. food coloring. It looks original, beautiful and so airy!
Today you will learn how to make a voluminous Christmas tree out of paper with your own hands. This master class describes not one voluminous Christmas tree made of paper, but several different options for crafts at once. Our ready-made templates will help you make them.
Tools and materials Time: 20-30 minutes Difficulty: 2/10
- printed Christmas tree templates on A4 paper;
- scissors;
- glue;
- acrylic paint and brushes;
- fluorescent paint (optional);
- sparkles, decorative snowflakes and other decor of your choice.
Volumetric Christmas tree paper - simple and very original way Decorate your home for Christmas and New Year!

These crafts are so easy that you can hook up preschool and toddler kids with no problem. school age to make them! Undoubtedly, you will all have fun creating various compositions from 3D Christmas trees!
Detailed description with photo
We offer you four options for making a voluminous paper Christmas tree with your own hands, but if you still don’t have enough of them, you can experiment with the sizes of the trees or create your own template. The possibilities here are endless!
Option 1. Christmas trees with stars
The first option includes a large number of trees, so we suggest starting with it.
Initially print out the templates below on A4 paper.
Template 1
Template 2
The first option assumes that you simply cut out the trees along the contour, and then cut recesses into them along the drawn lines.
Then you need to bend these strips in opposite directions through one. Thus, you have in your hands a ready-made voluminous Christmas tree made of paper!
For the second option, also cut out the trees along the contour. There are no drawn lines inside, which gives you the opportunity to experiment!
Here you can cut out arbitrary lines at the top, and put down stars below using a curly stapler. Or cut out thick lines, and put asterisks between them, or cut out curved lines, or .... In general, fantasy itself will tell you, and below in the photo you can see what happened with us!
Option 2. Christmas tree with a deer
If you want to move on to more complex compositions, try carving a Christmas tree with a deer, the template of which is provided below!
Template 3
To make this Christmas tree, first cut out the deer, then fold the Christmas tree paper in the middle and cut it out. After that, fold the paper for a small tree from the right edge and also cut it along the contour.
If desired, glue decorative stars and snowflakes on the tree, decorate with glitter, etc.
Option 3. Luminous volumetric tree
Print the template below on A4 standard paper.
Template 4
- Cut out the stars and use them as a template for the stars.
- Get your little one to carve the Christmas tree. Let him cut the tree along the contour and internal lines. Depending on your age, you may need a little help.
- Make sure all lines inside are cut.
- Using green or any other paint of your choice, paint the craft in 2 layers. Let it dry well between coats both times.
- Fold up paper strips inside the tree in opposite directions to create a 3D look.
Stars: In this tutorial, we used glow-in-the-dark spray paint that we found at our local craft store to make a 3D glow effect paper Christmas tree. We just sprayed paint on paper and cut stars out of it.
Alternatively, you can buy already finished paper, which glows in the dark, and cut stars out of it.
Glue the stars to your Christmas tree.
A do-it-yourself voluminous paper Christmas tree is ready! We hope our step by step master class with templates you like.
Subsequently, you can use this craft as a small night lamp, but be prepared for the fact that it will last you a very short time!
And as a small surprise, we attach to the master class interesting video, in which a professional decorator will tell you how to make a slightly different, but no less beautiful option do-it-yourself volumetric Christmas tree made of paper.


