Colored paper product for the new year. Christmas balls made of paper: the main work. Salt dough Christmas tree
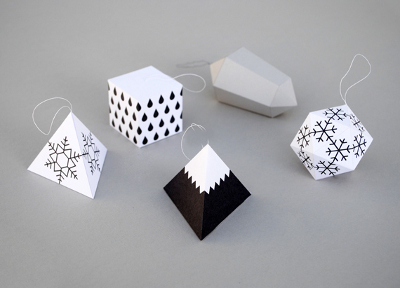
To decorate the Christmas tree with "precious paper stones", you just need to print ready-made templates, cut them out and glue paper Christmas decorations.
Before you completely glue the craft, attach a loop from the inside, for which you will then hang the toy on the Christmas tree. Finished paper stones can be covered with sparkles for beauty.
Templates small size: pattern-1 pattern-2 pattern-3 pattern-4 pattern-5
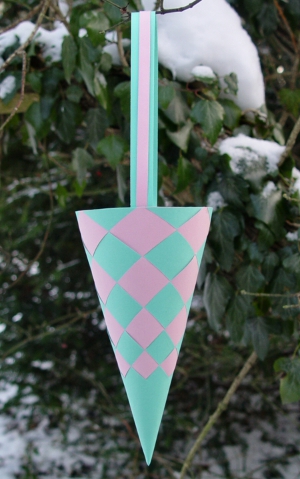
On the same site, you can download a template for another, more difficult to make New Year's paper craft - a paper diamond. It can also be used as a Christmas toy or Christmas decoration. Download template >>>>

Print New Year's scheme diamond on thick colored paper, cut it out. Before gluing the craft, carefully, along the ruler, scratch the fold lines (marked with a dotted line) with a needle to make it easier to fold the paper. Note: if you suddenly printed the template from the link above, but the dotted line is not visible on it, you can use this template. Here everything is the same, only there is no dotted line.

And more Christmas paper crafts from www.minieco.co.uk:
paper Christmas decorations

2. New Year paper crafts. New Year paper toys
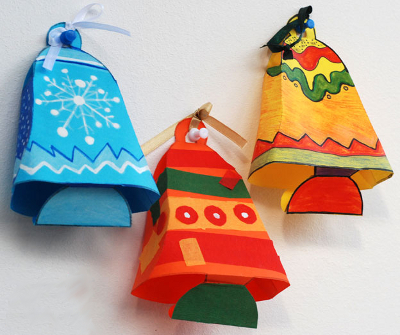
paper bells
3. New Year's decoration. New Year decoration
Probably already known to many, the Creative Park site from Canon will help you decorate Christmas tree handmade paper toys. Christmas decorations - bells, hearts, lollipops, Christmas decorations in the form of Christmas boxes- all this and much more you will find on the Creative Park website.


4. DIY Christmas decorations. How to make New Year's
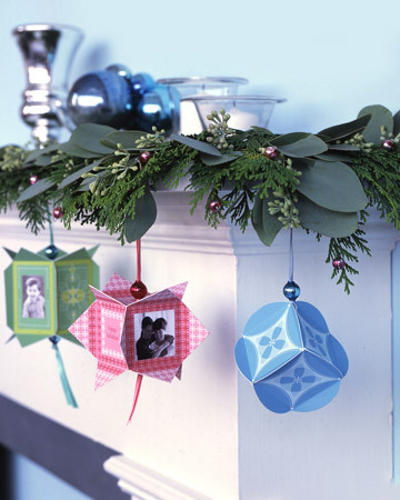
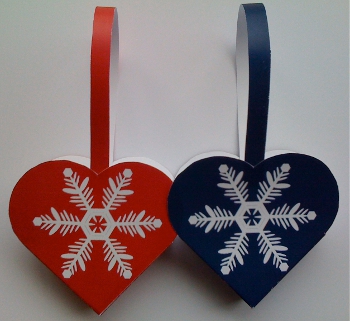
We suggest you make simple Christmas tree decorations out of paper, decorated with photographs of family members. To do this, you need to download templates for Christmas tree decorations from the link, cut out individual squares, bend their corners and glue them together. At New Year's toys from paper blue color need to cut, round off the corners. See photo below.
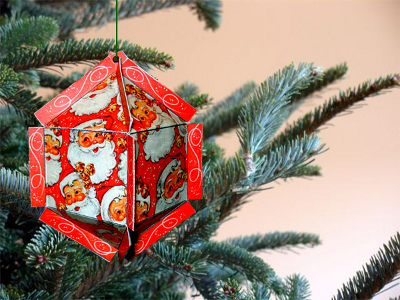
In the photo below, a New Year's paper toy depicting Santa Claus is made in a similar way. You can download the template.
5. New Year's ideas. New Year's master class
Another interesting new year idea- Christmas decoration origami wreath. To make such a paper wreath, you will need to cut beautiful paper into strips 4 cm wide and 8 cm long. You need 8 strips in total. Each strip must first be folded in half lengthwise, and then in half across. Holding the blank with the open edge up, bend its top corners down as shown in the photo. Cm. New Year's master class at the link >>>> From the resulting blanks, assemble a New Year's wreath by inserting them one into the other.

6. Christmas toys made of paper. How to make a Christmas toy
Most people associate ice cream with hot weather and summer vacation, nevertheless, Christmas decorations in the form of waffle cups with an appetizing treat look very festive and original on the New Year tree. To make these Christmas paper toys, you will need Kraft paper (for cups) and corrugated paper. different colors for the ice cream.

Cut out circles from craft paper, cut them in half. From each semicircle, fold a cone, glue it. corrugated paper crumple different colors into lumps, for one Christmas tree toy you will need two such lumps. Now you need to string "cups" and "ice cream" on a thread, making loops on top, for which you will then hang New Year's paper decorations on the Christmas tree. See the New Year's master class at the link >>>>
7. Christmas toys made of paper. New Year's schemes
In Denmark, there is a tradition of decorating the Christmas tree with heart-shaped wicker paper baskets. The photo below shows traditional wicker baskets made of paper. They can be hung on the Christmas tree empty or filled with small sweets, nuts, cookies.

To make this Christmas paper decoration with your own hands, you need to print the following template on two sheets of paper in different colors. Cut them out, fold in half, make three cuts. You should get these two blanks.
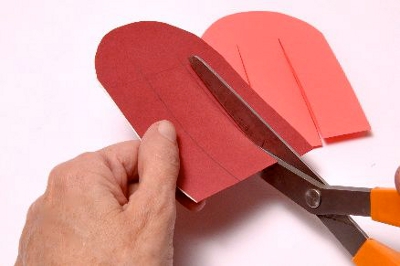
Now you need to weave them together to make a paper heart basket. For a detailed New Year's master class on how to weave a paper basket, see the link >>>>


Here are a few more New Year's paper baskets for the Christmas tree:
With snowflakes
 In chapter:
 On the eve of the New Year, children's handmade items are gaining particular popularity. Especially often craftswomen create christmas decor for the interior with your own hands - figurines, garlands, streamers, wreaths and, of course, New Year's toys.
One of the simplest and most economical materials has always been and remains paper. Fortunately, today there is a sufficient choice of this goodness in stores for children's creativity. But few people know that for crafts you can use not only purchased colored paper, but also quite rarely used paper waste, for example, old magazines and books, music notebooks and ordinary office sheets for a printer.
Also, needlewomen hold crepe, packaging, velvet, corrugated and scrap paper, remnants of wallpaper, bushings from toilet paper, paper baking tins, disposable napkins and paper plates. You have no idea what fantasy is capable of creative person and what masterpieces are created.


Christmas tree paper ball:

To make such a stunning voluminous Christmas tree ball, you will need the following materials and tools:
- Thick paper for 16 circles with a diameter of 6 cm;
- Scissors;
- Pencil;
- Glue stick;
- Sheet of paper as a template;
- Needle with thread.
We cut out 16 circles with a diameter of 6 cm from thick paper (you can use a glass as a template). Fold each circle in half, then in half again.
On a sheet of paper we draw 5 lines at the same distance from each other - 1.5 cm. We will lay out our blanks on this sheet to make it easier to glue. middle line denotes the middle of our circles. Lay out the first circle and coat with glue between 1 and 2 strips and between 4 and 5. Glue another circle on top. Now we will glue the next circle in the middle. We alternate glue strips until we glue 8 circles - this is half the toy. Repeat the same for the next 8 circles.

To make it easier to thread later, we pierce a hole with a thick needle, as shown in the figure. Between themselves, it is necessary to glue the two resulting blanks - we do this with the help of adhesive tape. Now we thread the thread and the paper Christmas toy is ready!
Next craft - volumetric sphere for decorating the Christmas tree, made from plain white office paper.

You can use any thick paper. The toy is created according to the following scheme (for children it may be difficult, you will need the help of adults). You will also need glue and a hole punch:

Very simple voluminous toys on the Christmas tree are made of cardboard and wrapping paper(color). You can also use leftover wallpaper. Using a glass, cut out 4 blank circles from cardboard and paper. We glue the paper on top of the cardboard so that the details are denser. We glue all 4 circles together, as shown in the figure. Before gluing the last circle, we fasten the ribbon inside for hanging on the Christmas tree.

Paper molds for cupcakes are excellent blanks for a Christmas tree toy. Just fold each mold 4 times and get one tier of Christmas trees - you need 3-4 of these. Well, if the molds are different colors. It remains only to attach the ribbon on top - and a beautiful Christmas toy is ready!

Another idea for a New Year's paper toy is a Christmas tree from an old book (you can use a music notebook). The sheets are cut in a semicircle and folded like an accordion:

These simple Christmas decorations are made from strips of colored or wrapping paper:


Unusual Christmas balls made of paper or cardboard can be made by printing and cutting out several templates:

The elements are glued together in the form of a "sun" - you will need two of these - different color. A circle is glued in the center. Then, placing both suns on top of each other, the ends-rays are intertwined with each other - so to the end, until a ball is obtained. From above, all ends are attached to each other and a circle is glued. It remains to fix the tape on which the ball will be held.

Very interesting paper toys for the Christmas tree are obtained from modular elements made using the origami technique. For this purpose, you can use thick printer paper, packing cardboard or gift paper:

A simple Christmas tree decoration can also be made from ordinary toilet roll. To work, you need several of these bushings, glue, scissors and decorative elements (sparkles, paints, beads, rhinestones). The bushings are slightly squeezed and cut into oblong elements 1-1.5 cm wide. Then a flower is assembled from these elements and decorated as desired.
Paper crafts are something that can be done for the New Year of the Dog quickly and easily as a gift to loved ones or just to decorate the house. Paper is always in the house and making it is interesting! We offer best crafts for the New Year 2018 from paper, which you can do with your own hands step by step photo and video.
In addition, consider what else can be done on New Year with your own hands at home from what you eat at hand. For such crafts, you don’t need to spend money on purchasing materials, and the result is interesting and it doesn’t look like completely unnecessary things were used. Let's look at a few master classes, from which everyone will choose what suits him.
📌 Important! Each description contains the colors of materials and a set of decor for those crafts that have already been made and shown in the photo. But it is not necessary to choose the same shades and the same decor. You can take those materials for the New Year paper craft 2018 that you have at home.
PHOTO: paper garland for the New Year
Several options for a decorative Christmas tree made of paper
Without smart Christmas tree New Year's Eve - nothing. Of course, the main heroine of the holiday is a big fluffy live spruce or a pine tree in the center of the room, or an artificial beauty dressed up in garlands and colorful toys. But you can also make small ones. decorative Christmas trees do-it-yourself paper and decorate with them for the New Year a table or shelf in the office or at home. The following are two master classes on creating such paper beauties.
For each of them we will need:
- A sheet of thick paper for the cone.
- Paper napkins of any color, you can combine several colors.
- PVA glue or pencil.
- Scissors.
- stapler.
- Pencil or any wooden stick.
- Christmas tree decor. Everything you can find at home: sequins, small beads, bells, ribbons, and so on.
And now, in turn, consider both options for Christmas trees from paper napkins.
Option 1 - Christmas tree made of paper roses
- make a cone out of thick paper. We glue it with glue or a stapler.
- now we make roses from napkins. To do this, we fold each napkin in half and in half again, fix it in the middle with a stapler.
- cut out the circle.
- we have a multi-layer circle and you need to take each subsequent layer from above and twist it tightly. We do this with all layers.
- when all the layers are twisted, you need to straighten the rose a little. Thus we make all the flowers.
- cover the cone with roses. It is better to start from the bottom in a circle and go up.
- glue roses should be close to each other so that there are no gaps.
- after the whole Christmas tree is “dressed” in roses, you can decorate it with any decorative elements by simply gluing them randomly over the flowers.
Such a craft for the New Year 2018 made of paper with your own hands is very simple to perform, even a child, a teenager can handle it, and in appearance it turns out to be very effective and beautiful.
Option 2 - Christmas tree made of paper napkins using the trimming technique
A similar very simple version of the Christmas tree. All that is needed for it is listed above, we will prepare everything according to the list and proceed:
- you have to start from the bottom. Thus, we attach all the twisted squares tightly, as much as possible closer friend to friend.
When we glue the whole Christmas tree with twisted squares, we get a fluffy beauty that can also be decorated with any decorative elements.
Using these techniques (napkin roses and trimming), you can create postcards by gluing elements onto a base with a drawn outline of a Christmas tree or other pattern, a snowman, for example.
PHOTO: DIY paper Christmas tree
Christmas trees can also be made from paper using other techniques. By simply gluing circles of colored paper onto a cone, or cutting circled palms from green paper. And you can also make loops from strips of paper and stick them on the cone.
Very beautiful Christmas trees from paper are obtained using the vytynanka technique. To do this, you need to fold a sheet of paper in half, draw a contour according to the template and cut through all the necessary places. Do the same with the second sheet. After connecting 2 sheets to each other at the fold.
Generally a Christmas tree paper cone you can decorate with anything. The idea is to make a construction paper cone and decorate it.
For decoration you can use:
- threads for knitting, simply wrapping or cone;
- buttons;
- tinsel and sweets, gluing them in rows alternating;
- crumpled paper petals;
- pasta;
- coffee beans and jute rope.
📌 This Christmas tree can be decorated with anything you find at home. After that, you can cover the resulting creation with golden paint or artificial snow or leave as is.
Paper crafts for the New Year in the form of a Christmas tree:
Decorative paper candles
As surprising as it may sound, you can make candles out of paper. Of course, they will not glow, but they can decorate a Christmas tree or a New Year's table.
PHOTO: Craft in the form of paper candles
Let's prepare everything that is required in the work:
- colored thick double-sided paper.
- scissors;
- glue stick;
- ruler;
- marker or marker.
When everything is ready, let's start:
- Cut strips of colored paper. Strips can be taken of any width, optimally 3-4 centimeters. To do this, you need to make marks on one and the other side of the sheet, draw lines along the ruler and cut. For one candle you need 2 strips. They can be made in one color or two shades.
- We take 2 strips and glue the ends as shown in the photo.
- Now we make weaving (see photo) and fix the tips. This is how the candle turned out.
- Cut out a circle from paper. We glue a wicker column on it.
- We cut out the flame of a candle of arbitrary shape with a rectangle at the bottom, for which the flame will be glued to the column.
- We draw a wick on both sides with a felt-tip pen, bend the rectangle and glue it to the post.
Step by step photos for making a paper Christmas candle
The finished candle can be glued to a clothespin and decorate the Christmas tree, or you can leave it as it is and place several of these candles on a shelf or on New Year's table. Such crafts for the New Year 2018 from paper with your own hands can be made to school or kindergarten for the competition!
Santa Claus and Snow Maiden made of paper
The main characters of the New Year - Santa Claus and the Snow Maiden can also be paper. Let's try to make them with our own hands for the New Year of the Dog 2018!
Getting ready for the creative process:
- We will need colored thick paper in blue and red for the cones.
- White paper for finishing.
- Beads, any decor.
- Paints and brushes.
- Glue.
- Scissors.
- Thread (you can take cotton for knitting).
And now let's get started:
- The description will go for Santa Claus, the Snow Maiden is done in exactly the same way, but you can change the base color and decor.
- We make a cone of thick red paper.
- We cut out several (2 or 3) semicircles from white paper and cut them so that we get terry. This will be the beard. We glue in several layers on a cone. For a beard, you can also use cotton pads.
- Eyes and a nose can be painted with paints or beads can be glued: black - eyes, pink or red - nose.
- Now you can make a cap. For him, we will make a small cone of red paper and glue a strip of white on the bottom. Put a cap on Frost and fix it with a drop of glue.
- You can draw or stick any decor on the figure.
- You can glue a thread to the top of the head, for which we will hang Frost on a Christmas tree or attach a white pom-pom to the tip of the thread.
This craft is something that you can do for the New Year with your own hands and give it to your mother, friends, relatives.
📌 Using this technique, you can make more penguins, snowmen, deer, and any figurine in the New Year theme.
Santa Claus, Reindeer and Paper Towel Snowman
For such beauties, you can use ordinary paper towel rolls or make a roll of any diameter and height yourself from thick paper.
Before starting the process of creating Santa Claus, we will prepare everything that is useful in the work:
- Roll for the base.
- Felt or colored paper in red, white, light brown, black and yellow shades.
- PVA glue.
- Eye blanks, they are sold in any needlework stores. Or you can use half beads for the eyes, buttons, in the end, just cut circles out of black paper or felt.
- Scissors.
And now let's start making paper crafts for the New Year 2018 with our own hands!
First we make Santa:
- Cut out a strip of red felt whose width is equal to the height of the roll plus 2 cm, and the width is equal to the diameter of the roll.
- Cut out a half circle from felt light Brown for the face, stick on.
- Cut out an oval white felt, cut off a recess for the face on one side and stick it on top of the face detail.
- We cut out the details for shoes from black felt (two ovals connected together). Glue on the underside of the roll.
- We cut a strip of black felt, stick it in the middle of the roll - this is a belt.
- Cut out a buckle from yellow felt. We glue over the belt in front.
- Now we glue the eyes and the circle of the nose.
- Glue the cap on top of Santa.
Now we make a snowman:
- Cut out a strip of white felt whose width is equal to the height of the roll plus 2 cm, and the width is equal to the diameter of the roll.
- We glue the roll with a strip, bend the ends inside the roll from one side and the other.
- We glue the eyes, nose and buttons - circles of felt.
- We cut out a scarf from red felt and cut along the edges, we tie it to a snowman.
- We make a cap. Cut out a semicircle from red felt, glue the sides. Cut out a strip of white felt and glue it along the bottom of the cap. Glue a pom-pom to the end.
- Glue the cap on top of the Snowman.
Next is the turn of the deer:
- Cut out a strip of light brown felt whose width is equal to the height of the roll plus 2 cm, and the width is equal to the diameter of the roll.
- We glue the roll with a strip, bend the ends inside the roll from one side and the other.
- We glue the eyes and nose.
- We make a cap. Cut out a semicircle from red felt, glue the sides. Cut out a strip of white felt and glue it along the bottom of the cap. Glue a pom-pom to the end. But here we still need to cut out the horns from brown felt and glue on the sides of the cap.
- Glue the cap on top of the deer.
Thus, three figures are ready. Such paper crafts can be put under the Christmas tree.
📌 Origami paper crafts video of Santa Claus:
Christmas tree toy from strips of paper
Among the crafts for the New Year 2018 made of paper with your own hands, you must definitely make a Christmas tree toy!
Let's analyze very interesting toys from strips of colored paper step by step, first prepare everything you need:
- Colored paper. For one toy one use two shades.
- Scissors.
- Needle with thread. You can use fishing line, or you can use ordinary sewing thread, but thicker.
- Pair of beads.
When everything is ready, we proceed to the process of creating a Christmas tree decoration:
- Cut the paper into strips about 10-15 centimeters long and 1.5 - 2 centimeters wide. For one toy, you need 9 strips of one color and 9 of another.
- Cut out 2 circles with a diameter of 1.5 centimeters.
- Pass the thread through the needle and fasten the bead at the end.
- Now add all the stripes, alternating colors in a pile. We put on the thread over the bead 1 circle and a stack of strips from one edge.
- Then we fold the strips in half and thread the entire pile from the other edge onto the thread.
- On top of the second circle and bead. We make a loop and the toy is ready.
You can make several of these multi-colored christmas decorations and decorate a Christmas tree or a room with them. This is just one version of a Christmas tree toy made of strips of paper, and you can make a great many of them.
New Year's paper garland - video:
Ideas New Year's crafts for New Year 2018:
And they will be very cheap in cost, and in beauty they will not be inferior to the purchased ones. Moreover, this year the trend is the naturalness and naturalness of materials in decorating the Christmas tree and the room. So the forest beauty dressed up paper toys, will be not only beautiful, but also stylish and fashionable.
Snowman with a whisk
📌 Another craft is a snowman, which we will try to make out of paper by simply folding it in a certain way.
Getting ready for work:
- take paper in white, black, orange and blue;
- scissors;
- paper glue.
And now we start:
- We make two circles for the snowman's body. To do this, we take 2 sheets of a larger format and 2 sheets of a smaller one. We fold them with an accordion.
- We bend the accordions in half. On the one hand, we glue the ends with each other, we get a semicircle. We glue together 2 large semicircles and two smaller semicircles. We glue a smaller circle on top of a large one. This is the body of a snowman.
- In the same way, we make small circles for pens and glue them to the snowman.
- Cut out circles for eyes and buttons from black paper and glue them on the snowman.
- We make a cone of orange paper and attach it to the snowman in place of the nose.
- We cut out a hat from black paper, decorate it with a strip of white paper and glue it on the snowman's head.
- cut off long strip blue paper, cut it around the edges and tie the snowman as a scarf.
- It remains to make a whisk. Add up white paper accordion and fasten the ends.
- We make an accordion out of orange paper and fold it in half, attach it to a strip of white paper and attach it to the snowman's handle.
With this snowman, you can decorate the wall in the room by attaching it with pins and needles or double-sided tape to the wallpaper.
And if you make such a snowman in a smaller format, then it will be a great decoration for a postcard. Complete the postcard with paper snowflakes or a Christmas tree made using the same technique, that is, from sheets of paper folded like an accordion and glued in layers.
📌 To create beautiful crafts for the New Year 2018 from paper with your own hands, use the tips given in the article and add an important “ingredient” - fantasy! Then you will get unique crafts that you can decorate your home with and give as a New Year's present to friends and family, or send the product to school and kindergarten to competitions!
Video craft options:
💖 Happy New Year! 💖
15 Christmas crafts you can do with your kids!There is very little time left before the New Year, and it would be time to think about holiday decorations for home. Can buy ready-made options in the store, but it is much better to make original things with your own hands.
sock snowman

From unnecessary socks you get such funny snowmen. You will need socks, rice for stuffing, some scraps and buttons. Cut off the toe at the sock, and on the other hand, tie it with a thread. Sprinkle rice, giving round shape, drag the thread again and pour more rice, forming a smaller ball. Sew on the eyes and nose, make a scrap scarf, sew on the buttons. And from the cut off part you get a great hat.
Christmas tree pendants

A cinnamon stick is taken as the basis, several artificial ones are attached to it with glue. spruce twigs and colorful buttons. Such Christmas trees will not only decorate the house, but also fill it with the warming aroma of cinnamon.
Cork deer

Bottle caps - great material for crafts. For example, you can make such a cute deer. You will need some corks, glue, and assorted beads for decoration. This is not ashamed to hang on the Christmas tree.
stick crafts

From ordinary ice cream sticks, cute Christmas trees, snowmen and snowflakes are obtained. You need paint, glitter, buttons and a little imagination. Even the smallest kids can handle these.
Christmas trees made of colored paper

These wonderful Christmas trees can be made by making a cone of green paper or cardboard and decorating it with various little things. Buttons, pebbles, beads and various paper figures will do.
potato drawings

This cute print is obtained by dipping half a potato in ordinary gouache. And the rest of the adults will need to paint on when the paint dries. This option is ideal for very young children.
Snowflakes from pasta

Clip pasta different shapes with glue and cover with silver paint, fasten the tape - an unusual New Year's snowflake is ready.
Snowmen from covers

Cover the metal bottle caps with white paint (it is better to take acrylic) and glue them together, as shown in the picture. Draw a face for the snowman and decorate with a scarf from a bright ribbon. If you glue a loop on top of it, such a snowman can be hung on a Christmas tree.
Crafts from cones

From the cones you can make different animals and any other characters. You need paints, shreds, buttons and, of course, fantasy and inspiration.
Christmas tree made of buttons

Pick up green buttons of different diameters and a few brown ones for the swag and secure them with a thick thread. Decorate the crown with an asterisk.
painted balls

Place the pieces wax pencils into a transparent Christmas ball, heat it with a hair dryer, constantly twisting it. Melting pencils will leave beautiful colored stains inside the ball.
Garland of fingerprints

Draw the cord of the garland and the bases of the light bulbs, then give the child different colors of paint - let him draw bright light bulbs with his fingers. This pattern can decorate new year card or a gift bag.
New Year is the time of a real fairy tale, when something that can only be called a miracle happens. Do-it-yourself Christmas crafts will certainly add magic and festive atmosphere your home, both with its look and manufacturing process, which you need to involve all family members in!
Postcards
Let's start with postcards - the most popular New Year's souvenirs.
Such a cute postcard can be made in just 15 minutes -
A little more difficult to execute (but all the more interesting!) postcards using the Scrapbooking technique.


Snowflakes
How to do christmas snowflakes from felt, beads, polymer clay, dough, as well as knitted, embroidered and many other options for their manufacture, see


It is very easy to make a snowflake from glue: in order to make it, you need to draw a snowflake on wax paper (lubricated with dishwashing detergent) using a glue gun. After drying, separate the snowflake from the paper and fasten a thread on it, for which you will hang the snowflake on the Christmas tree. Lubricate with PVA glue and sprinkle with sparkles. Ready!

Christmas toys
New Year's toys can be made from absolutely various materials, you just have to turn on your imagination and add a drop of New Year's magic)
From any children's toy you can make a New Year's toy, just by adding sparks) Coat the figure with glue and sprinkle with sparkles

Making such a sheep is very simple - you will need cotton buds, cardboard, sticks for legs and a ribbon. The process of its creation - in the photo:
Here is such a wonderful goat can be bent from ordinary wire.

How do you like this paper sheep? It's very easy to make it!

You can make a lot of things out of paper. interesting crafts. Here, for example, a lump of paper:

And crafts from real pine cones Even kids will love to do it.

Christmas toy in Kanzashi technique
You can make such a wonderful toy after reading this master class.

Christmas decorations from old light bulbs
For the manufacture of such Christmas decorations you will need old light bulbs that you need to coat with glue and sprinkle with sparkles, paint acrylic paints or decorate using decoupage technique. A string for hanging toys can be glued or wrapped around the thread.

Christmas trees
Christmas trees can be made from anything. Here are 25 options for New Year's beauties!


snowmen
Snowmen can be sewn or embroidered, glued from paper or cardboard, painted with paints.
This wonderful snowman is made of children's socks) Read how to make it


Christmas wreaths
The easiest way to make such a wreath is spruce branches twisted into a ring and fixed with wire, decorated with beads and bows.

Although when creating wreaths you should not limit your imagination)

To make the next wreath, you will need a wire hanger, Christmas balls and glue. Having given the hanger the shape of a ring, unwind it and put the balls on the wire, fixing them on right places glue.

Fairy lights
To make the simplest garlands, use colored paper, scissors and a stapler:

You should get something like this:

Now, taking the workpiece by the edges and spreading the arms to the sides, we will get such a piece of the garland:

By connecting several similar pieces together, we get a long garland, which, however, can also be hung vertically.


