Nail design gradient white. "Air" gradient: features of using an airbrush to create a manicure. Gradient twilight and sunsets on manicure
This year, the theme of gradient manicure has become very popular, both among nail service professionals and among ordinary manicure lovers. Many masters teach various technologies and options for its implementation, come up with their own “fast gradient” methods, and try to use all new materials and liquids to obtain an ideal smooth transition. So what is a gradient on nails, and how does it differ from an ombre manicure? Let's try to figure it out!What is a manicure gradient? Types of design and their differences.
We come across different names and types of this design on the pages of magazines and on the Internet - gradient, ombre, Dip Dye and even striped manicure. What is this design?Gradient manicure is a special nail coating technique in which one color smoothly transitions into another. This manicure is often called a fashionable ombre manicure. In part, this has become synonymous with the word gradient, but the ombre design on nails involves gradually lightening the tips by several tones, while the color remains the same color scheme. There is a term Dip Dye, it is also a synonym and has a similar meaning, but it more reflects the essence of the gradient as such. Dip Dye means dyeing something completely different bright color.
There are several types of gradient, among them are gradient and. Of course, every year there are more and more variations of this fashionable covering for nails, but the classics still remain in fashion. The gradient manicure technique is not complicated, but it will require a lot of patience and perseverance to perform.
Gradient with transition: how to quickly create a fashionable design.
Easiest to do gradient with transition. What colors are needed for this? We take 5 varnishes of the same color, but different shades, and cover each nail from the little finger to thumb in turn, the transition is obtained from one finger to another. If you don’t have 5 shades of the same color, it’s easy to create them yourself. To do this, we need a primary color - for example blue, and an additional color - for example white.We cover the first nail with a blue tint, on the second nail in a separate container or simply on a plastic/glass palette we mix in a drop of blue varnish and not a large number of white, thus obtaining a shade that is a shade lighter. Cover the second nail with the resulting color. Next, mix in a little more white again, getting an even lighter blue tint, and cover the next nail. Next, we simply continue mixing polishes according to this scheme until we reach the last nail. At the same time, we can also show originality and creativity, cover all 10 fingers in a gradient from blue to absolutely white, or cover 1 hand from blue to the lightest blue, and cover the second hand as well, or mirror it. 
Horizontal and vertical gradient: technical features.
What is horizontal gradient? IN in this case is created smooth transition colors on the nail, starting from the cuticle area and moving towards the tips of the nails. The color scheme can be absolutely any, from similar shades - then the manicure will turn out more delicate and “smooth”, to completely different, contrasting colors. In this case, the manicure will turn out bright and extravagant.In this manicure you can combine two, three or even more colors. It should be noted that the more colors are used, the sharper the transition of colors in a contrasting gradient of nails will be and the smoother the gradient will be with similar shades of varnishes. 
Vertical gradient It is also performed on the nail with a smooth transition from one shade to another. However, the technology differs in that the color changes from one side roller to another, vertically. You can also create different variations of this nail coating. For example, a manicure looks very original, in which the little finger is painted entirely in one color, on the ring finger a gradient transition is made to another color, the middle finger is covered with the color we switched to on the ring finger, and on index finger the transition is made again. This way, 3-4 or even 5 colors will be used in the gradient, and the manicure will become even more original.
Another interesting feature of ombre manicure is the use. You also do a manicure with color transitions, but instead of just polish or gel polish, you use thermo shades; at the slightest change in temperature, the polishes will change shades and the gradient will sparkle with new colors!


How to do a gradient manicure at home.
Here it is very important to consider the materials that you want to use for manicure: varnish or gel polish coating. Depending on your choice, the coating technology will change. Let's look at the materials needed for the gradient.
When using quick-drying varnish you will need:
- several shades of varnish (gel polishes or),
- soft sponge or special for gradient manicure,
- a few toothpicks or
- or cotton swabs with,
- .

Many people ask the question: which varnish is suitable for a gradient manicure?
We recommend using varnishes with a dense texture and good pigmentation - they are optimal for the design and require a minimum of coating layers. Next, you need to choose one of the gradient methods that is convenient for you:
Gradient is quick and easy. The two most popular methods of execution.
The first method is to apply several shades of varnish in strips directly onto a sponge. Immediately after application, you need to transfer the varnish onto the nail with light patting movements - due to this, the varnishes on the border will mix and give a soft transition. However, be careful! If you fiddle with the sponge for too long, the varnishes at the border of the transition may interfere with each other and give a dirty shade. To prevent this from happening, it is better to use different shades of the same color for this method. There is also a high probability that the varnishes will begin to dry out, since the layer of varnish on the sponge is very thin, and will begin to roll off on the sponge and nail, leaving stains and gaps. In this case, it is better to make a thin first layer, dry it, and then add a new varnish to the sponge and duplicate the layer again - this way it will be bright, and the sponge will not create any inconvenience for you :)
In order to easily and quickly clean the skin of excess paint after performing the ombre effect on your nails, you can use liquid tape (it’s called). This product for water and French gradient manicure is also popularly called pink tape or pink thing. It will allow you to remove excess from your fingers quickly and without the use of cleaning liquids, without drying out the skin of your hands and fingers.


The second method of applying gradient manicure with nail polish is to use any hard surface, plastic or glass. You can also mix polishes and make transitions using a special silicone nail polish.

We apply the lightest shade used in the gradient to the nail and let it dry. Next, we’ll dampen the polish sponge a little, so the polish won’t be absorbed into it too quickly and will allow us to do a manicure. On our glass surface we need to apply the dark shade used for the gradient, and next to it the same light shade that we applied to the nail. The shades should touch slightly. To make the border even smoother, we mix the varnishes at the junction with a toothpick or an orange stick, now we have our gradient in front of our eyes. This procedure must be done quickly enough so that the varnish does not have time to dry completely.
Next, we imprint our gradient onto the sponge with patting movements, slightly smearing it so that the borders of the colors blend a little and give a smooth transition, and apply the varnish from the sponge to the nail with the same movements. For each subsequent nail, you need to renew the varnishes, but with proper skill you can manage to apply the coating to several nails at once.

Geometric gradient: design features and method of implementation.
Gained enormous popularity in the last season geometric gradient(graphic) on the nails. The geometric gradient design is done with a thin brush. For it you will need 2 gel polishes: rich colored and. Gradually diluting colored shellac with white, we get an increasingly lighter shade and draw a geometric gradient step by step with a thin brush from the very light shade, gradually moving to the darkest, applying a thin layer so that the gel polish does not spread. There is no need to dry each step. Only after finishing the entire drawing, we send the design to dry in the lamp. The most common and popular in 2016 was the geometric diamond gradient (diamonds, diamonds).
Source: website manikyr.ru
How can you create a geometric gradient on your nails with regular polish, since it dries very quickly?
For this purpose it is better to use it on nails. Stencils can also be used in gel polish manicure. But gel polishes tend to flow under the stencil, so you need to get used to it. For varnish it’s great option, the varnish dries quickly in air and does not spread, its excess can be easily removed cotton swab soaked in nail polish remover. In addition, manufacturers now offer a large number of stencils and slider designs with a variety of geometric patterns that are suitable for creating an incredible geometric manicure.

Beautiful gradient manicure: 
Ombre design with gel polish and gel paint: subtleties of application and methods of execution.
The technology for applying gradient manicure with gel polish is significantly different. For such a manicure we must carry out full preparation nails to the coating, apply and remove from it sticky layer. It is advisable that the base coat be leveled, especially when using gel paint. Otherwise, all the irregularities will be clearly visible on the surface of the nail, and the gel paint will only highlight them even more, since it is a very thin coating.For the first method we need 2 shades of gel polish and. The simplest and most common method of obtaining horizontal gradient precisely with a thin brush. It is necessary to apply 1 layer of colored gel polish to the entire nail and dry it in a lamp. Next, apply the second layer and, without drying it, apply a small drop of the second layer to the area near the cuticle. Be careful not to fill the cuticle with gel polish! Since gel polishes are thinner than gel paint, they flow more easily, so gel polish should be applied in a medium drop and slightly indented from the cuticle. We pre-painted the area near the cuticle with a brush in 1 layer so that there were no gaps in it.

Next, we distribute our drop with a thin brush, gradually “smearing” it down towards the end of the nail, but not reaching it. Depending on how well you blend your second shade, the smoothness of the gradient transition will depend. There are also special brushes for gradients, they are wider and make the process of creating a gradient much more pleasant, speeding it up significantly. 

The second method is similar to the method of applying a varnish gradient - with a sponge. However, it is better for gel paints, since they do not smear and have good pigmentation. We also apply the gradient to the nail with a sponge, without drying it, remove the excess from the side ridges and cuticle area, and send the design to the lamp to dry. If necessary, repeat the procedure 1-2 times and cover ready-made manicure top coat for gel polish.
For vertical gradient technology, you can use a brush from the shellac bottle itself. It is better to use a brush of a darker shade, but you must always have a dry cloth on hand and often wipe the brush with it, so as not to introduce a different color into the bottle of gel polish. You can also use a flat square or oval brush. They are usually used for gel, but they are very convenient for creating a gradient. In this technology, a light shade of gel polish or gel paint is applied to half of the nail. Next, a dark color of paint is applied to the second half with a little spacing on the light part. After this, we wipe the brush and use a dry brush to walk along the border of the colors. This is our first base layer, put it in the lamp for 2 minutes. After this, we take the dark half with a brush, and the other half light paint at the same time, as if forming a gradient immediately on the brush. Using a brush with gel paints, apply the second layer with a brush strictly in the center of our nail, so that the middle of the gradient on the brush approximately coincides with the middle of the gradient on the nail. This way we form a soft vertical gradient. 
"Air" gradient: features of using an airbrush to create a manicure.
Nowadays, creating gradients, especially horizontal ones, using an airbrush is gaining popularity. An airbrush is a special device that sprays a thin layer of paint using air pressure. We'll look at the pros and cons of brush and airbrush gradients.A horizontal gradient with a brush on nails is quite difficult to perform; its careful execution is painstaking and time-consuming work. Many masters use an airbrush to simplify and speed up their work; thanks to the device, it takes about two minutes to create a gradient on 1 nail, while with a brush we spend about fifteen minutes shading gel polish or paint. The essence of the method is that we pour paint into the airbrush, turn on the compressor and simply spray the paint onto the nail. In this case, the paint is usually water based, or alcohol. In order to clean the client's handles and side rollers, there is no need to use special liquids; it is enough to cover the design with topcoat and send the client to wash their hands with soap. This not only saves liquids for the master, but also does not harm the skin of the client’s hands and eliminates allergies to liquids. Paint is sprayed the thinnest layer, so paint consumption is minimal. The layer on the nail is thin and does not create “patty nails” that can be obtained by layering with a regular gradient. 
What to choose, gradient manicure with shellac or varnish?
If you actively use gel polishes, then we recommend using gel polishes and paints, because the gradient effect in this case will remain on your nails for several weeks and will delight you every day. The nail polish gradient is quite simple to perform and can be completed faster, but it will last just like regular nail polish for 3-6 days.

Provocative red in combination with strict black ceases to be provocative and turns into sophisticated and elegant color. After all, together they give birth to an original ensemble that can be easily combined with both formal evening and youth or even office looks. Today we will tell you how to make a beautiful red and black manicure, its types and methods of application.
So let's get started.
Red becomes more softened and less aggressive 

New nail art
This season can rightfully be called the most loyal. Almost all nail design ideas will be appropriate in it, with the exception, perhaps, of eye-catching neon shades and excessive decoration. Red in 2019 becomes more softened and less aggressive - it turns into rich scarlet, the color of red dawn, red with an admixture of coral, burgundy, crimson, etc. It is these shades that we will use.


Today's nail art with the presence of red and classic black can have the following options:
- French black or moonlit French;
- gradient;
- space Galaxy art: gradient with the addition of " stardust» using glitters (sparkles);
- abstract: with geometric patterns;
- with marble effect (water);
- Hollywood with foil or special heat-resistant films;
- using stamps;
- aquarium: acrylic with all sorts of inclusions, giving the effect of a pattern inside the nails (although acrylic is used less often this season and only to create calm patterns);
- with patterns like “broken glass”;
- photo art: designs are applied using nail printers;
- artistic painting;
- openwork, including patterns with velvet sand;
- voluminous: 3D design is still welcome, but it should not be excessive
- bulky, flowers, monograms and patterns in it are already less voluminous;
- stickers, ribbons, feathers and rhinestones are also used to a minimum.


As you can see, there are many ideas for black and red manicure. All that remains is to choose the right one.
Advice! To add shine, depth and hold the varnish, do not forget to use a final coat.
French and lunar red and black manicure
You can get ideas for a red and black manicure anywhere, and not just online. Patterns for nails can be easily transferred from your own blouse or dress.


For such nail art at home, you can purchase stencils: floral, geometric, polka dot-shaped, bow-shaped, consisting of a combination of lines, etc. To draw dots and curls by hand, it is better to purchase the following special tools:
- dots: small metal stick with balls different sizes on both ends;
- thin brushes for nail art;
- Scotch tape: it is cut out and used as stencils to create geometric designs;
- floral or patterned stencils: they can be just the base on which finer patterned lines will be applied by hand.
To create a red and black manicure with a design, you will also need tweezers for placing rhinestones, pieces of fabric and glue to secure them.


More complex drawings and even entire paintings are made in salons. At home, only a few can do this painstaking work.
Advice! When working with stencils, the main condition should be observed - stick them only after completely dry varnish base. After coating with a colored composition, they should be removed quickly, before it has even had time to set even a little. Otherwise the pattern will be smudged.
Water red and black art
To create it at home you only need:
- any container;
- water;
- toothpick for stirring;
- fat cream;
- base varnish to protect nails from aggressive compounds and obtain an even coating;
- liquid decorative black and white varnish (thick gel polish will not work here);
- fixing transparent or translucent composition.


So, let's look at the process in more detail:
- Naturally, nails need to be prepared and carefully treated before a manicure;
- cover the nails basic basis and dry thoroughly;
- Now the most interesting part: we drop the first color, for example, red, into the center of a container of water and mix it with a toothpick;
- While the color is “stretching”, immediately add a drop of the second drop exactly to the center;
- mix again, trying to make one color overlap another, creating all kinds of patterns;
- apply any cream to the skin so that excess varnish does not have to be scraped off;
- lower one finger so that it lies horizontally, parallel to the water surface;
- with some skill you can paint 2-3 nails at a time;
- replace the water and repeat the procedure for the remaining nails;
- We fix the result with a fixing compound.


Advice! Many people try to replace the protective greasy cream with tape. However, in this case, varnish may get into the gap formed between the skin and the nail, and it will still have to be scraped off. It’s better to carefully spread the cream over the skin, trying not to touch your nails. If it does get on the plate, be sure to completely dissolve it with nail polish remover - otherwise the varnish coating will turn out smeared.
Openwork red-black

At home, you can use stickers (sliders) to get delicate nails. Such patterns can be complemented with neatly glued tiny bows, satin ribbons or several rhinestones.
They look very original on nails and openwork patterns from fabric. For this nail art you will need:
- base varnish;
- red varnish;
- black lace fabric;
- tweezers;
- scissors;
- transparent fixative varnish.
After applying and drying the base, the nails are covered with red varnish. Next, the lace is prepared. It is cut out according to the shape of each nail (in order not to spoil the fabric every time, it is more convenient to make a paper stencil).
 French manicure on rectangular nails
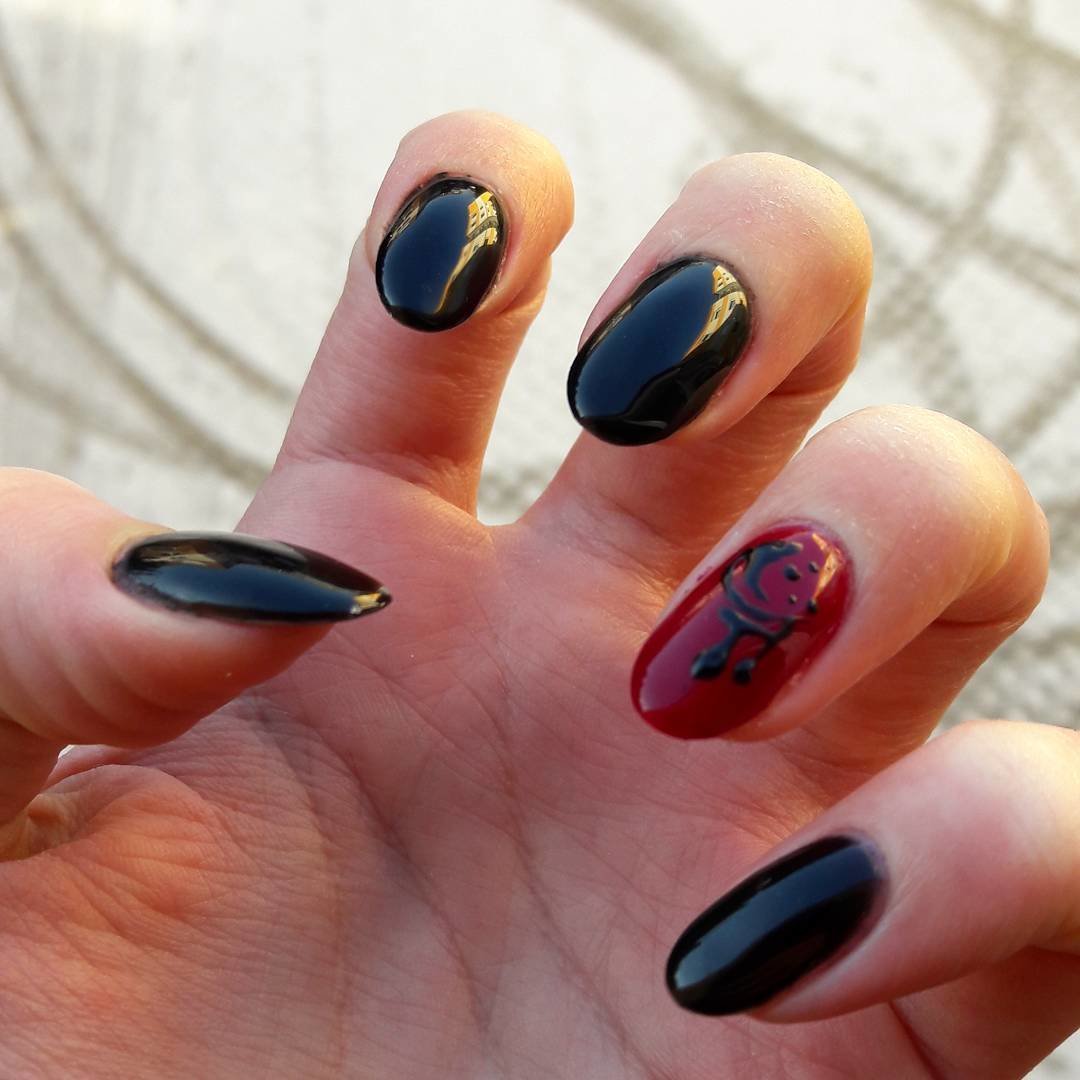
The nail is covered with a base or any transparent varnish and, until it is dry, quickly and carefully apply lace on it using tweezers, pressing it tightly to the base. The top is again coated with fixative varnish.
Sand red and black art nail
Using the sand manicure technique, it is also possible to create complex thematic patterns and lace. For this purpose, special varnishes with the finest powder introduced into them are used. Sometimes viscose is added to such compositions to create special effects. The result is an original velvet effect.
For this purpose, special varnishes with the finest powder introduced into them are used. We list the main stages of creating a red manicure with a black sand pattern or a contrasting black and red one:
- nails are covered with red and black matte varnish: as always, we combine the type of coating, paint parts of the nail alternately with these colors or cover one nail with red, the second with black, etc.;
- It is better to choose matte varnishes, in which case the velvet sand will be easier to attach;
- Apply the velvet composition using a patterned stencil only to the regrown ends or distribute the pattern along the entire length;
- We fix the result using a special lamp, keeping our hands under it for at least half an hour.
 Art painting of nails


Advice! You can replace velvet varnish by introducing acrylic powder into the regular composition. It is better to first test the resulting effect on one of the nails, and only then create patterns from it.
To summarize, we only note that, as in any type of modern art, the finishing of a red and black manicure should be moderate.
If you want to learn how to do an ombre manicure yourself, then read the article. Here you will learn all the subtleties and secrets.
Many people have already heard the word Ombre more than once. The first thought that comes to mind when pronouncing it is to dye your hair in different colors. But further we will talk not about hair, but about nails. You will learn how to make a stylish gradient (as it is also called differently) design on nail plates yourself at home.
How to make ombre nails at home: technique
The gradient looks perfect on both long and short nails. This manicure is suitable for both young beauties and older ladies. Transitions from one shade of varnish to another can be created with sharp or smooth boundaries.
To make an ombre yourself you will need to have:
- Two varnishes of different tones (at least)
- Regular set of manicure tools
- The basis
- Palette for mixing varnishes
- Toothpick
- Fixing coating
- Sponge


How to make a gradient on your nails?
- Do the preparatory procedures first. Remove cuticles, polish, degrease nails
- Cover each nail with base coat.
- Drop a little bit of one or two varnish onto the palette.
- Using a toothpick, carefully connect the edges
- Then dip the sponge
- Make imprints on the nail plates
- Remove all excess around the nails with a cotton swab dipped in a liquid that dissolves the nail polish.
- When your nails are dry, apply a fixative.


IMPORTANT: You don’t have to mix the tones in the palette; many masters apply strips of varnish to the foam rubber with a brush, then transfer them to the nails.

How to do ombre on nails with gel polish or shellac step by step?
You will get an original nail design if you use shellac or gel polish for the ombre technique. In addition, this manicure, thanks to the quality of these varnishes, will adhere well to the plates of your nails.
But you will need special equipment, without which it will be impossible to do a manicure. More precisely, varnishes will not dry without an ultraviolet lamp.


Tools and materials for ombre manicure with gel polishes, shellac:
- Manicure care set
- Thin cotton swabs, nail polish remover
- Varnishes of various tones, base varnish, fixing coating
- UV lamp for fixing the coating on nails
- Liquid for degreasing nails
- Colorless varnish base
- Toothpick, thick sponge
 Manicure, pedicure - ombre gel polishes
 Step-by-step instruction:
- Sand the nail plates with a buff, process the cuticles, straighten the nails with a nail file so that they are the same length
- Degrease your nails, apply base, let dry thoroughly
- Cure in a UV lamp for twenty seconds
- Apply a light tone of varnish at the base.
- Then paint the other half with dark gel polish.
- Use a brush to smooth out the edges, just be careful
- Dry your nails in an ultraviolet lamp (approximate drying time is 2.5-3 minutes)
- Fix the varnish with a special protective coating. And dry your nail plates in a lamp


IMPORTANT: Ombre nails with shellac should be done in the same sequence as gel polish. Also, do not apply too thick layers of shellac on your nails, otherwise, when drying with a UV lamp, the entire manicure will be ruined. At the end, be sure to remove the sticky top layer of shellac with a special solution.
Types of ombre on nails
Now there are many gradient techniques on nails. Thanks to the imagination of stylists, you can choose a manicure that suits Evening Dress, and under jeans or summer dress. Let's look at the most common types of gradient manicure.

Types of ombre on nails:
- Classic ombre— to create it, two tones of varnish are most often used. Moreover, at the base nail plate place varnish light tone, and at the tips - dark
- Ombre Beverly Hills— for such a manicure, you need to prepare several shades of varnish at once, since the transition from one tone to another will take place not on one nail plate, but on all of them. For example, from light pink on the little finger to cherry on the big
- French ombre manicure- making this gradient is not easy, but after training you will succeed. The essence of this design is that the tips of the nails are coated with light varnish, which then smoothly turns into a dark tone.
- Bright Skittles- for this manicure, bright varnishes are used and placed randomly on all nails
- Ombre with painting- this technique is suitable for manicure under an evening dress. Painting on nails with a gradient is best done in gold, silver, or black.


Device for ombre nails
An airbrush is often used for ombre nail designs that smoothly transition from one shade of polish to another. This device works like a sprayer. Only liquid varnish can be poured into this device; paint with a thick consistency will not work.
 Airbrush - a device for creating stylish design manicure for nails
 IMPORTANT: After use, the airbrush must be thoroughly rinsed with a liquid that will remove any remaining varnish.
Ombre nail polish
To obtain perfect manicure Ombre can be used with various varnishes, including: gel, shellac, etc. We mentioned this above, and we also discussed how to do this nail design earlier.
The main thing is that the shades of varnishes are beautifully selected, and your hand does not tremble. Below, see examples of ombre manicure. different colors.

 Chic ombre manicure long nails in blue and white colors
 IMPORTANT: Many artists use tint to create ombre. This nail coating is easy to apply simply with a brush. The result is an excellent manicure using the gradient technique. When one layer of varnish is applied to another, a smooth transition of colors is obtained.
Red ombre on nails, photo
Red color is always relevant. And this season, a gradient on the nail plates will come in handy for any outfit.


The technique looks good - a gradient in a combination of red and cherry gel polish.

Pink ombre on nails, photo


Black ombre on nails, photo
A manicure in black colors will look gloomy, but if you dilute the black with some other color, the look will be stunning.


French ombre on nails, photo
French gradient is a combined technique for creating nail designs. Many ladies choose it for a manicure, because with this design their nails look well-groomed. They go with business suits and other outfits.


Beige ombre on nails, photo
If you are using shades beige colour to create an ombre, the manicure will turn out natural. This tone will suit any outfit, because it best matches natural color nails

 Beautiful beige combined manicure- French ombre
 Delicate ombre on nails, photo
For gentle gradient you need to choose the right shades of varnish. Sharp transitions from one varnish color to another are undesirable.

White ombre on nails, photo
White gradient perfect for wedding celebration. Typically, this manicure combines other nail design techniques.


 White gradient with sparkles and rhinestones
 Ombre for short nails
If the base of the nail plate is painted with a light varnish and brighter or darker at the top, the nails will visually look longer.

 Pink manicure- ombre for square, short nails
Ombre for long nails
Ombre looks no less attractive on long nails of various shapes.


 Ombre (gradient) black and white
 Ombre pigments on nails
Pigments are widely used to create a gradient on nails. It is these paints that are convenient for doing manicures, because when applying one layer to another, a mixture of tones occurs.
Ombre pigments can be done simply with a brush. This nail design will only take an experienced nail artist 8-9 minutes of time.

Stretching during a gradient manicure with pigments is done in the following order:
- Apply base coat under gel polish
- Paint your nails with your chosen gel polish tones. Cure each layer in a UV lamp
- Prepare a thick brush and apply pigment to it. Blend it starting from the cuticle and ending in the middle of the nail plate.
- Then also shade the second part of the nail with a different pigment.
- Shake off any remaining pigment particles
- Then send it to dry ultraviolet lamp(for 35-60 seconds)
- Cover the pigment coating with a transparent topcoat, don’t worry - the pigment will no longer stick to the brush
- Dry the top in a UV lamp
- Remove any remaining sticky layer from the topcoat. And make your manicure neat - remove the ombre liquid around the nails

 Ombre. Stretching with bright pigments
 Vertical ombre on nails
A vertical gradient divides the nail plate into two or three tones. Thanks to this, your nails will play with different shades. In addition, this nail design can be done in all the colors of the rainbow.
The procedure for applying the coating is the same as for horizontal ombre, the only thing is that you need to print the varnishes from the foam rubber across, and not along, the nail plates.
 Rainbow, vertical manicure. Ombre
 Ombre glitter on nails
A manicure with glitter on nails done by an ombre technician will look very festive. Glitter varnish can be combined with both regular varnish and shiny varnish, but of a different tone.

 Gorgeous gradient. Manicure with glitter on short, square nails

 Ombre. Regular glitter stretch
 Video: gradient manicure
Posting ads is free and no registration is required. But there is pre-moderation of ads.
Gradient manicure. How to make a gradient on your nails
Bright and unusual color combinations, smooth transitions of shades on the nails - a fashionable manicure with a gradient effect has not lost its relevance for several seasons. Despite all the apparent complexity, the gradient manicure technique is quite simple, and making a manicure with a gradient effect at home is quite simple. To learn how to make a gradient on your nails correctly, what techniques for creating smooth color transitions on your nails exist, and what shades are best to choose, read our article.
What is a gradient manicure?
Manicure "gradient" (ombre, degrade) is a type decorative covering nails with the effect of a smooth transition of colors. A manicure in a gradient style can be done in shades of one color (the color changes its intensity from light to dark shades), or it can be a transition of two or more colors. Both similar shades and contrasting shades can be combined - both versions of the gradient on the nails look impressive.


There is another gradient option - in this case, each nail on the hand is painted in various shades one color, from lightest to darkest or possible gradient manicure in different colors.


When making a gradient, you can choose any color combinations - it all depends only on your imagination. A gradient manicure looks equally good on short nails and long nails of any shape.
Gradient manicure techniques
A manicure in a gradient style can be done in several ways. different ways. The gradient on the nails with a sponge is done in the first two methods, and in the third using a brush.
1. The first method is one of the easiest. It requires several shades of nail polish (2 or more) and a small piece of sponge. Strips of varnish are applied to it in the required sequence. Then the sponge is gently pressed onto the surface of the nail - the colors are transferred to the nail plate. To achieve maximum brightness of colors, you can first apply a thick white varnish to your nails. Excess color is removed from the skin with nail polish remover, and the nails are covered with a topcoat - a finishing coat that fixes the color and gives a glossy (or, if desired, matte) finish to the manicure.
Gradient manicure (photo) is performed step by step on each nail:

2. The second method allows you to achieve the smoothest color transitions. This gradient is performed step by step: varnishes different shades First they are mixed on a flat surface, and then the colors are transferred to a sponge, and only then to the surface of the nail. This is the most common way to make a gradient manicure with varnish (step-by-step photo):

3. The third gradient technique allows you to do without a sponge. This is the most easy way make a transition from one color to another, but in this case it is very difficult to achieve smoothness. The surface of the nail is covered in one or two layers with a base shade of varnish, after which has dried, another varnish is applied to part of the nail plate in the usual way. Gradient manicure with a brush is simple and quick to perform, but often it does not look neat enough.

What is needed to perform a gradient manicure?
To make a gradient varnish, you will need:
1. Several varnishes suitable shades. There can be two or more of them - it all depends on your desire.

2. Sponge for gradient manicure. The smaller the pores of the sponge, the more accurate and smooth the shade transitions will be. A regular dishwashing sponge will do, but it’s best to use a cosmetic sponge for application. foundation, cutting it to the required size.

3. A working surface for mixing varnishes - this can be a piece of plastic or film.
4. Toothpick or needle for mixing shades.
5. Nail polish remover - with its help, excess color is removed from the skin around the nail.
6. Finishing coat - top coat to fix the color.
How to make a gradient on your nails
It’s not difficult to do a gradient manicure at home, you just need to prepare everything necessary materials and be patient. It is necessary to perform a gradient manicure step by step:
Step 1
Before you do a gradient manicure, you need to take care of the shape of your nails and the skin around them. Give your nails the desired shape using a nail file and scissors, remove the cuticle and polish the surface of the nail plate, that is, do either a classic edged manicure or a European unedged manicure.

Step 2
Apply a layer of base coat to your nails. This can be a clear primer, a thick white varnish, or one of the shades used.

Step 3
Apply strips of varnish of different colors onto a flat surface so that they touch. Gently mix the colors at the junction using a needle or toothpick.

Step 4
Press a piece of sponge or sponge onto the painted surface, then press the sponge onto your nail and transfer the color onto it. Try to do this as carefully as possible, in one movement, so as not to smudge the colors.

Step 5
Remove excess polish from the skin around your nails using nail polish remover. The easiest way to do this is with a small cotton swab.
Step 6
Wait until the color coat dries and cover your nails with topcoat - it will fix the color and prolong the durability of the manicure.
Gradient manicure at home step by step:

Gradient manicure with gel polish and shellac
You already know how to make an ombre and gradient manicure at home yourself, using regular nail polishes. But this method has a small drawback - the beauty you create on your nails will last for a maximum of a week. What to do if you want to extend the pleasure of a beautiful manicure for several weeks?
There is a way out - make a gradient on your nails with shellac or using gel polishes. In this case beautiful manicure will delight you for at least three weeks without losing its original characteristics. How to make a gradient manicure with gel polish? The execution technique in this case is not very different from the usual one, however, the peculiar properties of durable coatings require special care, thoroughness and professionalism. In addition, each layer of durable coating requires polymerization under a UV lamp.
Gradient manicure with gel polish (step by step photo)

If you are not sure that you can complete all the steps correctly, you should entrust this work to a nail service specialist, then the result will be of the highest quality.
Gradient on nails with gel polish (photo):

Some gradient nail ideas
We invite you to evaluate interesting ideas gradient manicure. Perhaps some of them will inspire you to recreate this beauty yourself.

White gradient on nails
The closest “relative” of French manicure. Delicate transitions of white, cream or light pink colors give the hands a special grace. A tan will perfectly set off a white gradient manicure.


Black gradient on nails
The dramatic combination of black and deep scarlet is sure to turn heads in your hands. A black gradient manicure in combination with white will give your nails rigor and elegance.


Red gradient manicure
Gradient in shades of red - from bright scarlet to almost black burgundy - perfect option for an evening out. A red gradient on nails can also be made with a transition to other colors.


Pink gradient on nails
Combination of delicate pink shades Suitable for everyone - from a young girl to an accomplished lady. Pink gradient manicure makes the look feminine and delicate.


Brown gradient manicure


Blue gradient on nails


Blue gradient on nails


Green gradient on nails


Summer gradient manicure
Create a summer gradient on your nails in bright, rich neon colors. Even the brightest rainbow on nails will look appropriate in the sun, by the pool or on the beach.


Gradient manicure with glitter


Here are just a few ideas for creating a gradient on your nails. More more options combinations, as well as professional gradient manicure lessons, watch the video.
Gradient nails with a pattern


Vertical gradient manicure
It is performed using one of the described methods, only the colors are applied not horizontally, but vertically.

Gradient manicure photo tutorial

Gradient manicure for short nails
On short nails, the gradient is performed in the same way as on long nails. In this case, it is better to use only two colors and make the transition as smooth as possible.

Gradient manicure: photo


Rainbow gradient manicure


Now you know how to do a gradient manicure at home. Any manicure requires practice, so don't be upset if your first experience isn't perfect. Experiment with colors, try different techniques- and soon you will be able to get results indistinguishable from professional ones. Video tutorials from beauty bloggers and professional nail technicians will help you perform a gradient manicure as correctly as possible.
Ombre manicure in the photo beautiful design 2018 takes pride of place. Nail designers of all stripes never tire of singing odes of praise to him. Almost any nail fantasy only becomes more beautiful if you skillfully design the color stretch. You will find exquisite examples of fashionable gradient nail designs and two popular master classes on how to do them in this article.
Fashion trends of ombre manicure 2018
Gradient, ombre, degradé, stretch... Whatever this nail design has been called over the past few seasons. All this means a smooth transition from one tone to another. At first the technique referred to the gradual darkening of a light shade, but then the concept expanded. Today, this is no longer enough for a trendy manicure, and the coolest gradient is obtained by combining contrasting tones like orange and blue, pink and green. In a word, combine the incongruous and you will be happy!
Fashion trends of 2018 identified neat horizontal stretching as their favorite. Vertical is no longer in trend, and the flow of tones from finger to finger is considered clumsy.
But in decor, art is not limited to the word “absolutely.” Drawings, rhinestones, monograms, appliques are only welcome, because the only thing to be wary of in 2018 ombre manicure is banality! So the craftswomen practice color combinations and their decoration.


How to do an ombre manicure: two master classes in 5 minutes
The main thing is that fashion technology Please note that this is a gradual stretch without flaws. Just last year, you could smear a couple of strips on a sponge and press it onto your nail. With a 99.9% probability, the result would not be accurate, and even with bubbles.
Today the maneuver is “and so it will do!” it won't work. One has only to look at the ombre manicure 2018 in the photo - the impeccability and purity of the fusion of shades catches the eye. The easiest way to achieve this beauty at home is in two ways. We will talk about them.
Lesson No. 1: gradient with gel polish (shading with a comb brush)
A special brush will allow you to create a gradient on your nails with gel polish faster than all other tools. Her hair different lengths, and they are sparse towards the tip. You can cut the same shape from an ordinary flat brush, if, of course, your hands grow from right place. Or you can buy ready-made.
Gel polishes for this technique are needed with clear pigmentation, but not very dense. They should not streak noticeably, otherwise the result will be untidy. In addition, you will not have the opportunity to apply 3-4 layers. It's always easier to start a practice with light colors, and then proceed to rich contrasting ones.
So, you will need:
- Base and finish for gel polish.
- Blue and black gel polishes.
- Comb brush.
- LED lamp.
- Liquid for removing stickiness.
- Cotton pads.
- File the edges of the nails, apply a buff, shake off the sawdust and degrease the nails.
- Apply base and dry for 60 seconds.
- Cover the nail with blue polish, along which you will stretch the gradient, and dry it.
- Carefully fluff the comb.
- Paint the area around the lunula black. Having retreated the symbolic border a couple of millimeters, cover the rest of the edge with blue varnish.
- Now, using small strokes up and down, pull the black lake to the bottom. Make a couple of rows and wipe off the brush. Continue your strokes from where you left off.
- When the strokes become almost transparent, wipe the brush and separate the bristles.
- Start stretching the pigment again from the first row. By this time the transition will become noticeable. Having reached the end, polymerize the result.
- Again apply black and blue to the same borders and drag down. After two or three rows, wipe the tool.
- As a final touch, use a clean “comb” to stroke the entire stretch using patting movements. This is done to ensure that there are no bubbles left. Dry.
- Cover your work with finish.
For inspiration, here are some striking examples of this technique. Once you get the hang of it, you can use not just two colors, but much more.


And this video tutorial clearly shows the whole process:
Lesson #2: Airbrush Gradient
An airbrush is a pen-shaped device with a nozzle on top. Pour special paint into a funnel and “blow” it onto your nails. The advantage of technology is time saving and high-quality results. Minus - good tool quite expensive, costs about two thousand rubles.
Tools:
- Airbrush.
- Paint for him.
- A piece of paper (so as not to stain everything around).
- Base, top and gel polish.
- Defender.
- Liquid for degreasing and removing stickiness.
- Ultraviolet lamp.
- Apply the base to the prepared and grease-free plates, dry and coat with gel polish.
- After drying, remove the sticky layer and buff the surface a little. Shake off the sawdust.
- Coat the skin around the plates with defender and wait until dry.
- Pour paint into the nozzle and, holding the “handle” at an angle, spray on the tips of the nails from a distance of 15-20 centimeters.
- Pull off the defender film.
- When everything is dry, cover your work with finish and send it for polymerization.


The design turns out to be more original if you use various stencils for airbrushing. This is exactly what the second video lesson is about:
Rainbow nail art ideas in today's trends
Learning to blend colors perfectly is an achievement in itself. But look at the amazing possibilities the combination of gradient with decor and imagination opens up.
On short nails
It’s easier to practice at a short length, especially if you want to learn how to use a brush. The palette is any, pastel or, on the contrary, very rich, even neon. The rounded square loves kamifubuki, rhinestones and rubbing on the fusion of tones.


On long nails
Dark colors will look magnificent and predatory. Combine black with red, purple, emerald, dark blue... Draw, draw geometry, add sparkles.


And now about each nail art in more detail!
Matte
It's simple. Cover your work with a matte finish for sophisticated, muted art. For autumn and winter manicure, this is a win-win option.


Geometry
A geometric gradient is best displayed on a pastel base. Mix pink with white, blue, mint green and black or white gel paint and draw subtle patterns. The fence gradient is still in trend.
The schematic depiction of animal silhouettes is gaining popularity. Of course, it’s difficult to draw a fox’s head on your own, so use stencils.


"Broken glass"
Glass claws and ombre complement each other perfectly. Create a vertical stretch so that the color flows from one finger to the next one. Glue foil in darkened areas.


Monograms
You can decorate all fingers with a gradient, but place curls on only one, preferably the ring one. The purple-pink base and graceful curls of gel paint sprinkled with powder look luxurious.


Lunar
A hole designed in negative space and a colored weave below will be immensely aesthetic. Give preference to juicy colors. Black can be mixed with dark pink, lilac, blue...


Watch this master class and learn unusual art:
French
The most common solution is to duplicate the color of the smile with one of the tones used in the base. For example, did you design a red and black ombre? Extend a black smile below. This jacket flaunts mainly on short square nails and looks completely non-trivial and very catchy.


Gradient strip
The new product is just gaining popularity and one glance at this art is enough to fall in love once and for all. The stripes are quite easy to draw by hand, just follow the algorithm as in the video:
You can also use an airbrush. Stencil tapes are useful for this.
- Cover the plates with gel polish, top coat, remove the stickiness and stick the strips near the side rollers so that they fit very tightly.
- Spray paint, remove stencil.
- Finish line. If desired, you can sprinkle the strip with glitter or powder.


Kamifubuki
Select sequins to match the palette from which the ombre will be drawn, so that the design is not tacky. Stretching can be done on all nails or just one, but let the kamifubuki be in minimum quantities. Good example in the photo there are two nails with a blood-black gradient, and one has confetti perched on it.


With an image
Thin stems look great on a colored field. Choose dusty shades for combination, and then the art will be very delicate. Pastoral pictures are also difficult to imagine without ombre. Of course, floral images hold the palm. You can even draw a whole bouquet on your fingers if the petals are in harmony with the base palette.
By the way, the ability to stretch colors will be useful to you in your drawing. Gradient buds or butterfly wings will become much more realistic than in mono color. Choose a clear palette - yellow, a huge range of blue, green in combination with milk.


With rhinestones
Feel free to indulge your imagination! Pebbles perform superbly in color fusion. Make a blue-black gradient and draw a fragile line of rhinestones near the hole. The more shades there are in the ombre, the more elegant the rhinestones will look. Don’t be afraid to mix warm and cold tones; art with a yellow and blue transition will be very catchy. You can build a whole “starfall” on the matte indigo sky - from large stones to small ones.


