Animals made of fluffy wire. Chenille wire: from dirt to material for “fluffy” creativity
If you have a desire to make something incredibly beautiful and original and at the same time spend minimal amount time, then wire crafts are what you need!
And if you use chenille wire as a material for making crafts, you can easily win the hearts of children and teach them to create strange things with their own hands. Chenille wire is distinguished by its bright rich colors and a characteristic “fluffiness”, which is very pleasant to the touch and thereby creates amazing volume and beauty for crafts made from it.
In this article, the News Portal “site” has prepared for you several interesting and not difficult master classes on making the most various crafts from chenille wire. And if you are ready to start creating, then let's go!
Chenille wire cacti
DIY cacti
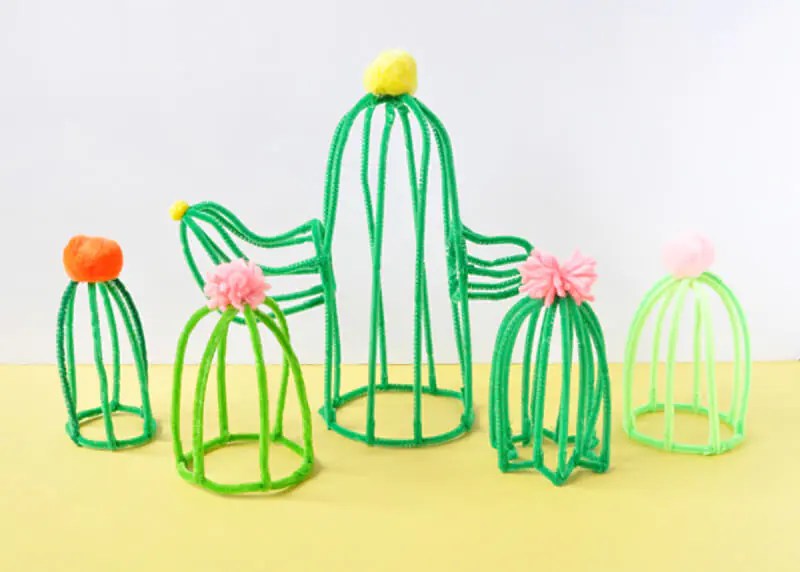
There is no opportunity or desire to acquire house plants?! No problem! Plants can be made with your own hands, and they will not require care and attention on your part.
So, we present to your attention these beautiful cacti made from chenille wire.
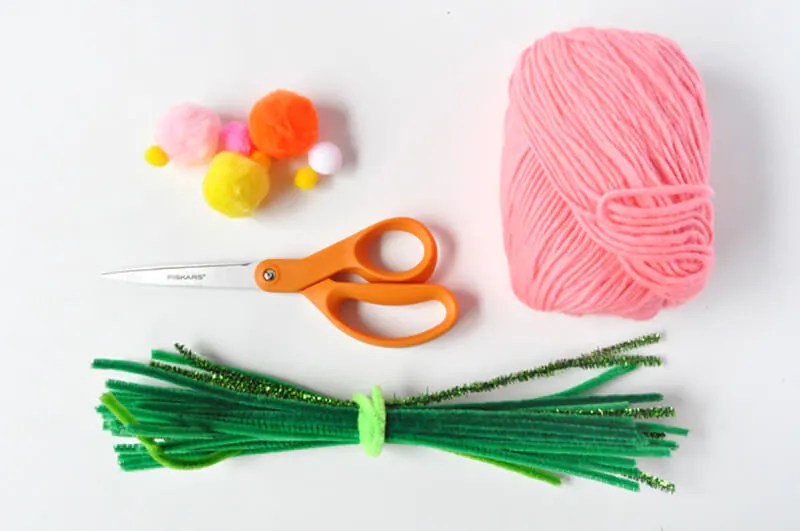
To make such a bright and original composition You will need green chenille wire, miniature pompoms or bright colors Knitting thread.
Build a frame from chenille wire that will visually resemble a cactus (see photo).

Then from knitting threads make small ones voluminous pompoms, which will decorate homemade cacti, creating the illusion of flowering.
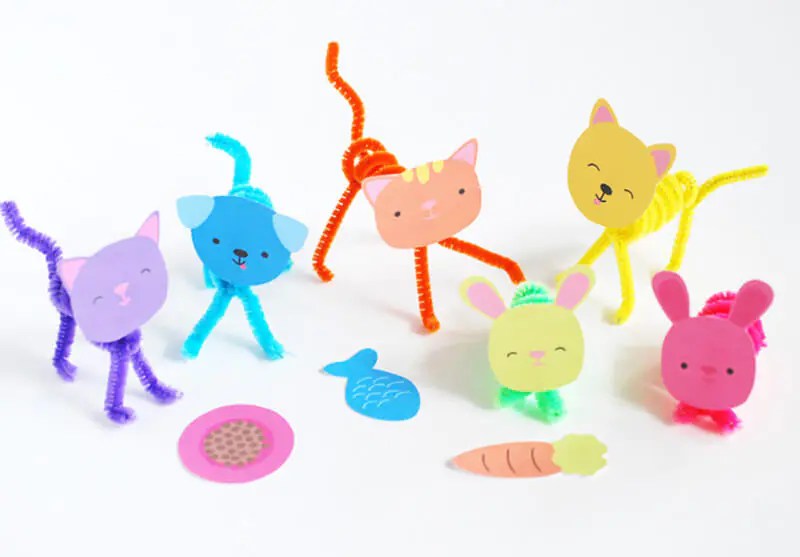
Chenille wire animals
How to make animals from chenille wire?

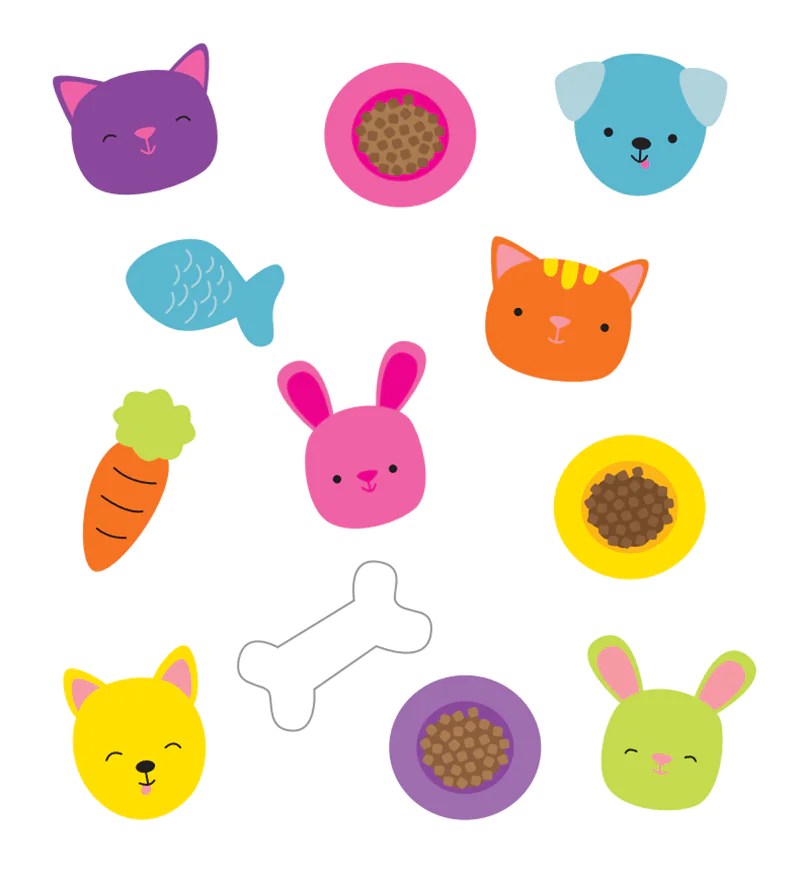
To create such fun company You will need chenille wire different colors, tape and ready-made templates animal faces (cat, dog, mouse, bunny, etc.).

Templates of animal faces must be printed and then carefully cut out.
Now twist the chenille wire into a spiral.

Glue the muzzle to one end using tape. The opposite end of the wire will be the tail.

Now you need to attach the paws.


It is very fun and interesting to play with such funny little animals.

Wire crown
Chenille wire crown

You can make such a rainbow fashionable headdress for attending a masquerade or party in a matter of minutes if you have some multi-colored chenille wire, a sheet of thick colored cardboard, and tape on hand.

Three different colors of chenille wire were used to make this rainbow crown: red, orange and yellow. Each color has its own size.
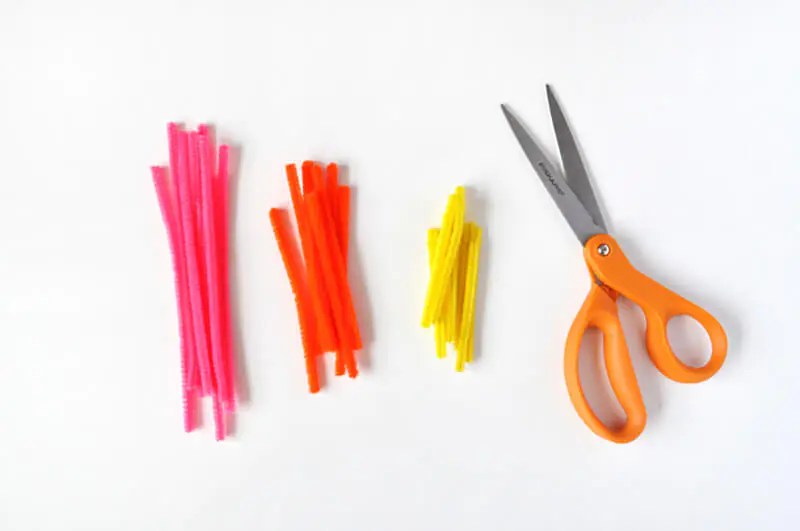
Measure your head and cut a wide strip from a sheet of thick colored cardboard that will fit the circumference of your head.

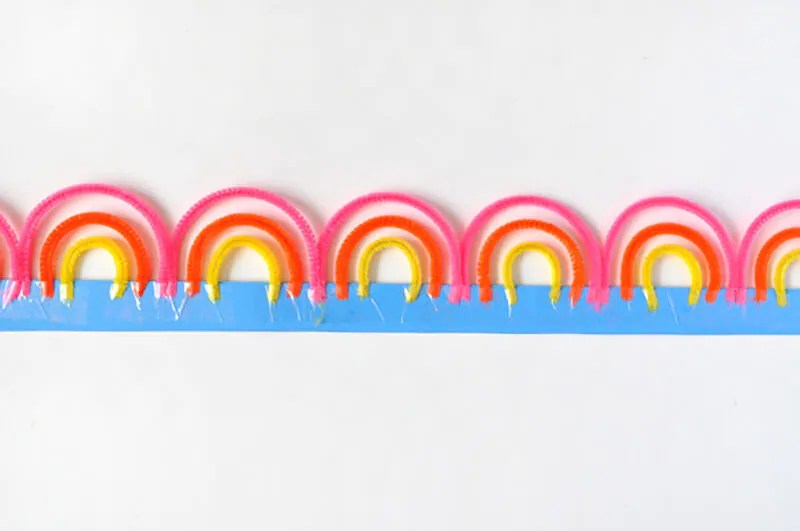
Now start gluing the wire. Shape each piece of wire into a rainbow shape and adhere it to a strip of cardboard using tape.

Then glue a second row of a different color and a third row of wire on the end.
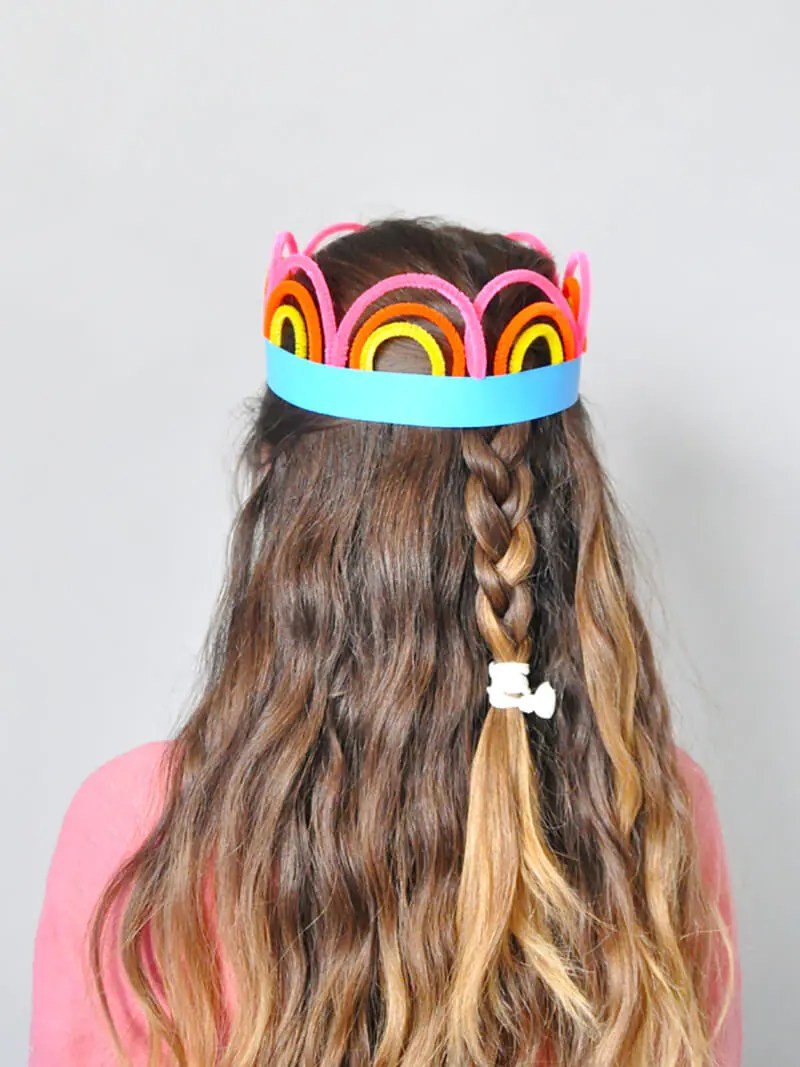
Connect the ends of the cardboard strip together using a stapler.

A bright and beautiful headdress for a party is ready!
Christmas tree made of wire
Christmas tree made of chenille wire

To create such an unusual spruce forest, you will need wooden skewers for kebabs, chenille wire, scissors, wooden ice cream sticks, and a large bead.

Cut the chenille wire into lengths and tie them tightly on a wooden skewer.
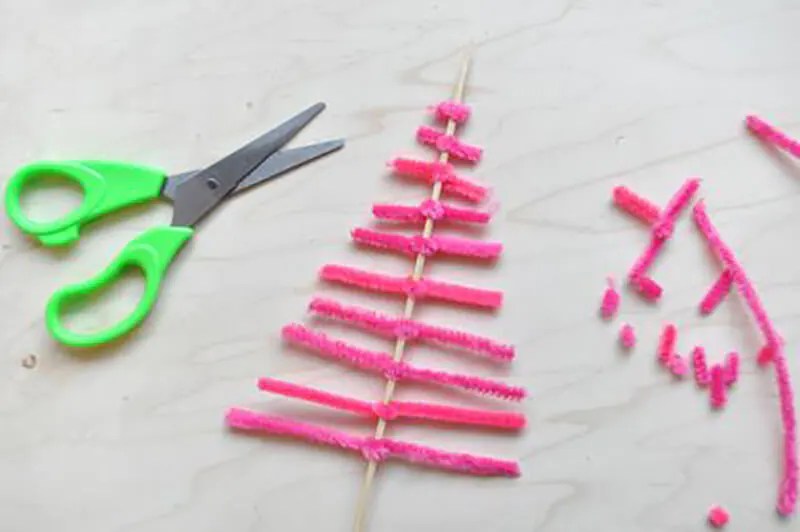
Then use scissors to give the piece a Christmas tree silhouette.
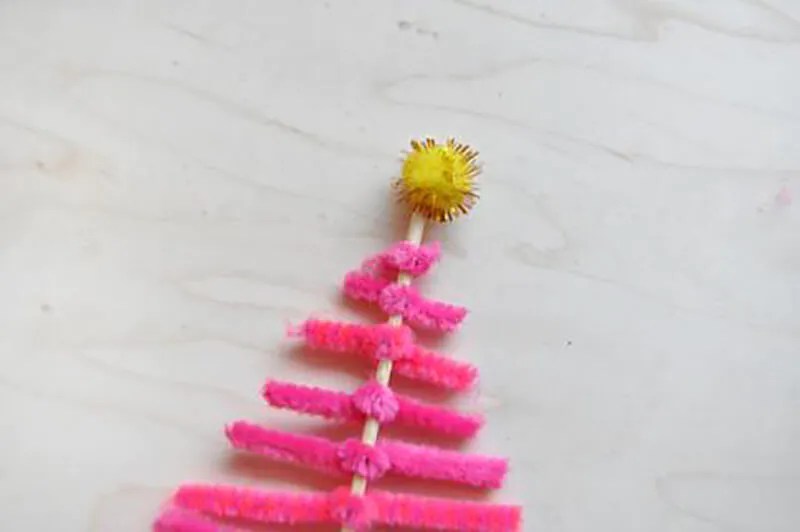
The top of the Christmas tree can be decorated with a decorative pompom or bow.
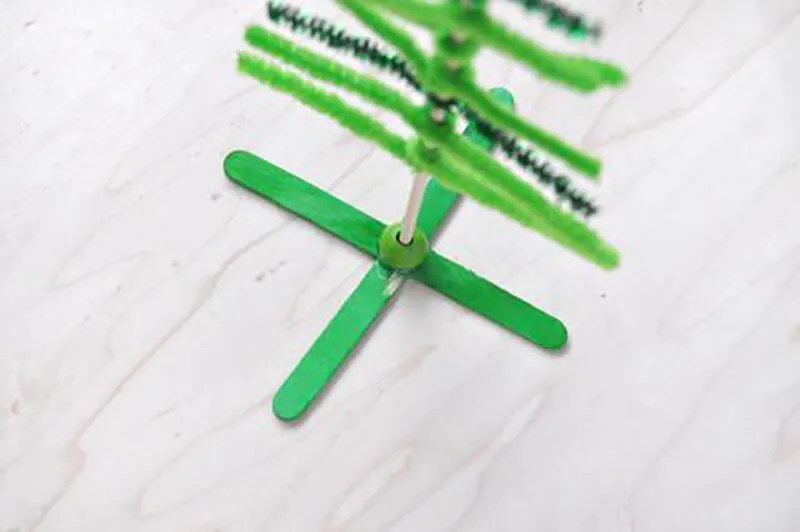
The stand can be made from wooden popsicle sticks and a large bead, or you can use a small piece of foam or floral foam.
These wonderful Christmas trees will be a wonderful decoration. home interior during the Christmas and New Year celebrations.
Crown made of wire and beads
DIY chenille wire crown
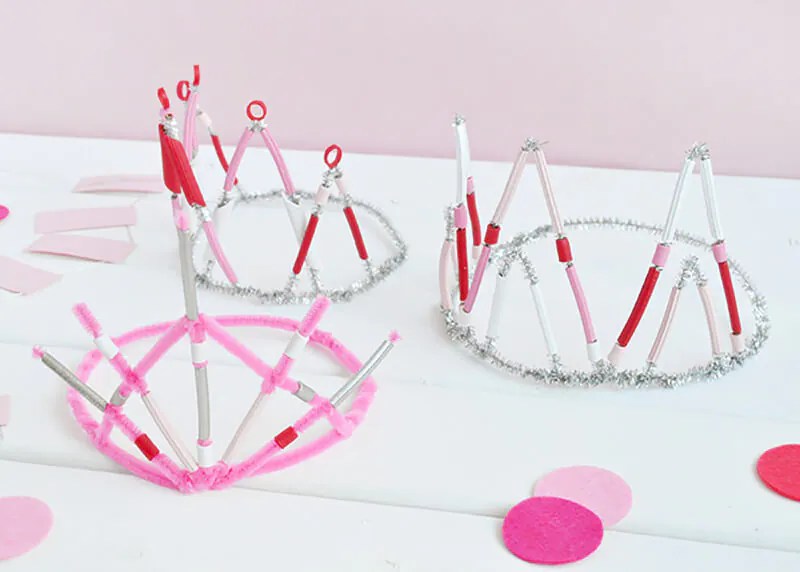
We bring to your attention another manufacturing option. beautiful crown for carnival or party. This headdress will be a great addition to the image of a queen, princess or snowflake.
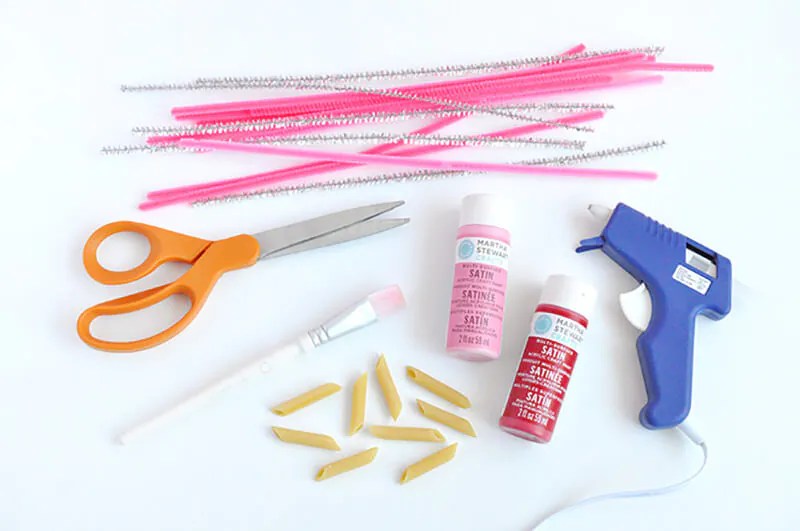
To make such luxurious crowns you will need chenille wire, pasta, acrylic paints and beads.

Pasta must first be painted acrylic paints and dry thoroughly.
Now you can start creating outlandish crowns, which can be decorated with multi-colored pasta and beautiful beads.
Wire bracelet
Chenille wire bracelet
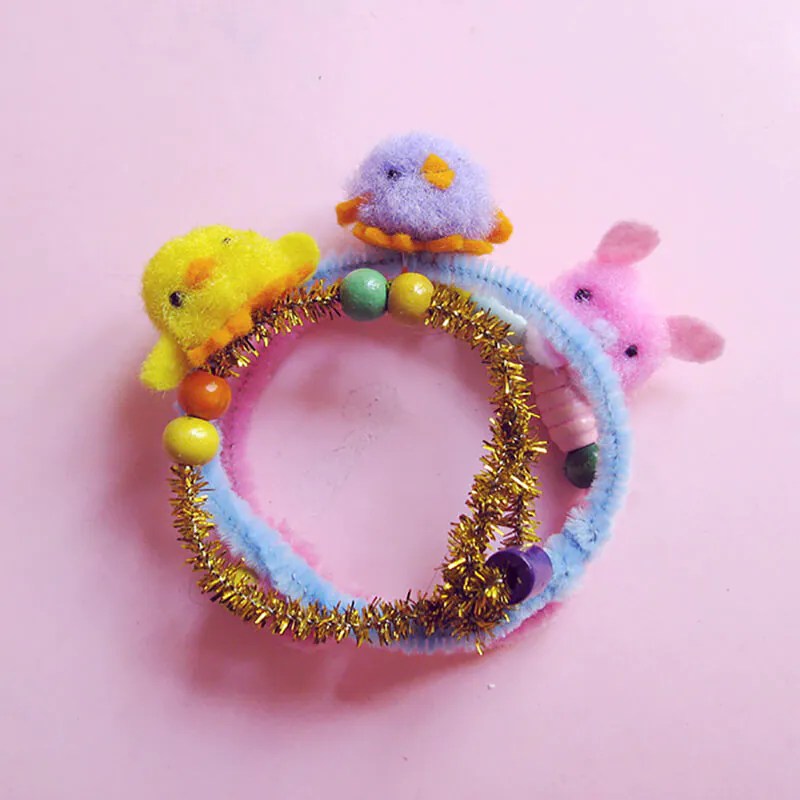
Any little fashionista will love such bright and unusual accessories - bracelets.

Each bracelet is decorated with miniature figures of birds and a bunny, as well as large beads.
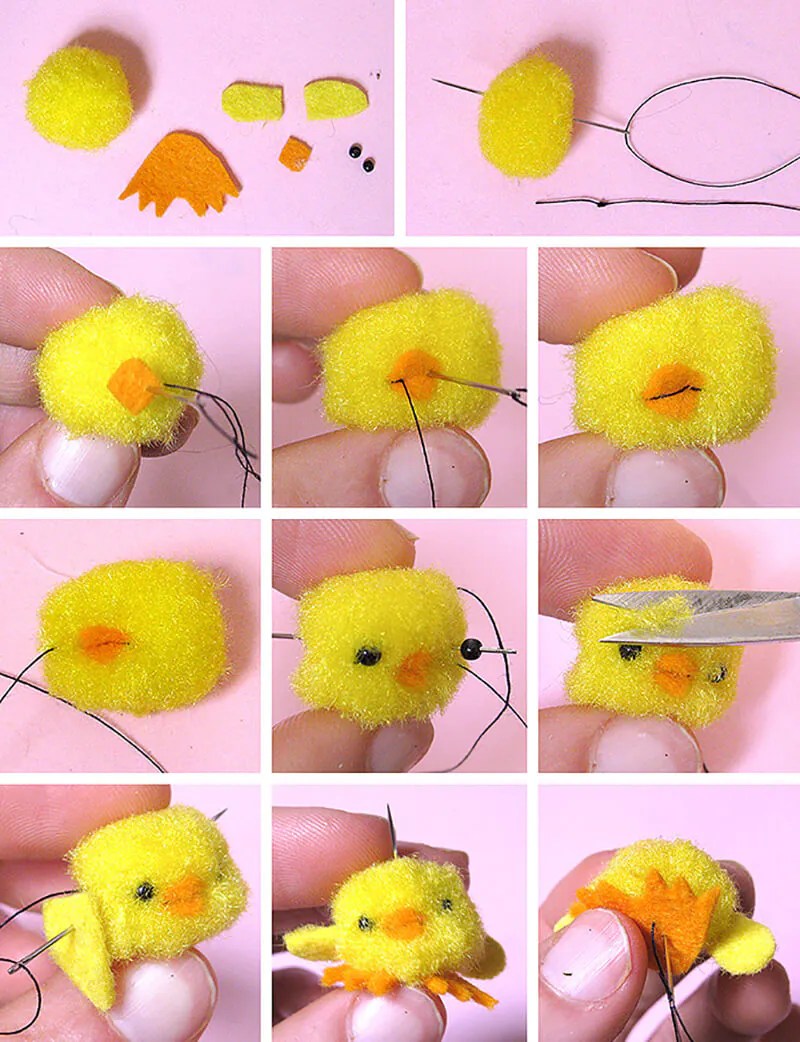


Miniature figures can be made from pieces of colored felt and miniature decorative pompoms. Make the eyes for the figures from small black beads.

Crafts made from chenille wire video:
Chenille wire dog
Chenille wire spider
Chenille wire flower
Crafts for children from fluffy wire is always a source of large quantities positive emotions and inexhaustible creative inspiration. The process of working with fluffy (chenille) wire is accompanied by a lot of pleasant sensations and contributes to the development tactile sensitivity fingers of the baby and make his hands more dexterous.
Crafts made from chenille wire in the shape of animals are of particular delight. Since making some kind of animal out of fluffy wire will not be particularly difficult for either the parents or the child himself, you can create a whole fluffy zoo, filling it with such exhibits as:

Starfish. We take a piece of wire and form it into irregular shape asterisk. Glue on the toy eyes - and the first resident of the zoo is ready!

Butterflies. They will become a real decoration of the zoo. To create them, we use two pieces of wire of different colors - one for the wings, the other for the body and head. We enliven the image with toy or plasticine eyes.

Fuzzy wire and plastic eggs make adorable bugs.

And here is a very original butterfly with wings made of autumn leaves.

Flamingo. Attach wires to the pink cardboard heart long legs and neck. We complement the bird with a lush feather tail and paint the beak.

Dragonfly. We intertwine two pieces of wire of different colors to get the body and head of a dragonfly. Glue small pompoms to the head - eyes. We make the wings from white wire.

Colored ostrich or peacock. Its body becomes a pom-pom into which wire legs, a neck and various pieces of wire are threaded - tail feathers. We attach a wire crown to the neck and glue toy eyes.

Caterpillar. Carefully twist two pieces of wire of different colors in a spiral. We attach wire antennae to the front and glue on the eyes.

Bees. We use yellow and black wire. By twisting the pieces together, we get the body of a bee, and from the black piece we form wings.

Squirrel. A charming animal whose body and head are made of hazelnut or acorn shells, and whose tail, paws and ears are made of brown chenille wire.

Video master class: “How to make a bear from chenille wire?”
Spider. We string two large beads onto a wire and twist it - we get the head and body of a spider. Attach the wire legs. Ready!

Check out “how to make a spider from fluffy wire”:
Ducks - pendants. We simply form a duck outline from the wire, which we hang on a thread or other thin wire.

Mouse. We twist a large piece of gray wire around the circumference, a smaller piece, and two small pieces. The result is the body, head and ears of the mouse. Glue them together, attach the eyes, nose and ear core.

Snake. We simply twist two different colored pieces of wire in a spiral and glue on the tongue and eyes.

You can make some characters in another way: for example, to create a butterfly we use wings from colored paper, lace or dried autumn leaves.

And a dragonfly can be made using a painted ice cream stick or wooden clothespin, which become the body of the insect.

Don’t forget to decorate the zoo’s territory by planting fluffy green Christmas trees. If you decorate such a Christmas tree with a star, you will get an original New Year's card.

We decorate our zoo with a beautiful rose!

Fuzzy wire can be wrapped around another wire. We will get a fluffy bendable edging for paper hearts.

We make different people by connecting pieces of wire of different colors together. Thanks to the pile, they will not roll down, so such DIY crafts made from fluffy wire are quite affordable for children.

All that remains for the child to do later is to play to his heart’s content with new homemade toys!
A lot of unusual materials used in needlework. Sometimes they initially had some very primitive use, but over time they became materials for creativity. For example, chenille wire was originally invented as a means for cleaning smoking pipes, and its “great-grandfather” was an ordinary chimney sweep.
Should you make your own chenille wire?
Many creative materials can be made with your own hands, avoiding expensive purchases in craft stores. But can Can chenille wire made by yourself become a practical alternative to the purchased option? To answer this question, we need to take a closer look at this interesting material for creativity. Fluffy "caterpillar", and this is exactly how it is translated from French the word chenille (chenille) consists of two thin wires tightly twisted together, between them there are villi - a synthetic fiber that creates t "fluffiness". Yes, if you set a goal, you can twist chenille wire at home. But will the time and material costs of such work be justified? Most likely no. Even if you twist the wire on a special machine, on which at the end of the last century craftsmen twisted chains for cheap jewelry, it will not be as high-quality, fluffy and neat as something bought in a specialized store, which means it was made in a fairly large quantities on special equipment. In addition, today chenille wire is a common material; you can buy as much of it as you need, and in such colors as you can imagine.
Crafts with children
P Chenille wire is a good material for children's creativity. It is safe, pleasant to the touch, has bright colors, easily bends and straightens back if necessary, and can be cut with scissors. Children can easily create almost any toy they want from such material, and adults will only have to suggest creative options.

Finger toys
Due to its qualities, chenille wire is a universal material for making toys - simple and primitive, but at the same time very, very cute. Even small children, with the help of adults, can master some techniques of such skill usingchenille wire. The master class on making finger toys will begin with the preparation of materials. You will need:
- Chenille wire of different colors.
- Large fluffy balls or plastic beads.
- Toy eyes, noses.
- Universal glue.
- Scissors.

So, the child himself will make the toy, and the adult will only help. You need to wrap a wire around your finger. Carefully remove. Decorate the fluffy ball with eyes and a nose; if necessary, also glue on mustaches and ears, which can also be made from a “caterpillar”. When the glue dries, glue the ball head onto the rolled spring. Finger toy ready!

Waiting for the New Year
New Year's crafts made from chenille wire are very funny and easy to make. You can even make a mini Christmas tree from a fluffy “caterpillar”. After all, this is a universal material - chenille wire. The master class will show and tell you how, what and why:
- cut the green wire like this: 3 long pieces - for winding the barrel and connecting the parts, also, depending on the number of tiers, 3 pieces of the same length, for example, 5 tiers, which means 3x5 = 15 pieces;
- prepare a strong, difficult-to-bend wire; you can use a four-core electrical wire;
- thin-nose pliers - pliers with thin ends - twist the wire;
- matching threads - if you need to secure the parts in place.
First, you should assemble all the tiers - twist three identical segments together to form a six-pointed star.

Each such “snowflake” is supplemented with shoots-twigs, screwing them with thin-nose pliers and securing them with threads to a knot. It should be remembered that all individual branches on each of the 6 rays of one tier must be the same length, decreasing from the center to the edge.

When all the snowflake tiers are ready, tightly wrap the thick wire with three pieces of chenille wire to form a trunk. Stop at the height where the first tier of branches will be located.

Now you should assemble the Christmas tree. Start from the bottom - the largest snowflake tier, then smaller, smaller, ending the Christmas tree with the crown of a 4-rayed tiny star. The tiers should be attached using three segments that form the trunk. They press the tier tightly to the base, then the wires are twisted again for some distance, and the next tier is attached.

Thus, the Christmas tree grows. You can stick fluffy balls on it, purchased specially or also twisted from a “caterpillar”, hang “lollipop canes” made from two pieces of chenille wire - red and white flowers, make from beads Happy New Year!

Summer is coming soon!
But chenille wire, although it is fluffy and warm to the touch, is not necessarily just for winter crafts. You can make a huge number of summer toys from it. While the flowers have not yet bloomed, you can make a cute bouquet for the window - twist flowers from multi-colored wire, securing the petals with a large bead, into which the stem is also secured. Place the flowers in a peat pot, painted and filled with sisal.

With the help of a fluffy “caterpillar” you can make funny decorative toys - butterflies, caterpillars, spiders will help enliven everyday life.

Chenille wire is a rewarding material. He compliantly responds to any manipulation, even small child, which can, using a couple of pieces of a fluffy “caterpillar”, create interesting toys, helping to decorate the world.
IN kindergarten or in elementary school, your child was asked to make an interesting craft, or you love spending time with your child and creating interesting crafts, then chenille wire best material for this. Fluffy wire is completely safe, very soft and allows you to create almost anything, from voluminous toys and animals, to colorful decorations.
Literally translated, chenille is a shaggy (velvety) cord, between several soft wires there is a row or several rows of fluffy thread.
Chenille wire is a universal material; at any time, the failed part of the craft can be untwisted and the whole thing can be made anew or a new product altogether. Despite the fact that such wire is quite flexible, it also holds its shape perfectly, even when connected to other surfaces and materials.

There are a huge number of colors, varieties and sizes of chenille wire, which allows you to realize the most unexpected and violent fantasies. However, there is a concept of marriage, we advise you to inspect every wire and even twist it, painting it into a small donut, and only then give it to the children.
If your child is getting acquainted with such fluffy material for the first time, start working small, show him how to make a small ring or hoop from fluffy wire.
Simple ideas for DIY wire crafts for children
Chenille spider hairpin
Making a spider is very simple, just twist four wires together - these will be the legs. Next you need to attach a longer piece and twist two spirals. The large spiral is the body, the small one is the head.

Having spent just 5 minutes creating such a spider, you will receive a magnificent hairpin, a boutonniere for your hand, a decoration for your diary and an unusual brooch.
Decorative fluffy flowers
In addition to wire, you can use almost any material you have at home to create flowers. In our case, we used paper, cardboard, a little Christmas tree rain, glue and buttons.
Make several petals from the wire, folding it into small accordions. And then just put everything on top of each other and glue it with PVA glue, as shown in the photo.

We also suggest that you watch the video, perhaps you will pick up some more interesting ideas for yourself.
Video lesson: How to make flowers from wire
But you shouldn’t stop at a small flower, because you can make a whole bouquet or even flower pot.
It is enough to repeat the steps shown in the photo instructions to get a beautiful decoration for your apartment.


Place a piece of polystyrene foam in a flower pot and fill it with rice or artificial material, insert previously prepared chenille flowers and you have a decorative decoration that is suitable for any interior.

Video lesson: Butterflies made of chenille wire for the little ones
We decided not to overwhelm you with a large amount of text information, but to provide interesting, and most importantly, understandable video material.
How to make an insect - a ladybug - from chenille wire
To work, you need to prepare only two wires: red and black, and 10 minutes of free time. From black wire you need to twist a simple figure - six legs and a head, as shown in the photo. The second, red wire, is needed to make a back for the insect; to do this, just twist the spiral and make it into a semicircle.

You can attach small pompoms made of yarn to the back or attach the same wire. There are two options to secure everything, with additional pieces of chenille or with glue.
Video lesson: Toys made from chenille wire and pompoms
We present to you another master class in which simple material both adults and children can create incredible toys or decorations.
Video lesson: Chenille puppets for a mini theater
Photo selection of children's crafts made from fluffy wire:


How to make an Easter egg from chenille wire with your own hands
A craft in itself Easter Egg from chenille very interesting and beautiful decoration, and on the eve of the holiday it will become very relevant. Nowadays it’s not a problem to find plastic containers similar to eggs, since every child loves Kinder Surprise. You can even use a real egg, but it’s better to boil it first. Then everything is very simple, select desired color shaggy wire and wrap it around the egg. You can combine colors and make a zebra or several colors in a row.

The craft itself is already ready, but it can also be decorated with small decorative flowers or pompoms made from the same wire.
Chenille wire is an amazing material for creativity; it is also called “fluffy” wire, which is what it essentially is. Thanks to her, you and your child can easily get a bright and simple craft- it bends easily and has different colors, does not stain your hands like plasticine, and provides a huge platform for creativity.
We have already told you how to make a dog from chenille wire. Next up are three more crafts that are so reminiscent of summer: a dragonfly, a snail and a butterfly.
Chenille wire dragonfly
These flying insects are distinguished by their rather large size and movable head with big eyes. At the same time, dragonflies are predators, since their diet consists of other small insects caught on the fly. In our master class we suggest making a dragonfly from chenille wire.

To create an insect from this soft material let's prepare:
- blue chenille wire (2 pcs.);
- 1 small pompom;
- a pair of plastic eyes;
- blue beads;
- scissors;
- glue gun

To form the dragonfly's body, bend the chenille wire in half.

Start stringing blue beads from the fold side.

We put it on required amount beads to achieve required length the body of our insect. After this, bend the tip of the chenille wire so that the beads cannot slip off.

From the other ends of the fluffy stick we will form one pair of wings.

To create the second pair of wings we will need another chenille wire. We fix the wings by twisting the wire around the dragonfly's body.

We cut off the excess ends with scissors.

Glue a blue pompom to the front. To do this we will use a glue gun. This is how we made the head of our insect.

Glue on the eyes. For this we again need a glue gun.

Our dragonfly, made of chenille wire, is ready.

It can become an interior decoration. For example, such a craft can be placed among indoor plants.
Chenille wire snail
This is interesting: Snails are the most numerous class of mollusks. Moreover, they are the only representatives of it that came onto land. Appearance snails can be different, but many know that they have a spiral-shaped shell, and the eyes of this mollusk are located on the tops of the tentacles.
Our craft reflects these features, and it is made of chenille wire. You can make such a snail, focusing on step by step photos proposed master class.

For work we will prepare:
- 3 chenille wires;
- plastic eyes;
- scissors;
- glue gun

First you need to put all 3 fluffy sticks together.

From these we will begin to form the spiral-shaped shell of our snail. To do this, we begin to twist all 3 chenille wires.

But we don’t twist it all the way. The outermost fluffy sticks remaining free should be left, and the middle one should be cut off.

Cut the cut lilac wire in half.

We twist each segment into a spiral.

For further work we will need a glue gun. With its help we will connect all the layers of our shell.

Now the blanks of lilac chenille wire need to be glued to the sides of the snail’s body.

The remaining side tips will be antennae. We twist them a little.

Glue on the plastic eyes. This is easy to do with hot glue.

Our chenille wire snail is ready.

Chenille wire butterfly
Bright fluffy sticks and pompoms allow you to create beautiful crafts that children like. At the same time, the creation process is largely accessible to kids, with the exception of some points. We propose to make a bright butterfly from these materials, focusing on this master class.

For work we will prepare:
- 3 pompons pink and red;
- 1 hot pink chenille wire;
- a small piece of light green chenille wire;
- plastic eyes;
- glue gun;
- scissors.

The body of our butterfly will consist of three pompoms. To do this, glue them together using hot glue. This stage of work should be entrusted to adults.


